


65、SpringSecurity基本的使用
1、添加SpringSecuruty的依赖
2、测试SpringSecurity
3、两个很重要的接口:UserDetailsService PasswordEncoder
3.1、如果要自定义登入
第一步创建一个类 继承 UsernamePasswordAuthenticationFilter 重写三个方法:attemptAuthentication successfulAuthentication unsuccessfulAuthentication
第二部创建类 实现 UserDetailsService 实现一个方法 loadUserByUsername
第三步创建类 PasswordEncoder接口的子类
二、用户名和密码配置的三种方式
1、通过配置文件配置
spring.security.user.name=edwin
spring.security.user.password=edwin
2、通过配置类的方式
@Configuration
public class SecurityConfig extends WebSecurityConfigurerAdapter {
    @Autowired
    private PasswordEncoder passwordEncoder;

    @Override
    protected void configure(AuthenticationManagerBuilder auth) throws Exception {
        auth.inMemoryAuthentication().withUser("admin").password(passwordEncoder.encode("123")).roles("admin");
    }

    @Bean
    public PasswordEncoder passwordEncoder () {
        return new BCryptPasswordEncoder();
    }
}
3、自定义的方式
创建配置类
@Configuration
public class SecurityConfigTest extends WebSecurityConfigurerAdapter {
    @Autowired
    private PasswordEncoder passwordEncoder;
    @Autowired
    private UserDetailsService myUserDetailsService;

    @Override
    protected void configure(AuthenticationManagerBuilder auth) throws Exception {
        auth.userDetailsService(myUserDetailsService).passwordEncoder(passwordEncoder);
    }

    @Bean
    public PasswordEncoder passwordEncoder() {
        return new BCryptPasswordEncoder();
    }
}
自定义实现的UserDetailService
@Service(value = "myUserDetailsService")
public class MyUserDetailsService implements UserDetailsService {
    @Override
    public UserDetails loadUserByUsername(String username) throws UsernameNotFoundException {
        List<GrantedAuthority> authorities = AuthorityUtils.commaSeparatedStringToAuthorityList("roles");
        return new User("joe",new BCryptPasswordEncoder().encode("123"),authorities);
    }
}
三、通过查询数据库的用户完成认证操作
1、添加依赖
       <dependency>
            <groupId>com.baomidou</groupId>
            <artifactId>mybatis-plus-boot-starter</artifactId>
            <version>3.4.1</version>
        </dependency>
        <dependency>
            <groupId>mysql</groupId>
            <artifactId>mysql-connector-java</artifactId>
        </dependency>
        <dependency>
            <groupId>org.projectlombok</groupId>
            <artifactId>lombok</artifactId>
        </dependency>
2、创建数据表的结构
CREATE TABLE `users` (
  `id` int(11) NOT NULL AUTO_INCREMENT,
  `username` varchar(255) NOT NULL,
  `password` varchar(255) NOT NULL,
  PRIMARY KEY (`id`)
) ENGINE=InnoDB AUTO_INCREMENT=3 DEFAULT CHARSET=utf8;
3、创建实体类
@Data
@TableName("users")
public class Users {
    @TableId(type = IdType.AUTO)
    private Integer id;
    private String username;
    private String password;
}
4、创建Mapper接口查询数据库
@Mapper
public interface UsersMapper extends BaseMapper<Users> {

    @Select("select *from users where username =#{username}")
    Users selectUserByUsername(String username);
}
5、补充业务代码
@Service(value = "myUserDetailsService")
public class MyUserDetailsService implements UserDetailsService {
    @Autowired
    private UsersMapper usersMapper;

    @Override
    public UserDetails loadUserByUsername(String username) throws UsernameNotFoundException {
        List<GrantedAuthority> authorities = AuthorityUtils.commaSeparatedStringToAuthorityList("roles");
        QueryWrapper<Users> wrapper = new QueryWrapper<>();
        wrapper.eq("username",username);
        Users users = usersMapper.selectOne(wrapper);
        if(users == null){
            throw new UsernameNotFoundException("用户不存在!");
        }
        return new User(users.getUsername(),new BCryptPasswordEncoder().encode(users.getPassword()),authorities);
    }
}
四、权限控制方法 hasAuthority hasAnyAuthority, hasRole hasAnyRole
//.antMatchers("/user/index").hasAuthority("admins")
//hasAnyAuthority 方法
//.antMatchers("/test/index").hasAnyAuthority("admins,manger")
//hasRole 方法
//.antMatchers("/test/index").hasRole("sale")
//hasAnyRole
.antMatchers("/test/index").hasAnyRole("sale,public")
五、Security 的注解的使用
1、Secured注解的使用,在启动类或者配置类中开启:@EnableGlobalMethodSecurity(securedEnabled = true)
    @GetMapping(value = "/update")
    @Secured("ROLE_sale,ROLE_sale1")
    public String update() {
        return "Hello Update";
    }
2、PreAuthorize注解的使用 在启动类或者配置类中开启: @EnableGlobalMethodSecurity(securedEnabled = true,prePostEnabled = true)
    @GetMapping(value = "/update")
    //@Secured("ROLE_sale")
    @PreAuthorize("hasAnyAuthority('ROLE_sale')")
    public String update() {
        return "Hello Update";
    }
六、用户注销操作![]()
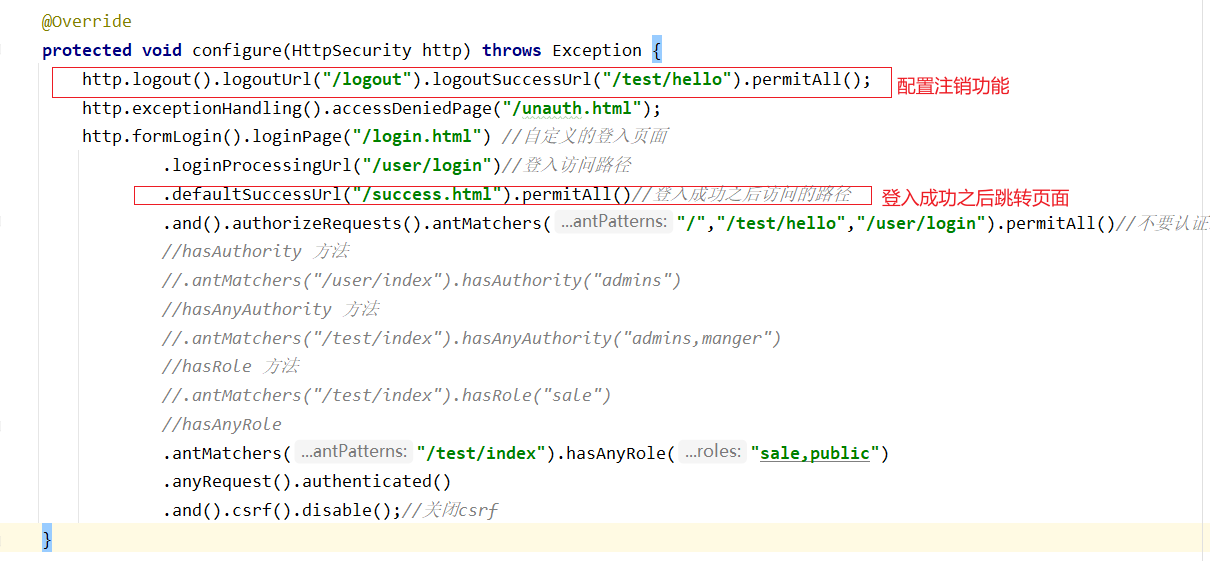
2、登入成功的页面
<!DOCTYPE html>
<html lang="en">
<head>
    <meta charset="UTF-8">
    <title>Title</title>
</head>
<body>
  <div>
    登入成功!
    <a href="/logout">退出登入</a>
  </div>
</body>
</html>
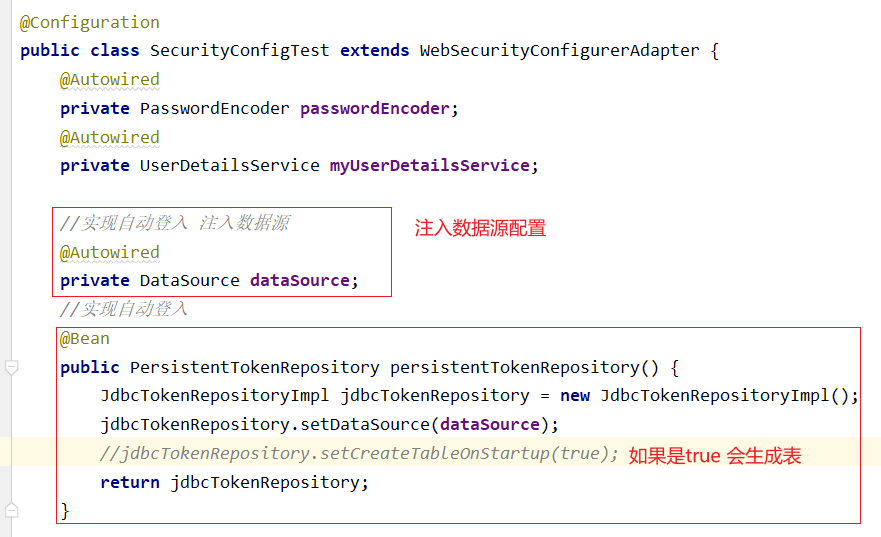
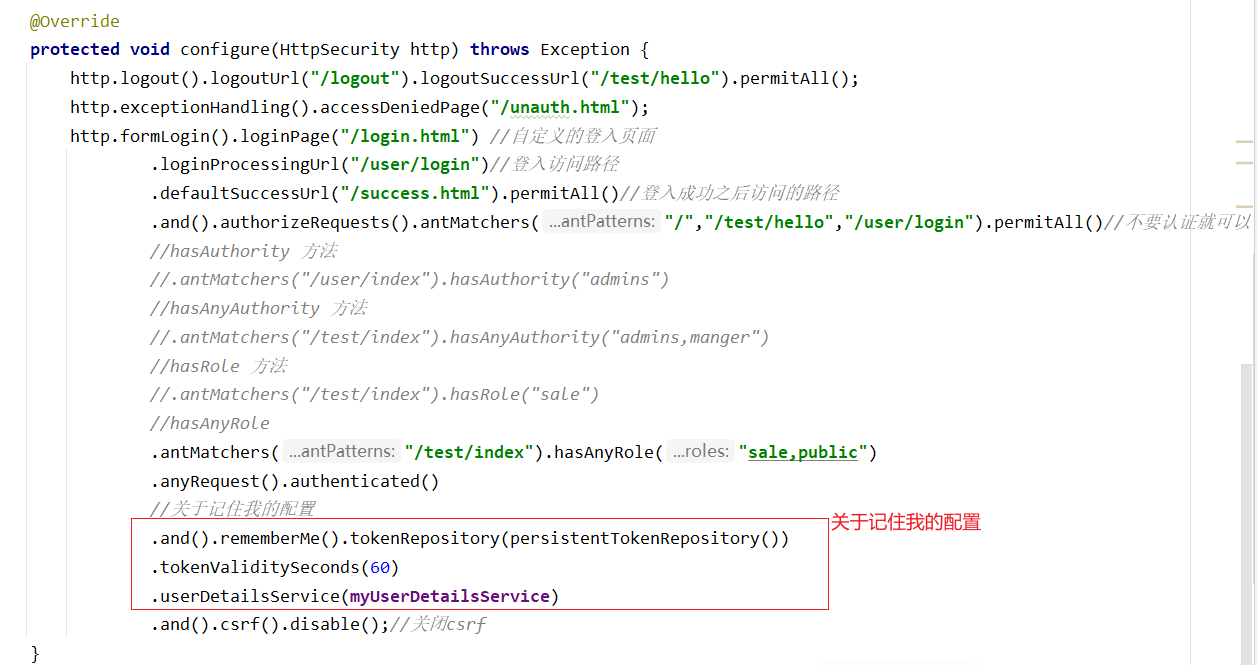
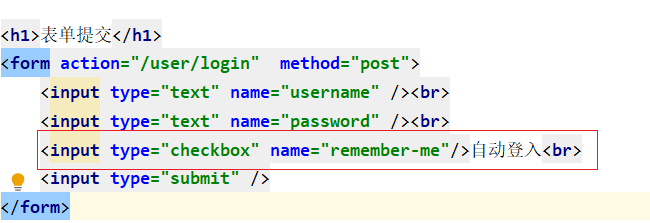
六、实现记住我,Security 自动登入![]()


 浙公网安备 33010602011771号