
node.js-express中间件/跨域问题
中间件
当一个请求到达express的服务器之后,可以连续第爱用多个中间件,从而对此次请求进行预处理
本质上是一个function处理 函数
注意:中间件函数的形参列表中,必须包含next,二路由只有req和res。
next函数是实现多个中间件连续调用的关键,他表示把流转关系转交给下一个中间件和路由。
全局中间件
const express = require('express');
const app = express();
//定义一个简单的中间件函数
const mw = function (req, res, next) {
console.log('这是一个简单的中间件函数');
//把流转关系,转交给下一个中间件或路由
next();
}
//将mw注册为一个全局生效的中间件
app.use(mw);
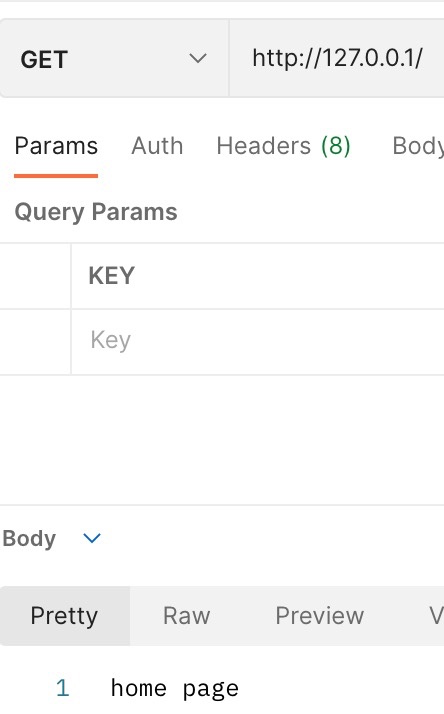
app.get('/', (req, res) => {
console.log('调用了/');
res.send('home page')
});
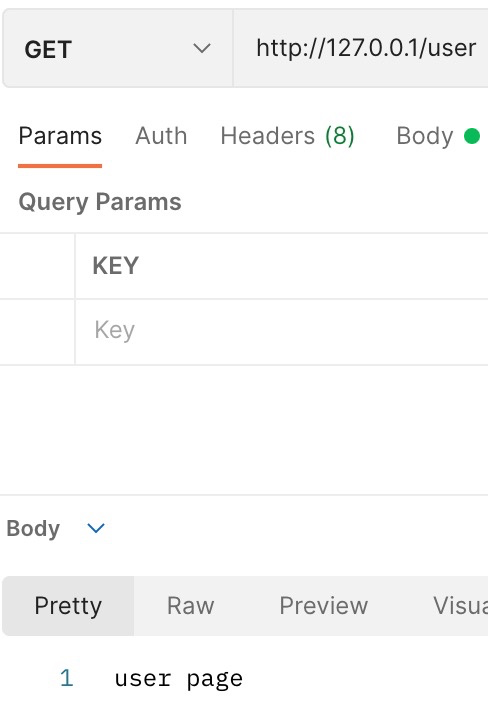
app.get('/user', (req, res) => {
console.log('调用了/user');
res.send('user page')
})
app.listen(80, () => {
console.log('http://127.0.0.1');
})
postman测试

终端测试结果
http://127.0.0.1
这是一个简单的中间件函数
调用了/
这是一个简单的中间件函数
调用了/user
中间件简化形式
app.use((req, res, next) => {
console.log('这是一个中间件');
next();
})
中间件的作用
多个中间件之间,共享同一份req和res。我们可以在上游的中间件中,统一为req和res对象添加自定义的属性和方法,恭下游的中间件和路由使用
const express = require('express');
const app = express();
app.use((req, res, next) => {
    //获取请求到达服务器的时间
    const time = Date.now();
    req.startTime = time;
    console.log('这是一个中间件');
    next();
})
app.get('/', (req, res) => {
    console.log('调用了/');
    res.send('home page' + req.startTime)
});
app.get('/user', (req, res) => {
    console.log('调用了/user');
    res.send('user page' + req.startTime)
})

app.listen(80, () => {
    console.log('http://127.0.0.1');
})
定义多个全局中间件
连续多次调用中间件
const express = require('express');
const { expr } = require('jquery');
const app = express();
app.use((req, res, next) => {
    console.log('调用第一个中间件');
    next();
})
app.use((req, res, next) => {
    console.log('调用第二个中间件');
    next();
})
app.get('/', (req, res) => {
    res.send('home page')
})
app.listen(80, () => {
    console.log('http://127.0.0.1');
})
postman测试
发送get请求
终端结果如下
[nodemon] starting `node 定义多个中间件.js`
http://127.0.0.1
调用第一个中间件
调用第二个中间件
局部生效的中间件
const express = require('express');
const app = express();
const mw1 = (req, res, next) => {
    console.log('调用了局部生效的中间件');
}
app.get('/', mw1, (req, res) => {
    res.send('home page');
});
app.get('/user', (req, res) => {
    res.send('user page');
});
app.listen(80, () => {
    console.log('http://127.0.0.1');
})
postman测试http://127.0.0.1/终端显示调用局部中间件
postman测试http://127.0.0.1/user,终端不显示调用局部中间件
定义多个局部中间件
const express = require('express');
const app = express();
const mw1 = (req, res, next) => {
    console.log('调用了局部生效的中间件1');
    next()
}
const mw2 = (req, res, next) => {
    console.log('调用了局部生效的中间件2');
    next()
}
app.get('/', mw1, mw2, (req, res) => {
    res.send('home page');
});
app.get('/user', [mw1, mw2], (req, res) => {
    res.send('user page');
});
app.listen(80, () => {
    console.log('http://127.0.0.1');
})
postman测试http://127.0.0.1/
postman测试http://127.0.0.1/user
[nodemon] starting `node 1局部中间件.js`
http://127.0.0.1
调用了局部生效的中间件1
调用了局部生效的中间件2
调用了局部生效的中间件1
调用了局部生效的中间件2
中间件的分类
应用级别的中间件
绑定到app实例上的中间件,例如app.use(),app.get()等
路由级别的中间件
绑定到router实例上的中间件,例如router.use(),router.get()等
错误级别的中间件
用来捕获整个项目发送的异常错误,从而防止项目异常崩溃的问题。
const express = require('express');
const app = express();
//定义路由
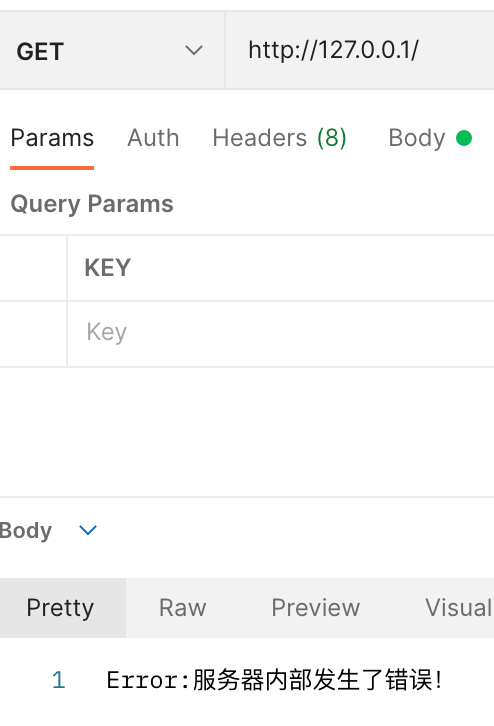
app.get('/', (req, res) => {
//人为制造错误
throw new Error('服务器内部发生了错误!');
res.send('home page');
})
//定义错误级别的中间件,捕获整个项目的异常错误,从而防止程序的崩溃
app.use((err, req, res, next) => {
console.log('发生了错误' + err.message);
res.send('Error:' + err.message)
})
app.listen(80, () => {
console.log('express server running at http://127.0.0.1');
})
postman测试
终端显示结果
[nodemon] starting `node 2演示错误级别的中间件.js`
express server running at http://127.0.0.1
发生了错误服务器内部发生了错误!
内置中间件
const express = require('express');
const app = express();
//通过express.json()来解析客户端发送过来的JSON格式的数据
app.use(express.json());
//通过express.urlencoded()这个中间件,解析表单中的url-encoded格式的数据。
app.use(express.urlencoded({ extended: false }))
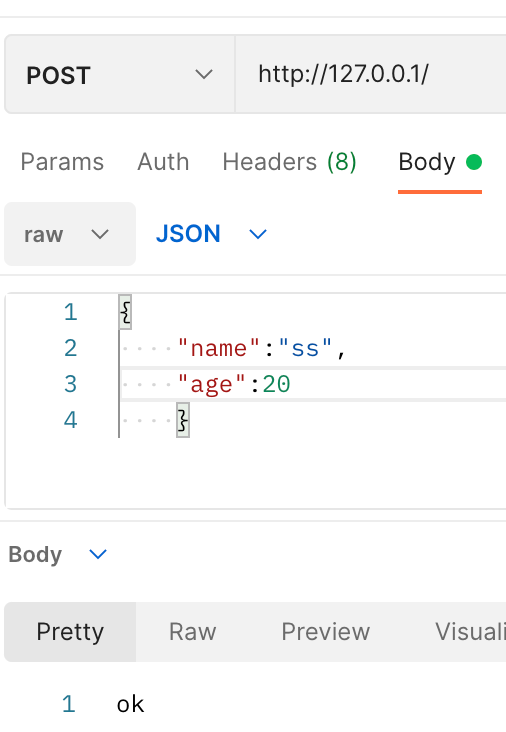
app.post('/', (req, res) => {
//在服务器,可以使用req.body这个属性,来接收客服端发送过来的额请求数据
//默认情况,如果不配置解析表单数据的中间件,则req.body默认等于undefined
console.log(req.body);
res.send('ok')
});
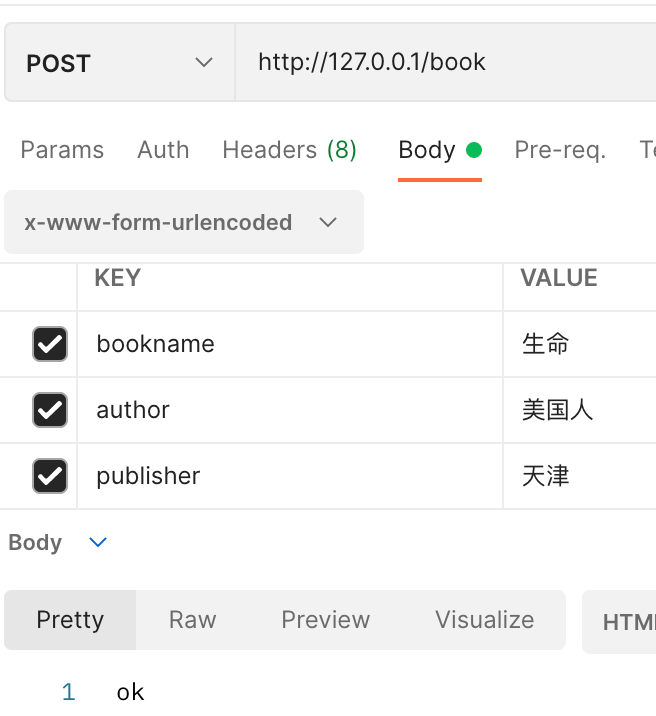
app.post('/book', (req, res) => {
//在服务器端,可以使用req.body这个属性来接收客服端发送过来的额请求数据
//默认情况,如果不配置解析表单数据的中间件,则req.body默认等于undefined
console.log(req.body);
res.send('ok')
});
app.listen(80, () => {
console.log('express server running at http://127.0.0.1');
})
postman中进行调试测试
[nodemon] starting `node 3演示内置中间件.js`
express server running at http://127.0.0.1
{ name: 'ss', age: 20 }![]()
[nodemon] starting `node 3演示内置中间件.js`
express server running at http://127.0.0.1
[Object: null prototype] {
bookname: '生命',
author: '美国人',
publisher: '天津'
}
第三方的中间件
const express = require('express');
const app = express();
//导入解析数据的中间件 body-parser
const parser = require('body-parser');
//注册中间件
app.use(parser.urlencoded({ extended: false }))

app.post('/user', (req, res) => {
    //没有配置任何解析表单数据的中间件,则req.body默认为undefined
    console.log(req.body);
    res.send('ok')
})
app.listen(80, () => {
    console.log('express server running at http://127.0.0.1');
})
注意:express内置的express.urlencoded中间件,就是基于body-parser这个第三方中间件进一步封装出来了。
自定义中间件
const express = require('express');
const app = express();
//解析表单中间件
//导入自己的中间件模块
const customBodyParser = require('./6custom-body-parser');
//将自定义的中间件函数,注册为全局可用的中间件
app.use(customBodyParser);
app.post('/user', (req, res) => {
    res.send(req.body);
})
app.listen(80, () => {
    console.log('express server running at http://127.0.0.1');
})
封装函数模块
const qs = require('querystring');

const bodyParser = (req, res, next) => {
    //定义一个字符串,专门用来存储客户端发送过来的请求体数据
    let str = "";
    req.on('data', (chunk) => {
        str += chunk;
    });
    //监听req的end事件
    req.on('end', () => {
        // console.log(str);
        //把字符串的请求体数据,解析成对象格式
        const body = qs.parse(str);
        //将解析出来的数据对象挂载为req.body
        req.body = body;
        next();
    })
}

module.exports = bodyParser
使用Express写接口
//创建一个基本服务器
const express = require('express');
const app = express();

//配置解析表单数据的中间件
app.use(express.urlencoded({ extended: false }))
//导入路由模块
const router = require('./8.路由模块');
//注册
app.use('/api', router);

app.listen(80, () => {
    console.log('express server running at http://127.0.0.1');
})
路由模块
const express = require('express');
const router = express.Router();
//挂载对于的路由
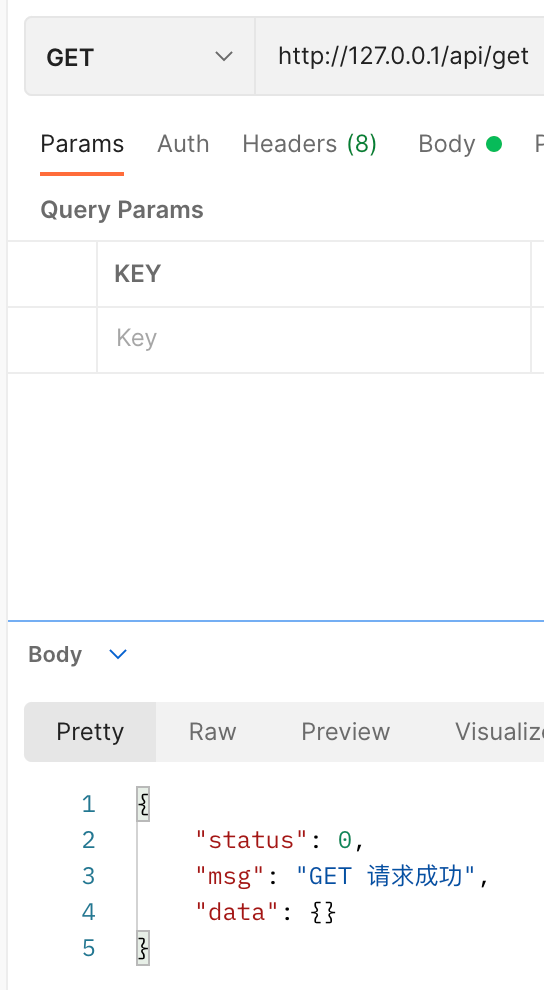
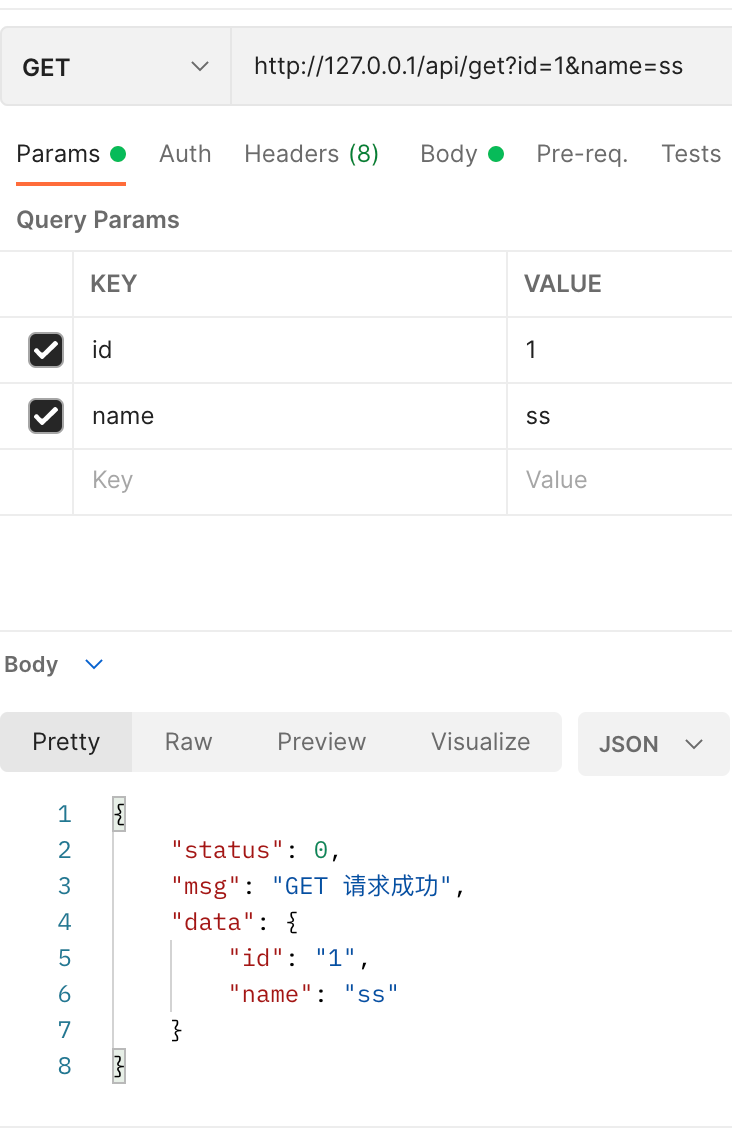
router.get('/get', (req, res) => {
//通过req.query获取客户端通过查询字符串,发送到服务器的数据
const query = req.query;
//调用res.send方法,想客服端响应处理结果
res.send({
status: 0,//0成功,1失败
msg: 'GET 请求成功',
data: query//需要响应给客户端的数据
})
})
//定义post接口
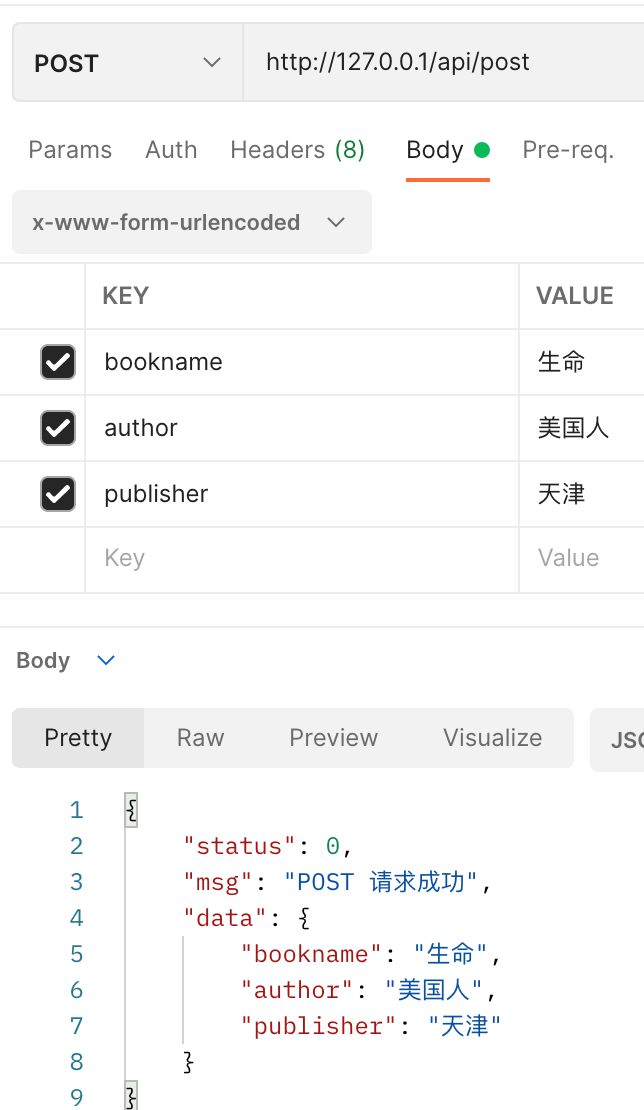
router.post('/post', (req, res) => {
//通过req.body获取请求体中包含的url-encoded格式的数据
const body = req.body;
//调用res.send,向客户端响应结果
res.send({
status: 0,
msg: 'POST 请求成功',
data: body
})
})
module.exports = router;
postman测试结果
加入查询条件之后
接口跨域问题
解决端口跨域问题的方案主要有两种:
CORS:推荐
JSON P:只支持GET请求
使用CORS中间件解决跨域问题
//创建一个基本服务器
const express = require('express');
const app = express();

//配置解析表单数据的中间件
app.use(express.urlencoded({ extended: false }));
//在路由之前,配置中间件
const cors = require('cors');
app.use(cors());
//导入路由模块
const router = require('./8.路由模块');
//注册
app.use('/api', router);

app.listen(80, () => {
    console.log('express server running at http://172.20.10.3');
})
加入cors中间件之后,可以解决跨域问题
<button id="btnGET">GET</button>
    <button id="btnPOST">POST</button>
    <script>
        $(function () {
            //1.测试GET接口
            $('#btnGET').on('click', function () {
                $.ajax({
                    type: 'GET',
                    url: 'http://172.20.10.3/api/get',
                    data: {
                        name: 'ss',
                        age: 20,
                    },
                    success: function (res) {
                        console.log(res);

                    }
                })
            });
            //2.测试POST接口
            $('#btnPOST').on('click', function () {
                $.ajax({
                    type: 'POST',
                    url: 'http://172.20.10.3/api/post',
                    data: {
                        bookname: '水浒传',
                        author: '施耐庵'
                    },
                    success: function (res) {
                        console.log(res);

                    }
                })
            })
        })
    </script>
在浏览器中打开,进行get和post请求成功
简单请求:
满足一下两大条件![]()

预检请求

在浏览器与服务器正式通信之前,浏览器会先发送OPTION请求进行预检,以获知服务器是否允许该实际请求,所以这一次的OPTION请求称为“预检请求”,服务器成功相应预检请求后,才会发送正真的请求,并且携带真实数据。
简单请求和预检请求的区别
简单请求的特点:客户端与服务器之间只会发生一次请求
预检请求的特点:客户端与服务器之间会发生两次请求,OPTION预检请求成功之后,才会发起真正的请求。
JSONP接口
//必须在cors之前创建jsonp接口
app.get('/api/jsonp', (req, res) => {

})
//在路由之前,配置中间件
const cors = require('cors');
app.use(cors());
在网页中使用jquery发起jsonp请求
app.get('/api/jsonp', (req, res) => {
    //得到函数的名称
    const funcname = req.query.callback;
    //定义要发送到客服端的数据对象
    const data = { name: "ss", age: 20 };
    //拼接以函数的调用
    const scriptstr = funcname + '(' + JSON.stringify(data) + ')';
    //把拼接的字符串,响应给客户端
    res.send(scriptstr);
})
//3.为JSONP绑定事件
            $("#btnJSONP").on('click', function () {
                $.ajax({
                    type: 'GET',
                    url: 'http://172.20.10.3/api/jsonp',
                    dataType: 'jsonp',
                    success: function (res) {
                        console.log(res);
                    }
                })
            })

 浙公网安备 33010602011771号