ASP.NET Core Blazor简介和快速入门二(组件基础)
大家好,我是码农刚子。上一章介绍了Blazor的简介,开发工具及环境,基本语法和一些示例。接下来我们继续了解Blazor 组件相关的基础知识,希望对你有所帮助。
1、组件生命周期
1.简介
Blazor的生命周期与React组件的生命周期类似,也分为三个阶段:初始化阶段、运行中阶段和销毁阶段,其相关方法有10个,包括设置参数前、初始化、设置参数之后、组件渲染后以及组件的销毁,但是这些方法有些是重复的,只不过是同步与异步的区别。
2.图解
首先将结果图呈现,代码位于第3部分:

Blazor生命周期方法主要包括:
|
1 |
设置参数前 |
SetParametersAsync |
|
2 |
初始化 |
OnInitialized/OnInitializedAsync |
|
3 |
设置参数后 |
OnParametersSet/OnParametersSetAsync |
|
4 |
组件渲染呈现后 |
OnAfterRender/OnAfterRenderAsync |
|
5 |
判断是否渲染组件 |
ShouldRender |
|
6 |
组件删除前 |
Dispose |
|
7 |
通知组件渲染 |
StateHasChanged |
在所有生命周期函数中,有以下需要注意的点:
(1)前5种方法的声明都是virtual,除SetParametersAsync为public外,其他的都是protected。
(2)OnAfterRender/OnAfterRenderAsync方法有一个bool类型的形参firstRender,用于指示是否是第一次渲染(即组件初始化时的渲染)。
(3)同步方法总是先于异步方法执行。
(4)Dispose函数需要通过使用@implements指令实现IDisposable接口来实现。
(5)StateHasChanged无法被重写,可以被显示调用,以便强制实现组件刷新(如果ShouldRender返回true,并且Blazor认为需要刷新);当组件状态更改时不必显示调用此函数,也可导致组件的重新渲染(如果ShouldRender返回true),因为其已经在ComponentBase内部的处理过程(第一次初始化设置参数时、设置参数后和DOM事件处理等)中被调用。
3.代码示例
设置参数时 (SetParametersAsync 设置由组件的父组件在呈现树或路由参数中提供的参数。
每次调用 ParameterView 时,方法的 参数都包含该组件的SetParametersAsync值集。 通过重写 SetParametersAsync 方法,C#代码可以直接与 ParameterView 参数交互。
@page "/set-params-async/{Param?}"

<PageTitle>Set Parameters Async</PageTitle>

<h1>Set Parameters Async Example</h1>

<p>@message</p>

@code {
    private string message = "Not set";

    [Parameter]
    public string? Param { get; set; }

    public override async Task SetParametersAsync(ParameterView parameters)
    {
        if (parameters.TryGetValue<string>(nameof(Param), out var value))
        {
            if (value is null)
            {
                message = "The value of 'Param' is null.";
            }
            else
            {
                message = $"The value of 'Param' is {value}.";
            }
        }

        await base.SetParametersAsync(parameters);
    }
}
组件初始化 (OnInitialized 和 OnInitializedAsync 专门用于在组件实例的整个生命周期内初始化组件。 参数值和参数值更改不应影响在这些方法中执行的初始化。 例如,将静态选项加载到下拉列表中,该下拉列表在组件的生命周期内不会更改,也不依赖于参数值,这是在这些生命周期方法之一中执行的操作。 如果参数值或参数值更改会影响组件状态,请改为使用 OnParametersSet{Async}。
组件在接收 SetParametersAsync 中的初始参数后初始化,此时,将调用这些方法。
如果使用同步父组件初始化,则保证父组件初始化在子组件初始化之前完成。 如果使用异步父组件初始化,则无法确定父组件和子组件初始化的完成顺序,因为它取决于正在运行的初始化代码。
对于同步操作,重写 OnInitialized:
@page "/on-init"

<PageTitle>On Initialized</PageTitle>

<h1>On Initialized Example</h1>

<p>@message</p>

@code {
    private string? message;

    protected override void OnInitialized() =>
        message = $"Initialized at {DateTime.Now}";
}
若要执行异步操作,请替代 OnInitializedAsync 并使用 await 运算符:
protected override async Task OnInitializedAsync()
{
    //await ...
    await Task.Delay(2000);    //2秒之后
    message = $"Initialized at {DateTime.Now} after 2 second delay";
}如果自定义基类与自定义初始化逻辑一起使用,需在基类上调用 OnInitializedAsync:
protected override async Task OnInitializedAsync()
{
    await ...

    await base.OnInitializedAsync();
}
设置参数之后 (OnParametersSet 或 OnParametersSetAsync 在以下情况下调用:
- 在 OnInitialized 或 OnInitializedAsync 中初始化组件后。
- 当父组件重新呈现并提供以下内容时:
- 至少一个参数已更改时的已知或基元不可变类型。
- 复杂类型的参数。 框架无法知道复杂类型参数的值是否在内部发生了改变,因此,如果存在一个或多个复杂类型的参数,框架始终将参数集视为已更改。
在组件路由中,不能同时对DateTime参数使用datetime路由约束,并将该参数设为可选。 因此,以下 OnParamsSet 组件使用两个 @page 指令来处理具有和没有 URL 中提供的日期段的路由。
@page "/on-params-set"
@page "/on-params-set/{StartDate:datetime}"

<PageTitle>On Parameters Set</PageTitle>

<h1>On Parameters Set Example</h1>

<p>
    Pass a datetime in the URI of the browser's address bar.
    For example, add <code>/1-1-2024</code> to the address.
</p>

<p>@message</p>

@code {
    private string? message;

    [Parameter]
    public DateTime StartDate { get; set; }

    protected override void OnParametersSet()
    {
        if (StartDate == default)
        {
            StartDate = DateTime.Now;

            message = $"No start date in URL. Default value applied " +
                $"(StartDate: {StartDate}).";
        }
        else
        {
            message = $"The start date in the URL was used " +
                $"(StartDate: {StartDate}).";
        }
    }
}
应用参数和属性值时,异步操作必须在 OnParametersSetAsync 生命周期事件期间发生:
protected override async Task OnParametersSetAsync()
{
    await ...
}如果自定义基类与自定义初始化逻辑一起使用,需在基类上调用 OnParametersSetAsync:
protected override async Task OnParametersSetAsync()
{
    await ...

    await base.OnParametersSetAsync();
}
组件呈现之后 (OnAfterRender 和 OnAfterRenderAsync 在组件以交互方式呈现并且 UI 完成更新之后被调用(例如,元素添加到浏览器 DOM 之后)。 此时会填充元素和组件引用。 在此阶段中,可使用呈现的内容执行其他初始化步骤,例如与呈现的 DOM 元素交互的 JS 互操作调用。
这些方法不会在预呈现或静态服务器端渲染(静态 SSR)期间在服务器上调用,因为这些进程未附加到实时浏览器 DOM,并且已在 DOM 更新之前完成。
对于 OnAfterRenderAsync,组件在任何返回 Task 的操作完成后不会自动重渲染,以避免无限渲染循环。
firstRender 和 OnAfterRender 的 OnAfterRenderAsync 参数:
- 在第一次呈现组件实例时设置为
true。 - 可用于确保初始化操作仅执行一次。
@page "/after-render"
@inject ILogger<AfterRender> Logger
<PageTitle>After Render</PageTitle>
<h1>After Render Example</h1>
<p>
<button @onclick="HandleClick">Log information (and trigger a render)</button>
</p>
<p>Study logged messages in the console.</p>
@code {
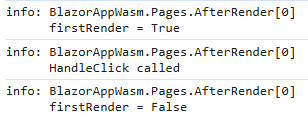
protected override void OnAfterRender(bool firstRender) =>
Logger.LogInformation("firstRender = {FirstRender}", firstRender);
private void HandleClick() => Logger.LogInformation("HandleClick called");
}加载页面并选择按钮时,AfterRender.razor 示例向控制台输出以下内容:
在渲染后立即进行的异步工作必须在 OnAfterRenderAsync 生命周期事件期间发生:
protected override async Task OnAfterRenderAsync(bool firstRender)
{
    ...
}如果自定义基类与自定义初始化逻辑一起使用,需在基类上调用 OnAfterRenderAsync:
protected override async Task OnAfterRenderAsync(bool firstRender)
{
    ...

    await base.OnAfterRenderAsync(firstRender);
}
基类生命周期方法
重写 Blazor 的生命周期方法时,无需为 ComponentBase 调用基类生命周期方法。 但在以下情况下,组件应调用重写的基类生命周期方法:
- 重写 ComponentBase.SetParametersAsync 时,通常会调用
await base.SetParametersAsync(parameters);, 因为基类方法会调用其他生命周期方法并以复杂的方式触发渲染。 有关详细信息,请参阅设置参数时 (SetParametersAsync) 部分。 - 如果基类方法包含必须执行的逻辑。 库使用者通常在继承基类时调用基类生命周期方法,因为库基类通常具有要执行的自定义生命周期逻辑。 如果应用使用某个库中的基类,请参阅该库的文档以获取指导。
以下示例中调用了 base.OnInitialized(); 以确保会执行基类的 OnInitialized 方法。 如果没有调用,BlazorRocksBase2.OnInitialized 不会执行。
@page "/blazor-rocks-2"
@inherits BlazorRocksBase2
@inject ILogger<BlazorRocks2> Logger

<PageTitle>Blazor Rocks!</PageTitle>

<h1>Blazor Rocks! Example 2</h1>

<p>
    @BlazorRocksText
</p>

@code {
    protected override void OnInitialized()
    {
        Logger.LogInformation("Initialization code of BlazorRocks2 executed!");

        base.OnInitialized();
    }
}
using Microsoft.AspNetCore.Components;
namespace BlazorAppWasm
{
public class BlazorRocksBase2: ComponentBase
{
[Inject]
private ILogger<BlazorRocksBase2> Logger { get; set; } = default!;
public string BlazorRocksText { get; set; } = "Blazor rocks the browser!";
protected override void OnInitialized() =>
Logger.LogInformation("Initialization code of BlazorRocksBase2 executed!");
}
}
2、数据绑定
Blazor提供了强大的数据绑定机制,主要包括单向绑定和双向绑定两种模式。
1. 单向数据绑定
单向绑定是指数据从组件流向UI,但UI的变化不会自动更新数据源。
基本语法
<!-- 使用 @ 符号进行单向绑定 -->
<p>当前值: @currentValue</p>
<span>用户名: @UserName</span>
<div>创建时间: @CreateTime.ToString("yyyy-MM-dd")</div>
完整示例
<!-- OneWayBinding.razor -->
<div class="one-way-demo">
    <h3>单向绑定示例</h3>

    <!-- 显示数据,但不允许编辑 -->
    <div class="display-area">
        <p>计数器: <strong>@count</strong></p>
        <p>消息: <strong>@message</strong></p>
        <p>用户信息: <strong>@user.Name</strong> - <strong>@user.Age</strong>岁</p>
    </div>

    <!-- 控制按钮 -->
    <div class="control-area">
        <button @onclick="Increment" class="btn btn-primary">增加计数</button>
        <button @onclick="ChangeMessage" class="btn btn-secondary">更改消息</button>
        <button @onclick="UpdateUser" class="btn btn-info">更新用户</button>
    </div>
</div>

@code {
    private int count = 0;
    private string message = "初始消息";
    private User user = new User { Name = "张三", Age = 25 };

    private void Increment()
    {
        count++;
        // StateHasChanged(); // 通常不需要手动调用,事件处理会自动触发重新渲染
    }

    private void ChangeMessage()
    {
        message = $"消息已更新: {DateTime.Now:HH:mm:ss}";
    }

    private void UpdateUser()
    {
        user = new User { Name = "李四", Age = 30 };
    }

    class User
    {
        public string Name { get; set; } = string.Empty;
        public int Age { get; set; }
    }
}
2. 双向数据绑定
双向绑定允许数据在组件和UI之间双向流动:UI变化自动更新数据源,数据源变化自动更新UI。
基本语法
<!-- 使用 @bind 指令进行双向绑定 -->
<input @bind="propertyName" />
<input @bind="fieldName" />
<select @bind="selectedValue">...</select>
完整示例
<!-- TwoWayBinding.razor -->
<div class="two-way-demo">
    <h3>双向绑定示例</h3>

    <div class="form-group">
        <label>用户名:</label>
        <input @bind="userName" class="form-control" />
        <small>显示: @userName</small>
    </div>

    <div class="form-group">
        <label>邮箱:</label>
        <input @bind="email" class="form-control" />
        <small>显示: @email</small>
    </div>

    <div class="form-group">
        <label>年龄:</label>
        <input @bind="age" type="number" class="form-control" />
        <small>显示: @age</small>
    </div>

    <div class="form-group">
        <label>城市:</label>
        <select @bind="selectedCity" class="form-control">
            <option value="">请选择</option>
            <option value="Beijing">北京</option>
            <option value="Shanghai">上海</option>
            <option value="Guangzhou">广州</option>
            <option value="Shenzhen">深圳</option>
        </select>
        <small>选择: @selectedCity</small>
    </div>

    <div class="form-group">
        <label>是否同意协议:</label>
        <input type="checkbox" @bind="isAgreed" />
        <span>@(isAgreed ? "已同意" : "未同意")</span>
    </div>

    <!-- 显示汇总信息 -->
    <div class="summary">
        <h4>汇总信息:</h4>
        <p>用户名: @userName</p>
        <p>邮箱: @email</p>
        <p>年龄: @age</p>
        <p>城市: @selectedCity</p>
        <p>同意协议: @isAgreed</p>
    </div>
</div>

@code {
    private string userName = string.Empty;
    private string email = string.Empty;
    private int age = 0;
    private string selectedCity = string.Empty;
    private bool isAgreed = false;
}
3. 绑定事件控制
3.1 绑定特定事件
默认情况下,@bind 在失去焦点时更新。可以使用 @bind:event 指定触发事件:
<!-- 实时绑定(输入时立即更新) -->
<div class="real-time-demo">
    <h4>实时绑定示例</h4>

    <input @bind="searchText" @bind:event="oninput"
           placeholder="输入搜索内容..." />
    <p>实时搜索: @searchText</p>

    <!-- 对比默认行为 -->
    <input @bind="normalText" placeholder="默认绑定(失去焦点更新)" />
    <p>默认绑定: @normalText</p>
</div>

@code {
    private string searchText = string.Empty;
    private string normalText = string.Empty;
}
3.2 绑定格式化
<div class="format-demo">
    <h4>格式化绑定示例</h4>

    <!-- 日期格式化 -->
    <input @bind="startDate" @bind:format="yyyy-MM-dd" type="date" />
    <p>选择的日期: @startDate.ToString("yyyy年MM月dd日")</p>

    <!-- 数字格式化 -->
    <input @bind="price" @bind:format="F2" type="number" step="0.01" />
    <p>价格: @price.ToString("C")</p>
</div>

@code {
    private DateTime startDate = DateTime.Today;
    private decimal price = 0.00m;
}
4. 自定义组件双向绑定
在自定义组件中实现双向绑定:
子组件
<!-- CustomInput.razor -->
<div class="custom-input">
    <label>@Label</label>
    <input
        value="@Value"
        @oninput="HandleInput"
        class="form-control @AdditionalClass"
        placeholder="@Placeholder" />
    @if (!string.IsNullOrEmpty(ValidationMessage))
    {
        <div class="text-danger">@ValidationMessage</div>
    }
</div>

@code {
    [Parameter]
    public string Value { get; set; } = string.Empty;

    [Parameter]
    public EventCallback<string> ValueChanged { get; set; }

    [Parameter]
    public string Label { get; set; } = string.Empty;

    [Parameter]
    public string Placeholder { get; set; } = string.Empty;

    [Parameter]
    public string AdditionalClass { get; set; } = string.Empty;

    [Parameter]
    public string ValidationMessage { get; set; } = string.Empty;

    private async Task HandleInput(ChangeEventArgs e)
    {
        Value = e.Value?.ToString() ?? string.Empty;
        await ValueChanged.InvokeAsync(Value);
    }
}
父组件使用
<!-- ParentComponent.razor -->
<div class="parent-demo">
    <h3>自定义组件双向绑定</h3>

    <CustomInput
        @bind-Value="userName"
        Label="用户名"
        Placeholder="请输入用户名" />

    <CustomInput
        @bind-Value="email"
        Label="邮箱"
        Placeholder="请输入邮箱地址"
        ValidationMessage="@(IsValidEmail ? "" : "邮箱格式不正确")" />

    <div class="result">
        <p>用户名: @userName</p>
        <p>邮箱: @email</p>
    </div>
</div>

@code {
    private string userName = string.Empty;
    private string email = string.Empty;

    private bool IsValidEmail => email.Contains("@") && email.Contains(".");
}
5.复杂对象绑定
<!-- ComplexObjectBinding.razor -->
<div class="complex-binding">
    <h3>复杂对象绑定</h3>

    <div class="form-section">
        <h4>用户信息</h4>

        <div class="form-group">
            <label>姓名:</label>
            <input @bind="currentUser.Name" class="form-control" />
        </div>

        <div class="form-group">
            <label>年龄:</label>
            <input @bind="currentUser.Age" type="number" class="form-control" />
        </div>

        <div class="form-group">
            <label>地址:</label>
            <input @bind="currentUser.Address.Street" class="form-control" placeholder="街道" />
            <input @bind="currentUser.Address.City" class="form-control" placeholder="城市" />
        </div>
    </div>

    <div class="display-section">
        <h4>当前用户信息:</h4>
        <pre>@userInfoJson</pre>
    </div>

    <button @onclick="ResetUser" class="btn btn-warning">重置用户</button>
    <button @onclick="CreateNewUser" class="btn btn-success">创建新用户</button>
</div>

@code {
    private User currentUser = new User();

    private string userInfoJson =>
        System.Text.Json.JsonSerializer.Serialize(currentUser, new System.Text.Json.JsonSerializerOptions
        {
            WriteIndented = true
        });

    private void ResetUser()
    {
        currentUser = new User();
    }

    private void CreateNewUser()
    {
        currentUser = new User
        {
            Name = "新用户",
            Age = 18,
            Address = new Address { Street = "新建街道", City = "新建城市" }
        };
    }

    class User
    {
        public string Name { get; set; } = string.Empty;
        public int Age { get; set; }
        public Address Address { get; set; } = new Address();
    }

    class Address
    {
        public string Street { get; set; } = string.Empty;
        public string City { get; set; } = string.Empty;
    }
}
6.绑定模式对比
|
绑定类型 |
语法 |
更新时机 |
适用场景 |
|
单向绑定 |
|
数据源变化时 |
显示数据、计算属性 |
|
双向绑定 |
|
失去焦点时 |
表单输入、用户交互 |
|
实时双向 |
|
输入时实时更新 |
搜索框、实时验证 |
|
自定义绑定 |
|
自定义事件触发 |
自定义表单组件 |
3、事件处理
1. 基本事件处理
1.1 单击事件
<!-- ClickEvents.razor -->
<div class="click-demo">
    <h3>单击事件示例</h3>

    <!-- 基本点击事件 -->
    <button @onclick="HandleClick" class="btn btn-primary">
        点击我
    </button>

    <!-- 带参数的事件处理 -->
    <div class="button-group">
        <button @onclick="() => HandleButtonClick(1)" class="btn btn-secondary">按钮 1</button>
        <button @onclick="() => HandleButtonClick(2)" class="btn btn-secondary">按钮 2</button>
        <button @onclick="() => HandleButtonClick(3)" class="btn btn-secondary">按钮 3</button>
    </div>

    <!-- 显示点击结果 -->
    <div class="result">
        <p>最后点击的按钮: @lastClickedButton</p>
        <p>点击次数: @clickCount</p>
    </div>
</div>

@code {
    private int lastClickedButton = 0;
    private int clickCount = 0;

    private void HandleClick()
    {
        clickCount++;
        Console.WriteLine("按钮被点击了!");
    }

    private void HandleButtonClick(int buttonNumber)
    {
        lastClickedButton = buttonNumber;
        clickCount++;
        StateHasChanged();
    }
}
1.2 异步事件处理
<!-- AsyncEvents.razor -->
<div class="async-demo">
    <h3>异步事件处理</h3>

    <button @onclick="HandleAsyncClick" class="btn btn-primary" disabled="@isLoading">
        @if (isLoading)
        {
            <span>加载中...</span>
        }
        else
        {
            <span>模拟异步操作</span>
        }
    </button>

    <div class="result">
        <p>操作结果: @operationResult</p>
        <p>耗时: @elapsedTime 毫秒</p>
    </div>
</div>

@code {
    private bool isLoading = false;
    private string operationResult = string.Empty;
    private long elapsedTime = 0;

    private async Task HandleAsyncClick()
    {
        isLoading = true;
        operationResult = "操作开始...";

        var stopwatch = System.Diagnostics.Stopwatch.StartNew();

        // 模拟异步操作
        await Task.Delay(2000);

        stopwatch.Stop();
        elapsedTime = stopwatch.ElapsedMilliseconds;

        operationResult = $"操作完成!数据已保存。";
        isLoading = false;

        StateHasChanged();
    }
}
2. 表单事件处理
2.1 输入事件
<!-- FormEvents.razor -->
<div class="form-events">
    <h3>表单事件处理</h3>

    <div class="form-group">
        <label>输入文本:</label>
        <input @oninput="HandleInput"
               @onchange="HandleChange"
               class="form-control"
               placeholder="输入内容..." />
        <small>实时输入: @inputValue | 变化事件: @changeValue</small>
    </div>

    <div class="form-group">
        <label>选择选项:</label>
        <select @onchange="HandleSelectChange" class="form-control">
            <option value="">请选择</option>
            <option value="option1">选项一</option>
            <option value="option2">选项二</option>
            <option value="option3">选项三</option>
        </select>
        <small>选择的值: @selectedValue</small>
    </div>

    <div class="form-group">
        <label>
            <input type="checkbox" @onchange="HandleCheckboxChange" />
            同意条款
        </label>
        <small>状态: @(isChecked ? "已选中" : "未选中")</small>
    </div>

    <!-- 表单提交 -->
    <form @onsubmit="HandleSubmit" @onvalidSubmit="HandleValidSubmit">
        <div class="form-group">
            <label>用户名:</label>
            <input @bind="user.Username" class="form-control" required />
        </div>

        <div class="form-group">
            <label>邮箱:</label>
            <input @bind="user.Email" type="email" class="form-control" required />
        </div>

        <button type="submit" class="btn btn-success">提交表单</button>
    </form>

    <div class="form-result">
        <h4>表单数据:</h4>
        <pre>@System.Text.Json.JsonSerializer.Serialize(user, new System.Text.Json.JsonSerializerOptions { WriteIndented = true })</pre>
        <p>提交状态: @submitStatus</p>
    </div>
</div>

@code {
    private string inputValue = string.Empty;
    private string changeValue = string.Empty;
    private string selectedValue = string.Empty;
    private bool isChecked = false;
    private string submitStatus = "未提交";

    private User user = new User();

    private void HandleInput(ChangeEventArgs e)
    {
        inputValue = e.Value?.ToString() ?? string.Empty;
    }

    private void HandleChange(ChangeEventArgs e)
    {
        changeValue = e.Value?.ToString() ?? string.Empty;
    }

    private void HandleSelectChange(ChangeEventArgs e)
    {
        selectedValue = e.Value?.ToString() ?? string.Empty;
    }

    private void HandleCheckboxChange(ChangeEventArgs e)
    {
        isChecked = (bool)(e.Value ?? false);
    }

    private void HandleSubmit()
    {
        submitStatus = "表单提交(可能有验证错误)";
    }

    private void HandleValidSubmit()
    {
        submitStatus = $"表单验证通过!数据已保存 - {DateTime.Now:HH:mm:ss}";
        // 这里可以调用API保存数据
    }

    class User
    {
        public string Username { get; set; } = string.Empty;
        public string Email { get; set; } = string.Empty;
    }
}
3. 鼠标和键盘事件
3.1 鼠标事件
<!-- MouseEvents.razor -->
<div class="mouse-events">
    <h3>鼠标事件</h3>

    <div class="interactive-area"
         @onmousedown="HandleMouseDown"
         @onmouseup="HandleMouseUp"
         @onmousemove="HandleMouseMove"
         @onmouseover="HandleMouseOver"
         @onmouseout="HandleMouseOut"
         @onclick="HandleAreaClick"
         @ondblclick="HandleDoubleClick"
         style="width: 300px; height: 200px; border: 2px solid #007bff; padding: 20px; margin: 10px 0;">
        鼠标交互区域
    </div>

    <div class="event-log">
        <h4>事件日志:</h4>
        <ul>
            @foreach (var log in eventLogs.TakeLast(10).Reverse())
            {
                <li>@log</li>
            }
        </ul>
    </div>

    <div class="mouse-info">
        <p>鼠标位置: (@mouseX, @mouseY)</p>
        <p>按钮状态: @(isMouseDown ? "按下" : "释放")</p>
        <p>悬停状态: @(isMouseOver ? "在区域内" : "在区域外")</p>
    </div>
</div>

@code {
    private double mouseX = 0;
    private double mouseY = 0;
    private bool isMouseDown = false;
    private bool isMouseOver = false;
    private List<string> eventLogs = new List<string>();

    private void LogEvent(string eventName)
    {
        eventLogs.Add($"{DateTime.Now:HH:mm:ss.fff} - {eventName}");
        StateHasChanged();
    }

    private void HandleMouseDown(MouseEventArgs e)
    {
        isMouseDown = true;
        LogEvent($"MouseDown - 按钮: {e.Button}, 位置: ({e.ClientX}, {e.ClientY})");
    }

    private void HandleMouseUp(MouseEventArgs e)
    {
        isMouseDown = false;
        LogEvent($"MouseUp - 按钮: {e.Button}, 位置: ({e.ClientX}, {e.ClientY})");
    }

    private void HandleMouseMove(MouseEventArgs e)
    {
        mouseX = e.ClientX;
        mouseY = e.ClientY;
        // 注意:频繁触发,生产环境需要节流
        // LogEvent($"MouseMove - 位置: ({e.ClientX}, {e.ClientY})");
    }

    private void HandleMouseOver(MouseEventArgs e)
    {
        isMouseOver = true;
        LogEvent("MouseOver");
    }

    private void HandleMouseOut(MouseEventArgs e)
    {
        isMouseOver = false;
        LogEvent("MouseOut");
    }

    private void HandleAreaClick(MouseEventArgs e)
    {
        LogEvent($"Click - 按钮: {e.Button}");
    }

    private void HandleDoubleClick(MouseEventArgs e)
    {
        LogEvent($"DoubleClick - 按钮: {e.Button}");
    }
}
3.2 键盘事件
<!-- KeyboardEvents.razor -->
<div class="keyboard-events">
    <h3>键盘事件</h3>

    <div class="input-area">
        <input @onkeydown="HandleKeyDown"
               @onkeyup="HandleKeyUp"
               @onkeypress="HandleKeyPress"
               class="form-control"
               placeholder="在这里输入并观察键盘事件..." />
    </div>

    <div class="event-log">
        <h4>键盘事件日志:</h4>
        <ul>
            @foreach (var log in keyEventLogs.TakeLast(10).Reverse())
            {
                <li>@log</li>
            }
        </ul>
    </div>

    <div class="key-info">
        <p>最后按下的键: @lastKey</p>
        <p>Ctrl 按下: @(isCtrlPressed ? "是" : "否")</p>
        <p>Shift 按下: @(isShiftPressed ? "是" : "否")</p>
        <p>Alt 按下: @(isAltPressed ? "是" : "否")</p>
    </div>
</div>

@code {
    private string lastKey = "无";
    private bool isCtrlPressed = false;
    private bool isShiftPressed = false;
    private bool isAltPressed = false;
    private List<string> keyEventLogs = new List<string>();

    private void LogKeyEvent(string eventName, KeyboardEventArgs e)
    {
        var log = $"{DateTime.Now:HH:mm:ss.fff} - {eventName}: Key='{e.Key}', Code='{e.Code}'";
        if (e.CtrlKey) log += " [Ctrl]";
        if (e.ShiftKey) log += " [Shift]";
        if (e.AltKey) log += " [Alt]";

        keyEventLogs.Add(log);
        StateHasChanged();
    }

    private void HandleKeyDown(KeyboardEventArgs e)
    {
        lastKey = e.Key;
        isCtrlPressed = e.CtrlKey;
        isShiftPressed = e.ShiftKey;
        isAltPressed = e.AltKey;

        LogKeyEvent("KeyDown", e);

        // 快捷键处理示例
        if (e.CtrlKey && e.Key == "s")
        {
            e.PreventDefault(); // 阻止浏览器默认保存行为
            LogKeyEvent("快捷键: Ctrl+S", e);
        }
    }

    private void HandleKeyUp(KeyboardEventArgs e)
    {
        isCtrlPressed = e.CtrlKey;
        isShiftPressed = e.ShiftKey;
        isAltPressed = e.AltKey;

        LogKeyEvent("KeyUp", e);
    }

    private void HandleKeyPress(KeyboardEventArgs e)
    {
        LogKeyEvent("KeyPress", e);
    }
}
4. 焦点和剪贴板事件
<!-- FocusClipboardEvents.razor -->
<div class="focus-clipboard">
    <h3>焦点和剪贴板事件</h3>

    <div class="form-group">
        <label>焦点测试输入框:</label>
        <input @onfocus="HandleFocus"
               @onblur="HandleBlur"
               class="form-control"
               placeholder="点击获取焦点,点击别处失去焦点" />
    </div>

    <div class="form-group">
        <label>复制粘贴测试:</label>
        <textarea @oncopy="HandleCopy"
                  @oncut="HandleCut"
                  @onpaste="HandlePaste"
                  class="form-control"
                  rows="3"
                  placeholder="在这里测试复制、剪切、粘贴操作">这是一些测试文本</textarea>
    </div>

    <div class="event-log">
        <h4>事件状态:</h4>
        <p>焦点状态: <span class="@(hasFocus ? "text-success" : "text-danger")">@(hasFocus ? "有焦点" : "无焦点")</span></p>
        <p>最后操作: @lastOperation</p>
        <p>剪贴板内容: @clipboardContent</p>
    </div>
</div>

@code {
    private bool hasFocus = false;
    private string lastOperation = "无";
    private string clipboardContent = "无";

    private void HandleFocus(FocusEventArgs e)
    {
        hasFocus = true;
        lastOperation = "获得焦点";
        StateHasChanged();
    }

    private void HandleBlur(FocusEventArgs e)
    {
        hasFocus = false;
        lastOperation = "失去焦点";
        StateHasChanged();
    }

    private void HandleCopy(ClipboardEventArgs e)
    {
        lastOperation = "复制操作";
        clipboardContent = "复制的内容无法直接获取(安全限制)";
        StateHasChanged();
    }

    private void HandleCut(ClipboardEventArgs e)
    {
        lastOperation = "剪切操作";
        clipboardContent = "剪切的内容无法直接获取(安全限制)";
        StateHasChanged();
    }

    private void HandlePaste(ClipboardEventArgs e)
    {
        lastOperation = "粘贴操作";
        clipboardContent = "粘贴的内容无法直接获取(安全限制)";
        StateHasChanged();
    }
}
5. 自定义事件处理
5.1 事件参数封装
<!-- CustomEventHandling.razor -->
<div class="custom-events">
    <h3>自定义事件处理</h3>

    <!-- 事件冒泡和阻止默认行为 -->
    <div @onclick="HandleParentClick" style="padding: 20px; border: 2px solid red;">
        <p>父级区域(点击会触发)</p>
        <button @onclick="HandleChildClick"
                @onclick:stopPropagation
                class="btn btn-primary">
            子按钮(点击不会冒泡)
        </button>

        <button @onclick="HandleChildClickWithPrevent"
                @onclick:preventDefault
                class="btn btn-secondary">
            阻止默认行为的按钮
        </button>
    </div>

    <!-- 自定义事件处理逻辑 -->
    <div class="custom-actions">
        <h4>自定义操作:</h4>
        <button @onclick="HandleCustomAction1" class="btn btn-info">操作1</button>
        <button @onclick="HandleCustomAction2" class="btn btn-info">操作2</button>
        <button @onclick="async () => await HandleCustomAsyncAction()" class="btn btn-info">异步操作</button>
    </div>

    <div class="action-log">
        <h4>操作日志:</h4>
        <ul>
            @foreach (var log in actionLogs.TakeLast(5).Reverse())
            {
                <li>@log</li>
            }
        </ul>
    </div>
</div>

@code {
    private List<string> actionLogs = new List<string>();

    private void LogAction(string action)
    {
        actionLogs.Add($"{DateTime.Now:HH:mm:ss} - {action}");
        StateHasChanged();
    }

    private void HandleParentClick()
    {
        LogAction("父级区域被点击");
    }

    private void HandleChildClick()
    {
        LogAction("子按钮被点击(事件不会冒泡)");
    }

    private void HandleChildClickWithPrevent()
    {
        LogAction("阻止默认行为的按钮被点击");
    }

    private void HandleCustomAction1()
    {
        LogAction("执行自定义操作1");
        // 自定义业务逻辑
    }

    private void HandleCustomAction2(MouseEventArgs e)
    {
        LogAction($"执行自定义操作2 - 点击位置: ({e.ClientX}, {e.ClientY})");
        // 自定义业务逻辑
    }

    private async Task HandleCustomAsyncAction()
    {
        LogAction("开始异步操作");
        await Task.Delay(1000);
        LogAction("异步操作完成");
    }
}
6. 事件处理最佳实践
6.1 性能优化
<!-- OptimizedEvents.razor -->
<div class="optimized-events">
    <h3>事件处理性能优化</h3>

    <!-- 避免内联Lambda表达式(可能引起不必要的重渲染) -->
    @foreach (var item in items)
    {
        <div class="item" @key="item.Id">
            <span>@item.Name</span>
            <!-- 好的做法:使用方法引用 -->
            <button @onclick="() => DeleteItem(item.Id)" class="btn btn-sm btn-danger">删除</button>
        </div>
    }

    <!-- 大量事件考虑使用事件委托 -->
    <div class="large-list">
        @foreach (var item in largeList)
        {
            <div class="list-item" data-id="@item.Id" data-name="@item.Name" @onclick="(e) => HandleListItemClick(e, item.Id)">
                @item.Name
            </div>
        }
    </div>

    <div class="action-log">
        <h4>操作日志:</h4>
        <ul>
            @foreach (var log in actionLogs.TakeLast(5).Reverse())
            {
                <li>@log</li>
            }
        </ul>
    </div>
</div>

@code {
    private List<Item> items = new List<Item>
    {
        new Item { Id = 1, Name = "项目1" },
        new Item { Id = 2, Name = "项目2" },
        new Item { Id = 3, Name = "项目3" }
    };

    private List<Item> largeList = Enumerable.Range(1, 100)
        .Select(i => new Item { Id = i, Name = $"项目{i}" })
        .ToList();

    private List<string> actionLogs = new List<string>();

    private void DeleteItem(int id)
    {
        items.RemoveAll(i => i.Id == id);
        LogAction($"删除了项目 {id}");
    }

    private void HandleListItemClick(MouseEventArgs e, int itemId)
    {
        // 通过参数 itemId 就知道是哪个按钮被点击了
        Console.WriteLine($"Clicked item ID: {itemId}");
    }

    // 添加 LogAction 方法
    private void LogAction(string action)
    {
        actionLogs.Add($"{DateTime.Now:HH:mm:ss} - {action}");
        StateHasChanged();
    }

    class Item
    {
        public int Id { get; set; }
        public string Name { get; set; } = string.Empty;
    }
}
7. 常用事件总结
|
事件类型 |
指令 |
事件参数 |
说明 |
|
点击事件 |
|
|
鼠标点击 |
|
双击事件 |
|
|
鼠标双击 |
|
鼠标移动 |
|
|
鼠标移动 |
|
鼠标按下 |
|
|
鼠标按下 |
|
鼠标释放 |
|
|
鼠标释放 |
|
键盘按下 |
|
|
键盘按下 |
|
键盘释放 |
|
|
键盘释放 |
|
输入事件 |
|
|
输入时触发 |
|
变化事件 |
|
|
值变化时触发 |
|
获得焦点 |
|
|
元素获得焦点 |
|
失去焦点 |
|
|
元素失去焦点 |
|
表单提交 |
|
|
表单提交 |
4、组件参数和级联参数
1. 组件参数(Parameter)
参数主要用来在各组件之间传递值,在初始项目的SurveyPrompt组件中就包含了一个参数:
[Parameter]
public string Title { get; set; }
通过用Parameter修饰符来修饰,就可以将指定的属性(注意要是public的)声明为参数,使用也很简单:
<SurveyPrompt Title="这里是参数的值" />2. CaptureUnmatchedValues
是 Blazor 中一个非常有用的特性,它允许组件捕获所有未匹配到组件参数的额外属性。
基本概念
当你在组件上设置了属性,但这些属性没有对应的 时, 可以捕获这些"未匹配"的属性,而且修饰的属性必须要是字典类型:IDictionary<string,object>。
基本用法
基本用法<!-- MyComponent.razor -->
<div @attributes="AdditionalAttributes">
组件内容
</div>
@code {
[Parameter(CaptureUnmatchedValues = true)]
public Dictionary<string, object> AdditionalAttributes { get; set; } =
new Dictionary<string, object>();
}使用场景示例
使用场景示例1. 创建可复用的按钮组件
1. 创建可复用的按钮组件<!-- MyButton.razor -->
<button @attributes="AdditionalAttributes" class="btn @Class">
@ChildContent
</button>
@code {
[Parameter]
public string Class { get; set; } = string.Empty;
[Parameter]
public RenderFragment? ChildContent { get; set; }
[Parameter(CaptureUnmatchedValues = true)]
public Dictionary<string, object> AdditionalAttributes { get; set; } =
new Dictionary<string, object>();
}使用方式
<MyButton class="btn-primary"
          id="submit-btn"
          onclick="console.log('clicked me')"
          data-custom="value">
    点击我
</MyButton>
2.包装第三方组件
2.包装第三方组件<!-- WrapperComponent.razor -->
<ThirdPartyComponent @attributes="AdditionalAttributes"
SpecificParameter="@SpecificValue" />
@code {
[Parameter]
public string SpecificValue { get; set; } = string.Empty;
[Parameter(CaptureUnmatchedValues = true)]
public Dictionary<string, object> AdditionalAttributes { get; set; } =
new Dictionary<string, object>();
}实际应用案例
实际应用案例创建灵活的容器组件
创建灵活的容器组件<!-- FlexContainer.razor -->
<div @attributes="AdditionalAttributes" class="flex-container @Class">
@ChildContent
</div>
@code {
[Parameter]
public string Class { get; set; } = string.Empty;
[Parameter]
public RenderFragment? ChildContent { get; set; }
[Parameter(CaptureUnmatchedValues = true)]
public Dictionary<string, object> AdditionalAttributes { get; set; } =
new Dictionary<string, object>();
}使用示例:
<FlexContainer class="my-styles"
               id="main-container"
               style=""
               data-tracking="user-section"
               aria-label="主要区域">
    <p>这里是可以自定义样式的容器内容</p>
</FlexContainer>
3. 级联参数(CascadingParameter)
3. 级联参数(CascadingParameter)级联参数看起来就比Parameter更高级,主要用来在多级组件之间传递参数,听起来有点抽象,咱们举个栗子:
考虑以下三个组件的嵌套关系,如果想把一个参数同时传给CascComp1和CascComp2应该如何做呢?

如果采用普通的Parameter,代码应该是这样的:
如果采用普通的Parameter,代码应该是这样的:<!--this is CascCompSample.razor-->
<h3>This is the sample page</h3>
<CascComp1 NickName="沈先生"></CascComp1><!--this is CascComp1.razor-->
<h3>Comp1: @NickName</h3>
<CascComp2 NickName="@NickName"></CascComp2>
@code {
[Parameter]
public string NickName { get; set; }
}<!--this is CascComp2.razor-->
<h3>Comp2: @NickName</h3>
@code {
[Parameter]
public string NickName { get; set; }
}采用CascadingParameter会有什么不一样呢?请看:
采用CascadingParameter会有什么不一样呢?请看:<!--this is CascCompSample.razor-->
@page "/cascparamsample"
<h3>This is the sample page</h3>
<CascadingValue Value="NickName">
<CascComp1></CascComp1>
</CascadingValue>
@code
{
private string NickName = "沈先生";
}<!--this is CascComp1.razor-->
<h3>Comp1: @NickName</h3>
<CascComp2></CascComp2>
@code {
[CascadingParameter]
public string NickName { get; set; }
}<!--this is CascComp2.razor-->
<h3>Comp2: @NickName</h3>
@code {
[CascadingParameter]
public string NickName { get; set; }
}看到区别了吗?
首先在CascCompSample.razor页面,我们通过把CascComp1嵌套到CascadingValue里面来传递参数。其次在CascComp1和CascComp2,不再需要显式传递参数,只需要声明CascadingParameter即可拿到值。
CascadingValue组件的Value参数不能直接传递字符串,必须要声明一个变量
那么什么场景下需要用到这种方式呢?我想比较多的还是用来在多个组件之间共享上下文吧。
4. CascadingParameter如何传递多个参数
4. CascadingParameter如何传递多个参数前面的例子我们通过CascadingParameter传递了一个参数,那么有没有办法传递多个参数呢?
当然可以,CascadingValue是支持嵌套的,你可以这样:
<!--this is CascCompSample.razor-->

@page "/cascparamsample"

<h3>This is the sample page</h3>

<CascadingValue Value="NickName">
    <CascadingValue Value="36">
        <CascComp1></CascComp1>
    </CascadingValue>
</CascadingValue>

@code
{
    private string NickName = "沈先生";
}
<!--this is CascComp1.razor-->
<h3>Comp1: @NickName - @Age</h3>
<CascComp2></CascComp2>
@code {
[CascadingParameter]
public string NickName { get; set; }
[CascadingParameter]
public int Age { get; set; }
}Blazor是通过参数的类型来关联的,在外层通过CascadingValue传递了一个字符串和一个整数,在里层则通过类型匹配将字符串赋值给NickName,将整数赋值给Age。所以里层的参数名是可以随便取的,你可以把NickName改为FullName,并不会影响参数值的获取。
这个方式虽然可以少写一些代码,但是容易出错,而且如果碰到多个同类型的参数就无法处理了,笔者并不建议用这种方式。
除此之外,CascadingValue还有一个Name参数,可以给每个参数指定参数名,这样就可以显式的把各个组件的参数关联起来,笔者建议不管是一个参数还是多个参数都指定一个名字,这样可以尽量避免混淆,代码如下:
<!--this is CascCompSample.razor-->

@page "/cascparamsample"

<h3>This is the sample page</h3>

<CascadingValue Value="NickName" Name="NickName">
    <CascadingValue Value="36" Name="Age">
        <CascadingValue Value="Sex" Name="Sex">
            <CascComp1></CascComp1>
        </CascadingValue>
    </CascadingValue>
</CascadingValue>

@code
{
    private string NickName = "沈先生";
}
<!--this is CascComp1.razor-->
<h3>Comp1: @NickName - @Sex - @Age</h3>
<CascComp2></CascComp2>
@code {
[CascadingParameter(Name="NickName")]
public string NickName { get; set; }
[CascadingParameter(Name = "Sex")]
public string? Sex { get; set; }
[CascadingParameter(Name="Age")]
public int Age { get; set; }
}需要注意的是如果在CascadingValue组件里面指定了Name参数,那么在所有CascadingParameter的地方也需要指定Name,否则就会找不到参数值。

 浙公网安备 33010602011771号