

在iOS原生功能中加入RN,请看之前 写的 RN与iOS交互系列文章.本篇只讲下视图混编.
关键点只有二:
1.通过 RCTRootView 加载RN视图.
2.RN中,只需要AppRegistry.registerComponent()导出即可.
关键代码:
OC里面:


//
//  RootViewController.m
//  iOSRN
//
//  Created by Shaoting Zhou on 2017/12/8.
//  Copyright © 2017年 Shaoting Zhou. All rights reserved.
//

#import "RootViewController.h"
#import <React/RCTRootView.h>
#define Main_Screen_Height      [[UIScreen mainScreen] bounds].size.height
#define Main_Screen_Width      [[UIScreen mainScreen] bounds].size.width
@interface RootViewController ()

@end

@implementation RootViewController

- (void)viewDidLoad {
    [self loadIOSView];
    [self loadRNView];

}
#pragma mark - 添加IOS视图
-(void)loadIOSView{
    self.view.backgroundColor = [UIColor redColor];


    NSString * strUrl = @"http://localhost:8081/App.bundle?platform=ios&dev=true";
    NSURL * jsCodeLocation = [NSURL URLWithString:strUrl];
    RCTRootView * rootView = [[RCTRootView alloc] initWithBundleURL:jsCodeLocation moduleName:@"iosrn"
                                                  initialProperties:nil
                                                      launchOptions:nil];
    rootView.frame = CGRectMake(100, 100, 50, 50);

    [self.view addSubview:rootView];


}

#pragma mark - 添加rn视图
-(void)loadRNView{
    [super viewDidLoad];
    NSString * strUrl = @"http://localhost:8081/index.bundle?platform=ios&dev=true";
    NSURL * jsCodeLocation = [NSURL URLWithString:strUrl];

    RCTRootView * rootView = [[RCTRootView alloc] initWithBundleURL:jsCodeLocation moduleName:@"iosrn"
                                                  initialProperties:nil
                                                      launchOptions:nil];
    rootView.frame = CGRectMake(0, Main_Screen_Height/2, Main_Screen_Width, Main_Screen_Height/2);

    UILabel * la = [[UILabel alloc]initWithFrame:CGRectMake(100, 200, 100, 100)];
    la.backgroundColor = [UIColor blueColor];
    la.text = @"我是原生";
    [rootView addSubview:la];


    [self.view addSubview:rootView];

}


- (void)didReceiveMemoryWarning {
    [super didReceiveMemoryWarning];
    // Dispose of any resources that can be recreated.
}

/*
#pragma mark - Navigation

// In a storyboard-based application, you will often want to do a little preparation before navigation
- (void)prepareForSegue:(UIStoryboardSegue *)segue sender:(id)sender {
    // Get the new view controller using [segue destinationViewController].
    // Pass the selected object to the new view controller.
}
*/

@end
RN里面:
import React, { Component } from 'react';
import {
  AppRegistry,
  Platform,
  StyleSheet,
  Text,
  View
} from 'react-native';

const instructions = Platform.select({
  ios: 'Press Cmd+R to reload,\n' +
    'Cmd+D or shake for dev menu',
  android: 'Double tap R on your keyboard to reload,\n' +
    'Shake or press menu button for dev menu',
});

export default class App extends Component<{}> {
  render() {
    return (
      <View style={styles.container}>
       <Text>
          我是RN
       </Text>
      </View>
    );
  }
}

const styles = StyleSheet.create({
  container: {
    flex: 1,
    backgroundColor: '#F5FCFF',
  },
  welcome: {
    fontSize: 20,
    textAlign: 'center',
    margin: 10,
  },
  instructions: {
    textAlign: 'center',
    color: '#333333',
    marginBottom: 5,
  },
});

AppRegistry.registerComponent('iosrn', () => App);
效果如图:
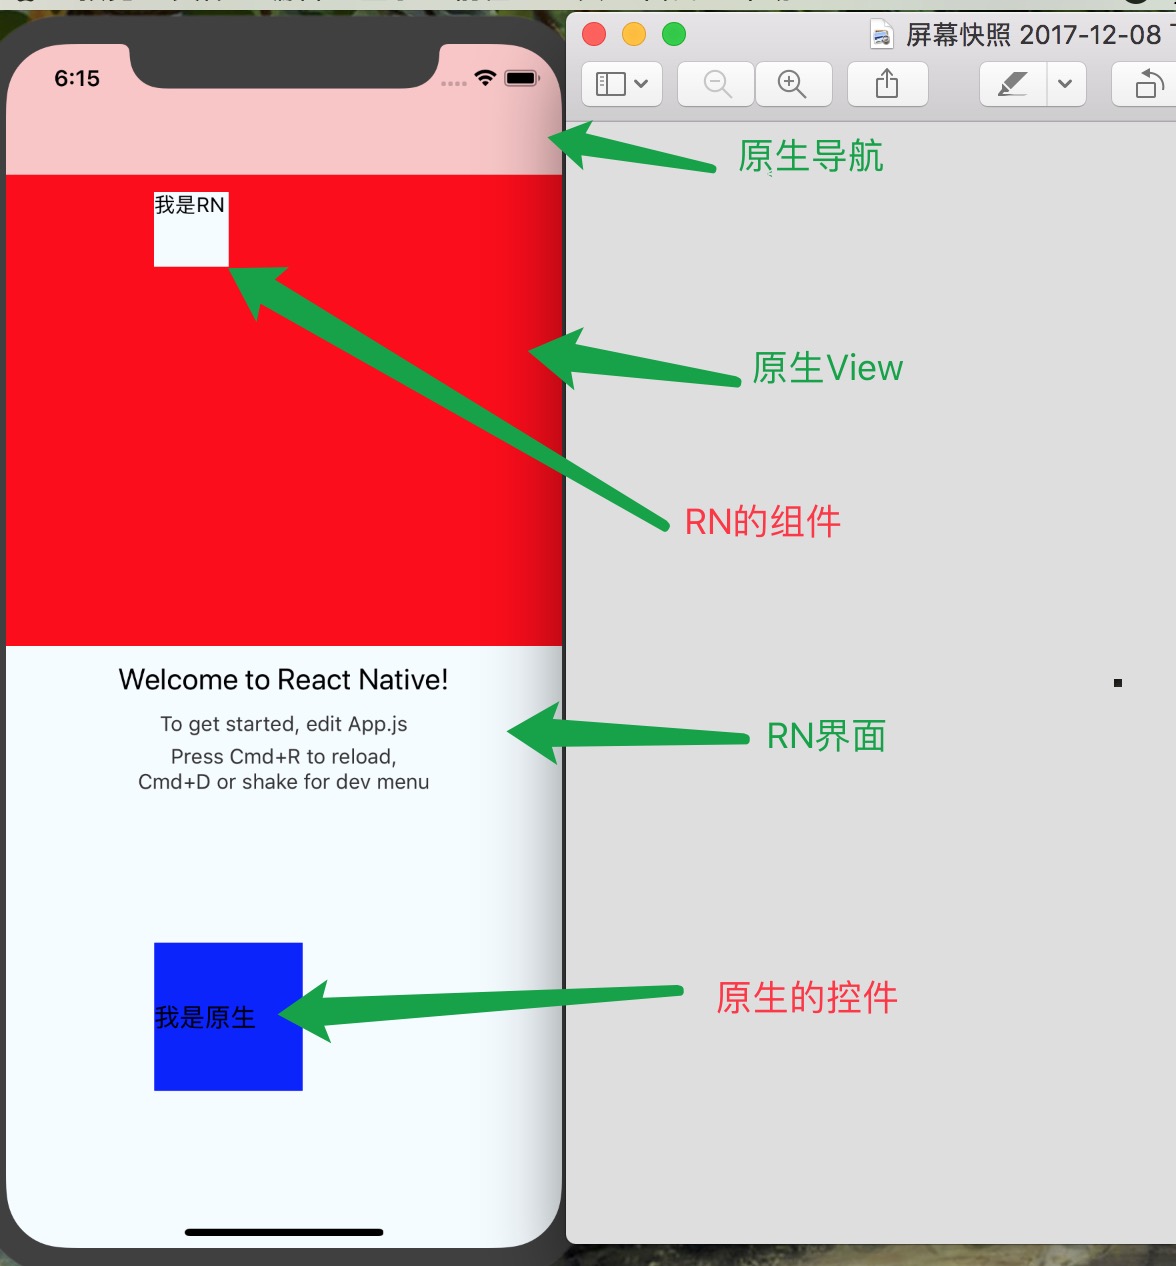
github: https://github.com/pheromone/IOS-native-and-React-native-interaction 中的 iOSRN
