FolderSync :The various features and how to use them
Help
This page describes the various features of FolderSync and how to use them. If you have problems, try consulting the FAQ or try posting in the forum. Thank you.
General info
Foldersync uses the ActionBar and Navigation drawer pattern. For general info about these user interface patterns see these links:
Note: Below help text is valid for versions prior to 2.5.0. It is still helpful to you when configuring FolderSync, but is not 100% accurate.
FolderSync contains 5 main sections. Home (dashboard), File Manager, Sync Status, Accounts and Folderpairs screens. To change between them press the dropdown control in the top actionbar to the right of the FolderSync icon, as seen below on the middle screenshot.
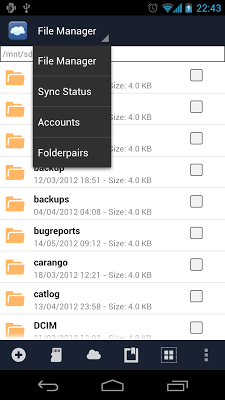

The three-dot icon to the right is an "overflow" menu that opens up additional options as seen on the image to the right. There you can access settings, help and about screen from all main sections of the application.
Note: On older Android devices it may be necessary to use the menu button to access this menu.
Tip: To know what an icon does, long-press it and a help text will appear - no action will be taken when you do so.
Pr. default, FolderSync starts up in the dashboard mode. This can be changed on the settings screen.
Video tutorial
This video demonstrates how to use some of the features of FolderSync.
Among other stuff, it shows how to create a Dropbox account and configure a folderpair for syncing.
Create an account
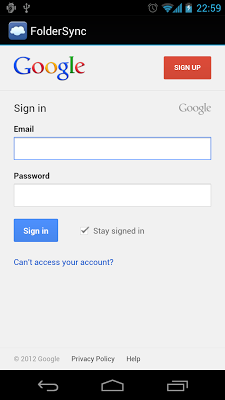
The first thing to do in FolderSync is create an account to use for syncing with cloud storage. You will be required to provide your login credentials, either directly in FolderSync or on the provider webpage for those using OAuth authentication. If you do not already have an account you can create one for free at the applicable vendor website, if you want to use SkyDrive, Dropbox, SugarSync, Google Drive, Ubuntu One, Box or Amazon S3 cloud storage.
Select the [Account] option in the dropdown menu at the top. Then you will be presented with the Account window.

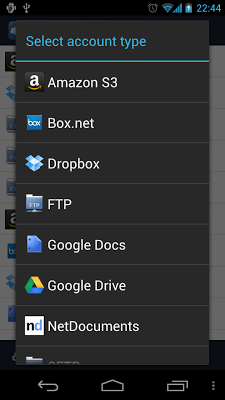
Then you want to press the add account icon represented as a cloud with a plus icon. That will bring up menu, seen in the middle screenshot above, where you are asked to select provider type. In the example below, we have chosen to add a Google Drive account.
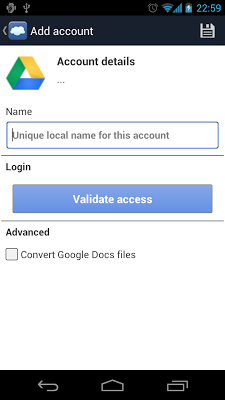
To activate the account, press [Validate access]. Then a webpage asking for your login credentials to your Google account will open - FolderSync will not know your password, as the Google webpage will generate an OAuth token it returns to FolderSync, when you have signed in. On the screenshot on the right we have successfully signed in, and we can see quota and usage of our Google Drive.

Depending on the account type, this process may be different. Some cloud providers does not support OAuth authentication. For those provider types where FolderSync need to store credentials, they are stored in encrypted form.
If you want to use Samba/Windows shares, FTP, SFTP or WebDAV, you have to set it up on a server or your home PC, or have access to an existing account. Explaining how setup this is not in the scope of this help text, but try using Google.
When not using OAuth, FolderSync provides an option to test your entered account settings using the [Validate login] button, to see if it can connect to the selected provider with the server address and credentials you have entered.
When entering a server address, never enter protocol type and never enter folders. Just enter a server address or IP address, eg. "www.server.com" or "11.22.11.43". If you need to define a start folder for your server, enter it in the start folder field.
Create a folderpair
A FolderPair is a definition of a sync that you want this application to perform. A folderpair defines a sync between a local folder on your device and a remote folder for your chosen provider type. A sync can sync files to remote cloud storage, to your local storage or both ways. Select [Folderpairs] from the top drowdown menu.


Then press the plus icon to create a new folderpair.
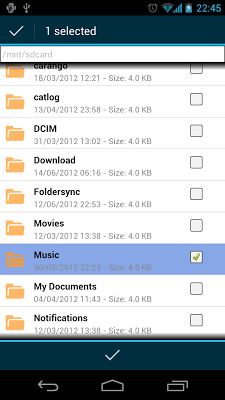
The first thing you do, after selecting a name for your folderpair, is select an account to use. If you have not already configured an account, do this before setting up a folderpair or use the built-in SD Card account if you want to sync locally on your device between two folders. When an account has been selected, and it is properly configured, you will be able to browse the remote file system for your cloud provider, when clicking the remote folder input field, and chose the folder to be used when syncing. Similarly you can choose which local folder to use. See the third screenshot above for an example of the folder selection dialog.
Additionally you define various parameters for each sync: which network connection it should be allowed to use, allowed/disallowed SSID's, if sub folders or hidden files are to be synced and if you want a scheduled sync to run automatically or at certain times.
Explanation of folderpair configuration options:
- General
- Name: Unique name of your choice.
- Account: The account to sync to or from (must be configured first on account page).
- Remote folder: The remote folder to sync to or from. Can be selected after an account has been chosen.
- Local folder: The local folder on the device to sync to or from.
- Sync type: The type of sync - one-way to local or remote or two-way sync. Default: To local folder.
- Scheduling
- Use scheduled sync: Check this if you want to sync on a schedule (and not solely by manual start or Tasker).
- Sync interval: Choose how often you want to sync.
- Sync days: If sync interval is set to advanced, then this option is shown. Choose which days to sync.
- Sync times: If sync interval is set to advanced, then this option is shown. Choose which time of day to sync.
- Sync options
- Instant sync: Select this for instant sync on change. Only detects changes on local device. Use with care!
- Copy files to time-stamped folder: For one-way sync only. If enabled , this creates a time-stamped folder at target location, so all source files are synced every time into a new folder at target location.
- Exclude from force sync: Check this if this sync should be excluded from sync all action on sync status screen.
- Sync sub-folders: Check this if sub-folders are to be synced. Enabled by default.
- Sync hidden files: Check this if hidden files are to be synced. Enabled by default.
- Delete source files after sync: For one-way sync only. After syncing of files, the source files are deleted. Use with care! Disabled by default.
- Sync deletions: Check this if deletions are to be mirrored. Use with care! Disabled by default.
- Overwrite old files: Choose what to do if a file already exist at target. Default setting is to overwrite the old file, so the newest file is used.
- If conflicting modifications: Choose what to do if a conflicting modification is detected. A conflicting modification is one where both the source and target file has been changed since last recorded sync. Default is to skip file, which will result in sync warnings.
- Connection
- Use WiFi: Check this setting, if this Folderpair is allowed to sync on WiFi.
- Turn on WiFi for scheduled syncs: Check this if WiFi can be turned on for this sync.
- Allowed WiFi SSID's: Enter a list of allowed WiFi SSID's to sync on. If empty, all WiFi networks are allowed.
- Disallowed Wifi SSID's: Enter a list of disallowed WiFi SSID's.
- Use Edge/3G/4G: Check this setting, if this FolderPair is allowed to sync on mobile networks.
- Use other connections: Enable this if other connection types should be allowed (Bluetooth, USB, etc.).
- Sync when roaming: Enable this to allow sync while roaming on mobile networks (use with care).
- Notifications
- Show notification when syncing: Show persistent notification while syncing folderpair.
- Show notification on sync success: Show dismiss-able notification on sync success .
- Show notification when changes occur: Show dismiss-able notification if transfers/deletions happened.
- Show notification on sync error: Show dismiss-able notification if syncs fail for any reason.
- Advanced
- Only sync if charging: Check this setting if FolderPair should only sync when charging.
- Rescan media library: Check this if media library should be updated for deleted or added media files.
- Use MD5 checksums: Check this setting if MD5 checksum should be calculated for files. May decrease sync speed and use extra battery, but can also result in less download and upload traffic. Enabled by default.
- Use temp-file scheme: Check this setting, if you want to use temp-file scheme. Temp-file scheme means files are transferred using temporary name, and upon completion of transfer is renamed to the final filename. This may break the functionality of some cloud providers (proper revisions etc.). Enabled by default.
- Disable file-size check: Check this if transferred files should not be validated against source by comparing file-size. Some providers adds bytes to certain files when uploaded, so this setting can help in those cases.
Sync filters
In the full version you have the ability to create sync filters, where your can include or exclude files and folders based on file type, name, size, file age and modification date. Regular expression filtering is also supported (experts only). Sync filters are specific to the folderpair for which you configure them.
All filters are case-sensitive.
For file type filters you should enter the file type of the file, for example "jpg" or "doc". Don't include leading period.
All folders will be matched against folder filters - that means if you want to exclude or include a specific folder with name matching "xyz" then all folders in the tree under the root folder configured for the folderpair will be filtered, if it has the name "xyz".
To exclude or include only a specific "xyz" folder you have to include a forward slash ("/") in the name you specify. Then you can exclude a folder and all its sub folders with a folder filter of type "startswith" with value "/mnt/sdcard/rootfolder/xyz". When using full path in a filter please only use the "startswith" type filter.
Syncing
Syncing occurs according to the schedule you have defined for each folderpair. If a schedule is not defined the folderpair will only be synced if you manually initiate it. If no network connection is set to be allowed for a folderpair it will never sync, not even if you manually initiate it. This is to ensure you are not accidentally charged for expensive network traffic. Files are compared using their last modification date and optionally using MD5 hashes (for local files).
Two-way sync
Two-way sync copies files in both directions, overwriting older files if duplicate files are found. It will also detect cases where modifications have happened on both local and cloud storage. If this happens, the latest modified file will be used or the file will be skipped, according to what you specify in for the folderpair.
Instant sync
This feature is experimental and can be enabled for a folderpair. When enabled, local file changes will be detected in the device folder, and a immediate partial sync will be attempted. It is recommended that a scheduled sync is still configured, as some change events are not detected properly - fx. on some custom ROMs etc.
Mirroring of deletions
If the "Do not sync deletions" option is not enabled, deletions will also be synced, for all types of sync. FolderSync has an internal database of synced files. If a previously synced filed is deleted at either end, the deletion will also happen at the opposite end (if the file at the opposite end has not changed since last sync). Use this option only if you are sure what you are doing, and at your own risk!
Sync status
The sync status windows provides you with the opportunity to see whats going on when syncing, and to view a history of past syncs that have occurred. It also informs you when the next sync check will run.

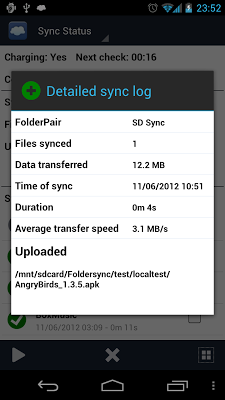
Successful syncs will have a green icon, either containing a check mark or plus character. The latter is present when a sync has transferred actual files. A yellow icon indicates a sync has errors.
If you click on an item in the sync history, you will be able to see a detailed log of events for the sync.
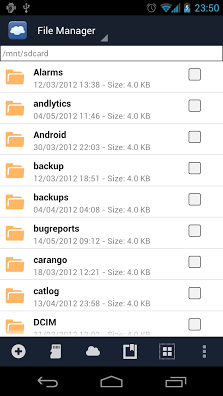
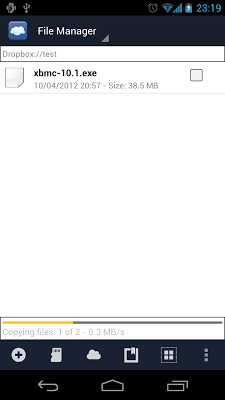
File manager
The file manager allows you to copy/move files to and from your accounts from the local sdcard, as well as move/copy files in a remote storage space. You can also rename files and folders and create new folders. Copying from one remote account to another is not supported, as this is not possible without using the local sdcard as a temporary storage space.
Moving files locally on a cloud provider is not supported by all providers either.
To select a file or folder in the file manager long press it, or press the checkbox. If you normal press a file it will be opened or, if its a remote file, a dialog will open asking if you want to download an open the file. The opening will only succeed if you still have the file manager open when the download has finished. else the file will be available in the temp folder.
When you press the overflow menu in the file manager you are provides with extra options,. in addition to the three standard menu options. These are:
- Toogle view of hidden files
- Sort (with options to sort files on different criteria)
- Refresh (refreshes the files and folder view)
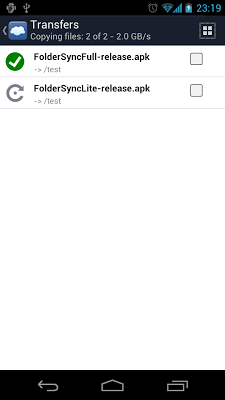
- Manage transfers (opens a window with transfers)
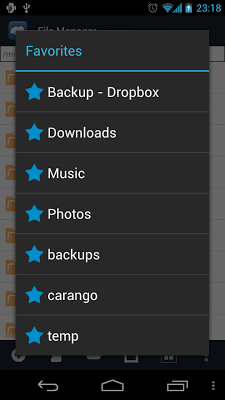
- Manage favorites
When you have selected one or more folders you are presented with these options:
- Delete
- Copy
- Cut
- Rename (single selection only)
- Details (single selection only)
- Add favorite (single selection only)
- Media scan
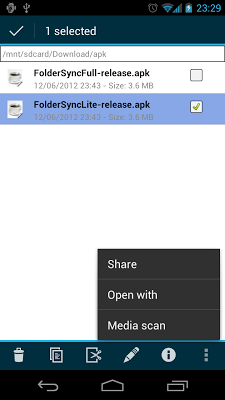
When you have selected one or more files you are presented with these options:
- Delete
- Copy
- Cut
- Rename (single selection only)
- Details (single selection only)
- Share (single selection only)
- Open with (single selection only)
- Media scan
To copy files manually from the SD card to a cloud provider or the other way around, selected the files you want to transfer, press the copy (or cut) icon, then browse to the folder where you want to paste the files (using a favorite shortcut for example). Then press the paste icon, that will have appeared on the actionbar. That will start the transfer of the files to the folder that are currently designated in the location bar.
File manager screenshots:


Favorites screenshots:

Transfers screenshots:
The settings panel allow you to backup/restore the underlying database. The backup is saved to the default folder /mnt/sdcard/Foldersync/backup/ (or another folder which you can select). You can also disable notifications, if you do not want to be bothered with these when syncs occur.
You also have the option to disable scheduled syncs completely. If you do this, no scheduled syncs will run. Only disable this, if you use manual sync only or syncs initiated from Tasker or Locale.
Tasker
The full version of FolderSync works as Tasker plugin. This means one or more folderpair syncs can be initiated when a condition or rule you configured in Tasker occurs. Configuring Tasker is out of the scope of this help text, but FolderSync is found in the the Plugin section. Note that syncs will run no matter what settings they are configured with, when initiated from Tasker, except if the allowed connection type(s) is not met.
Logging
FolderSync incorporates its own log collection functionality, to help the developers fix bugs that might exist.

To create a log file with useful data, enable [Collect logs] on FolderSync about screen. Redo that function/action that fails (previous errors will not be logged, so its important to recreate the error). After that, go back to the about screen and review the log. Then press [Send collected logs] to attach the log to a new e-mail. Add your description of the problem and press send.
Notes
Amazon endpoint is only used in regards to creating a bucket in this application - all other operations are targeted to a specific bucket you specify, no matter with which endpoint it was created. Using Amazon S3 can incur costs on your part.
Amazon endpoint is only used in regards to creating a bucket in this application - all other operations are targeted to a specific bucket you specify, no matter with which endpoint it was created. Using Amazon S3 can incur costs on your part.
Dropbox has a 150 MB upload limitation - files over this size will probably not succeed in uploading.
Box.net has various upload size limitations based on account type.
SkyDrive has various limitations also - please read the FAQ.

 浙公网安备 33010602011771号