
Debug vs. Release In Delphi Build Configurations
http://delphi.about.com/od/objectpascalide/ss/debug-vs-release-in-delphi-build-configurations.htm

The Project Manager window in your Delphi (RAD Studio) IDE displays and organizes
the contents of your current project group and any projects it contains.
It will list all the units that are part of your project
as well as all the forms and resource files included.
The Build Configurations section will list various build configurations you have for your project.
Some more recent (to be correct: starting from Delphi 2007) Delphi versions
have two (three) default build configurations: DEBUG and RELEASE.
The Conditional Compilation 101 article does mention build configurations
but does not explain the difference in details.
Debug vs. Release
Since you can activate each of the build configurations you see in the Project Manager,
and build your project producing a different executable file, the question is
what is the difference between Debug and Release?
The naming itself: "debug" and "release" should point you in the right direction.
- Debug configuration should be active and used
while we are developing and debugging and changing your application. - Release configuration should be activated
when we are building your application so that the produced executable file
to be sent to the users.
Yet, the question remains:
what's the difference?
What can you do while "debug" is active and what is included in the final executable file vs.
how does the executable look when "release" is applied?
Build Configurations
By default there are three (even though in the Project Manager you only see two) build configurations
created by Delphi when you start a new project. Those are: Base, Debug and Release.
The Base configuration acts as a base set of option values
that is used in all the configurations you subsequently create.
The option values mentioned, are the compiling and linking and other set of options
you can alter for your project using the Project Options dialog
(main menu: Project - Options).
The Debug configuration extends Base by disabling optimization
and enabling debugging, as well as setting specific syntax options.
The Release configuration extends Base to
not produce symbolic debugging information, the code is not generated for TRACE and ASSERT calls,
meaning the size of your executable is reduced.
You can add your own build configurations, you can delete
both the default Debug and Release configurations,
but you cannot delete the Base one.
Build configurations are saved in the project file (.dproj).
The DPROJ is an XML file, here's how the section with build configurations:
<PropertyGroup Condition="'$(Base)'!=''">
  <DCC_ImageBase>00400000</DCC_ImageBase>
  <DCC_DcuOutput>.\$(Config)\$(Platform)</DCC_DcuOutput>
  <DCC_UnitAlias>WinTypes=Windows;WinProcs=Windows;DbiTypes=BDE;DbiProcs=BDE;$(DCC_UnitAlias)</DCC_UnitAlias>
  <DCC_ExeOutput>.\$(Config)\$(Platform)</DCC_ExeOutput>
</PropertyGroup>
<PropertyGroup Condition="'$(Cfg_1)'!=''">
  <DCC_Define>DEBUG;$(DCC_Define)</DCC_Define>
  <DCC_Optimize>false</DCC_Optimize>
  <DCC_GenerateStackFrames>true</DCC_GenerateStackFrames>
</PropertyGroup>
<PropertyGroup Condition="'$(Cfg_2)'!=''">
  <DCC_LocalDebugSymbols>false</DCC_LocalDebugSymbols>
  <DCC_Define>RELEASE;$(DCC_Define)</DCC_Define>
  <DCC_SymbolReferenceInfo>0</DCC_SymbolReferenceInfo>
  <DCC_DebugInformation>false</DCC_DebugInformation>
</PropertyGroup>
Of course, you will not alter the DPROJ file manually, it is maintained by Delphi.
You *can* rename build configurations,
you *can* alter the settings for each build configuration,
you *can* make it so that "release" is for debugging and "debug" is optimized for your clients.
Therefore you need t know what you are doing :)
Compiling, Building, Running
As you are working on your application, developing it,
you can compile, build, and run the application directly from the IDE.
Compiling, building and running will produce the executable file.
Compiling will syntax check your code and will compile the application -
taking into account only those files that have changed since the last Build.
Compiling produces DCU files.
Building is an extension to compiling where all the units (even those not altered) are compiled.
When you change project options you should build!
Running compiles the code and runs the application.
You can run with debugging (F9) or without debugging (Ctrl+Shift+F9).
If run without debugging, the debugger built into the IDE will not be invoked -
your debugging breakpoints will "not" work.
Now that you know how and where the build configurations are saved,
let's see the difference between the Debug and Release builds.

The default build configuration Debug, you can locate in the Project Manager for your Delphi project,
is created by Delphi when you created a new application/project.
Debug configuration disables optimization and enables debugging.
To edit the build configuration: right click the configuration name,
select "Edit" from the context menu and you will find yourself looking at the Project Options dialog box.
Debug Options
Since debug extends the Base configuration build,
those settings that have a different value will be displayed in bold.
For Debug (and therefore debugging) the specific options are:
- Delphi Compiler - Compiling - Code Generation -
Optimization OFF - the compiler will NOT perform a number of code optimizations,
such as placing variables in CPU registers,
eliminating common subexpressions,
and generating induction variables. - Delphi Compiler - Compiling - Code Generation -
Stack Frames ON - stack frames are always generated for procedures and functions,
even when they're not needed. - Delphi Compiler - Compiling - Debugging -
Debug Information ON - when a program or unit is compiled with this option enabled,
the integrated debugger lets you single-step and set breakpoints.
Debug information being "on" does not affect the size or speed of the executable program -
debug information is compiled into the DCUs and does not get linked into the executable. - Delphi Compiler - Compiling - Debugging -
Local symbols ON - When a program or unit is compiled with this option enabled,
the integrated debugger lets you examine and modify the module's local variables.
Local symbols being "on" does not affect the size or speed of the executable program.
NOTE: by default, the "use debug .dcus" option is OFF.
Setting this option on enables you to debug Delphi VCL source code (set a breakpoint in the VCL)
Let's now see what "Release" is about...
The default build configuration Release, you can locate in the Project Manager for your Delphi project,
is created by Delphi when you created a new application/project.
Release configuration enables optimization and disables debugging,
the code is not generated for TRACE and ASSERT calls,
meaning the size of your executable is reduced.
To edit the build configuration: right click the configuration name,
select "Edit" from the context menu and you will find yourself looking at the Project Options dialog box.
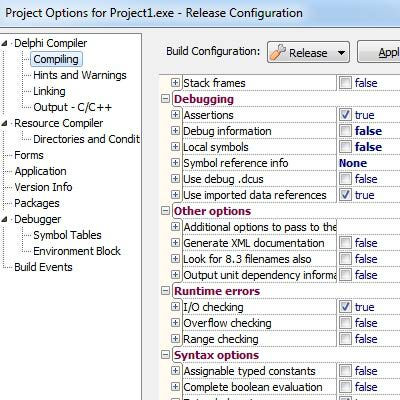
Release Options
Since release extends the Base configuration build, those settings that have a different value will be displayed in bold.
For Release (the version to be used by the users of your application - not for debugging) the specific options are:
- Delphi Compiler - Compiling - Code Generation -
Optimization ON - the compiler will perform a number of code optimizations,
such as placing variables in CPU registers,
eliminating common subexpressions,
and generating induction variables. - Delphi Compiler - Compiling - Code Generation -
Stack Frames OFF - stack frames are NOT generated for procedures and functions. - Delphi Compiler - Compiling - Debugging -
Debug Information OFF - when a program or unit is compiled with this option disabled,
the integrated debugger does NOT let you single-step and set breakpoints. - Delphi Compiler - Compiling - Debugging -
Local symbols OFF - When a program or unit is compiled with this option disabled,
the integrated debugger does NOT let you examine and modify the module's local variables.
Those are the default values set by Delphi for a new project.
You can alter any of the Project options to make your own version of debug or release build configurations.
http://delphi.about.com/od/objectpascalide/a/delphi-conditional-compilation-101.htm
Have Two Applications In One Delphi Program
(Conditional Compilation)
When creating "normal" Delphi desktop applications (not services or web servers and similar),
let's say using the VCL, you would start by selecting "New VCL Forms Application" from the IDE's main menu.
This will create a program/application skeleton for you containing a single form.
You add more forms and units to build your application.
Project Group, Project, Program, Application
Now, the above action will actually create a new "project".
Take a look at the Project Manager (somewhere in the IDE or make it visible
by selecting View-Project Manager from the IDE's main menu).
You'll see "ProjectX" (containing UnitX.pas) that is a part of what is called "ProjectGroupX".
The X can be "1" or "2" or similar, depending on how many projects (sorry, applications)
you started and saved, but did not change the default name.
Therefore, the newly created "application" is actually a "project" in some project group.
A complete, Delphi executable application consists of multiple units,
all tied together by a single source code unit called a project file (like the One Ring).
If you take a look at the projects file source code (DPR),
you'll note the DPR unit starts with the reserved word "program".
The program keyword, inside the DPR source file, identifies this unit as a program's main source unit.
You can see that the unit name, ProjectX, follows the program keyword
(Delphi gives the project a default name until you save the project with a more meaningful name).
When you compile (or build) Delphi uses the name of the project file for the name of the EXE file that it creates.
Again, normally, all the forms and units that are part of the project
would be compiled/linked into the final executable file.
For the sake of this article, and since in developers talking
both "program" and "application" are used to describe the same thing,
I will refer to "program" when I think of a project,
and the "application" will be the final executable.
Ok, all set and we can continue with the article main idea :)
Two Applications In One Project (sorry, Program)
Have you even wanted to have two executable versions for your application?
Let's say one "trial" and one "normal"?
Have you ever needed to include or not include pieces
(some forms, units) of the project based on some criteria?
Have you ever needed to have the same code base in one program
but also have an option to build two (or more) different applications?
If the answer to any of the above is "yes",
then you are ready to learn about Delphi's conditional compilation.
Conditional Compilation
Now, before moving into a discussion how to have "here's how" for the above
(and similar questions) let's see what conditional compilation is.
Delphi component developers are certainly familiar with conditional compilation.
However, if you plan on writing Delphi code that should work
with several version of the Delphi compiler
(as you are working in a team and not all members are using the same Delphi version, for a dummy example)
you need to know under which versions your code gets compiled.
The Delphi Compiler Version Directives article has some startup info on
how conditional compilation is used to test the version of the Delphi compiler.
Essentially, conditional compilation is based on the existence and evaluation of constants,
the status of compiler switches, and the definition of conditional symbols.
Such symbols are like boolean values.
There's a set of pre-defined conditional symbols in Delphi like:
"MSWINDOWS" (indicates that the operating environment is Windows),
"CONSOLE" (defined if an application is being compiled as a console application),
"WIN32" (use to distinguish between specific Windows platforms, such as 32-bit versus 64-bit)
and alike (above mentioned VER symbols to indicate the compiler version).
As stated, conditional symbols act like boolean values,
they are either defined (true) or undefined (false).
Any conditional symbol is treated as false until it has been defined.
Since conditional symbols are like boolean values, to test for true or false,
you would use the "special version" of the if then else statement.
Here's an example:
{$IFDEF DEBUG}
  Caption := '"DEBUG" is defined and "on"';
{$ELSE}
  Caption := '"DEBUG" is not defined and "off"';
{$ENDIF}
Try placing the above code inside the OnCreate event handler for
the (main) form of the application (program, project) created at the beginning of the article.
Now, take a look at the Project Manager, the "Build Configurations" node.
Either "Debug" or "Release" will be bold. That is the currently active build configurations.
Double click one to activate it. Run (F9) the application.
Note the different form caption depending on what the active build configuration is?
Ha! Conditional compilation in action!!
IFDEF, IFNDEF
Just like normal if and else, the "$IFDEF" and "$IFNDEF" along with "$ELSE" and "$ENDIF"
are used when you want to leverage conditional compilation.
They get surrounded by "{" and "}".
The "IFDEF" means "if defined" whatever comes after it.
IFNDEF is for "not defined".
In the above example the conditional symbol is "DEBUG" -
a pre-defined symbol by Delphi used in "debug build configuration".
You cannot use conditional symbols with normal if/then/else statements.
Now, the question comes up: how do I define my own conditional symbols? How do I go with:
{$IFDEF MY_CONDITIONAL_SYMBOL}
  Caption := 'This is a TRIAL version, buy the full one to have all the features!"';
{$ENDIF}
First, note that when a conditional symbol, like "MY_CONDITIONAL_SYMBOL",
is NOT defined the above would always evaluate to false
and the "Caption := ..." line of code would never execute.
Build Configuration: Release + TRIAL
The option to have different build configurations for your Delphi program
allows you to have two (or more) different applications (executable files)
being produced by the compiler/linker.
For this purpose you would use a feature called conditional compilation.
Conditional compilation let's you tell Delphi compiler
to include or not include parts of your code
depending on the existence of conditional symbols.
As explained, some conditional symbols,
like "DEBUG" and "WIN32" are pre-defined in Delphi.
If you want to be able to easily have two different executable files for your program
(therefore produce two different applications using the same code base),
let's say "TRIAL" and "normal", you could define a conditional symbol
"TRIAL_VERSION", then have lines of code like:
{$IFDEF TRIAL_VERSION}
  Caption := 'This is a TRIAL version, buy the full one to have all the features!"';
{$ENDIF}
Therefore, the question is: how to define a custom conditional symbol (like "TRIAL_VERSION")?
Build Configuration: Release + TRIAL
For the sake of simplicity, let's say you want to have a special "RELEASE" version of your program.
The normal RELEASE will build your normal application,
the executable will have name as specified by the project (dpr) file.
The, let's call it, TRIAL RELEASE will create a differently named executable
that will be the trial version of your application where some features are not allowed.
For the above, we want to have a special release version where our custom conditional symbol "TRIAL_VERSION" is defined.
We will define the TRIAL_VERSION conditional symbol as a part of a special extension
to the existing RELEASE build configuration. Here's how:
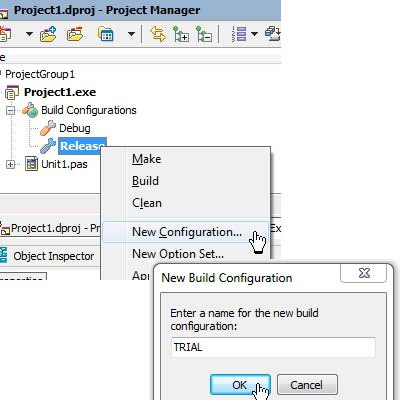
- Expand the "Build Configurations" node under "Project1" in "ProjectGroup1" inside the Project Manger,
- Right click the "Release" build configuration and select "New Configuration..." from the popup menu.
- Let the name for the new configuration build be "TRIAL" on the New Build Configuration dialog.
- The TRIAL is now a sub-node to the Release build configuration node.
The TRIAL build configuration extends the Release configuration, and for the moment they are the same.
Let's now see how to add our custom conditional symbol "TRIAL_VERSION" to the "TRIAL" build configuration.
Once the custom TRIAL build configuration is created
(extending the pre-defined Release configuration),
you need to define a custom conditional symbol
to ensure building your program as a trial build
will create a different application - due to conditional compilation.
Here's how to add/define your own conditional symbol "TRIAL_VERSION"
for the custom "Trial" build configuration:
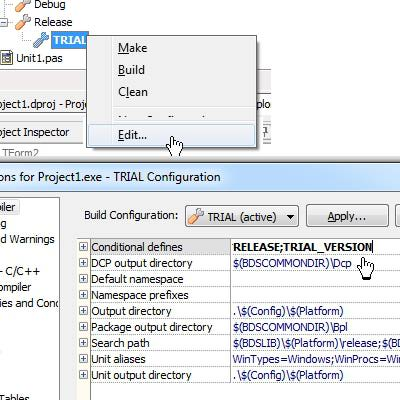
- Right click on the newly created build configuration
(Trial, extends Release). Select Edit.. - Project Options dialog will get displayed.
The Conditional defines will list "Release".
Add "TRIAL_VERSION" (use a semicolon to separate multiple symbols).RELEASE;TRIAL_VERSION - Click Ok on the Project Options dialog
With the above our custom conditional symbol "TRIAL_VERSION"
is defined for the "TRIAL" build configuration!
Note: conditional symbols must start with a letter,
followed by any combination of letters, digits, and underscores;
they can be of any length, but only the first 255 characters are significant.
Once a conditional symbol is defined we can use special conditional directives:
$IFDEF, $IFNDEF, $ELSEIF, $ELSE, $ENDIF
to code against the existence of a conditional symbol...
Ok, let's now see how this works and how to take "TRIAL_VERSION" into consideration
when coding and building our application.
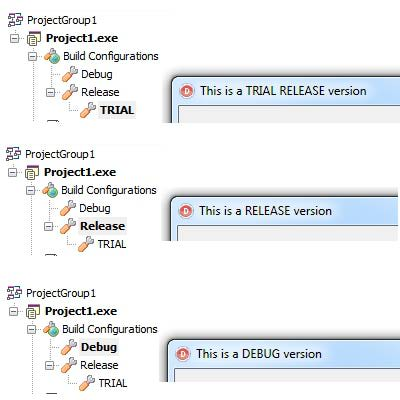
TRIAL_VERSION in Action!
Have the next code inside the OnCreate event handler for the main form of the program:
procedure TForm1.FormCreate(Sender: TObject);
begin
{$IFDEF TRIAL_VERSION}
  Caption := 'This is a TRIAL RELEASE version';
{$ELSE}
  {$IFDEF DEBUG}
    Caption := 'This is a DEBUG version';
  {$ELSE}
    Caption := 'This is a RELEASE version';
  {$ENDIF}
{$ENDIF}
end;
Double clicking the Debug, Release and Trial build configurations activate each configuration
(in the Project Manager) and run the program.
Note how the Caption of the form changes depending on the active build configuration!
That's it: conditional compilation in action :)
How could we now have different forms be a part of our program
depending on the conditional symbols and compilation?
Having seen how you can have your application respond to
user action differently depending on the existence of conditional symbols
and conditional compilation, let's now see how to include different forms.
Suppose you have a splash screen and you want a different splash screen
to appear for the trial and for the normal release of the application.
Trial vs. Release Splash Screen
A splash screen is a form which appears before your main form is displayed -
maybe to show the title of the application, some additional data, whatever.
For each build configuration (and therefore a different application),
be it "release" or "trial" you can display a different splash screen.
Here's how
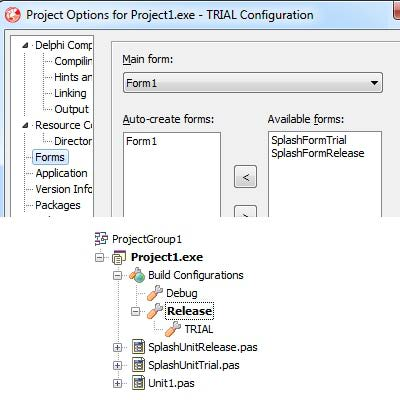
- Add two more forms to the project.
- Name the forms: "TSplashFormTrial" (unit name: "SplashUnitTrial") and
"TSplashFormRelease" (unit name: "SplashUnitRelease").
Note that by design the two newly added forms will not be a part of those forms
that get auto created by Delphi.
Rather, they will be listed in the Project Options - Forms - Available Forms list.
This means that you need to manually create and show and free the forms. - Each of the splash forms will have a simple Execute class method -
creating and displaying the form.class procedure TSplashFormRelease.Execute; begin with TSplashFormRelease.Create(nil) do try Show; Refresh; Sleep(1000); finally Free; end; end;
The above code is for the "release" version.
The TSplashFormTrial has the same method,
the Sleep call is here only to mimic some workload.
Now, open up the project's unit (dpr) source code and let it look like:
program Project1;

uses
  Forms,
  Unit1 in 'Unit1.pas' {Form1},
  {$IFDEF TRIAL_VERSION}
  SplashUnitTrial in 'SplashUnitTrial.pas' {SplashFormTrial};
  {$ELSE}
  SplashUnitRelease in 'SplashUnitRelease.pas' {SplashFormRelease};
  {$ENDIF}

{$R *.res}

begin
  Application.Initialize;

  {$IFDEF TRIAL_VERSION}
    TSplashFormTrial.Execute;

    Application.Title := 'myApplication TRIAL VERSION';
  {$ELSE}
    TSplashFormRelease.Execute;

    Application.Title := 'myApplication';
  {$ENDIF};

  Application.MainFormOnTaskbar := True;
  Application.CreateForm(TForm1, Form1);
  Application.Run;
end.
Depending on your active build configuration,
either the TSplashFormTrial Execute (if TRIAL active) will get called
or the one from TSplashFormRelease.
Also, note that depending on the conditional symbol,
only one of the two splash forms will actually be included in the final compiled application -
as we are using conditional directives in the uses list also.
WARNING: IDE Destroys Project's Code Containing Conditional Compilation!!
Having conditional compilation in your project's unit - you need to be very careful.
If you do something which would result in Delphi auto-maintaining the source code of the project's unit -
your conditional directives will get messed up!
For example: add one more unit (or form) to the project, the result is:
program Project1;

uses
  Forms,
  Unit1 in 'Unit1.pas' {Form1},
  SplashUnitRelease in 'SplashUnitRelease.pas' {SplashFormRelease},
  Unit2 in 'Unit2.pas';

{$ENDIF}

{$R *.res}
...
The "SplashUnitTrial in 'SplashUnitTrial.pas' {SplashFormTrial};"
is gone under the uses section. There's a leftover "{$ENDIF}".
This problem will only happen to the uses section -
not in-between the begin/end pair.
Therefore, you should, again, manually fix this to:
program Project1;

uses
  Forms,
  Unit1 in 'Unit1.pas' {Form1},
  {$IFDEF TRIAL_VERSION}
  SplashUnitTrial in 'SplashUnitTrial.pas' {SplashFormTrial},
  {$ELSE}
  SplashUnitRelease in 'SplashUnitRelease.pas' {SplashFormRelease},
  {$ENDIF}
  Unit2 in 'Unit2.pas';

{$R *.res}
...
The last question is how to have a different exe name
depending on the build configuration / conditional compilation.
Answered on the next page...

Now that you know how to have your own conditional symbols defined,
to have Delphi's conditional compilation create different versions of your application,
you might ask "how to change the exe name depending on the build configuration?"
Yes, your IDE has the answer :)
Please note that the name of the project's source unit (the DPR) defines
what will be the name of the generated executable file.
If your project is named "Project1", the executable will be named "Project1.exe".
Since now you have a trial and a normal release build -
you might want to create differently named executable files for your application.
Build Events
Take a look at the Project Options for your project.
You should see a node named "Build Events".
You can use the build events to create a list of events that occur
in two stages of the build process:
pre-build and post-build.
The build, compile, and make commands available in the IDE
call the new build engine from Microsoft:
MSBuild.
I will not go into many details, and will leave for you to explore MS Build :)
So what the task was? To have a different name for the executable file
when the "trial" build configuration is active!
Where's the exe?
First, note that the final executable file will, by design, created in a different -
build configuration related folder.
This is specified by the "Output Directory" option in the Project Options - Delphi Compiler.
By design, the value is:
.\$(Config)\$(Platform)
This means that the "Project1.exe" will get generated inside the
"\Release\Win32" folder (if running under Win32)
when the "Release" build configuration is active.
Our trial version is therefore generated in : "\Trial\Win32"
Post-Build Event: Rename Exe
Go to Project Options - Build Events and enter the following for the post-build command:
IF $(Config) == TRIAL Move "$(OUTPUTDIR)$(OUTPUTFILENAME)" "$(OUTPUTDIR)$(OUTPUTNAME)_TRIAL_$(OUTPUTEXT)"
The above msbuild commands will rename the generated executable file
if the active build configuration is "trial".
After building, the "Output" window will show:
Target PreBuildEvent:
    echo TRIAL
    TRIAL
Target _PasCoreCompile:
    c:\program files (x86)\embarcadero\rad studio\ ...
Target PostBuildEvent:
    IF TRIAL == TRIAL  Move ".\TRIAL\Win32\Project1.exe" ".\TRIAL\Win32\Project1_TRIAL_.exe"
            1 file(s) moved.
Build succeeded.
    0 Warning(s)
    0 Error(s)
And that's it! Finally, all questions answered!! :)
Note: the "download" section has the entire project available for download.
http://delphi.about.com/library/code/conditional-compilation.zip
Pre and Post-Build Automation in Delphi
Extend the BDS IDE so that Pre-Build and
Post-Build tasks can be automated
http://delphi.about.com/od/devutilities/a/pre_post_build.htm
This article describes a simple way to
extend the BDS IDE so that Pre-Build and Post-Build tasks
can be automated without a single line of code.
Why Pre or Post-Build?
I’m trying to create my first shareware program in my free time.
With that comes adding some security measures and so I chose Armadillo
(now SoftwarePassport). The way this protection works is
by wrapping the program’s EXE which means it has to be done
after building the main program.
This protective wrapper needs to be in place even for development work,
be that to test settings related to the protection itself or
simply to avoid a large number of conditional defines to block code out.
For the last few days I’ve been trying to automate the process
which involves running a windows application with certain parameters.
Because there is not much information on how to successfully accomplish this,
I decided to write this article to share the workaround that I found to be very good,
at least until Delphi gains a more customizable builder.
The solution to Pre-Build and Post-Build in the BDS IDE
The whole idea works around 2 concepts applied together:
using Build Tools and Project Groups.
I’ll describe the process for the Post-Build situation in my particular case,
but, by playing around with the build order, this can easily be adapted to Pre-Build too
and you can even have several Pre and Post-Build tools being executed.
Step-by-step instructions
Let’s start by opening your project.
- Right-click on the Project Group and select "Add New Project…".
- Any type of project will do, I selected a console application and named it PostBuild,
but again, any name will do. You can keep your project the Active one. - Save all that and choose a proper name for the .bdsgroup file.
- Right-click on the PostBuild project in the project explorer
and select "Dependencies": this is one of the most important steps
because in here you can say that this project (PostBuild)
depends on another one (your main project),
so that it will always be built after your main one.
Now for the tool configuration. In my particular case, I need to run the following command line:
"C:\Program Files\SoftwarePassport\Armadillo.exe" "D:\Dev\My Prog\Prot.arm" /P So, let’s do two things here:
add the Prot.arm file to the Post-Build project and
create a Build Tool to handle .arm files.
The Build Tools dialog, or more specifically, the "Add…" sub-dialog,
could use a bit more explanation in the help file
but eventually I got it working as you might have guessed or
I would not be writing this article!
The key points in this dialog are:
Title: Anything will do but using a descriptive title always helps
Default Extensions: *.arm (this is for my case for the example command-line above)
Command Line: This is the trickiest of them all, but after you get one working, they’re all easy.
The trick here is not to use quotes on the program’s name
but instead use the windows SFN (Short File Name).
The reason is that, should you need to use quotes to enclose the path of your file,
the IDE gets confused with too many quotes.
So, these are the wrong ways of adding that command line above:
C:\Program Files\SoftwarePassport\Armadillo.exe D:\Dev\My Prog\Prot.arm /P
"C:\Program Files\SoftwarePassport\Armadillo.exe" D:\Dev\My Prog\Prot.arm /P
C:\Program Files\SoftwarePassport\Armadillo.exe "D:\Dev\My Prog\Prot.arm" /P
"C:\Program Files\SoftwarePassport\Armadillo.exe" "D:\Dev\My Prog\Prot.arm" /P
This last one should work, if it were not for the IDE to be confused with it.
So, what does work is either of these:
C:\Progra~1\Softwa~1\Armadillo.exe "D:\Dev\My Prog\Prot.arm" /P
C:\Progra~1\SoftwarePassport\Armadillo.exe "D:\Dev\My Prog\Prot.arm" /P
The 1st one is a "true" SFN (if in doubt, run CMD.exe and do a dir /X "C:\";
it's not critical that you use a "true SFN",
the important thing is that no part of the full path + program name
has spaces in it as you can see in the 2nd example,
thus leaving the quotes available for use on the file name.
Of course, we don’t want this exactly as it is as it would be hard coded.
We can use some Macros to make it more generic,
so here are the Add Build Tool contents for my case:
Title: ArmProtect
Default Extensions: *.arm
Command Line: C:\Progra~1\SoftwarePassport\Armadillo.exe "$PATH$NAME" /P
Using these Macros is also the reason why I used SFN on the program and not on the filename!
In this case, "$PATH$NAME" gets expanded to "D:\Dev\My Prog\Prot.arm".
Don't forget that this tool will only be used on the extensions indicated in this dialog.
You can also, at any point in time, manually run this command by right-clicking
any *.arm file on your project and selecting the tool from the menu.
The final step to remember is to Build All Projects
(you can give it a keyboard shortcut to make it easier to use and/or put it on your toolbar).
Pre and Post-Build in Short
- Add a Post-Build "void" project to your project group;
- Right click that project, select Dependencies and make it depend on your main project
- Add the file you want to be processed after building your program to the PostBuild project
- Create a Build Tool to run the proper command-line and associate
it with that file’s extension (don't forget about using SFN for the program name) - Always load the .bdsgroup instead of the .bdsproj and use
Project -> Build All Projects whenever you want the Pre/Post-Build to work.
Final Notes
You may need to exit and re-open the IDE for it to acknowledge changes to Build Tools,
especially when you just added a new one.
Adding a Pre-Build is also easy to achieve playing with the project’s dependencies:
you will need to make your main project dependent on the PreBuild one.
If you need to add some step that does not depend on any type of file,
simply make up some extension (use 4 or more characters to avoid conflicts with existing extensions)
and create a void file of that extension to associate with the Build Tool, for instance, "nothing.step1".
If you want to customize the Build Current Project key to perform Build All Projects instead,
take a look at the free GExperts Add-In.

 浙公网安备 33010602011771号