
创建kickstart文件,并使用pxe实现自动安装centos系统
- 创建kickstart文件
安装开始前准备工作:(不使用http以及dhcp安装的话才需要下载)
先到阿里云下载:https://mirrors.aliyun.com/centos/
centos8需要下载以"boot.iso"结尾的iso镜像
centos7需要下载以"NetInstall-2003.iso"结尾的镜像
centos6需要下载以"netinstall.iso"结尾的镜像
然后创建新的虚拟机,将刚刚下载的对应的镜像挂载上去(这里以centos8为例)
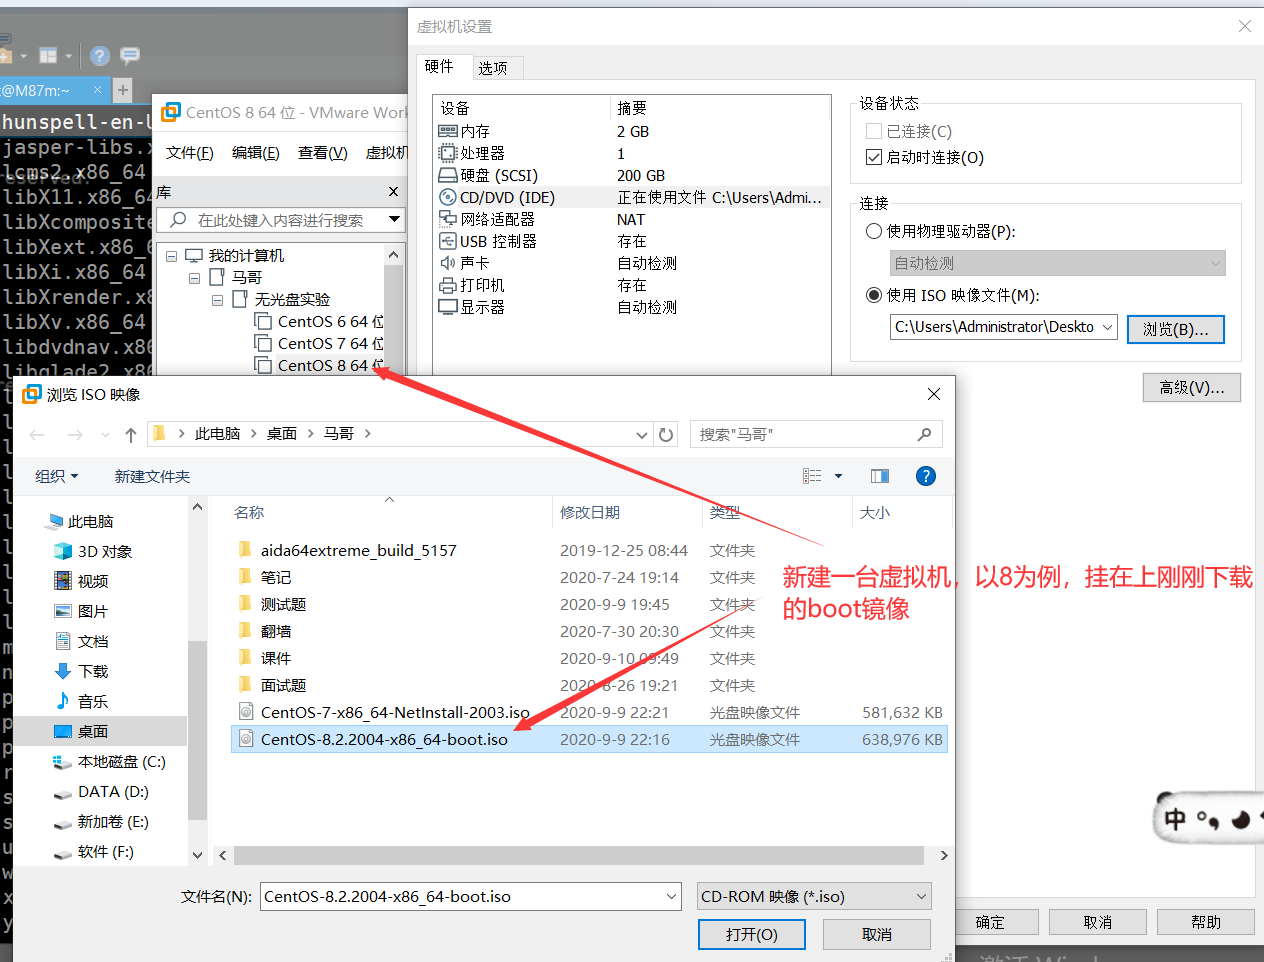
这台虚拟机到现在就已经可以开启了,开启后会发现,机器可以正常进入图形安装界面,但是却安装不了程序包,因为boot的镜像当中并没有相关的一系列安装包,而kickstart就是解决这个问题的文件,如何生成kickstart,这就是接下来要解决的问题。
如果只是想要通过kickstart就来安装系统的话是不会成功的,还需要一些其他的相关服务来一起工作才可以达到目的。
1 [root@M87m ~]# yum install -y httpd;systemctl enable --now httpd  #以网络的形式下载
2 ......
3 [root@M87m ~]# yum -y install system-config-kickstart  #创建kickstart的工具
4 5 ......
在这里还需要通过XShell的另外一个应用来一起辅助做kickstart:
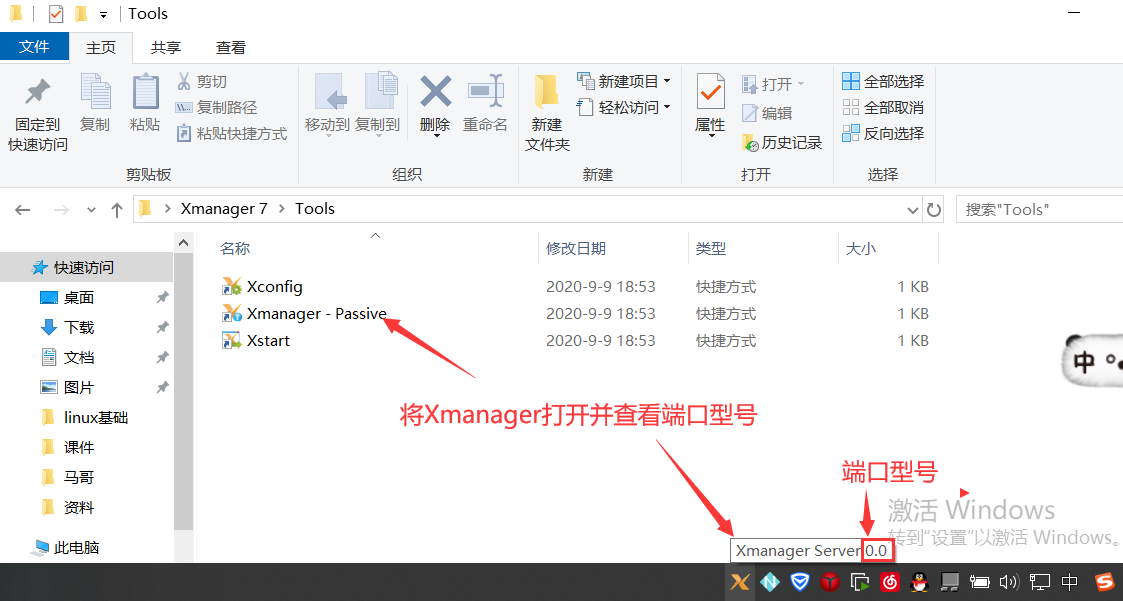
[root@M87m ~]# export DISPLAY=10.0.0.1:0.0  #固定格式,10.0.0.1为本地地址
[root@M87m ~]# system-config-kickstart   #运行了这个命令就会打开图形窗口了
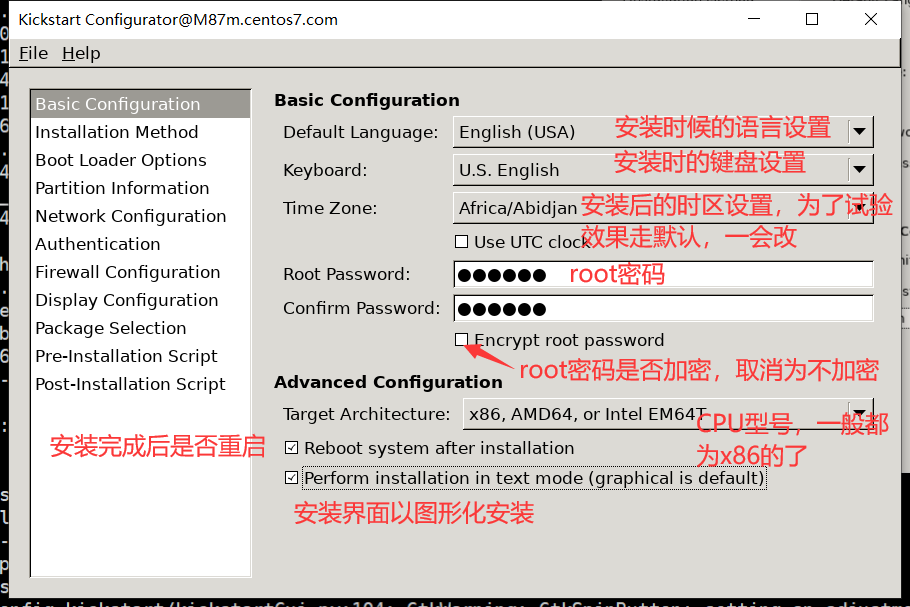
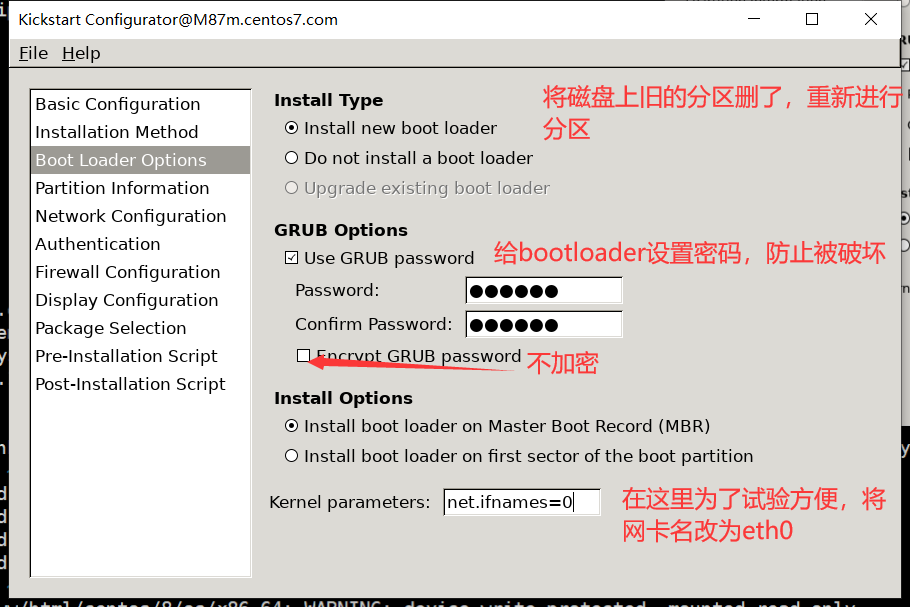
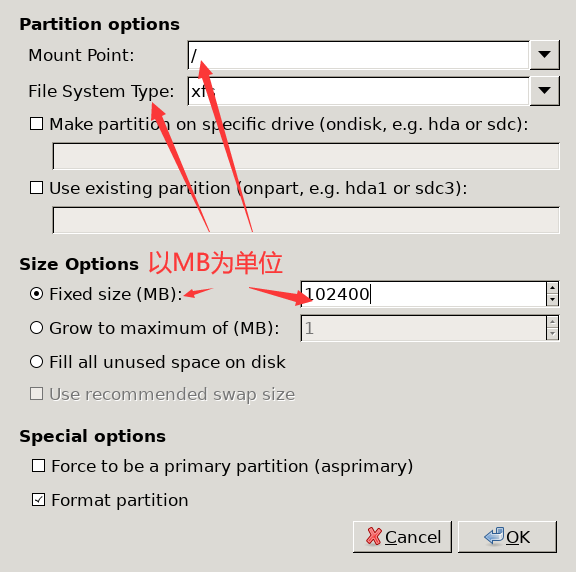
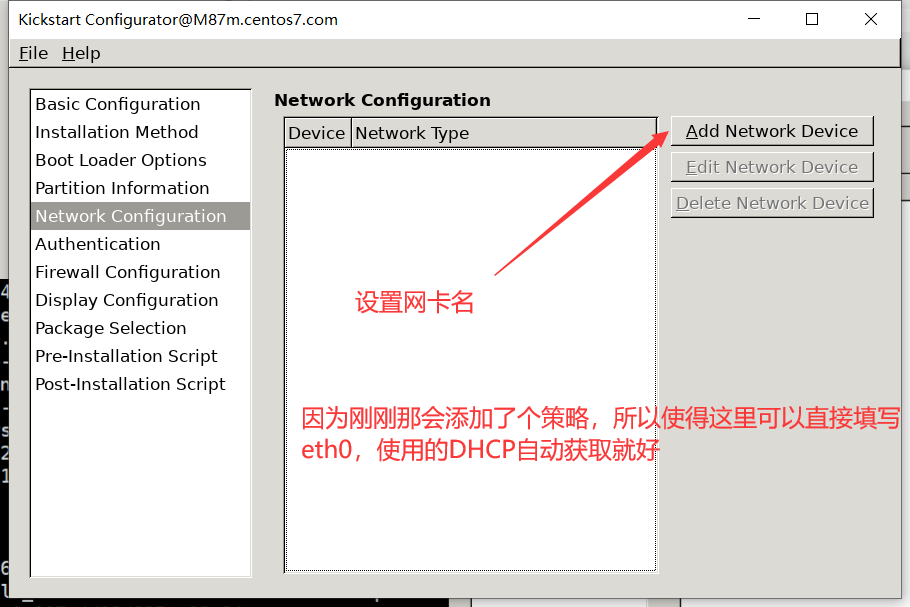
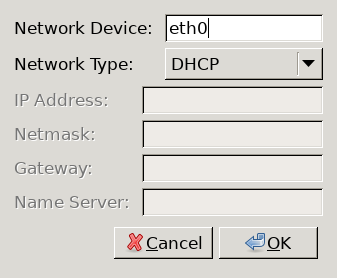
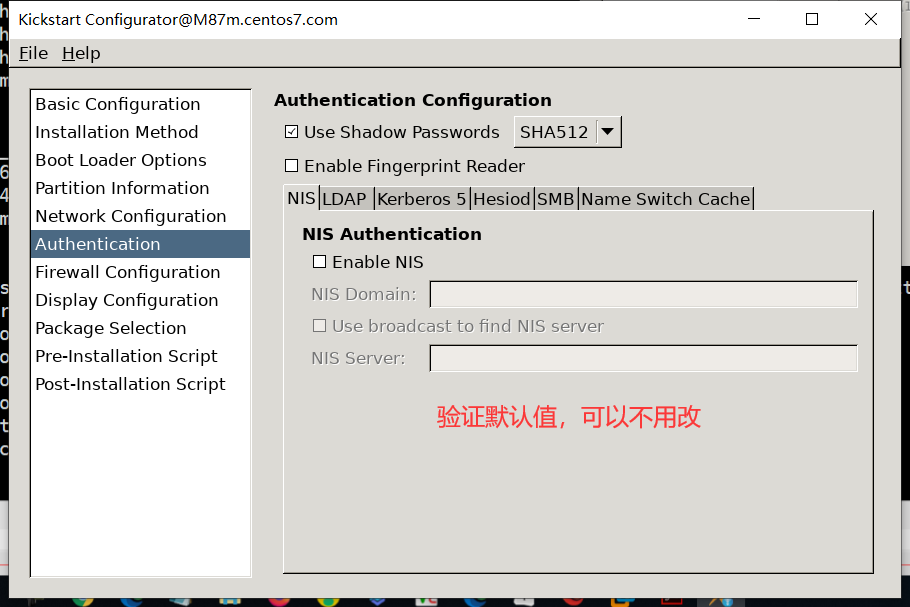
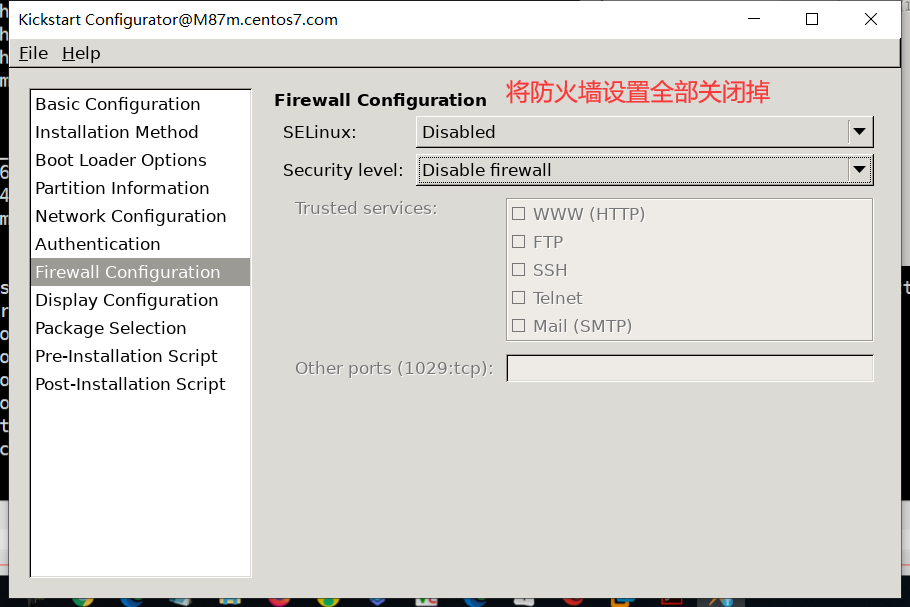
接下来按照以下图片的流程走即可:


接下来是选包的操作,选包的实现要将/etc/yum.repo.d/*.repo文件中的base改为development,不然就无法进行选包
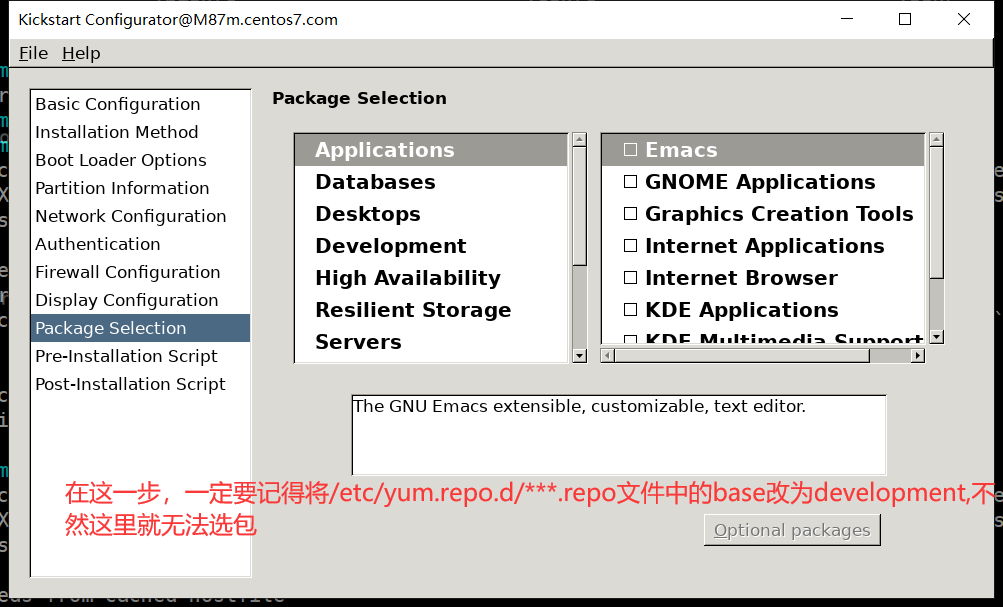 这里的选包只是为了实验选择了web-server,同样也可以不选择
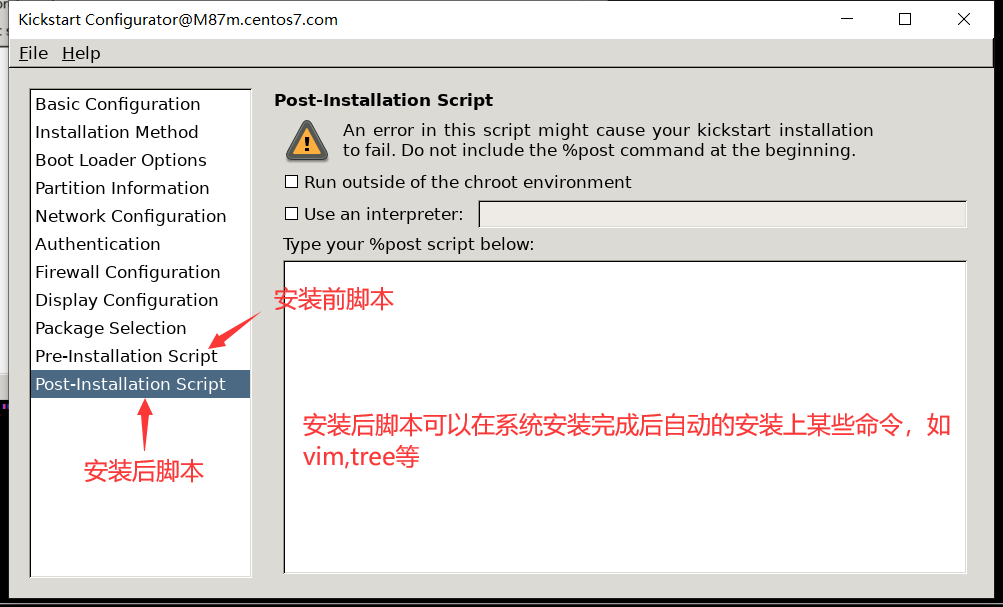
在这里的安装后脚本,可写可不写,为了实验目的,可以选择安装一些命令,或者将yum源写进去。
接下来只需要点击左上角的File,选择Save将文件保存到想要保存的目录下即可(注:该文件一定是以".cfg"结尾的文件)。
以下是整理好了的kickstart文件(这是一个自动化安装centos7的kickstart)
#platform=x86, AMD64, or Intel EM64T
#version=DEVEL
# Install OS instead of upgrade
install
# Keyboard layouts
keyboard 'us'
# Root password
rootpw --plaintext 123456
# System language
lang en_US
# System authorization information
auth  --useshadow  --passalgo=sha512
# Use text mode install
text
firstboot --disable
# SELinux configuration
selinux --disabled
# Firewall configuration
firewall --disabled
# Network information
network  --bootproto=dhcp --device=eth0
network  --hostname=shiyan.centos7.com  #这个地方是后来补上去的刚刚没设置
# Reboot after installation
reboot
# System timezone
timezone Asia/Shanghai    #时区要记得更改
# Use network installation
url --url="http://10.0.0.25/centos/7/os/x86_64/"
# System bootloader configuration
bootloader --append="net.ifnames=0"--location=mbr --boot-drive=sda #(--location=none这个地方原本在之前选择应答文件的时候给丢失了,导致缺失了grub,重启起不来)
# Clear the Master Boot Record
zerombr
# Partition clearing information
clearpart --all --initlabel
ignoredisk --only-use=sda     #和老师的实验一样,这个东西不见了,手动加上
# Disk partitioning information
part / --fstype="ext4" --size=102400
part /boot --fstype="ext4" --size=1024
part swap --fstype="swap" --size=2048

%post
mkdir /etc/yum.repos.d/backup
mv /etc/yum.repos.d/*.repo /etc/yum.repos.d/backup
cat > /etc/yum.repos.d <<EOF
[base]
name=base.repo
baseurl=https://mirrors.aliyun.com/centos/\$releasever/os/x86_64
        https://repo.huaweicloud.com/centos/\$releasever/os/x86_64
gpgcheck=0
gpgkey=file:///etc/pki/rpm-gpg/RPM-GPG-KEY-CentOS-7

[epel]
name=Extra Packages for Enterprise Linux \$releasever - \$basearch
baseurl=http://mirrors.aliyun.com/epel/\$releasever/\$basearch
        https://repo.huaweicloud.com/epel/\$releasever/x86_64
failovermethod=priority
enabled=1
gpgcheck=0
gpgkey=file:///etc/pki/rpm-gpg/RPM-GPG-KEY-EPEL-7
EOF


useradd bai
echo 981108 |passwd --stdin bai
%end

%packages
vim
wget
tree
curl
%end
ksvalidator 这个命令可以检查kickstart是否符合语法
[root@M87m ~]# ksvalidator ks7.cfg
然后将这个kickstart文件拷贝到实现准备好的http目录下:
[root@M87m ~]# cp ks7.cfg /var/www/html/ksdir/
这个是在centos7上写的8的kickstart文件
#platform=x86, AMD64, or Intel EM64T
#version=DEVEL
# Install OS instead of upgrade
install
# Keyboard layouts
keyboard 'us'
# Root password
rootpw --plaintext 123456
# System language
lang en_US
# System authorization information
auth  --useshadow  --passalgo=sha512
# Use text mode install
text
firstboot --disable
# SELinux configuration
selinux --disabled
# Firewall configuration
firewall --disabled
# Network information
network  --bootproto=dhcp --device=eth0 --ipv6=auto --activate
network  --hostname=shiyan.centos8.com
# Reboot after installation
reboot
# System timezone
timezone Asia/Shanghai
# Use network installation
url --url="http://10.0.0.21/centos/8/os/x86_64/"
# System bootloader configuration
bootloader --append="net.ifnames=0" --location=mbr --boot-drive=sda
# Clear the Master Boot Record
zerombr
# Partition clearing information
clearpart --all --initlabel
ignoredisk --only-use=sda
# Disk partitioning information
part / --fstype="ext4" --size=102400
part /boot --fstype="ext4" --size=51200
part swap --fstype="swap" --size=2048
skipx
services --disabled="chronyd"

%post
useradd bai
echo 981108 |passwd --stdin bai
%end

%packages
vim
wget
tree
curl
%end
接下来是网络上的服务器端的配置:(这是一个自动化安装7的文件)
[root@M87m html]# mount /dev/sr0 /var/www/html/centos/7/os/x86_64/
注:再一次强调将/etc/yum.repos.d/*.repo中的base,改为development
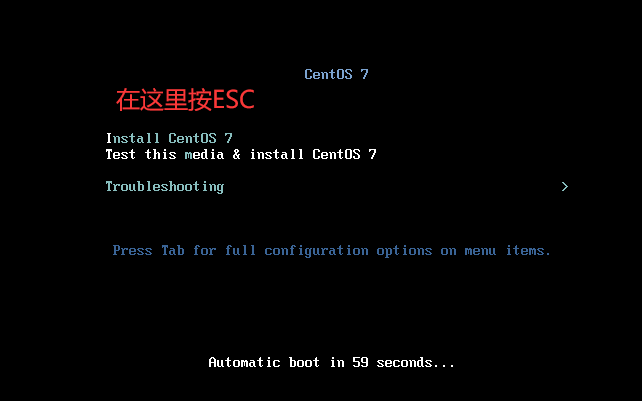
接下来就创建相关虚拟机,并且让他自动安装了:
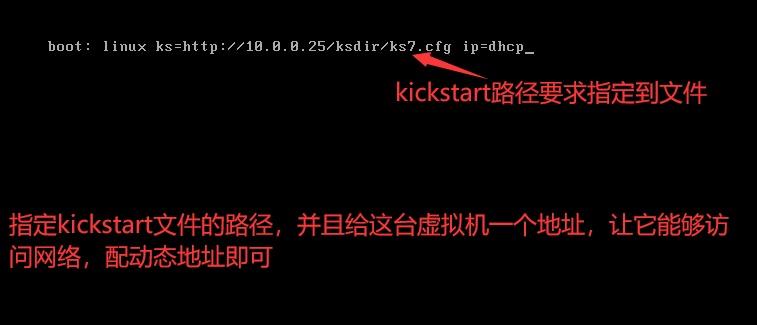 这里的ks所指定的路径是本机的http服务所在的路径,就是刚刚将ks7.cfg拷贝到的目录,一定是能够访问的
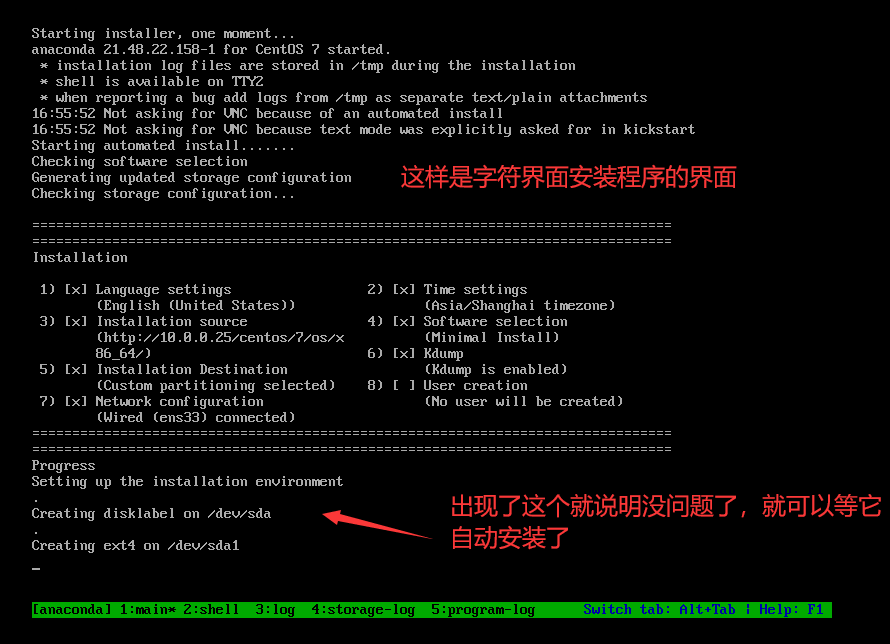
接下来就不用管了,一切都会自动化完成了,因为在设置中有设置安装完毕自动重启,所以设备也会在安装完成后自动重启。
以上就是使用kickstart文件来自动化安装centos了。
接下来是建立在拥有了kickstart文件的基础下利用pxe实现自动化系统部署:
要想实现pxe自动化部署还需要两个服务来辅助,那就是DHCP以及TFTP服务,原因是因为pxe的实现流程:
PXE的实现流程:
利用pxe实现自动化安装流程:
1. Client向PXE Server上的DHCP发送IP地址请求消息,DHCP检测Client是否合法(主要是检测 Client的网卡MAC地址),如果合法则返回Client的IP地址,同时将启动文件pxelinux.0的所在 TFTP服务器地址信息一并传送给Client
2. Client向TFTP服务器发送获取pxelinux.0请求消息,TFTP服务器接收到消息之后,向Client发送 pxelinux.0大小信息,试探Client是否满意,当TFTP收到Client发回的同意大小信息之后,正式向 Client发送pxelinux.0
3. Client执行接收到的pxelinux.0文件,并利用此文件启动
4. Client向TFTP 服务器发送请求针对本机的配置信息文件(在TFTP 服务器的pxelinux.cfg目录 下),TFTP服务器将启动菜单配置文件发回Client,继而Client根据启动菜单配置文件执行后续操 作
5. Client根据启动菜单配置文件里的信息,向TFTP发送Linux内核和initrd文件请求信息,TFTP接收 到消息之后将内核和initrd文件发送给Client
6. Client向TFTP发送根文件请求信息,TFTP接收到消息之后返回Linux根文件系统
7. Client启动Linux内核,加载相关的内核参数
8. Client通过内核参数下载kickstart文件,并根据kickstart文件里的安装信息,下载安装源文件进行 自动化安装
首先我们先来简单搭建DHCP服务:
[root@M47m ~]# yum -y install dhcp  #服务器端下载这个安装包
[root@M47m ~]# systemctl enable --now dhcpd  #刚下好dhcp是无法设置开机自启的
Created symlink from /etc/systemd/system/multi-user.target.wants/dhcpd.service
Job for dhcpd.service failed because the control process exited with error cod
[root@M47m ~]# vim /etc/dhcp/dhcpd.conf  #因为要想dhcp开机自启,需要这个文件夹有相应的设置才行,但是进到这个文件夹下发现这个文件中没有东西,只有一个模板提示,因此需要将模板文件拷贝到这儿,然后更改相关设置如下↓
[root@M47m ~]# cp /usr/share/doc/dhcp-4.2.5/dhcpd.conf.example /etc/dhcpd.conf
cp: overwrite ‘/etc/dhcp/dhcpd.conf’? y
[root@M47m ~]# vim /etc/dhcp/dhcpd.conf  #以下是这个文件的相关设置

option domain-name "baidu.com";   #这个是设置/etc/resolv.conf下的search给客户端
option domain-name-servers 8.8.8.8, 114.114.114.114;   #给客户端设置的DNS

default-lease-time 36000;  #最小租赁时间
max-lease-time 72000;   #最大租凭时间

subnet 10.0.0.0 netmask 255.255.255.0 {   #租赁网段以及子网掩码。必须和本机同网段
    range 10.0.0.50 10.0.0.100;          #租赁地址范围
    range 10.0.0.150 10.0.0.200;
    option routers 10.0.0.2;             #租赁网关
}
接下来是TFTP了
[root@M47m ~]# yum info tftp-server  #服务器端下载这个
[root@M47m ~]# rpm -ql tftp-server
/etc/xinetd.d/tftp
/usr/lib/systemd/system/tftp.service  #service和socket分离表示监听端口和服务进程的
/usr/lib/systemd/system/tftp.socket  #启动无关,监听端口和服务启动无关
/usr/sbin/in.tftpd            #这个就是监听端口的主程序,是个二进制文件,不用管
/usr/share/doc/tftp-server-5.2
/usr/share/doc/tftp-server-5.2/CHANGES
/usr/share/doc/tftp-server-5.2/README
/usr/share/doc/tftp-server-5.2/README.security
/usr/share/man/man8/in.tftpd.8.gz
/usr/share/man/man8/tftpd.8.gz
/var/lib/tftpboot    #这个就是默认tftp的访问文件夹,本实验可以全程在这个路径下
[root@M47m ~]# systemctl start tftp.socket   #只启动了端口的监听设置,和服务没关系
[root@M47m ~]# ss -nutl    #启动服务后发现前后变化多了个69端口
Netid State      Recv-Q Send-Q Local Address:Port               Peer Address:Port
......
udp   UNCONN     0      0       :::69                  :::*
......
[root@M47m ~]# yum install -y mlocate syslinux #mlocate是数据库的;syslinux是为了能够生成pxelinux.0以及menu.c32的
[root@M47m ~]# cp /usr/share/syslinux/pxelinux.0 /var/lib/tftpboot/
[root@M47m ~]# cd /var/lib/tftpboot/
[root@M47m tftpboot]# ls
pxelinux.0
[root@M47m tftpboot]# ss -nutl
Netid State Recv-Q Send-Q Local Address:Port Peer Address:Port
udp UNCONN 0 0 *:67 *:* #dhcp服务端口
udp UNCONN 0 0 :::69 :::* #tftp服务端口
tcp LISTEN 0 128 *:22 *:*
tcp LISTEN 0 100 127.0.0.1:25 *:*
tcp LISTEN 0 128 :::80 :::* #http服务端口
......
[root@M47m tftpboot]# cp /var/www/html/centos/8/os/x86_64/isolinux/vmlinuz .
[root@M47m tftpboot]# cp /var/www/html/centos/8/os/x86_64/isolinux/initrd.img .
[root@M47m tftpboot]# locate menu.c32 #这步是在查找启动菜单的,因为没更新库
locate: can not stat () `/var/lib/mlocate/mlocate.db': No such file or directory
[root@M47m tftpboot]# updatedb #更新了数据库后就可以查找到了
[root@M47m tftpboot]# locate menu.c32
......
/usr/share/syslinux/menu.c32 #这个文件是menu风格的启动菜单
......
[root@M47m tftpboot]# cp /usr/share/syslinux/menu.c32 /var/lib/tftpboot
[root@M47m tftpboot]# cp /var/www/html/centos/8/os/x86_64/isolinux/ldlinux.c32 .
[root@M47m tftpboot]# cp /var/www/html/centos/8/os/x86_64/isolinux/libcom32.c32 .
[root@M47m tftpboot]# cp /var/www/html/centos/8/os/x86_64/isolinux/libutil.c32 .
[root@M47m tftpboot]# mkdir pxelinux.cfg
[root@M47m tftpboot]# cp /var/www/html/centos/8/os/x86_64/isolinux/isolinux.cfg pxelinux.cfg/default #这个用来做启动菜单的,默认文件名必须为default
[root@M47m tftpboot]# tree
.
├── initrd.img
├── ldlinux.c32
├── libcom32.c32
├── libutil.c32
├── menu.c32
├── pxelinux.0
├── pxelinux.cfg
│ └── default
└── vmlinuz
1 directory, 8 files
[root@M47m tftpboot]# mkdir centos{6,7,8} #一口气将6,7,8的安装全都做下来
[root@M47m tftpboot]# mv vmlinuz initrd.img centos8 #这里是将开机启动所需要的文件都按版本号分类区分开
[root@M47m tftpboot]# cp /var/www/html/centos/7/os/x86_64/isolinux/initrd.img ./centos7/
[root@M47m tftpboot]# cp /var/www/html/centos/7/os/x86_64/isolinux/vmlinuz ./centos7/
[root@M47m tftpboot]# cp /var/www/html/centos/6/os/x86_64/isolinux/vmlinuz ./centos6/
[root@M47m tftpboot]# cp /var/www/html/centos/6/os/x86_64/isolinux/initrd.img ./centos6/
[root@M47m tftpboot]# tree /var/lib/tftpboot #这个是最终所形成的目录样子
.
├── centos6
│ ├── initrd.img
│ └── vmlinuz
├── centos7
│ ├── initrd.img
│ └── vmlinuz
├── centos8
│ ├── initrd.img
│ └── vmlinuz
├── ldlinux.c32
├── libcom32.c32
├── libutil.c32
├── menu.c32
├── pxelinux.0
└── pxelinux.cfg
└── default
[root@M47m tftpboot]# vim pxelinux.cfg/default #以下为菜单内容(这个地方是直接写成了支持安装6,7,8三种风格的安装模式)
default menu.c32 #这个地方要改为menu.c32启动风格
timeout 600 #选择默认的时间(这是60秒,单位为1/10秒)
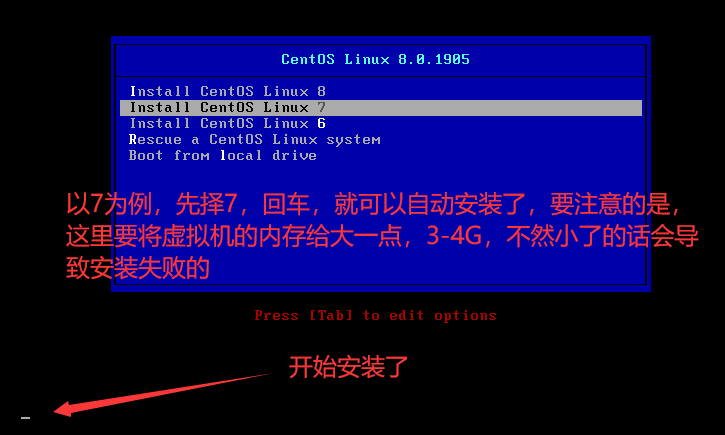
menu title CentOS Linux #菜单名称
label linux8
menu label Install CentOS Linux ^8 #这个是8的安装选择”^”表示快捷键
kernel centos8/vmlinuz #这个地方是相对路径
append initrd=centos8/initrd.img ks=http://10.0.0.21/ksdir/ks8.cfg quiet #这个地方是相对路径,以下一样
label linux7
menu label Install CentOS Linux ^7
kernel centos7/vmlinuz
append initrd=centos7/initrd.img ks=http://10.0.0.21/ksdir/ks7.cfg quiet
label linux6
menu label Install CentOS Linux ^6
kernel centos6/vmlinuz
append initrd=centos6/initrd.img ks=http://10.0.0.21/ksdir/ks6.cfg quiet
label rescue
menu label ^Rescue a CentOS Linux system #这里只做了8的救援模式,7和6一样
kernel centos8/vmlinuz
append initrd=centos8/initrd.img inst.repo=http://10.0.0.21/centos/8/os/x86_64 rescue quiet
label local #这个是硬盘启动的
menu default #将硬盘启动设置为了默认,这个是可以更改的默认项
menu label Boot from ^local drive
localboot 0xffff


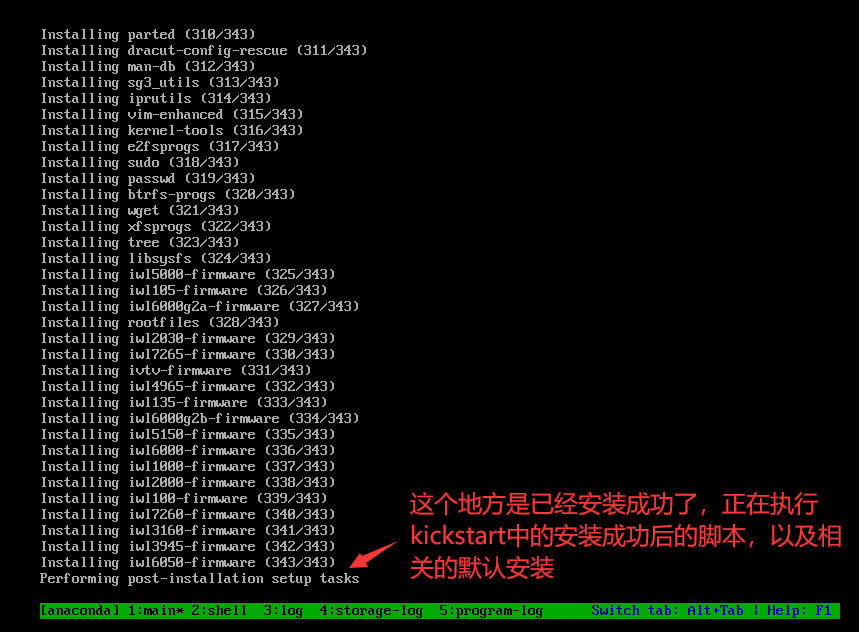 这个地方安装可能会有点忙,不着急稍等一下就好。

 浙公网安备 33010602011771号