再续:解读keep-alive:Vue3中手动清理keep-alive组件缓存的一个解决方案
接上一篇,上一篇提供了一种手动清理keep-alive组件缓存的一个解决方案,但是要求在非production或者启用devtools的情况下才生效,所以不实用。
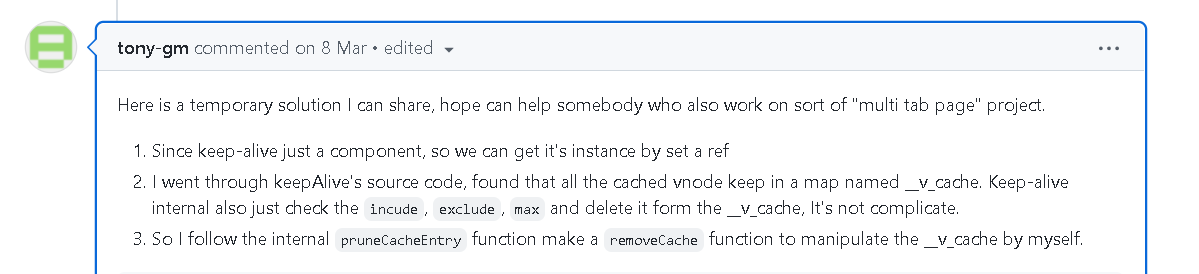
在仔细读了源码之后,还是没有一个好的办法,上github的上查看issue,发现很多人都提出了这个问题,但是vue的作者就是不愿意解决,可能作者有其它的顾虑吧,此外,issue里也提出了很多解决思路,比如实现一个自己的keep-alive组件等等,看到一个名为tony-gm的评论,可以通过编译时修改源码来解决这个问题,评论地址:https://github.com/vuejs/core/pull/4339#issuecomment-1061855701
仔细想想,确实可行,源码中有一个pruneCacheEntry函数,就是通过key来清理缓存,我们也确实是想要这个函数,但是vue的作者通过闭包把它锁死了,所以通过修改源码是一个很不错的解决方案!但是我们不能直接修改node_module里面的源码,毕竟我们一个项目可能是几个人开发,所以如果自己修改了本地的,而别人那里又没有,这就尴尬了,所以通过编译时来修改源码是一个不错的思路!
查看源码,找到一处特征点,主要是下面几行代码:
    if ((process.env.NODE_ENV !== 'production') || __VUE_PROD_DEVTOOLS__) {
        instance.__v_cache = cache;
    }

    //省略一些代码...

    function pruneCacheEntry(key) {
        const cached = cache.get(key);
        if (!current || cached.type !== current.type) {
            unmount(cached);
        }
        else if (current) {
            // current active instance should no longer be kept-alive.
            // we can't unmount it now but it might be later, so reset its flag now.
            resetShapeFlag(current);
        }
        cache.delete(key);
        keys.delete(key);
    }
这里表明我们有两种修改方案:
    方案一:注释 instance.__v_cache = cache; 这行代码的判断条件,也就是注释掉它的if判断,这样无论在什么环境,我们都可以取到__v_cache对象,这样就可以按照上一篇的方案来解决手动释放的问题
    方案二:注意到源码中的pruneCacheEntry函数就是通过key来释放缓存,所以如果仅仅是想通过key来释放缓存,那么可以通过将pruneCacheEntry函数暴露出来实现我们的要求
方案一
修改vue.config.js,在文件开头添加下面的代码:
    const path = require("path");
    const fs = require("fs");
    try {
      const vue_bundler_file = path.resolve(
        __dirname,
        "node_modules/@vue/runtime-core/dist/runtime-core.esm-bundler.js"
      );
      //使用同步读取文件
      let data = fs.readFileSync(vue_bundler_file, "utf8");
      //如果未添加过
      if (data.indexOf("//__v_cache") < 0) {
        console.log("正在修改源码文件:", vue_bundler_file);
        //先找到__v_cache变量的位置
        let index = data.indexOf("__v_cache");
        if (index >= 0) {
          // 继续往前找if关键字
          index = data.lastIndexOf("if ", index);
          if (index >= 0) {
            //从上一个位置开始
            index -= 1;
            //然后放一个注释
            const comment = " //__v_cache ";
            //然后拼接
            data = data.substring(0, index) + comment + data.substring(index);

            //继续往后找下一个大括号 }
            index = data.indexOf("}", index);
            if (index >= 0) {
              //从上一个位置开始
              index -= 1;
              //然后拼接
              data = data.substring(0, index) + comment + data.substring(index);
            }

            fs.writeFileSync(vue_bundler_file, data, "utf8");
          }
        }
      }
    } catch (er) {
      console.error(er.message);
}然后重新启动运行项目,就可以按照上一篇的方式,通过 __v_cache 对象来手动清理keep-alive的缓存了。
    export default {
      setup() {
        const instance = getCurrentInstance();
        const handler = new KeepAliveHandler();
        onMounted(() => {
          const keepAlive = instance.refs.keepAlive;
          handler.bind(keepAlive);
        });
        const remove = (key) => {
          handler.remove(key);
        };

        return {
          remove,
        };
      },
    };
如果打开 node_modules/@vue/runtime-core/dist/runtime-core.esm-bundler.js 文件,搜索 __v_cache ,会看到这样的代码片段:

方案二
在 vue.config.js 中开头添加如下代码:
    const path = require("path");
    const fs = require("fs");
    try {
      const vue_bundler_file = path.resolve(
        __dirname,
        "node_modules/@vue/runtime-core/dist/runtime-core.esm-bundler.js"
      );
      //使用同步读取文件
      const data = fs.readFileSync(vue_bundler_file, "utf8");
      //如果未添加过
      if (data.indexOf("sharedContext.$pruneCacheEntry") < 0) {
        console.log("正在修改源码文件:", vue_bundler_file);
        //先找到__v_cache变量的位置
        let index = data.indexOf("__v_cache");
        if (index >= 0) {
          // 继续找下一个大括号 }
          index = data.indexOf("}", index);
          if (index >= 0) {
            //从下一个位置开始
            index += 1;
            //然后放一个可以释放的函数
            const remove =
              "        sharedContext.$pruneCacheEntry = function(key) {\r\n" +
              "            const cached = cache.get(key);\r\n" +
              "            if (cached) {\r\n" +
              "                if (cached.key == current?.key) {\r\n" +
              "                    resetShapeFlag(current);\r\n" +
              "                } else {\r\n" +
              "                    unmount(cached);\r\n" +
              "                }\r\n" +
              "                cache.delete(key);\r\n" +
              "                keys.delete(key);\r\n" +
              "            }\r\n" +
              "        }\r\n"
            //然后拼接
            const result =
              data.substring(0, index) +
              "\r\n" +
              remove +
              "\r\n" +
              data.substring(index);
            fs.writeFileSync(vue_bundler_file, result, "utf8");
          }
        }
      }
    } catch (er) {
      console.error(er.message);
}之后,我们项目重新运行后,就可以通过ref取到keep-alive组件的引用,然后使用这个引用对象直接使用$pruneCacheEntry函数来删除指定key的缓存了:
this.$refs.keepAlive.$pruneCacheEntry("key")如果打开 node_modules/@vue/runtime-core/dist/runtime-core.esm-bundler.js 文件,搜索 __v_cache ,会看到这样的代码片段:

结语
目前,目前还没有找到更好的解决方案,我自己采用的是第二种方案,算是暂时解决了问题,当然,两种方案可以结合使用。
不过,最后还是要吐槽一下,确实在某些情况下,keep-alive的缓存机制很好用,但是它却不能手动的进行释放内存资源,很难想象作者为什么一直不提供一个手动清理的入口,而且确实很多开发者都在吐槽这一点,希望作者多听听大众的声音吧。

 浙公网安备 33010602011771号