帝国CMS的总结
已完成的成品网站,完全自己的作品:
http://www.bofanchem.com/
建模型的话在系统-》数据表与系统模型-》管理数据表-》里面建模型即可。
在新建模型时有特殊属性选项需要打钩,不打钩的话后台发布信息时需要进行审核。
HTML中的单选按钮实现男女性别选择,不让男女同是都能选择,实现方法:在按钮的属性里写一个name属性,并且把name的值设置成相同的
例:<input id="man" type="radio" checked="checked" name="1" />男<input id="woman" type="radio" name="1"/>女
修改网站留言板的地方:
后台-》插件-》信息反馈管理-》管理反馈分类-》修改-》
录入表单模板 <script>location.href='/lxwm/';</script> (点击提交后网页跳转到的页面)
要想到后台点开查看信息,需要把标题的字段打钩。模板里面多写一句 <input name='title' type='hidden' value='联系我们'> 这样到后台点击联系我们查看信息就可以了。
<form class="fl c_c" name='feedback' method='post' enctype='multipart/form-data' action='/e/enews/index.php'>
      <input name='title' type='hidden' value='联系我们'>
      <input name='enews' type='hidden' value='AddFeedback'>
      <input name='bid' type='hidden' value='1'>
      <input type="text" placeholder="姓名" name='name' class="fl a_xm">

      <div class="b_p">
           <div class="fl c_a">性别</div>
           <div class="fr c_b">
                <input id="man" name="xb" type="radio" value="男 女" checked="checked" name="1" />
                <span style="margin-left: 10px;">男</span>
                <input name="xb" type="radio" value="男 女" name="1" />
                <span style="margin-left: 10px;">女</span>
           </div>
      </div>

      <input type="text" placeholder="手机号码" class="fl a_xm" name='mycall' value=''>
      <input type="text" placeholder="邮箱" name='email' value='' class="fl a_xm c_d">
      <textarea name='saytext' class="c_e" placeholder="留言内容"></textarea>
      <input type="submit" name='submit' value='提交' />
</form>
每个页面的开始:
<!DOCTYPE html>
<html>
    <head>
        <meta charset="UTF-8">
        <title>[!--pagetitle--]</title>
        <meta name="keywords" content="[!--pagekey--]" />
        <meta name="description" content="[!--pagedes--]" />

        <link href="/css/css.css" rel="stylesheet" type="text/css" />
        <script src="/js/jquery1.42.min.js"></script>
        <script src="/js/jquery.SuperSlide.2.1.1.js"></script>
    </head>
[!--pagetitle--]
[!--pagekey--]
[!--pagedes--]
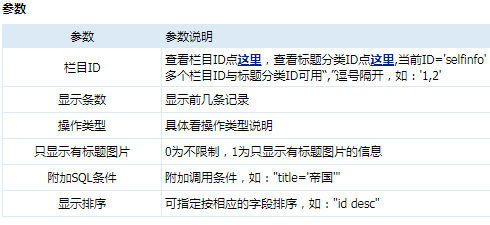
遍历循环内容: 用灵动标签循环首页的内容
[e:loop={栏目ID,显示条数,操作类型,只显示有标题图片,附加SQL条件,显示排序}]
模板代码内容
[/e:loop]
    [e:loop={1,2,0,0,'',''}]
            <div class="xwzx_nr fl">
                <div class="xw_imgtext_box">
                    <div class="xwzx_img fl"><a href="<?=$bqsr[titleurl]?>"><img src="<?=$bqr[titlepic]?>" /></a></div>
                    <div class="xwzx_text fr">
                        <div class="xw_data">
                            <div class="xw_data_year"><?=date('Y-m-d',$bqr[newstime])?></div>
                            <div class="xw_data_day"><?=date('Y-m-d',$bqr[newstime])?></div>
                        </div>
                        <div class="xw_text"><a href="<?=$bqsr[titleurl]?>"><?=$bqr[title]?></a></div>
                        <a href="<?=$bqsr[titleurl]?>"><div class="xw_ljxq">了解详情<span>→</span></div></a>
                    </div>
                    <div class="clear"></div>
                </div>
            </div>
    [/e:loop]


简介内容的调用:    <?=$bqr[smalltext]?>
调用头部: [!--temp.header--]
调用底部: [!--temp.footer--]
循环二级栏目名称时: (光循环二级导航栏目的时候使用标签模板)
在循环要显示二级栏目的地方写下面这句
[showclasstemp]3,13,0,0[/showclasstemp] //[showclasstemp]父栏目ID,标签模板ID,是否显示栏目信息数,显示栏目数[/showclasstemp]
保存内容模板后需要再用到标签模板。
13也就是标签模板对应的是下面这块
再增加一个标签模板。
[!--empirenews.listtemp--]
<!--list.var1-->
[!--empirenews.listtemp--]
下面写循环每一个的:
<a class="mb_nav fl" href="[!--classurl--]">[!--classname--]</a>
面包屑(当前位置)只需要写一句代码即可:
[!--newsnav--]
列表页
列表页遍历:
<div class="right_text">

   <p>公司通过立足科学发展,创新发展理念、转变发展方式,走专业化、集约化、精细化、信息化的道路,大力推进技术创新和循环经济,持续推动节能减排,为公司可持续健康发展提供有力保障。</p>


   [!--empirenews.listtemp--]<!--list.var1-->[!--empirenews.listtemp--]


   <div class="pagepage"><div class="epages" style="text-align: center;">[!--show.listpage--]</div></div>

</div>
下面的方框写:
<div class="list_cpa fl">
     <a class="cp_img fl" href="[!--titleurl--]"><img src="[!--titlepic--]" /></a>
     <div class="cp_jja fl">
          <a class="cp_tita" href="[!--titleurl--]">[!--title--]</a>
          <div class="cp_js">[!--smalltext--]</div>
     </div>
     <div class="clear"></div>
</div>
列表页获取当前栏目名称:
[!--class.name--]
内容页调用标题:
[!--title--]
内容页调用内容:
[!--newstext--]
建立page单页面的步骤:
信息-》该栏目-》添加信息-》修改-》选项设置-》文件名-》index-》
栏目-》该栏目-》修改-》生成选项-》不生成栏目页 此时该栏目单页面的模板对应的就是内容模板。
列表内容循环遍历的变量名称:
|
碎片标签模板变量说明
|
|
|
静态碎片
|
模板标签变量说明:[!--the.spname--]:碎片名称,[!--the.spid--]:碎片ID,[!--the.sppic--]:碎片效果图,[!--the.spsay--]:碎片描述
list.var模板标签: |
|
动态碎片
|
模板标签变量说明:[!--the.spname--]:碎片名称,[!--the.spid--]:碎片ID,[!--the.sppic--]:碎片效果图,[!--the.spsay--]:碎片描述
list.var模板标签: |
|
代码碎片
|
无需标签模板,直接显示代码内容 |
调用列表内容的分页:
<style type="text/css">
    .epages {text-align:center;margin-bottom:20px;margin-top:20px;}
    .epages a{display:inline-block;line-height:26px;padding:0 10px;border:1px solid #dedee0;color:#6a6a6a;margin:0 3px;}
    .epages b{display:inline-block;line-height:26px;width:26px;background-color:#348aea;color:#fff;}
    .epages a b{color:#ccc;background-color:#fff}
</style>

<div class="pagepage"><div class="epages" style="text-align: center;">[!--show.listpage--]</div></div>
加高亮,二级栏目加个特殊标记:
给列表页加:
标签模板:
<li><a href="[!--classurl--]" data-curr="[!--classid--]">[!--classname--]</a></li>


html中:
<script type="text/javascript" src="/js/jquery.js"></script>
<script type="text/javascript" src="/js/jquery.SuperSlide.2.1.1.js" ></script>
<script type="text/javascript">
     $(".mb_nav[data-curr=[!--self.classid--]]").addClass("first");
</script>
给首页导航栏目加:
头部区域:
<!--头部开始-->
        <div class="header_box w">
            <div class="a_logo fl"><img src="/img/img_01.jpg" /></div>
            <div class="fr">
                <div class="a_ssbox">
                    <a class="a_yw" href="">English</a>
                    <form name="" method="post" action="/e/search/index.php">
                        <input name="keyboard" type="text" placeholder="搜索内容"  class="a_input" />
                        <input type="hidden" name="classid" value="0">
                        <input type="hidden" name="show" value="title,newstext">
                        <input type="submit" class="a_img" name="Submit1" align="absmiddle">
                    </form>
                    <div class="clear"></div>
                </div>
                <div class="yiji_box">
                    <a class="yiji fl" href="/" data-curr="0">首页</a>
                    <a class="yiji fl" href="/guanyubofan"  data-curr="1" >关于博凡</a>
                    <a class="yiji fl" href="/xinwenzhongxin"  data-curr="2">新闻中心</a>
                    <a class="yiji fl" href="/chanpinzhongxin"  data-curr="3">产品中心</a>
                    <a class="yiji fl" href="/wuliucangchu"  data-curr="4">物流仓储</a>
                    <a class="yiji fl" href="/jiaruwomen"  data-curr="5">加入我们</a>
                    <a class="yiji fl" href="/lianxiwomen"  data-curr="6">联系我们</a>
                </div>
            </div>
        </div>
        <!--头部结束-->
data-curr="4"后面直接加数字,数字是它们栏目id号。


在页面底部公共区域加上:
<script type="text/javascript">
     $(".yiji[data-curr=[!--self.classid--]]").addClass("first");
</script>
即可。
给好几个单页面加:
标签模板:
[e:loop={1,99,0,0,'','id asc'}]
<li><a href="<?=$bqsr[titleurl]?>" data-curr="<?=$bqr['id']?>"><?=$bqr[title]?></a></li>
[/e:loop]

html中:
<script type="text/javascript" src="/js/jquery.js"></script>
<script type="text/javascript" src="/js/jquery.SuperSlide.2.1.1.js" ></script>
<script type="text/javascript">
    $(".mb_nav[data-curr=[!--id--]]").addClass("first");
</script>
帝国的表单调用:
前端登录页面内容
用一句js语句来实现连接后台登录内容。
<div class="tj_form_box fl">

   <script src="/e/member/login/loginjs.php"></script>

</div>
再到后台-》公共模板-》JS调用登录模板
模板格式:登陆前显示内容[!--empirenews.template--]登陆后显示内容
<div class="bd_dl fl">用户登录</div> <div class="bd_img fr"><img src="img/bd_img01.jpg" /></div> <div class="clear"></div> <form name="login" method="post" action="/e/member/doaction.php"> <input type="hidden" name="enews" value="login"> <input type="hidden" name="ecmsfrom" value="9"> <div class="bd_yhmtext">用户名</div> <input class="bd_yhm" name="username" type="text" /> <div class="bd_yhmtext bd_mm">密码</div> <input class="bd_yhm" name="password" type="password" /> <input type="submit" type="hidden" name="Submit" value="" class="bd_andl"/> <a class="bd_andl bd_anzc" href="/e/member/register/index.php?tobind=0&groupid=1" target="_blank"><img src="img/bd_img03.jpg" /></a> </form> [!--empirenews.template--]
<p class="t4"> >> <font color=red><b>[!--username--]</b></font></p>
<p class="t5"><a href="[!--news.url--]e/member/cp/" target="_parent">【个人中心】</a></p>
<p class="t5"><a href="[!--news.url--]e/member/doaction.php?enews=exit&ecmsfrom=9" onclick="return confirm('确认要退出?');"> 退出</a></p>
给单页面加地图功能:
<div class="right_text">

   [!--newstext--]

   <div style="width:99%;height:350px;border:#ccc solid 1px;font-size:12px;margin-top: 30px;" id="map"></div>
</div>
在加js:
<script type="text/javascript" src="http://api.map.baidu.com/api?v=2.0&ak=HXlss9ho8CHdZX20wMw1o2G7lAL0qeo3"></script>
<script type="text/javascript">
    //创建和初始化地图函数:
    function initMap(){
      createMap();//创建地图
      setMapEvent();//设置地图事件
      addMapControl();//向地图添加控件
      addMapOverlay();//向地图添加覆盖物
    }
    function createMap(){
      map = new BMap.Map("map");
      map.centerAndZoom(new BMap.Point(118.063257,36.847326),13);
    }
    function setMapEvent(){
      map.enableScrollWheelZoom();
      map.enableKeyboard();
      map.enableDragging();
      map.enableDoubleClickZoom()
    }
    function addClickHandler(target,window){
      target.addEventListener("click",function(){
        target.openInfoWindow(window);
      });
    }
    function addMapOverlay(){
      var markers = [
        {content:"",title:"淄博博凡化工有限公司",imageOffset: {width:0,height:3},position:{lat:36.847326,lng:118.063257}}
      ];
      for(var index = 0; index < markers.length; index++ ){
        var point = new BMap.Point(markers[index].position.lng,markers[index].position.lat);
        var marker = new BMap.Marker(point,{icon:new BMap.Icon("http://api.map.baidu.com/lbsapi/createmap/images/icon.png",new BMap.Size(20,25),{
          imageOffset: new BMap.Size(markers[index].imageOffset.width,markers[index].imageOffset.height)
        })});
        var label = new BMap.Label(markers[index].title,{offset: new BMap.Size(25,5)});
        var opts = {
          width: 200,
          title: markers[index].title,
          enableMessage: false
        };
        var infoWindow = new BMap.InfoWindow(markers[index].content,opts);
        marker.setLabel(label);
        addClickHandler(marker,infoWindow);
        map.addOverlay(marker);
      };
    }
    //向地图添加控件
    function addMapControl(){
      var scaleControl = new BMap.ScaleControl({anchor:BMAP_ANCHOR_BOTTOM_LEFT});
      scaleControl.setUnit(BMAP_UNIT_IMPERIAL);
      map.addControl(scaleControl);
      var navControl = new BMap.NavigationControl({anchor:BMAP_ANCHOR_TOP_LEFT,type:BMAP_NAVIGATION_CONTROL_LARGE});
      map.addControl(navControl);
      var overviewControl = new BMap.OverviewMapControl({anchor:BMAP_ANCHOR_BOTTOM_RIGHT,isOpen:true});
      map.addControl(overviewControl);
    }
    var map;
      initMap();
  </script>
单页面里面加上以上两个即可。
英文网页替换上一页下一页为英文:
在每个有分页的地方加上这段话即可。
<?php
$GLOBALS['fun_r'][nextpage]="NEXT";
$GLOBALS['fun_r'][pripage]="PREV";
$GLOBALS['fun_r'][startpage]="FIRST";
$GLOBALS['fun_r'][lastpage]="LAST";

$GLOBALS['fun_r'][index]='Home';
?>
用帝国CMS写英文版网站的步骤:
1.直接在已经写好的中文版的后台新建栏目ENGLISH。
2.给ENGLISH设置个封面模板,内容复制中文首页模板的。
3.这时候ENGLISH就相当于是英文版网站的首页。
4.出现403错误是因为访问的栏目下没有index文件,此时只存在栏目目录文件夹。
5.然后挨个复制中文的各个栏目,更换他们的模板里的文字,替换成英文的即可。
给手机版网页的列表页添加分页功能:
找到路径phone/e/class/connect.php 搜 “前台模板”。
//前台分页 function page1($num,$line,$page_line,$start,$page,$search){ global $fun_r; $num=(int)$num; $line=(int)$line; $page_line=(int)$page_line; $start=(int)$start; $page=(int)$page; if($num<=$line) { return ''; } $search=RepPostStr($search,1); $url=eReturnSelfPage(0).'?page'; $snum=2;//最小页数 $totalpage=ceil($num/$line);//取得总页数 $firststr='<a title="'.$fun_r['trecord'].'"> <b>'.$num.'</b> </a> '; //上一页 if($page<>0) { $toppage='<a href="'.$url.'=0'.$search.'">'.$fun_r['startpage'].'</a> '; $pagepr=$page-1; //$prepage='<a href="'.$url.'='.$pagepr.$search.'">'.$fun_r['pripage'].'</a>'; $prepage='<li><a href="'.$url.'='.$pagepr.$search.'">'.$fun_r['pripage'].'</a></li>'; } //下一页 if($page!=$totalpage-1) { $pagenex=$page+1; //$nextpage=' <a href="'.$url.'='.$pagenex.$search.'">'.$fun_r['nextpage'].'</a>'; $nextpage=' <li><a href="'.$url.'='.$pagenex.$search.'">'.$fun_r['nextpage'].'</a></li>'; $lastpage=' <a href="'.$url.'='.($totalpage-1).$search.'">'.$fun_r['lastpage'].'</a>'; } $starti=$page-$snum<0?0:$page-$snum; $no=0; for($i=$starti;$i<$totalpage&&$no<$page_line;$i++) { $no++; if($page==$i) { $is_1="<b>"; $is_2="</b>"; } else { $is_1='<a href="'.$url.'='.$i.$search.'">'; $is_2="</a>"; } $pagenum=$i+1; $returnstr.=" ".$is_1.$pagenum.$is_2; } //$returnstr=$firststr.$toppage.$prepage.$returnstr.$nextpage.$lastpage; $returnstr=$prepage.$nextpage; return $returnstr; } //---------- 伪静态 ----------
修改输出结果 和输出分页的样式将它改为bootstrap的样式即可。
后台备份数据库文件会到的位置:
根目录下e/admin/ebak/bdata 一个文件夹名
帝国相关调用参考:
https://www.cnblogs.com/dream-w/p/4806458.html
帝国CMS关于自定义页面的说明:
http://www.moke8.com/article-9055-1.html
写完前端后开始套后台:
访问路径首页/e/install,这里可能会要求删除 install.off 文件。删除后再来访问首页/e/install
访问后进入的页面相当于新建数据库界面,新建数据库就可。
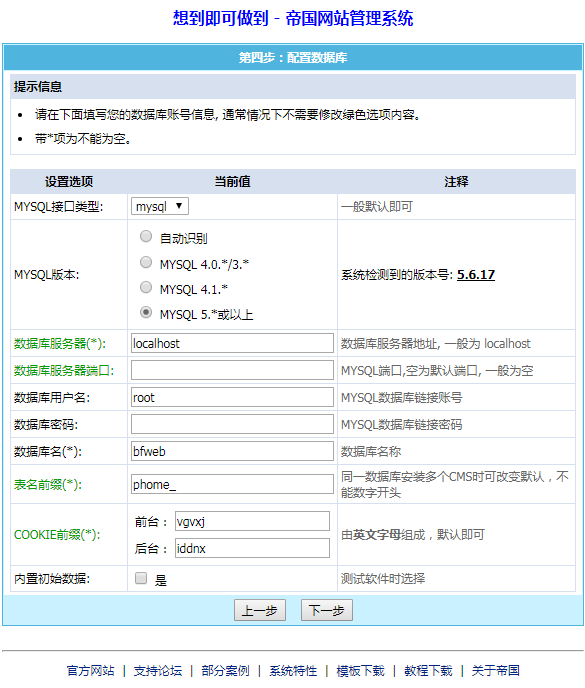
等到套完了之后去到phpmyadmin页面将新建的bfweb数据库里的表导出出来就可以了。
套后台时给一级栏目设置只添加单页面显示:
1. 设置栏目中-》生成选项-》不生成栏目页打√
2.信息-》本栏目-》要显示的文章-》修改-》选项设置-》文件名改成 / index
还可以在管理信息-》修改中-》单独选用一个模板显示。
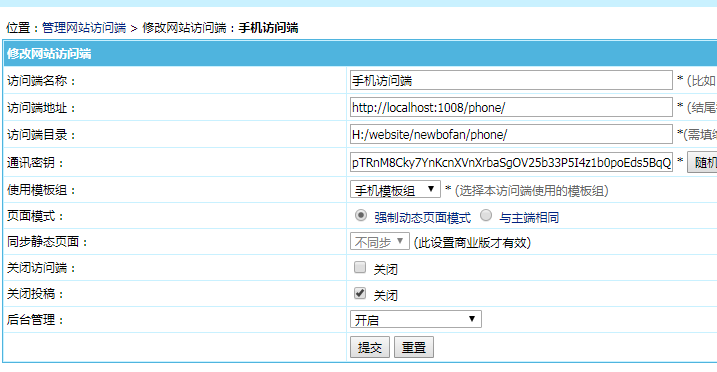
帝国cms建手机端的方法:
http://bbs.phome.net/ShowThread/?threadid=329096&forumid=13
五、到主访问端后台新增“网站访问端”
动图片:
给img的父级元素加上overflow: hidden;
给img加属性:
.d_cpimg img{
    -webkit-transition-duration:0.7s;
    -moz-transition-duration:0.7s;
    -ms-transition-duration:0.7s;
    transition-duration:0.7s;
}

.d_cpimg:hover img{
    transform: scale(1.2);
}
wamp配置多端口,多站点:
wamp/bin/apache/apache2.4.9/conf/httpd.conf
ServerRoot "c:/wamp/bin/apache/apache2.4.9"

Define APACHE24 Apache2.4

#
# Mutex: Allows you to set the mutex mechanism and mutex file directory
# for individual mutexes, or change the global defaults
#
# Uncomment and change the directory if mutexes are file-based and the default
# mutex file directory is not on a local disk or is not appropriate for some
# other reason.
#
# Mutex default:logs

#
# Listen: Allows you to bind Apache to specific IP addresses and/or
# ports, instead of the default. See also the <VirtualHost>
# directive.
#
# Change this to Listen on specific IP addresses as shown below to
# prevent Apache from glomming onto all bound IP addresses.
#
#Listen 12.34.56.78:80
Listen 0.0.0.0:80
Listen [::0]:80


Listen 0.0.0.0:1001
Listen 0.0.0.0:1002
Listen 0.0.0.0:1003
设置听端口 1003
再找还是本文件内的:
<IfModule cgid_module>
    #
    # ScriptSock: On threaded servers, designate the path to the UNIX
    # socket used to communicate with the CGI daemon of mod_cgid.
    #
    #Scriptsock cgisock
</IfModule>

#
# "c:/wamp/bin/apache/apache2.4.9/cgi-bin" should be changed to whatever your ScriptAliased
# CGI directory exists, if you have that configured.
#
<Directory "c:/wamp/bin/apache/apache2.4.9/cgi-bin">
    AllowOverride None
    Options None
    Require all granted
</Directory>


<Directory "h:/website/gaoriguangfu">
Options Indexes FollowSymLinks
AllowOverride all
Order Allow,Deny
Allow from all
</Directory>


<Directory "h:/website/2018pannan">
Options Indexes FollowSymLinks
AllowOverride all
Order Allow,Deny
Allow from all
</Directory>


<IfModule mime_module>
    #
    # TypesConfig points to the file containing the list of mappings from
    # filename extension to MIME-type.
    #
    TypesConfig conf/mime.types
添加个网站的名称:
然后再找到文件:
wamp/bin/apache/apache2.4.9/conf/extra/httpd-vhosts.conf
在 httpd-vhosts.conf 文件的最后加上新网站名称。
<VirtualHost *:1001>
    DocumentRoot h:/website/gaoriguangfu
    ServerName gaoriguangfu
    <Directory "h:/website/gaoriguangfu">
            Options Indexes FollowSymLinks
            AllowOverride all
            Order allow,deny
            Allow from all
    </Directory>
</VirtualHost>


<VirtualHost *:1002>
    DocumentRoot h:/website/sunwenxiao
    ServerName sunwenxiao
    <Directory "h:/website/sunwenxiao">
            Options Indexes FollowSymLinks
            AllowOverride all
            Order allow,deny
            Allow from all
    </Directory>
</VirtualHost>

<VirtualHost *:1003>
    DocumentRoot h:/website/2018pannan
    ServerName 2018pannan
    <Directory "h:/website/2018pannan">
            Options Indexes FollowSymLinks
            AllowOverride all
            Order allow,deny
            Allow from all
    </Directory>
</VirtualHost>
重启wamp环境 这样就实现了多端口 多站点访问网站。
输入域名后可查询每个网站的备案号:
http://seo.chinaz.com/
一键生成表格的编辑器:
http://kindeditor.net/demo.php

 浙公网安备 33010602011771号