

freemaker 优缺点 及 应用配置
通俗的讲,freemaker其实就是一个模板引擎。什么意思呢?——Java可以基于依赖库,然后在模板上进行数据更改(显示)。
在模板中,您专注于如何呈现数据,而在模板外(后台业务代码),您将专注于呈现什么数据。
但是,对于使用freemarker的过程中所体现出来的优缺点,主要做下总结。具体如下:
优点:
3.1、动态页面静态化的优点
a) 利于搜索引擎优化(SEO)
b) 减轻服务器压力
c) 提高了网站的安全性
d) 加快了客户端的访问速度
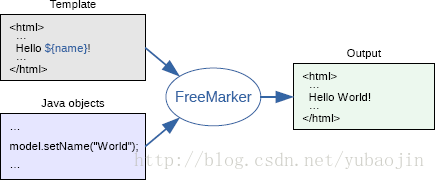
可以彻底的分离表现层和业务逻辑。在过去的一段时间里,freemarker还是表现出来来一些优势。在早期使用JSP开发过程中发现在页面中大量的存在业务逻辑的代码,使得页面内容凌乱,在后期大量的修改维护过程中就变得非常困难。 FreeMarker根本不支持Java脚本代码。 FreeMarker的原理就是:模板+数据模型=输出,模板只负责数据在页面中的表现,不涉及任何的逻辑代码,而所有的逻辑都是由数据模型来处理的。用户最终看到的输出是模板和数据模型合并后创建的。
可以提高开发效率。JSP在第一次执行的时候需要转换成Servlet类,开发阶段进行功能调适时,需要频繁的修改JSP,每次修改都要编译和转换,那么试想一天中我们浪费在程序编译的时间有多少。相对于JSP来说,FreeMarker模板技术不存在编译和转换的问题,所以就不会存在上述问题。而且开发过程中,大家在不必在等待界面设计开发人员完成页面原形后,大家再来开发程序。
使得开发过程中的人员分工更加明确。这个相必大家都比较熟悉,各司其职,不再赘述。
缺点:
数据更新不及时。应用FreeMarker模板技术,在修改模板后,可能会看到已经过期的数据。如:生成静态的HTML页面后,如果一旦模板改变,而没有及时更新模板生成的HTML页面的话,用户看到的就是过期的数据。
FreeMarker模板技术在应用过程中,FreeMarker中的变量必须要赋值,如果不赋值,那么就会抛出异常。想避免错误就要应用if/elseif/else指令进行判段,如果对每一个变量都判断的话,那么则反而增加了编程的麻烦。
FreeMarker的map限定key必须是string,其他数据类型无法操作。
FreeMarker不支持集群应用。为了编成的方便性,把序列化的东西都放到了Session中,如Session,request等,在开发的过程中确实方便,但如果将应用放到集群中,就会出现错误。
什么是freemarker
FreeMarker是一个用Java语言编写的模板引擎,它基于模板来生成文本输出。FreeMarker与Web容器无关,即在Web运行时,它并不知道Servlet或HTTP。它不仅可以用作表现层的实现技术,而且还可以用于生成XML,JSP或Java 等。
目前企业中:主要用Freemarker做静态页面或是页面展示
2.Freemarker的使用方法
把freemarker的jar包添加到工程中。
2.1Maven工程添加依赖
<dependency>
  <groupId>org.freemarker</groupId>
  <artifactId>freemarker</artifactId>
  <version>2.3.23</version>
</dependency>- 1
- 2
- 3
- 4
- 5
2.2非maven工程加入相应jar包到build path中
2.3原理:![这里写图片描述]()
3.使用步骤:
第一步:创建一个Configuration对象,直接new一个对象。构造方法的参数就是freemarker对于的版本号。
第二步:设置模板文件所在的路径。
第三步:设置模板文件使用的字符集。一般就是utf-8.
第四步:加载一个模板,创建一个模板对象。
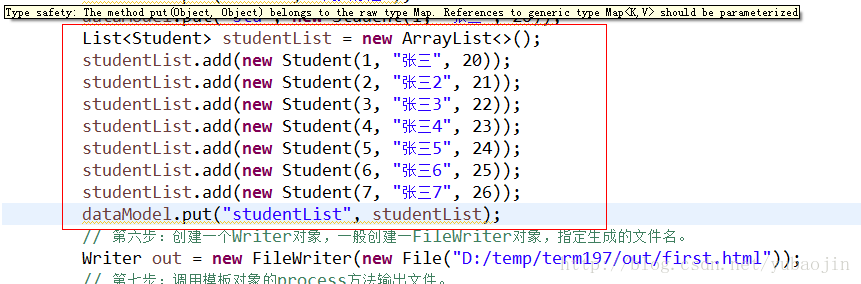
第五步:创建一个模板使用的数据集,可以是pojo也可以是map。一般是Map。
第六步:创建一个Writer对象,一般创建一FileWriter对象,指定生成的文件名。
第七步:调用模板对象的process方法输出文件。
第八步:关闭流。
3.1模板:
放在WEN-INF/ftl/hello.ftl文件中: ${hello}
3.2实现代码
    @org.junit.Test
    public void test() throws IOException, TemplateException {
        // 第一步:创建一个Configuration对象,直接new一个对象。构造方法的参数就是freemarker对于的版本号。
        Configuration configuration = new Configuration(Configuration.getVersion());
        // 第二步:设置模板文件所在的路径。
        configuration.setDirectoryForTemplateLoading(
                new File("D:\\Java\\Eclipse\\workspace_Test\\FreeMarker\\src\\main\\webapp\\WEB-INF\\ftl"));
        // 第三步:设置模板文件使用的字符集。一般就是utf-8.
        configuration.setDefaultEncoding("utf-8");
        // 第四步:加载一个模板,创建一个模板对象。
        Template template = configuration.getTemplate("hello.ftl");
        // 第五步:创建一个模板使用的数据集,可以是pojo也可以是map。一般是Map。
        Map dataModel = new HashMap();
        // 向数据集中添加数据
        dataModel.put("hello", "this is my first freemarker test.");
        // 第六步:创建一个Writer对象,一般创建一FileWriter对象,指定生成的文件名。
        Writer out = new FileWriter(new File("D:\\Java\\Eclipse\\workspace_Test\\FreeMarker\\out\\hello.html"));
        // 第七步:调用模板对象的process方法输出文件。
        template.process(dataModel, out);
        // 第八步:关闭流。
        out.close();
}- 1
- 2
- 3
- 4
- 5
- 6
- 7
- 8
- 9
- 10
- 11
- 12
- 13
- 14
- 15
- 16
- 17
- 18
- 19
- 20
- 21
- 22
4.模板的语法
4.1访问map中的key
${key}
4.2访问pojo中的属性
Student对象。学号、姓名、年龄
${key.property} 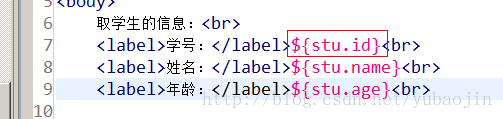
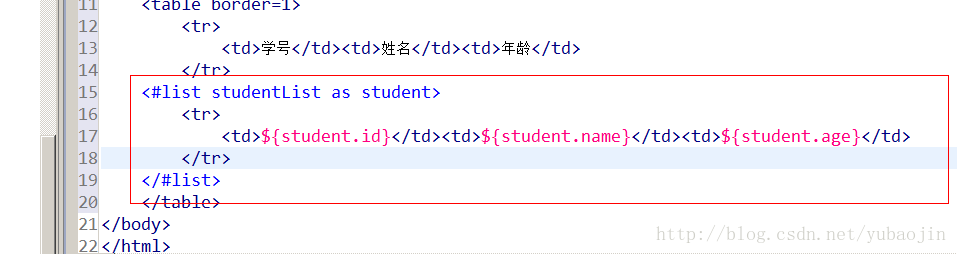
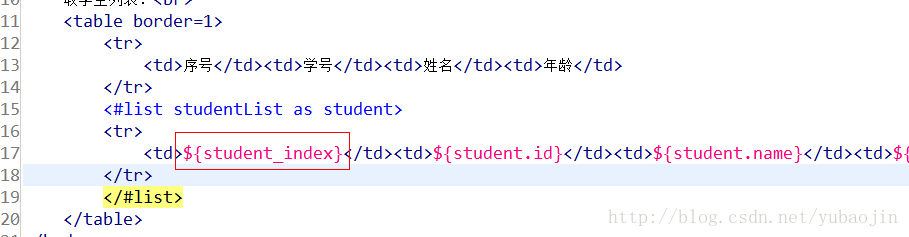
4.3取集合中的数据
循环使用格式:
<#list 要循环的数据 as 循环后的数据>
</#list>- 1
- 2
如:
<#list studentList as student>
${student.id}/${studnet.name}
</#list>- 1
- 2
- 3
4.4取循环中的下标
<#list studentList as student>
    ${student_index}
</#list>- 1
- 2
- 3
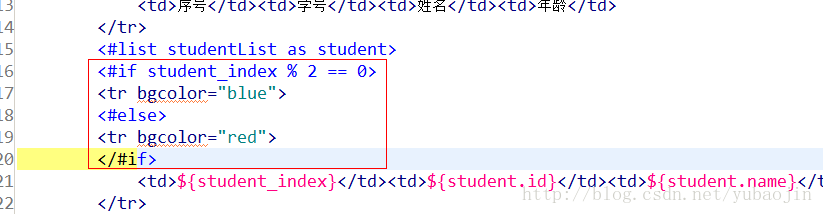
4.5判断
<#if student_index % 2 == 0>
<#else>
</#if>- 1
- 2
- 3
4.6日期类型格式化
直接取值:${date}(date是属性名)如果传来的是一个Date型数据会报错
${date?date} //2016-9-13
${date?time} //17:53:55
${date?datetime} //2016-9-13 17:53:55- 1
- 2
- 3
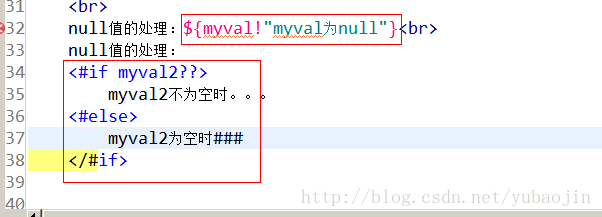
4.7Null值的处理
如果直接取一个不存在的值(值为null)时会报异常 ${aaa}
处理: aaa!”默认值”或者aaa!”默认值”或者{aaa! }代表空字符串
4.8Include标签
<#include “模板名称”> //(相当于jstl中的包含)- 1

5.Freemarker整合spring
5.1引入jar包:
Freemarker的jar包
Spring web mvc 的jar包
Sping context supportjar 包
<project xmlns="http://maven.apache.org/POM/4.0.0" xmlns:xsi="http://www.w3.org/2001/XMLSchema-instance"
    xsi:schemaLocation="http://maven.apache.org/POM/4.0.0 http://maven.apache.org/xsd/maven-4.0.0.xsd">
    <modelVersion>4.0.0</modelVersion>
    <groupId>top.yubaojin</groupId>
    <artifactId>FreeMarker</artifactId>
    <version>0.0.1-SNAPSHOT</version>
    <packaging>war</packaging>

    <dependencies>
        <!-- https://mvnrepository.com/artifact/org.springframework/spring-context-support -->
        <dependency>
            <groupId>org.springframework</groupId>
            <artifactId>spring-context-support</artifactId>
            <version>4.3.13.RELEASE</version>
        </dependency>

        <!-- https://mvnrepository.com/artifact/org.springframework/spring-webmvc -->
        <dependency>
            <groupId>org.springframework</groupId>
            <artifactId>spring-webmvc</artifactId>
            <version>4.3.13.RELEASE</version>
        </dependency>

        <!-- https://mvnrepository.com/artifact/org.freemarker/freemarker -->
        <dependency>
            <groupId>org.freemarker</groupId>
            <artifactId>freemarker</artifactId>
            <version>2.3.23</version>
        </dependency>
    </dependencies>
    <build>
        <plugins>
            <plugin>
                <groupId>org.apache.tomcat.maven</groupId>
                <artifactId>tomcat7-maven-plugin</artifactId>
                <version>2.2</version>
                <configuration>
                    <path>/</path>
                    <port>8080</port>
                </configuration>
            </plugin>
        </plugins>
    </build>
</project>- 1
- 2
- 3
- 4
- 5
- 6
- 7
- 8
- 9
- 10
- 11
- 12
- 13
- 14
- 15
- 16
- 17
- 18
- 19
- 20
- 21
- 22
- 23
- 24
- 25
- 26
- 27
- 28
- 29
- 30
- 31
- 32
- 33
- 34
- 35
- 36
- 37
- 38
- 39
- 40
- 41
- 42
- 43
- 44
5.2创建整合spring的配置文件
<?xml version="1.0" encoding="UTF-8"?>
<beans xmlns="http://www.springframework.org/schema/beans"
    xmlns:xsi="http://www.w3.org/2001/XMLSchema-instance" xmlns:p="http://www.springframework.org/schema/p"
    xmlns:context="http://www.springframework.org/schema/context"
    xmlns:mvc="http://www.springframework.org/schema/mvc"
    xsi:schemaLocation="http://www.springframework.org/schema/beans http://www.springframework.org/schema/beans/spring-beans-4.3.xsd
        http://www.springframework.org/schema/mvc http://www.springframework.org/schema/mvc/spring-mvc-4.3.xsd
        http://www.springframework.org/schema/context http://www.springframework.org/schema/context/spring-context-4.3.xsd">
    <!-- 配置注解驱动 -->
    <mvc:annotation-driven />
    <!-- freemarker整合spring中 -->
    <bean id="freemarkerConfig"
        class="org.springframework.web.servlet.view.freemarker.FreeMarkerConfigurer">
        <property name="templateLoaderPath" value="/WEB-INF/ftl/" />
        <property name="defaultEncoding" value="UTF-8" />
    </bean>
    <!-- 配置包扫描器,扫描@Controller注解的类 -->
    <context:component-scan base-package="top.yubaojin.controller" />
</beans> - 1
- 2
- 3
- 4
- 5
- 6
- 7
- 8
- 9
- 10
- 11
- 12
- 13
- 14
- 15
- 16
- 17
- 18
- 19
5.3web文件
<?xml version="1.0" encoding="UTF-8"?>
<web-app xmlns:xsi="http://www.w3.org/2001/XMLSchema-instance"
    xmlns="http://java.sun.com/xml/ns/javaee"
    xsi:schemaLocation="http://java.sun.com/xml/ns/javaee http://java.sun.com/xml/ns/javaee/web-app_2_5.xsd"
    version="2.5">
    <display-name>FreeMarker</display-name>
    <!-- 前端控制器 -->
    <servlet>
        <servlet-name>freemarker</servlet-name>
        <servlet-class>org.springframework.web.servlet.DispatcherServlet</servlet-class>
        <!-- contextConfigLocation不是必须的, 如果不配置contextConfigLocation, springmvc的配置文件默认在:WEB-INF/servlet的name+"-servlet.xml" -->
        <init-param>
            <param-name>contextConfigLocation</param-name>
            <param-value>classpath:springmvc.xml</param-value>
        </init-param>
        <load-on-startup>1</load-on-startup>
    </servlet>
    <servlet-mapping>
        <servlet-name>freemarker</servlet-name>
        <!-- 拦截所有请求jsp除外 -->
        <url-pattern>/</url-pattern>
    </servlet-mapping>
</web-app>- 1
- 2
- 3
- 4
- 5
- 6
- 7
- 8
- 9
- 10
- 11
- 12
- 13
- 14
- 15
- 16
- 17
- 18
- 19
- 20
- 21
- 22
- 23
5.4编写测试Controller
请求的url:/test
参数:无
返回值:ok (String, 需要使用@ResponseBody)
业务逻辑:
1、从spring容器中获得FreeMarkerConfigurer对象。
2、从FreeMarkerConfigurer对象中获得Configuration对象。
3、使用Configuration对象获得Template对象。
4、创建数据集
5、创建输出文件的Writer对象。
6、调用模板对象的process方法,生成文件。
7、关闭流。
package top.yubaojin.controller;
import java.io.File;
import java.io.FileWriter;
import java.io.IOException;
import java.io.Writer;
import java.util.HashMap;
import java.util.Map;
import org.springframework.beans.factory.annotation.Autowired;
import org.springframework.stereotype.Controller;
import org.springframework.web.bind.annotation.RequestMapping;
import org.springframework.web.bind.annotation.ResponseBody;
import org.springframework.web.servlet.view.freemarker.FreeMarkerConfigurer;
import freemarker.template.Configuration;
import freemarker.template.Template;
import freemarker.template.TemplateException;
@Controller
public class FreeMarkerController {
@Autowired
private FreeMarkerConfigurer freeMarkerConfigurer;
@RequestMapping("/test")
@ResponseBody
public String test() throws IOException, TemplateException {
// 1、从spring容器中获得FreeMarkerConfigurer对象。
// 2、从FreeMarkerConfigurer对象中获得Configuration对象。
Configuration configuration = freeMarkerConfigurer.getConfiguration();
// 3、使用Configuration对象获得Template对象。
Template template = configuration
.getTemplate("hello.ftl");
// 4、创建数据集
Map dataModel = new HashMap();
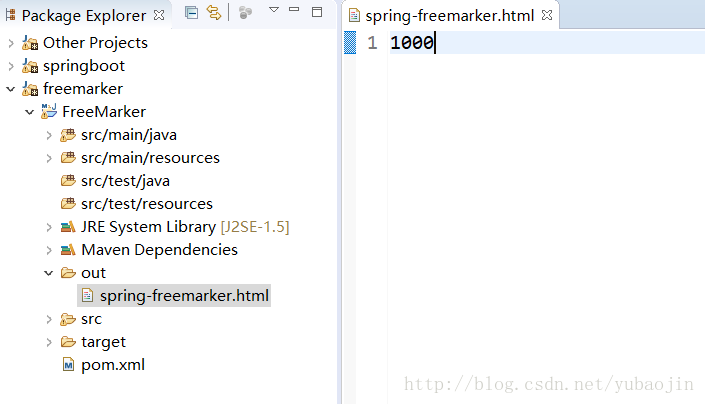
dataModel.put("hello", "1000");
// 5、创建输出文件的Writer对象。
//需要手动在D:/Java/Eclipse/workspace_Test/FreeMarker/下创建out目录
File file = new File("D:/Java/Eclipse/workspace_Test/FreeMarker/out/spring-freemarker.html");
/* if(!file.exists()) {
file.createNewFile();
}*/
Writer out = new FileWriter(file);
// 6、调用模板对象的process方法,生成文件。
template.process(dataModel, out);
// 7、关闭流。
out.close();
return "OK";
}
}- 1
- 2
- 3
- 4
- 5
- 6
- 7
- 8
- 9
- 10
- 11
- 12
- 13
- 14
- 15
- 16
- 17
- 18
- 19
- 20
- 21
- 22
- 23
- 24
- 25
- 26
- 27
- 28
- 29
- 30
- 31
- 32
- 33
- 34
- 35
- 36
- 37
- 38
- 39
- 40
- 41
- 42
- 43
- 44
- 45
- 46
- 47
- 48
- 49
- 50
- 51
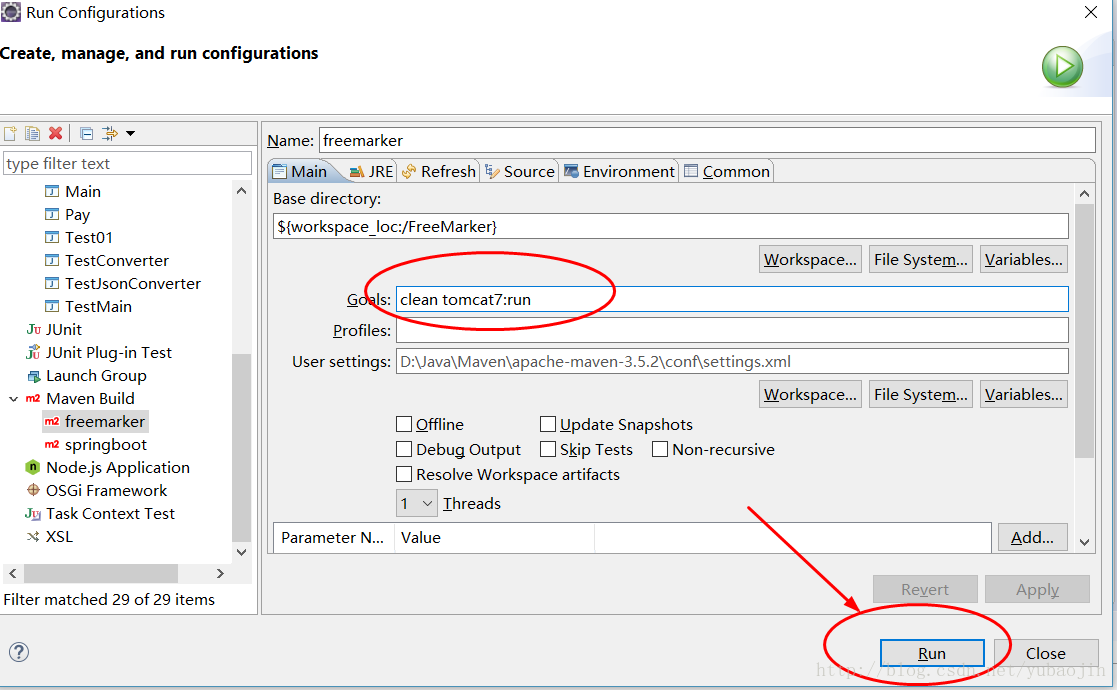
6.测试
6.1配置Tomcat插件运行maven build
6.2浏览器请求测试

结果:

6.3查看结果
7.网页静态化方案
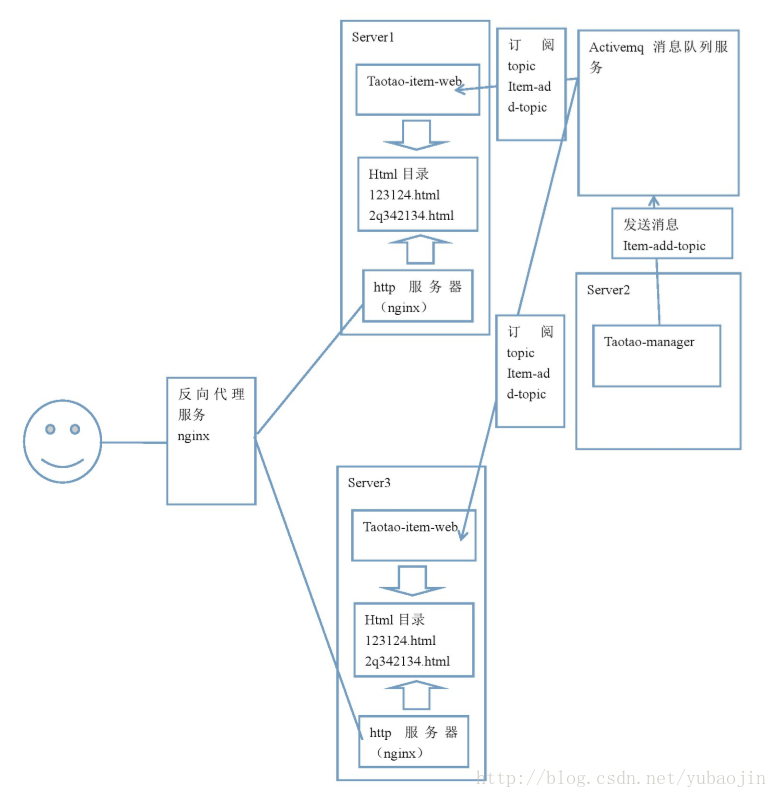
输出文件的名称:商品id+“.html”
输出文件的路径:工程外部的任意目录。
网页访问:使用nginx访问网页。在此方案下tomcat只有一个作用就是生成静态页面。
工程部署:可以把taotao-item-web部署到多个服务器上。
生成静态页面的时机:商品添加后,生成静态页面。可以使用Activemq,订阅topic(商品添加)

 浙公网安备 33010602011771号