

Zabbix
一 概述
zabbix 是一个基于WEB界面的提供分布式系统监视以及网络监视功能的企业级的开源解决方案 ( 基于 GPL V2 )
zabbix由 2 部分构成,zabbix server与可选组件zabbix agent
二 工作架构
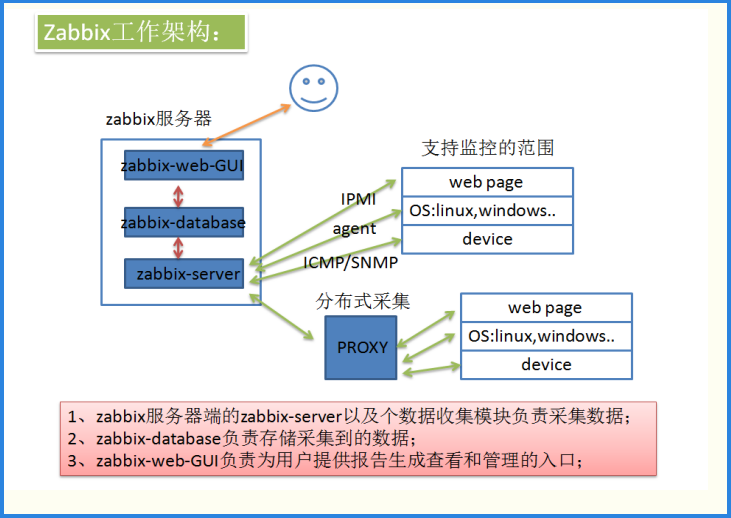
三 Zabbix 进程构成
构成 - 1
zabbix 安装完成后会产生 5 个程序:
  zabbix_agentd、zabbix_get、zabbix_proxy、zabbix_sender、zabbix_server,zabbix_java_gateway是可选,这个需要另外安装

zabbix_agentd:
  客户端守护进程,此进程收集客户端数据,例如 cpu负载、内存、硬盘使用情况等
zabbix_get:
  zabbix 工具,单独使用的命令,通常用于排错
zabbix_sender:
  zabbix工具,用于发送数据给 server 或者 proxy ,在脚本完成之后使用 sender 主动将数据提交
zabbix_server:
  zabbix 服务端守护进程,所有的数据都是被提交或主动提交到  zabbix_server 端
构成 - 2
zabbix_proxy:
  zabbix代理守护进程。功能类似server,唯一不同的是它只是一个中转站,它需要把收集到的数据提交/被提交到server里
zabbix_java_gateway:
  zabbix2.0之后引入的一个功能。顾名思义:Java网关,类似agentd,但是只用于Java方面。需要特别注意的是,它只能主动去获取数据,而不能被动获取数据。它的数据最终会给到server或者proxy
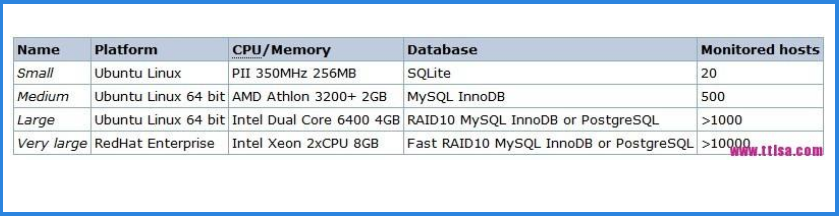
四 Zabbix 硬件需求
五 监控Linux
一、初始化系统设置
    systemctl stop firewalld
    systemctl disable firewalld
    setenforce 0
    sed -i "s/SELINUX=enforcing/SELINUX=disabled/g" /etc/selinux/config


yum -y install iptables-services


二、安装 LAMP 环境
    wget http://mirrors.163.com/.help/CentOS7-Base-163.repo
    yum clean all
    yum makecache   #服务器的包信息下载到本地缓存起来
    yum -y install mariadb mariadb-server httpd php php-mysql


   systemctl start httpd
    systemctl enable httpd
  systemctl start mariadb
    systemctl enable mariadb

    mysql_secure_installation


三、安装 Zabbix 程序
    rpm -ivh  http://repo.zabbix.com/zabbix/3.2/rhel/7/x86_64/zabbix-release-3.2-1.el7.noarch.rpm
    rpm --import /etc/pki/rpm-gpg/RPM-GPG-KEY-ZABBIX
    yum -y install zabbix-server-mysql zabbix-web-mysql  zabbix-agent

    初始化数据库:
        mysql -u root -p
        CREATE DATABASE zabbix DEFAULT CHARACTER SET utf8 COLLATE utf8_bin;
        grant all privileges on zabbix.* to zabbix@localhost identified by 'zabbix';

    读入数据库
        cd /usr/share/doc/zabbix-server-mysql-3.2.1
        zcat create.sql.gz | mysql -uroot -p  zabbix

    启动 Zabbix 服务
        vim /etc/zabbix/zabbix_server.conf
            DBHost=localhost
            DBName=zabbix
            DBUser=zabbix
            DBPassword=zabbix

    systemctl start zabbix-server
    systemctl enable zabbix-server

    编辑 zabbix 前端 php 配置
        vim /etc/httpd/conf.d/zabbix.conf
            php_value max_execution_time 300
            php_value memory_limit 128M
            php_value post_max_size 16M
            php_value upload_max_filesize 2M
            php_value max_input_time 300
            php_value always_populate_raw_post_data -1
            php_value date.timezone Asia/Shanghai

    调整时间同步
        yum -y install ntpdate
        ntpdate cn.pool.ntp.org


浏览器访问:http://192.168.10.11/zabbix/
# 输入不想加 zabbix

cd /usr/share/zabbix/^C

[root@localhost ~]# vi /etc/httpd/conf/httpd.conf
    119 DocumentRoot "/usr/share/zabbix/"
    131 <Directory "/usr/share/zabbix/">

[root@localhost ~]# systemctl restart httpd    #重启 Apache 服务生效


    user:Admin
    passwd:zabbix


四、修改中文乱码问题
    Win+R    >    fonts    >    拷贝微软雅黑字体改名为 msyh.ttf      >        /usr/share/zabbix/fonts

chmod a+x  msyh.ttf

[root@localhost fonts]# vi /usr/share/zabbix/include/defines.inc.php
    45 define('ZBX_GRAPH_FONT_NAME',   'kaiti'); // font file name     #将'graphfont' 修改为 kaiti.无需重启。刷新页面


五、添加客户端 192.168.10.30
[root@localhost ~]# yum -y install zabbix-agent-3.2.6-1.el6.x86_64.rpm


[root@localhost ~]# vim /etc/zabbix/zabbix_agentd.conf
    95 Server=192.168.10.11
    136 ServerActive=192.168.10.11
    147 Hostname=192.168.10.30


[root@localhost ~]# service zabbix-agent start
Starting Zabbix agent:                                     [确定]
[root@localhost ~]# chkconfig zabbix-agent on

[root@localhost ~]# netstat -an |grep :10050
tcp        0      0 0.0.0.0:10050               0.0.0.0:*                   LISTEN
tcp        0      0 :::10050                    :::*

浏览器:配置 --> 主机 --> Zabbix server 删除 --> 创建主机 --> 主机图片--> 模板(最基本的:Template OS Linux;Template OS Linux)--> 主机 添加
六 监控win
在win系统中,解压文件后,修改conf目录下的zabbix_agentd.win.conf文件 Server=192.168.10.11 #zabbix服务器 ServerActive=192.168.10.11 Hostname=192.168.26.150 #监控的win服务器 win+R --> cmd c:\bin\win64\zabbix_agentd.exe -c c:\conf\zabbix_agentd.win.conf -i #将进程添加到 windows 服务管理
c:\bin\win64\zabbix_agentd.exe -c c:\conf\zabbix_agentd.win.conf -s #开启服务 netstat -an #查看端口 tcp 10050 自动发现 多台服务器: 192.168.10.40 192.168.10.50 1.分别安装 yum -y install zabbix-agent-3.2.1-1.el6.x86_64.rpm 2.分别修改配置文件 [root@localhost ~]# vim /etc/zabbix/zabbix_agentd.conf Server=192.168.10.11 ServerActive=192.168.10.11 Hostname=192.168.10.50 [root@localhost ~]# service zabbix-agent start Starting Zabbix agent: [确定] [root@localhost ~]# chkconfig zabbix-agent on
[root@localhost src]# netstat -antp |grep :10050 #查看端口
tcp 0 0 0.0.0.0:10050 0.0.0.0:* LISTEN 24674/zabbix_agentd
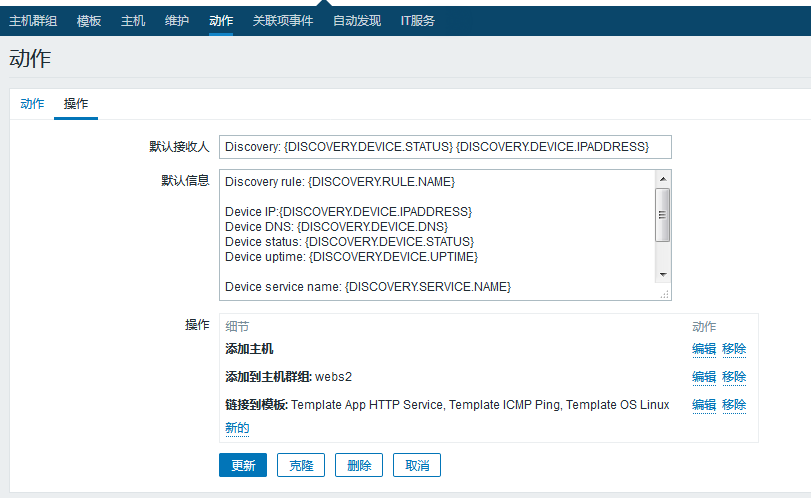
tcp 0 0 :::10050 :::* LISTEN 24674/zabbix_agentd 3.开启 httpd 服务 4.浏览器配置: a.先配置触发器 配置 --> 动作 --> 事件源(自动发现) --> 创建动作(名称:webs上线;新的触发条件:主机IP地址;在线/不在在线);-- 操作:添加主机;添加到主机群组webs -- 与模板关联 ) --> 添加
b.自动发现
配置 --> 自动发现 --> 创建发现规则 --> 填写规则 --> 名称:web上线;IP范围:192.168.10.xx-xx; 检查:ICMP ping
c.查看
检测中 --> 自动发现
配置 --> 主机

监控返回码:


配置 -- 主机 -- 应用集 -- 创建应用集 --名称:http-code -- web场景(name: http-code) --步骤 ---添加

之后 : 配置 -- 主机 -- 触发器 -- 创建触发器--name:http-code -- 监控项:Response code for step "访问主页" of scenario "http-code";功能:最新得T值不是 N ;N 200 --插入 -- 触发器(表达式):{Linux-1:web.test.rspcode[http-code,访问主页].last()}<>200  and {Linux-1:web.test.rspcode[http-code,访问主页].last(1)}<>200 and {Linux-1:web.test.rspcode[http-code,访问主页].last(2)}<>200  and {Linux-1:web.test.rspcode[http-code,访问主页].last(3)}<>200  -- 添加
七 监控nginx
192.168.10.20
#安装
vim /usr/local/nginx/conf/nginx.conf
 server {


        location /nginx-check {
                stub_status on;
        }
 }

[root@localhost nginx-1.0.8]# /usr/local/nginx/sbin/nginx -t
nginx: the configuration file /usr/local/nginx/conf/nginx.conf syntax is ok
nginx: configuration file /usr/local/nginx/conf/nginx.conf test is successful


/usr/local/nginx/sbin/nginx  #启动


浏览器:
http://192.168.10.10/nginx-check
a.编写客户端脚本
[root@localhost ~]# cd /etc/zabbix/zabbix_agentd.d
[root@localhost zabbix_agentd.d]# ls
userparameter_mysql.conf

[root@localhost zabbix_agentd.d]# vim nginx.sh  #脚本编写
#!/bin/bash
        # DateTime: 2015-10-25
        # AUTHOR:凉白开
        # WEBSITE: http://www.ttlsa.com
        # Description:zabbix监控nginx性能以及进程状态
        # Note:此脚本需要配置在被监控端,否则ping检测将会得到不符合预期的结果


        HOST="127.0.0.1"
        PORT="80"

        # 检测nginx进程是否存在
        function ping {
            /sbin/pidof nginx | wc -l
        }
        # 检测nginx性能
        function active {
            /usr/bin/curl "http://$HOST:$PORT/nginx-check/" 2>/dev/null| grep 'Active' | awk '{print $NF}'
        }
        function reading {
            /usr/bin/curl "http://$HOST:$PORT/nginx-check/" 2>/dev/null| grep 'Reading' | awk '{print $2}'
        }
        function writing {
            /usr/bin/curl "http://$HOST:$PORT/nginx-check/" 2>/dev/null| grep 'Writing' | awk '{print $4}'
        }
        function waiting {
            /usr/bin/curl "http://$HOST:$PORT/nginx-check/" 2>/dev/null| grep 'Waiting' | awk '{print $6}'
        }
        function accepts {
            /usr/bin/curl "http://$HOST:$PORT/nginx-check/" 2>/dev/null| awk NR==3 | awk '{print $1}'
        }
        function handled {
            /usr/bin/curl "http://$HOST:$PORT/nginx-check/" 2>/dev/null| awk NR==3 | awk '{print $2}'
        }
        function requests {
            /usr/bin/curl "http://$HOST:$PORT/nginx-check/" 2>/dev/null| awk NR==3 | awk '{print $3}'
        }
        # 执行function
        $1


[root@localhost zabbix_agentd.d]# chmod a+x nginx.sh #赋予权限
[root@localhost zabbix_agentd.d]# ./nginx.sh ping
1
b. 将自定义的UserParameter加入配置文件,然后重启agentd
[root@localhost zabbix]# pwd
/etc/zabbix
[root@localhost zabbix]# ls
zabbix_agentd.conf  zabbix_agentd.d
[root@localhost zabbix]# vim zabbix_agentd.conf
    284 UnsafeUserParameters=1
    293 UserParameter=nginx.status[*],/etc/zabbix/zabbix_agentd.d/nginx.sh $1

[root@localhost ~]# service zabbix-agent start  #重启
c. zabbix服务器:zabbix_get获取数据 192.168.10.11
[root@localhost ~]# yum -y install zabbix-get

[root@localhost zabbix]# zabbix_get -s 192.168.10.30 -k 'nginx.status[ping]'
1    #开启


192.168.10.30
[root@localhost ~]# killall nginx   #kill nginx

192.168.10.11
[root@localhost zabbix]# zabbix_get -s 192.168.10.30 -k 'nginx.status[ping]'
0
八 钉钉
192.168.10.11
[root@localhost alertscripts]# cd /usr/lib/zabbix/alertscripts
[root@localhost alertscripts]# cat token.sh
#!/bin/bash

to=1
subject=2
text=3
curl 'https://oapi.dingtalk.com/robot/send?access_token=20dda99d5929fd7d8b57cdf957d0c4a0b69361830ee3c788a15a0e9dcdb80af9' \
-H 'Content-Type: application/json' \
-d '
{"msgtype": "text",
    "text": {
        "content": "'"$text"'"
},
"at":{
    "atMobiles":[
        "'"$1"'"
],
"isAtAll":false
}
}'
#补充在公布

 浙公网安备 33010602011771号