vue项目、路由
Vue项目创建
1) 进入存放项目的目录
>: cd vue_project

2) 创建项目
>: vue create v-proj

3) 项目初始化
- 输入
npm run serve初始化项目
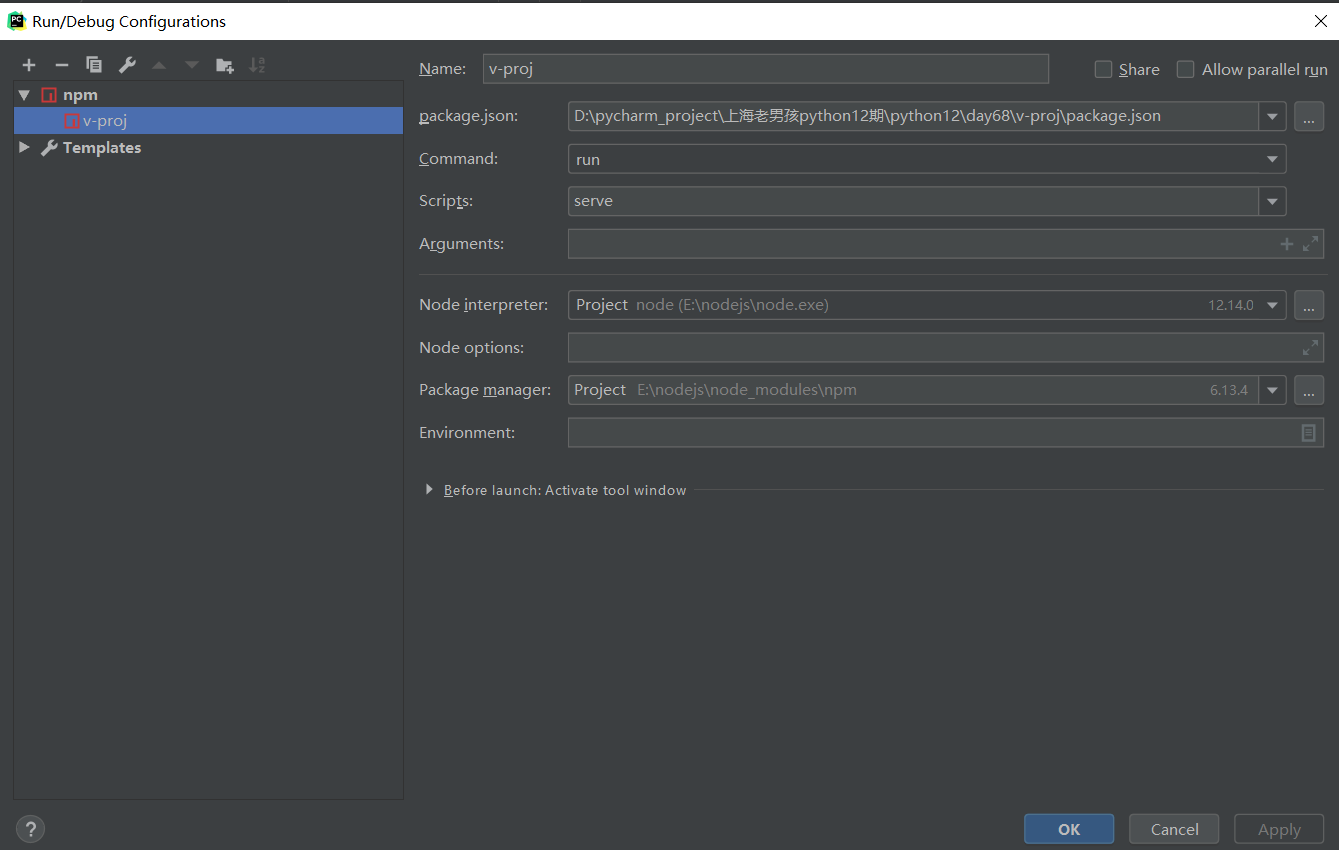
pycharm配置并启动vue项目
1) 用pycharm打开vue项目
2) 添加配置npm启动
vue项目目录结构分析
├── v-proj
|	├── node_modules  	// 当前项目所有依赖,一般不可以移植给其他电脑环境
|	├── public
|	|	├── favicon.ico	// 标签图标
|	|	└── index.html	// 当前项目唯一的页面
|	├── src
|	|	├── assets		// 静态资源img、css、js
|	|	├── components	// 小组件
|	|	├── views		// 页面组件
|	|	├── App.vue		// 根组件
|	|	├── main.js		// 全局脚本文件(项目的入口)
|	|	├── router
|	|	|	└── index.js// 路由脚本文件(配置路由 url链接 与 页面组件的映射关系)
|	|	└── store
|	|	|	└── index.js// 仓库脚本文件(vuex插件的配置文件,数据仓库)
|	├── README.md
└	└── package.json等配置文件
js原型补充
function A() {}

let a1 = new A();
let a2 = new A();

// 为A类添加原型   类似于类属性
A.prototype.num = 100;

console.log(a1.num);
console.log(a2.num);

// ES6语法下的类
class B {
    constructor(name) {
        this.name = name
    }
}

let b1 = new B('cwz');
let b2 = new B('neo');
B.prototype.count = 666;
console.log(b1.count);
console.log(b2.count);

console.log(b1.name);
console.log(b2.name);
vue项目生命周期
全局脚本文件main.js 文件入口
import Vue from 'vue'
import App from './App.vue'
import router from './router'
import store from './store'

Vue.config.productionTip = false

new Vue({
    router,
    store,
    render: h => h(App)
}).$mount('#app');
改为:
// 项目一启动,加载一堆环境
import Vue from 'vue'
import App from './App.vue'
import router from './router'
import store from './store'

Vue.config.productionTip = false

// 创建根组件
new Vue({         // 挂载、 渲染挂载点
   el: '#app',
    router: router,   // 把路由、仓库配置到vue对象中
    store: store,
    render: function (read_vue_fn) {
        return read_vue_fn(App)
    }
});
-
启动项目,加载主脚本文件 mian.js,加载vue环境, 创建根组件完成渲染;加载系统已有的第三方环境:router、store;加载自定义的第三方环境与自己配置的环境,后期项目不断添加
-
router被加载,就会解析router文件夹下的index.js脚本文件,完成路由-组件 的映射关系
-
新建视图组件.vue(在views文件夹中), 在路由中配置(在router的index.js中),设置路由跳转(在导航栏组件中)
<router-link to="/user">去用户页面</router-link>  完成标签跳转

this.$router.push('/user')   完成逻辑跳转
页面组件
views文件夹下新建Home.vue
<!--
template标签负责组件的html结构,有且只有一个根标签
-->

<template>
    <div class="home">
        <h1>主页</h1>
        <hr>
        <Nav></Nav>
    </div>
</template>

<!--
script标签负责组件的js逻辑:逻辑固定导出(外界才可以导入)
-->
<script>
    import Nav from '../components/Nav'

    export default {
        data() {
            return {}
        },
        methods: {},
        components: {
            Nav,
        }
    }
</script>

<!--
style标签负责组件的css样式:  scoped保证样式的组件化   样式只在该组件内部起作用
-->
<style scoped>

</style>
根组件 App.vue:
<template>
    <div id="app">
       <!--页面组件占位符-->
        <router-view/>
    </div>
</template>
配置自定义全局样式
在mian.js中配置:
// 配置全局样式  @就代表src文件夹的绝对路径
// import '@/assets/css/global.css'
// import './assets/css/global.css'
require('./assets/css/global.css');   // 官方提倡required加载静态文件
路由逻辑跳转
this.$router     控制路由跳转
this.$route      控制路由数据
this.$router.push('/')  往下再跳转一页
this.$router.go(-2)    go是历史记录前进后退, 正为前进,负为后退,数字为步数


// router文件夹 index.js中
const routes = [
    {
        path: '/',
        name: 'home',
        component: Home
    },
    {
      path: '/course',
      name: 'course',
      component: Course
    },
]

// 其中name的用法:
<router-link :to="{name: 'course'}">课程页</router-link>
路由重定向
const routes = [
    {
        path: '/',
        name: 'home',
        component: Home
    },
    {
      path: '/home/',
      redirect: '/',
    },
]
组件的生命周期钩子
- 一个组件从创建到销毁的众多时间节点回调的方法
- 这些方法都是vue组件 实例的成员
- 生命周期钩子的作用就是满足不同时间节点需要完成的事
new Vue({
    el: "#app",
    data: {
        msg: "message"
    },
    beforeCreate () {
        console.log("组件要创建了");
        console.log(this.msg);

    },
    created () {   // 在该钩子中完成后台数据的请求
        console.log("实例创建成功, data, methods已拥有");
        console.log(this.msg);
    },
    beforeMount() {
        console.log("组件准备加载")
    },
    mounted () {  // 特别耗时的数据请求,可以延后到组件初步加载成功,再慢慢请求
        console.log("组件加载完成");
    },
    destroyed() {
        console.log("组件销毁成功了")
    }
    // 拿到需求 => 确定钩子函数 => 解决需求的逻辑代码块
})
路由传参
第一种:
{
	path: '/course/detail',
	name: 'course-detail',
    component: CourseDetail
}
{
	path: '/detail',
    redirect: '/course/detail'
}
this.$router.push('/course/detail');
this.$router.push('/course/detail?pk=1');  => this.$route.query.pk
第二种:
{
	path: '/course/detail/:pk',
	name: 'course-detail',
    component: CourseDetail
}
this.$router.push('/course/detail/10');  => this.$route.params.pk

 浙公网安备 33010602011771号