
7.Session与ServletContext
一、Session对象【重点】
1.1 Session概述
Session用于记录用户的状态。Session指的是在一段时间内,单个客户端与Web服务器的一连串相关的交互过程。
在一个Session中,客户可能会多次请求访问同一个资源,也有可能请求访问各种不同的服务器资源。
1.2 Session原理
服务器会为每一次会话分配一个Session对象
同一个浏览器发起的多次请求,同属于一次会话(Session)
首次使用到Session时,服务器会自动创建Session,并创建Cookie存储SessionId发送回客户端
1.3 Session使用
Session作用域:拥有存储数据的空间,作用范围是一次会话有效
一次会话是使用同一浏览器发送的多次请求。一旦浏览器关闭,则结束会话
可以将数据存入Session中,在一次会话的任意位置进行获取
可传递任何数据(基本数据类型、对象、集合、数组)
1.3.1 获取Session
session是服务器端自动创建的,通过request对象获取
        //获取Session对象
        HttpSession session=request.getSession();
        System.out.println("Id:"+session.getId());//唯一标记,
1.3.2 Session保存数据
setAttribute(属性名,Object)保存数据到session中
session.setAttribute("key",value);//以键值对形式存储在session作用域中。1.3.3 Session获取数据
getAttribute(属性名);获取session中数据
session.getAttribute("key");//通过String类型的key访问Object类型的value1.3.4 Session移除数据
removeAttribute(属性名);从session中删除数据
session.removeAttribute("key");//通过键移除session作用域中的值1.4 Session与Request应用区别
request是一次请求有效,请求改变,则request改变
session是一次会话有效,浏览器改变,则session改变
1.4.1 Session应用
@WebServlet(name = "SessionServlet",value = "/ss")
public class SessionServlet extends HttpServlet {
protected void service(HttpServletRequest request, HttpServletResponse response) throws ServletException, IOException {
//1.通过request对象获取Session对象
HttpSession session = request.getSession();
//2.使用session保存数据
session.setAttribute("username","gavin");
request.setAttribute("password","123456");
//3.获取session保存的数据
String password = (String)request.getAttribute("password");
String s = (String) session.getAttribute("username");
System.out.println("从session中获得了:"+s);
System.out.println("从reqeust中获得了:"+password);
response.sendRedirect("/WebProject_war_exploded/getValue");
System.out.println(session.getId());
}
}
1.5 Session的生命周期
开始:第一次使用到Session的请求产生,则创建Session
结束:
浏览器关闭,则失效
Session超时,则失效
session.setMaxInactiveInterval(seconds);//设置最大有效时间(单位:秒)
手工销毁,则失效
session.invalidate();//登录退出、注销
1.5.1 Session失效
session.setMaxInactiveInterval(60*60);//设置session最大有效期为一小时
session.invalidate();//手工销毁1.5 Session实战权限验证
| Session记录登录状态 |
|---|
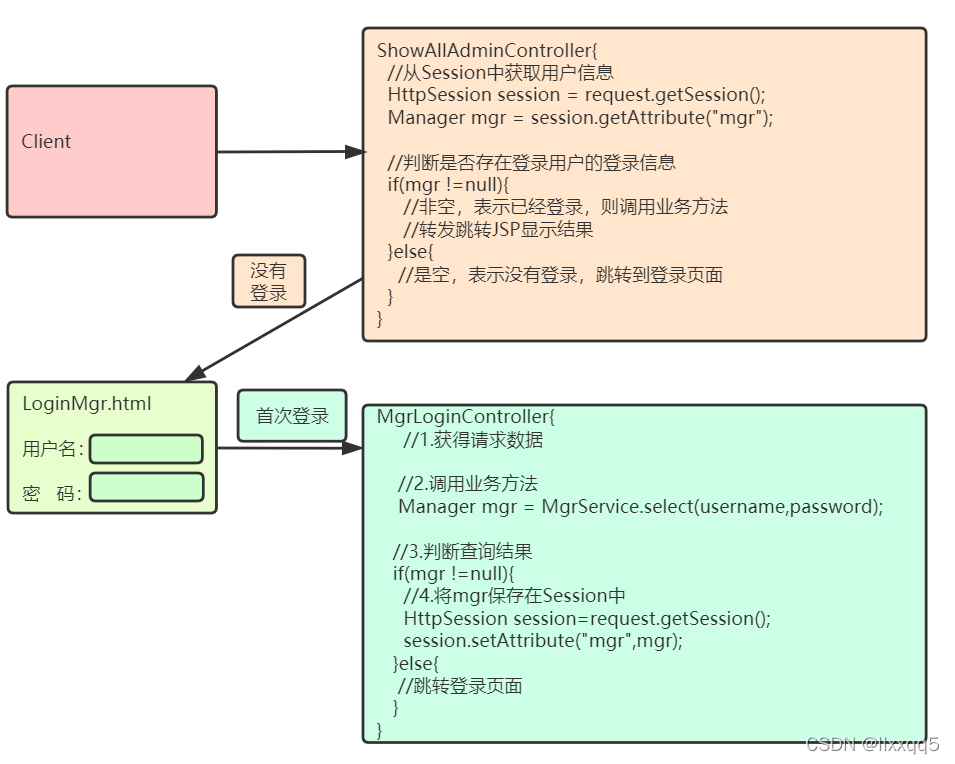 |
1.5.1 创建管理员表
CREATE TABLE Manager(
    username VARCHAR(20) PRIMARY KEY,
    password VARCHAR(20) NOT NULL
)charset=utf8;
1.5.2 登录页面
<!DOCTYPE html>
<html lang="en">
<head>
    <meta charset="UTF-8">
    <title>管理员登录</title>
    </head>
    <body>
    <form action="/WebProject_war_exploded/loginMgr" method="post">
        用户名:<input type="text" name="username"/><br/>
        密码:<input type="password" name="password" /><br/>
        <input type="submit" value="登录">
    </form>
</body>
</html>
1.5.3 LoginMgrController
@WebServlet(name = "LoginMgrController",value = "/loginMgr")
public class LoginMgrController extends HttpServlet {
    protected void service(HttpServletRequest request, HttpServletResponse response) throws ServletException, IOException {
        //1.处理乱码
        request.setCharacterEncoding("UTF-8");
        response.setContentType("text/html;charset=utf-8");
        //2.收参
        String username = request.getParameter("username");
        String password = request.getParameter("password");
        //3.调用业务方法
        ManagerService managerService = new ManagerServiceImpl();
        Manager mgr = managerService.login(username,password);
        //4.处理结果,流程跳转
        if(mgr!=null){
            //登录成功
            //将管理员信息存储在Session里
            HttpSession session = request.getSession();
            session.setAttribute("mgr",mgr);
            //跳转  目标、方式
            response.sendRedirect("/WebProject_war_exploded/showallcontroller");
        }else{
            //登录失败
            response.sendRedirect("/WebProject_war_exploded/loginMgr.html");
        }
    }

}
1.5.4 ShowAllAdminController
@WebServlet(value = "/showallcontroller")
public class ShowAllAdminController extends HttpServlet {
    @Override
    protected void service(HttpServletRequest req, HttpServletResponse resp) throws ServletException, IOException {
        //通过HttpSession完成权限控制
        HttpSession session = req.getSession();
        Manager mgr  =(Manager)session.getAttribute("mgr");
        if(mgr !=null){
            //只负责调用业务逻辑功能
            AdminService adminService = new AdminServiceImpl();

            List<Admin> adminList = adminService.showAllAdmin();

            //request作用域存储数据
            req.setAttribute("admins",adminList);
            //通过转发 跳转到显示结果servlet
            req.getRequestDispatcher("/showalljsp").forward(req,resp);
        }else{
            resp.sendRedirect("/WebProject_war_exploded/loginMgr.html");
        }

    }
1.6 Session实战保存验证码
1.6.1 创建验证码
导入ValidateCode.jar
创建生成验证码的Servlet
/**
 * Servlet implementation class CreateCode
 * 验证码的生成
 */
@WebServlet("/createcode")
public class CreateCode extends HttpServlet {
    protected void service(HttpServletRequest request, HttpServletResponse response) throws ServletException, IOException {
        ValidateCode vc=new ValidateCode(200, 30, 4, 10);
        String code=vc.getCode();
        System.out.println(request.getRemoteAddr()+":生成:"+code);
        //使用Session存储生成的验证码
        HttpSession session=request.getSession();
        session.setAttribute("code",code);
        //响应给客户端
        vc.write(response.getOutputStream());
    }
}
1.6.2 登录页面
<!DOCTYPE html>
<html lang="en">
<head>
    <meta charset="UTF-8">
    <title>管理员登录</title>
    </head>
    <body>
    <form action="/WebProject_war_exploded/loginMgr" method="post">
        用户名:<input type="text" name="username"/><br/>
        密码:<input type="password" name="password" /><br/>
        验证码:<input type="text" name="inputVcode"/> <img src="/WebProject_war_exploded/createcode" /><br/>
        <input type="submit" value="登录">
    </form>
</body>
</html>
1.6.3 LoginMgrController
@WebServlet(name = "LoginMgrController", value = "/loginMgr")
public class LoginMgrController extends HttpServlet {
protected void service(HttpServletRequest request, HttpServletResponse response) throws ServletException, IOException {
//1.处理乱码
request.setCharacterEncoding("UTF-8");
response.setContentType("text/html;charset=utf-8");
//2.收参
String username = request.getParameter("username");
String password = request.getParameter("password");
String inputVcode = request.getParameter("inputVcode");
String codes = (String) request.getSession().getAttribute("codes");
if (!inputVcode.isEmpty() && inputVcode.equalsIgnoreCase(codes)) {
//3.调用业务方法
ManagerService managerService = new ManagerServiceImpl();
Manager mgr = managerService.login(username, password);
//4.处理结果,流程跳转
if (mgr != null) {
//登录成功
//将管理员信息存储在Session里
HttpSession session = request.getSession();
session.setAttribute("mgr", mgr);
//跳转 目标、方式
response.sendRedirect("/WebProject_war_exploded/showallcontroller");
} else {
//登录失败
response.sendRedirect("/WebProject_war_exploded/loginMgr.html");
}
}else{
response.sendRedirect("/WebProject_war_exploded/loginMgr.html");
}
}
}
二、ServletContext对象【重点】
2.1 ServletContext概述
全局对象,也拥有作用域,对应一个Tomcat中的Web应用
当Web服务器启动时,会为每一个Web应用程序创建一块共享的存储区域(ServletContext)。
ServletContext在Web服务器启动时创建,服务器关闭时销毁。
2.2 获取ServletContext对象
GenericServlet提供了getServletContext()方法。(推荐) this.getServletContext();
HttpServletRequest提供了getServletContext()方法。(推荐)
HttpSession提供了getServletContext()方法。
2.3 ServletContext作用
2.3.1 获取项目真实路径
获取当前项目在服务器发布的真实路径
String realpath=servletContext.getRealPath("/");2.3.2 获取项目上下文路径
获取当前项目上下文路径(应用程序名称)
System.out.println(servletContext.getContextPath());//上下文路径(应用程序名称)
System.out.println(request.getContextPath());
2.3.3 全局容器
ServletContext拥有作用域,可以存储数据到全局容器中
存储数据:servletContext.setAttribute("name",value);
获取数据:servletContext.getAttribute("name");
移除数据:servletContext.removeAttribute("name");
2.4 ServletContext特点
唯一性: 一个应用对应一个ServletContext。
生命周期: 只要容器不关闭或者应用不卸载,ServletContext就一直存在。
2.5 ServletContext应用场景
ServletContext统计当前项目访问次数
/**
 * Servlet implementation class Servlet3
 */
@WebServlet("/servlet3")
public class Servlet3 extends HttpServlet {

    protected void service(HttpServletRequest request, HttpServletResponse response) throws ServletException, IOException {
        request.setCharacterEncoding("utf-8");
        response.setContentType("text/html;charset=utf-8");

        ServletContext application = request.getServletContext();
        Integer count=(Integer) application.getAttribute("count");
        if(count==null) {
            count=1;
            application.setAttribute("count", count);
        }else {
            count++;
            application.setAttribute("count", count);
        }

        PrintWriter out=response.getWriter();
        out.write("servlet共访问次数:"+count);

    }
}
2.6 作用域总结
HttpServletRequest:一次请求,请求响应之前有效
HttpSession:一次会话开始,浏览器不关闭或不超时之前有效
ServletContext:服务器启动开始,服务器停止之前有效

 浙公网安备 33010602011771号