
后端学习笔记
JavaWeb
Java
Idea
快捷键:
- 自动生成属性和方法:
Alt + Ins - 根据变量类型自动生成变量:
Ctrl + Alt + V
JSON
import com.fasterxml.jackson.databind.ObjectMapper;

ObjectMapper objectMapper = new ObjectMapper();
String objStr = objectMapper.writeValueAsString(javaObj);
ObjType obj = objectMapper.readValue(personStr, ObjType.class);
XML
<?xml version="1.0" encoding="UTF-8"?> <!--第一行内容-->
使用Java读取xml配置文件:
SAXReader saxReader = new SAXReader();
InputStream resourceAsStream = TestDom4j.class.getClassLoader().getResourceAsStream("xml/file/path");
Document document = saxReader.read(resourceAsStream);
Tomcat
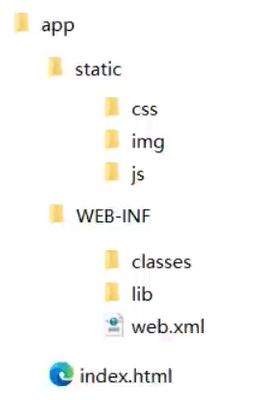
一个Web项目的标准结构:
-
app
-
static
- css
- js
- img
-
WEB-INF
无法被浏览器访问到的路径
-
添加自定义本地磁盘路径的项目时:
-
在
conf/Catalina/localhost路径下创建app.xml文件,并添加下面内容:<Context path="path/of/url" docBase="path/of/local" />
Cookie
实质:一个json对象(key、value键值对)的字符串格式
Maven
依赖管理工具
maven项目结构
- src
- main(项目核心文件夹)
- java
- resources
- test(项目测试文件夹)
- java
- resources
- main(项目核心文件夹)
- pom.xml(配置文件)
- target(编译生成的文件)
安装
企业开发常用配置:jdk11 + maven-3.6.1
配置本地仓库
<!-- conf/settings.xml -->
<localRepository>E:\Server\maven\repository</localRepository>
配置阿里云国内镜像
<!-- conf/settings.xml -->
<mirror>
    <id>nexus-aliyun</id>
    <mirrorOf>central</mirrorOf>
    <name>aliyun maven</name>
    <url>http://maven.aliyun.com/nexus/content/groups/public</url>
</mirror>
IDEA配置
- 创建一个新的Java Project
- File-Setting-Build-Maven -> 选择
Maven位置和settings.xml文件的位置 - ...-Maven-Runner -> 选择JRE版本
- ...-Compiler-Java Compiler -> 选择字节码版本(与上一步相同)
Maven坐标
通过在 pom.xml配置文件中添加以下内容进行以来传递:
<dependencies>
    <dependency>
        <groupId>ch.qos.logback</groupId>
        <artifactId>logback-classic</artifactId>
        <version>1.2.3</version>
    </dependency>
</dependencies>
排除依赖
添加以下内容排除依赖中的依赖传递
<exclusions>
    <exclusion>
        <groupId>junit</groupId>
        <artifactId>junit</artifactId>
    </exclusion>
</exclusions>
Tomcat
解决控制台输出日志中文乱码的问题
修改配置文件 conf/logging.properties
java.util.logging.ConsoleHandler.encoding = UTF-8 -> java.util.logging.ConsoleHandler.encoding = GBK
配置文件解释
配置文件 conf/server.xml
端口号配置:

JDBC(MyBatis替代)
public class JDBCUtils {
    public static Connection getConnection() throws Exception {
        //1. 导入配置信息
        Properties properties = new Properties();
        InputStream inputStream = ClassLoader.getSystemResourceAsStream("jdbc.properties");
        properties.load(inputStream);
        String url = properties.getProperty("url");
        String user = properties.getProperty("user");
        String password = properties.getProperty("password");
        String driverName = properties.getProperty("driverName");
        //2. 注册驱动
        Class.forName(driverName);
        //3. 获取连接
        return DriverManager.getConnection(url, user, password);
    }
    public static void releaseResource(Connection conn, Statement ps) {
        try {
            if (ps != null)
                ps.close();
        } catch (SQLException e) {
            throw new RuntimeException(e);
        }
        try {
            if (conn != null)
                conn.close();
        } catch (SQLException e) {
            throw new RuntimeException(e);
        }
    }
    public static void releaseResource(Connection conn, Statement ps, ResultSet rs) {
        try {
            if (ps != null)
                ps.close();
        } catch (SQLException e) {
            throw new RuntimeException(e);
        }
        try {
            if (conn != null)
                conn.close();
        } catch (SQLException e) {
            throw new RuntimeException(e);
        }
        try {
            if (rs != null)
                rs.close();
        } catch (SQLException e) {
            throw new RuntimeException(e);
        }
    }
}
Servlet(SpringBoot替代)
//Servlet是一个接口,需要实现其中的一些方法
public class TestServlet implements Servlet {
    @Override
    public void init(ServletConfig servletConfig) throws ServletException {
		//Servlet服务器初始化进行的操作
        //可以对servletConfig进行操作,获取<init-param>标签

    }

    @Override
    public ServletConfig getServletConfig() {
        return null;
    }

    @Override
    public void service(ServletRequest servletRequest, ServletResponse servletResponse) throws ServletException, IOException {
        //Servlet服务器被访问进行的操作
        //HttpServletRequest为ServletRequest的子类型(类型转换)
        HttpServletRequest hsr = (HttpServletRequest) servletRequest;
        //调用HttpServletRequest的getMethod()方法,获取请求方式
        String method = hsr.getMethod();
    }

    @Override
    public String getServletInfo() {
        return null;
    }

    @Override
    public void destroy() {
		//Servlet服务器被关闭时进行的操作
    }
}
HttpServlet
- HttpServlet为Servlet的子实现方法
public class TestServlet2 extends HttpServlet {
    @Override
    protected void doGet(HttpServletRequest req, HttpServletResponse resp) throws ServletException, IOException {
        //get请求时进行的操作
        super.doGet(req, resp);
    }

    @Override
    protected void doPost(HttpServletRequest req, HttpServletResponse resp) throws ServletException, IOException {
        //post请求时进行的操作
        super.doPost(req, resp);
    }
}
- Http是无状态的,通过Session会话来进行状态记录
Session
HttpSession session = req.getSession():获取当前会话,没有则创建新的会话
若传入参数true,则效果跟不带参数时相同
若传入参数false,获取当前会话,没有则返回null,不会创建新的会话
session.getId():获取sessionID
session.isNew():判断当前session是否为新的
session.getMaxInactiveInterval():获取会话最大间隔时间
session.setMaxInactiveInterval():设置会话最大间隔时间
session.setAtrribute(<key>, <value>):设置session中的名为<key>的属性
session.getAttribute(<key>):获取session中名为<key>的属性
session.removeAttribute(<key>):删除session中名为<key>的属性
注:不同的服务器访问时创建不同的session,属性也都不相同
资源跳转
req.getRequestDispatcher("<redirect_url>").forward(req, resp):服务器端内部转发
resp.sendRedirect("<redirect_url>"):客户端重定向
ServletConfig
servletConfig.getInitParameter(String):获取初始化参数
servletConfig.getServletName():获取Servlet别名
servletConfig.getServletContext():获取ServletContext对象
ServletContext
- ServletContext是一个接口,表示Servlet上下文对象
- 一个Web工程只有一个ServletContext对象(单例)
- ServletContext是一个域对象(key-value组成)
ServletContext context = config.getServletContext();:获取ServletContext
context.setAttribute([name]):存数据
context.getAttribute([name]):取数据
context.removeAttribute([name]):删除数据
HttpServletRequest
req.getParameter(<name_param>):获取GET请求中的参数<name_param>值,返回值是String
req.getParameterValues(<name_param>):当请求有多个值时(checkbox)使用,返回值是String[]
req.setCharacterEncoding("utf-8"):设置字符集编码为utf-8(解决在POST请求中出现的乱码问题)(必须在获取参数之前调用)
Spring(SpringBoot替代)
pom.xml项目配置文件
<!--导入依赖文件-->
<dependencies>
    <dependency>
        <groupId>org.springframework</groupId>
        <artifactId>spring-context</artifactId>
        <version>6.0.2</version>
    </dependency>
    <dependency>
        <groupId>org.junit.jupiter</groupId>
        <artifactId>junit-jupiter-api</artifactId>
        <version>5.6.3</version>
    </dependency>
</dependencies>
bean.xml配置文件
通过xml配置文件进行属性注入(需要已经创建了对应的类,并且类中需要有getter和setter方法)
<!--在配置文件中创建类的信息-->
<bean id="[类的别名]" class="[类的路径]"></bean>

<!--通过setter方法创建对象-->
<bean id="book1" class="di.Book" >
        <!--使用setter方法注入-->
        <property name="bname" value="java learning"></property>
        <property name="author" value="Maxime"></property>
</bean>

<!--通过有参构造函数创建对象-->
<bean id="book2" class="di.Book" >
    <constructor-arg name="bname" value="c++ learning">				</constructor-arg>
    <constructor-arg name="author" value="Maxime">	</constructor-arg>
</bean>

<!--写入特殊符号-->
<![CDATA[  其中可以写入特殊符号  ]]>
Log4j2日志框架
<!--log4j2的依赖-->
<dependency>
    <groupId>org.apache.logging.log4j</groupId>
    <artifactId>log4j-core</artifactId>
    <version>2.19.0</version>
</dependency>
<dependency>
    <groupId>org.apache.logging.log4j</groupId>
    <artifactId>log4j-slf4j2-impl</artifactId>
    <version>2.19.0</version>
</dependency>
log4j.xml配置文件
<?xml version="1.0" encoding="UTF-8"?>
<!--log4j.xml-->
<configuration>
    <loggers>
        <!--
            level指定日志级别,从低到高的优先级:
                TRACE < DEBUG < INFO < WARN < ERROR < FATAL
                trace:追踪,是最低的日志级别,相当于追踪程序的执行
                debug:调试,一般在开发中,都将其设置为最低的日志级别
                info:信息,输出重要的信息,使用较多
                warn:警告,输出警告的信息
                error:错误,输出错误信息
                fatal:严重错误
        -->
        <root level="DEBUG">
            <appender-ref ref="spring6log"/>
            <appender-ref ref="RollingFile"/>
            <appender-ref ref="log"/>
        </root>
    </loggers>

    <appenders>
        <!--输出日志信息到控制台-->
        <console name="spring6log" target="SYSTEM_OUT">
            <!--控制日志输出的格式-->
            <PatternLayout pattern="%d{yyyy-MM-dd HH:mm:ss SSS} [%t] %-3level %logger{1024} - %msg%n"/>
        </console>

        <!--文件会打印出所有信息,这个log每次运行程序会自动清空,由append属性决定,适合临时测试用-->
        <File name="log" fileName="d:/spring6_log/test.log" append="false">
            <PatternLayout pattern="%d{HH:mm:ss.SSS} %-5level %class{36} %L %M - %msg%xEx%n"/>
        </File>

        <!-- 这个会打印出所有的信息,
            每次大小超过size,
            则这size大小的日志会自动存入按年份-月份建立的文件夹下面并进行压缩,
            作为存档-->
        <RollingFile name="RollingFile" fileName="d:/spring6_log/app.log"
                     filePattern="log/$${date:yyyy-MM}/app-%d{MM-dd-yyyy}-%i.log.gz">
            <PatternLayout pattern="%d{yyyy-MM-dd 'at' HH:mm:ss z} %-5level %class{36} %L %M - %msg%xEx%n"/>
            <SizeBasedTriggeringPolicy size="50MB"/>
            <!-- DefaultRolloverStrategy属性如不设置,
            则默认为最多同一文件夹下7个文件,这里设置了20 -->
            <DefaultRolloverStrategy max="20"/>
        </RollingFile>
    </appenders>
</configuration>
Java中调用bean创建的对象
//通过配置文件类获取bean对象
ApplicationContext context =
                new ClassPathXmlApplicationContext("bean.xml");
Class<?> o = context.getBean("[id]", Class<?>);
SpringBoot
数据库
MySQL
MyBatis
项目实战
YApi
Api管理工具,包含mock功能
尚品汇
初始化配置
-
初始化项目:
vue create <project_name> -
配置项目部署后浏览器自动打开:
// package.json "scripts": { "serve": "vue-cli-service serve --open" //添加--open参数 } -
关闭eslint校验功能:
// vue.config.js module.exports = defineConfig({ transpileDependencies: true, lintOnSave: false }) -
配置
src文件夹别名:// jsconfig.json "paths": { "@/*": [ "src/*" ] }, -
安装
less、less-loadernpm install less less-loader@7.3.0 --save-dev -
路由组件的搭建及配置
npm i vue-router@3
配置重定向
// router/index.js
{
    path: '*',
    redirect: '/path/to/redirect'
}
路由跳转
- 声明式导航:使用
<router-link></router-link>组件实现 - 编程式导航:使用
$router.push() | $router.replace()函数实现
<router-link to="/path"></router-link><!--作用与a标签相同-->
路由跳转push、replace方法重写
// router/index.js
let push = VueRouter.prototype.push
let replace = VueRouter.prototype.replace
VueRouter.prototype.push = function(location, resolve, reject) {
    if (resolve && reject) {
        push.call(this, location, resolve, reject)
    } else {
        push.call(this, location, () => {}, () => {})
    }
}
VueRouter.prototype.replace = function(location, resolve, reject) {
    if (resolve && reject) {
        replace.call(this, location, resolve, reject)
    } else {
        replace.call(this, location, () => {}, () => {})
    }
}
网络请求
axios二次封装
自定义请求拦截器、相应拦截器
请求拦截器:可以在发送请求之前处理一些业务,相应拦截器:当服务器数据返回时可以处理一些事情
npm i axios:安装axios- 创建
src/api文件夹,在其中编写二次封装 -
const requests = axios.create({
    baseURL: '/api',
    timeout: 5000,
})

//请求拦截器
requests.interceptors.request.use((config) => {
    return config  //配置对象,包含headers请求头
})
//响应拦截器
requests.interceptors.response.use(
    (resp) => { //请求成功
        return resp.data
    },
    (error) => { //请求失败
        return Promise.reject(new Error('failed'))
    }
)
配置代理服务器
解决网络请求跨域的问题
// vue.config.js
devServer: {
      proxy: { //解决跨域问题
        '/api': {
          target: 'http://gmall-h5-api.atguigu.cn',
        },
      }
  }
进度条实现
npm i nprogress --save-dev
// api/requests.js
import nprogress from 'nprogress'
import 'nprogress/nprogress.css'

nprogress.start() //进度条启动
nprogress.done()  //进度条停止
vuex
集中管理项目中的组件之间共用的数据
npm i vuex@3 --save-dev
-
创建
src/store/index.js -
// store/index.js import Vue from 'vue' import Vuex from 'vuex' Vue.use(Vuex) const state = {} const mutations = {} const actions = {} const getters = {} export default new Vuex.Store({ state, mutations, actions, getters }) -
模块式编程
// store/home/index.js
const state = {}
const mutations = {}
const actions = {}
const getters = {}

export default { // home模块(只需要将一个对象暴露)
    state,
    mutations,
    actions,
    getters
}
小兔鲜
-
使用
Vue3新建项目:npm init vue@latest -
项目
src目录调整apiscomposables:放置组合函数directivesstylesutils
-
配置别名路径联想
//jsconfig.json
{
  "compilerOptions": {
    "baseUrl": "./",
    "paths": {
      "@/*": ["src/*"]
    }
  },
  "exclude": ["node_modules", "dist"]
}
使用ElementPlus组件库
-
安装:
npm install element-plus --savenpm install -D unplugin-vue-components unplugin-auto-import(按需引入组件)-D:表示只在开发环境中使用--save:表示在开发环境和部署环境都是用 -
定制
ElementPlus组件主题色-
安装
sass:npm i -D sass -
配置主题色:
/* 文件路径:styles/element/index.scss 配置需要修改的主题色 */ @forward 'element-plus/theme-chalk/src/common/var.scss' with ( $colors: ( 'primary': ( // 主色 'base': #27ba9b, ), 'success': ( // 成功色 'base': #1dc779, ), 'warning': ( // 警告色 'base': #ffb302, ), 'danger': ( // 危险色 'base': #e26237, ), 'error': ( // 错误色 'base': #cf4444, ), ) ) -
设置配置文件:
    //vite.config.js
    export default defineConfig({
    plugins: [
        vue(),
        AutoImport({
        resolvers: [ElementPlusResolver()],
        }),
        Components({
        resolvers: [
            ElementPlusResolver({importStyle: "sass"})
        ],
        }),

    ],
    resolve: {
        alias: {
        '@': fileURLToPath(new URL('./src', import.meta.url))
        }
    },
    css: {
        preprocessorOptions: {
        scss: {
            // 自动导入定制化样式文件进行样式覆盖
            additionalData: `
            @use "@/styles/element/index.scss" as *;
            `,
        }
        }
    }
    })
-
-
定义axios的请求、响应拦截器
import axios from 'axios'

// 创建axios实例
const http = axios.create({
    baseURL: 'http://pcapi-xiaotuxian-front-devtest.itheima.net',
    timeout: 5000
})

// axios请求拦截器
instance.interceptors.request.use(
    config => {
        return config
    },
    e => Promise.reject(e)
)

// axios响应式拦截器
instance.interceptors.response.use(
    res => res.data,
    e => {
    return Promise.reject(e)
})

export default http
苍穹外卖
密码md5加密
String s = DigestUtils.md5DigestAsHex(password.getBytes()); //对字符串password进行md5加密,获取加密后的字符串
Swagger
-
导入maven依赖
<!--Swagger依赖--> <dependency> <groupId>com.github.xiaoymin</groupId> <artifactId>knife4j-spring-boot-starter</artifactId> <version>3.0.2</version> </dependency> -
在配置类中添加
knife4j相关配置/** * 通过knife4j生成接口文档 * @return */ public Docket docket() { ApiInfo apiInfo = new ApiInfoBuilder() .title("苍穹外卖项目接口文档") .version("2.0") .description("苍穹外卖项目接口文档") .build(); Docket docket = new Docket(DocumentationType.SWAGGER_2) .apiInfo(apiInfo) .select() .apis(RequestHandlerSelectors.basePackage("com.sky.controller")) .paths(PathSelectors.any()) .build(); return docket; } -
设置静态资源映射
/**
 * 设置静态资源映射(重写WebMvcConfigurationSupport类中的addResourceHandlers方法)
 * @param registry
 */
protected void addResourceHandlers(ResourceHandlerRegistry registry) {
  registry.addResourceHandler("/doc.html").addResourceLocations("classpath:/META-INF/resources/");
    registry.addResourceHandler("/webjars/**").addResourceLocations("classpath:/META-INF/resources/webjars/");
}

 浙公网安备 33010602011771号