
Nginx(二)——配置及status监控
nginx的平滑升级(热部署)
Nginx方便地帮助我们实现了平滑升级。其原理简单概括,就是:
(1)在不停掉老进程的情况下,启动新进程。
(2)老进程负责处理仍然没有处理完的请求,但不再接受处理请。
(3)新进程接受新请求。
(4)老进程处理完所有请求,关闭所有连接后,停止。
热部署加载echo模块
- 查看现有已编译模块
[root@localhost ~]# nginx -V
.......
configure arguments: --prefix=/usr/local/nginx --user=nginx --group=nginx --with-debug --with-http_ssl_module --with-http_realip_module --with-http_image_filter_module --with-http_gunzip_module --with-http_gzip_static_module --with-http_stub_status_module --http-log-path=/var/log/nginx/access.log --error-log-path=/var/log/nginx/error.log
- 下载echo模块代码
[root@localhost ~]# ls
anaconda-ks.cfg  cowsay.sh  echo-nginx-module-master.zip

## 解压zip包
[root@localhost ~]# unzip echo-nginx-module-master.zip
[root@localhost ~]# ls
anaconda-ks.cfg  cowsay.sh  echo-nginx-module-master  echo-nginx-module-master.zip

## 备份原nginx程序
[root@localhost sbin]# cp nginx nginx.bak
[root@localhost sbin]# ls
nginx  nginx.bak

## 编译新nginx
[root@localhost nginx-1.18.0]# ./configure --prefix=/usr/local/nginx --user=nginx --group=nginx --with-debug --with-http_ssl_module --with-http_realip_module --with-http_image_filter_module --with-http_gunzip_module --with-http_gzip_static_module --with-http_stub_status_module --http-log-path=/var/log/nginx/access.log --error-log-path=/var/log/nginx/error.log --add-module=../echo-nginx-module-master  ##添加新的模块

[root@localhost nginx-1.18.0]# make
......

## 查看新的nginx启动程序包含模块
[root@localhost nginx-1.18.0]# cd objs/
[root@localhost objs]# ./nginx -V
nginx version: nginx/1.18.0
built by gcc 8.3.1 20191121 (Red Hat 8.3.1-5) (GCC)
built with OpenSSL 1.1.1g FIPS  21 Apr 2020
TLS SNI support enabled
configure arguments: --prefix=/usr/local/nginx --user=nginx --group=nginx --with-debug --with-http_ssl_module --with-http_realip_module --with-http_image_filter_module --with-http_gunzip_module --with-http_gzip_static_module --with-http_stub_status_module --http-log-path=/var/log/nginx/access.log --error-log-path=/var/log/nginx/error.log --add-module=../echo-nginx-module-master  ##已经成功编译新模块


## 停止旧进程并复制nginx程序,最后运行新程序
[root@localhost objs]# nginx -s stop ;cp ./nginx /usr/local/nginx/sbin/ ; /usr/local/nginx/sbin/nginx
cp: overwrite '/usr/local/nginx/sbin/nginx'? yes
- 查看进程并测试新模块
[root@localhost objs]# ss -antl
State   Recv-Q   Send-Q       Local Address:Port                    Peer Address:Port
LISTEN  0        128                0.0.0.0:80                           0.0.0.0:*
LISTEN  0        128                0.0.0.0:22                           0.0.0.0:*
LISTEN  0        128                   [::]:22                              [::]:*

[root@localhost nginx]# vim conf/nginx.conf
......
server {
        listen       80;
        server_name  localhost;

        #charset koi8-r;

        #access_log  logs/host.access.log  main;

        location / {
            root   /usr/local/nginx/html;
            index  index.php index.html index.htm ;
        }

        location /test {
            echo "HELLO WORLD"    访问/test打印HELLOWORLD
        }

[root@localhost nginx]# nginx -s reload


## 测试访问
[root@localhost nginx]# curl 192.168.197.141/test
HELLO WORLD
location配置段
location语法规则
location [=|~|~*|^~] /uri/ { … }
location修饰符
| 符号 | 含义 |
|---|---|
| = | 表示精确匹配 |
| ^~ | 表示uri以某个常规字符串开头,理解为匹配 url路径即可。 |
| ~ | 表示区分大小写的正则匹配 |
| ~* | 表示不区分大小写的正则匹配 |
修饰符优先级
当有多条 location 规则时,nginx 有一套比较复杂的规则,优先级如下:
- 精确匹配 =
- 前缀匹配 ^~(立刻停止后续的正则搜索)
- 按文件中顺序的正则匹配 ~ 或 ~*
- 匹配不带任何修饰的前缀匹配
访问控制
用于location/server/httpd段
- allow:设定允许哪台或哪些主机访问,多个参数间用空格隔开
- deny:设定禁止哪台或哪些主机访问,多个参数间用空格隔开
实例:
location /test {
            echo "HELLO WORLD";
            allow 192.168.197.141;   允许该ip访问服务器
            deny all;               拒绝别的主机访问改服务器
        }

[root@localhost nginx]# nginx -s reload


## 192.168.197.1主机访问不了
C:\Users\Sawyer>curl 192.168.197.141/test
<html>
<head><title>403 Forbidden</title></head>
<body>
<center><h1>403 Forbidden</h1></center>
<hr><center>nginx/1.18.0</center>
</body>
</html>

## 192.168.197.141 主机访问成功
[root@localhost nginx]# curl 192.168.197.141/test
HELLO WORLD
用户认证
通过登录用户名密码的方式进行访问nginx服务器
语法: htpasswd -c -m /path/to/.user_auth_file USERNAME
- 实例:
[root@localhost nginx]# yum install -y httpd-tools


## 添加虚拟认证用户及密码
[root@localhost nginx]# htpasswd -c -m /root/.root_passwd root
New password:
Re-type new password:
Adding password for user root

## 编辑配置文件
 location /test {
            echo "HELLO WORLD";
            auth_basic "你好";
            auth_basic_user_file "/root/.root_passwd
        }
[root@localhost ~]# nginx -s reload
- 测试访问
![]()
.jpg)
Zabbix自定义监控web状态
| 服务器名 | IP |
|---|---|
| Nginx服务器 | 192.168.197.141 |
| Zabbix服务器 | 192.168.197.138 |
- Nginx服务器段安装zabbix客户端,并修改配置文件
[root@localhost ~]# tar -xf zabbix-5.2.0.tar.gz -C /usr/src
[root@localhost ~]# cd usr/src
-bash: cd: usr/src: No such file or directory
[root@localhost ~]# cd /usr/src
[root@localhost src]# ls
debug mysql-5.7.22-linux-glibc2.12-x86_64.tar.gz nginx-1.18.0.tar.gz
kernels nginx-1.18.0 zabbix-5.2.0
[root@localhost src]# cd zabbix-5.2.0/
## 编译安装
[root@localhost zabbix-5.2.0]# ./configure --enable-agent
......
LDAP support: no
IPv6 support: no
***********************************************************
* Now run 'make install' *
* *
* Thank you for using Zabbix! *
* <http://www.zabbix.com> *
***********************************************************
[root@localhost zabbix-5.2.0]# make install
......
## 配置zabbix_agentd配置文件
[root@localhost etc]# vim zabbix_agentd.conf
......
# Server=
Server=192.168.197.138 指定服务器IP
......
ServerActive=192.168.197.138
......
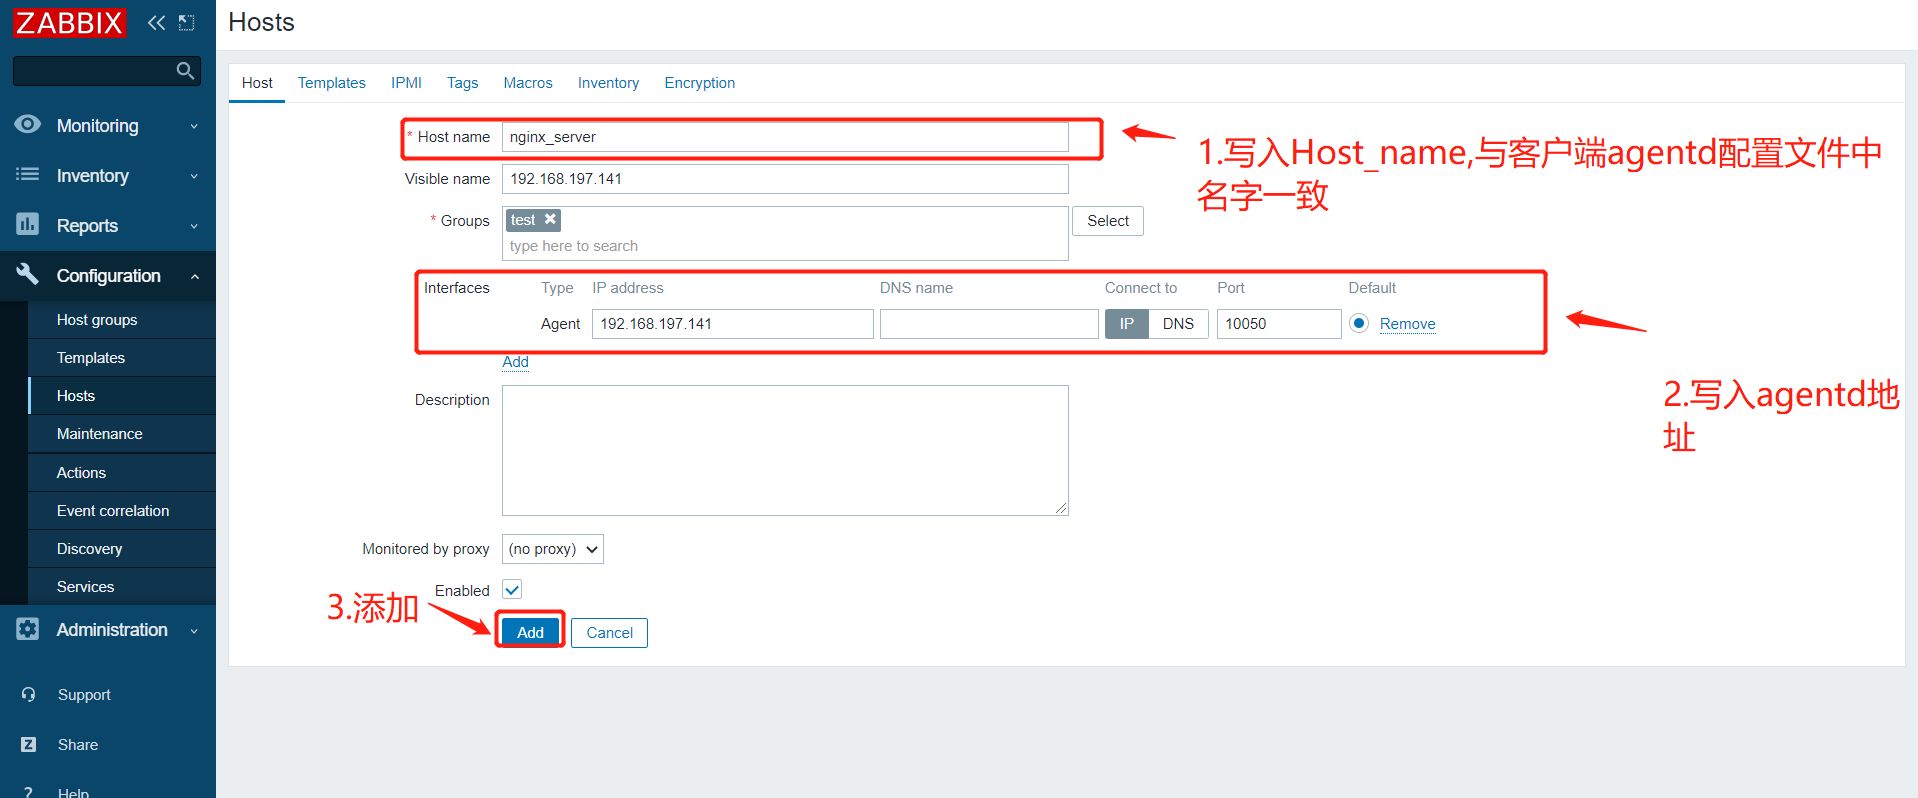
Hostname=nginx_server
- 开启zabbix_agentd
[root@localhost etc]# useradd -r -m -s /sbin/nologin zabbix
[root@localhost etc]# zabbix_agentd
[root@localhost etc]# ss -antl
State    Recv-Q    Send-Q          Local Address:Port          Peer Address:Port
LISTEN   0         128                   0.0.0.0:80                 0.0.0.0:*
LISTEN   0         128                   0.0.0.0:22                 0.0.0.0:*
LISTEN   0         128                   0.0.0.0:10050              0.0.0.0:*
LISTEN   0         128                 127.0.0.1:9000               0.0.0.0:*
LISTEN   0         128                      [::]:22                    [::]:*
LISTEN   0         80                          *:3306                     *:*
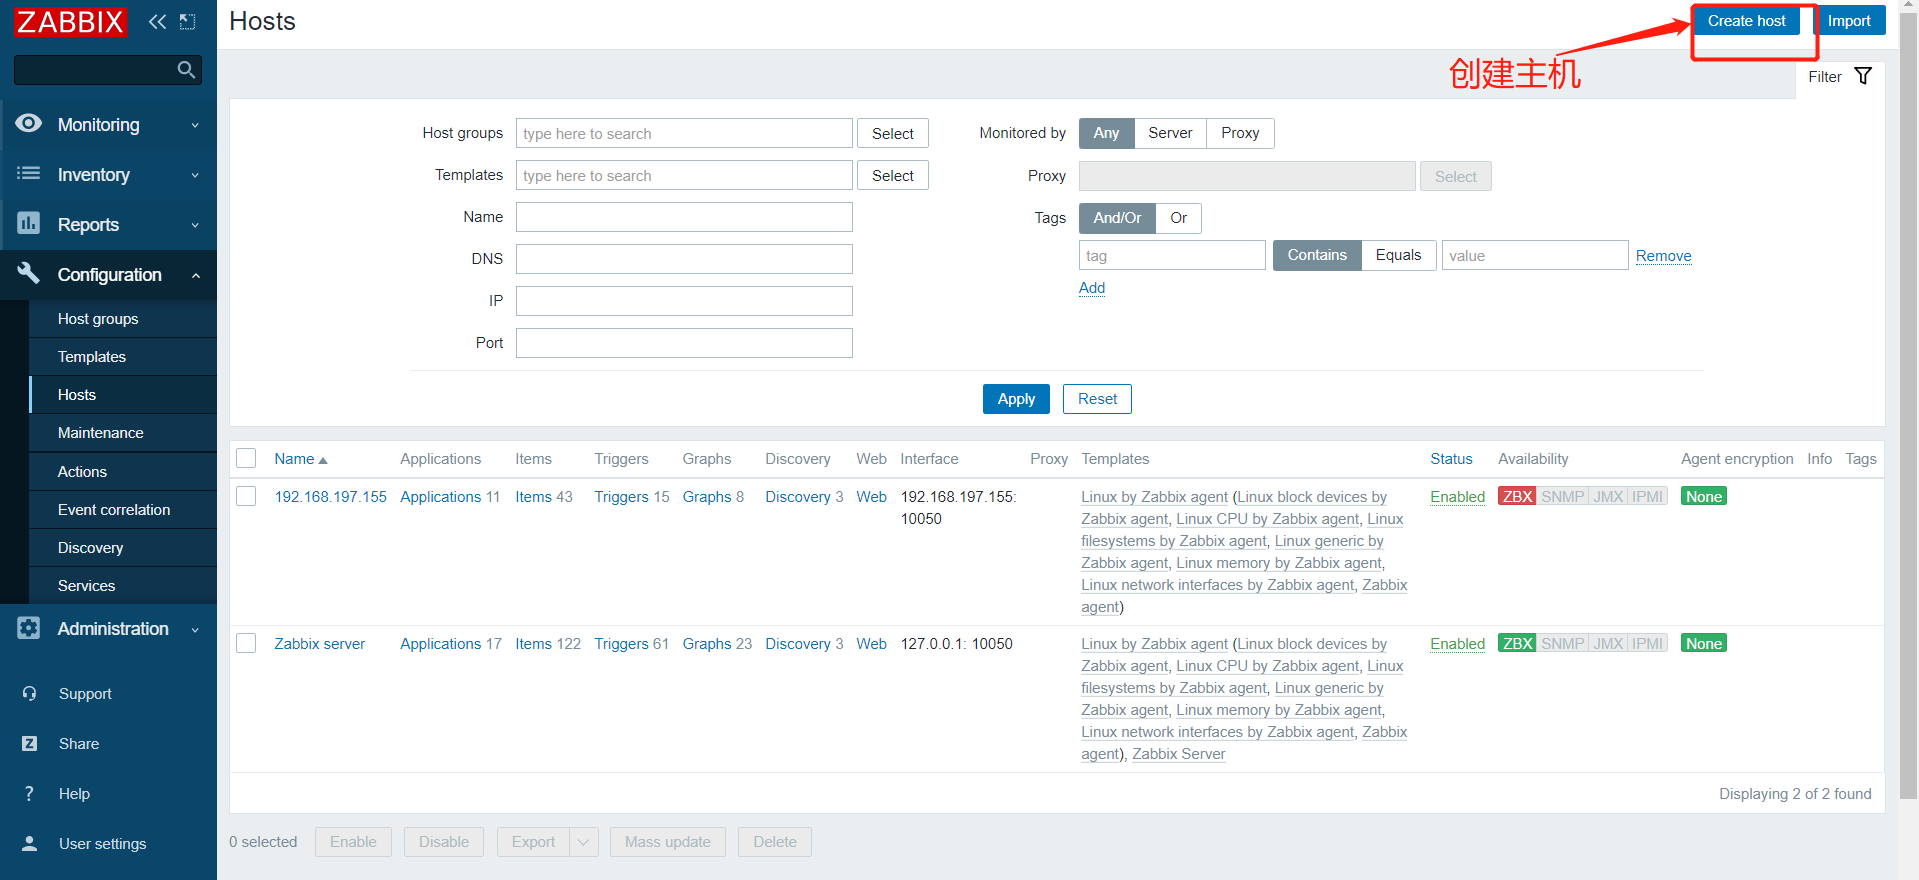
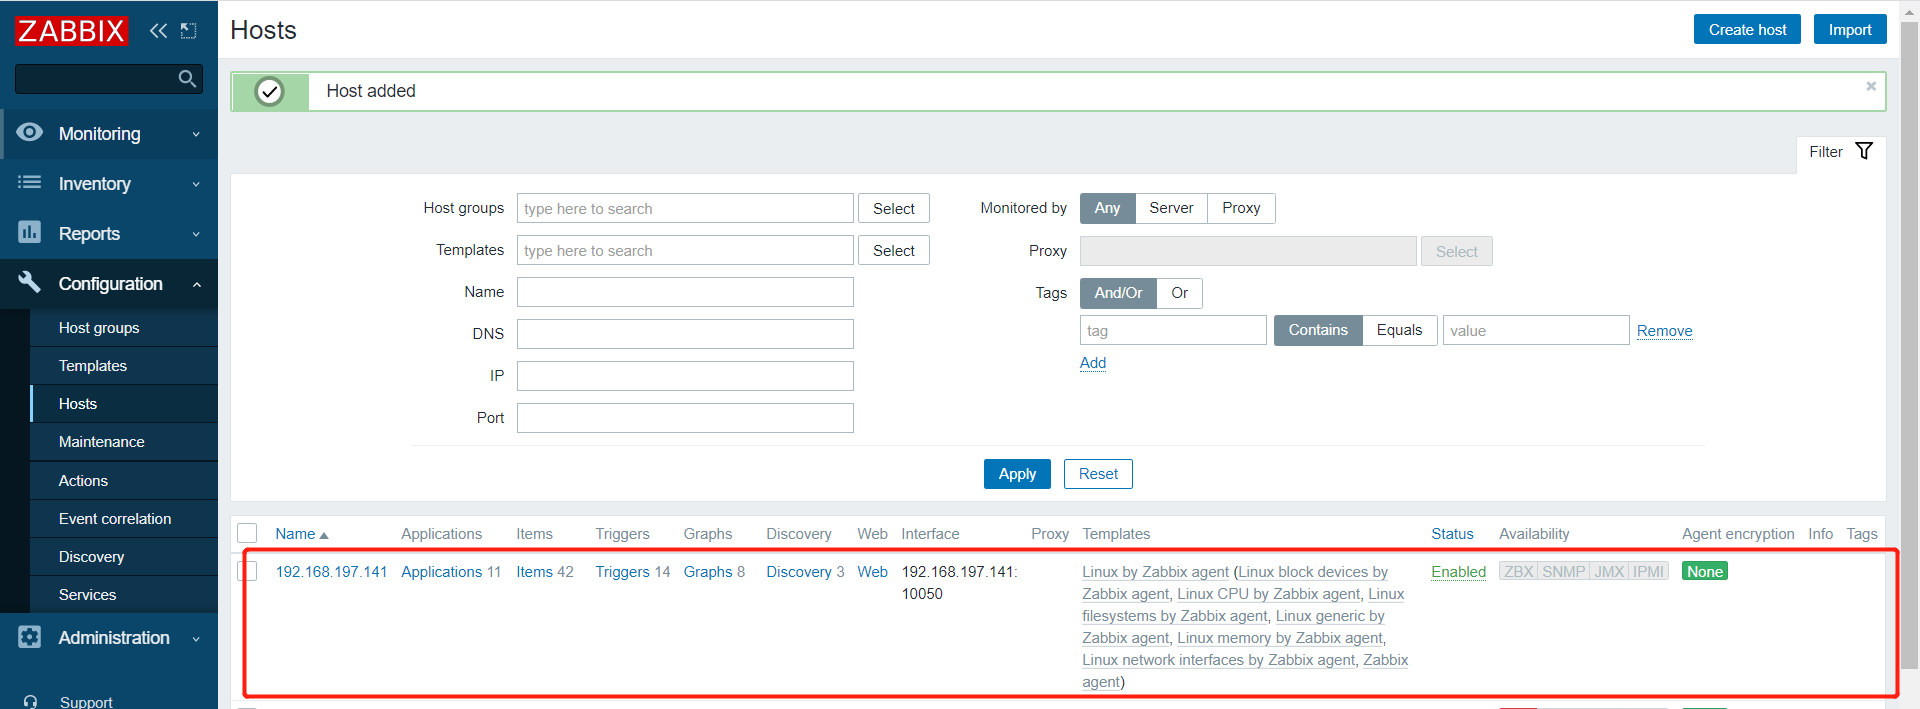
- Zabbix_server端WEB页新建主机
![]()
- nginx服务器新建状态页面
location / {
            root   /usr/local/nginx/html;
            index  index.php index.html index.htm ;
        }
        location /status {
            stub_status on;
        }


## 测试访问
[root@localhost conf]# curl 192.168.197.141/status
Active connections: 1
server accepts handled requests
 1 1 1
Reading: 0 Writing: 1 Waiting: 0
- 编写项目监控脚本
[root@localhost scripts]# !vim
vim nginx_status.sh

#!/bin/bash

Active_con=`curl -s 192.168.197.141/status |grep Active|awk '{print $3}'`
accepts=`curl -s 192.168.197.141/status |awk NR==3 |awk '{print $1}'`
handled=`curl -s 192.168.197.141/status |awk NR==3 |awk '{print $2}'`
requests=`curl -s 192.168.197.141/status |awk NR==3 |awk '{print $3}'`
reading=`curl -s 192.168.197.141/status |grep Reading|awk '{print $2}'`
writing=`curl -s 192.168.197.141/status |grep Reading|awk '{print $4}'`
waiting=`curl -s 192.168.197.141/status |grep Reading|awk '{print $6}'`

case $1 in
active_con )
        echo $Active_con
        ;;
accepts )
        echo $accepts
        ;;
handled )
        echo $handled
        ;;
requests )
        echo $requests
        ;;
reading )
        echo $reading
        ;;
writing )
        echo $writing
        ;;
waiting )
        echo $waiting
        ;;
* )
        echo 'please enter (active_con,accepts,handled,requests,reading,writing,waiting) parameters'
        ;;
esac
- 将脚本写入zabbix_agentd配置文件
[root@localhost ~]# vim /usr/local/etc/zabbix_agentd.conf
# Range: 0-1
# Default:
UnsafeUserParameters=1 ## 打开自定义监控项参数
......
 TLSCipherAll=
UserParameter=nginx_status[*],/scripts/nginx_status.sh $1  ## 文件末尾写入

## 重启zabbix
[root@localhost ~]# pkill zabbix
[root@localhost ~]# zabbix_agentd


## zabbix服务器上测试脚本
[root@localhost ~]# zabbix_get -s 192.168.197.141 -k 'nginx_status[writing]'
1
[root@localhost ~]# zabbix_get -s 192.168.197.141 -k 'nginx_status[ssss]'
please enter (active_con,accepts,handled,requests,reading,writing,waiting) parameters
- zabbix Web页添加item
![]()

注意:如果需要将web_status中的每个指标监控,则需要新建多个item,这里以"writing"为示例
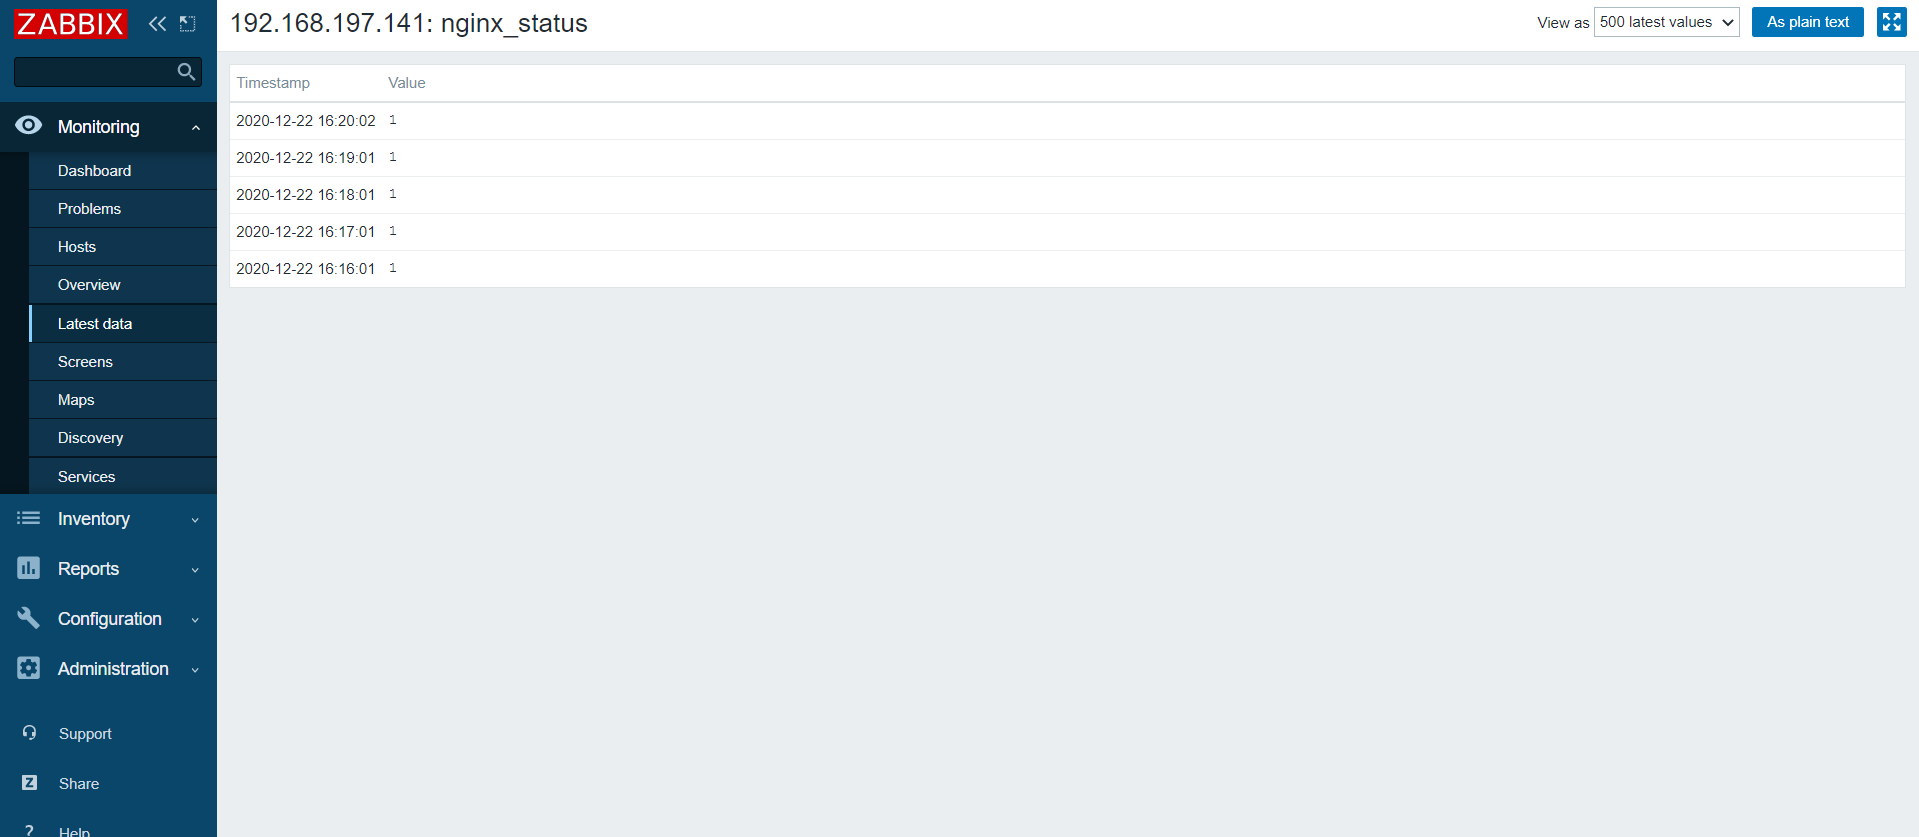
-
成功取到writing值.
![]()
-
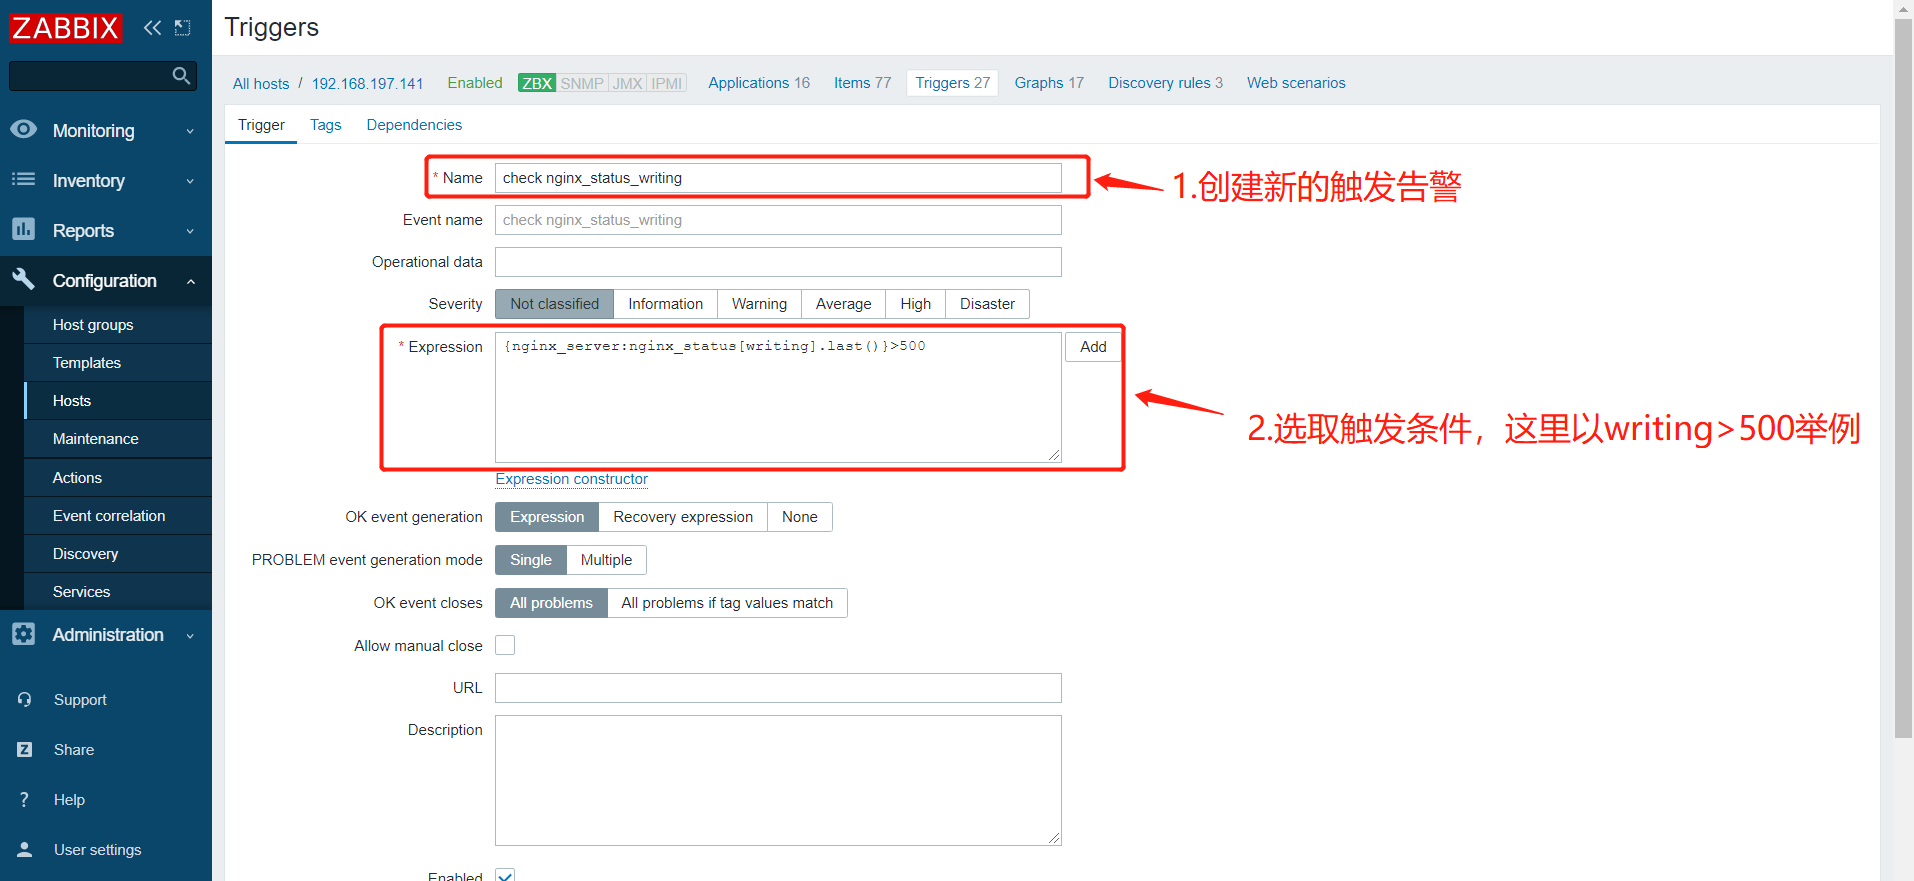
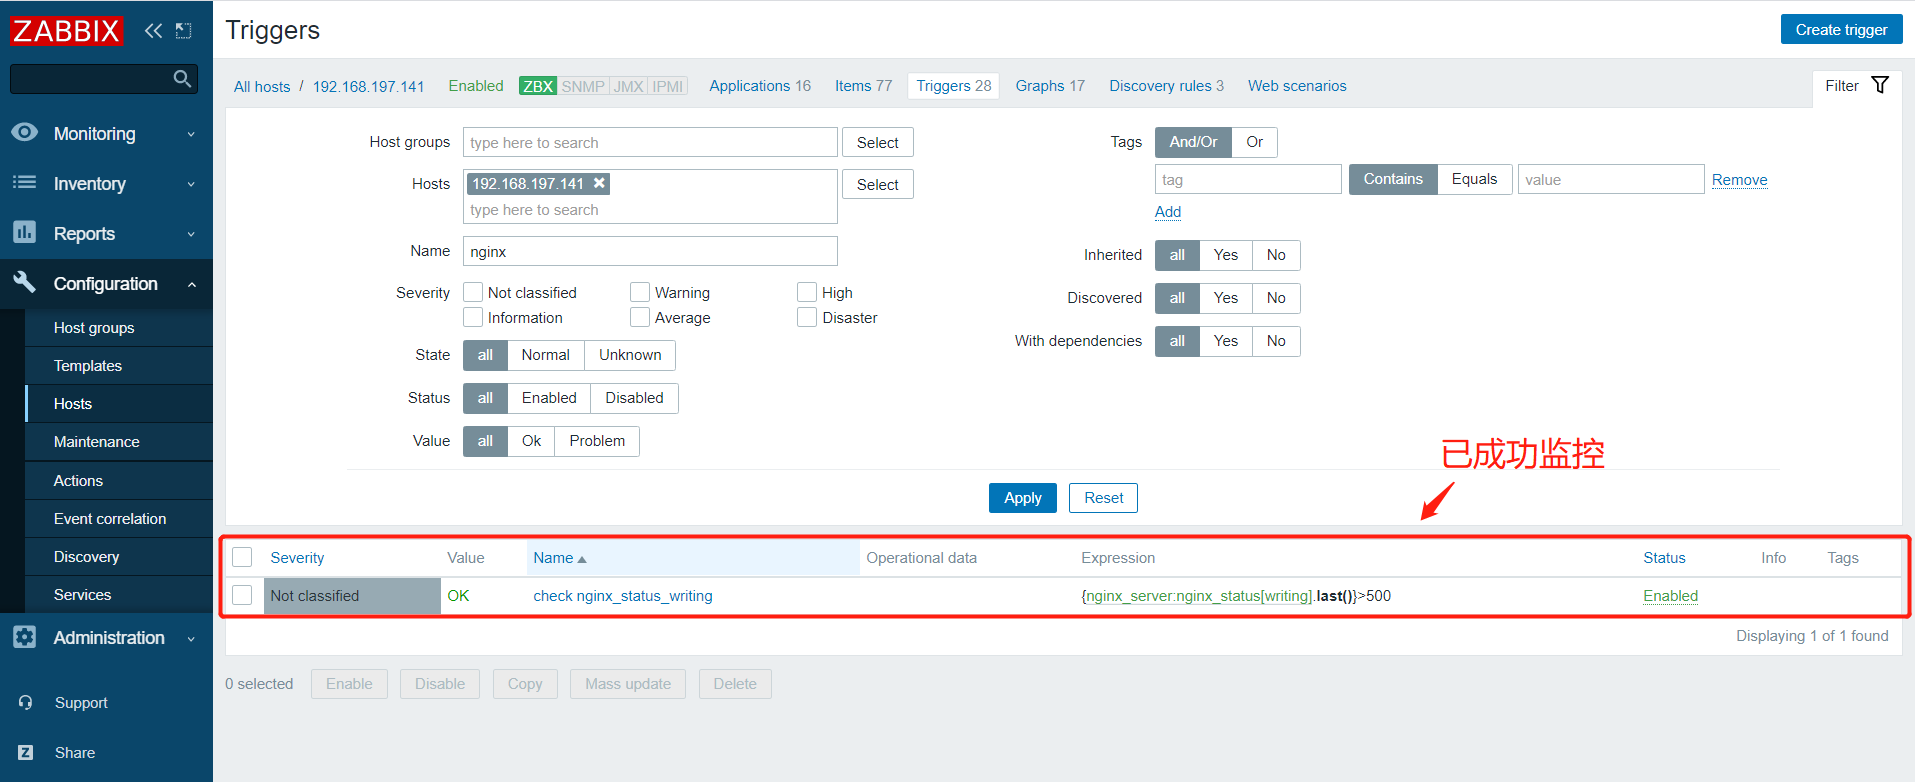
新建触发告警

 浙公网安备 33010602011771号