

在k8s集群中安装rook-ceph 1.8版本步骤
官方文档地址:https://rook.io/docs/rook/v1.8/quickstart.html
Kubernetes 最小版本号
Kubernetes 最小版本号:Kubernetes v1.16
前提
- Kubernetes 集群各节点主机安装 lvm2 软件:
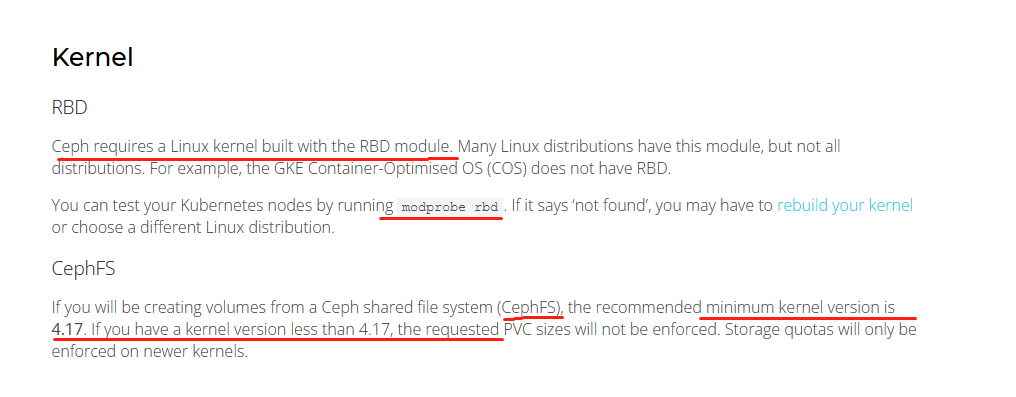
yum -y install lvm2 - Kubernetes 集群各节点主机内核版本不低于4.17
- Kubernetes 集群有至少 3 个工作节点(master和worker),且每个工作节点都有一块初系统盘以外的 未格式化 的裸盘(工作节点是虚拟机时,未格式化的裸盘可以是虚拟磁盘),用于创建 3 个 Ceph OSD;
- 也可以只有 1 个工作节点,挂载了一块 未格式化 的裸盘;
- 在节点机器上执行 lsblk -f 指令可以查看磁盘是否需被格式化,输出结果如下:
NAME                  FSTYPE      LABEL UUID                                   MOUNTPOINT
vda
└─vda1                LVM2_member       >eSO50t-GkUV-YKTH-WsGq-hNJY-eKNf-3i07IB
 ├─ubuntu--vg-root   ext4              c2366f76-6e21-4f10-a8f3-6776212e2fe4   /
 └─ubuntu--vg-swap_1 swap              9492a3dc-ad75-47cd-9596-678e8cf17ff9   [SWAP]
vdb
如果 FSTYPE 字段不为空,则表示该磁盘上已经被格式化。在上面的例子中,可以将磁盘 vdb 用于 Ceph 的 OSD,而磁盘 vda 及其分区则不能用做 Ceph 的 OSD。
下载yaml文件
从官方GitHub上下载过来的压缩包:https://files.cnblogs.com/files/sanduzxcvbnm/rook-1.8.1.zip
# 有压缩包了,这一步可以省略
# git clone --single-branch --branch v1.8.1 https://github.com/rook/rook.git
事先下载好yaml文件使用的镜像
每个K8s集群主机都需要下载
里面使用到的yaml文件中有些镜像会从k8s.gcr.io中下载,这里事先从GitHub下载同名镜像,然后重新tag,使其符合要求
若不事先执行这一步,直接操作执行后面那些yaml文件后会发现有些pod启动失败,查看详情得知镜像是从k8s.gcr.io中下载导致的,镜像下载不下来导致有关pod启动失败
在这里事先下载好这些镜像了(从文件operator.yaml中可以事先获取到,这样就避免真正执行yaml的时候发现pod报错再解决了)
  # The default version of CSI supported by Rook will be started. To change the version
  # of the CSI driver to something other than what is officially supported, change
  # these images to the desired release of the CSI driver.
  # ROOK_CSI_CEPH_IMAGE: "quay.io/cephcsi/cephcsi:v3.4.0"
  # ROOK_CSI_REGISTRAR_IMAGE: "k8s.gcr.io/sig-storage/csi-node-driver-registrar:v2.3.0"
  # ROOK_CSI_RESIZER_IMAGE: "k8s.gcr.io/sig-storage/csi-resizer:v1.3.0"
  # ROOK_CSI_PROVISIONER_IMAGE: "k8s.gcr.io/sig-storage/csi-provisioner:v3.0.0"
  # ROOK_CSI_SNAPSHOTTER_IMAGE: "k8s.gcr.io/sig-storage/csi-snapshotter:v4.2.0"
  # ROOK_CSI_ATTACHER_IMAGE: "k8s.gcr.io/sig-storage/csi-attacher:v3.3.0"
docker pull rook/ceph:v1.8.1
docker pull quay.io/ceph/ceph:v16.2.7
docker pull quay.io/cephcsi/cephcsi:v3.4.0

docker pull liangjw/csi-node-driver-registrar:v2.3.0
docker tag liangjw/csi-node-driver-registrar:v2.3.0 k8s.gcr.io/sig-storage/csi-node-driver-registrar:v2.3.0

docker pull liangjw/csi-provisioner:v3.0.0
docker tag liangjw/csi-provisioner:v3.0.0 k8s.gcr.io/sig-storage/csi-provisioner:v3.0.0

docker pull liangjw/csi-resizer:v1.3.0
docker tag liangjw/csi-resizer:v1.3.0 k8s.gcr.io/sig-storage/csi-resizer:v1.3.0

docker pull liangjw/csi-attacher:v3.3.0
docker tag liangjw/csi-attacher:v3.3.0 k8s.gcr.io/sig-storage/csi-attacher:v3.3.0

docker pull liangjw/csi-snapshotter:v4.2.0
docker tag liangjw/csi-snapshotter:v4.2.0 k8s.gcr.io/sig-storage/csi-snapshotter:v4.2.0
初始化
cd rook/deploy/examples
kubectl create -f crds.yaml -f common.yaml -f operator.yaml

# verify the rook-ceph-operator is in the `Running` state before proceeding
kubectl -n rook-ceph get pod
安装rook-ceph
kubectl create -f cluster.yaml
kubectl -n rook-ceph get pod
使用toolbox工具箱验证rook-ceph状态
kubectl create -f deploy/examples/toolbox.yaml (删除:kubectl -n rook-ceph delete deploy/rook-ceph-tools)
kubectl -n rook-ceph exec -it deploy/rook-ceph-tools -- bash
# 进去到toolbox中后可以执行如下四个命令
  ceph status
  ceph osd status
  ceph df
  rados df

# 执行ceph status命令后的结果显示
 cluster:
   id:     a0452c76-30d9-4c1a-a948-5d8405f19a7c
   health: HEALTH_OK

 services:
   mon: 3 daemons, quorum a,b,c (age 3m)
   mgr: a(active, since 2m)
   osd: 3 osds: 3 up (since 1m), 3 in (since 1m)
...
web页面访问
在cluster.yaml文件中默认已经开启了dashboard,默认端口是8443,不过对应的service类型是ClusterIP,只能集群内部访问,无法通过外网访问
  spec:
    dashboard:
      enabled: true

# kubectl -n rook-ceph get service
NAME                                    TYPE        CLUSTER-IP       EXTERNAL-IP   PORT(S)          AGE
rook-ceph-mgr                           ClusterIP   10.108.111.192   <none>        9283/TCP         4h
rook-ceph-mgr-dashboard                 ClusterIP   10.110.113.240   <none>        8443/TCP         4h
外部用户访问dashboard,有Ingress Controller和其他方式等,其他方式比如有NodePort, LoadBalancer和ExternalIPs 这三种方式,这里采用Node Port方式
Node Port
https形式:dashboard-external-https.yaml
http形式:dashboard-external-http.yaml
# kubectl create -f dashboard-external-https.yaml

# kubectl -n rook-ceph get service
NAME                                    TYPE        CLUSTER-IP       EXTERNAL-IP   PORT(S)          AGE
rook-ceph-mgr                           ClusterIP   10.108.111.192   <none>        9283/TCP         4h
rook-ceph-mgr-dashboard                 ClusterIP   10.110.113.240   <none>        8443/TCP         4h
rook-ceph-mgr-dashboard-external-https  NodePort    10.101.209.6     <none>        8443:31176/TCP   4h

# 访问地址:https://ip<Node Port>:31176

# 默认用户:admin,密码:使用下面的命令获取
kubectl -n rook-ceph get secret rook-ceph-dashboard-password -o jsonpath="{['data']['password']}" | base64 --decode && echo
LoadBalancer
文件:dashboard-loadbalancer.yaml
# kubectl create -f dashboard-loadbalancer.yaml
# kubectl -n rook-ceph get service
NAME                                     TYPE           CLUSTER-IP       EXTERNAL-IP                                                               PORT(S)             AGE
rook-ceph-mgr                            ClusterIP      172.30.11.40     <none>                                                                    9283/TCP            4h
rook-ceph-mgr-dashboard                  ClusterIP      172.30.203.185   <none>                                                                    8443/TCP            4h
rook-ceph-mgr-dashboard-loadbalancer     LoadBalancer   172.30.27.242    a7f23e8e2839511e9b7a5122b08f2038-1251669398.us-east-1.elb.amazonaws.com   8443:32747/TCP      4h

# 访问地址:https://a7f23e8e2839511e9b7a5122b08f2038-1251669398.us-east-1.elb.amazonaws.com:8443
Ingress Controller
nginx Ingress Controlle ,文件:dashboard-ingress-https.yaml
# 替换文件中的域名,host: rook-ceph.example.com为实际使用的域名

# kubectl create -f dashboard-ingress-https.yaml
# kubectl -n rook-ceph get ingress
NAME                      HOSTS                      ADDRESS   PORTS     AGE
rook-ceph-mgr-dashboard   rook-ceph.example.com      80, 443   5m

# kubectl -n rook-ceph get secret rook-ceph.example.com
NAME                       TYPE                DATA      AGE
rook-ceph.example.com      kubernetes.io/tls   2         4m

# 访问地址:https://rook-ceph.example.com/
基于rook-ceph创建共享文件系统cephfs,名称是myfs
共享文件系统可以通过多个POD的读/写权限装载
# kubectl create -f filesystem.yaml
# kubectl -n rook-ceph get pod -l app=rook-ceph-mds
NAME                                      READY     STATUS    RESTARTS   AGE
rook-ceph-mds-myfs-7d59fdfcf4-h8kw9       1/1       Running   0          12s
rook-ceph-mds-myfs-7d59fdfcf4-kgkjp       1/1       Running   0          12s

# kubectl -n rook-ceph exec -it deploy/rook-ceph-tools -- bash
ceph status

 ...
 services:
   mds: myfs-1/1/1 up {[myfs:0]=mzw58b=up:active}, 1 up:standby-replay
基于文件系统创建StorageClass
kubectl create -f deploy/examples/csi/cephfs/storageclass.yaml
基于文件系统创建StorageClass举例使用
kubectl create -f deploy/examples/csi/cephfs/kube-registry.yaml

kubectl delete -f deploy/examples/csi/cephfs/kube-registry.yaml
# 前提:filesystem.yaml文件中preserveFilesystemOnDelete: true (默认)
删除基于rook-ceph创建共享文件系统cephfs,名称是myfs
kubectl -n rook-ceph delete cephfilesystem myfs
基于rook-ceph创建块设备,名称是rook-ceph-block
块存储允许单个pod安装存储
在Rook调配存储之前,需要创建StorageClass和CephBlockPool。这将允许Kubernetes在配置持久卷时与Rook进行互操作。
注意:此示例要求每个节点至少有1个OSD,每个OSD位于3个不同的节点上。
每个OSD必须位于不同的节点上,因为failureDomain设置为host,并且已复制。大小设置为3。
kubectl create -f deploy/examples/csi/rbd/storageclass.yaml
举例
这一步相当于是创建俩应用,每个应用使用一个快设备,从块存储中获取一个20G的磁盘
cd deploy/examples
kubectl create -f mysql.yaml
kubectl create -f wordpress.yaml

kubectl get pvc
NAME             STATUS    VOLUME                                     CAPACITY   ACCESSMODES   AGE
mysql-pv-claim   Bound     pvc-95402dbc-efc0-11e6-bc9a-0cc47a3459ee   20Gi       RWO           1m
wp-pv-claim      Bound     pvc-39e43169-efc1-11e6-bc9a-0cc47a3459ee   20Gi       RWO           1m

kubectl get svc wordpress
NAME        CLUSTER-IP   EXTERNAL-IP   PORT(S)        AGE
wordpress   10.3.0.155   <pending>     80:30841/TCP   2m

# echo http://$(minikube ip):$(kubectl get service wordpress -o jsonpath='{.spec.ports[0].nodePort}')
# 访问地址:http://集群任意节点ip:30841

kubectl delete -f wordpress.yaml
kubectl delete -f mysql.yaml
删除块设备
# 等同于直接执行文件命令:kubectl delete  -f deploy/examples/csi/rbd/storageclass.yaml
kubectl delete -n rook-ceph cephblockpools.ceph.rook.io replicapool
kubectl delete storageclass rook-ceph-block
基于rook-ceph创建对象存储,名称是rook-ceph-rgw
官方文档:https://rook.io/docs/rook/v1.8/ceph-object.html
注意:此示例至少需要3个bluestore OSD,每个OSD位于不同的节点上。
OSD必须位于不同的节点上,因为failureDomain设置为host,并且erasureCoded区块设置需要至少3个不同的OSD(2个数据区块+1个编码区块)。
Create the object store
cd deploy/examples
kubectl create -f object.yaml

# To confirm the object store is configured, wait for the rgw pod to start
kubectl -n rook-ceph get pod -l app=rook-ceph-rgw
NAME                                        READY   STATUS    RESTARTS   AGE
rook-ceph-rgw-my-store-a-67c588c977-h6wc6   1/1     Running   0          22s
连接到其他对象存储的网关 (使用其他的存储对象网关,不是这次要创建的存储对象网关) (这一步可以不用操作)
kubectl create -f object-external.yaml
ceph-object-controller: ceph object store gateway service >running at 10.100.28.138:8080

kubectl -n rook-ceph get svc -l app=rook-ceph-rgw
NAME                     TYPE        CLUSTER-IP      EXTERNAL-IP   PORT(S)    AGE
rook-ceph-rgw-my-store   ClusterIP   10.100.28.138   <none>        8080/TCP   6h59m

# 集群中的任何pod现在都可以访问此端点:
$ curl 10.100.28.138:8080
<?xml version="1.0" encoding="UTF-8"?><ListAllMyBucketsResult xmlns="http://s3.amazonaws.com/doc/2006-03-01/"><Owner><ID>anonymous</ID><DisplayName></DisplayName></Owner><Buckets></Buckets></ListAllMyBucketsResult>

# 也可以使用内部注册的DNS名称:
curl rook-ceph-rgw-my-store.rook-ceph:8080
<?xml version="1.0" encoding="UTF-8"?><ListAllMyBucketsResult xmlns="http://s3.amazonaws.com/doc/2006-03-01/"><Owner><ID>anonymous</ID><DisplayName></DisplayName></Owner><Buckets></Buckets></ListAllMyBucketsResult>

# DNS名称是使用以下模式:rook-ceph-rgw-$STORE_NAME.$NAMESPACE
创建一个桶
kubectl create -f storageclass-bucket-delete.yaml (set the reclaim policy to delete the bucket and all objects when its OBC is deleted.)
# kubectl create -f storageclass-bucket-retain.yaml (set the reclaim policy to retain the bucket when its OBC is deleted.)
kubectl create -f object-bucket-claim-delete.yaml
客户端连接,这一步可以跳过
官方文档中建立的rook-ceph是基于aws,因此这里使用的是AWS,不影响使用,只是表述显示的问题,当然也可以换成其他名称来使用,这里只是举例说明
#config-map, secret, OBC will part of default if no specific name space mentioned
# ceph-delete-bucket根据上一步的结果而定,官方页面给的是ceph-bucket找不到
export AWS_HOST=$(kubectl -n default get cm ceph-delete-bucket -o jsonpath='{.data.BUCKET_HOST}')
export AWS_ACCESS_KEY_ID=$(kubectl -n default get secret ceph-delete-bucket -o jsonpath='{.data.AWS_ACCESS_KEY_ID}' | base64 --decode)
export AWS_SECRET_ACCESS_KEY=$(kubectl -n default get secret cceph-delete-bucket -o jsonpath='{.data.AWS_SECRET_ACCESS_KEY}' | base64 --decode)

# 实际执行后的结果显示如下:
export AWS_HOST=rook-ceph-rgw-my-store.rook-ceph.svc
export AWS_ACCESS_KEY_ID=RIEOBDSNISG4YPIJ4PWR
export AWS_SECRET_ACCESS_KEY=GEntrTD8Z6k1zM82h9Vj9VeWCZH0JKejYYVCbbsK
通过toolbox来使用对象存储
export AWS_HOST=<host>
export AWS_ENDPOINT=<endpoint>
export AWS_ACCESS_KEY_ID=<accessKey>
export AWS_SECRET_ACCESS_KEY=<secretKey>
- Host: The DNS host name where the rgw service is found in the cluster. Assuming you are using the default rook-ceph cluster, it will be rook-ceph-rgw-my-store.rook-ceph.
- Endpoint: The endpoint where the rgw service is listening. Run kubectl -n rook-ceph get svc rook-ceph-rgw-my-store, then combine the clusterIP and the port.
- Access key: The user’s access_key as printed above
- Secret key: The user’s secret_key as printed above
Endpoint=172.16.123.52:80 (获取命令:kubectl -n rook-ceph get svc rook-ceph-rgw-my-store)
# 实际执行后获取的参数信息
export AWS_HOST=rook-ceph-rgw-my-store.rook-ceph.svc
export AWS_ENDPOINT=172.16.123.52:80
export AWS_ACCESS_KEY_ID=RIEOBDSNISG4YPIJ4PWR
export AWS_SECRET_ACCESS_KEY=GEntrTD8Z6k1zM82h9Vj9VeWCZH0JKejYYVCbbsK

# 官方文档页面给的展示的数据样式
export AWS_HOST=rook-ceph-rgw-my-store.rook-ceph
export AWS_ENDPOINT=10.104.35.31:80
export AWS_ACCESS_KEY_ID=XEZDB3UJ6X7HVBE7X7MA
export AWS_SECRET_ACCESS_KEY=7yGIZON7EhFORz0I40BFniML36D2rl8CQQ5kXU6l
Configure s5cmd
To test the CephObjectStore, set the object store credentials in the toolbox pod for the s5cmd tool.
# 使用toolbox pod进行测试
kubectl -n rook-ceph exec -it deploy/rook-ceph-tools -- bash

export AWS_HOST=rook-ceph-rgw-my-store.rook-ceph.svc
export AWS_ENDPOINT=172.16.123.52:80
export AWS_ACCESS_KEY_ID=RIEOBDSNISG4YPIJ4PWR
export AWS_SECRET_ACCESS_KEY=GEntrTD8Z6k1zM82h9Vj9VeWCZH0JKejYYVCbbsK

mkdir ~/.aws
cat > ~/.aws/credentials << EOF
[default]
aws_access_key_id = ${AWS_ACCESS_KEY_ID}
aws_secret_access_key = ${AWS_SECRET_ACCESS_KEY}
EOF
PUT or GET an object
echo "Hello Rook" > /tmp/rookObj
s5cmd --endpoint-url http://$AWS_ENDPOINT cp /tmp/rookObj s3://rookbucket

# 报错:ERROR "cp /tmp/rookObj s3://rookbucket/rookObj": NotFound: Not Found status code: 404, request id: tx00000697d87623a91fcc6-0061c2e235-e056-my-store, host id:

s5cmd --endpoint-url http://$AWS_ENDPOINT cp s3://rookbucket/rookObj /tmp/rookObj-download
cat /tmp/rookObj-download
外网访问对象存储
Rook设置对象存储,以便POD可以访问集群内部。如果应用程序在集群外运行,则需要通过NodePort设置外部服务。
kubectl -n rook-ceph get service rook-ceph-rgw-my-store
NAME                     CLUSTER-IP   EXTERNAL-IP   PORT(S)     AGE
rook-ceph-rgw-my-store   10.3.0.177   <none>        80/TCP      2m

kubectl create -f rgw-external.yaml # 注意:文档中使用的内部端口是8080,需要修改成80端口

kubectl -n rook-ceph get service rook-ceph-rgw-my-store rook-ceph-rgw-my-store-external
NAME                              TYPE        CLUSTER-IP       EXTERNAL-IP   PORT(S)        AGE
rook-ceph-rgw-my-store            ClusterIP   10.104.82.228    <none>        80/TCP         4m
rook-ceph-rgw-my-store-external   NodePort    10.111.113.237   <none>        80:31536/TCP   39s
在内部,rgw服务正在端口80上运行。本例中的外部端口为31536。现在,您可以从任何地方访问CephObjectStore!您只需要集群中任何计算机的主机名、外部端口和用户凭据。
创建用户
kubectl create -f object-user.yaml

kubectl -n rook-ceph describe secret rook-ceph-object-user-my-store-my-user
Name:		rook-ceph-object-user-my-store-my-user
Namespace:	rook-ceph
Labels:		app=rook-ceph-rgw
	        rook_cluster=rook-ceph
		rook_object_store=my-store
Annotations:	<none>

Type:	kubernetes.io/rook

Data
====
AccessKey:	20 bytes
SecretKey:	40 bytes
获取用户访问对象存储使用的AccessKey和SecretKey
kubectl -n rook-ceph get secret rook-ceph-object-user-my-store-my-user -o jsonpath='{.data.AccessKey}' | base64 --decode
kubectl -n rook-ceph get secret rook-ceph-object-user-my-store-my-user -o jsonpath='{.data.SecretKey}' | base64 --decode
使用prometheus监控rook-ceph
Prometheus Operator
kubectl apply -f https://raw.githubusercontent.com/coreos/prometheus-operator/v0.40.0/bundle.yaml
kubectl get pod
使用客户端进行访问验证还有待进一步研究
Prometheus Instances
cd rook/deploy/examples/monitoring
kubectl create -f service-monitor.yaml
kubectl create -f prometheus.yaml
kubectl create -f prometheus-service.yaml

kubectl -n rook-ceph get pod prometheus-rook-prometheus-0
Prometheus Web Console
echo "http://$(kubectl -n rook-ceph -o jsonpath={.status.hostIP} get pod prometheus-rook-prometheus-0):30900"

Prometheus Alerts
kubectl create -f deploy/examples/monitoring/rbac.yaml

# 修改cluster.yaml文件,开启监控 (默认:enabled: false)
apiVersion: ceph.rook.io/v1
kind: CephCluster
metadata:
  name: rook-ceph
  namespace: rook-ceph
[...]
spec:
[...]
  monitoring:
    enabled: true
    rulesNamespace: "rook-ceph"
[...]

kubectl apply -f cluster.yaml
Grafana Dashboards
Ceph - Cluster:https://grafana.com/grafana/dashboards/2842
Ceph - OSD (Single):https://grafana.com/dashboards/5336
Ceph - Pools:https://grafana.com/dashboards/5342
Updates and Upgrades
更新Rook时,可能会更新RBAC以进行监视。每次更新或升级都很容易应用更改。这应该在更新Rook公共资源(如common)的同时完成。
kubectl apply -f deploy/examples/monitoring/rbac.yaml
卸载
kubectl delete -f service-monitor.yaml
kubectl delete -f prometheus.yaml
kubectl delete -f prometheus-service.yaml
kubectl delete -f https://raw.githubusercontent.com/coreos/prometheus-operator/v0.40.0/bundle.yaml

 浙公网安备 33010602011771号