Spring 中 Bean 的定义及注入 Value
Spring 中,bean 的定义有三种方式:
- 基于 XML 的配置
- 基于注解的配置
- 基于 Java 类的配置
Bean 的注入有两种方式:基于构造函数的依赖注入和基于设值函数的依赖注入。
这里我们先给大家介绍第一种,基于 XML 的配置方法,这种方法在 Spring 中是最常见的。
基于 XML 的配置方法
基于 XML 的配置方法又分为三种写法:一般方法,缩写方法,pschema 方法。先看下面的 Bean:FileNameGenerator.java,其中包含两个 properties,name 和 type,我们向两个 properties 注入 value。
在 src/main/java 路径下,新建类:FileNameGenerator.java
package com.shiyanlou.spring.bean;
public class FileNameGenerator {
private String name;
private String type;
public String getName() {
return name;
}
public void setName(String name) {
this.name = name;
}
public String getType() {
return type;
}
public void setType(String type) {
this.type = type;
}
/*
*打印文件名和文件类型的方法
*/
public void printFileName() {
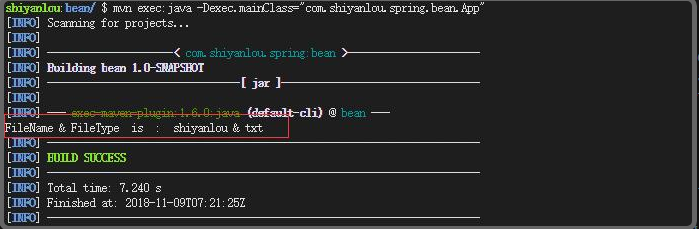
System.out.println("FileName & FileType is : "+name+" & "+type);
}
}
接着在 src/main/resources 路径下新建 SpringBeans.xml 文件:
<?xml version = "1.0" encoding = "UTF-8"?>
<beans xmlns = "http://www.springframework.org/schema/beans"
       xmlns:xsi = "http://www.w3.org/2001/XMLSchema-instance"
       xsi:schemaLocation = "http://www.springframework.org/schema/beans http://www.springframework.org/schema/beans/spring-beans.xsd">
    <!--一般方法-->
    <bean id = "FileNameGenerator" class = "com.shiyanlou.spring.bean.FileNameGenerator">
        <property name = "name">
            <value>shiyanlou</value>
        </property>
        <property name = "type">
            <value>txt</value>
        </property>
    </bean>
    <!-- 另一重配置方法 缩写方法-->
    <!--
        <bean id = "FileNameGenerator" class = "com.shiyanlou.spring.bean.FileNameGenerator">
               <property name = "name" value = "shiyanlou" />
               <property name = "type" value = "txt" />
           </bean>
     -->
</beans>
第三种方法:pschema 方法。
<?xml version = "1.0" encoding = "UTF-8"?>
<beans xmlns = "http://www.springframework.org/schema/beans"
    xmlns:xsi = "http://www.w3.org/2001/XMLSchema-instance"
    xmlns:p = "http://www.springframework.org/schema/p"
    xsi:schemaLocation = "http://www.springframework.org/schema/beans
    http://www.springframework.org/schema/beans/spring-beans.xsd">

    <!--<bean id = "FileNameGenerator" class = "com.shiyanlou.spring.bean.FileNameGenerator">
        <property name = "name">
            <value>shiyanlou</value>
        </property>
        <property name = "type">
            <value>txt</value>
        </property>
    </bean>-->
    <bean id = "FileNameGenerator" class = "com.shiyanlou.spring.bean.FileNameGenerator"
             p:name = "shiyanlou" p:type = "txt" />
</beans>
注意,这种方法需要在 bean 的配置文件 xml 中,加入声明。
xmlns:p = "http://www.springframework.org/schema/p"
最后需要在 com.shiyanlou.spring.bean 路径下写一个 App.java。
package com.shiyanlou.spring.bean;

import org.springframework.context.ApplicationContext;
import org.springframework.context.support.ClassPathXmlApplicationContext;

import com.shiyanlou.spring.bean.FileNameGenerator;

public class App
{
    private static ApplicationContext context;

        public static void main( String[] args ) {
            context = new ClassPathXmlApplicationContext("SpringBeans.xml");

            FileNameGenerator obj = (FileNameGenerator) context.getBean("FileNameGenerator");
            obj.printFileName();
        }
}
基于注解的配置
注解是为 Spring 容器提供 Bean 定义的信息,把 XML 定义的信息通过类注解描述出来。众所周知,Spring 容器三大要素:Bean 定义、Bean 实现类以及 Spring 框架。如果采用 XML 配置,Bean 定义和 Bean 实现类本身分离,而采用注解配置,Bean 定义在 Bean 实现类上注解就可以实现。在后面我们会有一节实验专门讲解基于注解的配置,以下先简单列举几个注解方式。
@Component
被此注解标注的类将被 Spring 容器自动识别,自动生成 Bean 定义。即:
packeage com.shiyanlou.spring;

@Component("shiyanlou")
public class shiyanlou{

}
与在 XML 中配置以下效果相同:
<bean id = "shiyanlou" class = "com.shiyanlou.spring.shiyanlou">
除此之外,Spring 有三个与 @Component 等效的注解:
1、@Controller:对应表现层的 Bean,也就是 Action。
2、@Service:对应的是业务层 Bean。
3、@Repository:对应数据访问层 Bean。
@Autowired
@Autowired 可以用来装配 bean,都可以写在字段上,或者方法上。使用 @Autowired,首先要在在 applicationContext.xml 中加入
@Autowired()
@Qualifier("shiyanlouDao")
private ShiyanlouDao shiyanlouDao;
Configuration
通过使用注释 @Configuration 告诉 Spring,这个 Class 是 Spring 的核心配置文件,并且通过使用注解 @Bean 定义 bean,举例说明:
package com.shiyanlou.spring.java_config;

import org.springframework.context.annotation.Bean;
import org.springframework.context.annotation.Configuration;

@Configuration
public class AppConfig {

    @Bean(name = "animal")
    public IAnimal getAnimal(){
        return new Dog();
    }
}
App.java 内容:
package com.shiyanlou.spring.java_config;

import org.springframework.context.ApplicationContext;
import org.springframework.context.annotation.AnnotationConfigApplicationContext;

public class App {

    private static ApplicationContext context;

    public static void main(String[] args) {
        context = new AnnotationConfigApplicationContext(AppConfig.class);
        IAnimal obj = (IAnimal) context.getBean("animal");
        obj.makeSound();

    }

}
通过上面的 @Configuration 注解,相当于在 ApplicationContext.xml 文件中添加如下配置,使用了 @Configuration + @Bean 就不需要添加了:
<bean id = "animal" class = "com.shiyanlou.spring.java_config.Dog">

 浙公网安备 33010602011771号