Your First ASP.NET 5 Web App Using Visual Studio(你的首个用visual studio开发的Asp.net 5 Web应用)
本菜鸟基本是个英盲,此篇外博是我用有道翻译的,好在内容还算简单,但愿不会误人子弟。英语好的同志们可直接去看原文:https://docs.asp.net/en/latest/tutorials/your-first-aspnet-application.html#id6,如果有人能重新翻译发布出来让大家学习那再好不过,省得我这种人一个一个地查单词。
欢迎指正!
By Erik Reitan
In this tutorial, you’ll create a simple web app using ASP.NET 5. The app stores data in a SQL database using Entity Framework (EF) and uses ASP.NET MVC to support the basic CRUD operations (create, read, update, delete).
在这个练习中,你将会使用Asp.net 5创建一个简单的web应用。应用使用实体框架(EF)存储在SQL数据库里,并且使用Asp.net MVC来支持基本的CRUD(增查改删)操作。
In this article(这篇文章分以下小节):
- Prerequisites(先期准备)
- Create a new ASP.NET 5 project(新建一个Asp.net 5项目)
- Entity Framework(实体框架)
- Create a data model and scaffolding(创建数据模型和基架)
- Using data migrations to create the database(使用数据迁移创建数据库)
- Adding navigation(增加导航)
- Run the web app locally(在本地运行web应用)
- Publish the web app to Azure App Service(发布web应用到Azure应用服务)
- Additional Resources(更多资源)
Prerequisites(先期准备)
Before you start, make sure that you have the followed the getting started steps for Installing ASP.NET 5 On Windows. This tutorial assumes you have already installed Visual Studio 2015 and the latest ASP.NET 5 runtime and tooling.
在开始之前,确保你已按照开始步骤安装了Asp.net 5。此练习假设你已经安装了Visual Studio 2015和最近版的Asp.net 5及其工具。
Note: For additional information about installing ASP.NET 5 on other platforms, see Getting Started.
注意:关于在其它系统上安装Asp.net 5,请看开始。
Create a new ASP.NET 5 project(新建一个Asp.net 5项目)
Start Visual Studio 2015. From the File menu, select New > Project.
启动Visual Studio 2015。点击“文件”菜单,选择“新建”>"项目"。
Select the ASP.NET Web Application project template. It appears under Installed > Templates >Visual C# > Web. Name the project ContosoBooks and click OK.
选择“已安装”>“模板”>“Visual C#”>“Web”下的“ASP.NET Web Application”项目模板。将项目命名为ContosoBooks并点击“确定”按钮。


In the New ASP.NET Project dialog, select Web Application under ASP.NET 5 Preview Templates. Also, make sure the Host in the cloud checkbox is not selected and click OK.
在弹出的“新建ASP.NET项目”对话框中,选择“ASP.NET 5预览板模板”下的“Web Application”。同样,请确保不要选中“在云中托管”,并点击“确定”按钮。


Running the default app(运行默认应用)
Once Visual Studio finishes creating the app, run the app by selecting Debug -> Start Debugging. As an alternative, you can press F5.
一旦Visual Studio完成创建应用,通过选择“调试”->“开始调试”或按“F5”键运行应用。 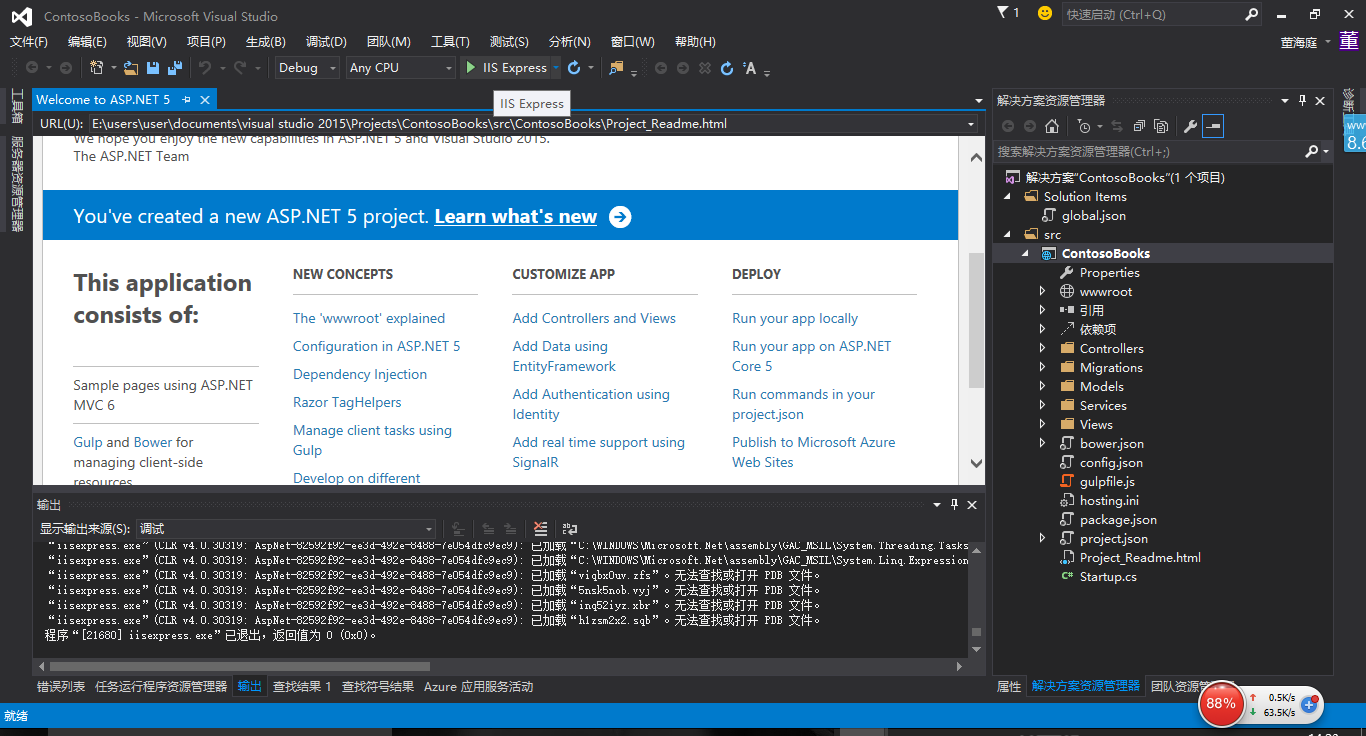
It may take time to initialize Visual Studio and the new app. Once it is complete, the browser will show the running app.
初始化Visual Studio 和新建的应用的准备工作可能要花些时间,一旦这些工作完成,app就会在浏览器上跑起来。

After reviewing the running Web app, close the browser and click the “Stop Debugging” icon in the toolbar of Visual Studio to stop the app.
看过运行在浏览器中的Web应用后,关闭浏览器,并在Visual Studio工作栏中点击“停止调度”图标停止运行应用。
Review the project(查看项目)
In Visual Studio, the Solution Explorer window lets you manage files for the project. The web application template that you used to create this web app adds the following basic folder structure:
你可以在Visual Studio的“解决方案资源管理器”中管理项目文件。刚才创建此Web应用时使用的web应用模板为此解决方案增加了如下基本文件结构:


Visual Studio creates some initial folders and files for your project. The primary files that you should be familiar with include the following:
Visual Studio 为你的项目创建了一些初始的文件夹和文件。你应该熟悉下面这些主要文件:
|
File name 文件名 |
Purpose 用途 |
|---|---|
| project.json |
The presence of a project.json file defines a .NET Execution Environment (DNX) project. It is the project.json file that contains all the information that DNX needs to run and package your project. For additional details, including the project.json file schema, see Working with DNX Projects. project.json文件定义.NET运行环境(DNX)映射。project.json包含运行DNX和打包项目的所有信息。有关更多详细内容,包括project.json文件模式结构,请看运行DNX项目。 |
| global.json |
Visual Studio uses this file to configure the project. Visual Studio 使用此文件配置项目。 |
| config.json |
This file allows you to include additional project information, such as connection string values. For more information, see Configuration. 此文件允许你包含更多项目信息,比如数据库连接字符串。更多信息,请看设置。 |
| Statup.cs |
The Startup类为应用提供入口。Startup类必须定义一个Configure函数,和可选的ConfigureServices函数,当应用启动时,它们会被调用。更多信息,请看应用启动。 |
| Index.cshtml |
This 此视图包含默认页的HTML。 |
| _Layout.cshtml |
This 此视图包含通用HTML。其它视图很可能也会包含这些HTML,微软就将这些经常出现的HTML提取出来,单独放在_Layout.cshtml,方便其它视图引用,这和Web Form里的母版页很相似。 |
| HomeController.cs |
This 此控制器包含的类会处理来自浏览器的请求,检索模型数据,并指定视图模板来为浏览器返回响应。 |
Understanding MVC(理解MVC)
This project uses ASP.NET MVC. MVC stands for model-view-controller. MVC is a pattern for developing applications that are well architected, testable, and easy to maintain. MVC-based applications contain:
此项目使用ASP.NET MVC。MVC意为模型-视图-控制器。MVC是开发应用的一种模式,一各不错的架构,可测试,并容易维护。基于MVC的应用包含:
- Models: Classes that represent the data of the application and that use validation logic to enforce business rules for that data.(模型:描述应用中数据并使用验证逻辑规范商业规则的类。)
- Views: Template files that your application uses to dynamically generate HTML responses.(视图:应用用来动态生成HTML响应的模板文件)
- Controllers: Classes that handle incoming browser requests, retrieve model data, and then specify view templates that return a response to the browser.(控制器:处理来自浏览器的请求,检索模型数据,并指定视图模板来为浏览器返回响应的类。)
Understanding .NET Core(理解.NET Core)
.NET Core 5 is a modular runtime and library implementation that includes a subset of the .NET Framework. .NET Core 5 has been designed for Windows, Linux and OS X. It consists of a set of libraries, called “CoreFX”, and a small, optimized runtime, called “CoreCLR”. .NET Core is open-source, so you can follow progress on the project and contribute to it on GitHub. For more information, seeChoosing the Right .NET For You on the Server.
.NET Core 5 是个更加模块化的运行时和库实现,它是全功能.NET Framework的一个子集。.NET Core 5 被设计为可以运行在Windows,Linux和OS X。它由一些叫做“CoreFX”的库和一个小的,最优的叫做“CoreCLR”运行时组成。.NET Core 是开源的,所以你可以跟进项目并在GitHubh 为它贡献你的代码。更多信息,请看为你的服务选择正确的.NET。
Entity Framework(实体框架)
Entity Framework (EF) is an object-relational mapping (ORM) framework. It lets you work with relational data as objects, eliminating most of the data-access code that you’d usually need to write. Using EF, you can issue queries using LINQ, then retrieve and manipulate data as strongly typed objects. LINQ provides patterns for querying and updating data. Using EF allows you to focus on creating the rest of your application, rather than focusing on the data access fundamentals.
实体框架(EF)是一个对象关系映射(ORM)框架。它让你像使用对象一样使用关系型数据,避免像以前那样需要编写大量数数据访问代码。使用EF,你可以使用LINQ发起查询,然后像使用强类型对象一样检索并操作数据。LINQ为查询和更新数据提供样板。使用EF允许你聚焦于应用的其它部分,而不是聚焦于数据访问。
Open the project.json file. In the dependencies section, you will see the following lines related to EF:
打开project.json文件。在“dependencies”结点,你可以看到以下与EF有关的行:
  "dependencies": {
    "EntityFramework.Commands": "7.0.0-rc1-final",
    "EntityFramework.MicrosoftSqlServer": "7.0.0-rc1-final",
These lines show that you can issues EF commands from the command window and that the EF NuGet package is included with your project.
这些行说明你可以从命令窗口发起EF命令并将EF NuGet包包含到项目中。
Create a data model and scaffolding(创建数据模型和基架)
Entity Framework supports a development paradigm called Code First. Code First lets you define your data models using classes. A class is a construct that enables you to create your own custom types by grouping together variables of other types, methods and events. You can map classes to an existing database or use them to generate a database. In this tutorial, you’ll begin by creating the entity classes that define the data models for the Web application. Then you will create a context class that manages the entity classes and provides data access to the database. You will then configure EF and populate the database.
实体框架支持一种开发范例叫做代码优先。代码优先是让你先使用类定义模型。类是一种结构,通过组合其它类型的变量,函数和事件,可以构造你自定义的类型。你可以映射类到已有的数据库或使用它们(类)来全新生成一个数据库。在此练习中,你将从创建定义数据模型的实体类开始。然后你将创建一个上下文类来管理实体类并提供到数据库的数据访问。你稍后将会设置EF并填充数据库。
Create entity classes(创建实体类)
The classes you create to define the schema of the data are called entity classes. If you’re new to database design, think of the entity classes as table definitions of a database. Each property in the class specifies a column in the table of the database. These classes provide a lightweight, object-relational interface between object-oriented code and the relational table structure of the database.
你创建并用来定义数据结构的类叫实体类。如果你对数据库设计不熟悉,把实体类看作数据库中的数据表定义。类中的每个属性指定数据库中数据表的一列。这些类在面向对象代码和数据库的关系表结构之间提供一个轻量,对象-关系接口。
The Web app will have two new entities(本应用将有两个新实体):
- Book(图书)
- Author(作者)
You will define a class for each in the Models folder within Solution Explorer.
你将在“解决方案资源管理器”的“Models”文件夹中为第个实体定义一个类。
Note:You can put model classes anywhere in your project. The Models folder is just a convention.
注意:你可以将实体类放在你项目中的任何位置。“Models”文件夹只是个约定。
Right-click the Models folder and select Add > New Item. In the Add New Item dialog, select theClass template. In the Name edit box, type “Author.cs” and click OK.
右击“Models”文件夹并选择“添加”>“新建项”。在弹出的“添加新项”对话框,选择类模板。在名称编辑框,输入“Author.cs”并点击“确定”按钮。


Replace the default code with the following code(替换默认代码为以下代码):
using System.Collections.Generic;
using System.ComponentModel.DataAnnotations;

namespace ContosoBooks.Models
{
    public class Author
    {
        [ScaffoldColumn(false)]
        public int AuthorID { get; set; }
        [Required]
        [Display(Name = "Last Name")]
        public string LastName { get; set; }

        [Display(Name = "First Name")]
        public string FirstMidName { get; set; }

        public virtual ICollection<Book> Books { get; set; }
    }
}
Repeat these steps to add another class named Book with the following code(重复上面的步骤来添加Book类,并修改默认代码为以下代码):
using System.ComponentModel.DataAnnotations;

namespace ContosoBooks.Models
{
    public class Book
    {
        [ScaffoldColumn(false)]
        public int BookID { get; set; }
        [Required]
        public string Title { get; set; }

        public int Year { get; set; }
        [Range(1, 500)]
        public decimal Price { get; set; }

        public string Genre { get; set; }

        [ScaffoldColumn(false)]
        public int AuthorID { get; set; }

        // Navigation property
        public virtual Author Author { get; set; }
    }
}
To keep the app simple, each book has a single author. The Author property provides a way to navigate the relationship from a book to an author. In EF, this type of property is called a navigation property. When EF creates the database schema, EF automatically infers that AuthorID should be a foreign key to the Authors table.
为了保持应用简单,每本书只有一个作者。Author属性提供从book到author的关系导航。在EF中,这种类型的属性叫做导航属性。当EF创建数据库结构,EF自动推断AuthorID应该是到作者表的外键。
Add Scaffolding(添加基架)
Scaffolding saves you time and coding effort by automatically generating the starting point for your application’s CRUD (Create, Read, Update and Delete) operations. Starting from a simple model class, and, without writing a single line of code, you will create two controllers that will contain the CRUD operations related to books and authors, as well as the all the necessary views.
基架能自动为CRUD操作生成起始代码,节省自己编写代码的时间。从简单的模型类开始,并且不用写一行代码,你将创建两个包含CRUD操作的控制器,同样还有必要的视图。
To add a scaffolding, right-click the Controllers folder in Solution Explorer. Select Add –> New Scaffolded Item.
要添加基架,右击“解决方案资源管理器”中的“Controllers”文件夹,选择“添加”->“新建基架项”。

From the Add Scaffold dialog box, select MVC 6 Controller with views, using Entity Framework, then click the Add button.
从“添加基架”对话框,选择MVC 6 Controller with views,using Entity Framework,然后点击“添加”按钮。

Next, in the Add Controller dialog box, set the model class dropdown to Book (ContosoBooks.Models). Also, set the data context class to ApplicationDbContext (ContosoBooks.Models). Make sure the Generate views checkbox is checked. Then click the Addbutton.
接着,在“添加控制器”对话框,“模型类”下拉列表选择“Book(ContosoBooks.Models)”。同样,“数据上下文类”下拉列表选择“ApplicationDbContext(ContosoBooks.Models)”。确保选中“生成视图”复选框。然后点击“添加”按钮。

As you can see in the above image, the Add Controller dialog box gives you the opportunity to select options for generating the controller and views.
“添加控制器”对话框让你可以选择是否生成视图。
This scaffold creates the code that provides a controller and a set of views. The views provide the UI and code to create, read, update, delete, and list data from the database.
基架为控制器创建代码和一系列视图。
Repeat the above scaffolding steps to create an Author controller and related views. Use the Author (ContosoBooks.Models) model class and the ApplicationDbContext (ContosoBooks.Models)data context class as shown in the following image.
重复上面的步骤创建Author控制器和相关的视图。使用“Author(ContosoBooks.Models)”模型类和“ApplicationDbContext”数据上下文类,如下所示:

In the Solution Explorer you’ll see that the new controllers were added within the Controller folder and new views were created within the Views folder.
在“解决方案资源管理器”你会看到“Controller”文件夹中新增的控制器和“Views”文件夹中新增的视图。

Configure the web app before including sample data(在加入示例数据之前设置web应用)
Next, you’ll add the Microsoft.Extensions.DependencyInjection package to your app. In Solution Explorer find and open project.json. In the dependencies section, begin by typing the following line at the end of the section.
接下来,你将为应用增加Microsoft.Extensions.DependencyInjection包。在“解决方案资源管理器”中打开project.json文件。在“dependencies”节里,键入如下代码:

You will see that IntelliSense provides coding help as you type. Also, when you save project.json, Visual Studio will automaticaly resolve the new package reference.
你将看到智能提示提供的帮助。而且,当你保存project.json文件时,Visual studio 将自动解析新的包引用。

After the above line has been added, the dependencies section of your project.json file will appear as follows:
在增加上面的行后,“dependencies”节将类似下面这样:
"dependencies": {
    "EntityFramework.Commands": "7.0.0-rc1-final",
    "EntityFramework.MicrosoftSqlServer": "7.0.0-rc1-final",
    "Microsoft.AspNet.Authentication.Cookies": "1.0.0-rc1-final",
    "Microsoft.AspNet.Diagnostics.Entity": "7.0.0-rc1-final",
    "Microsoft.AspNet.Identity.EntityFramework": "3.0.0-rc1-final",
    "Microsoft.AspNet.IISPlatformHandler": "1.0.0-rc1-final",
    "Microsoft.AspNet.Mvc": "6.0.0-rc1-final",
    "Microsoft.AspNet.Mvc.TagHelpers": "6.0.0-rc1-final",
    "Microsoft.AspNet.Server.Kestrel": "1.0.0-rc1-final",
    "Microsoft.AspNet.StaticFiles": "1.0.0-rc1-final",
    "Microsoft.AspNet.Tooling.Razor": "1.0.0-rc1-final",
    "Microsoft.Extensions.CodeGenerators.Mvc": "1.0.0-rc1-final",
    "Microsoft.Extensions.Configuration.FileProviderExtensions" : "1.0.0-rc1-final",
    "Microsoft.Extensions.Configuration.Json": "1.0.0-rc1-final",
    "Microsoft.Extensions.Configuration.UserSecrets": "1.0.0-rc1-final",
    "Microsoft.Extensions.Logging": "1.0.0-rc1-final",
    "Microsoft.Extensions.Logging.Console": "1.0.0-rc1-final",
    "Microsoft.Extensions.Logging.Debug": "1.0.0-rc1-final",
    "Microsoft.VisualStudio.Web.BrowserLink.Loader": "14.0.0-rc1-final",
    "Microsoft.Extensions.DependencyInjection": "1.0.0-rc1-final"
  },
Add sample data(增加示例数据)
Rather than entering several sample records by hand, you will add code that will by used to populate your database. Add a class named SampleData in the Models folder with the following code:
你将增加用于填充数据库的代码,而不是手工输入几条示例记录。在“Models”文件夹添加一个叫“SampleData”的类,修改代码如下:
using Microsoft.Data.Entity;
using Microsoft.Extensions.DependencyInjection;
using System;
using System.Linq;

namespace ContosoBooks.Models
{
    public static class SampleData
    {
        public static void Initialize(IServiceProvider serviceProvider)
        {
            var context = serviceProvider.GetService<ApplicationDbContext>();
            context.Database.Migrate();
            if (!context.Book.Any())
            {
                var austen = context.Author.Add(
                    new Author { LastName = "Austen", FirstMidName = "Jane" }).Entity;
                var dickens = context.Author.Add(
                    new Author { LastName = "Dickens", FirstMidName = "Charles" }).Entity;
                var cervantes = context.Author.Add(
                    new Author { LastName = "Cervantes", FirstMidName = "Miguel" }).Entity;

                context.Book.AddRange(
                    new Book()
                    {
                        Title = "Pride and Prejudice",
                        Year = 1813,
                        Author = austen,
                        Price = 9.99M,
                        Genre = "Comedy of manners"
                    },
                    new Book()
                    {
                        Title = "Northanger Abbey",
                        Year = 1817,
                        Author = austen,
                        Price = 12.95M,
                        Genre = "Gothic parody"
                    },
                    new Book()
                    {
                        Title = "David Copperfield",
                        Year = 1850,
                        Author = dickens,
                        Price = 15,
                        Genre = "Bildungsroman"
                    },
                    new Book()
                    {
                        Title = "Don Quixote",
                        Year = 1617,
                        Author = cervantes,
                        Price = 8.95M,
                        Genre = "Picaresque"
                    }
                );
                context.SaveChanges();
            }
        }
    }
}
You wouldn’t put this sample data class into production code, but it’s okay for this sample app scenario.
不要将此示例数据类放入生产环境,但它在演示应用的场景中还是很好的。
Next, in Solution Explorer, open the Startup.cs file. Add the following line of code at the end of theConfigure method:
接下来,从“解决方案资源管理器”中打开“Startup.cs”文件。增加如下代码到“Configure”函数的末尾。
SampleData.Initialize(app.ApplicationServices);
After the above line has been added, the completed Startup.cs file will appear as follows:
添加了上面的代码以后,完成了的“Startup.cs”文件将如下所示:
using System;
using System.Collections.Generic;
using System.Linq;
using System.Threading.Tasks;
using Microsoft.AspNet.Builder;
using Microsoft.AspNet.Hosting;
using Microsoft.AspNet.Identity.EntityFramework;
using Microsoft.Data.Entity;
using Microsoft.Extensions.Configuration;
using Microsoft.Extensions.DependencyInjection;
using Microsoft.Extensions.Logging;
using ContosoBooks.Models;
using ContosoBooks.Services;

namespace ContosoBooks
{
    public class Startup
    {
        public Startup(IHostingEnvironment env)
        {
            // Set up configuration sources.
            var builder = new ConfigurationBuilder()
                .AddJsonFile("appsettings.json")
                .AddJsonFile($"appsettings.{env.EnvironmentName}.json", optional: true);

            if (env.IsDevelopment())
            {
                // For more details on using the user secret store see http://go.microsoft.com/fwlink/?LinkID=532709
                builder.AddUserSecrets();
            }

            builder.AddEnvironmentVariables();
            Configuration = builder.Build();
        }

        public IConfigurationRoot Configuration { get; set; }

        // This method gets called by the runtime. Use this method to add services to the container.
        public void ConfigureServices(IServiceCollection services)
        {
            // Add framework services.
            services.AddEntityFramework()
                .AddSqlServer()
                .AddDbContext<ApplicationDbContext>(options =>
                    options.UseSqlServer(Configuration["Data:DefaultConnection:ConnectionString"]));

            services.AddIdentity<ApplicationUser, IdentityRole>()
                .AddEntityFrameworkStores<ApplicationDbContext>()
                .AddDefaultTokenProviders();

            services.AddMvc();

            // Add application services.
            services.AddTransient<IEmailSender, AuthMessageSender>();
            services.AddTransient<ISmsSender, AuthMessageSender>();
        }

        // This method gets called by the runtime. Use this method to configure the HTTP request pipeline.
        public void Configure(IApplicationBuilder app, IHostingEnvironment env, ILoggerFactory loggerFactory)
        {
            loggerFactory.AddConsole(Configuration.GetSection("Logging"));
            loggerFactory.AddDebug();

            if (env.IsDevelopment())
            {
                app.UseBrowserLink();
                app.UseDeveloperExceptionPage();
                app.UseDatabaseErrorPage();
            }
            else
            {
                app.UseExceptionHandler("/Home/Error");

                // For more details on creating database during deployment see http://go.microsoft.com/fwlink/?LinkID=615859
                try
                {
                    using (var serviceScope = app.ApplicationServices.GetRequiredService<IServiceScopeFactory>()
                        .CreateScope())
                    {
                        serviceScope.ServiceProvider.GetService<ApplicationDbContext>()
                             .Database.Migrate();
                    }
                }
                catch { }
            }

            app.UseIISPlatformHandler(options => options.AuthenticationDescriptions.Clear());

            app.UseStaticFiles();

            app.UseIdentity();

            // To configure external authentication please see http://go.microsoft.com/fwlink/?LinkID=532715

            app.UseMvc(routes =>
            {
                routes.MapRoute(
                    name: "default",
                    template: "{controller=Home}/{action=Index}/{id?}");
            });
            SampleData.Initialize(app.ApplicationServices);
        }

        // Entry point for the application.
        public static void Main(string[] args) => WebApplication.Run<Startup>(args);
    }
}
Notice in ConfigureServices the app calls Configuration.Get to get the database connection string. During development, this setting comes from the config.json file. When you deploy the app to a production environment, you set the connection string in an environment variable on the host. If the Configuration API finds an environment variable with the same key, it returns the environment variable instead of the value that is in config.json.
注意,“ConfigureServices”函数内调用“Configuration.Get”来获取数据库连接字符串。在开发阶段,此设置来自“config.json”文件。当你部署应用到生产环境,你在宿主的环境变量里设置连接字符串。如果Configuration API 找到一个有同样的key的环境变量,它返回环境变量的值,而不是“config.json”文件中的值。
Build the web application(生成web应用)
To make sure that all the classes and changes to your Web application work, you should build the application.
为了确保所有的类和变动可以工作,你需要生成应用。
From the Build menu, select Build Solution.
从“生成”菜单中选择“生成解决方案”。
The Output window is displayed, and if all went well, you see a succeeded message.
会显示“输出”窗口,并且如果一切正常,你会看到一条成功的信息。

If you run into an error, re-check the above steps. The information in the Output window will indicate which file has a problem and where in the file a change is required. This information will enable you to determine what part of the above steps need to be reviewed and fixed in your project.
如果你遇到报错,重新检查上面的步骤。“输出”窗口的提示信息将指出哪个文件有问题并且文件的什么地方需要修改。这些提示信息将帮助你推断出上面的什么步骤需要检查和修正。
Using data migrations to create the database(使用数据迁移来创建数据库)
Data migrations in EF are used to perform model updates throughout your entire application. By initially using data migrations to create your database, you can modify your database after the model has changed with simple steps. This will allow you to build and maintain your web app more efficiently. The alternative to data migrations, where model or schema changes are required after the database has been created, involves recreating your entire database.
EF中的数据迁移被用于在整个应用中完成模型更新。通过最初使用数据迁移来创建你的数据库,你可以在模型变更后修改数据库。这样将让你更高效地生成和维护web应用。如果不使用数据迁移,数据库被创建后模型或结构变更,会导致完全重建数据库。
Open a Command Prompt in the project directory (ContosoBooks/src/ContosoBooks).
打开命令提示符定位到项目文件目录(ContosoBooks/src/ContosoBooks)。
Note:To open the Command Prompt, you can right-click the Windows start button and selectCommand Prompt from the menu.
注意:要打开命令提示符,你可以右击Windows的“开始”按钮并选择“命令提示符”。
To find the project directory, in Visual Studio you can right-click the project name (ContosoBooks) in the Solution Explorer and select Open Folder in File Explorer. Copy your project path from File Explorer so you can copy it to the Command Prompt. For example, enter the following from theCommand Prompt to change directories:
为找到项目目录,在Visual Studio你可以在“解决方案资源管理器”中右击项目名(ContosoBooks)并选择“打开所在的文件夹”。从“文件资源管理器”中复制你的项目路径,粘贴到命令提示符。在命令提示符中定位目录,命令类似如下:
cd C:\Projects\ContosoBooks\src\ContosoBooks
Note:Make sure that you have navigated to the ContosoBooks folder within the src folder.
注意:确保你已经导航到src文件夹下的ContosoBooks文件夹。
Run each of the following commands from the Command Prompt:
在命令提示符中运行如下命令:
dnu restore
dnx ef migrations add Initial
dnx ef database update
Note:If dnu restore is not a recognized command, you may have missed a prerequisite step (or part of a prerequisites step) at the beginning of this topic. For general EF command help, enter the following in the command window: dnx ef -?. For help with the add command, enter the following in the command window: dnx ef migrations add -?. And, for help with the updatecommand, enter the following in the command window: dnx ef database update -?.
注意:如果“dnu restore”为未认证的命令,你可能漏掉了这篇文章开头的先期步骤(或先期步骤的一部分)。要查看EF命令帮助,在下面的命令窗口输入“dnx ef -?”。要查看“add”的命令帮助,在下面的命令窗口输入“dnx ef migrations add -?”。要查找“update”命令的帮助,在下面的命令窗口中输入“dnx ef database update -?”。
The .NET Version Manager (dnvm) is a set of command line utilities that are used to update and configure .NET Runtime.
.NET版本管理器是一系列命令行实用工具,被用于更新和配置.NET运行时。
DNX stands for the .NET Execution Environment. The ef command is specificed in the project.jsonfile of your project. For more information about dnvm, dnu, and dnx, see DNX Overview.
DNX代表.NET执行环境。EF命令在“project.json”文件中指定。关于dnvm,dnu和dnx的更多信息,请看DNX概述。
The “add Initial” command creates a migration named “Initial” that adds code to the project, allowing EF to update the database schema.
“add Initial”命令创建一个叫“Initial”的迁移,它添加了允许EF更新数据库结构的代码。
The update command creates the actual database. After you run this command, the Migrations folder of your project will be updated as follows:
“update”命令创建真实的数据库。你运行此命令后,“Migrations”文件夹会被更新如下:

Also, you will be able to view the newly created database within SQL Server Object Explorer.
并且,你将在“SQL Server对象资源管理器”中看到最新创建的数据库。

Adding navigation(增加导航)
Update the navigation for the web app. From Solution Explorer, open theViews/Shared/_Layout.cshtml file. Find the following markup:
为web应用更新导航。从“解决方案资源管理器”中,打开“Views/Shared/_layout.cshtml”文件。找到如下标签:
<li><a asp-controller="Home" asp-action="Index">Home</a></li>
<li><a asp-controller="Home" asp-action="About">About</a></li>
<li><a asp-controller="Home" asp-action="Contact">Contact</a></li>
Replace the above markup with the following markup:
将上面的标签替换成下面的标签:
<li><a asp-controller="Books" asp-action="Index">Books</a></li>
<li><a asp-controller="Authors" asp-action="Index">Authors</a></li>
The above changes will add a link to view Books and a link to view Authors. You created each of these views when you added scaffolding to the project.
上面的改变将增加到一个到Books视图链接和一个到Authors视图的链接。你已经在添加基架的时候创建了这些视图。
Run the web app locally(在本地运行web应用)
Run the app now to see how you can view all of the products or just a set of products limited by category.
现在运行应用,看看你是怎么看到所有产品或是通过种类筛选出的产品集合。
In the Solution Explorer, right-click the project name and select View -> View in Browser. As an alternative, you can press the F5 key.
在“解决方案资源管理器”,右击项目名并选择“查看”->“在浏览器中查看”。你也可以按“F5”键来运行应用。
The browser will open and show the web app. Click on the Books link at the top of the page.
浏览器将打开并显示web应用。单击页面顶端的“Books”链接。

Close the browser and click the “Stop Debugging” icon in the toolbar of Visual Studio to stop the app.
关闭浏览器并点击Visual Studio工具栏中的“停止调试”图标来停止app运行。
Publish the web app to Azure App Service(发布web应用到Azure应用服务)
In Solution Explorer of Visual Studio, right-click on the project and select Publish.
在Visual Studio中的“解决方案资源管理器”中,右击项目并选择“发布”。

In the Publish Web window, click on Microsoft Azure Web Apps and log into your Azure subscription.
在“发布Web”窗口,点击“Microsoft Azure Web Apps”并登录你的Azure订阅。

Make sure you are signed in to Azure with your Microsoft account, then click New to create a new Web app in Azure.
确保你用你的微软账号登入Azure,然后点击“新建”来在Azure上新建Web应用。

Enter a unique site name, and select an app service plan, resource group, and region. Also, choose to create a database server, along with a database username and password. If you’ve created a database server in the past, use that. When you’re ready to continue, click Create.
输入唯一的网站名,并选择一个应用服务计划,资源组,地区。同样,选择创建一个数据库服务,并填写用户名和密码。如果你过去已经创建了数据库服务,就可以使用它。当你准备好继续,请单击“创建”按钮。

On the Connection tab of the Publish Web window, click Publish.
在“发布Web”窗口的“连接”选项卡,点击“发布”。

You can view the publishing progress in eith the Output window or the Azure App Service Activitywindow within Visual Studio.
你可以在Visual Studio的“输出”窗口或“Azure应用服务活动”窗口中查看发布过程。

When publishing to Azure is complete, your web app will be displayed in a browser running on Azure.
当完成发布到Azure,你的web应用将会显示在浏览器,此时应用运行在Azure上。

For additional publishing information, see Publishing and Deployment.
关于发布的更多信息,请看发布与部署。
Additional Resources(更多资源)
- Introduction to ASP.NET 5(Asp.net 5简介)
- Understanding ASP.NET 5 Web Apps(理解Asp.net 5 Web应用)
- ASP.NET 5 Fundamentals(Asp.net 5 基本原理)


 浙公网安备 33010602011771号