

threejs之创建发光墙体
threejs之创建发光墙体
组件文件:
图片两张:
bgImg.png

flowImg.png(图片是透明的,页面上看不到)

组件文件:
import * as THREE from 'three';
import bgImg from '/scene3D/bgImg.png'
import flowImg from '/scene3D/flowImg.png'
/**
 * 创建流体墙体材质
 * option =>
 * params bgUrl flowUrl
 * **/
const createWallMaterial = ({
  bgTexture,
  flowTexture
}) => {
  // 顶点着色器
  const vertexShader = `
          varying vec2 vUv;
          varying vec3 fNormal;
          varying vec3 vPosition;
          void main(){
                  vUv = uv;
                  vPosition = position;
                  vec4 mvPosition = modelViewMatrix * vec4( position, 1.0 );
                  gl_Position = projectionMatrix * mvPosition;
          }
      `;
  // 片元着色器
  const fragmentShader = `
          uniform float time;
          varying vec2 vUv;
          uniform sampler2D flowTexture;
          uniform sampler2D bgTexture;
          void main( void ) {
              vec2 position = vUv;
              vec4 colora = texture2D( flowTexture, vec2( vUv.x, fract(vUv.y - time )));
              vec4 colorb = texture2D( bgTexture , position.xy);
              gl_FragColor = colorb + colorb * colora;
          }
      `;
  // 允许平铺
  flowTexture.wrapS = THREE.RepeatWrapping;
  return new THREE.ShaderMaterial({
    uniforms: {
      time: {
        value: 0,
      },
      flowTexture: {
        value: flowTexture,
      },
      bgTexture: {
        value: bgTexture,
      },
    },
    transparent: true,
    depthWrite: false,
    depthTest: false,
    side: THREE.DoubleSide,
    vertexShader: vertexShader,
    fragmentShader: fragmentShader,
  });
};
/**
 * 通过path构建墙体
 * option =>
 * params height path material expand(是否需要扩展路径)
 * **/
export const creatWallByPath = ({
  height = 10,
  path = [],
  material,
  expand = true,
}) => {
  let verticesByTwo = null;
  // 1.处理路径数据  每两个顶点为为一组
  if (expand) {
    // 1.1向y方向拉伸顶点
    verticesByTwo = path.reduce((arr, [x, y, z]) => {
      return arr.concat([
        [
          [x, y, z],
          [x, y + height, z],
        ],
      ]);
    }, []);
  } else {
    // 1.2 已经处理好路径数据
    verticesByTwo = path;
  }
  // 2.解析需要渲染的四边形 每4个顶点为一组
  const verticesByFour = verticesByTwo.reduce((arr, item, i) => {
    if (i === verticesByTwo.length - 1) return arr;
    return arr.concat([[item, verticesByTwo[i + 1]]]);
  }, []);
  // 3.将四边形面转换为需要渲染的三顶点面
  const verticesByThree = verticesByFour.reduce((arr, item) => {
    const [[point1, point2], [point3, point4]] = item;
    return arr.concat(
      ...point2,
      ...point1,
      ...point4,
      ...point1,
      ...point3,
      ...point4
    );
  }, []);
  const geometry = new THREE.BufferGeometry();
  // 4. 设置position
  const vertices = new Float32Array(verticesByThree);
  geometry.setAttribute("position", new THREE.BufferAttribute(vertices, 3));
  // 5. 设置uv 6个点为一个周期 [0, 1, 0, 0, 1, 1, 0, 0, 1, 0, 1, 1]

  // 5.1 以18个顶点为单位分组
  const pointsGroupBy18 = new Array(verticesByThree.length / 3 / 6)
    .fill(0)
    .map((item, i) => {
      return verticesByThree.slice(i * 3 * 6, (i + 1) * 3 * 6);
    });
  // 5.2 按uv周期分组
  const pointsGroupBy63 = pointsGroupBy18.map((item, i) => {
    return new Array(item.length / 3)
      .fill(0)
      .map((it, i) => item.slice(i * 3, (i + 1) * 3));
  });
  // 5.3根据BoundingBox确定uv平铺范围
  geometry.computeBoundingBox();
  const { min, max } = geometry.boundingBox;
  const rangeX = max.x - min.x;
  const uvs = [].concat(
    ...pointsGroupBy63.map((item) => {
      const point0 = item[0];
      const point5 = item[5];
      const distance =
        new THREE.Vector3(...point0).distanceTo(new THREE.Vector3(...point5)) /
        (rangeX / 10);
      return [0, 1, 0, 0, distance, 1, 0, 0, distance, 0, distance, 1];
    })
  );
  geometry.setAttribute(
    "uv",
    new THREE.BufferAttribute(new Float32Array(uvs), 2)
  );
  // 更新法线
  // geometry.computeVertexNormals();
  const meshMat =
    material ||
    new THREE.MeshBasicMaterial({
      color: 0x00ffff,
      side: THREE.DoubleSide,
    });
  return new THREE.Mesh(geometry, material);
};
// 创建墙体
export function createWall(path) {
  const bgTexture = new THREE.TextureLoader().load(bgImg);
  const flowTexture = new THREE.TextureLoader().load(flowImg);
  const material = createWallMaterial({
    bgTexture,
    flowTexture
  });
  const wallMesh = creatWallByPath({
    height: 10,
    path,
    material:material
  });
  return wallMesh
}
注意:图片文件放在public中使用import引用
方法调用:
            const path = [
                [80, 0, -40],
                [10, 0, 0],
                [60, 0, 50],
                [0, 10, 0],
                [-60, 0, 50],
                [-50, 0, -30],
                [80, 0, -40],
            ];
            scene.add(createWall(path));
效果:
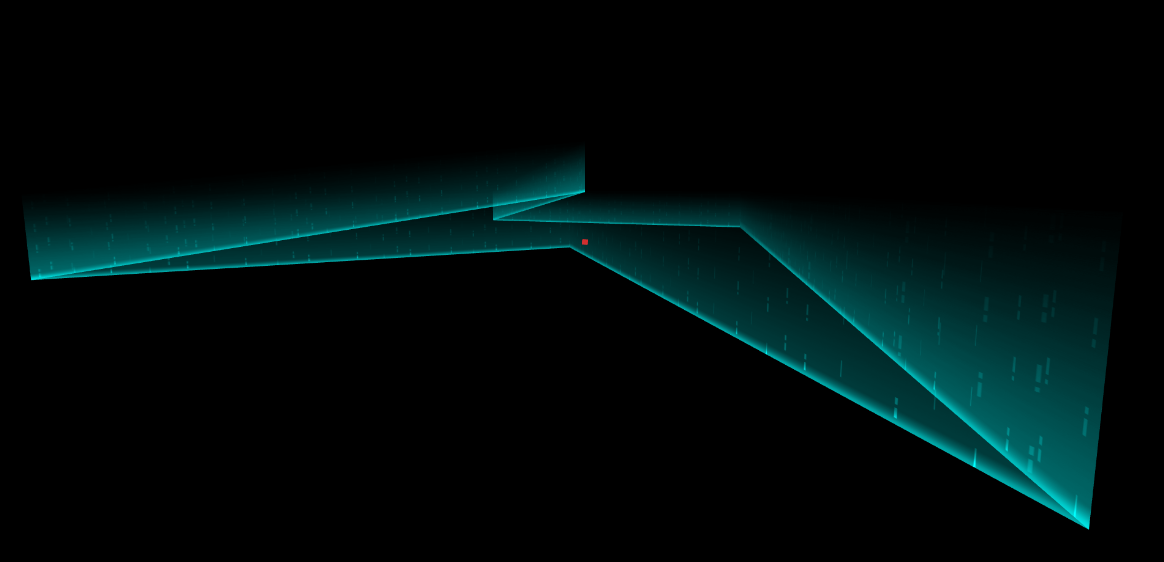
注:动态效果后续使用后补充
转载自:
https://www.cnblogs.com/loveFlex/p/17669620.html

 浙公网安备 33010602011771号