图片懒加载
 图片延迟加载的三种方案

常规方案一

核心是 imgs[i].offsetTop < scrollTop + winHeight 判断图片顶部到文档body底部的距离是否是小于0,小于0说明进入视窗,需要加载,所以将data-src中的图片地址赋值给src,这样就能加载了
<!DOCTYPE html>
 <html lang="en">
     <head>
         <style>
             .container img {
                 width: 800px;
                 height: 500px;
             }
         </style>
     </head>
 <div class="container">
      <img src="loading.gif"  data-src="images/lazy.png"><br>
      <img src="loading.gif"  data-src="images/lazy.png"><br>
      <img src="loading.gif"  data-src="images/lazy.png"><br>
      <img src="loading.gif"  data-src="images/lazy.png"><br>
      <img src="loading.gif"  data-src="images/lazy.png"><br>
      <img src="loading.gif"  data-src="images/lazy.png"><br>
 </div>
 <script>
 var imgs = document.querySelectorAll('img');
 function lozyLoad(){
         var scrollTop = document.body.scrollTop || document.documentElement.scrollTop;
         var winHeight= window.innerHeight;
         for(var i=0;i < imgs.length;i++){
             if(imgs[i].offsetTop < scrollTop + winHeight ){
                 imgs[i].src = imgs[i].getAttribute('data-src');
             }
         }
     }
     // window.addEventListener("scroll",()=>{   //这个生效
     //     lozyLoad();
     // })
    window.onscroll = lozyLoad();  //这个可能不生效,因为html高度可能小于视窗
 </script>
 </html>
常规方案二
还有另外一种方便一点方式,思路是一样,只是上边是利用imgs[i].offsetTop获取图片顶部到body顶部的距离,现在还可以利用 element.imgs.getBoundingClientRect().top 方式来获取图片顶部到视窗顶部的距离来判断。
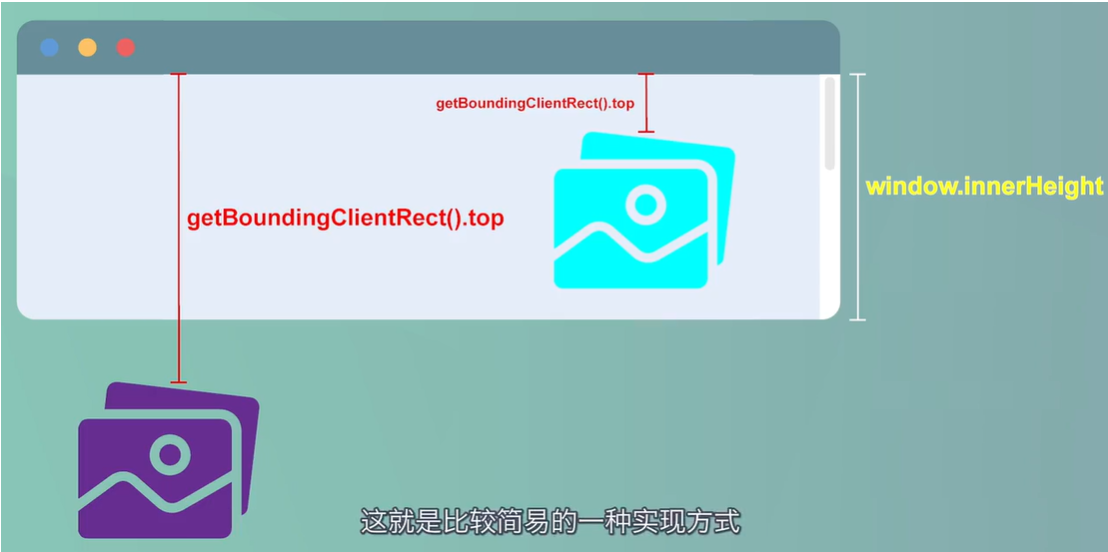
element.getBoundingClientRect()
 //获取到的是element元素的位置信息:
 {
     "x": 8,   //元素左上角距离视窗左边界距离
     "y": 436,   //元素左上角距离视窗顶部距离
     "width": 800,  //元素宽度
     "height": 500,  //元素高度
     "top": 436,  //元素顶部距离视窗顶部的距离
     "right": 808,  //元素右边框距离视窗左边界的距离
     "bottom": 936,  //元素底部距离视窗顶部的距离
     "left": 8  //元素左边框距离视窗左边界的距离
 }
var imgs = document.querySelectorAll('img');
function lozyLoad(){
var winHeight= window.innerHeight;
for(var i=0;i < imgs.length;i++){
if(imgs[i].getBoundingClientRect().top < winHeight ){
imgs[i].src = imgs[i].getAttribute('data-src');
}
}
}
window.addEventListener("scroll",()=>{
lozyLoad();
})交叉观察器(推荐)
虽然以上的两种方式已经能够达到懒加载的效果了,但是考虑到scroll会密集触发就需要进行大量的循环遍历就头疼,这显然会给浏览器造成句大负担,所以还需要改进。
-
交叉观察器:可以自动"观察"元素是否可见,Chrome 51+ 已经支持。由于可见(visible)的本质是,目标元素与视口产生一个交叉区,所以这个 API 叫做"交叉观察器"。其实此API就是可以判断被监听的元素是否出现或者消失在视口,通过
isIntersecting属性的值(true、false)来判断是否在视口。
交叉观察器:IntersectionObserver(callback, option),看
//创建 IntersectionObserver 对象
var io = new IntersectionObserver(callback, option);
// 开始观察,一次只能添加一个被观察的元素
io.observe(document.getElementById('example1'));
io.observe(document.getElementById('example2'));
// 停止观察
io.unobserve(element);
// 关闭观察器
io.disconnect();具体实现:
var imgs = document.querySelectorAll('img');
const observer = new IntersectionObserver((entries)=>{
entries.forEach(entry => {
if( entry.isIntersecting ){ //是否在视窗看见
const image = entry.target;
const data_src = image.getAttribute('data-src');
image.setAttribute('src',data_src); //将src赋值
observer.unobserve(image); //加载完毕,取消观察
}
});
})
imgs.forEach(image => { //通过遍历让IntersectionObserver对象观察所有图片
observer.observe(image)
})


 浙公网安备 33010602011771号