

第11課-Channel Study For Create Custom Restful Service
这节课我们一起学习利用Mirth Connect的HTTP Listener源通道与JavaScript Writer目的通道搭建自定义Restful风格webapi服务。
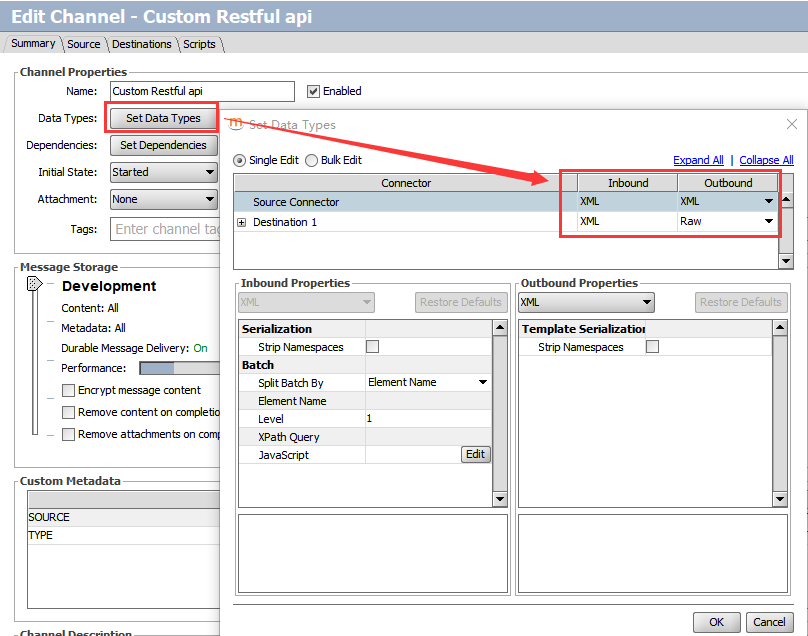
1.新建名为‘Custom Restful api’的信道,指定源通道与目的通道的输入输出消息格式
2.设置HTTP Listener类型源通道参数
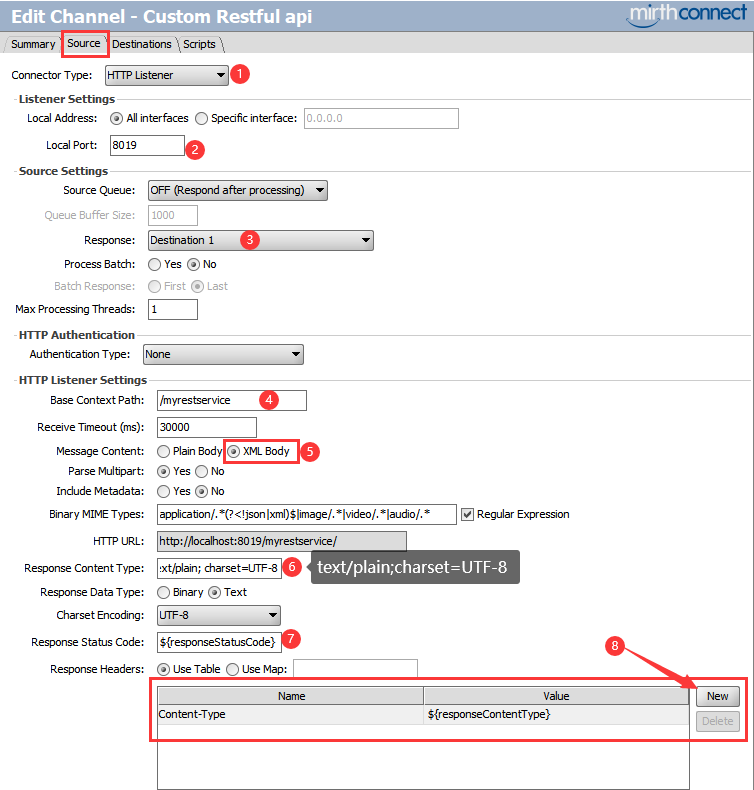
- 把 "Response" 响应指定为 destination 1
- 输入‘Base context path’ 为
/myrestservice - 设置 "Message Content" 为 XML Body
- 设置默认"Response Content Type" 为
text/plain; charset=UTF-8我们将在目的通道中通过channel map重写它的值为application/xml或application/json - 设置 "Response Status Code" 响应码为
${responseStatusCode}我们将在目的通道中通过channel map重写它的值为200(成功)或500(失败) - 在 "Response Header" 中添加一个变量 "Content-Type" ,指定其值为
${responseContentType}我们将在目的通道中通过channel map重写它的值为application/xml或application/json
3.设置JavaScript Writer目的通道参数并编写JS实现脚本
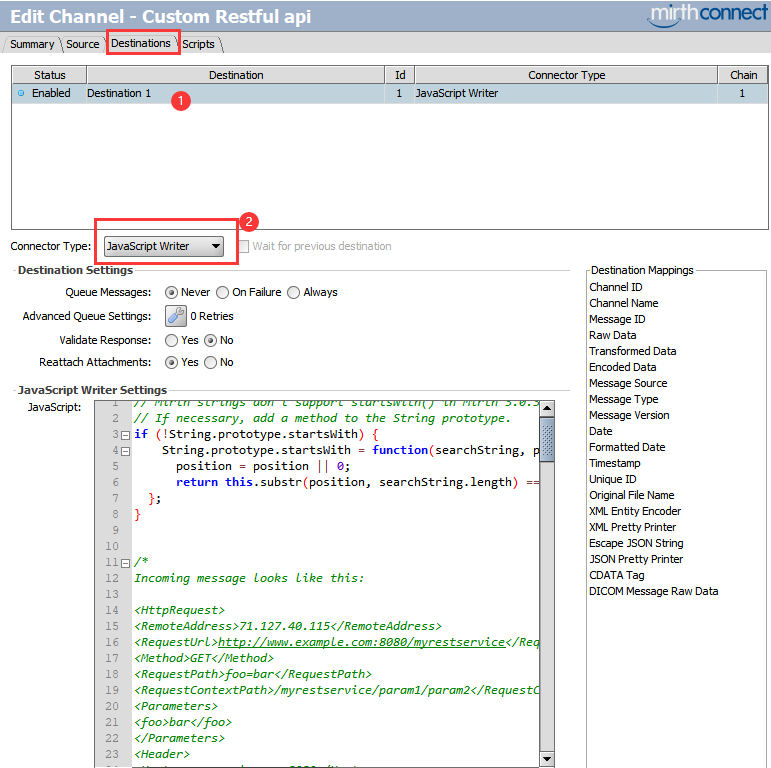
// Mirth strings don't support startsWith() in Mirth 3
// If necessary, add a method to the String prototype.
if (!String.prototype.startsWith) {
    String.prototype.startsWith = function(searchString, position){
      position = position || 0;
      return this.substr(position, searchString.length) === searchString;
  };
}


/*
Incoming message looks like this:

<HttpRequest>
<RemoteAddress>71.127.40.115</RemoteAddress>
<RequestUrl>http://www.example.com:8080/myrestservice</RequestUrl>
<Method>GET</Method>
<RequestPath>foo=bar</RequestPath>
<RequestContextPath>/myrestservice/param1/param2</RequestContextPath>
<Parameters>
<foo>bar</foo>
</Parameters>
<Header>
<Host>www.example.com:8080</Host>
<Accept-Encoding>identity</Accept-Encoding>
<User-Agent>Wget/1.18 (darwin15.5.0)</User-Agent>
<Connection>keep-alive</Connection>
<Accept>application/xml</Accept>
</Header>
<Content/>
</HttpRequest>

<HttpRequest>
<RemoteAddress>71.127.40.115</RemoteAddress>
<RequestUrl>http://www.example.com:8080/myrestservice</RequestUrl>
<Method>GET</Method>
<RequestPath>foo=bar</RequestPath>
<RequestContextPath>/myrestservice/param1/param2</RequestContextPath>
<Parameters>
<foo>bar</foo>
</Parameters>
<Header>
<Host>www.example.com:8080</Host>
<Accept-Encoding>identity</Accept-Encoding>
<User-Agent>Wget/1.18 (darwin15.5.0)</User-Agent>
<Connection>keep-alive</Connection>
<Accept>application/json</Accept>
</Header>
<Content/>
</HttpRequest>
*/

// Just in case we fail, set a sane responseContentType
channelMap.put('responseContentType', 'text/plain');

var msg = XML(connectorMessage.getRawData());
 logger.info(msg);
// Get the REST data from the "context path" which is actually
// the "path info" of the request, so it will start with '/myrestservice'.
var rest = msg['RequestContextPath'];
logger.info(rest);
var myServicePrefix = '/myrestservice';
var minimumURLParameterCount = 4; // This is the minimum you require to do your work
var maximumExpectedURLParameterCount = 5; // however many you expect to get
var params = rest.substring(myServicePrefix).split('/', maximumExpectedURLParameterCount);
if(params.length < minimumURLParameterCount)
 return Packages.com.mirth.connect.server.userutil.ResponseFactory.getErrorResponse('Too few parameters in request');
var mrn = params[1]; // params[0] will be an empty string
logger.info(mrn);
// Now, determine the client's preference for what data type to return (XML vs. JSON).
// We will default to XML.
var clientWantsJSON = false;
var responseContentType = 'text/xml';

// If we see any kind of JSON before any kind of XML, we'll use
// JSON. Otherwise, we'll use XML.
//
// Technically, this is incorrect resolution of the "Accept" header,
// but it's good enough for an example.
var mimeTypes = msg['Header']['Accept'].split(/\s*,\s*/);
for(var i=0; i<mimeTypes.length; ++i) {
  var mimeType = mimeTypes[i].toString();
  if(mimeType.startsWith('application/json')) {
    clientWantsJSON = true;
    responseContentType = 'application/json';
    break;
  } else if(mimeType.startsWith('application/xml')) {
    clientWantsJSON = false;
    responseContentType = 'application/xml';
    break;
  } else if(mimeType.startsWith('text/xml')) {
    clientWantsJSON = false;
    responseContentType = 'text/xml';
    break;
  }
}

var xml;
var json;

if(clientWantsJSON)
  json = { status : '' };
else
  xml = new XML('<response></response>');

try {
    /*
      Here is where you do whatever your service needs to actually do.
     */

  if(clientWantsJSON) {
   json.data = { foo: 1,
                  bar: 'a string',
                  baz: [ 'list', 'of', 'strings']
                };
  } else {
    xml['@foo'] = 1;
    xml['bar'] = 'a string';
    xml['baz'][0] = 'list';
    xml['baz'][1] = 'of';
    xml['baz'][3] = 'strings';
  }

  // Set the response code and content-type appropriately.
  // http://www.mirthproject.org/community/forums/showthread.php?t=12678

  channelMap.put('responseStatusCode', 200);

  if(clientWantsJSON) {
    json.status = 'success';
    var content = JSON.stringify(json);
    channelMap.put('responseContent', content);
    channelMap.put('responseContentType', responseContentType);
    return content;
  } else {
    channelMap.put('responseContentType', responseContentType);
    var content = xml.toString();
    channelMap.put('responseContent', content);
    return content;
  }
}
catch (err)
{
  channelMap.put('responseStatusCode', '500');
  if(clientWantsJSON) {
    json.status = 'error';
    if(err.javaException) {
      // If you want to unpack a Java exception, this is how you do it:
      json.errorType = String(err.javaException.getClass().getName());
      json.errorMessage = String(err.javaException.getMessage());
    }

    channelMap.put('responseContentType', responseContentType);

    // Return an error with our "error" JSON
    return Packages.com.mirth.connect.server.userutil.ResponseFactory.getErrorResponse(JSON.stringify(json));
  } else {
    if(err.javaException) {
      xml['response']['error']['@type'] = String(err.javaException.getClass().getName());
      xml['response']['error']['@message'] = String(err.javaException.getMessage());
    }

    channelMap.put('responseContentType', responseContentType);

    // Return an error with our "error" XML
    return Packages.com.mirth.connect.server.userutil.ResponseFactory.getErrorResponse(xml.toString());
  }
}
我们通过目的通道以上JS脚本,学习到以下特别重要的知识:
- 获取输入请求的原始消息并自动格式化为XML格式:
var xml = new XML(connectorMessage.getRawData()) - 设置响应类型,如:
channelMap.put('responseContentType', 'application/json') - 设置响应码,如:
channelMap.put('responseStatusCode', '200') - 设置响应内容并通过JS脚本返回XML实体或者Json实体的字符串格式值
- 异常处理通过JS脚本调用Mirth的API函数Packages.com.mirth.connect.server.userutil.ResponseFactory.getErrorResponse(string)返回字符串格式错误消息
4.部署信道并测试
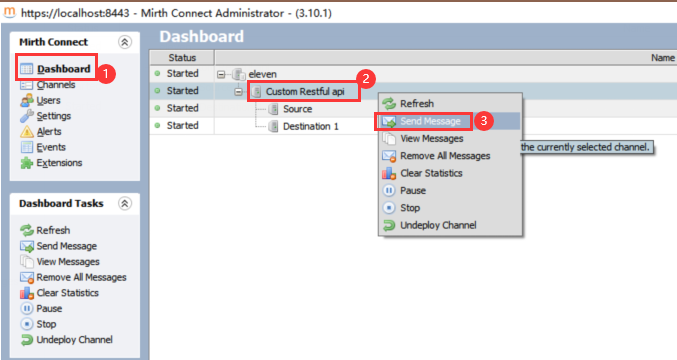
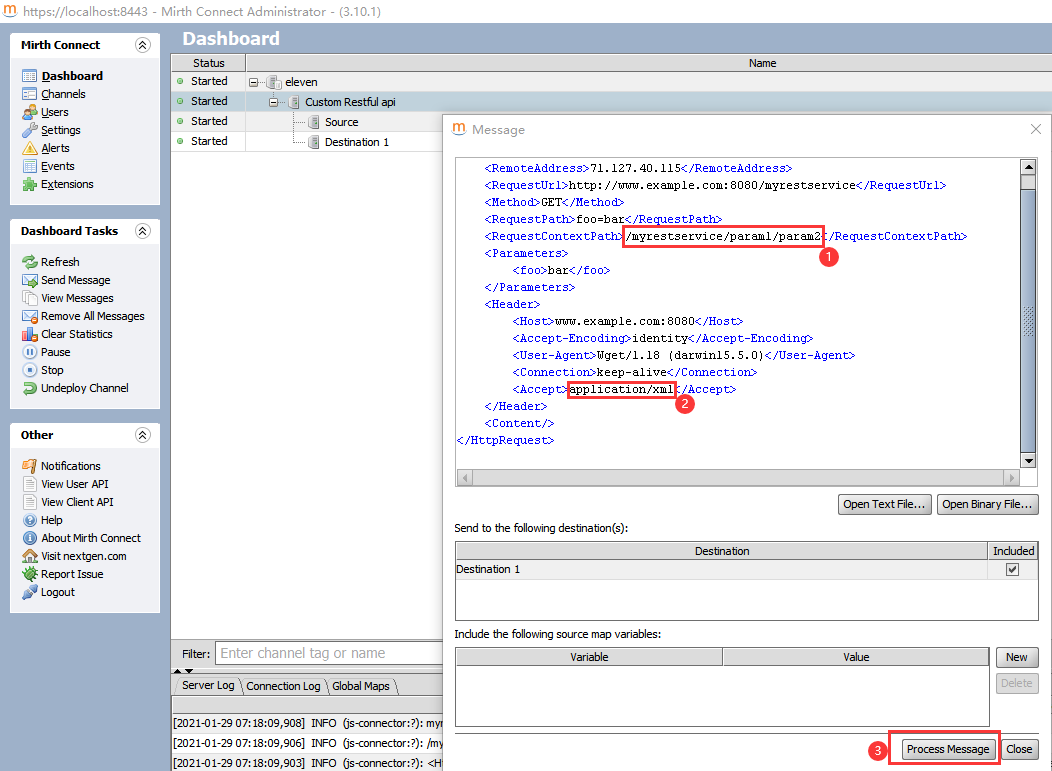
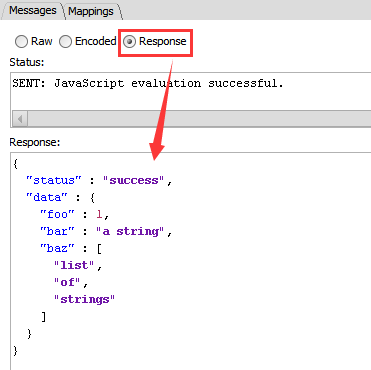
发送消息要区分application/json和application/xml,可以看到响应值格式会相应变化
<HttpRequest>
    <RemoteAddress>71.127.40.115</RemoteAddress>
    <RequestUrl>http://www.example.com:8080/myrestservice</RequestUrl>
    <Method>GET</Method>
    <RequestPath>foo=bar</RequestPath>
    <RequestContextPath>/myrestservice/param1/param2</RequestContextPath>
    <Parameters>
        <foo>bar</foo>
    </Parameters>
    <Header>
        <Host>www.example.com:8080</Host>
        <Accept-Encoding>identity</Accept-Encoding>
        <User-Agent>Wget/1.18 (darwin15.5.0)</User-Agent>
        <Connection>keep-alive</Connection>
        <Accept>application/json</Accept>
    </Header>
    <Content/>
</HttpRequest>
<HttpRequest>
    <RemoteAddress>71.127.40.115</RemoteAddress>
    <RequestUrl>http://www.example.com:8080/myrestservice</RequestUrl>
    <Method>GET</Method>
    <RequestPath>foo=bar</RequestPath>
    <RequestContextPath>/myrestservice/param1/param2</RequestContextPath>
    <Parameters>
        <foo>bar</foo>
    </Parameters>
    <Header>
        <Host>www.example.com:8080</Host>
        <Accept-Encoding>identity</Accept-Encoding>
        <User-Agent>Wget/1.18 (darwin15.5.0)</User-Agent>
        <Connection>keep-alive</Connection>
        <Accept>application/xml</Accept>
    </Header>
    <Content/>
</HttpRequest>

潤沁網路大學

 浙公网安备 33010602011771号