


环境准备
发布CRM你将使用以下软件
- nginx
- uWSGI
- CentOS7
- CRM项目文件
- virtualenv/virtualenvwrapper
- supervisor
WSGI、uWSGI
python web服务器开发使用WSGI协议(Web Server Gateway Interface)
python web项目默认会生成一个wsgi.py文件,确定好应用模块。
生产环境中使用的是uWSGI,实现了WSGI所有接口,C语言编写,效率很高的web服务器。
uWSGI是一个全功能的HTTP服务器,实现了WSGI协议、uwsgi协议、http协议等。它要做的就是把HTTP协议转化成语言支持的网络协议。比如把HTTP协议转化成WSGI协议,让Python可以直接使用。
Nginx
使用nginx是为了它的反向代理功能,项目会通过Django+uWSGI+Nginx进行服务器线上部署。
CentOS
1.打包项目CRM文件夹,压缩文件
2.通过xftp、scp、lrzsz等上传文件至Centos服务器
Linux使用技巧
1.通过xshell或者iTerm等软件,多终端操作你的linxu,这样对uwsgi、nginx、项目代码调试的时候,避免来回切换目录,提供工作效率。
2.注意修改了linux软件的配置文件,都要重启服务才能生效。
Virtualenv/Virtualenvwrapper
构建一个干净,隔离的python解释器环境,防止软件依赖,冲突等问题,建议使用。
Supervisor
Supervisor(http://supervisord.org/)是用Python开发的一个client/server服务,是Linux/Unix系统下的一个进程管理工具,不支持Windows系统。它可以很方便的监听、启动、停止、重启一个或多个进程。用Supervisor管理的进程,当一个进程意外被杀死,supervisort监听到进程死后,会自动将它重新拉起,很方便的做到进程自动恢复的功能,不再需要自己写shell脚本来控制。


nginx部署python程序
1.在进行项目部署的时候,如果报错
no application not found
就是因为你的uwsgi没找到django的wsgi.py应用文件

2.为什么要用nginx uwsgi
因为用户只想访问域名,不带有任何端口
通过nginx反向代理,用户直接访问 chiji.com,但是nginx直接转发给了django,我们其实看到的页面是django
uwsgi是支持并发的,python web服务器,让你的django并发性更高,但是uwsgi不支持静态文件的处理,静态文件会丢失

用nginx处理静态文件,uwsgi处理动态请求

3.项目部署实验步骤
####
nginx

####
uwsgi+django
1.workon切换之前的虚拟环境或者创建新的虚拟环境(mkvirtualenv nginx_crm)且解决环境依赖
[root@localhost ~]# workon
[root@localhost ~]# workon myblog
(myblog) [root@localhost ~]# pip3 list

2.在虚拟环境下安装uwsgi
(myblog) [root@localhost ~]# pip3 install uwsgi
(myblog) [root@localhost ~]# which uwsgi
/root/Envs/myblog/bin/uwsgi
(myblog) [root@localhost ~]# uwsgi --version
2.0.18


3.用uwsgi启动一个python文件:
uwsgi --http :8000 --wsgi-file test.py
http :8000: 使用http协议,端口8000
wsgi-file test.py: 加载指定的文件,test.py

#test.py
def application(env, start_response):
    start_response('200 OK', [('Content-Type','text/html')])
    return [b"Hello World"] # python3

#访问:http://192.168.0.101:8000/


4.用uwsgi启动一个项目(在虚拟环境下操作):
    #cd到目录中,myblog/wsgi.py确保找到这个文件
    (myblog) [root@localhost ~]# uwsgi --http :8000 --module myblog.wsgi --py-autoreload=1
    module myblog.wsgi: 加载指定的wsgi模块
    --py-autoreload=1  热加载命令(修改django代码,uWSGI会自动加载django程序)


    使用uwsgi配置文件去启动项目:

    1.手动创建uwsgi.ini 配置文件
    (myblog) [root@localhost myblog]# ls
    backend  db.sqlite3  manage.py  media  myblog  repository  static  templates  utils  web
    (myblog) [root@localhost myblog]# touch uwsgi.ini
    (myblog) [root@localhost myblog]# vim uwsgi.ini

    #########################
    # mysite_uwsgi.ini file
    [uwsgi]

    # Django-related settings
    # the base directory (full path)
    #指定django的项目目录,第一层
    chdir           = /opt/myblog
    # Django's wsgi file
    #找到django的wsgi文件
    #这里需要写项目的第二层目录myblog
    module          = myblog.wsgi
    # the virtualenv (full path)
    #填写虚拟环境的绝对路径
    home            = /root/Envs/myblog
    # process-related settings
    # master
    master          = true
    # maximum number of worker processes
    开启进程数量
    processes       = 5
    # the socket (use the full path to be safe
    #指定socket协议,运行django,只能与nginx结合时使用
    #指定socket协议,运行django,只能与nginx结合时使用
    socket          = 0.0.0.0:8000

    #如果你没用nginx,只想启动一个http界面,用这个
    #http          = 0.0.0.0:8000

    # ... with appropriate permissions - may be needed
    # chmod-socket    = 664
    # clear environment on exit
    vacuum          = true
    #########################

    2.通过配置文件启动uwsgi
    (myblog) [root@localhost myblog]# ls
    backend  db.sqlite3  manage.py  media  myblog  repository  static  templates  utils  web
    (myblog) [root@localhost myblog]# uwsgi --ini uwsgi.ini


5.收集myblog的静态文件
编辑myblog的settings.py配置文件
#定义django的静态资源根目录,便于用命令收集资源,存放的地儿
STATIC_ROOT="/opt/myblog_static"

[root@localhost myblog]# vim settings.py
加上STATIC_ROOT="/opt/myblog_static"
用命令收集静态文件
[root@localhost myblog]# python3 manage.py collectstatic

6.配置nginx,反向代理django服务器,且解析静态文件
proxy_pass仅仅是请求转发的参数,与uwsgi结合,还有更高级的协议参数

修改nginx配置文件如下:
http {
    server {
        listen       80;
        #server_name  myblog.com;
        server_name  localhost;
        location / {
        #使用uwsgi_pass转发基于uwsgi协议的一个请求
        include /opt/nginx112/conf/uwsgi_params;
        uwsgi_pass 192.168.0.101:8000;
        }
    #配置一个url的入口,告诉django静态文件去哪里找
        #当请求静态文件是就进行别名,nginx去/opt/myblog_static/下找,注意不要用tab键切换,敲空格
        location /static{alias /opt/myblog_static/;}
    }
}

7.此时nginx结合uwsgi已经完成
192.168.0.101:8000/访问不到,避免了端口工具
192.168.0.101通过nginx的反向代理访问


8.配置supervisor工具,管理django后台【记住这里退出虚拟环境,使用物理环境去运行】
    1.下载supervisor
    [root@localhost ~]# easy_install supervisor
    2.配置supervisor的配置文件,编写django任务
    (myblog) [root@localhost myblog]# deactivate
    [root@localhost myblog]# echo_supervisord_conf > /etc/supervisor.conf
    [root@localhost myblog]# vim /etc/supervisor.conf
    最底行写入:

    [program:myblog]
    command=/root/Envs/myblog/bin/uwsgi --ini /opt/myblog/uwsgi.ini  ;  #写绝对路径
    autostart=true
    stopasgroup=true
    killasgroup=true

    3.启动supervisor服务端
    [root@localhost myblog]# supervisord -c /etc/supervisor.conf
    通过客户端命令查看任务
    [root@localhost myblog]# supervisorctl -c /etc/supervisor.conf
    myblog                           RUNNING   pid 21129, uptime 0:00:14
    supervisor>

    4.supervisor管理命令
    [root@localhost myblog]# supervisorctl -c /etc/supervisor.conf
    myblog                           RUNNING   pid 21129, uptime 0:00:14
    supervisor>
    supervisor> stop myblog  #停止所有任务
    myblog: stopped
    supervisor> start myblog  #启动所有任务
    myblog: started
    supervisor>
    supervisor> status
    myblog                           RUNNING   pid 21284, uptime 0:01:17
    supervisor>


其他:
找uwsgi的绝对路径
(myblog) [root@localhost myblog]# which uwsgi
/root/Envs/myblog/bin/uwsgi
(myblog) [root@localhost myblog]# pwd
/opt/myblog


怎么查看虚拟环境绝对路径:
(myblog) [root@localhost opt]# cdvirtualenv
(myblog) [root@localhost myblog]# pwd
/root/Envs/myblog


找uwsgi_params的路径
[root@localhost myblog]# find / -name uwsgi_params
/opt/nginx-1.12.0/conf/uwsgi_params
/opt/nginx112/conf/uwsgi_params
[root@localhost myblog]#
nginx+uwsgi+路飞学城部署
1.单机本地测试运行方式,调用django第三方的wsgiref单机模块,性能很低
python3 manage.py runserver 0.0.0.0:8000

2.使用uwsgi去启动django项目,支持并发更多

3.准备前后端代码

4.先从vue前端整起
    1.解决node环境
    2.更改vue发送请求的接口地址
    这个vue发送的地址,应该是发送给nginx代理,然后代理再转发请求给drf后台
    用以下命令,更改vue发送的接口地址
    [root@localhost restful]# sed -i "s/127.0.0.1/192.168.0.101/g"  /opt/luffy/07-luffy_project_01/src/restful/api.js

    !!!待会要准备nginx的代理地址,如下:
    !!!待会要准备nginx的代理地址,如下:
    !!!待会要准备nginx的代理地址,如下:
    192.168.0.101:8000
    3.打包编译vue静态文件

    [root@localhost 07-luffy_project_01]# ls
    build  config  index.html  package.json  package-lock.json  README.md  src  static
    [root@localhost 07-luffy_project_01]# pwd
    /opt/luffy/07-luffy_project_01
    [root@localhost 07-luffy_project_01]# npm install
    [root@localhost 07-luffy_project_01]# ls
    build  config  index.html  node_modules  package.json  package-lock.json  README.md  src  static
    [root@localhost 07-luffy_project_01]# npm run build
    [root@localhost 07-luffy_project_01]# ls
    build  config  dist  index.html  node_modules  package.json  package-lock.json  README.md  src  static

    4.生成的dist文件夹,就是路飞学城的静态页面,丢给nginx去返回即可
    配置nginx.conf找到vue的静态页面
    http {
    server {
        listen       80;
        server_name  luffy.com;
        #server_name  localhost;
        location / {
        root   /opt/luffy/07-luffy_project_01/dist;
        index  index.html index.htm;
        }
    }

}

5.开始配置后端代码,用uwsgi启动luffy
    1.新建虚拟环境
    mkvirtualenv luffy
    2.解决所需的依赖模块,准备一个模块版本文件:requirements.txt 这个文件可以手动创建写入如下依赖
    (luffy) [root@localhost opt]# cd /opt/luffy/luffy_boy
    (luffy) [root@localhost luffy_boy]# touch requirements.txt
    (luffy) [root@localhost luffy_boy]# vim requirements.txt
    ##############################
    certifi==2018.11.29
    chardet==3.0.4
    crypto==1.4.1
    Django==2.1.4
    django-redis==4.10.0
    django-rest-framework==0.1.0
    djangorestframework==3.9.0
    idna==2.8
    Naked==0.1.31
    pycrypto==2.6.1
    pytz==2018.7
    PyYAML==3.13
    redis==3.0.1
    requests==2.21.0
    shellescape==3.4.1
    urllib3==1.24.1
    uWSGI==2.0.17.1
    ##############################
    (luffy) [root@localhost luffy_boy]# ls
    api  db.sqlite3  keys  luffy_boy  manage.py  requirements.txt  static  templates
    3.安装所需的依赖模块
    (luffy) [root@localhost luffy_boy]# pip3 install -i https://pypi.douban.com/simple -r requirements.txt
    4.看一看
    pip3 list
    5.运行
    python3 manage.py runserver 0.0.0.0:8000  (注意端口得是8000,因为前端的vue发的就是8000)

6.准备uwsgi,以及uwsgi.ini

# mysite_uwsgi.ini file
[uwsgi]

# Django-related settings
# the base directory (full path)
chdir           = /opt/luffy/luffy_boy
# Django's wsgi file
module          = luffy_boy.wsgi
# the virtualenv (full path)
home            = /root/Envs/luffy
# process-related settings
# master
master          = true
# maximum number of worker processes
processes       = 5
# the socket (use the full path to be safe
socket          = 0.0.0.0:9000
# ... with appropriate permissions - may be needed
# chmod-socket    = 664
# clear environment on exit
vacuum          = true


7.通过配置文件启动uwsgi
(luffy) [root@localhost luffy_boy]# ls
!  api  db.sqlite3  keys  luffy_boy  manage.py  requirements.txt  static  templates  uwsgi.ini
(luffy) [root@localhost luffy_boy]# uwsgi --ini uwsgi.ini


8.配置nginx,反向代理django服务器,且解析静态文件
#虚拟主机1的功能是web页面返回
    server {
        listen       80;
        server_name 192.168.0.101;

        location / {
        root   /opt/luffy/07-luffy_project_01/dist;
        index  index.html index.htm;
        }
      }

#虚拟主机2的功能是反向代理,vue发送的代理地址是192.168.0.101:8000
    server {
        listen       8000;
        server_name  192.168.0.101;
        location / {

                include /opt/nginx112/conf/uwsgi_params;
                uwsgi_pass 192.168.0.101:9000;
                 }
         }


#解释:
当用户发送请求给192.168.0.101时,默认走的是第一个虚拟主机,进行vue静态页面返回
然后在浏览器中点击课程列表,vue发送请求给代理ip,(然后nginx就支持反向代理,再定义虚拟主机2,监听的地址是8000,

转发的请求地址是后台的uwsgi端口,可以是9000,也可以是9999,自定义)


9.修改项目的settings文件中的redis配置
CACHES = {
    "default": {
        "BACKEND": "django_redis.cache.RedisCache",
        "LOCATION": "redis://192.168.0.101:6380",
        "OPTIONS": {
            "CLIENT_CLASS": "django_redis.client.DefaultClient",
            "CONNECTION_POOL_KWARGS": {"max_connections": 100},
            # "PASSWORD": "密码",
            "DECODE_RESPONSES":True
        }
    },
}

10修改项目代码中/opt/luffy/luffy_boy/api/views/shoppingcart.py 的代码
(更改redis数据库连接的驱动,用django的驱动)
#REDIS_CONN = redis.Redis(decode_responses=True)改成下面的
REDIS_CONN = get_redis_connection()


11.redis的配置
(luffy) [root@localhost redis-4.0.10]# pwd
/opt/redis-4.0.10
(luffy) [root@localhost redis-4.0.10]# vim redis-6380.conf
复制如下代码:
port 6380
daemonize yes
pidfile /data/6380/redis.pid
loglevel notice
logfile "/data/6380/redis.log"
dir /data/6380
requirepass 111111
appendonly yes
appendfsync everysec
protected-mode no
bind 192.168.0.101

12.启动redis
(luffy) [root@localhost redis-4.0.10]# redis-server  redis-6380.conf
(luffy) [root@localhost redis-4.0.10]# redis-cli -p 6380 -a 111111 -h 192.168.0.101

13.redis nginx uwsgi 确保都启动了,alex   alex3714登录

其他:
    配置两个本地解析的域名
    C:\Windows\System32\drivers\etc\hosts文件,写入如下配置:
    192.168.1.101 chiji.com
    192.168.1.101 hanju.com


    #如果打包不成功
    1.更换网络
    2.在window中打包,生成dist文件夹后,发送给Linux
    3.更换源,加速下载
命令:curl -I baidu.com

[root@localhost ~]# curl -I baidu.com
HTTP/1.1 200 OK
Date: Tue, 24 Sep 2019 19:24:44 GMT
Server: Apache
Last-Modified: Tue, 12 Jan 2010 13:48:00 GMT
ETag: "51-47cf7e6ee8400"
Accept-Ranges: bytes
Content-Length: 81
Cache-Control: max-age=86400
Expires: Wed, 25 Sep 2019 19:24:44 GMT
Connection: Keep-Alive
Content-Type: text/html

web服务器(nginx):接收HTTP请求(例如www.pythonav.cn/xiaocang.jpg)并返回数据
web服务器,仅仅就是接受一个web请求,返回一个磁盘上的静态资源(jpg,mp4...)

错误码
50x 服务器错误,django flask后台蹦了
40x 客户端错误,权限不足,资源不存在等等...
30x 资源重定向
20x 请求正确返回

技术栈:
贵:
Java+apache(web服务器,处理静态资源)+oracle(数据库)+tomcat(处理Java应用)+svn(代码托管)+js+jQuery +redhat
为了省钱,切换开源技术栈
java + perl + python + nginx + mysql + git + js + centos

web框架(django,flask):开发web应用程序,处理接收到的数据

nginx安装步骤,源码编译安装(源码编译,开源自定制更多功能)
1.解决软件正常运转所需依赖包
yum install gcc patch libffi-devel python-devel  zlib-devel bzip2-devel openssl-devel ncurses-devel sqlite-devel readline-devel tk-devel gdbm-devel db4-devel libpcap-devel xz-devel openssl openssl-devel -y
2.下载源代码
[root@localhost ~]# cd /opt
[root@localhost opt]# wget -c https://nginx.org/download/nginx-1.12.0.tar.gz
3.解压缩源码
[root@localhost opt]# tar -zxvf nginx-1.12.0.tar.gz
4.进入源码目录,编译安装
[root@localhost opt]# cd nginx-1.12.0/
[root@localhost nginx-1.12.0]# ./configure --prefix=/opt/nginx112
[root@localhost nginx-1.12.0]# make && make install
5.进入Nginx功能目录
cd /opt/nginx112
6.学习Nginx功能目录
[root@localhost nginx112]# ls
conf  配置文件nginx.conf
html  存放前端页面
logs  存放Nginx的运行日志,错误日志
sbin   存放Nginx可执行程序的目录
7.卸载原本的yum装的Nginx
[root@localhost nginx112]# yum remove nginx -y
8.启动
[root@localhost nginx112]# netstat -tunlp | grep 80
[root@localhost nginx112]# ps -ef|grep nginx
root      15678  13010  0 00:45 pts/3    00:00:00 grep --color=auto nginx
[root@localhost nginx112]# ls
conf  html  logs  sbin
[root@localhost nginx112]# cd sbin
[root@localhost sbin]# ls
nginx
[root@localhost sbin]# ./nginx
[root@localhost sbin]# !ps
ps -ef|grep nginx
root      15682      1  0 00:47 ?        00:00:00 nginx: master process ./nginx
nobody    15683  15682  0 00:47 ?        00:00:00 nginx: worker process
root      15685  13010  0 00:47 pts/3    00:00:00 grep --color=auto nginx
[root@localhost sbin]#
[root@localhost sbin]# history
    1  pwd
    2  ip a
    3  w
    4  ip a
    ...
  341  ps -ef|grep nginx
  342  ls
  343  cd sbin
  344  ls
  345  ./nginx
  346  history
[root@localhost sbin]# !341
ps -ef|grep nginx
root      15682      1  0 00:47 ?        00:00:00 nginx: master process ./nginx
nobody    15683  15682  0 00:47 ?        00:00:00 nginx: worker process
root      15687  13010  0 00:48 pts/3    00:00:00 grep --color=auto nginx
[root@localhost sbin]#

9.添加Nginx的环境变量,可以快捷使用Nginx
[root@localhost sbin]# pwd
/opt/nginx112/sbin
[root@localhost sbin]# vim /etc/profile
PATH="/opt/python36/bin:/usr/local/sbin:/usr/local/bin:/usr/sbin:/usr/bin:/root/bin:/opt/node-v8.6.0-linux-x64/bin:/opt/nginx112/sbin"

10.读取配置文件 source /etc/profile
[root@localhost sbin]# nginx
-bash: nginx: command not found
[root@localhost sbin]# source /etc/profile
[root@localhost sbin]# which nginx
/opt/nginx112/sbin/nginx

11.测试
192.168.0.101

12.修改配置文件

13.平滑重启nginx
[root@localhost nginx112]# ls
client_body_temp  conf  fastcgi_temp  html  logs  proxy_temp  sbin  scgi_temp  uwsgi_temp
[root@localhost nginx112]# ./sbin/nginx -s reload


Nginx功能目录
conf  配置文件nginx.conf (Nginx的功能参数都在这个文件定义)
html  存放前端页面
logs  存放Nginx的运行日志,错误日志
sbin   存放Nginx可执行程序的目录

conf/nginx.conf参数说明:
####################
#user  nobody;
#工作进程数,根据cpu的核数优化。
worker_processes  4;
#错误日志
#error_log  logs/error.log;
#error_log  logs/error.log  notice;
error_log  logs/error.log  info;
#进程id文件
#pid        logs/nginx.pid;

#nginx事件驱动
events {
    worker_connections  60000;
}

#nginx web配置核心区域
http {
    include       mime.types;
    default_type  application/octet-stream;

    #日志格式
    log_format  main  '$remote_addr - $remote_user [$time_local] "$request" '
                      '$status $body_bytes_sent "$http_referer" '
                      '"$http_user_agent" "$http_x_forwarded_for"';

    #日志文件
    access_log  logs/access.log  main;

    sendfile        on;
    #tcp_nopush     on;

    #keepalive_timeout  0;
    keepalive_timeout  65;

    #gzip  on;
    #定义nginx虚拟主机的
    server {
        #nginx监听的端口,默认浏览器是80
        listen       80;
        #填写服务器的域名,如果你有域名,nginx会解析到当前这个虚拟主机
        #当访问pythonav.cn:80
        server_name  pythonav.cn;

        #charset koi8-r;

        #access_log  logs/host.access.log  main;

        #location 就是nginx的路径资源匹配
        #就是当请求
        #pythonav.cn/
        #pythonav.cn/zoie.jpg
        #python.cn/flash/zoie.mp4
        #这个location / 这个语法是万能匹配,你所有的请求,都会进入这个location
        location / {
            #这个root用于定义网页根目录路径(可以换成其他绝对路径,相对路径是当前nginx)
            root   html;
            #定义网页的首页文件,名字必须叫做index.html
            index  index.html index.htm;
        }
        #通过这个参数,定义错误页面的文件,当状态码是404 400 401时,返回40x.html页面
        error_page  404 401 400 403             /40x.html;

        # redirect server error pages to the static page /50x.html
        #
        error_page   500 502 503 504  /50x.html;
        location = /50x.html {
            root   html;
        }

        # proxy the PHP scripts to Apache listening on 127.0.0.1:80
        #
        #location ~ \.php$ {
        #    proxy_pass   http://127.0.0.1;
        #}

        # pass the PHP scripts to FastCGI server listening on 127.0.0.1:9000
        #
        #location ~ \.php$ {
        #    root           html;
        #    fastcgi_pass   127.0.0.1:9000;
        #    fastcgi_index  index.php;
        #    fastcgi_param  SCRIPT_FILENAME  /scripts$fastcgi_script_name;
        #    include        fastcgi_params;
        #}

        # deny access to .htaccess files, if Apache's document root
        # concurs with nginx's one
        #
        #location ~ /\.ht {
        #    deny  all;
        #}
    }


    # another virtual host using mix of IP-, name-, and port-based configuration
    #
    #server {
    #    listen       8000;
    #    listen       somename:8080;
    #    server_name  somename  alias  another.alias;

    #    location / {
    #        root   html;
    #        index  index.html index.htm;
    #    }
    #}


    # HTTPS server
    #
    #server {
    #    listen       443 ssl;
    #    server_name  localhost;

    #    ssl_certificate      cert.pem;
    #    ssl_certificate_key  cert.key;

    #    ssl_session_cache    shared:SSL:1m;
    #    ssl_session_timeout  5m;

    #    ssl_ciphers  HIGH:!aNULL:!MD5;
    #    ssl_prefer_server_ciphers  on;

    #    location / {
    #        root   html;
    #        index  index.html index.htm;
    #    }
    #}

}


####################
1.nginx定义多虚拟主机配置如下:
http{
    #虚拟主机1,运行吃鸡网站
    #虚拟主机的加载,自上而下的加载,如果是访问的ip地址,永远访问第一个
    server{
        listen 80;
        #当访问的域名是chiji.com就进入这个server标签
        server_name  chiji.com;
        location / {
            root   /opt/chiji;
            index  index.html index.htm;
        }
    }
    #虚拟主机2,运行韩剧网站
    server{
        listen 80;
        #当访问的域名是hanju.com就进入这个server标签
        server_name  hanju.com;
        location / {
            root   /opt/hanju;
            index  index.html index.htm;
        }
    }
}

2.配置两个虚拟主机的网站资源
    1.配置吃鸡网游的资料
    在/opt/chiji 目录下创建index.html
    2.配置韩剧的资料
    在/opt/hanju 目录下创建index.html
    3.配置两个本地解析的域名
    C:\Windows\System32\drivers\etc\hosts文件,写入如下配置:
    192.168.1.101 chiji.com
    192.168.1.101 hanju.com
    4.在Windows下测试访问是否正常
    chiji.com
    hanju.com

3.定义nginx错误页面优化404页面定制
    修改nginx.conf 找到如下参数
    #通过这个参数,定义错误页面的文件,当状态码是404 400 401时,返回40x.html页面
    error_page  404 401 400 403             /40x.html;

4.nginx用户访问日志access.log

####################
nginx反向代理

代理:
微商,代购,房屋中介,黄牛,

用户向一个代理请求资源,而不需要关注这个资源的真实位置
用户(浏览器) 请求网站资源 --》直接定位到django后台(所有的请求压力,都直接给了后台)
django默认对并行很差,并且处理网页的静态资源效率很差。

10万个并发请求--》后台应用
静态请求 --> nginx(天然并发性很高,并且处理静态资源css,js,jpg),静态资源nginx直接从磁盘上返回。
hanju.com/zoie.png
nginx无法处理动态请求,直接将这个请求丢给后端应用django

动态请求(对数据库进行交互,必须有编程语言的支撑)
hanju.com/login/  --> django 后台,django这个编程语言框架,就可以对login请求处理

####################
实现nginx反向代理的功能
1.实验环境准备,2台机器
    用户:浏览器发送请求,得到请求
    192.168.0.101  nginx反向代理服务器(房屋中介代理)
    192.168.0.111  真实资源服务器(有房源的房东)

2.分别在2台机器上,安装nginx
3.先配置真实资源服务器 192.168.0.111,打开这个机器的页面是吃鸡的网游页面
4.配置反向代理服务器192.168.0.101
http{
    #虚拟主机的加载,自上而下的加载,如果是访问的ip地址,永远访问第一个
    #这个nginx服务器,不再是用作虚拟主机了
    #而是直接转发别人的请求,是一个代理身份
    server{
        listen 80;
        #当访问的域名是chiji.com就进入这个server标签
        server_name  chiji.com;
        location / {
            #root   /opt/chiji;
            #index  index.html index.htm;
            #当请求是chiji.com的时候,这个nginx不做处理,直接转发请求给另一台机器
            proxy_pass  http://192.168.0.111;
        }
    }


####################其他
1.nginx脚本命令
nginx 直接输入是启动
nginx -s stop 停止
nginx -s reload 平滑重启,重新读取配置文件


.nginx.conf.swp 这个文件是由于你在vim编辑文件的时候,异常退出,或者有其他人也想获取这个文件句柄,
vim防止文件内容错乱,丢失,自动生成一个swp缓存文件,用于保护文件的。
[root@localhost conf]# rm -rf .nginx.conf.swp   #删除这个隐藏文件就可以了


###
top 命令可以查看cpu核数
hostnamectl set-hostname master
hostnamectl set-hostname slave
redis持久化之RDB:
1.rdb持久化,可以手动触发持久化,通过redis放入save命令触发
2.rdb文件是一个经过压缩的二进制文件,redis可以通过这个文件还原数据
3.rdb持久化还有时间策略
save  900 1          #900秒  1个修改类的操作
save 300 10          #300秒  10个操作
save 60  10000       #60秒  10000个操作

4.使用rdb持久化的方式
--配置文件:
    [root@localhost redis-4.0.10]# vim redis-6380.conf
    写入以下内容:
    port 6380    #redis端口
    daemonize yes  #后台运行redis
    pidfile /data/6380/redis.pid  #pid号码
    loglevel notice   #日志等级
    logfile "/data/6380/redis.log"  #日志文件存放路径
    requirepass bubu666  #redis的密码
    dir /data/6380  #redis数据目录/#定义持久化文件存储位置【记得去创建一下目录】

    dbfilename  redis.dump        #rdb持久化文件(此文件在/data/6380目录下)
    save 900 1                    #rdb机制 每900秒 有1个修改记录
    save 300 10                   #每300秒        10个修改记录
    save 60  10000                #每60秒内        10000修改记录


5.关闭redis服务端,准备重启或者使用kill
redis-cli -p 6380 -a bubu666 shutdown

6.使用新的支持rdb持久化的配置文件启动redis
redis-server redis-6380.conf

7.手动触发rdb持久化
127.0.0.1:6380> set name dsb
OK
127.0.0.1:6380> save
OK

8.让配置文件支持定期持久化
save 900 1                    #rdb机制 每900秒 有1个修改记录
save 300 10                   #每300秒        10个修改记录
save 60  10000                #每60秒内        10000修改记录


redis持久化之AOF(企业一般多用这个):
1.配置文件:
    [root@localhost redis-4.0.10]# vim redis-6380.conf
    写入以下内容:
    port 6380    #redis端口
    daemonize yes  #后台运行redis
    pidfile /data/6380/redis.pid  #pid号码
    loglevel notice   #日志等级
    logfile "/data/6380/redis.log"  #日志文件存放路径
    requirepass bubu666  #redis的密码
    dir /data/6380  #redis数据目录/#定义持久化文件存储位置【记得去创建一下目录】

    appendonly yes
    appendfsync everysec

2.启动
redis-server redis-6380.conf
3.写入数据
[root@localhost redis-4.0.10]# redis-cli -p 6380 -a bubu666
Warning: Using a password with '-a' option on the command line interface may not be safe.
127.0.0.1:6380> set name dsb
OK
127.0.0.1:6380> keys *
1) "name"

4.新终端中检查
[root@localhost redis-4.0.10]# cd /data/6380
[root@localhost 6380]# tail -f appendonly.aof


##############################################

AOF持久化配置,两条参数
appendonly yes
appendfsync  always    总是修改类的操作
             everysec   每秒做一次持久化
             no     依赖于系统自带的缓存大小机制

#bind 10.0.0.10  127.0.0.1    #redis绑定地址

[root@localhost ~]# redis-server -v
Redis server v=4.0.10 sha=00000000:0 malloc=jemalloc-4.0.3 bits=64 build=b632d68350d21f18
Linux redis学习
1.安装redis的方式
    yum (删除这个yum安装的redis,我们只用源码编译安装的)
    rpm
    源码编译
2.删除原本的redis
    yum remove redis -y
3.源码安装redis
    1.下载redis源码
    wget http://download.redis.io/releases/redis-4.0.10.tar.gz
    2.解压缩
    tar -zxf redis-4.0.10.tar.gz
    3.切换redis源码目录
    cd redis-4.0.10.tar.gz
    4.编译源文件
    make
    5.编译好后,src/目录下有编译好的redis指令
    6.make install 安装到指定目录
    7.默认在/usr/local/bin
    8.配置文件:
    [root@localhost opt]# cd redis-4.0.10/
    [root@localhost redis-4.0.10]# touch redis-6380.conf
    [root@localhost redis-4.0.10]# vim redis-6380.conf
    写入以下内容:
    port 6380    #redis端口
    daemonize yes  #后台运行redis
    pidfile /data/6380/redis.pid  #pid号码
    loglevel notice   #日志等级
    logfile "/data/6380/redis.log"  #日志文件存放路径
    requirepass bubu666  #redis的密码
    dir /data/6380  #redis数据目录【记得去创建一下目录不然启动redis就报错了】


    9.新建文件
    [root@localhost redis-4.0.10]# mkdir -p /data/6380

    10.指定redis的配置文件,启动redis
    redis-server  redis-6380.conf

    [root@localhost ~]# ps -ef|grep redis
    [root@localhost ~]# netstat -tunlp

    11.连接
    [root@localhost ~]# redis-cli -p 6380
    127.0.0.1:6380> ping
    PONG
    127.0.0.1:6380>

    12.加了密码以后(auth bubu666)
    [root@localhost redis-4.0.10]# redis-cli -p 6380
    127.0.0.1:6380> ping
    (error) NOAUTH Authentication required.
    127.0.0.1:6380> auth bubu666
    OK
    127.0.0.1:6380> ping
    PONG
    127.0.0.1:6380>

    或者
    [root@localhost redis-4.0.10]# redis-cli -p 6380 -a bubu666
    127.0.0.1:6380> ping
    PONG
    127.0.0.1:6380>
编译安装python3
1.切换opt目录(这是一个约定)
cd /opt
2.下载python3的源代码
wget https://www.python.org/ftp/python/3.6.2/Python-3.6.2.tgz
3.安装python前的库环境,非常重要
yum install gcc patch libffi-devel python-devel  zlib-devel bzip2-devel openssl-devel ncurses-devel sqlite-devel readline-devel tk-devel gdbm-devel db4-devel libpcap-devel xz-devel -y

4.解压缩python3的源代码压缩文件
cd /opt/ 进入存在这个文件的目录
tar -xf Python-3.6.2.tgz 解压
5.cd Python-3.6.2/  进入源代码目录下,准备开始编译安装
6.编译安装三部曲
第一曲:
cd Python-3.6.2/
#configure 这个脚本文件,只是为了释放makefile,用于指定python3安装到哪里
./configure    --prefix=/opt/python36  --with-ssl
        --prefix 这个参数用于指定python安装的路径
第二曲:
执行make开始编译python3.6的源代码
make

第三曲:
make install  生成/opt/python36

(第二曲和第三曲可以写成    make && make install)

7.配置环境变量
echo $PATH             #$PATH是有优先级顺序的
将/opt/python36/bin/放入环境变量,注意要添加到path的最前面
#变量的赋值只是临时有效
PATH="/opt/python36/bin:/usr/local/sbin:/usr/local/bin:/usr/sbin:/usr/bin:/root/bin"
#将这个参数,写入到Linux的全局变量配置文件中
vim /etc/profile     #打开这个全局变量文件,写入PATH="/opt/python36/bin:/usr/local/sbin:/usr/local/bin:/usr/sbin:/usr/bin:/root/bin"到文件最后

8.退出(logout),重新加载全局变量.
9.which python3 确认是否正确安装
10.不要将系统默认的python 改成python3  这是一个大坑。
(因为Linux有很多工具,默认是用的python2,例如yum)


11.在Linux下安装django程序
pip3 install -i https://pypi.douban.com/simple django==1.11.16
pip3 install django==1.11.16
pip3 list

12.使用django命令创建项目
[root@localhost ~]# cd /opt
[root@localhost opt]# django-admin startproject mysite

13.修改mysite的settings.py中的ALLOWED_HOSTS
vim /opt/mysite/mysite/settings.py     #/查找
ALLOWED_HOSTS = ["*"]

14.启动项目
[root@localhost opt]# cd mysite/
[root@localhost mysite]# python3 manage.py runserver 0.0.0.0:9999

补充:
python3的管理工具是pip3 install flask
python2的是easy_install flask


[root@localhost ~]# python -V
Python 2.7.5
[root@localhost ~]# python --version
Python 2.7.5
[root@localhost ~]# python3 --version
Python 3.6.2
[root@localhost ~]# pip3 list
DEPRECATION: The default format will switch to columns in the future. You can use --format=(legacy|columns) (or define a format=(legacy|columns) in your pip.conf under the [list] section) to disable this warning.
Django (1.11.16)
pip (9.0.1)
pytz (2019.2)
setuptools (28.8.0)
You are using pip version 9.0.1, however version 19.2.3 is available.
You should consider upgrading via the 'pip install --upgrade pip' command.
[root@localhost ~]#
###########################################
dns    /etc/resolv.conf

[root@localhost ~]# ifconfig
eno16777736: flags=4163<UP,BROADCAST,RUNNING,MULTICAST>  mtu 1500
        inet 192.168.0.101  netmask 255.255.255.0  broadcast 192.168.0.255
        inet6 fe80::20c:29ff:fe53:9402  prefixlen 64  scopeid 0x20<link>
        ether 00:0c:29:53:94:02  txqueuelen 1000  (Ethernet)
        RX packets 68  bytes 9208 (8.9 KiB)
        RX errors 0  dropped 0  overruns 0  frame 0
        TX packets 84  bytes 11947 (11.6 KiB)
        TX errors 0  dropped 0 overruns 0  carrier 0  collisions 0

lo: flags=73<UP,LOOPBACK,RUNNING>  mtu 65536
        inet 127.0.0.1  netmask 255.0.0.0
        inet6 ::1  prefixlen 128  scopeid 0x10<host>
        loop  txqueuelen 0  (Local Loopback)
        RX packets 11  bytes 1220 (1.1 KiB)
        RX errors 0  dropped 0  overruns 0  frame 0
        TX packets 11  bytes 1220 (1.1 KiB)
        TX errors 0  dropped 0 overruns 0  carrier 0  collisions 0

[root@localhost ~]# vim /etc/sysconfig/net
netconsole       network          network-scripts/
[root@localhost ~]# vim /etc/sysconfig/network-scripts/if
ifcfg-eno16777736  ifdown-eth         ifdown-post        ifdown-Team        ifup-aliases       ifup-ipv6          ifup-post          ifup-Team
ifcfg-lo           ifdown-ippp        ifdown-ppp         ifdown-TeamPort    ifup-bnep          ifup-isdn          ifup-ppp           ifup-TeamPort
ifdown             ifdown-ipv6        ifdown-routes      ifdown-tunnel      ifup-eth           ifup-plip          ifup-routes        ifup-tunnel
ifdown-bnep        ifdown-isdn        ifdown-sit         ifup               ifup-ippp          ifup-plusb         ifup-sit           ifup-wireless
[root@localhost ~]# vim /etc/sysconfig/network-scripts/ifcfg-eno16777736   #打开网卡配置文件

HWADDR="00:0C:29:53:94:02"
TYPE="Ethernet"
BOOTPROTO="dhcp"    #动态获取ip协议
DEFROUTE="yes"
PEERDNS="yes"
PEERROUTES="yes"
IPV4_FAILURE_FATAL="no"
IPV6INIT="yes"
IPV6_AUTOCONF="yes"
IPV6_DEFROUTE="yes"
IPV6_PEERDNS="yes"
IPV6_PEERROUTES="yes"
IPV6_FAILURE_FATAL="no"
NAME="eno16777736"
UUID="67dc0736-0a20-48c1-8576-31ae47670ff5"
ONBOOT="yes"   #必须将他改为ONBOOT="yes" 开机时读取这个网卡脚本

不能上网
1.网卡配置文件中必须将他改为ONBOOT="yes" 开机时读取这个网卡脚本
2.systemctl restart network


centos7 mariadb的学习
1.在Linux上安装软件的方式
yum安装 在线搜索rpm格式的软件包,进行自动的依赖关系处理,下载,安装
(阿里云的yum仓库,里面的软件都是阿里云运维工程师定义的)
yum install mysql -y
手动rpm包安装,需要手动解决N个软件依赖
rpm -ivh mysqlxx.rpm
源码编译安装(这种方式是企业应用最多的)
(可以自定制软件的版本,以及可以最优先的使用最新版本的软件)

2.yum源的配置(mysql的yum源)
    cd /etc/yum.repos.d/
    1.在线下载阿里云的yum仓库,以及epel仓库
    2.安装mysql的方式
    yum install mysql-server mysql -y
    3.安装mysql的方式也有2种,阿里云官方提供的mariadb软件包,版本可能太低。(下载网速很快,方便学习使用)
    4.企业里多半不会用阿里云的,因为版本低,安全性太低,会配置mariadb官方的yum仓储
        1.如下操作:(手动创建mariadb仓库文件,写入配置信息,安装最新版本mariadb)
        [root@localhost ~]# cd /etc/yum.repos.d/
        [root@localhost yum.repos.d]# touch Mariadb.repo
        [root@localhost yum.repos.d]# vim Mariadb.repo
        写入如下配置:
        [mariadb]
        name = MariaDB
        baseurl = http://yum.mariadb.org/10.1/centos7-amd64
        gpgkey=https://yum.mariadb.org/RPM-GPG-KEY-MariaDB
        gpgcheck=1
        [root@localhost yum.repos.d]# mysql -V
        mysql  Ver 15.1 Distrib 5.5.64-MariaDB, for Linux (x86_64) using readline 5.1
        [root@localhost yum.repos.d]# yum install mariadb-server mariadb -y
        2.启动
        systemctl start mariadb
        3.初始化mysql
        mysql_secure_installation
        【
        Set root password? [Y/n] y
        New password:  输入root管理员设置的数据库密码
        Re-enter new password: 再次输入密码
        Remove anonymous users? [Y/n] y 删除匿名账户
        Disallow root login remotely? [Y/n] n 允许root管理员从远程登录
        Remove test database and access to it? [Y/n] y  删除test数据库并取消对它的访问权限
        Reload privilege tables now? [Y/n] y   #刷新授权表,让初始化后的设定立即生效

        】
        4.配置数据库的中文支持
        \s 查看数据库编码

        编辑mysql配置文件/etc/my.cnf,写入以下内容:
        [mysqld]
        character-set-server=utf8
        collation-server=utf8_general_ci
        log-error=/var/log/mysqld.log
        [client]
        default-character-set=utf8
        [mysql]
        default-character-set=utf8
        5.在服务器上,修改了配置文件,都需要重启数据库服务
        systemctl restart mariadb
        6.查看具体库表的编码
        show create database myblog;
        show create table user;
    5.window去链接(报错需要授权配置)
    mysql -uroot -p -h 192.168.0.101
    6.授权配置:配置mysql支持远程连接的sql语句
    授予root用户对所有的库表所有的权限,在所有的机器上操作,皆可登陆。
    MariaDB [(none)] > grant all privileges on *.* to root@'%' identified by '密码';
    #刷新权限
    MariaDB [(none)] > flush privileges;


mysql主从同步技术
1.环境准备,准备2台机器,一台master一台slave
    192.168.0.101  (主库)
    192.168.0.111  (从库)
【主库】
2.配置主库的环境
    1.#停mariadb
    systemctl stop mariadb

    2.#修改主库的配置文件,开启binlog功能
    vim /etc/my.cnf
    #修改内容
    #解释:server-id服务的唯一标识(主从之间都必须不同);log-bin启动二进制日志名称为mysql-bin
      [mysqld]
      server-id=1
      log-bin=mysql-bin

    3.#启动mariadb
    systemctl start mariadb


    4.新建用于主从同步的用户tom,允许登录的从库是'192.168.0.111'
    create user 'tom'@'192.168.0.111' identified by '密码';
    #create user 'tom'@'%' identified by '密码';

    5.授权tom一个slave的身份标识,在192.168.0.111机器上复制
    grant replication slave on *.* to 'tom'@'192.168.0.111';
    #grant replication slave on *.* to 'tom'@'%';

    6.锁表
    flush table with read lock;

    7.数据库信息导出
    mysqldump -uroot -p --all-databases > /opt/db.dump

    8.从主库把sql文件发给从库
    scp /opt/db.dump root@192.168.0.111:/opt/

    9.【从库配置】

    10.解锁
    unlock tables;

    11.验证主从同步是否正常。

【从库】
配置从库的环境
    1.编码:编辑mysql配置文件/etc/my.cnf,写入以下内容:
            [mysqld]
            character-set-server=utf8
            collation-server=utf8_general_ci
            log-error=/var/log/mysqld.log
            [client]
            default-character-set=utf8
            [mysql]
            default-character-set=utf8

    2.修改Slave的/etc/my.cnf,写入
    [mysqld]
    server-id=3
    read-only=true

    (说明:设置server-id值并关闭binlog功能参数
    数据库的server-id在主从复制体系内是唯一的,Slave的server-id要与主库和其他从库不同,并且注释掉Slave的binlog参数。)

    3.启动
    systemctl start mariadb

    4.导入数据(之前从主库传过来的)
    mysql -uroot -p < /opt/db.dump

    5.在从库,通过一条命令,开启主从同步
    mysql > change master to master_host='192.168.0.101',


    6.配置复制的参数,Slave从库连接Master主库的配置
    【master_log_file和master_log_pos 通过show master status 查看】

    mysql >
    change master to master_host='192.168.0.101',
    master_user='tom',
    master_password='tom密码',
    master_log_file='mysql-bin.000001',
    master_log_pos=575;

    7.开启slave同步
    start slave;

    8.检查主从同步状态
    show slave status\G;
    保障都yes(注意关闭防火墙)
     Slave_IO_Running: Yes
     Slave_SQL_Running: Yes

    9.验证主从同步是否正常。


注意:如果你用的就是阿里云的yum源,安装mariadb的软件包名字就是如下:
yum install mysql-server mysql -y
如果你用的就是官方mariadb的yum源,
yum install mariadb-server mariadb -y

熟悉mariadb curd操作,mariadb主从同步,读写分离技术...
学习运维架构技术乃王道
1.Nginx高可用负载均衡/缓存、限流/提升集群处理并发能力
2.mysql主从复制,读写分离
3.redis缓存加速与主从复制,哨兵,集群
4.异步消息/服务解耦之rabbitMQ消息队列
5.代码层优化/改进算法/多线程与内存优化
6.使用golang,Erlang等csp并发编程语言
7.docker容器时代


服务器介绍:
1.路飞的7台阿里云,腾讯云,亚马逊云,华为云
    数据都放在其他人的电脑上,安全性由别人掌控

2.公司有钱,有26台Dell实体服务器,vmware  esxi虚拟化的300+Linux
    公司有钱,自建机房(盖了一个厂房,里面专业托管服务器)
    有专业的公司,建造机房(世纪互联)
    机房都是有严格的标准,保护机器不断电,不损坏
    1.无静电
    2.无尘
    3.无湿度
    4.低温

Linux发行部:
Linux是一个名词,是系统的代表
1.红帽子公司  redhat Linux 收费
    -2045之前,外企
    -红帽Linux 资格认证证书
    rhcsa 红帽系统管理员
    rhce 红帽工程师
    rhca 红帽构架师
2.centos 免费版,社区版 centos7
3.Ubuntu 乌班图系统
4.suse 德国    Linux 收费


保证开发环境的一致性
1.手动解决
2.自动化解决
3.通过docker镜像
4.通过vmware系统模板镜像


Linux网络连接方式
桥接:
在一个局域网内,添加了一个新的机器

vmware就像是虚拟化的一个机房的服务器

远程连接
1.使用ssh命令
2.获取服务器的ip地址
3.window的xshell中输入:ssh root@192.168.0.101 远程连接Linux机器

Linux重要的目录
bin目录 有关bin的文件夹都是存放可执行文件的
etc目录存放配置文件的  /etc/my.conf   /etc/nginx.conf   /etc/redis.conf
    配置文件就是定制一堆参数,自己控制的参数
opt目录 存放第三方软件的安装路径的   /opt/redis   /opt/nginx   /opt/python36
root目录 存放超级用户的家目录
var目录 存放系统日志相关

Linux目录结构的操作
cd - 上一次的工作目录
cd ~ 当前登录用户的家目录
cd . 当前目录
cd .. 上一级目录

绝对路径:一切从根目录开始,就是一个绝对路径
相对路径:以当前位置为相对,找到路径

PATH变量是用于,当用户直接输入命令的时候,去查找的一个路径寻找点
当我们输入ls的时候,Linux回去PATH中寻找,哪里有ls


Linux命令学习:
ssh root@192.168.0.101
1.查看ip地址
ip a
ifconfig
2.linux目录分割是正斜杠/
3.w 那些用户在登录
4.whoami 我是谁
5.pwd 我在哪
6.更改目录
cd /
7.用于输出文件夹的内容
ls
ll
ls -a 查看隐藏文件
ls -la
ls -lh 带文件大小
8.linux文件的颜色
浅蓝是软链接目录
蓝色是文件夹
白色是普通文件
绿色是可执行文件
9.创建目录
mkdir
mkdir -p ./a/b/c/d
mkdir -p ./bubu/{linux,python}
10.创建文件
touch
11.vi/vim写入内容
    a.此时进入了命令模式,输入键盘的i,进入编辑模式
    b.编辑模式下可以写入代码
    c.退出编辑模式按下Esc,此时就进入了底线命令模式
    d.输入:wq!
        :进入底线模式
        w 写入
        q 退出
        !强制的
    底线命令模式 :set nu 显示行号
12.cat查看写入cat >>ceshi.txt <<EOF
[root@localhost /tmp/bubu 00:19:28]#cat >>ceshi.txt <<EOF
> ceshi
> 123
> EOF
[root@localhost /tmp/bubu 00:20:02]#cat ceshi.txt
ceshi
[root@localhost /tmp/bubu 00:20:09]#

cat /etc/passwd > ./passwd.txt 将/etc/passwd的内容写入到当前passwd.txt文件中

13.创建新用户
useradd bubu
passwd bubu
14.切换用户
su bubu
15.删除
rmdir 删除空文件夹
rm -rf * == rm -rf ./*  强制删除当前目录的所有内容
rm -rf /*  删除根(作死)
    -f递归删除文件夹
    -r强制性删除
    -i提示性操作,是否删除

16.ctrl+c 中断当前操作
17.which ls
18.echo $PATH
19.hostname 查看主机名
20.hostnamectl set-hostname localhost
21.logout 退出重新登录查看
22.Linux命令提示符
[root@localhost ~]#
23.修改命令提示符
PS1变量控制

[root@localhost ~]# echo $PS1
[\u@\h \W]\$

修改命令提示符:
PS1='[\u@\h \w \t]\$'


24.软件时间date,硬件时间hwclock
ntpdate -u ntp.aliyun.com
25.clear
26.history

27.yum install tree -y 安装树状图命令
28.tree mysite/
29.echo 写入文件内容
echo 'hello' > ./test.txt
> 重定向覆盖写入符
>> 追加

30.拷贝 cp 目标文件 拷贝后的文件
cp my.py my.py.bak

31.重命名命令,以及移动命令
mv 旧文件名 新文件名
mv 目标文件 移动后的路径
mv ../tmp/ceshi/txt ./

32.find 查找文件
find / -name test.txt  从根目录开始找,一个叫做test.txt的文件
find /opt -name '*.py'  从/opt目录下查找所有的.py文件
linux 管道符“|” 语法就是将第一条命令的结果传给第二条

33.过滤出python有关的进程
ps -ef | grep python
34.过滤出22端口的信息
netstat -tunlp| grep 22

35.过滤命令grep
grep nobody ./passwd.txt  从当前的passwd.txt文件中过滤出nobody的信息
grep all settings.py  过滤出django中settings.py 中allow_hosts的信息
grep all settings.py -n 过滤出allow_hosts的信息且输出行号
grep -v all settings.py  过滤出除allow_hosts之外的信息
grep -v all settings.py -n  过滤出除allow_hosts之外的信息且输出行号
cat settings.py | grep allow

36.head
head -5 test.txt
37.tail
tail -5 test.txt
tail -f test.txt 实时监控

37.alias别名
alias rm="rm -i"
alias rm="echo 求求你了,你可别坑我了!!!"

38.unalias rm 取消别名

39.远程传输文件,在两台Linux上
scp  想要操作的文件地址  存放的目标文件地址
scp  test.txt root@192.168.0.109:/tmp/
scp -r a root@192.168.0.109:/tmp/     -r递归传输文件夹

40.查看文件夹大小
方式1:ls -lh
方式2:du -h
du -sh /var/log/
    -s 合计文件夹大小
    -h 显示友好的单位换算

41.top命令(任务管理器)用于动态地监视进程活动和系统负载等信息 q退出
42.wget 下载
wget -r -p http://www.luffycity.com
43.Linux和window互相传递文件
    1.lrzsz
        sz test.txt(下载 从Linux传给window)
        rz test.txt(上传)
    2.xftp

44.reboot 重启
45.poweroff 关闭系统
46.free -m 查看内存
47.man grep 查看grep的帮助手册
48.防火墙
iptables -L #查看规则
iptables -F #清空防火墙规则
永久关闭防火墙,可能防火墙会阻挡你的Linux环境配置实验,为了方便,关闭它。
systemctl stop firewalld  #关闭防火墙服务
systemctl disable firewalld #设置开机禁用防火墙

49.tar -xf Python-3.6.2.tgz 解压
50.logout 退出账号


#######################################################################
用户权限相关
[root@localhost ~]# id       #返回用户的身份信息,当uid为0的时候,这个用户就是超级用户
uid=0(root) gid=0(root) groups=0(root) context=unconfined_u:unconfined_r:unconfined_t:s0-s0:c0.c1023
[root@localhost ~]# id root
uid=0(root) gid=0(root) groups=0(root)

用户的存放文件:
/etc/passwd
/etc/shadow  存放用户密码的文件

用户的管理命令:
添加普通用户(只有root用户有这个权利)
[root@localhost ~]# useradd tom     #创建用户,这个用户的信息会存放到/etc/passwd
[root@localhost ~]# grep tom /etc/passwd  #查看用户信息,普通用户的id默认是从1000开始的
tom:x:1001:1001::/home/tom:/bin/bash
[root@localhost ~]#

修改普通用户的密码
passwd 用户名

切换用户(必须加上中横线- 代表完全用户切换)
[root@localhost ~]# su - tom
[tom@localhost root]$

添加用户组
groupadd it_dep

删除用户
userdel -rf tom
-f     强制删除用户
-r    同事删除用户以及家目录

sudo命令用来以其他身份来执行命令,预设的身份为root
1.编辑sudoers配置文件,添加tom用户信息
vim /etc/sudoers    (/查找root   n查找下一个)
2.定位权限设置到
root    ALL=(ALL)       ALL
添加
root    ALL=(ALL)       ALL
tom     ALL=(ALL)       ALL
3.使用sudo命令,去执行Linux命令,解决权限不足
[tom@localhost ~]$ ls /root
ls: cannot open directory /root: Permission denied
[tom@localhost ~]$ sudo ls /root
[sudo] password for tom:

anaconda-ks.cfg
4.sudo还提供了一个语法检测的命令 visudo


文件权限:
读取(vim)  查看(cat)   执行(xx.py   xx.sh)
通过解释器执行  ./xx.sh    或者  source  xx.sh    或者   . xx.sh
文件夹的权限:
新增  修改  删除   进入目录

Linux软链接创建注意用绝对路径
ln -s 目标文件绝对路径  软链接绝对路径


tar命令,参数
-x 解压
-v 显示压缩解压过程
-f 指定压缩文件
-z 指定调用gzip命令
-c 压缩当前目录的所有内容:
-r 添加文件到已有的压缩文件中
tar -rf alltmp.tgz 新加的文件名

压缩当前目录的所有内容:
tar -cf alltmp.tgz ./*
tar -cf alltmp.tgz *
tar -cf alltmp.tar *

tar -zcf alltmp.tar.gz *


解压到当前目录
tar -xf alltmp.tgz

查看命令帮助:
tar --help
man tar
linum 中文手册


进程查看
ps -ef 查看所有进程的状态
ps -ef | grep python

网络端口管理命令
netstat -tunlp | grep 8000

kill命令 杀死进程
kill pid    (pid通过ps -ef 查看)

一次性杀死多个匹配的进程,一个是pkill,一个是killall,
如果没有killall就安装一下 yum install psmisc -y
killall python

查看磁盘空间
df -h

Linux的dns服务相关
1.dns服务指定配置文件,这个文件,告诉Linux去那解析dns域名,
有主备两个dns服务器ip地址
[root@localhost ~]# cat /etc/resolv.conf
# Generated by NetworkManager
domain www.tendawifi.com
search www.tendawifi.com
nameserver 192.168.0.1
[root@localhost ~]#

2.Linux解析dns的命令
nslookup www.baidu.com #解析到这个域名对应的ip地址

3.Linux强制dns,或者本地dns域名解析
vim /etc/hosts
ip 自定义的域名

4.域名解析的流程,(一个域名从浏览器访问,解析过程是如何的)
    1.浏览器输入域名,浏览器首先会去当前机器的本地dns缓存中查找记录
    2.去hosts文件中查找是否写死了对应的记录
    3.去指定的dns服务器中寻找dns记录,如果找到了域名解析记录后
    4.将这个dns记录缓存到本机的缓存记录中
    5.下一次寻找域名,就去缓存中找

Linux的计划任务,也叫做定时任务,名字是crond
1.查看Linux本机的定时任务
crontab -l  #查看计划任务
2.编写自己的计划任务
crontab -e #编辑计划任务
分时日月周  命令绝对路径
* * * * * /user/bin/echo "666" >> /tmp/ceshi.txt

Linux系统服务管理命令
系统服务(Linux安装的软件名)
只有通过yum安装的软件才可以使用这个命令
systemctl 这是centos7系列的命令
service 这是centos6系统的服务管理命令

查看网络状态
systemctl status network

查看发行版
cat /etc/os-release
pip3是管理python模块的工具,自动解决模块依赖
pip3 list
pip3 install flask 默认是去python官方下载,网速很慢
更改pip下载的源,加速下载,使用离咱们近的豆瓣源,163源或者清华源
pip3 install -i https://pypi.douban.com/simple flask


Linux安装软件包
rpm手动安装
yum工具自动化安装    效果等同于 pip3

1.理解yum源(阿里云的yum源  epel额外仓库)
yum源仓库的位置:cd /etc/yum.repos.d/,并且只能读出第一层的repo文件
yum仓库的文件都是以.repo结尾的

2.下载阿里云的.repo仓库文件,放到/etc/yum.repos.d/
    第一步:备份原本的仓库文件
    cd /etc/yum.repos.d/
    mkdir allbak
    mv * allbak

    1.下载第一个阿里云仓库文件
    wget -O /etc/yum.repos.d/CentOS-Base.repo http://mirrors.aliyun.com/repo/Centos-7.repo
         -O 参数,指定一个下载地址,且改名
    2.配置第二个仓库文件 epel 额外仓库(redis,nginx,mongo,ipython)
    wget -O /etc/yum.repos.d/epel.repo http://mirrors.aliyun.com/repo/epel-7.repo

    3.清空原本yum缓存
    yum clean all
    4.生成新的阿里云的yum缓存,加速下载预热数据(此步骤非必须)
    yum makecache


代码:
1.cd /etc/yum.repos.d/
2.mkdir allbak
3.mv * allbak
4.wget -O /etc/yum.repos.d/CentOS-Base.repo http://mirrors.aliyun.com/repo/Centos-7.repo
5.wget -O /etc/yum.repos.d/epel.repo http://mirrors.aliyun.com/repo/epel-7.repo
6.yum clean all
7.yum makecache


yum安装nginx:
1.yum install nginx -y
2.systemctl start/restart/stop nginx
3.netstat -tunlp | grep 80 查看端口,过滤80端口的信息
4.iptables -F (清空防火墙规则)
5.客户端:192.168.0.101:80 访问

/usr/share/nginx/html/index.html
yum remove nginx
virtualenv 是python解释器的分身
它是基于物理解释器,进行一个解释器分身,这个分身,可以用于运行各种python开发环境,
并且创建简单,删除销毁也简单,解决环境依赖灾难。
1.安装虚拟环境
pip3 install -i https://pypi.douban.com/simple virtualenv
2.通过virtualenv创建虚拟环境
mkdir /opt/allenv   #建立统一管理目录
cd /opt/allenv  #进入统一管理目录
virtualenv --no-site-packages --python=python3  venv1 #建立虚拟环境venv1
--no-site-packages 创建一个干净隔离的python环境
--python=python3 基于python3创建虚拟环境
venv1 虚拟环境文件夹的名字,自己定义
3.激活虚拟环境
cd /opt/allenv
通过source命令,读取激活脚本,激活虚拟环境
source /opt/allenv/venv1/bin/activate
4.激活虚拟环境后,检查以下几个步骤,是否正确激活
which pip3
which python3
5.检查虚拟环境是否干净隔离
pip3 list
6.退出虚拟环境的命令
deactivate


[root@localhost ~]# pip3 install -i https://pypi.douban.com/simple virtualenv
[root@localhost ~]# cd /opt
[root@localhost opt]# mkdir allenv
[root@localhost opt]# cd allenv
[root@localhost allenv]# virtualenv --no-site-packages --python=python3  venv1
Running virtualenv with interpreter /opt/python36/bin/python3
Already using interpreter /opt/python36/bin/python3
Using base prefix '/opt/python36'
New python executable in /opt/allenv/venv1/bin/python3  # 这个就是虚拟环境venv1的python3解释器
Also creating executable in /opt/allenv/venv1/bin/python
Installing setuptools, pip, wheel...
done.
[root@localhost allenv]#
[root@localhost allenv]# ls
venv1
[root@localhost allenv]# cd venv1
[root@localhost venv1]# ls
bin  include  lib
[root@localhost venv1]# cd bin
[root@localhost bin]# ls
activate      activate.fish  activate_this.py  easy_install      pip   pip3.6  python3    python-config
activate.csh  activate.ps1   activate.xsh      easy_install-3.6  pip3  python  python3.6  wheel
[root@localhost bin]# source activate
(venv1) [root@localhost bin]#
(venv1) [root@localhost bin]# which pip3
/opt/allenv/venv1/bin/pip3
(venv1) [root@localhost bin]#
(venv1) [root@localhost bin]# pip3 list
Package    Version
---------- -------
pip        19.2.3
setuptools 41.2.0
wheel      0.33.6
(venv1) [root@localhost bin]# which python3
/opt/allenv/venv1/bin/python3
(venv1) [root@localhost bin]#
(venv1) [root@localhost bin]# echo $PATH
/opt/allenv/venv1/bin:/opt/python36/bin:/usr/local/sbin:/usr/local/bin:/usr/sbin:/usr/bin:/root/bin:/root/bin
(venv1) [root@localhost bin]# pip3 install -i https://pypi.douban.com/simple django==2.0


确保开发环境的一致性:

解决方案:
1.通过命令保证环境的一致性,导出当前python环境的包
pip3 freeze > requirements.txt

这将会创建一个 requirements.txt 文件,其中包含了当前环境中所有包及 各自的版本的简单列表。
可以使用 “pip list”在不产生requirements文件的情况下, 查看已安装包的列表。

2.上传至服务器后,在服务器下创建virtualenv,在venv中导入项目所需的模块依赖
pip3 install -r requirements.txt
虚拟环境之virtualenvwrapper:
1.因为virtualenv工具使用并不方便
2.安装virtualenvwrapper
pip3 install virtualenvwrapper
3.设置Linux的环境变量,每次启动就加载virtualenvwrapper
    1.打开文件
    vim ~/.bashrc  (这个文件是用户个人配置文件)
    2.写入以下几行代码 (export和source一样都是读取Linux shell 变量的命令)
    export WORKON_HOME=~/Envs   #设置virtualenv的统一管理目录
    export VIRTUALENVWRAPPER_VIRTUALENV_ARGS='--no-site-packages'   #添加virtualenvwrapper的参数,生成干净隔绝的环境
    export VIRTUALENVWRAPPER_PYTHON=/opt/python36/bin/python3     #指定python解释器
    source /opt/python36/bin/virtualenvwrapper.sh #这一步才是真正使用工具的步骤,执行virtualenvwrapper安装脚本
    3.退出当前会话,重新登录Linux
    logout
    4.重新登录,查看是否可以使用virtalenvwrapper
    5.确保可以使用后,学习这个工具的命令
        1.创建新的虚拟环境
        mkvirtualenv django201
        mkvirtualenv django115
        2.切换不同的虚拟环境
        workon django201
        workon django115
        3.退出虚拟环境
        deactivate
        4.删除虚拟环境
        rmvirtualenv django116
        5.进入虚拟环境的家目录(直接进入到 site-packages 目录中)
        cdsitepackages
        6.列举所有的环境。
        lsvirtualenv
        7.显示 site-packages 目录中的内容。
        lssitepackages
运行crm
1.准备代码
2.上传代码到Linux中
    方式1:lrzsz(只能传单个的文件,必须是压缩包)
        yum install lrzsz -y # 安装传输工具
        sz test.txt(下载 从Linux传给window)
        rz test.txt(上传)
    方式2:xftp
3.解压
unzip crm.zip
4.用之前建好的虚拟环境去运行 :
workon django201
5.启动
python3 /opt/crm/manage.py runserver 0.0.0.0:9000


上面第四步也可以新建虚拟环境去运行 :
1.mkvirtualenv myblog
2.解决环境依赖,少什么装什么
  pip3 install -i https://pypi.douban.com/simple django==2.0
  pip3 install -i https://pypi.douban.com/simple pymysql
  pip3 install -i https://pypi.douban.com/simple django-multiselectfield   [multiselectfield模块]
3.安装Linux的mysql数据库
在centos7中,mysql叫mariadb  安装mariadb的服务端和客户端
yum install mariadb-server  mysql -y
4.启动mariadb数据库
[root@localhost ~]# systemctl start mariadb
5.检查数据库是否正常(下面几种方式都可以)
ps -ef|grep mariadb
netstat -tunlp |grep 3306
systemctl status mariadb
6.看settings的配置,DATABASES,ALLOWED_HOSTS
7.建数据库,导入数据
[root@localhost ~]# systemctl start mariadb
[root@localhost ~]# mysql -uroot -p
MariaDB [(none)]> create database myblog;
MariaDB [(none)]> use myblog;
MariaDB [myblog]> source /opt/myblog.sql;
MariaDB [myblog]> show databases;

8.运行
python3 /opt/myblog/manage.py runserver 0.0.0.0:9000
运行路飞学城
1.下载代码
路飞学城django代码
wget https://files.cnblogs.com/files/pyyu/luffy_boy.zip
vue代码
wget https://files.cnblogs.com/files/pyyu/07-luffy_project_01.zip
2.解压
unzip 07-luffy_project_01.zip
unzip luffy_boy.zip
3.先从后端代码开始,进入后端代码文件夹
4.新建虚拟环境
mkvirtualenv luffy
5.解决所需的依赖模块,准备一个模块版本文件:requirements.txt 这个文件可以手动创建写入如下依赖
(luffy) [root@localhost opt]# cd /opt/luffy/luffy_boy
(luffy) [root@localhost luffy_boy]# touch requirements.txt
(luffy) [root@localhost luffy_boy]# vim requirements.txt
##############################
certifi==2018.11.29
chardet==3.0.4
crypto==1.4.1
Django==2.1.4
django-redis==4.10.0
django-rest-framework==0.1.0
djangorestframework==3.9.0
idna==2.8
Naked==0.1.31
pycrypto==2.6.1
pytz==2018.7
PyYAML==3.13
redis==3.0.1
requests==2.21.0
shellescape==3.4.1
urllib3==1.24.1
uWSGI==2.0.17.1
##############################
(luffy) [root@localhost luffy_boy]# ls
api db.sqlite3 keys luffy_boy manage.py requirements.txt static templates
6.安装所需的依赖模块
(luffy) [root@localhost luffy_boy]# pip3 install -i https://pypi.douban.com/simple -r requirements.txt
7.看一看
pip3 list
8.运行
python3 manage.py runserver 0.0.0.0:8000 (注意端口得是8000,因为前端的vue发的就是8000)
9.新开一个终端开始前端(要在服务器上,编译打包vue项目,必须得有node环境)
1.准备node环境
下载node二进制包,此包已经包含node,不需要再编译
[root@localhost ~]# cd /opt
[root@localhost opt]# wget https://nodejs.org/download/release/v8.6.0/node-v8.6.0-linux-x64.tar.gz
2.解压缩
[root@localhost opt]# tar -zxvf node-v8.6.0-linux-x64.tar.gz
3.进入node文件夹
[root@localhost opt]# cd node-v8.6.0-linux-x64/
[root@localhost node-v8.6.0-linux-x64]# ls
bin CHANGELOG.md etc include lib LICENSE README.md share
[root@localhost node-v8.6.0-linux-x64]# cd bin
[root@localhost bin]# ls
node npm npx
[root@localhost bin]# pwd
/opt/node-v8.6.0-linux-x64/bin
4.配置环境变量
[root@localhost bin]# vim /etc/profile
PATH="/opt/python36/bin:/usr/local/sbin:/usr/local/bin:/usr/sbin:/usr/bin:/root/bin:/opt/node-v8.6.0-linux-x64/bin"
5.读取全局配置文件,加载node的环境变量
[root@localhost bin]# source /etc/profile #就不需要退出重新加载了
[root@localhost bin]# echo $PATH
/opt/python36/bin:/usr/local/sbin:/usr/local/bin:/usr/sbin:/usr/bin:/root/bin:/opt/node-v8.6.0-linux-x64/bin
[root@localhost bin]# which node
/opt/node-v8.6.0-linux-x64/bin/node
6.检测node环境
[root@localhost bin]# node -v
v8.6.0
[root@localhost bin]# npm -v
5.3.0
[root@localhost bin]#
【注意】进入vue代码包中,开始进行打包,注意修改vue的api请求接口地址!!
【注意】进入vue代码包中,开始进行打包,注意修改vue的api请求接口地址!!
【注意】进入vue代码包中,开始进行打包,注意修改vue的api请求接口地址!!
7.修改src/restful/api.js中Axios的请求地址 ##里面的127.0.0.1都换成你后端服务器的id地址 192.168.0.101
[root@localhost ~]# sed -i "s/127.0.0.1/192.168.0.101/g" /opt/luffy/07-luffy_project_01/src/restful/api.js ##全局替换命令
8.进入vue目录(安装vue模块,默认去装package.json的模块内容,如果出现模块安装失败,手动再装)
[root@localhost bin]# cd /opt/luffy/07-luffy_project_01/
[root@localhost 07-luffy_project_01]# ls
build config index.html package.json package-lock.json README.md src static
[root@localhost 07-luffy_project_01]# npm install
[root@localhost 07-luffy_project_01]# ls #增加了node_modules
build config index.html node_modules package.json package-lock.json README.md src static
9.打包vue项目,生成一个dist静态文件夹
[root@localhost 07-luffy_project_01]# npm run build
10.检查dist文件夹
[root@localhost 07-luffy_project_01]# ls
build config dist index.html node_modules package.json package-lock.json README.md src static #增加了dist
[root@localhost 07-luffy_project_01]# ls dist
index.html static
11.只需要将vue的静态文件,发布到web我放弃,访问web服务器即可。
12.安装配置nginx web服务器,访问到vue的静态文件
[root@localhost ~]# yum install nginx -y
[root@localhost ~]# systemctl start nginx
[root@localhost ~]# netstat -tunlp|grep nginx
[root@localhost ~]# find / -name index.html # 192.168.0.101 看到的就是这个页面/usr/share/nginx/html/index.html
[root@localhost ~]# vim /etc/nginx/nginx.conf
###################
server {
listen 80 default_server;
listen [::]:80 default_server;
server_name _;
root /opt/luffy/07-luffy_project_01/dist; ##更改这的路径
#root这个参数代表定义网页根目录,只要访问Nginx,Nginx就去这个根目录下寻找一个index.html的文件
# Load configuration files for the default server block.
include /etc/nginx/default.d/*.conf;
location / {
}
error_page 404 /404.html;
location = /40x.html {
}
error_page 500 502 503 504 /50x.html;
location = /50x.html {
}
}
###################
12.重启nginx服务才能生效
[root@localhost ~]# systemctl restart nginx
13.添加课程数据是存放到redis中的,需要安装redis
yum install redis -y
14.启动redis
[root@localhost ~]# systemctl start redis
[root@localhost ~]# netstat -tunlp |grep 6379
[root@localhost ~]# redis-cli
127.0.0.1:6379> ping
PONG
127.0.0.1:6379> FLUSHDB #手动清除数据
OK
127.0.0.1:6379> keys *
15.测试
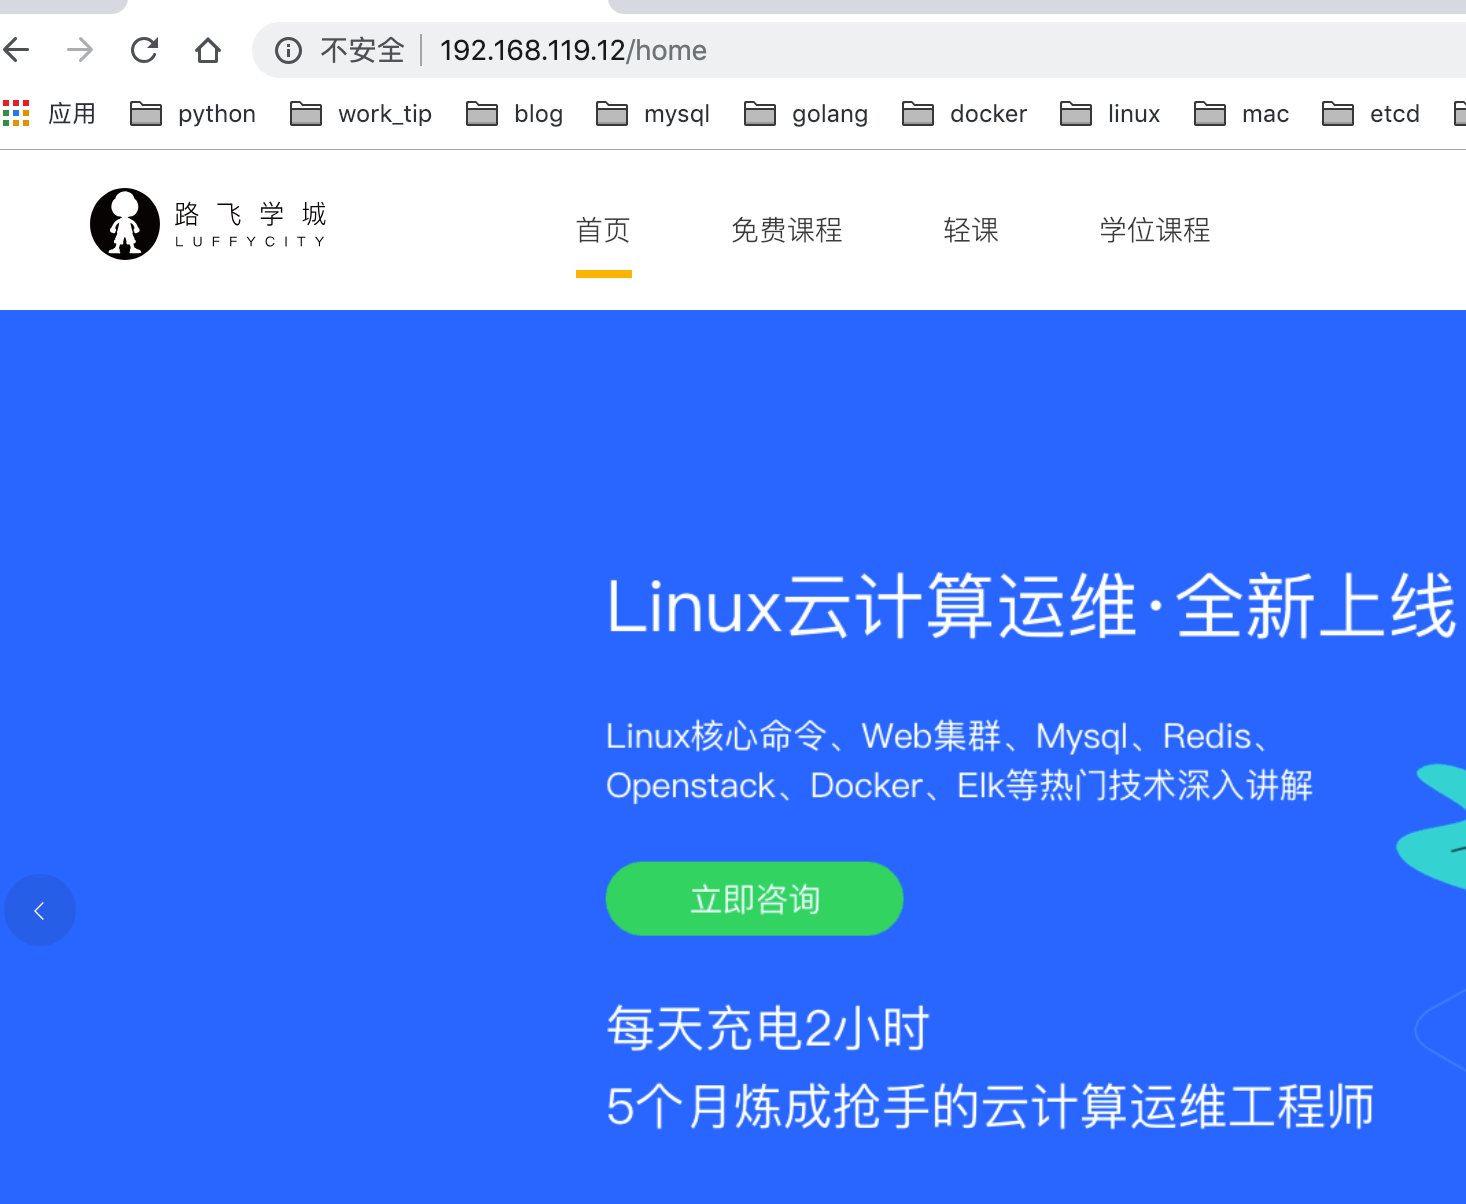
http://192.168.0.101
#编辑:
vim /etc/bashrc
#最下面添加:
export PS1="[\[\e[34;1m\]\u@\[\e[0m\]\[\e[32;1m\]\H\[\e[0m\]\[\e[31;1m\] \w\[\e[0m\]]\\$ "
#生效:
source /etc/bashrc
crm项目部署
激活虚拟python环境
#创建基于python3的虚拟解释器环境venv
virtualenv --no-site-packages --python=python3 venv
#激活python3虚拟环境
[root@yugo /data 11:11:30]#source venv/bin/activate
(venv) [root@yugo /data 11:11:35]#
安装uwsgi
(venv) [root@yugo /data 11:13:23]#pip3 install uwsgi
配置启动uwsgi.ini,启动uwsgi时候,用这个配置文件启动
(venv) [root@yugo /data 11:14:25]#cat uwsgi.ini
[uwsgi]
#使用nginx连接时使用
socket=0.0.0.0:8000
#不用nginx直接当做web服务器使用
#http=0.0.0.0:9000
#项目目录绝对路径
chdir=/data/Ace_crm
#wsgi文件路径,在项目底下
wsgi-file=Ace_crm/wsgi.py
#指定解释器目录
home=/data/venv
processes=4
threads=2
master=True
pidfile=uwsgi.pid
daemonize=uwsgi.log
配置nginx
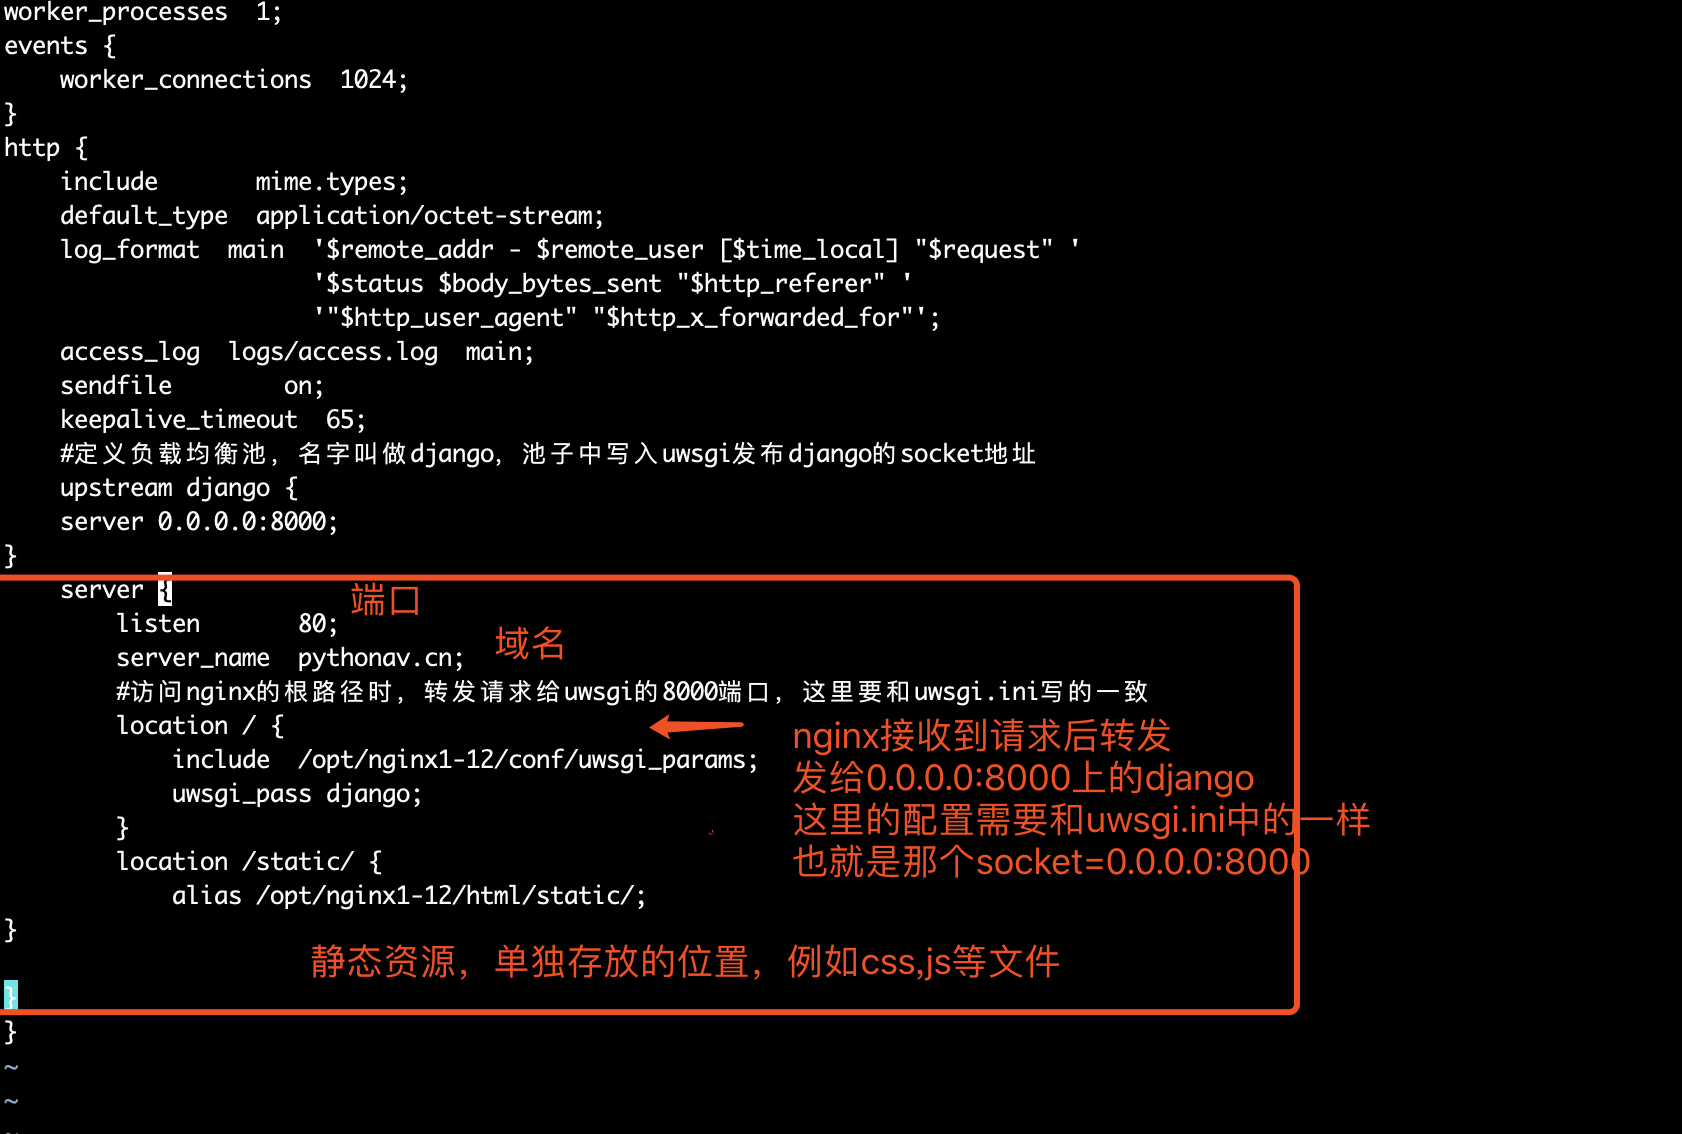
配置nginx.conf,通过nginx反向代理将请求丢给django处理
(venv) [root@yugo /data 11:20:32]#cat /opt/nginx1-12/conf/nginx.conf
worker_processes  1;
events {
    worker_connections  1024;
}
http {
    include       mime.types;
    default_type  application/octet-stream;
    log_format  main  '$remote_addr - $remote_user [$time_local] "$request" '
                      '$status $body_bytes_sent "$http_referer" '
                      '"$http_user_agent" "$http_x_forwarded_for"';
    access_log  logs/access.log  main;
    sendfile        on;
    keepalive_timeout  65;
    #定义负载均衡池,名字叫做django,池子中写入uwsgi发布django的socket地址
    upstream django {
    server 0.0.0.0:8000;
}
    server {
        listen       80;
        server_name  pythonav.cn;
        #访问nginx的根路径时,转发请求给uwsgi的8000端口,这里要和uwsgi.ini写的一致
        location / {
        include  /opt/nginx1-12/conf/uwsgi_params;
     #请求转发给upstream地址池里的uwsgi程序
        uwsgi_pass django;
        }
        location /static/ {
            alias /opt/nginx1-12/html/static/;
}

}
}
热加载nginx服务,读取nginx.conf内容
(venv) [root@yugo /data 11:24:24]#/opt/nginx1-12/sbin/nginx -t
nginx: the configuration file /opt/nginx1-12/conf/nginx.conf syntax is ok
nginx: configuration file /opt/nginx1-12/conf/nginx.conf test is successful
(venv) [root@yugo /data 11:26:07]#/opt/nginx1-12/sbin/nginx -s reload
启动uwsgi,启动django
(venv) [root@yugo /data 11:26:54]#uwsgi --ini uwsgi.ini
[uWSGI] getting INI configuration from uwsgi.ini
(venv) [root@yugo /data 11:27:10]#ps -ef|grep uwsgi
root     15540     1  0 11:27 ?        00:00:00 uwsgi uwsgi.ini
root     15543 15540  0 11:27 ?        00:00:00 uwsgi uwsgi.ini
root     15544 15540  0 11:27 ?        00:00:00 uwsgi uwsgi.ini
root     15545 15540  0 11:27 ?        00:00:00 uwsgi uwsgi.ini
root     15546 15540  0 11:27 ?        00:00:00 uwsgi uwsgi.ini
root     15590 11958  0 11:27 pts/0    00:00:00 grep --color=auto uwsgi

#如果需要停止uwsgi可以使用ps -ef|grep uwsgi,找到pid杀掉
#更好的一个杀掉uwsgi的方式
killall -9 uwsgi
访问nginx的80端口,查看是否请求转发给django
http://pythonav.cn/login/
或者10.0.0.10/login
配置nginx的静态资源
为什么要配置静态资源?
配置静态资源目录是因为让静态资源通过nginx可以直接返回,不需要通过uwsgi,也就是让uwsgi只处理后端逻辑,不处理静态资源,优化性能
配置静态资源,django和nginx
#创建静态资源存放目录
[root@yugo /opt/nginx1-12/html 11:39:51]#mkdir -vp /opt/nginx1-12/html/static
mkdir: created directory ‘/opt/nginx1-12/html/static’
#给目录添加权限
[root@yugo /opt/nginx1-12/html 11:40:57]#chmod  755 /opt/nginx1-12/html/static/
配置django的settings.py
DEBUG = False
ALLOWED_HOSTS = ['*']


# Static files (CSS, JavaScript, Images)
# https://docs.djangoproject.com/en/1.11/howto/static-files/

STATIC_URL = '/static/'
STATIC_ROOT= '/opt/nginx1-12/html/static/'
STATICFILES_DIRS = [
    os.path.join(BASE_DIR, 'static')
]

分割线--

收集django静态文件
python3 manage.py collectstatic

这一句话就会把以前放在app下static中的静态文件全部拷贝到 settings.py 中设置的 STATIC_ROOT 文件夹中

然后请求静态资源就会去nginx配置的 location /static {alias /opt/nginx1-12/html/static/ } 寻找
以上步骤完成后,访问服务器主机地址和端口,如果nginx.conf中配置的为80端口,则地址栏不需要输入端口,因为浏览器请求端口也是默认为80端口,非80端口的需要自己在ip后面添加
luffy项目部署(vue+uwsgi+nginx)
- 路飞学城django代码:https://files.cnblogs.com/files/pyyu/luffy_boy.zip
- vue代码:https://files.cnblogs.com/files/pyyu/07-luffy_project_01.zip
一、将代码搞到服务器上
在linux上直接下载
wget https://files.cnblogs.com/files/pyyu/luffy_boy.zip
wget https://files.cnblogs.com/files/pyyu/07-luffy_project_01.zip
在window上下载,通过lrzsz,或者xftp传输到linux服务器上
二、先从前端vue搞起
要在服务器上,编译打包vue项目,必须得有node环境
下载node二进制包,此包已经包含node,不需要再编译
wget https://nodejs.org/download/release/v8.6.0/node-v8.6.0-linux-x64.tar.gz
解压缩
tar -zxvf node-v8.6.0-linux-x64.tar.gz
进入node文件夹
[root@web02 opt]# cd node-v8.6.0-linux-x64/
[root@web02 node-v8.6.0-linux-x64]# ls
bin  CHANGELOG.md  etc  include  lib  LICENSE  README.md  share
[root@web02 node-v8.6.0-linux-x64]# ls bin
node  npm  npx
[root@web02 node-v8.6.0-linux-x64]# ./bin/node -v
v8.6.0
[root@web02 node-v8.6.0-linux-x64]# ./bin/npm -v
5.3.0
将node命令,添加至linux环境变量,修改/etc/profile,写入
PATH=$PATH:/opt/node-v8.6.0-linux-x64/bin
读取文件,生效PATH
source /etc/profile
测试path
[root@web02 node-v8.6.0-linux-x64]# node -v
v8.6.0
[root@web02 node-v8.6.0-linux-x64]# npm -v
5.3.0
node环境有了,安装node模块,以及打包node项目
进入vue源码目录
cd 07-luffy_project_01/
安装vue模块,默认去装package.json的模块内容,如果出现模块安装失败,手动再装
npm install

此时注意,你本地写的vue代码,接口很可能连接的服务器地址有问题,注意Axios.POST提交的地址,一定得发送给django应用(如果用了nginx,就发送给nginx的入口端口)
超哥这里为了试验方便,将vue项目和django项目放在了一台服务器,通过nginx反向代理功能(8000端口),转发vue请求给django(9000)

准备编译打包vue项目,替换配置文件所有地址,改为服务器地址
sed -i 's/127.0.0.1/192.168.119.12/g' /opt/07-luffy_project_01/src/restful/api.js


确保vue的route模式是history
路径:opt/luffy/07-luffy_project_01/src/router/index.js
export default new Router({
linkActiveClass:'is-active',
mode: 'history',//改成history模式
此时打包vue项目,生成一个dist静态文件夹
npm run build

检查dist文件夹
[root@web02 07-luffy_project_01]# ls dist/
index.html static
至此vue代码就结束了,只需要让nginx配置,找到vue的index.html首页文件即可
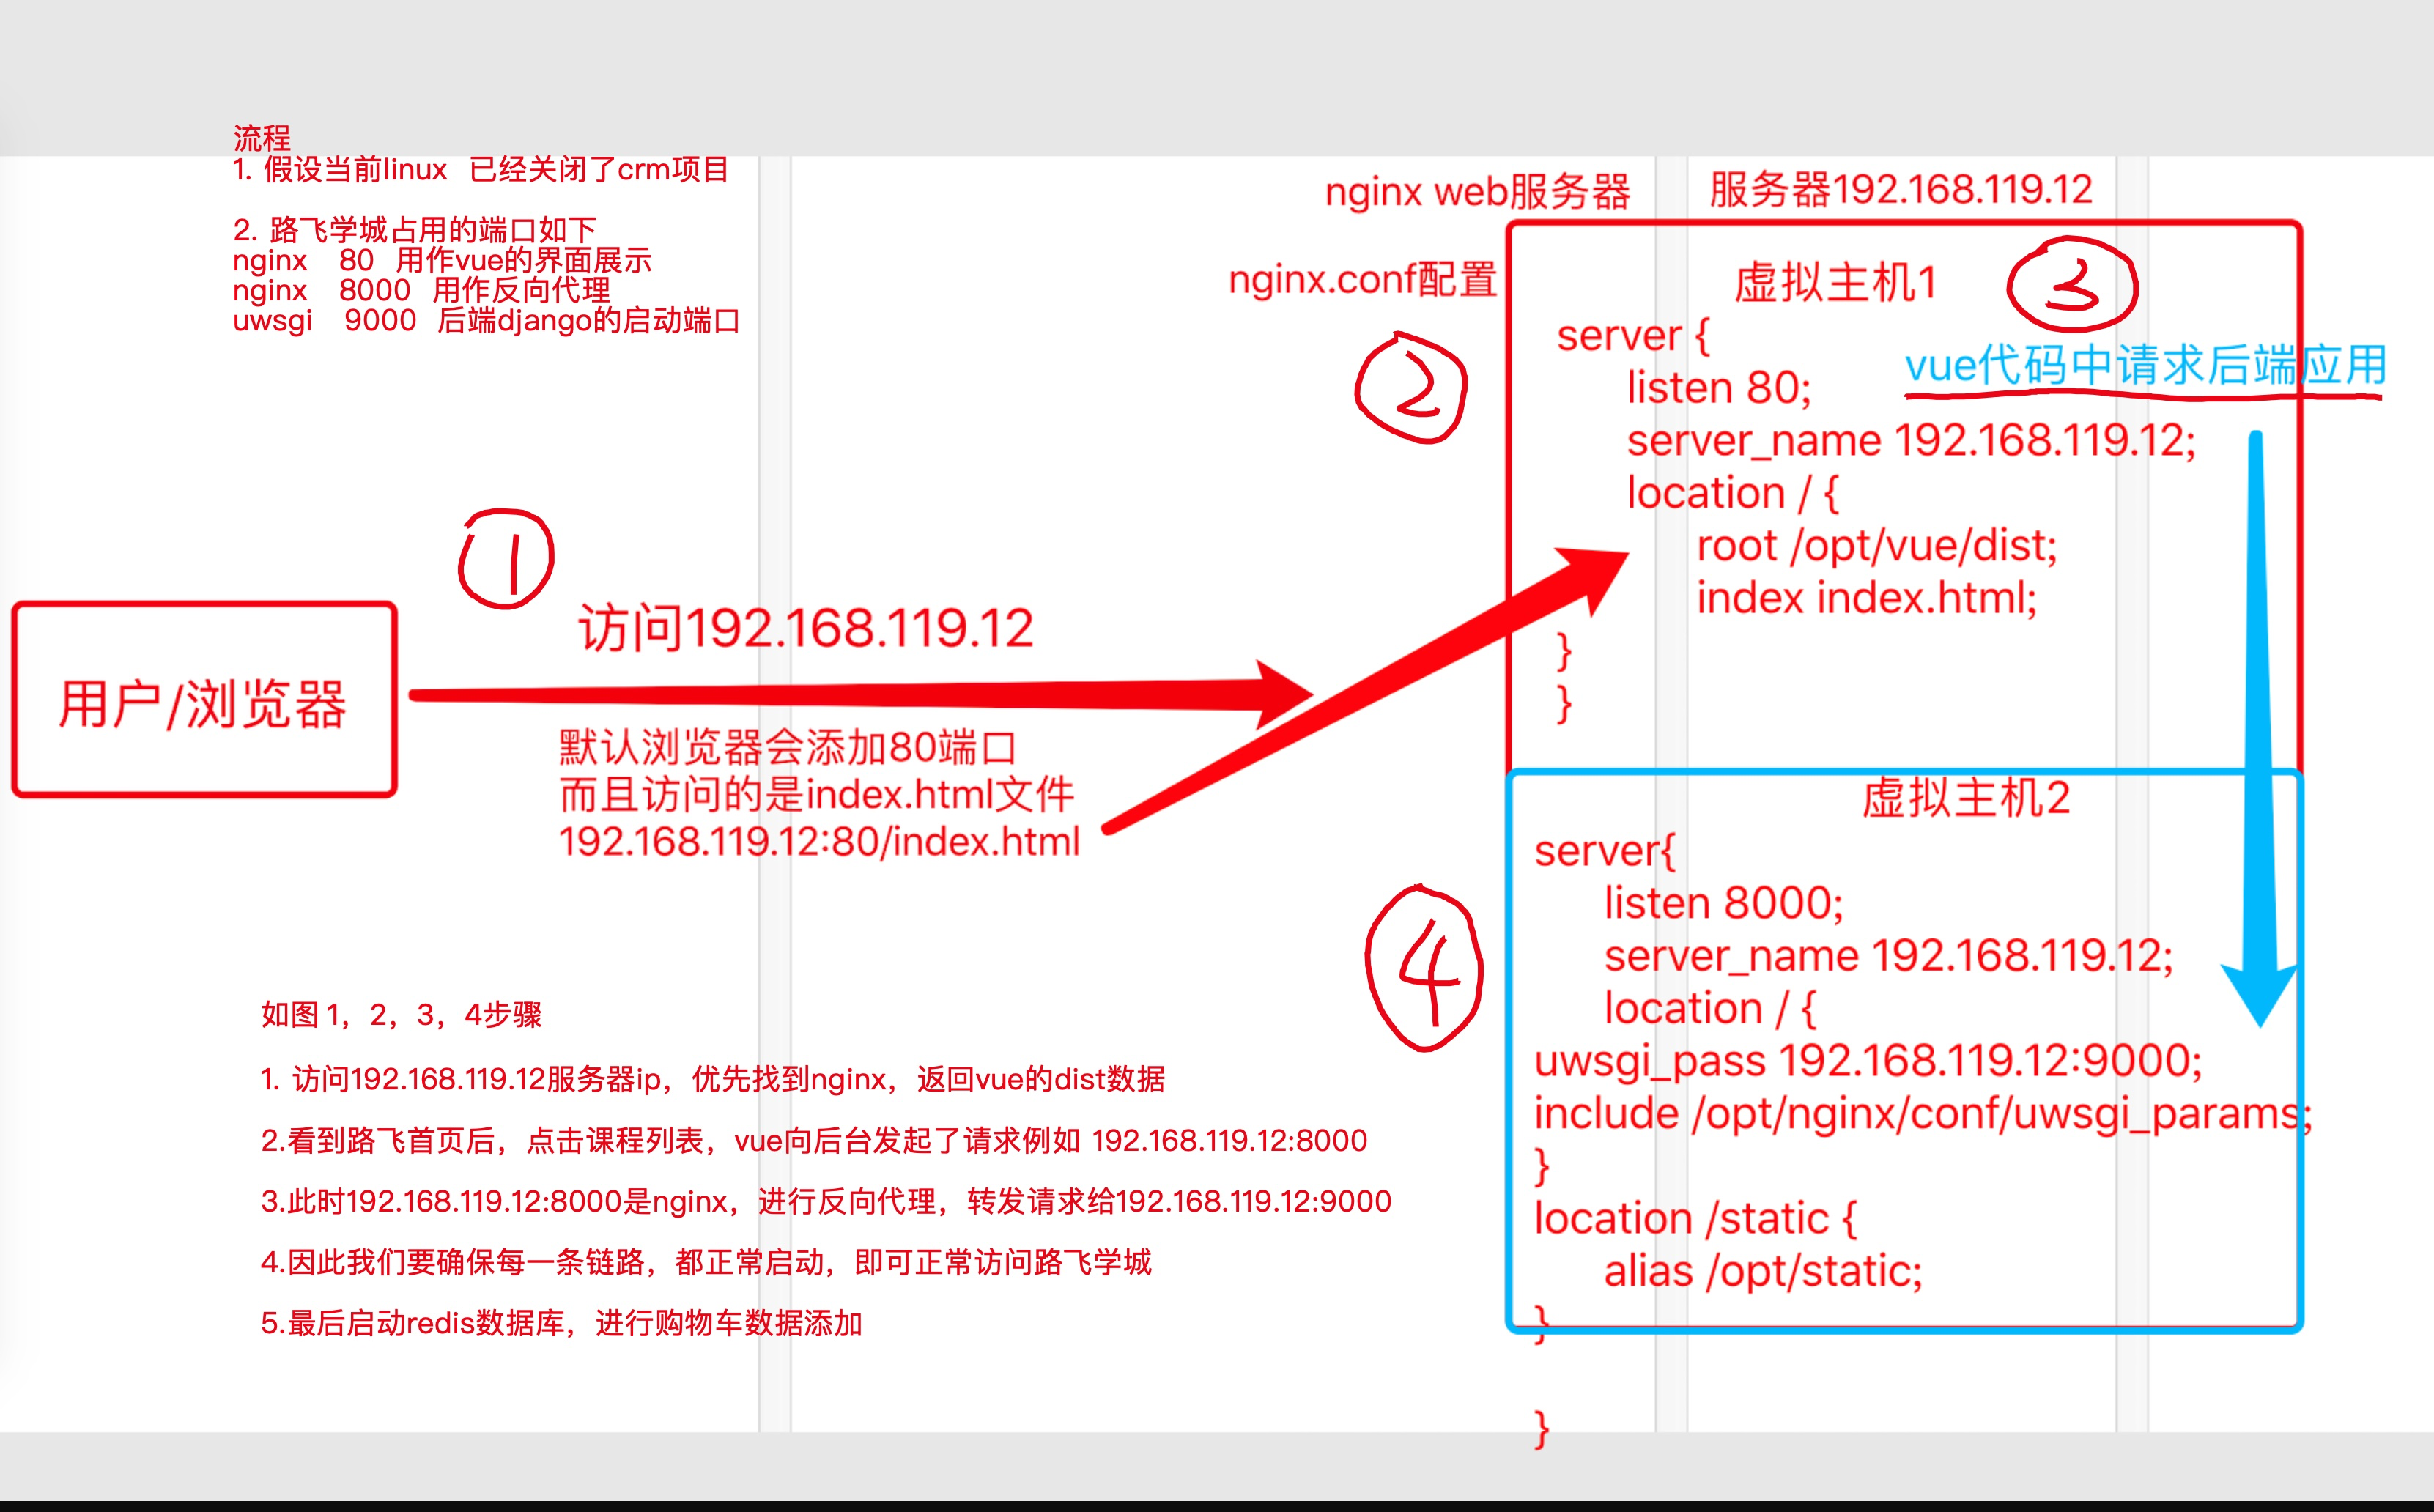
nginx这里不做解释,编译安装好即可
server {
     #用户访问域名或者ip,默认是nginx的80端口

        listen       80;
        server_name  192.168.119.12;
     #url匹配  /   也就是请求地址是192.168.119.12时,进入此location,返回vue的dist下index.html路飞学城首页
        location / {
        root /opt/07-luffy_project_01/dist;
        index index.html;
        }
    }
三、配置后端代码,解决虚拟环境,保证项目干净隔离
激活虚拟环境venv1,在虚拟环境下,安装路飞项目所需的依赖模块
[root@web02 opt]# cat requirements.txt
certifi==2018.11.29
chardet==3.0.4
crypto==1.4.1
Django==2.1.4
django-redis==4.10.0
django-rest-framework==0.1.0
djangorestframework==3.9.0
idna==2.8
Naked==0.1.31
pycrypto==2.6.1
pytz==2018.7
PyYAML==3.13
redis==3.0.1
requests==2.21.0
shellescape==3.4.1
urllib3==1.24.1
uWSGI==2.0.17.1
这个路飞代码数据库用的是sqllite,不需要配置数据库了
购物车用都的是redis,因此要启动服务器的redis-server服务端
redis-server /etc/redis.conf

ps -ef|grep redis
redis-server *:6379
通过uwsgi启动路飞项目
[uwsgi]
# Django-related settings
# the base directory (full path)
chdir           = /opt/luffy_boy
# Django's wsgi file
module          = luffy_boy.wsgi
# the virtualenv (full path)
home            = /opt/venv1
# process-related settings
# master
master          = true
# maximum number of worker processes
processes       = 1
# the socket (use the full path to be safe
socket          = 0.0.0.0:9000
# clear environment on exit
vacuum          = true
#后台运行uwsgi
daemonize=yes
(venv1) [root@web02 opt]# uwsgi --ini luffy_boy/uwsgi.ini
四、配置nginx,此步重要
worker_processes  1;

events {
    worker_connections  1024;
}


http {
    include       mime.types;
    default_type  application/octet-stream;
    sendfile        on;
    keepalive_timeout  65;
    server {
        listen       80;
        server_name  192.168.119.12;
        location / {
        root /opt/07-luffy_project_01/dist;
        index index.html;
    #这一条参数确保vue页面刷新时候,不会出现404页面
      try_files $uri $uri/ /index.html;
        }
        error_page   500 502 503 504  /50x.html;
        location = /50x.html {
           root   html;
        }
    }

server {
listen       8000;
        server_name  192.168.119.12;
        location / {
        uwsgi_pass 0.0.0.0:9000;
        include /opt/nginx/conf/uwsgi_params;
        }
        location /static {
        alias /opt/static;
}
}
}
原理图
项目访问
测试账号密码
alex
alex3714
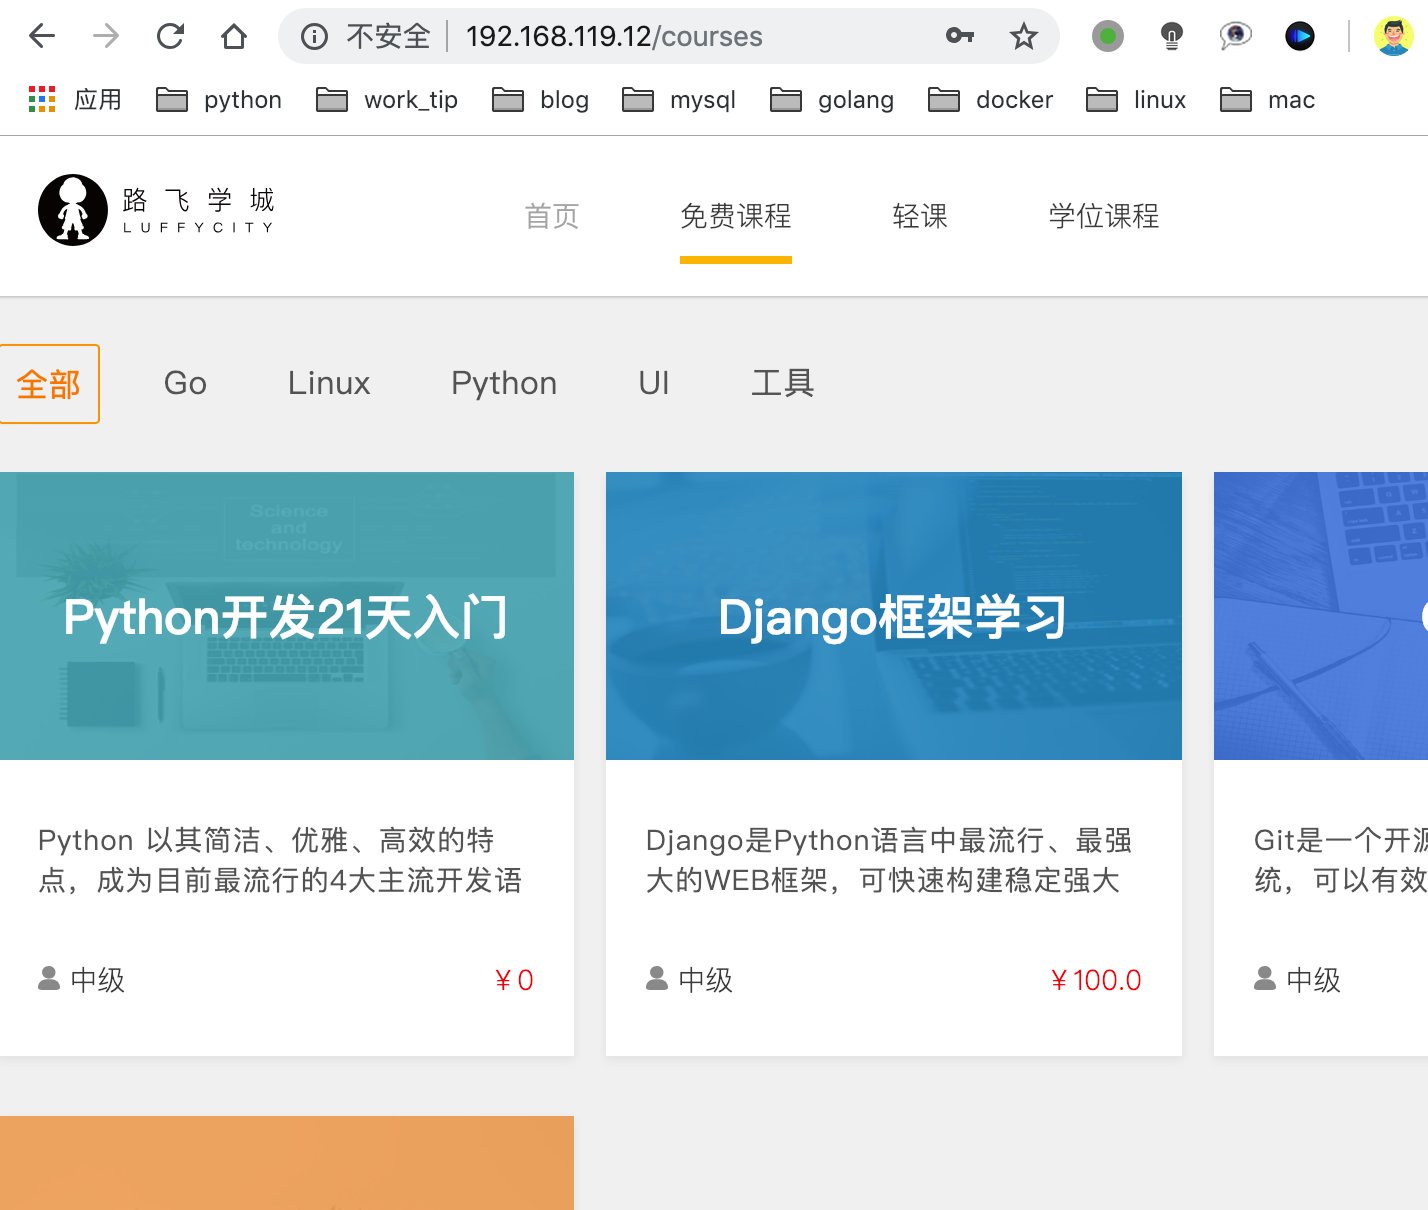
目前代码功能演示,演示流程:
- 登录alex账号
- 选择免费课程,django框架学习
- 添加课程到购物车,检查alex账号的购物车记录,添加成功后再redis有数据

 浙公网安备 33010602011771号