ansible-playbook
yaml格式参数解释

基础用法
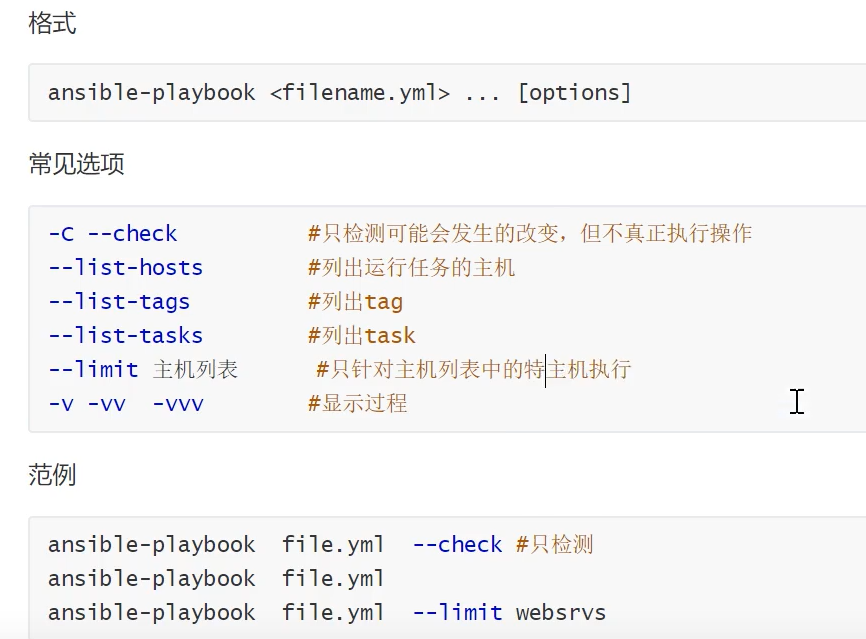
playbook 常见选项
测试
语法检测
[root@master-1 playbook]# ansible-playbook  redis.yaml  --syntax-check

playbook: redis.yaml
-C 模拟运行
ansible-playbook -C(即 --check 模式)用于执行干跑(dry-run),检查 playbook 会执行哪些更改,而不真正执行变更。
ansible-playbook -C 会跳过 unarchive,因为它涉及文件操作,无法模拟
列出主机
[root@master-1 roles]# ansible-playbook -i roles/es_cluster/hosts/inventory.yaml  main_nginx_all.yml  --list-hosts

playbook: main_nginx_all.yml

  play #1 (elasticsearch): elasticsearch        TAGS: []
    pattern: [u'elasticsearch']
    hosts (3):
      es-node3
      es-node2
      es-node1
模拟运行
[root@master-1 roles]# ansible-playbook -i roles/es_cluster/hosts/inventory.yaml main_nginx_all.yml -C
列出任务和hosts
[root@master-1 playbook]# ansible-playbook --list-hosts redis.yaml

playbook: redis.yaml

  play #1 (nginx): nginx        TAGS: []
    pattern: [u'nginx']
    hosts (2):
      192.168.43.130
      192.168.43.131
[root@master-1 playbook]# ansible-playbook --list-tasks redis.yaml

playbook: redis.yaml

  play #1 (nginx): nginx        TAGS: []
    tasks:
      install reddis    TAGS: []
      copy cfg  TAGS: []
      start service     TAGS: []
playbook高级用法
[root@master-1 playbook]# cat redis.yaml
- hosts: nginx
  remote_user: root
  # ansible执行的时候默认会收集目标主机的信息,禁用能提高效率
  gather_facts: no
  tasks:
    - name: install reddis
      yum: name=redis state=present
    - name: copy cfg
      copy: src=/opt/ansible/test.sh dest=/tmp/ansible/test3.sh
    - name: start service
      systemd: name=redis state=started enabled=yes
新版本语法
ansible.builtin.lineinfile 是 Ansible 2.10 及以上版本推荐的写法,它明确指定了 lineinfile 模块是 **官方自带(builtin)**的模块。
其他模块如 copy、yum 也建议使用 ansible.builtin.xxx 形式,以确保兼容性和可读性。
- hosts: nginx
  remote_user: root
  gather_facts: no
  tasks:
    - name: install reddis
      # yum: name=redis state=present
      ansible.builtin.yum:
        name: redis
        state: present
    - name: copy cfg
      #copy: src=/opt/ansible/test.sh dest=/tmp/ansible/test3.sh
      #notify: restart rediis
      ansible.builtin.copy:
        src: /opt/ansible/test.sh
        dest: /tmp/ansible/test6.sh
      notify: restart redis
    - name: start service
      #systemd: name=redis state=started enabled=yes
      ansible.builtin.systemd:
        name: redis
        state: started
        enabled: yes
  handlers:
    - name: restart redis
      #systemd: name=redis state=restarted
      ansible.builtin.systemd:
        name: redis
        state: restarted
运行
[root@master-1 playbook]# ansible-playbook redis.yaml
如果文件未发生改变,则不会触发notify
[root@master-1 playbook]# ansible-playbook redis.yaml

PLAY [nginx] *******************************************************************************************************************************************************************************

TASK [install reddis] **********************************************************************************************************************************************************************
ok: [192.168.43.130]
ok: [192.168.43.131]

TASK [copy cfg] ****************************************************************************************************************************************************************************
ok: [192.168.43.131]
ok: [192.168.43.130]

TASK [start service] ***********************************************************************************************************************************************************************
ok: [192.168.43.131]
ok: [192.168.43.130]

PLAY RECAP *********************************************************************************************************************************************************************************
192.168.43.130             : ok=3    changed=0    unreachable=0    failed=0    skipped=0    rescued=0    ignored=0
192.168.43.131             : ok=3    changed=0    unreachable=0    failed=0    skipped=0    rescued=0    ignored=0
notify与handlers
在Ansible中,notify 和 handlers 是用于在任务执行过程中触发特定操作的机制。它们通常用于在任务完成后执行一些清理工作、重启服务或应用配置更改等操作。以下是对这两个概念的详细解释:
notify
notify 关键字用于在任务(task)中指定当任务成功执行后要触发的 handler。当某个任务成功执行时,Ansible 会查找与该任务关联的 notify,并执行相应的 handler。
- name: Update a configuration file
  copy:
    src: /path/to/new/config.conf
    dest: /etc/config.conf
  notify:
    - Restart the service
handlers
handlers 是在 Ansible playbook 中定义的一组任务,它们不会直接执行,而是由 notify 关键字触发。Handlers 通常用于执行仅在特定条件下需要运行的任务,例如服务重启或配置重新加载。
- 避免重复触发:如果多个任务通知同一个 handler,并且这些任务在同一个 Ansible 运行中成功执行,那么该 handler 只会执行一次。
- 条件性触发:虽然
notify通常用于任务成功后的触发,但也可以结合 Ansible 的条件语句(如when)来实现更复杂的触发逻辑。 - Handler 顺序:Handlers 的执行顺序是按照它们在 playbook 中定义的顺序进行的。如果需要特定的执行顺序,可以调整 handlers 的定义顺序。
    - name: start service
      #systemd: name=redis state=started enabled=yes
      ansible.builtin.systemd:
        name: redis
        state: started
        enabled: yes
而无论是否触发handlers,都会执行这一步骤,对于service和systemd来说,可以检测服务状态,如果没发生改变,则不做任何改变。
如果是二进制启动,则无法检测
    - name: start nginx
      ansible.builtin.shell: |
        pkill nginx
        "{{ nginx_install_dir }}/sbin/nginx"
那么对于nginx来说,无论是kill进程(服务中断)或者启动(端口占用),都是不希望看到的。
解决方式:
1. 进行进程和端口访问测试
使用uri模块和shell模块
    - name: start nginx
      ansible.builtin.systemd:
        name: nginx
        daemon_reload: yes
        state: started

    - name: check nginx pidfile
      ansible.builtin.stat:
        path: "{{ nginx_install_dir }}/logs/nginx.pid"
      register: nginx_pid

    - name: output mesage
      ansible.builtin.debug:
        msg: "nginx pid文件存在,nginx启动完成..."
      when: nginx_pid.stat.exists

    - name: check nginx port
      ansible.builtin.uri:
        url: http://localhost:{{ listen_port }}
        #status_code: 404
        status_code: 200
      register: result
      until: result.status == 200
      retries: 5
      delay: 3
      when: nginx_pid.stat.exists

  handlers:
    - name: reload nginx
      #ansible.builtin.systemd:
      #  name: redis
      #  state: restarted
      #ansible.builtin.shell: |
      #  #pkill nginx
      #  "{{ nginx_install_dir }}/sbin/nginx" -s reload
      ansible.builtin.systemd:
        name: nginx
        state: reloaded
      when: nginx_pid.stat.exists
2. 使用systemd管理nginx
2.1 创建nginx.conf.j2文件
[root@master-1 playbook]# cat nginx/templates/nginx.service.j2
[Unit]
Description=Nginx Web Server
After=network.target

[Service]
Type=forking

ExecStartPre={{ nginx_install_dir }}/sbin/nginx -t
ExecStart={{ nginx_install_dir }}/sbin/nginx
ExecReload={{ nginx_install_dir }}/sbin/nginx -s reload
ExecStop={{ nginx_install_dir }}/sbin/nginx -s quit
Restart=always
User=root
LimitNOFILE=100000

[Install]
WantedBy=multi-user.target
2.2 playbook
    - name: 使用 template 渲染并验证 Nginx 启动文件
      ansible.builtin.template:
        src: nginx.service.j2
        dest: "/usr/lib/systemd/system/nginx.service"
      tags: template_nginx_service
tags
对任务做标签,在执行playbook的时候,可以-t tagname,tagname进行选择性执行。
    - name: 使用 template 渲染并验证 Nginx 配置
      ansible.builtin.template:
        src: templates/nginx.conf.j2
        dest: "{{ nginx_install_dir }}/conf/nginx.conf"
        validate: "'{{ nginx_install_dir }}/sbin/nginx' -t -c %s"
      tags: template_nginx_conf
      notify: reload nginx

  handlers:
    - name: reload nginx
      #ansible.builtin.systemd:
      #  name: redis
      #  state: restarted
      ansible.builtin.shell: |
        #pkill nginx
        "{{ nginx_install_dir }}/sbin/nginx" -s reload
执行
可以看到只执行了渲染这个模块步骤,并且触发了handlers任务。
[root@master-1 nginx]# ansible-playbook -t template_nginx_conf template-deploy-nginx.yaml

PLAY [nginx] ****************************************************************************************************************************************************************************

TASK [Gathering Facts] ******************************************************************************************************************************************************************
ok: [192.168.43.131]
ok: [192.168.43.130]

TASK [使用 template 渲染并验证 Nginx 配置] *******************************************************************************************************************************************************
changed: [192.168.43.130]
changed: [192.168.43.131]

RUNNING HANDLER [reload nginx] **********************************************************************************************************************************************************
changed: [192.168.43.130]
changed: [192.168.43.131]

PLAY RECAP ******************************************************************************************************************************************************************************
192.168.43.130             : ok=3    changed=2    unreachable=0    failed=0    skipped=0    rescued=0    ignored=0
192.168.43.131             : ok=3    changed=2    unreachable=0    failed=0    skipped=0    rescued=0    ignored=0
案例
1. 二进制部署nginx
在 Playbook 中使用template模块动态生成配置文件
不需要 roles 目录,直接在 playbook.yml 里定义 template 任务,例如:
1. 文件结构
/opt/ansible/playbook/
│── playbook.yml            # Ansible Playbook
│── vars.yml                # 变量文件
│── templates/
│   ├── nginx.conf.j2       # Jinja2 模板文件
2. 变量文件 vars.yml
[root@master-1 nginx]# cat vars.yaml
nginx_version: "1.22.1"
nginx_src_dir: "/tmp/nginx/"
nginx_install_dir: "/usr/local/nginx"
server_name: localhost
listen_port: 81
3. Playbook (playbook.yml)
- hosts: nginx
  remote_user: root
  # 收集远程主机信息
  gather_facts: yes
  #vars:
  #  nginx_version: "1.22.1"
  #  nginx_src_dir: "/tmp/nginx/"
  #  nginx_install_dir: "/usr/local/nginx"
  vars_files:
    - vars.yaml
  tasks:
    - name: install gcc openssl
      ansible.builtin.yum:
        name:
          - openssl
          - openssl-devel
          - make- libxslt-devel
          - perl
          - perl-ExtUtils-Embed
        state: present
        update_cache: yes
      when: ansible_distribution == "CentOS"
    - name: ubuntu install gcc openssl
      ansible.builtin.apt:
        name:
          - build-essential
          - libpcre3
          - libpcre3-dev
          - openssl
          - libssl-dev
          - zlib1g-dev zlib1g
        state: present
        update_cache: yes
      when: ansible_distribution == "Ubuntu"
    # 使用unarchive 将本地包解压到远程主机
    #- name: copy nginx package
    #  ansible.builtin.copy:
    #    src: /opt/ansible/playbook/nginx/nginx-{{ nginx_version }}.tar.gz
    #    dest: "{{ nginx_src_dir }}"
    #- name: ls nginx
    #  ansible.builtin.shell: |
    #    ls -l /tmp/nginx/
    # 如果是将本地文件解压到远程服务器,则目标路径必须存在
    - name: unarchive nginx
      ansible.builtin.file:
        path: "{{ nginx_src_dir }}"
        state: directory
    - name: unarchive nginx
      ansible.builtin.unarchive:
        #src: "{{ nginx_src_dir }}nginx-{{ nginx_version }}.tar.gz"
        src: /opt/ansible/playbook/nginx/nginx-1.22.1.tar.gz
        dest: "{{ nginx_src_dir }}"
        # 可以直接将本地包直接解压到目标主机目录下,不用 remote_src: yes
        #remote_src: yes
    - name: configuure nginx
      ansible.builtin.shell: |
        #{{ nginx_src_dir }}/nginx-{{ nginx_version }}/configure
        ./configure \
        --prefix={{ nginx_install_dir }} \
        --user=nginx \
        --group=nginx \
        --with-http_ssl_module \
        --with-http_v2_module \
        --with-http_realip_module \
        --with-http_stub_status_module \
        --with-http_gzip_static_module \
        --with-pcre \
        --with-stream \
        --with-stream_ssl_module \
        --with-stream_realip_module
      args:
        # Change into this directory before running the command.
        chdir: "{{ nginx_src_dir }}/nginx-{{ nginx_version }}"
        # A filename, when it already exists, this step will *not* be run.
        creates: "{{ nginx_src_dir }}/nginx-{{ nginx_version }}/objs/Makefile"
    - name: make nginx
      ansible.builtin.shell: |
        make
      args:
        chdir: "{{ nginx_src_dir }}/nginx-{{ nginx_version }}"
        creates: "{{ nginx_src_dir }}/nginx-{{ nginx_version }}/objs/nginx"
    - name: make install
      ansible.builtin.shell: |
        make install
      args:
        chdir: "{{ nginx_src_dir }}/nginx-{{ nginx_version }}"
        creates: "{{ nginx_install_dir }}/sbin/nginx"
    - name: create nginx user
      ansible.builtin.user:
        name: nginx
        shell: /sbin/nologin
        create_home: false
    #- name: copy nginx config
    #  ansible.builtin.copy:
    #    src: /opt/ansible/playbook/nginx/nginx.conf
    #    dest: "{{ nginx_install_dir }}/conf/"
        # 检查nginx配置格式
        # 如果 validate 失败,Ansible 会报错并停止 Playbook,后续任务不会执行。
        # %s 代表临时文件路径,Ansible 会把新文件存到临时位置进行测试。
        # validate: "'{{ nginx_install_dir }}/sbin/nginx' -t -c %s"
      # 忽略错误,失败后继续执行下面的task
      # ignore_errors: yes
    - name: 使用 template 渲染并验证 Nginx 配置
      ansible.builtin.template:
        src: templates/nginx.conf.j2
        dest: "{{ nginx_install_dir }}/conf/nginx.conf"
        validate: "'{{ nginx_install_dir }}/sbin/nginx' -t -c %s"
      tags: template_nginx_conf
      notify: reload nginx

    - name: 使用 template 渲染并验证 Nginx 启动文件
      ansible.builtin.template:
        src: nginx.service.j2
        dest: "/usr/lib/systemd/system/nginx.service"
      tags: template_nginx_service

    - name: chown nginx_install_dir
      ansible.builtin.file:
        path: "{{ nginx_install_dir }}"
        owner: nginx
        group: nginx
        # 递归修改目录权限,仅当state=directory有效
        # 相当于 chown -R
        recurse: yes
        state: directory

    - name: start nginx
      ansible.builtin.systemd:
        name: nginx
        daemon_reload: yes
        state: started

    - name: check nginx pidfile
      ansible.builtin.stat:
        path: "{{ nginx_install_dir }}/logs/nginx.pid"
      register: nginx_pid

    - name: output mesage
      ansible.builtin.debug:
        msg: "nginx pid文件存在,nginx启动完成..."
      when: nginx_pid.stat.exists

    - name: check nginx port
      ansible.builtin.uri:
        url: http://localhost:{{ listen_port }}
        #status_code: 404
        status_code: 200
      register: result
      until: result.status == 200
      retries: 5
      delay: 3
      when: nginx_pid.stat.exists

  handlers:
    - name: reload nginx
      #ansible.builtin.systemd:
      #  name: redis
      #  state: restarted
      #ansible.builtin.shell: |
      #  #pkill nginx
      #  "{{ nginx_install_dir }}/sbin/nginx" -s reload
      ansible.builtin.systemd:
        name: nginx
        state: reloaded
      when: nginx_pid.stat.exists   # 添加了判断条件,nginx特性:只有nginx启动时,pid文件存在。
4. Jinja2 模板 (templates/nginx.conf.j2)
[root@master-1 nginx]# cat templates/nginx.conf.j2
user nginx nginx;
worker_processes auto;
events {
  worker_connections  1024;
}

http {
  #include    mime.types;
  include     {{ nginx_install_dir }}/conf/mime.types;
  default_type application/octet-stream;
  sendfile    on;
  keepalive_timeout  65;

 server {
   listen    {{ listen_port }};
   server_name {{ server_name }};

    location / {
     root  html;
     index index.html index.htm;
   }

   error_page  500 502 503 504 /50x.html;

   location = /50x.html {
     root  html;
   }
 }

#mail {
#    }
#stream {
#        ...
#    }

#include /apps/nginx/conf.d/*.conf
}
5. 运行 Playbook
ansible-playbook playbook.yml
6. 遇到的问题:
1. include mime.types; validate 无法检查成功
[root@master-1 nginx]# cat templates/nginx.conf.j2
user nginx nginx;
worker_processes auto;
events {
  worker_connections  1024;
}

http {
  include    mime.types;
  default_type application/octet-stream;
  sendfile    on;
  keepalive_timeout  65;

 server {
   listen    {{ listen_port }};
   server_name {{ server_name }};

    location / {
     root  html;
     index index.html index.htm;
   }

   error_page  500 502 503 504 /50x.html;

   location = /50x.html {
     root  html;
   }
 }

#mail {
#    }
#stream {
#        ...
#    }

#include /apps/nginx/conf.d/*.conf
}
这个include在ansible有什么特殊意义吗,为什么会报错fatal: [192.168.43.130]: FAILED! => {"changed": false, "checksum": "1bbcd856439212a903d0eccf4885c544741c012f", "exit_status": 1, "msg": "failed to validate", "stderr": "nginx: [emerg] open() \"/root/.ansible/tmp/ansible-tmp-1739344206.81-34410-165624038437658/mime.types\" failed (2: No such file or directory) in /root/.ansible/tmp/ansible-tmp-1739344206.81-34410-165624038437658/source:8\nnginx: configuration file /root/.ansible/tmp/ansible-tmp-1739344206.81-34410-165624038437658/source test failed\n", "stderr_lines": ["nginx: [emerg] open() \"/root/.ansible/tmp/ansible-tmp-1739344206.81-34410-165624038437658/mime.types\" failed (2: No such file or directory) in /root/.ansible/tmp/ansible-tmp-1739344206.81-34410-165624038437658/source:8", "nginx: configuration file /root/.ansible/tmp/ansible-tmp-1739344206.81-34410-165624038437658/source test failed"], "stdout": "", "stdout_lines": []}

而当我注释掉
#  include    mime.types; 就可以成功
原因:
这个 validate 选项的作用是:
- Ansible 生成一个临时的 Nginx 配置文件,存放在
/root/.ansible/tmp/.../source目录。 - Ansible 让 Nginx 在这个临时路径检查配置文件的正确性:
/usr/local/nginx/sbin/nginx -t -c /root/.ansible/tmp/.../source
Nginx 解析配置文件,当它执行到:
include mime.types;
这条配置时,它会去查找 mime.types 文件,但默认情况下,它认为 mime.types 文件应该在与 nginx.conf 相同的路径,即:
/root/.ansible/tmp/.../mime.types
但是 mime.types 文件并不在这个临时目录里,所以 Nginx 报错找不到文件
解决:
使用绝对路径
修改 nginx.conf.j2,指定 mime.types 的完整路径:
http {
  include {{ nginx_install_dir }}/conf/mime.types;
这样,即使 Nginx 在临时目录检查配置,也会去 正确的路径 查找 mime.types,避免报错。
2. 二进制部署es分布式集群
需求分析:如何动态生成配置文件,比如node.name,discovery.seed_hosts,cluster.initial_master_nodes等。
1. 目录解构
-rw-r--r-- 1 root root       231 2月  16 21:49 vars.yaml
[root@master-1 es]# tree .
.
├── certs
│   ├── elastic-certificates.p12
│   └── elastic-stack-ca.p12
├── config
├── deploy.yaml
├── elasticsearch-7.16.3-linux-x86_64.tar.gz
├── elasticsearch-analysis-ik-7.16.3.zip
├── inventory.yaml
├── jdk-8u341-linux-x64.tar.gz
├── templates
│   └── elasticsearch.yml.j2
└── vars.yaml
2. 主机清单inventory.yaml
[root@master-1 es]# cat inventory.yaml
all:
  # Ansible 习惯使用 children 来定义组,而 all.hosts 一般只包含独立主机,所以这里设置为空 {} 让结构更清晰。
  hosts: {}
  # 这里将下面hosts定义的单独主机用children权保部写到elasticsearch组。
  children:
    elasticsearch:
      hosts:
        es-node1:
          ansible_host: 192.168.43.129
          node_name: es-node1
          # 用于when条件控制,生成证书
          is_ca: true
        es-node2:
          ansible_host: 192.168.43.130
          node_name: es-node2
        es-node3:
          ansible_host: 192.168.43.131
          node_name: es-node3
3. 变量vars.yml
[root@master-1 es]# cat vars.yaml
JAVA_HOME: "/opt/jdk1.8.0_341"
cluster_name: cluster
listen_port: 9200
es_version: 7.16.3
es_install_dir: "/opt/elasticsearch-{{ es_version }}"
password: "$1$6NXikaln$64e67B6Q2C0xK0fuNkVw30"
es_ca_pass: 123456
es_cert_pass: 123456
4. elasticsearch.yml.j2配置文件
[root@master-1 es]# egrep -v "^#|^$" templates/elasticsearch.yml.j2
cluster.name: {{ cluster_name }}
node.name: {{ node_name }}
path.data: {{ es_install_dir }}/data
path.logs: {{ es_install_dir }}/logs
network.host: {{ ansible_host }}
http.port: {{ listen_port }}
discovery.seed_hosts:
  {% for host in groups['elasticsearch'] %}
  - "{{ hostvars[host]['ansible_host'] }}"
  {% endfor %}
cluster.initial_master_nodes:
  {% for host in groups['elasticsearch'] %}
  - "{{ hostvars[host]['node_name'] }}"
  {% endfor %}
transport.tcp.port: 9300
xpack.security.enabled: true
xpack.security.transport.ssl.enabled: true
xpack.security.transport.ssl.verification_mode: certificate
xpack.security.transport.ssl.keystore.path: {{ es_install_dir }}/config/elastic-certificates.p12
xpack.security.transport.ssl.truststore.path: {{ es_install_dir }}/config/elastic-certificates.p12
xpack.monitoring.collection.cluster.stats.timeout: '30s'
ingest.geoip.downloader.enabled: false
5. playbook
- hosts: elasticsearch
  remote_user: root
  # 收集远程主机信息
  gather_facts: yes
  #vars:
  #  nginx_version: "1.22.1"
  #  nginx_src_dir: "/tmp/nginx/"
  #  nginx_install_dir: "/usr/local/nginx"
  vars_files:
    - vars.yaml
  tasks:
    - name: unarchive java
      ansible.builtin.unarchive:
        src: jdk-8u341-linux-x64.tar.gz
        dest: /opt/

    # blockinfile可以避免重复写入
    - name: Configure Java environment variables
      blockinfile:
        path: /etc/profile
        block: |
          export JAVA_HOME={{ JAVA_HOME }}
          export CLASSPATH=.:{{ JAVA_HOME }}/jre/lib/rt.jar:{{ JAVA_HOME }}/lib/dt.jar:{{ JAVA_HOME }}/lib/tools.jar
          export PATH={{ JAVA_HOME }}/bin:$PATH
        marker: "# {mark} ANSIBLE MANAGED BLOCK - JAVA"

############################################################################
    #- name: source
    #  ansible.builtin.shell: |
    #    source  /etc/profile

    # 报错,java命令找不到,所以需要执行时,再source一次
    #- name: check java
    #  ansible.builtin.shell: |
    #    java -version
    #  register: java_version
    #  #ignore_errors: yes  # 避免 playbook 因错误中断

    #- debug:
    #    msg: "{{ java_version.stderr }}"
############################################################################
    #- name: 修改内核参数
    #  ansible.builtin.lineinfile:
    #    path: /etc/sysctl.conf
    #    regexp: '^vm\.max_map_count'
    #    line: "vm.max_map_count= 262144"

    #- name: 使内核参数生效
    #  ansible.builtin.shell:
    #    sysctl -p
#############################################################################
############################# 优化后 #########################################
    - name: 修改并应用内核参数
      ansible.builtin.sysctl:
        name: vm.max_map_count
        # 只能用'', ""语法报错
        value: '262144'
        state: present
        reload: yes

    #- name: 获取主机信息
    #  setup:
    #    # 将setup收集到信息保存到变量register。
    #  register: system_info

    - name: 解压es到远程服务器
      ansible.builtin.unarchive:
        src: elasticsearch-7.16.3-linux-x86_64.tar.gz
        dest: /opt
      # 需要开启收集远程主机信息
      when: ansible_machine == "x86_64"

    - name: 创建数据目录
      ansible.builtin.file:
        path: "{{ es_install_dir}}/data"
        state: directory

    - name: 修改JVM内存
      ansible.builtin.lineinfile:
        path: "{{ es_install_dir }}/config/jvm.options"
        regexp: "^## -Xms"
        #line: "-Xms{{ (system_info.ansible_facts.ansible_memtotal_mb / 2)|int }}m"
        line: "-Xms{{ (ansible_memtotal_mb / 3)|int }}m"

    - name: 修改JVM最大使用内存
      ansible.builtin.lineinfile:
        path: "{{ es_install_dir }}/config/jvm.options"
        regexp: "^## -Xmx"
        #line: "-Xmx{{ (system_info.ansible_facts.ansible_memtotal_mb / 2)|int }}m"
        line: "-Xmx{{ (ansible_memtotal_mb / 3)|int }}m"

    - name: 渲染配置文件
      ansible.builtin.template:
        src: elasticsearch.yml.j2
        dest: "{{ es_install_dir }}/config/elasticsearch.yml"
      notify: restart elasticsearch

    - name: 生成CA证书
      ansible.builtin.shell: |
        cd "{{ es_install_dir }}/bin"
        ./elasticsearch-certutil ca --pass "{{ es_ca_pass }}" -out "{{ es_install_dir }}/config/elastic-stack-ca.p12"
      args:
        creates: "{{ es_install_dir }}/config/elastic-stack-ca.p12"
      when:  inventory_hostname in groups['elasticsearch'] and hostvars[inventory_hostname].is_ca is defined and hostvars[inventory_hostname].is_ca

    - name: 生成节点证书
      ansible.builtin.shell: |
        cd "{{ es_install_dir }}/bin"
        echo "{{ es_cert_pass}}" |./elasticsearch-certutil cert --ca "{{ es_install_dir }}/config/elastic-stack-ca.p12" --ca-pass "{{ es_ca_pass }}" -out "{{ es_install_dir }}/config/elastic-certificates.p12"
      args:
        creates: "{{ es_install_dir }}/config/elastic-certificates.p12"
      when:  inventory_hostname in groups['elasticsearch'] and hostvars[inventory_hostname].is_ca is defined and hostvars[inventory_hostname].is_ca

    - name: 拉取CA证书
      ansible.builtin.fetch:
        src: "{{ es_install_dir }}/config/elastic-stack-ca.p12"
        dest: "./certs/"
        # 如果dest以/结尾,则复制到目录下,否则为文件名
        flat: yes
      when: inventory_hostname in groups['elasticsearch'] and hostvars[inventory_hostname].is_ca is defined and hostvars[inventory_hostname].is_ca

    - name: 拉取服务证书
      ansible.builtin.fetch:
        src: "{{ es_install_dir }}/config/elastic-certificates.p12"
        dest: "./certs/"
        # 如果dest以/结尾,则复制到目录下,否则为文件名
        flat: yes
      when: inventory_hostname in groups['elasticsearch'] and hostvars[inventory_hostname].is_ca is defined and hostvars[inventory_hostname].is_ca

    - name: 拷贝CA证书
      ansible.builtin.copy:
        src: "./certs/elastic-stack-ca.p12"
        dest: "{{ es_install_dir }}/config/elastic-stack-ca.p12"

    - name: 拷贝服务证书
      ansible.builtin.copy:
        src: "./certs/elastic-certificates.p12"
        dest: "{{ es_install_dir }}/config/"

    - name: 创建keystore
      ansible.builtin.shell: |
        cd "{{ es_install_dir }}/bin"
        ./elasticsearch-keystore create
      args:
        creates: "{{ es_install_dir }}/config/elasticsearch.keystore"- name: 导入证书
      ansible.builtin.shell: |
        cd "{{ es_install_dir }}/bin"
        echo "123456" |./elasticsearch-keystore add xpack.security.transport.ssl.keystore.secure_password
        echo "123456" |./elasticsearch-keystore add xpack.security.transport.ssl.truststore.secure_password

    - name: 创建ik分词器目录
      ansible.builtin.file:
        path: "{{ es_install_dir }}/plugins/ik"
        state: directory

    - name: 导入ik分词器
      ansible.builtin.unarchive:
        src: elasticsearch-analysis-ik-7.16.3.zip
        dest: "{{ es_install_dir }}/plugins/ik"

    - name: 创建系统es登录用户
      ansible.builtin.user:
        name: es
        shell: /bin/bash
        password: "{{ password}}"

    - name: 修改目录权限
      ansible.builtin.file:
        path: "{{ es_install_dir }}"
        owner: es
        group: es
        recurse: yes
        state: directory

    - name: 切换用户es,并启动es程序
      ansible.builtin.shell: |
        source /etc/profile
        #cd  "{{ es_install_dir }}/bin" && "./elasticsearch -d"
        nohup "{{ es_install_dir }}/bin/elasticsearch" &
      become: true
      become_user: es

    #- name: 确保 Elasticsearch 进程存在
    #  ansible.builtin.shell: |
    #    echo "正在启动es服务,请等待..."
    #    sleep 30
    #    pgrep -f "elasticsearch"
    #  register: es_process
    #  # 判断命令是否执行成功
    #  # return code 0:正常 1:错误
    #  failed_when: es_process.rc != 0

    - name: 等待 Elasticsearch 端口 9200 可用
      ansible.builtin.wait_for:
        host: "{{ ansible_default_ipv4.address }}"
        port: "{{ listen_port }}"
        # 每 5 秒检查一次端口状态
        delay: 5
        # 总的等待超时时间(秒)。如果在这个时间内端口没有变得可用,任务将失败。
        timeout: 60
      register: es_ready
      changed_when: false

    #- name: 创建es应用登录用户
    #  ansible.builtin.shell: |
    #    cd {{ es_install_dir }}/bin
    #    ./elasticsearch-setup-passwords interactive

    #- name: 等待 Elasticsearch HTTP 服务响应
    #  ansible.builtin.shell: |
    #    until curl -s -o /dev/null -w "%{http_code}" http://{{ ansible_facts.ansible_default_ipv4.address }}:9200 | grep -q "200"; do
    #      sleep 5
    #    done
    #  register: es_http
    #  # 即使执行成功,让ansible也不认为发生了变化
    #  changed_when: false

  handlers:
    - name: restart elasticsearch
      ansible.builtin.shell: |
        kill `ps -ef |grep elasticsearch --no-header |awk '{print $2}'`
        source /etc/profile
        #cd  "{{ es_install_dir }}/bin"
        #"./elasticsearch" -d
        nohup "{{ es_install_dir }}/bin/elasticsearch" &
6. 遇到的问题
6.1.
本文来自博客园,作者:不会跳舞的胖子,转载请注明原文链接:https://www.cnblogs.com/rtnb/p/18257920

 浙公网安备 33010602011771号