locust 手册
wait_time 等待时间
用于确定模拟用户在执行任务之间将等待多长时间
1. between(min_wait, max_wait)
该函数将在 min_wait 和 max_wait 之间返回一个随机数,此例,在每个任务之间随机等待 0.1s 到 1s
wait_time = between(0.1, 1)
2. constant(wait_time)
该函数只返回 wait_time 参数指定的数字,此例,在每个任务之间固定等待 3s
wait_time = constant(3)
3. constant_pacing(wait_time)
确保任务每 X 秒运行一次,此例,每秒执行一次任务,无轮上次任务是否完成
wait_time = constant_pacing(1)
4. Constant_throughput(x)
指定每秒执行任务请求数。此例,每秒执行两次请求。
wait_time = Constant_throughput(2)
5. 自定义 wait_time
当然也支持自定义等待时间。
定义一个 wait_time 方法,每次调用次方法都返回 变量(last_wait_time)加 1 的数
也就是第一次等待 1s,第二次等待 2s,依次类推
class MyUser(User):
    last_wait_time = 0

    def wait_time(self):
        self.last_wait_time += 1
        return self.last_wait_time
weight 权重、fixed_count 固定次数
1. 如果文件中存在多个类,并且命令行中没有指定运行那个类,locust将从现有类中随机选择
当然你也可以使用如下命令行指定那个类
locust -f aa.py WebUser MobileUser
2. 如果你想让 WebUser 执行得更频繁,你可以 weight(权重)属性。例如,WebUser用户是MobileUser用户的三倍
from locust import HttpUser, task, constant

class WebUser(HttpUser):
    weight = 3
    wait_time = constant(1)
    host = 'https://www.cnblogs.com'

    @task
    def my_task(self):
        self.client.get("/bainianminguo/p/1.html")

class MobileUser(HttpUser):
    weight = 1
    wait_time = constant(1)
    host = 'https://www.cnblogs.com'

    @task
    def my_task(self):
        self.client.get("/bainianminguo/p/2.html")
3. 也可以设置 fixed_count 属性。在这种情况下,权重属性将被忽略,并且将生指定数量的用户数。这些用户首先产生。
下例中,将仅生成一个 AdminUser 实例,而与用户总数无关。这样无论你设置并发数是多少,就只会有一个 AdminUser
from locust import HttpUser, task, constant , constant_pacing

class AdminUser(HttpUser):
    fixed_count = 1
    wait_time = constant_pacing(1)
    host = 'http://127.0.0.1:8080'

    @task
    def task_1(self):
        self.client.get("/p/1.html")

class MobileUser(HttpUser):
    weight = 10
    wait_time = constant_pacing(1)
    host = 'http://127.0.0.1:8080'

    @task(70)
    def task_3(self):
        self.client.get("/p/3.html")
host 主机属性
1. host 属性是 URL 的前缀。它会自动添加到请求中。
下例中,会访问这个地址 http://127.0.0.1:8080/p/1.html
from locust import HttpUser, task

class AdminUser(HttpUser):
    host = 'http://127.0.0.1:8080'

    @task
    def task_1(self):
        self.client.get("/p/1.html")
2. 也可以在命令行中增加 --host 参数实现
locust -f a1.py --host http://127.0.0.1:8080
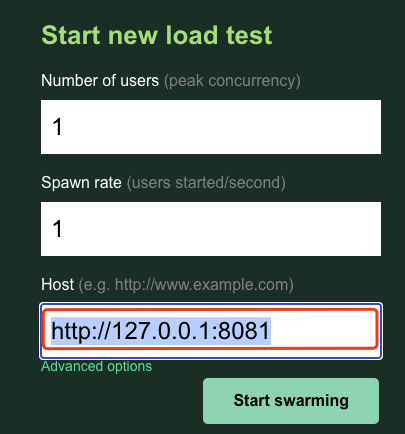
3. 也可以在 Web UI 中输入
task 任务、@task 装饰器、tasks 任务属性
User 类可以使用 @task 装饰器将声明任务,但也可以使用 tasks 属性指定任务。@task 装饰器、tasks 属性选一个就好,建议使用 @task 装饰器
1. 装饰器方式,也就是在任务上添加 @task
from locust import User, task, constant

class MyUser(User):
    wait_time = constant(1)

    @task
    def my_task(self):
        print("User instance (%r) executing my_task" % self)
2. 任务属性,也就是哪些是任务加到 tasks = [] 中
from locust import User, constant

def my_task(user):
    pass

class MyUser(User):
    tasks = [my_task]
    wait_time = constant(1)
3. @task 可选权重参数,用于指定任务的执行比率。
在以下示例中,constant_pacing(0.1) 每0.1s请求一次(也就是每秒10次),其中task_1占 30%,task_2占 70%(也就是每秒请求 task_1 3次,请求 task_2 7次)
from locust import HttpUser, task, constant , constant_pacing

class AdminUser(HttpUser):
    fixed_count = 1
    wait_time = constant_pacing(0.1)
    host = 'http://127.0.0.1:8080'

    @task(30)
    def task_1(self):
        self.client.get("/p/1.html")

    @task(70)
    def task_2(self):
        self.client.get("/p/2.html")
@tag 标签装饰器
@tag 标签装饰器要配合命令行参数 --tags 或 --exclude-tags 一起使用,如下代码
from locust import HttpUser, task, constant , constant_pacing, tag

class AdminUser(HttpUser):
    fixed_count = 1
    host = 'http://127.0.0.1:8080'

    @tag('tag1')
    @task
    def task_1(self):
        self.client.get("/p/1.html")

    @tag('tag1', 'tag2')
    @task
    def task_2(self):
        self.client.get("/p/2.html")

    @tag('tag3')
    @task
    def task_3(self):
        self.client.get("/p/3.html")
-
执行命令
locust -f a1.py --tags tag1会请求 task_1 和 task_2 -
执行命令
locust -f a1.py --tags tag2会请求 task_2 -
执行命令
locust -f a1.py --exclude-tags tag2会请求除了 task_2 外的所有请求
on_start 类开始运行前、on_stop 类结束运行前
on_start 在开始运行时将调用其方法
on_stop 在停止运行时将调用其方法
from locust import HttpUser, task

class AdminUser(HttpUser):
    fixed_count = 1
    host = 'http://127.0.0.1:8080'

    def on_start(self):
        print("类似类中的构造方法,每个用户在任务开始前,只执行一次,在这里可以定义一个对象的属性,这样其它测试集就可以使用这个属性")

    def on_stop(self):
        print("类似类中的析构方法,每个用户在任务结束前,只执行一次,在这里可以定义一个对象的属性,这样其它测试集就可以使用这个属性")

    @task
    def task_1(self):
        self.client.get("/p/1.html")
test_start 压测开始前、test_stop 压测试结束前
如果需要在压测开始时或停止时运行某些代码,则使用 test_start 和test_stop 事件
from locust import HttpUser, task, events

class AdminUser(HttpUser):
    fixed_count = 1
    host = 'http://127.0.0.1:8080'

    @events.test_start.add_listener
    def on_test_start(environment, **kwargs):
        print("测试开始前,执行一次。比如,在测试前需要构造数据等")

    @events.test_stop.add_listener
    def on_test_stop(environment, **kwargs):
        print("测试停止前,执行一次。比如,在测试后需要删除压测数据等")

    @task
    def task_1(self):
        self.client.get("/p/1.html")
init 启动 locust 时触发的
init 事件在每个 Locust 进程开始时触发,只要执行 locust 命令后即运行。这在分布式模式下特别有用。
在分布模式下,如果一个 master 带多个 worker,使用 test_start 只会运行一次,如果这时你想在 worker 机器上执行一些命令就可以使用 init 事件
from locust import HttpUser, task, events
from locust.runners import MasterRunner

class AdminUser(HttpUser):
    fixed_count = 1
    host = 'http://127.0.0.1:8080'

    @events.init.add_listener
    def on_locust_init(environment, **kwargs):
        if isinstance(environment.runner, MasterRunner):
            print("我在 master 节点上")
        else:
            print("我在 worker 节点或独立节点上")

    @task
    def task_1(self):
        self.client.get("/p/1.html")
- 执行命令
locust -f a1.py --master就会打印 “我在 master 节点上” - 执行命令
locust -f a1.py或locust -f a1.py --worker就会打印 “我在 worker 节点或独立节点上”
HttpSession
HttpSession 的主要功能是将请求结果报告给 Locust(success/fail, response time, response length, name)
适用于所有 HTTP 方法的方法:get, post, put, ...
1. 隐式重用 cookie
就像 requests.Session 一样,它会在请求之间保留 cookie
例如:登录后自动保存 cookie,这样就可以请求后续需要登录才能访问的页面
from locust import HttpUser, task

class AdminUser(HttpUser):
    fixed_count = 1
    host = 'http://127.0.0.1:8080'

    @task
    def task_1(self):
        response = self.client.post("/user/user/login", json={"account": "aaa", "code": "xxx"})
        print("Response status code:", response.status_code)
        print("Response text:", response.text)
        response = self.client.get("/user/user/getInfo")
        print("Response status code:", response.status_code)
        print("Response text:", response.text)
2. 单次修改 sesion
如何登录成功后,在返回 json 中携带 token,后面需要将 token 添加到后续请求的 headr 中,就可以用这个方法
假如请求 /user/user/login 后返回的 json 如下
{
    "code": 0,
    "msg": "请求成功",
    "data": {
        "token": "eyJ0 ...... vH0"
    }
}
则 locust 代码,如下:
- 其中请求 /user/user/login 后会将返回内容转为 json 对象,然后取得 data / token
- 将得到的 token 存到 header 中,修改下一个请求 /user/user/getInfo 的 headers,这样就可以正常请求 getInfo 接口了
from locust import HttpUser, task
import json

class AdminUser(HttpUser):
    fixed_count = 1
    host = 'http://127.0.0.1:8080'

    @task
    def task_1(self):
        response = self.client.post("/user/user/login", json={"account": "aaa", "code": "xxx", "local": False})
        print("Response status code:", response.status_code)
        print("Response text:", response.text)
        res_token = json.loads(response.text)["data"]["token"]
        print("Response token:", res_token)
        header = {
            "Token" : res_token
        }
        response = self.client.get("/user/user/getInfo", headers=header, verify=False)
        print("Response status code:", response.status_code)
        print("Response text:", response.text)
3. 修改 sesion
上例中在请求 /user/user/getInfo 接口时 headers 中会添加 token,但如果后续还有请求也需要 token 怎么办呢?
如下使用 headers.update 更新 sesion 中的 headers
- 同样也是先从 /user/user/login 拿到 token,保存到 header 中
- 使用
self.client.headers.update(header)更新 HttpSession 中的 headers,这样之后的所有请求 headers 中都会携带 token - 使用
print(self.client.headers)可以打印当前 HttpSession 中的 headers - 可以看到调用 update 之前是
{'User-Agent': 'python-requests/2.31.0', 'Accept-Encoding': 'gzip, deflate, br', 'Accept': '*/*', 'Connection': 'keep-alive'}之后是{'User-Agent': 'python-requests/2.31.0', 'Accept-Encoding': 'gzip, deflate, br', 'Accept': '*/*', 'Connection': 'keep-alive', 'Token': 'eyJ......Mw'}
from locust import HttpUser, task
import json

class AdminUser(HttpUser):
    fixed_count = 1
    host = 'http://127.0.0.1:8080'

    @task
    def task_1(self):
        response = self.client.post("/user/user/login", json={"account": "aaa", "code": "xxx", "local": False})
        print(self.client.headers)
        print("Response status code:", response.status_code)
        print("Response text:", response.text)
        res_token = json.loads(response.text)["data"]["token"]
        print("Response token:", res_token)
        header = {
            "Token" : res_token
        }
        self.client.headers.update(header)
        response = self.client.get("/user/user/getInfo", verify=False)
        print(self.client.headers)
        print("Response status code:", response.status_code)
        print("Response text:", response.text)
Http
get 请求
1. 无参 get 请求
上面已经写过很多 get 示例了,这里就不赘述了,其实就是简单给一个路径
response = self.client.get("/user/user/getInfo", verify=False)
2. 带 URL 参数的 get 请求
可以有两种方式携带 url 参数
- 直接拼接在路径中
from locust import HttpUser, task

class AdminUser(HttpUser):
    fixed_count = 1
    host = 'http://127.0.0.1:8080'

    @task
    def task_1(self):
        response = self.client.get("/user/user/getInfo?uid=aa&name=xx", verify=False)
        print("Response status code:", response.status_code)
- 使用 params 参数
首先定义参数 query_data,然后通过 params=query_data 设置 url 参数
from locust import HttpUser, task

class AdminUser(HttpUser):
    fixed_count = 1
    host = 'http://127.0.0.1:8080'

    @task
    def task_1(self):
        query_data = {
            'id' : 'aa',
            'name' : 'xx'
        }
        response = self.client.get("/user/user/getInfo", params=query_data, verify=False)
        print("Response status code:", response.status_code)
3. 带 body 参数的 get 请求
- 带 json body 请求
from locust import HttpUser, task

class AdminUser(HttpUser):
    fixed_count = 1
    host = 'http://127.0.0.1:8080'

    @task
    def task_1(self):
        query_data = {
            'id' : 1,
            'name' : 'xx'
        }
        response = self.client.get("/user/user/login", json=query_data, verify=False)
        print("Response status code:", response.status_code)
post 请求
1. json body 的 post 请求
from locust import HttpUser, task
import json

class AdminUser(HttpUser):
    fixed_count = 1
    host = 'http://127.0.0.1:8080'

    @task
    def task_1(self):
        response = self.client.post("/user/user/login", json={"account": "aaa", "code": "xxx", "local": False})
        print("Response status code:", response.status_code)
        print("Response text:", response.text)
2. form body 的 post 请求
下面两种写法都一样,唯一区别是多一个 data=
from locust import HttpUser, task
import json

class AdminUser(HttpUser):
    fixed_count = 1
    host = 'http://127.0.0.1:8080'

    @task
    def task_1(self):
        response = self.client.post("/user/user/login", data={"account": "aaa", "code": "xxx", "local": False})
        print("Response status code:", response.status_code)
        print("Response text:", response.text)
from locust import HttpUser, task
import json

class AdminUser(HttpUser):
    fixed_count = 1
    host = 'http://127.0.0.1:8080'

    @task
    def task_1(self):
        response = self.client.post("/user/user/login", {"account": "aaa", "code": "xxx", "local": False})
        print("Response status code:", response.status_code)
        print("Response text:", response.text)
3. 带 URL 参数的 post 请求
- 跟 get 请求一样,可以有两种方式携带 url 参数,一种直接拼接在路径中、另一种使用 params 参数。下例使用的是 params 参数方式
- 同时传 url 参数和 form body 参数时,body 参数前必须添加
data= - 也可以同时传 url 参数和 json body 参数,同样也是把
data=改为json=
from locust import HttpUser, task
import json

class AdminUser(HttpUser):
    fixed_count = 1
    host = 'http://127.0.0.1:8080'

    @task
    def task_1(self):
        query_data = {
            'id' : 'aa',
            'name' : 'xx'
        }
        response = self.client.post("/user/user/login", params=query_data, data={"account": "aaa", "code": "xxx", "local": False})
        print("Response status code:", response.status_code)
        print("Response text:", response.text)
4. 单文件上传的 post 请求
其实就是 post form 表单,只是在 post 请求中添加了可选参数 files。
from locust import HttpUser, task, between
import json

class MyUser(HttpUser):
    wait_time = between(1, 1)
    host = 'http://127.0.0.1:8080'

    @task
    def index(self):
        header = {
            "Token" : "eyJ0eXAiO ...... ZMI-8"
        }
        attach = open('ssn.csv', 'rb')
        response = self.client.post(
            "/tools/upload/fileUpload",
            headers=header,
            data={ "name": "file", "filename": "ssn.csv" },
            verify=False,
            files={'file': attach}
        )
        print("Response status code:", response.status_code)
        print("Response text:", response.text)
5. 多文件上传的 post 请求
多文件上传跟单文件上传也没多大区别,只是在可选参数 files 中添加多个文件即可。
from locust import HttpUser, task, between
import json

class MyUser(HttpUser):
    wait_time = between(100, 100)
    host = 'http://127.0.0.1:8080'

    @task
    def index(self):
        header = {
            "Token" : "eyJ0eXAiO ...... ZMI-8"
        }
        attach = open('ssn.csv', 'rb')
        attach2 = open('ssn.csv', 'rb')
        response = self.client.post(
            "/tools/upload/fileUpload",
            headers=header,
            data={ "name": "file", "filename": "ssn.csv" },
            verify=False,
            files={'file': attach, 'file2': attach2}
        )
        print("Response status code:", response.status_code)
        print("Response text:", response.text)
返回结果 参数化
大部分多接口(业务流程)压测,一般都会从上一个接口的返回中取得部分内容,当下一个接口的参数发出。
1. 从 json 数据中得到
在 “单次修改 sesion” 中已经给过例子。关键代码如下,主要是将返回内容转为 json,然后从 json 中拿数据
        response = self.client.post("/user/user/login", json={"account": "aaa", "code": "xxx", "local": False})
        res_token = json.loads(response.text)["data"]["token"]
也可以直接 json() 返回 json,然后从 json 中拿数据
        response = self.client.post("/user/user/login", json={"account": "lrs", "code": "111111", "local": False})
        res_token = response.json()["data"]["token"]
2. 从 html(text)数据中得到
下例是从返回 html 中取得 div 的 id,总体思想是先得到 dom 对象,然后使用 xpath 得到 html 元素,然后用 get 方法那到指定属性的内容 注意:locust 用的是 request 库,没有 js 引擎,所以没有加载动态内容。如果你的页面是 vue 这类写的那就无法得到 html 数据了
同理如果返回的是 text,也是找一个库或方法,拿到你想要的数据即可
from locust import HttpUser, task
from lxml import etree


class AdminUser(HttpUser):
    fixed_count = 1
    host = "http://localhost:9527"

    @task
    def task_1(self):
        response = self.client.get("/", verify=False)
        dom = etree.HTML(response.content.decode('utf-8')) # 返回的是list对象
        div_id = dom.xpath('//*[@id="app"]')[0].get('id')
        print(div_id)
注意:使用 lxml 模块前需要先安装。我的 locust 安装在 python3 中,所以执行 pip3 install lxml 安装
参数
- method:新 Request 对象的方法
- url:新 Request 对象的URL
- name:可选参数。
可以指定为 Locust 的统计信息中的标签,用于代替 URL 路径。这可以用于将被请求的不同 URL 分组到 Locust 统计数据中的一个条目中。 - catch_response可选参数。如果要设置,可以是一个布尔值。可以用来使请求返回为作为with 语句的参数的上下文管理器。这将允许根据响应内容将请求标记为失败,即使响应代码是 ok (2xx) ,反之亦然。可以使用 catch_response捕捉请求,然后将其标记为成功,即使响应代码不是 ok (例如 500 或 404)。
- params:可选参数。要发送到Request的查询字符串的字典或 bytes 对象。
- data:可选参数。要发送到 Request主体中的字典或 bytes 对象。
- headers:可选参数。与 Request一起发送的表示 HTTP headers 的字典。
- cookies:可选参数。与 Request一起发送的表示 cookies 的 dict 或 CookieJar 对象。
- files:可选参数。用于多部分编码上传的元素为 filename: filename: file-like-objects 的字典。
- auth:可选参数:用于启用 Basic/Digest或自定义的 HTTP Auth 的元组或可调用对象。
- timeout:可选参数。以浮点数或(连接超时、读取超时)元组的形式等待服务器发送数据的时间(以秒为单位)。
- allow_redirects:可选参数。布尔类型。默认值为 True。表示是否允许重定向。
- proxies:可选参数。字典类型。键表示代理使用的协议,键值表示代理的URL。
- stream:可选参数。是否立即下载响应内容。默认值为 False。
- verify:可选参数。如果为True,则会验证 SSL 证书。也可以提供一个 CA_BUNDLE 路径。
- cert:可选参数。如果提供一个字符串。那么应该是指向SSL 客户端证书(.pem文件)的路径;如果是一个元组,则应该是 (‘cert’, ‘key’)。
验证响应
默认只要 HTTP 响应 code < 400,则视为请求成功。但我想加一些特殊的验证改如何做呢?
验证返回内容
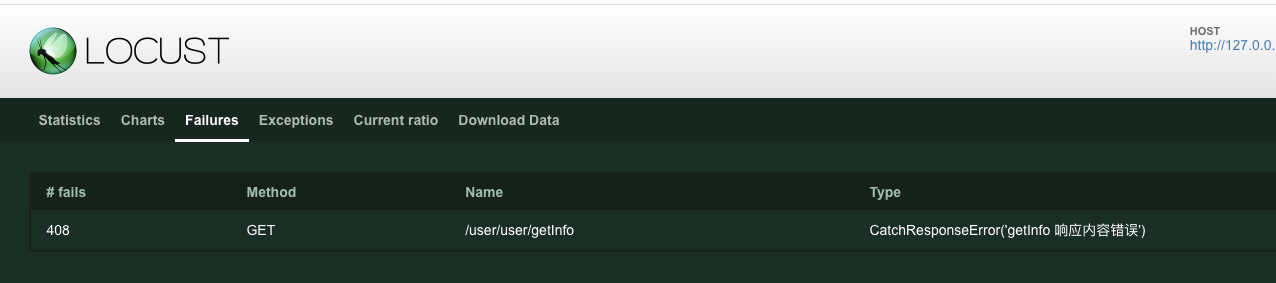
这个例子,就是当返回内容中不包含 code 就认为错。代码修改内容如下:
- 添加 with 语句
- 添加 catch_response=True 参数
- 添加 response.failure("getInfo 响应内容错误") 语句
from locust import HttpUser, task
import json

class AdminUser(HttpUser):
    fixed_count = 1
    host = 'http://127.0.0.1:8080'

    @task
    def task_1(self):
        with self.client.get("/user/user/getInfo", catch_response=True) as response:
            if "code" not in response.text:
                response.failure("getInfo 响应内容错误")
其中 “getInfo 响应内容错误” 会显示在报告中,如下图:
验证响应时间
from locust import HttpUser, task
import json

class AdminUser(HttpUser):
    fixed_count = 1
    host = 'http://127.0.0.1:8080'

    @task
    def task_1(self):
        with self.client.get("/user/user/getInfo", catch_response=True) as response:
            if response.elapsed.total_seconds() > 0.5:
                response.failure("getInfo 请求响应响应时间超过 0.5s")
验证 Http code
下例中当返回的 Http code 等于 404 时,成功。否则失败
from locust import HttpUser, task
import json

class AdminUser(HttpUser):
    fixed_count = 1
    host = 'http://127.0.0.1:8080'

    @task
    def task_1(self):
        with self.client.get("/user/user/getInfo", catch_response=True) as response:
            if response.status_code == 404:
                response.success()
            else:
                response.failure("getInfo 返回了非 404 的 http code")
抛出异常
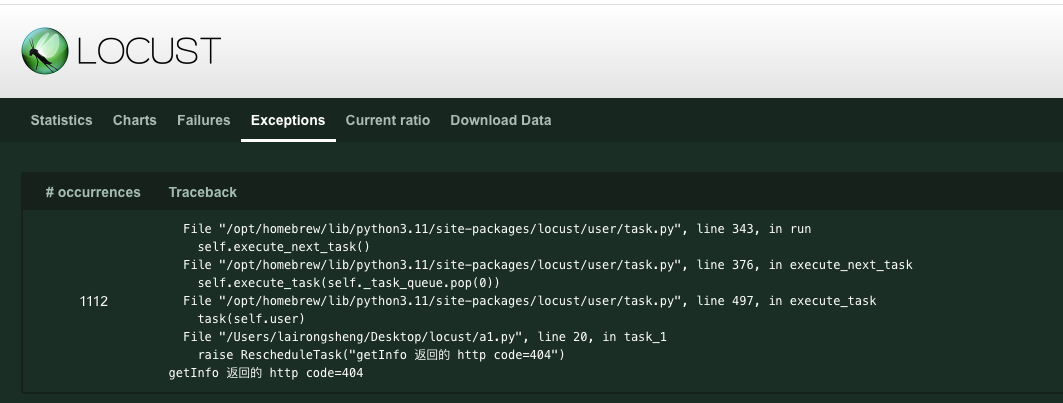
1. 抛出异常,让 Locust 捕获
下例就是直接抛出异常让 Locust 捕获
from locust import HttpUser, task
import json

class AdminUser(HttpUser):
    fixed_count = 1
    host = 'http://127.0.0.1:8080'

    @task
    def task_1(self):
        with self.client.get("/user/user/getInfo", catch_response=True) as response:
            if response.status_code == 404:
                raise RescheduleTask()
运行后会看到 Locust 测试报告的 Statistics 中没有失败统计。在下图位置可以看到 Locust 捕捉到的异常
2. 抛出异常,然后在 with 外捕获
下例是捕捉到异常后,将异常信息打印到控制台。同样在 Locust 测试报告的 Statistics 中没有失败统计。
from locust import HttpUser, task
import json

class RescheduleTask(Exception):
    def __init__(self, message):
        self.message = message

    def __str__(self):
        return self.message

class AdminUser(HttpUser):
    fixed_count = 1
    host = 'http://127.0.0.1:8080'

    @task
    def task_1(self):
        try:
            with self.client.get("/user/user/getInfo", catch_response=True) as response:
                if response.status_code == 200:
                    raise RescheduleTask("getInfo 返回的 http code=404")
        except RescheduleTask as e:
            print(str(e))
请求分组
默认 Locust 会在报告中显示完整 url(包括参数),所以 /userInfo?id=1 和 /userInfo?id=2 会在测试报告中显示成两行,这个当然不是大家想要的。这时就可以用到请求分组。
就是 name 可选参数,name 相同的就会统计在一起。你都可以将不同请求统计到一起,例如: login 跟 userInfo。
from locust import HttpUser, task
import json

class AdminUser(HttpUser):
    fixed_count = 1
    host = 'http://127.0.0.1:8080'

    @task
    def task_1(self):
        response = self.client.get("/userInfo?id=1", name="userInfo", verify=False)
        response = self.client.get("/userInfo?id=2", name="userInfo", verify=False)
这种写法也是一样,但要注意报告中显示的是 userInfo?id=[id],其中 id 就是 id 字符而不是 1 到 10
from locust import HttpUser, task
import json

class AdminUser(HttpUser):
    fixed_count = 1
    host = 'http://127.0.0.1:8080'

    @task
    def task_1(self):
        for i in range(10):
            response = self.client.get("/userInfo?id=%i" % i, name="userInfo?id=[id]", verify=False)
公共库
对于小型测试项目,将所有测试代码保存在一个单一的文件中,即可。
对于大型测试项目,通常会用到您自己写的公共库,此时 locust 会加载项目根目录(跟测试脚本在一个目录中)中的公共库。
当然,如何构建测试源代码完全取决于您,只要能正确找到即可。
下面是一个虚构示例文件结构:
项目根目录
    commonlib_config.py
    commonlib_auth.py
    locustfile_web_app.py
    locustfile_api.py
    locustfile_ecommerce.py
打开 HTTP debug 信息
注意:需要先关闭 HTTP debug 后再正式压测。日志会大量消耗性能,不关闭日志可能造成压力上不去
当需要查看 http 请求信息时,可以参考如下代码
from locust import HttpUser, task
import json
import logging
from http.client import HTTPConnection

HTTPConnection.debuglevel = 1
logging.basicConfig()
logging.getLogger().setLevel(logging.DEBUG)
requests_log = logging.getLogger("requests.packages.urllib3")
requests_log.setLevel(logging.DEBUG)
requests_log.propagate = True

class AdminUser(HttpUser):
    fixed_count = 1
    host = 'http://127.0.0.1:8080'

    @task
    def task_1(self):
        self.client.get("/user/user/getInfo")
运行代码后,打印信息如下图

参数化
为什么要参数化呢?
比如有一个测试,先要用户登录,然后用户要搜索商品。
此时你想摸你用户的正常操作,也就是不同用户在搜索不同商品,此时就用到参数化了。
CSV 文件参数化
有如下 csv 文件内容,文件名为 ssn.csv
ZhangSan,111
LiSi,222
WangWu,333
1. 使用 csv 库读取
代码如下:
from locust import HttpUser, task, between
import csv

class MyUser(HttpUser):
    wait_time = between(1, 1)
    host = 'http://127.0.0.1:8080'

    @task
    def my_task(self):
        with open('ssn.csv', mode='r') as infile:
            reader = csv.reader(infile)
            for row in reader:
                print(str(self) + " == " + row[0])
                self.client.get(f"/user/user/getInfo?name={row[0]}")
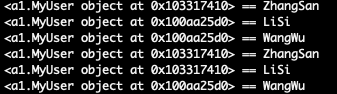
运行代码后,可以看到 name 参数分别使用了 ZhangSan、LiSi、WangWu
再次运行,将 users 改为 2,可以看到如下图。
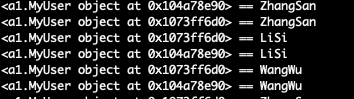
从图中可以看到两个 user 0x1073ff6d0、0x104a78e90 都是遍历 ZhangSan、LiSi、WangWu,那这样如果想让每个用户使用自己的数据该如何处理呢?
就可以使用 csv + itertools 然后将 file、reader 保存成全局变量实现。当然你也可以一次读出 csv,然后通过操作 index 实现
2. 使用 csv + itertools 库读取
from locust import HttpUser, task, events, between
import csv
import itertools

class MyUser(HttpUser):
    host = 'http://127.0.0.1:8080'
    wait_time = between(1, 1)

    # 利用 locust 的 test_start 监听事件,打开 csv 文件并转成 reader
    @events.test_start.add_listener
    def on_test_start(environment, **kwargs):
        global file
        global reader
        file = open('ssn.csv', mode='r')
        file = file
        reader = csv.reader(file)

    # 读取 csv 文件的下一行,遇到文件结尾,重新开始
    def csv_next_row():
        global file
        global reader
        try:
            return next(reader)
        except StopIteration:
            file.seek(0, 0) # 文件读到 EOF,移动 seek 到文件头
            return next(reader)

    @task
    def my_task(self):
        row = MyUser.csv_next_row()
        print(str(self) + " == " + row[0])
        self.client.get(f"/user/user/getInfo?name={row[0]}")
运行后如下图,可以看到两个用户是顺序依次取的数据,这样如果 csv 数据行够多就可以做到参数不重复
3. 使用 Locust 插件
使用 CSVReaders(Locust 插件)同样可以实现 “使用 csv + itertools 库读取” 效果,而且代码看着更简洁。
但需要安装 Locust 插件后才能使用,安装命令 pip3 uninstall locust_plugins
from locust_plugins.csvreader import CSVReader
from locust import HttpUser, task, between

reader = CSVReader("ssn.csv")

class MyUser(HttpUser):
    wait_time = between(1, 1)
    host = "http://example.com"

    @task
    def index(self):
        row = next(reader)
        print(str(self) + " == " + row[0])
        self.client.get(f"/user/user/getInfo?name={row[0]}")
数据库参数化
上面演示了如何使用 csv 文件做参数化,当然也可以换成数据库。也就是从数据库中读出数据以实现参数化。这里就不累述了
比如:
- mysql 数据库
- sqlserver 数据库
- MongoDB 数据库
Locust 插件
除了 Locust 本身功能,还提供了一组精选的 插件/扩展。csv 参数化中就展示了其中一个插件。
详见 locust 插件仓库地址: https://github.com/SvenskaSpel/locust-plugins#listeners
下面摘抄了一部分我觉得不错的插件:
新协议
- Playwright
- WebSockets/SocketIO
- Selenium/Webdriver
- 加载 html 页面资源的 HTTP 用户
- Kafka
- MqttUser
Readers
提供测试数据(参数化)
- csv
- MongoDB
等待时间
自定义等待时间函数
分发测试数据
支持将测试数据从主服务器分发到工作程序
事务管理
支持记录事务(聚合多个请求或其他操作)(类似 LoadRunner 中的 Start Transaction、End Transaction)

 浙公网安备 33010602011771号