
webpack 项目接入Vite的通用方案介绍(上)
 通过本文,能给读者提供一个存/增量项目接入Vite的点子,起抛砖引玉的作用,减少这方面能力的建设成本
愿景
希望通过本文,能给读者提供一个存/增量项目接入Vite的点子,起抛砖引玉的作用,减少这方面能力的建设成本
在阐述过程中同时也会逐渐完善webpack-vite-serve这个工具
读者可直接fork这个工具仓库,针对个人/公司项目场景进行定制化的二次开发
背景
在当下的业务开发中处处可见webpack的身影,大部分的业务项目采用的构建工具也都是它。
随着时间的推移,存量老项目体积越来越大,开发启动(dev)/构建(build) 需要的时间越来越长。针对webpack的优化手段越来越有限。
于是乎某些场景出现了用其它语言写的工具,帮助构建/开发提效。如SWC(Rust),esbuild(Go)
当然上述工具并不是一个完整的构建工具,不能取代webpack直接使用,只是通过plugin,为webpack工作提效
当下另一种火热的方案是bundleless,利用浏览器原生支持ES Module的特性,让浏览器接管"打包"工作,工具只负责对浏览器请求的资源进行相应的转换,从而极大的减少服务的启动时间,提升开发体验与开发幸福感
本文的主角就是Vite:下一代前端开发与构建工具
由于Vite的周边还处于建设期,要完全替代webpack,还需要一定时日,为了保证存量线上项目的稳定性,Vite作为一个开发时可选的能力接入是比较推荐的一个做法。
# webpack devServer
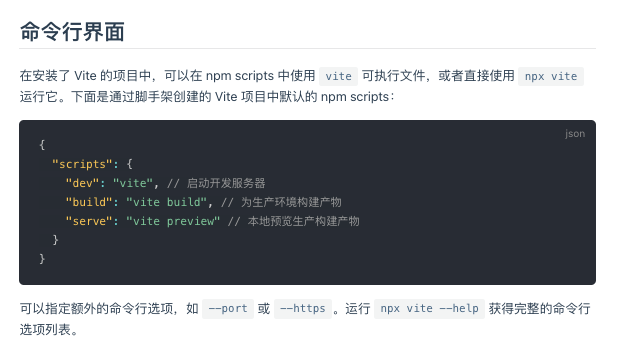
npm run dev
# Vite devServer
npm run vite
目标
为webpack项目开发环境提供最简单的Vite接入方案
待接入项目只需要做极小的变动就能享受到Vite带来的开发乐趣
方案
- 做一个CLI工具,封装Vite启动项目的能力
- 将Vite相关的配置全部收敛于插件内,自动将webpack配置转化为Vite配置
- 对外提供一些可选参数,用于手动指定配置文件的位置
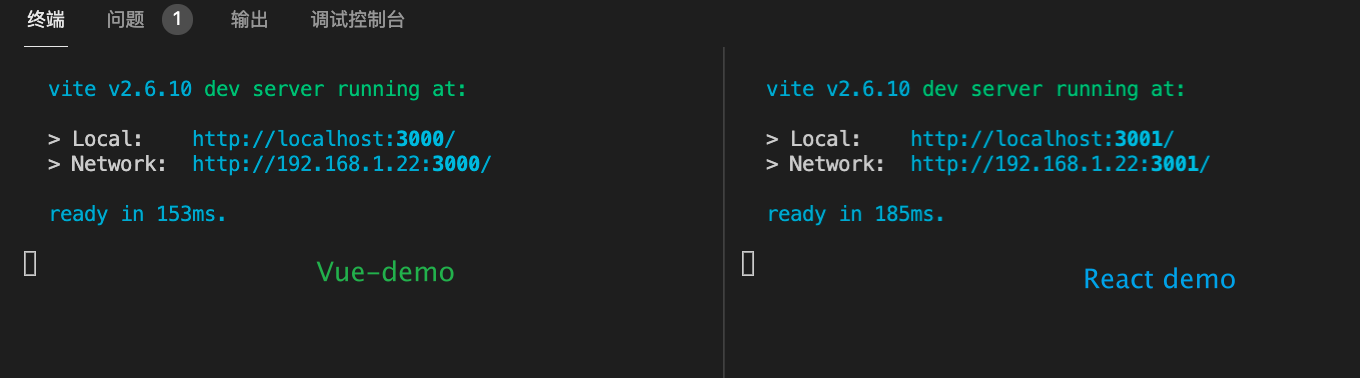
demo效果
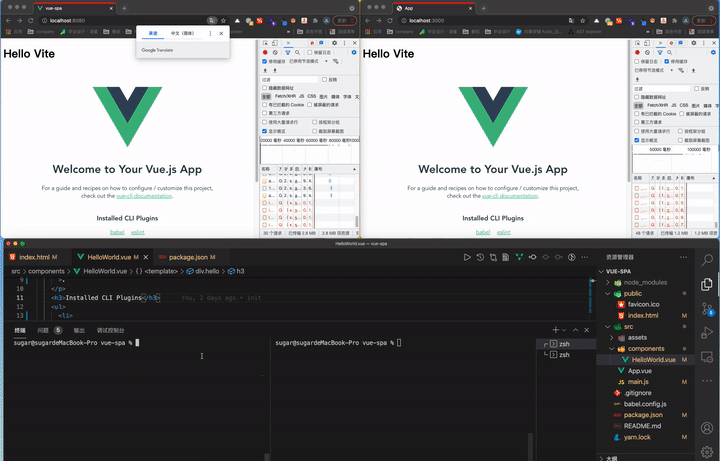
Vue SPA
React SPA
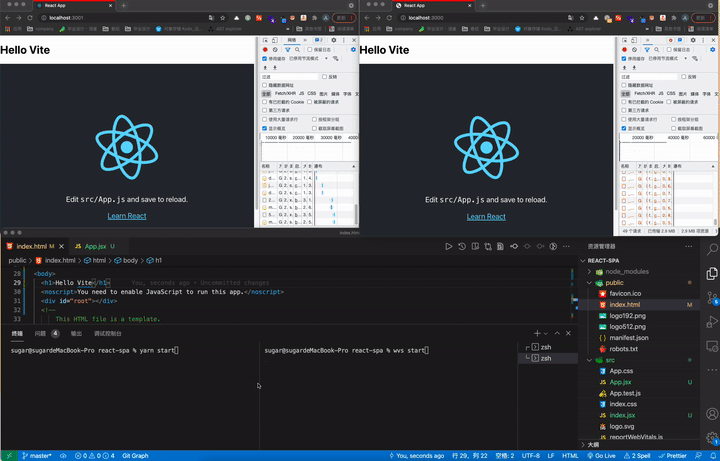
在最简单的Demo工程中,Vite的启动/HMR速度也是明显比webpack快不少的
其它常见项目类型的demo也会逐渐的完善到源码仓库中
实现
1. 初始化工程
完整的工程结构移步仓库
注册一个启动方法start
src/bin.ts
#!/usr/bin/env node
import { Command } from 'commander';
import { startCommand } from './command';
program.command('start')
  .alias('s')
  .action(startCommand);

program.parse(process.argv);
export default function startCommand() {
  console.log('hello vite');
}
package.json中添加指令
- 其中
wvs为自定义的指令 npm run dev:利用typescript依赖提供的指令,监听文件变动,自动将其转换js文件
{
  "bin": {
    "wvs": "./dist/bin.js"
  },
  "scripts": {
    "dev": "tsc -w -p .",
    "build": "rimraf dist && tsc -p ."
  },
}
项目根目录执行npm link,注册指令
npm link
测试
wvs start

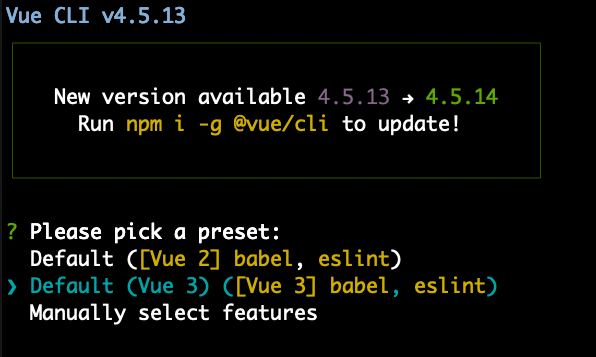
紧接着我们用Vue-CLI和Create React App分别创建两个webpack的SPA应用进行接下来的实验
vue create vue-spa
npx create-react-app react-spa
2. 收敛Vite启动
Vite的启动比较简单,只需要执行vite这个指令就行s
在我们的CLI工具里使用spawn创建子进程启动Vite
- 其中
cwd用于指定子进程的工作目录 - stdio:子进程的标准输入输出配置
import { spawn } from 'child_process';

export default function startCommand() {
  const viteService = spawn('vite', ['--host', '0.0.0.0'], {
    cwd: process.cwd(),
    stdio: 'inherit',
  });

  viteService.on('close', (code) => {
    process.exit(code);
  });
}
这里为了方便调试,咱们全局安装一下Vite
npm i -g vite
在启动模板public/index.html里添加一个<h1>Hello Vite</h1>
在demo项目里运行wvs start
打开对应地址
# vue
http://localhost:3000/
# react
http://localhost:3001/
得到了如下的结果,提示找不到页面(意料之中)

通过文档得知,Vite会默认寻找index.html作为项目的入口文件

这就带来了第一个要处理的问题,多页应用下可能有多个模板文件
如何根据访问路由动态的指定这个x.html的入口?
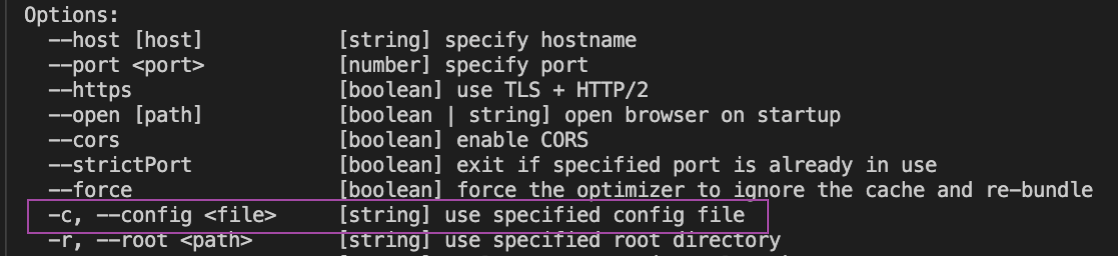
在解决问题之前,咱们再简单完善一下启动指令,为其指定一个vite.config.js 配置文件
通过vite --help,可以看到通过--config参数指定配置文件位置
export default function startCommand() {
  const configPath = require.resolve('./../config/vite.js');
  const viteService = spawn('vite', ['--host', '0.0.0.0', '--config', configPath], {
    cwd: process.cwd(),
    stdio: 'inherit',
  });
}
这里指向配置文件的绝对路径
config/vite.ts
import { defineConfig } from 'vite';

module.exports = defineConfig({
  plugins: [],
  optimizeDeps: {},
});
3. html模板处理
拓展Vite的能力就是定制各种的插件,根据插件文档
编写一个简单的plugin,利用configServer钩子,读取浏览器发起的资源请求
import type { PluginOption } from 'vite';

export default function HtmlTemplatePlugin(): PluginOption {
  return {
    name: 'wvs-html-tpl',
    apply: 'serve',
    configureServer(server) {
      const { middlewares: app } = server;
      app.use(async (req, res, next) => {
        const { url } = req;
        console.log(url);
        next();
      });
    },
  };
}
在上述的配置文件中引入
import { htmlTemplatePlugin } from '../plugins/index';
module.exports = defineConfig({
  plugins: [
    htmlTemplatePlugin(),
  ]
});
再次启动服务观察
- 访问
http://localhost:3000,终端中输出/ - 访问
http://localhost:3000/path1/path2,终端中输出/path1/path2 - 访问
http://localhost:3000/path1/path2?param1=123,终端中输出/path1/path2?param1=123
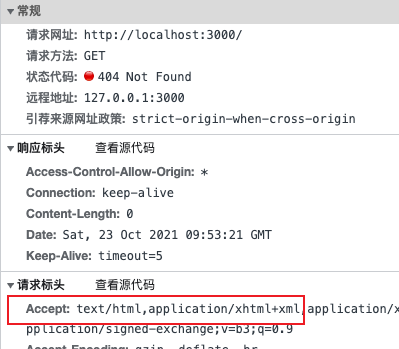
在 devTools面板内容中可以看到,第一个资源请求头上的Accept字段中带有text/html,application/xhtml+xml等内容,咱们就以这个字段表明请求的是html文档
再次修改一下处理资源请求的代码
import { readFileSync } from 'fs';
import path from 'path';
import { URL } from 'url';

function loadHtmlContent(reqPath) {
  // 单页默认 public/index.html
  const tplPath = 'public/index.html';
  // 可以根据请求的path:reqPath 作进一步的判断
  return readFileSync(path.resolve(process.cwd(), tplPath));
}

// 省略了前面出现过的代码
app.use(async (req, res, next) => {
  const { pathname } = new URL(req.url, `http://${req.headers.host}`);
  const htmlAccepts = ['text/html', 'application/xhtml+xml'];
  const isHtml = !!htmlAccepts.find((a) => req.headers.accept.includes(a));
  if (isHtml) {
    const html = loadHtmlContent(pathname);
    res.end(html);
    return;
  }
  next();
});
再次在demo中启动服务,访问就能正确看到Hello Vite
在终端中会发现一个报错
UnhandledPromiseRejectionWarning: URIError: URI malformed
打开模板可以发现是由于有一些其它的内容,里面包含一些变量,这部分在webpack中是由 html-webpack-plugin插件处理
<link rel="manifest" href="%PUBLIC_URL%/manifest.json" />
<link rel="apple-touch-icon" href="%PUBLIC_URL%/logo192.png" />
<link rel="icon" href="<%= BASE_URL %>favicon.ico">
<title>
  <%= htmlWebpackPlugin.options.title %>
</title>
这里编写一个简单的方法对模板先做一些简单处理(这个方法只处理了当前遇到的这种情况)
/**
 * 初始化模板内容(替换 <%= varName %> 一些内容)
 */
function initTpl(tplStr:string, data = {}, ops?:{
  backup?:string
  matches?:RegExp[]
}) {
  const { backup = '', matches = [] } = ops || {};
  // match %Name% <%Name%>
  return [/<?%=?(.*)%>?/g].concat(matches).reduce((tpl, r) => tpl.replace(r, (_, $1) => {
    const keys = $1.trim().split('.');
    const v = keys.reduce((pre, k) => (pre instanceof Object ? pre[k] : pre), data);
    return (v === null || v === undefined) ? backup : v;
  }), tplStr);
}
如果模板中还有复杂的ejs语法可以使用 ejs 库做进一步处理
import ejs from 'ejs';

/**
 * ejs渲染
 */
function transformEjsTpl(html:string, data = {}) {
  return ejs.render(html, data);
}
当然如果还有其它未考虑到的case,可根据特定情况,再对模板做进一步的处理
下面将上述编写的方法集成到插件中
export default function HtmlTemplatePlugin(): PluginOption {
  return {
    configureServer(server) {
      const { middlewares: app } = server;
      app.use(async (req, res, next) => {
        // 省略代码
        if (isHtml) {
          const originHtml = loadHtmlContent(pathname);
          // 调用插件中的transformIndexHtml 钩子对模板做进一步处理
          const html = await server.transformIndexHtml(req.url, originHtml, req.originalUrl);
          res.end(html);
          return;
        }
        next();
      });
    },
    transformIndexHtml(html) {
      // data可以传入模板中包含的一些变量
      // 可以再此处获取webpack配置,做自动转换
      return initTpl(html, {
        PUBLIC_URL: '.',
        BASE_URL: './',
        htmlWebpackPlugin: {
          options: {
            title: 'App',
          },
        },
      });
    },
  };
}
到此再次在demo中运行,页面跑起来了,终端中也无报错,页面的模板到此算是处理完毕
有了初始的模板,就意味着我们已经为Vite提供了页面的入口,但其中还没有处理的js/ts的依赖即 entry
下面将介绍往模板中插入entry
4. 指定entry入口
入口文件名(entryName)通常为(main|index).js|ts|jsx|tsx
- 单页应用(SPA)中entryBase通常为:
src - 多页应用(MPA)中entryBase通常为:
src/pages/${pageName}
利用transformIndexHtml钩子往模板中插入<script type="module" src="entryFile"></script>
export default function pageEntryPlugin(): PluginOption {
  return {
    name: 'wvs-page-entry',
    apply: 'serve',
    transformIndexHtml(html, ctx) {
      return html.replace('</body>', `<script type="module" src="${getPageEntry(ctx.originalUrl)}"></script>
        </body>
        `);
    },
  };
}
这里以SPA为例
function getPageEntry(reqUrl) {
  // SPA
  const SPABase = 'src';
  return getEntryFullPath(SPABase);
}
getEntryFullPath 实现如下
- 先判断目录是否存在
- 读取目录,遍历文件利用正则
/(index|main)\.[jt]sx?$/判断文件是否为目标文件
const resolved = (...p) => path.resolve(getCWD(), ...p);
const getEntryFullPath = (dirPath) => {
  if (!existsSync(resolved(dirPath))) {
    return false;
  }
  // main|index.js|ts|jsx|tsx
  const entryName = /(index|main)\.[jt]sx?$/;
  const entryNames = readdirSync(resolved(dirPath), { withFileTypes: true })
    .filter((v) => {
      entryName.lastIndex = 0;
      return v.isFile() && entryName.test(v.name);
    });
  return entryNames.length > 0 ? path.join(dirPath, entryNames[0].name) : false;
};
将这个插件加入到配置里
import { pageEntryPlugin } from '../plugins/index';
module.exports = defineConfig({
  plugins: [
    pageEntryPlugin(),
  ]
});
启动demo查看效果,抛出了一堆错误
wvs start
下面是针对框架特定的处理
React
- React: the content contains invalid JS syntax
React中将带有jsx语法的js文件后缀改为jsx,关于直接在js中使用jsx语法的处理方案,见文章:解决Vite-React项目中.js使用jsx语法报错的问题
- Uncaught ReferenceError: React is not defined
在 react组件顶部引入React,或引入@vitejs/plugin-react插件,同下3处理方案
import React from 'react';
- HMR支持
import react from '@vitejs/plugin-react'

module.exports = defineConfig({
  plugins: [
    react(),
  ]
});
Vue
需要添加插件处理.vue文件
import vue from '@vitejs/plugin-vue'

module.exports = defineConfig({
  plugins: [
    vue(),
  ]
});
同时 @vitejs/plugin-vue 需要 vue (>=3.2.13)
由于前面采用的是npm link创建软连接进行的调试,配置文件中会在开发目录下去查找Vue依赖,不会在指令运行目录下查找,会不断的抛出上述问题
这里在demo项目里本地安装我们的依赖,然后在package.json添加相关指令
yarn add file:webpack-vite-service-workspace-path
{
  "scripts": {
    "vite": "wvs start -f vue"
  },
}
Vue项目中并没有React相关依赖,所以在Vue项目中不能引入@vitejs/plugin-react插件
可以在指令入口添加框架相关参数判断处理一下,只引入对应框架的插件
// src/bin.ts
program.command('start')
  .option('-f, --framework <type>', 'set project type [vue/react]')
  .action(startCommand);

// src/command/start.ts
export default function startCommand(options:{[key:string]:string}) {
  const { framework = '' } = options;
  process.env.framework = framework.toUpperCase();
}

// src/config/vite.ts
import react from '@vitejs/plugin-react';
import vue from '@vitejs/plugin-vue';

const extraPlugins: any[] = [
  process.env.framework === 'REACT' ? [react()] : [],
  process.env.framework === 'VUE' ? [vue()] : [],
];
module.exports = defineConfig({
  plugins: [
    htmlTemplatePlugin(),
    pageEntryPlugin(),
    ...extraPlugins,
  ],
});
到此最关键的两个步骤就算完成了
5. 其它工程能力
目前针对webpack常见的能力,社区已经有了许多插件和方案,下面只做简单介绍
这些插件当然也有些场景可能处理不了,还是期望广大开发者,勇于实验,然后向插件作者提交PR/issues
- Sass/Less:在依赖中安装
Sass/Less即可 - 组件库按需引入:vite-plugin-style-import
- process.env:vite-plugin-env-compatible
- window.xx/xx undefined:使用
transformIndexHtml钩子开发插件,在模板中提前引入这个方法的polyfill或者兜底处理 - ...
总结
企业:大部分是拥有自己的研发框架,在研发框架中只需要加入一个Vite启动的CLI指令,这样对接入方的影响与使用成本是最小的
个人:喜欢折腾/不想改动原来的代码,可以按上述流程自己接一下,新项目可以直接使用Vite官方模板开发
总之:开发中使用Vite还是很香的
由于篇幅与时间都有限,文中部分地方只介绍了实现思路,并没粘贴完整代码,完整代码可在源码仓库中查看,也可fork直接进行二次开发
webpack向vite配置的转换这部分的内容将放在下期做介绍

 浙公网安备 33010602011771号