
Spring基础--ioc,AOP,事务等
# Spring
注意:116-119:关于Spring的整合Web没有实践,因为JSP不懂
第1章--Spring概述
1.1 Spring概述

1.2.Spring模块划分

1.Test:Spring的单元测试模块:
spring-test-4.0.0.RELEASE
2.Core Container:核心容器(IOC);黑色代表这部分的功能由哪些jar包组成;要使用这个部分的完整功能,这些jar都需要导入:
spring-beans-4.0.0.RELEASE、
spring-core-4.0.0.RELEASE、
spring-context-4.0.0.RELEASE、
spring-expression-4.0.0.RELEASE
3.AOP+Aspects(面向切面编程模块):
spring-aop-4.0.0.RELEASE、spring-aop-4.0.0.RELEASE
4.数据访问/:Spring数据库访问模块:
 spring-jdbc-4.0.0.RELEASE、spring-orm(Object Relation Mapping)-4.0.0.RELEASE、
 spring-ox(xml)m-4.0.0.RELEASE、spring-jms-4.0.0.RELEASE、(Intergration)
 spring-tx-4.0.0.RELEASE(事务)
5.Web:Spring开发web应用的模块:
spring-websocket(新的技术)-4.0.0.RELEASE、
spring-web-4.0.0.RELEASE、和原生的web相关(servlet)
spring-webmvc-4.0.0.RELEASE、开发web项目的(web)
spring-webmvc-portlet-4.0.0.RELEASE(开发web应用的组件集成)
用哪个模块导哪个包(建议);
第2章--IOC(容器)
第一部分:

2-1. IOC可以被动的接收资源方式
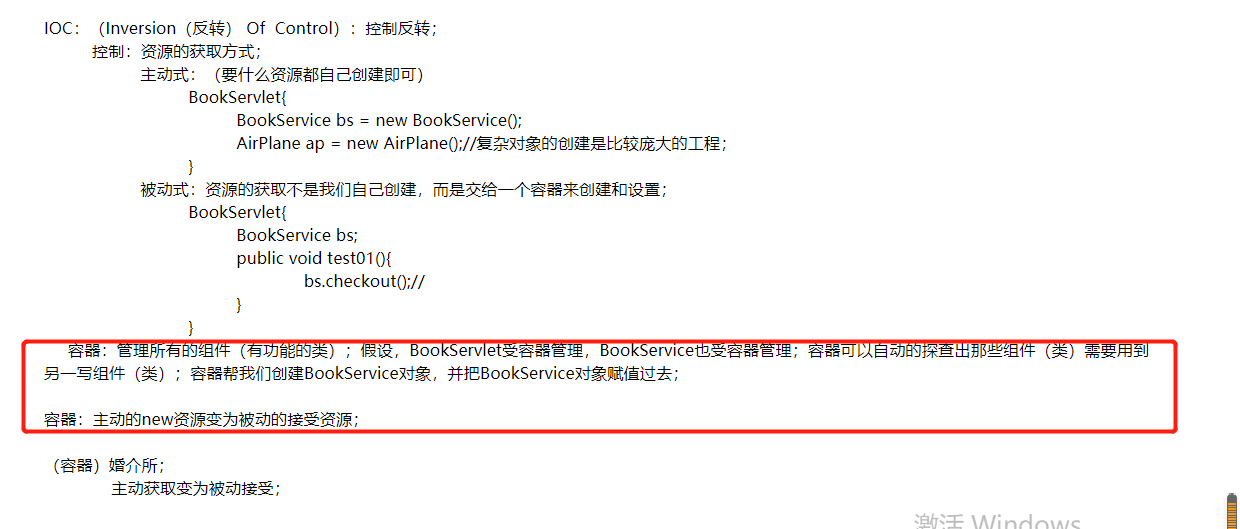
2-2. DI(IOC的具体实现)

2-3.给容器中注册一个组件(实验1:)
前提准备:
1.在maven中导入---使用Spring的4个核心包以及一个运行的时候依赖的一个日志包
<!--        使用Spring的4个核心包以及一个运行的时候依赖的一个日志包-->
        <dependency>
            <groupId>org.springframework</groupId>
            <artifactId>spring-beans</artifactId>
            <version>4.0.0.RELEASE</version>
        </dependency>
        <dependency>
            <groupId>org.springframework</groupId>
            <artifactId>spring-context</artifactId>
            <version>4.0.0.RELEASE</version>
        </dependency>
        <dependency>
            <groupId>org.springframework</groupId>
            <artifactId>spring-core</artifactId>
            <version>4.0.0.RELEASE</version>
        </dependency>
        <dependency>
            <groupId>org.springframework</groupId>
            <artifactId>spring-expression</artifactId>
            <version>4.0.0.RELEASE</version>
        </dependency>
        <dependency>
            <groupId>commons-logging</groupId>
            <artifactId>commons-logging</artifactId>
            <version>1.1.3</version>
        </dependency>

<!--        导入单元测试jar-->
        <dependency>
            <groupId>junit</groupId>
            <artifactId>junit</artifactId>
            <version>RELEASE</version>
            <scope>test</scope>
        </dependency>

    </dependencies>
2.注册一个组件,并为每一个组件的属性赋值

3.代码实现
person组件:
<!-- 注意1:
 一个bean标签可以注册一个组件(对象,类)
 class:写要注册的组件的全类名
 id:这个对象的唯一标识
 -->
    <bean id="person01" class="com.xu1.bean.Person">
<!--注意2:
使用property标签为Person对象的属性赋值
name="lastName":指定属性名
value="张三":这个为属性值
-->
        <property name="lastname" value="xinting"></property>
        <property name="age" value="21"></property>
        <property name="email" value="xinting@163.com"></property>
        <property name="gender" value="男"></property>
    </bean>
package com.xu1.bean;

/**
 * @auther xu
 * @Description
 * @date 2022/5/3 - 15:02
 * @Modified By:
 */
public class Person {
    private String lastname;
    private Integer age;
    private String gender;
    private String email;

    public Person() {
    }

    public Person(String lastname, Integer age, String gender, String email) {
        this.lastname = lastname;
        this.age = age;
        this.gender = gender;
        this.email = email;
    }

    public String getLastname() {
        return lastname;
    }

    public void setLastname(String lastname) {
        this.lastname = lastname;
    }

    public Integer getAge() {
        return age;
    }

    public void setAge(Integer age) {
        this.age = age;
    }

    public String getGender() {
        return gender;
    }

    public void setGender(String gender) {
        this.gender = gender;
    }

    public String getEmail() {
        return email;
    }

    public void setEmail(String email) {
        this.email = email;
    }

    @Override
    public String toString() {
        return "Person{" +
                "lastname='" + lastname + '\'' +
                ", age=" + age +
                ", gender='" + gender + '\'' +
                ", email='" + email + '\'' +
                '}';
    }
}
单元测试结果:
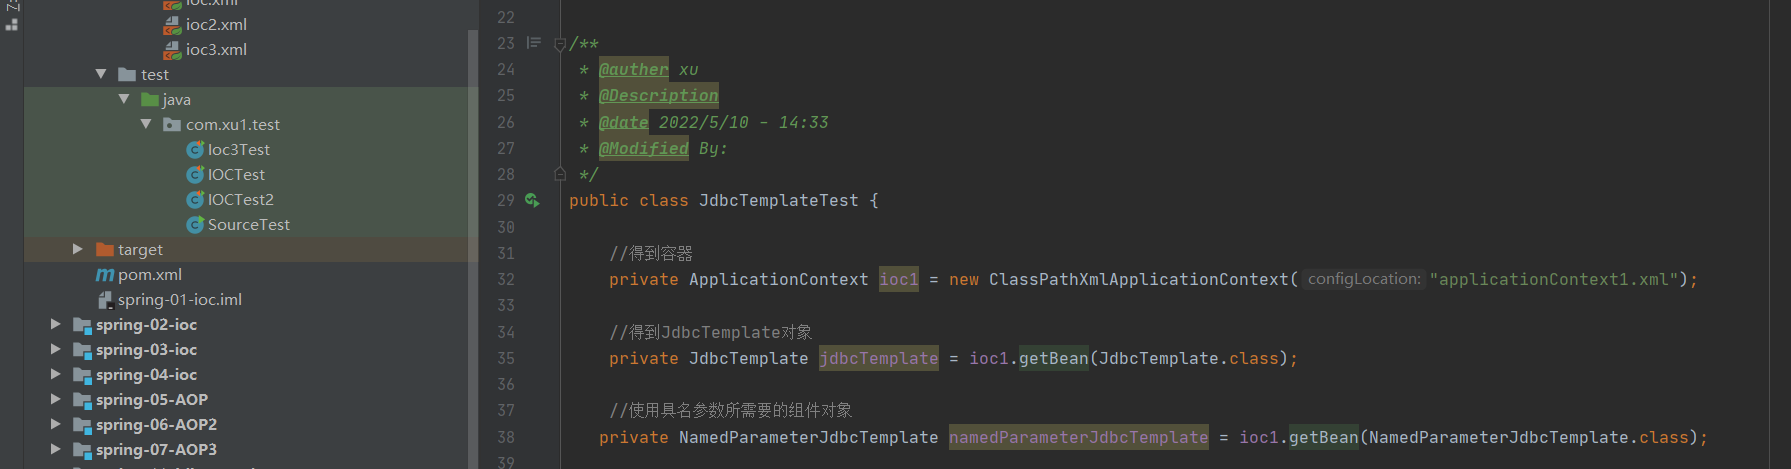
package com.xu1.test;

import com.xu1.bean.Person;
import org.junit.Test;
import org.springframework.context.ApplicationContext;
import org.springframework.context.support.ClassPathXmlApplicationContext;

/**
 * @auther xu
 * @Description
 * @date 2022/5/3 - 15:18
 * @Modified By:
 */
public class IOCTest {

    /**
     *
     * @Description 从容器中拿到这个组件
     * @Author xu
     * @return
     * @throws
     * @Date 2022/5/3 15:22
     *
     */
    @Test
    public void test() {

        //ApplicationContext:代表IOC容器
        //ClassPathXmlApplicationContext:当前应用的xml配置文件在ClassPath下
        //根据spring的配置文件得到ioc容器对象
        ApplicationContext ioc = new ClassPathXmlApplicationContext("ioc.xml");

        //容器帮我们实例化了对象
        Person person1 = (Person)ioc.getBean("person01");
        System.out.println(person1);

    }
}

补充:容器中实例化是利用反射技术动态的实现的。
4.细节
1.读取配置文件创建容器的两种方式:

2.给容器中注册一个组件,我们也从容器中按照id拿到这个组件的对象,组件的创建工作是容器完成。
3.Person对象是什么时候创建好呢?
答:容器中对象的创建在容器创建完成的时候就已经创建好了。
验证:验证在容器创建好的时候就已经实例化了对象


补充:帮我们实例化了两个对象,调用了两次无参构造器
4.同一个组件在ioc容器中是单实例的(ioc.getBean("person01");通过多次调用该方法造多个对象都指向同一个地址),容器启动完成都已经创建好了
验证:

5.获取一个不存在的组件:报异常

6.ioc容器在创建这个组件对象的时候,(property)会利用setter方法为javaBean的属性进行赋值。
验证:


7.javaBean的属性名是由什么决定的?
由Person类中getter/setter方法决定,而不是属性名(注意:不要随意更改get和set方法名)


总结如下:
通过各种方式给容器中注册对象(注册会员),以前是自己new 对象,现在所有的对象交给容器创建;前提:给容器中注册组件
2-4 实验2--- 根据bean的类型从IOC容器中获取bean的实例(重要)
 /**
     * 实验2:
     *
     * 1.如果ioc容器中这个类型的bean有多个,按照类型找或报如下错误
     * org.springframework.beans.factory.NoUniqueBeanDefinitionException: No qualifying bean of type
     * [com.xu1.bean.Person] is defined: expected single matching bean but found 2: person01,person02
     *
     * 2.解决:传入类型的时候,同时传入id
     *
     * @Description 根据bean的类型从IOC容器中获取bean的实例(重要)
     * @Author xu
     * @return
     * @throws
     * @Date 2022/5/3 20:24
     *
     */
    private ApplicationContext ioc = new ClassPathXmlApplicationContext("ioc.xml");
    @Test
    public void test02() {
//        Person bean1 = ioc.getBean(Person.class);
//        System.out.println(bean1);

        //解决按照类型找唯一性的问题:传入id的时候传入类型
        Person bean2 = ioc.getBean("person02", Person.class);
        System.out.println(bean2);
    }
结论:


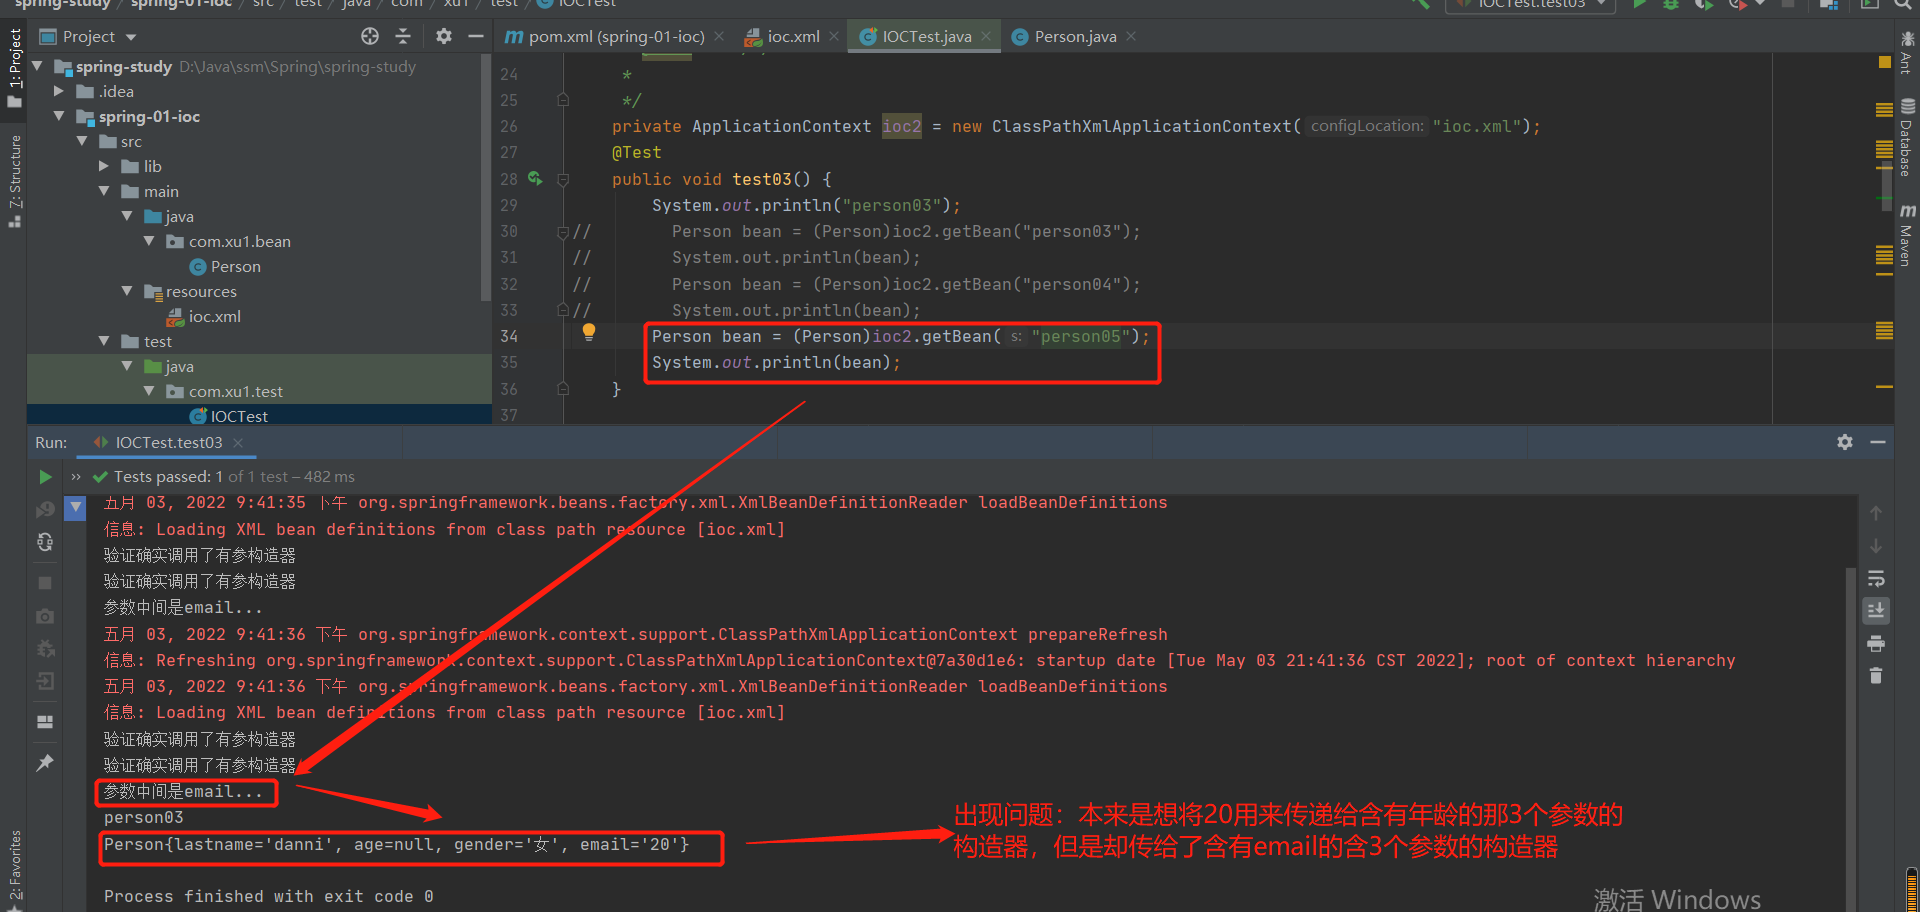
2-5 实验3--- 调用有参构造器进行创建对象并赋值,构造器有多少个参数就建立多少个如下标签
1.bean--person03组件:

2.验证调用了有参构造器:

结果:

未解决问题:打印了两次,难道是调用了两次有参构造器?
代码参考:
/**
 * 实验3:通过调用有参构造器完成对象的初始化工作
 *
 * @Description
 * @Author xu
 * @return
 * @throws
 * @Date 2022/5/3 20:46
 *
 */
private ApplicationContext ioc2 = new ClassPathXmlApplicationContext("ioc.xml");
@Test
public void test03() {
    System.out.println("person03");
    Person bean = (Person)ioc2.getBean("person03");
    System.out.println(bean);
}
2-6 实验3---严格按照name属性,严格按照构造器参数的位置,其实都是有默认的index
第一部分:省去name属性(默认有index)
bean组件:

Person含参构造器:

运行代码以及结论:

代码参考:
bean组件:
  <bean id="person04" class="com.xu1.bean.Person">
<!--        严格按照name属性,严格按照构造器参数的位置,其实都是有默认的index-->
<!--        Person(String lastname, Integer age, String gender, String email)-->
        <constructor-arg value="danni" index="0"></constructor-arg>
        <constructor-arg value="20"></constructor-arg>
        <constructor-arg value="dan@163.com"></constructor-arg>
        <constructor-arg value="女"></constructor-arg>
    </bean>
test:
 /**
     * 实验3:通过调用有参构造器完成对象的初始化工作
     *
     * @Description
     * @Author xu
     * @return
     * @throws
     * @Date 2022/5/3 20:46
     *
     */
    private ApplicationContext ioc2 = new ClassPathXmlApplicationContext("ioc.xml");
    @Test
    public void test03() {
        System.out.println("person03");
//        Person bean = (Person)ioc2.getBean("person03");
//        System.out.println(bean);
        Person bean = (Person)ioc2.getBean("person04");
        System.out.println(bean);
    }
第2部分:构造器重载问题
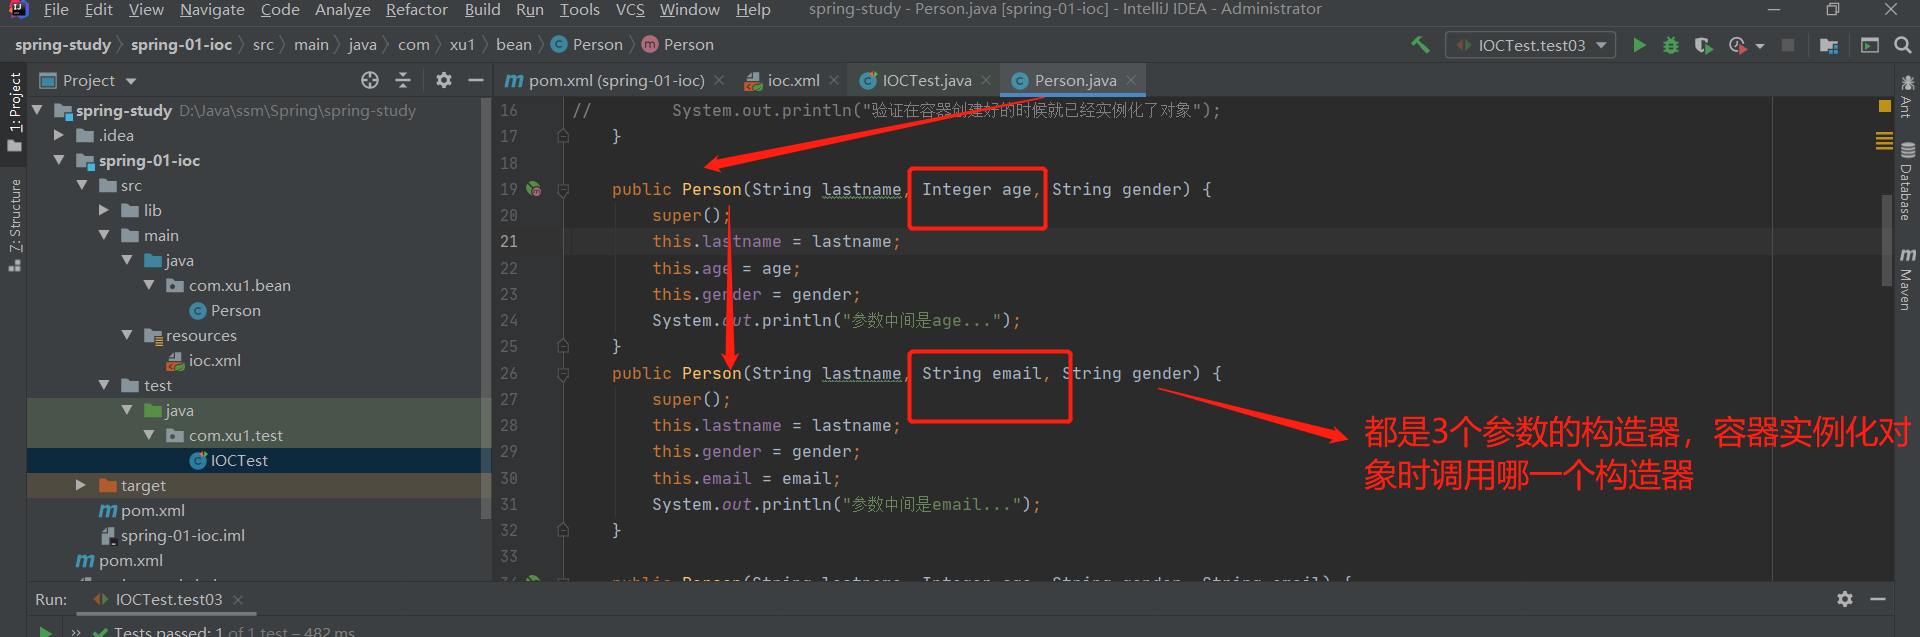
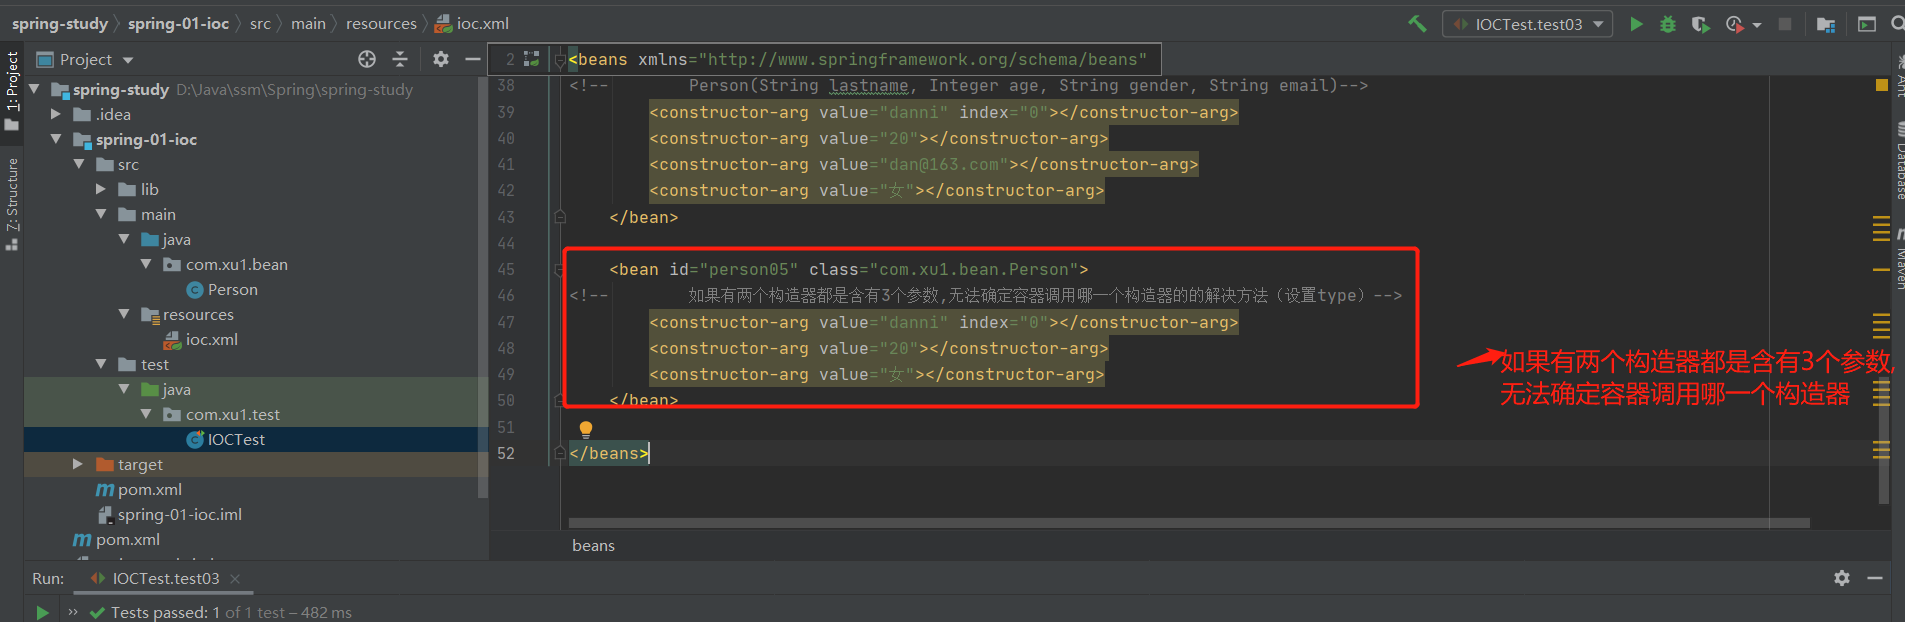
解决问题:使用type标签
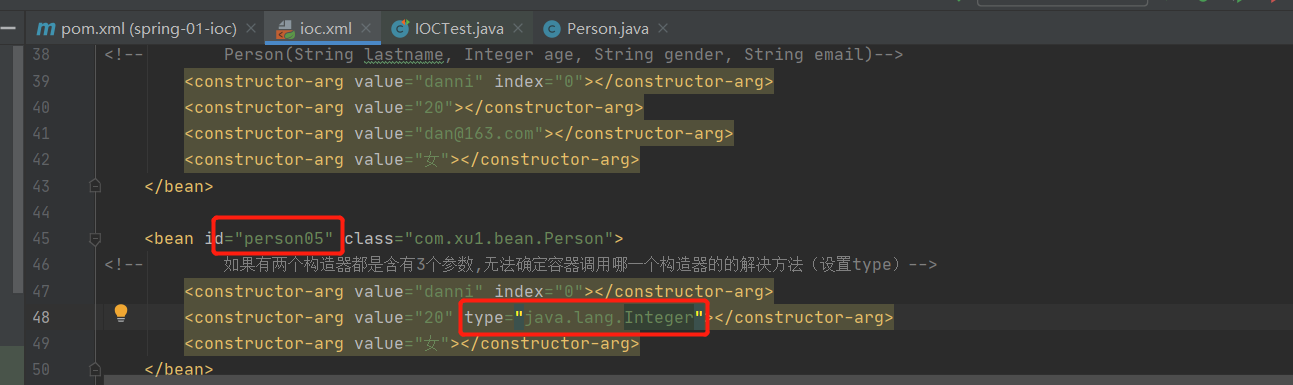

代码参考:
bean--person05:
    <bean id="person05" class="com.xu1.bean.Person">
<!--        如果有两个构造器都是含有3个参数,无法确定容器调用哪一个构造器的的解决方法(设置type)-->
        <constructor-arg value="danni" index="0"></constructor-arg>
        <constructor-arg value="20" type="java.lang.Integer"></constructor-arg>
        <constructor-arg value="女"></constructor-arg>
    </bean>
test:
   /**
     * 实验3:通过调用有参构造器完成对象的初始化工作
     *
     * @Description
     * @Author xu
     * @return
     * @throws
     * @Date 2022/5/3 20:46
     *
     */
    private ApplicationContext ioc2 = new ClassPathXmlApplicationContext("ioc.xml");
    @Test
    public void test03() {
        System.out.println("person03");
//        Person bean = (Person)ioc2.getBean("person03");
//        System.out.println(bean);
//        Person bean = (Person)ioc2.getBean("person04");
//        System.out.println(bean);
        Person bean = (Person)ioc2.getBean("person05");
        System.out.println(bean);
    }
第3部分:通过p名称空间为bean赋值--防止标签重复


bean组件:
<!--    通过p名称空间为bean赋值__防止标签重复-->
    <bean id="person06" class="com.xu1.bean.Person"
    p:age="20" p:email="lixinting@163.com" p:lastname="lixinting" p:gender="女"></bean>
test:
public class IOCTest {

    /**
     * 实验3:通过调用有参构造器完成对象的初始化工作
     *
     * @Description
     * @Author xu
     * @return
     * @throws
     * @Date 2022/5/3 20:46
     *
     */
    private ApplicationContext ioc2 = new ClassPathXmlApplicationContext("ioc.xml");
    @Test
    public void test03() {
        System.out.println("person03");
//        Person bean = (Person)ioc2.getBean("person03");
//        System.out.println(bean);
//        Person bean = (Person)ioc2.getBean("person04");
//        System.out.println(bean);
//        Person bean = (Person)ioc2.getBean("person05");
//        System.out.println(bean);
        Person bean = (Person)ioc2.getBean("person06");
        System.out.println(bean);
    }
输出结果:

第2章--IOC(容器)----第2部分
2-7 正确的为各种属性赋值,测试null(实验4)
创造复杂属性:
Car类:
package com.xu1.bean;

/**
 * @auther xu
 * @Description
 * @date 2022/5/4 - 9:35
 * @Modified By:
 */
public class Car {
    private String carName;
    private Integer price;
    private String color;

    public Car() {
    }

    public Car(String carName, Integer price, String color) {
        this.carName = carName;
        this.price = price;
        this.color = color;
    }

    public String getCarName() {
        return carName;
    }

    public void setCarName(String carName) {
        this.carName = carName;
    }

    public Integer getPrice() {
        return price;
    }

    public void setPrice(Integer price) {
        this.price = price;
    }

    public String getColor() {
        return color;
    }

    public void setColor(String color) {
        this.color = color;
    }

    @Override
    public String toString() {
        return "Car{" +
                "carName='" + carName + '\'' +
                ", price=" + price +
                ", color='" + color + '\'' +
                '}';
    }
}
Book类:
package com.xu1.bean;

/**
 * @auther xu
 * @Description
 * @date 2022/5/4 - 9:28
 * @Modified By:
 */
public class Book {
    private String bookName;
    private String author;

    public Book() {

    }

    public Book(String bookName, String author) {
        this.bookName = bookName;
        this.author = author;
    }

    public String getBookName() {
        return bookName;
    }

    public void setBookName(String bookName) {
        this.bookName = bookName;
    }

    public String getAuthor() {
        return author;
    }

    public void setAuthor(String author) {
        this.author = author;
    }

    @Override
    public String toString() {
        return "Book{" +
                "bookName='" + bookName + '\'' +
                ", author='" + author + '\'' +
                '}';
    }
}
Person类:
package com.xu1.bean;

import java.util.List;
import java.util.Map;
import java.util.Properties;

/**
 * @auther xu
 * @Description
 * @date 2022/5/3 - 15:02
 * @Modified By:
 */
public class Person {
    private String lastname;
    private Integer age;
    private String gender;
    private String email;


    private Car car;
    private List<Book> books;
    private Map<String,Object> maps;
    private Properties properties;

    public Car getCar() {
        return car;
    }

    public void setCar(Car car) {
        this.car = car;
    }

    public List<Book> getBooks() {
        return books;
    }

    public void setBooks(List<Book> books) {
        this.books = books;
    }

    public Map<String, Object> getMaps() {
        return maps;
    }

    public void setMaps(Map<String, Object> maps) {
        this.maps = maps;
    }

    public Properties getProperties() {
        return properties;
    }

    public void setProperties(Properties properties) {
        this.properties = properties;
    }

    public Person() {
//        System.out.println("验证在容器创建好的时候就已经实例化了对象");
    }

    public Person(String lastname, Integer age, String gender) {
        super();
        this.lastname = lastname;
        this.age = age;
        this.gender = gender;
        System.out.println("参数中间是age...");
    }
    public Person(String lastname, String email, String gender) {
        super();
        this.lastname = lastname;
        this.gender = gender;
        this.email = email;
        System.out.println("参数中间是email...");
    }

    public Person(String lastname, Integer age, String gender, String email) {
        super();
        this.lastname = lastname;
        this.age = age;
        this.gender = gender;
        this.email = email;
        System.out.println("验证确实调用了有参构造器");
    }

    public String getLastname() {
        return lastname;
    }

    public void setLastname(String lastname) {
//        System.out.println("验证property标签,调用了set方法进行赋值为:"+lastname);
        System.out.println("验证调用了该方法完成对属性的赋值(lixinting):"+lastname);
        this.lastname = lastname;
    }

    public Integer getAge() {
        return age;
    }

    public void setAge(Integer age) {
        this.age = age;
    }

    public String getGender() {
        return gender;
    }

    public void setGender(String gender) {
        this.gender = gender;
    }

    public String getEmail() {
        return email;
    }

    public void setEmail(String email) {
        this.email = email;
    }

    @Override
    public String toString() {
        return "Person{" +
                "lastname='" + lastname + '\'' +
                ", age=" + age +
                ", gender='" + gender + '\'' +
                ", email='" + email + '\'' +
                ", car=" + car +
                ", books=" + books +
                ", maps=" + maps +
                ", properties=" + properties +
                '}';
    }
}
1.先对默认值进行测试:
ioc--bean-person01:
<?xml version="1.0" encoding="UTF-8"?>
<beans xmlns="http://www.springframework.org/schema/beans"
       xmlns:xsi="http://www.w3.org/2001/XMLSchema-instance"
       xsi:schemaLocation="http://www.springframework.org/schema/beans http://www.springframework.org/schema/beans/spring-beans.xsd">


    <bean id="person01" class="com.xu1.bean.Person">

    </bean>
</beans>
属性默认为null:

如果属性有值:如果我需要将该默认值(三国演义)赋值为null,该如何做

可验证如上说法:

解决:只需要名称,然后在property标签中对该对象中对应的名称进行赋值
<!--
实验4:正确的为各种属性赋值
测试使用null值,
引用类型赋值(引用其他bean,引用内部bean)
集合类型赋值(List,Map,Properties),
util名称空间的创建集合类型bean
-->
    <bean id="person01" class="com.xu1.bean.Person">
        <!--    进行赋值的赋值    -->
        <property name="lastname" >
            <null/>
        </property>
    </bean>

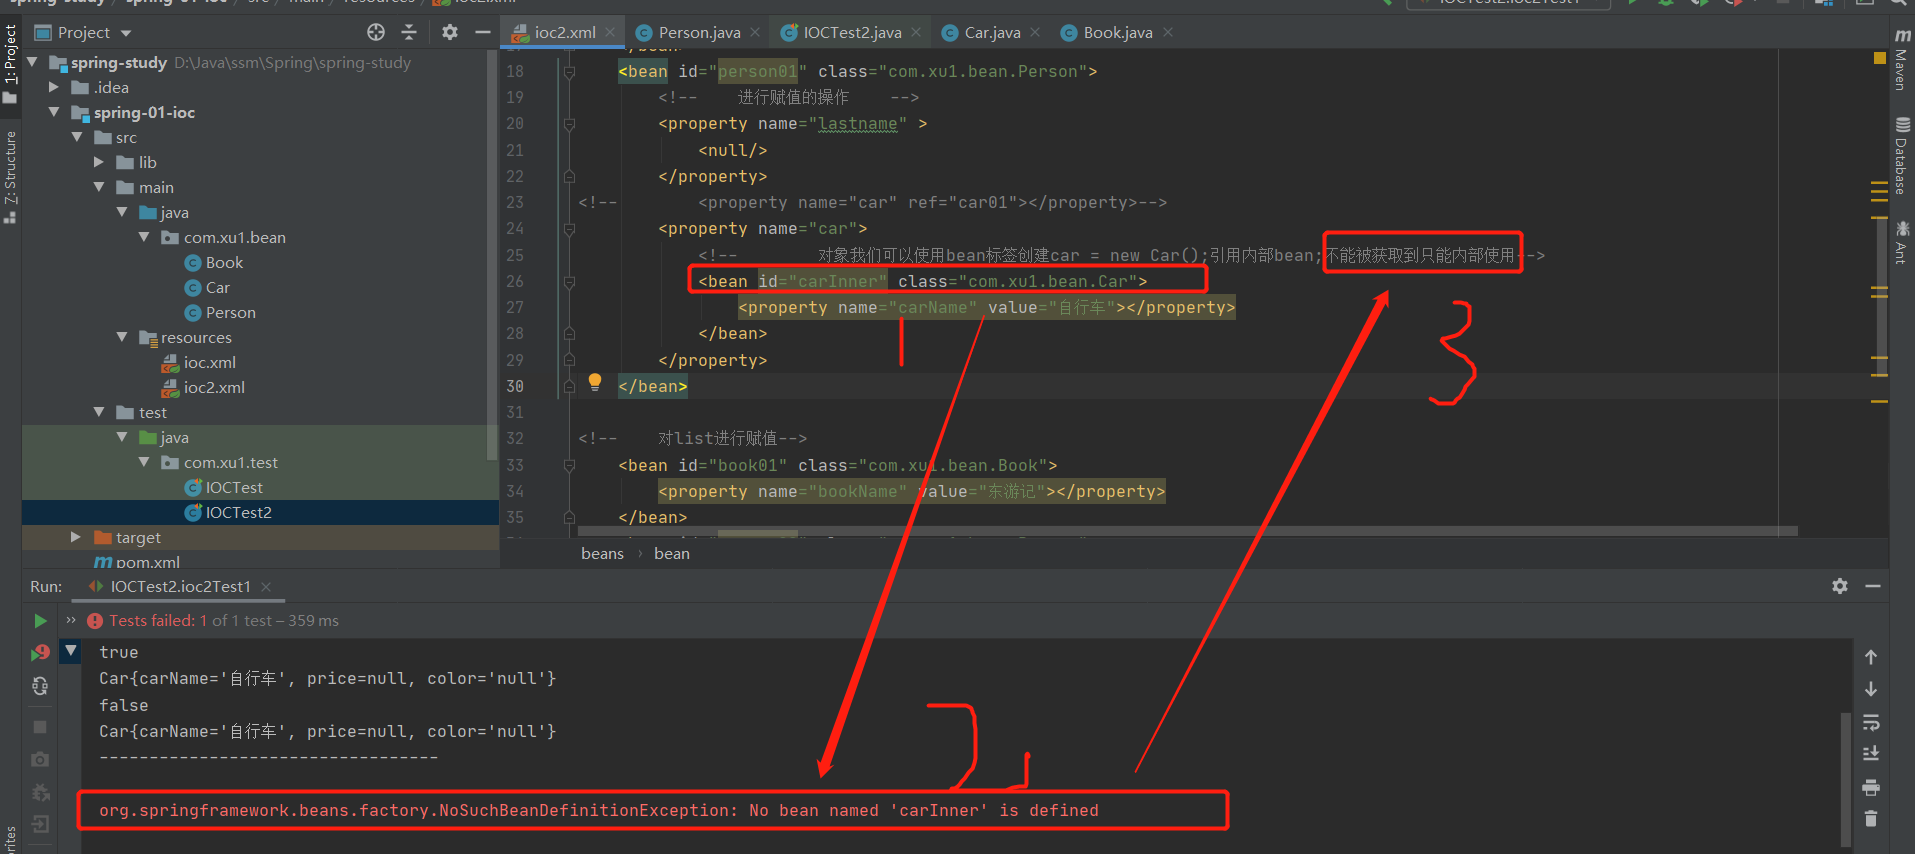
2.正确的为各种属性赋值--ref引用外部的值(引用外部的bean)
<bean id="car01" class="com.xu1.bean.Car">
    <property name="carName" value="宝马"></property>
    <property name="color" value="red"></property>
    <property name="price" value="500000"></property>
</bean>
<bean id="person01" class="com.xu1.bean.Person">
    <!--    进行赋值的赋值    -->
    <property name="lastname" >
        <null/>
    </property>
    <property name="car" ref="car01"></property>
</bean>
test结果:


3.引用内部bean


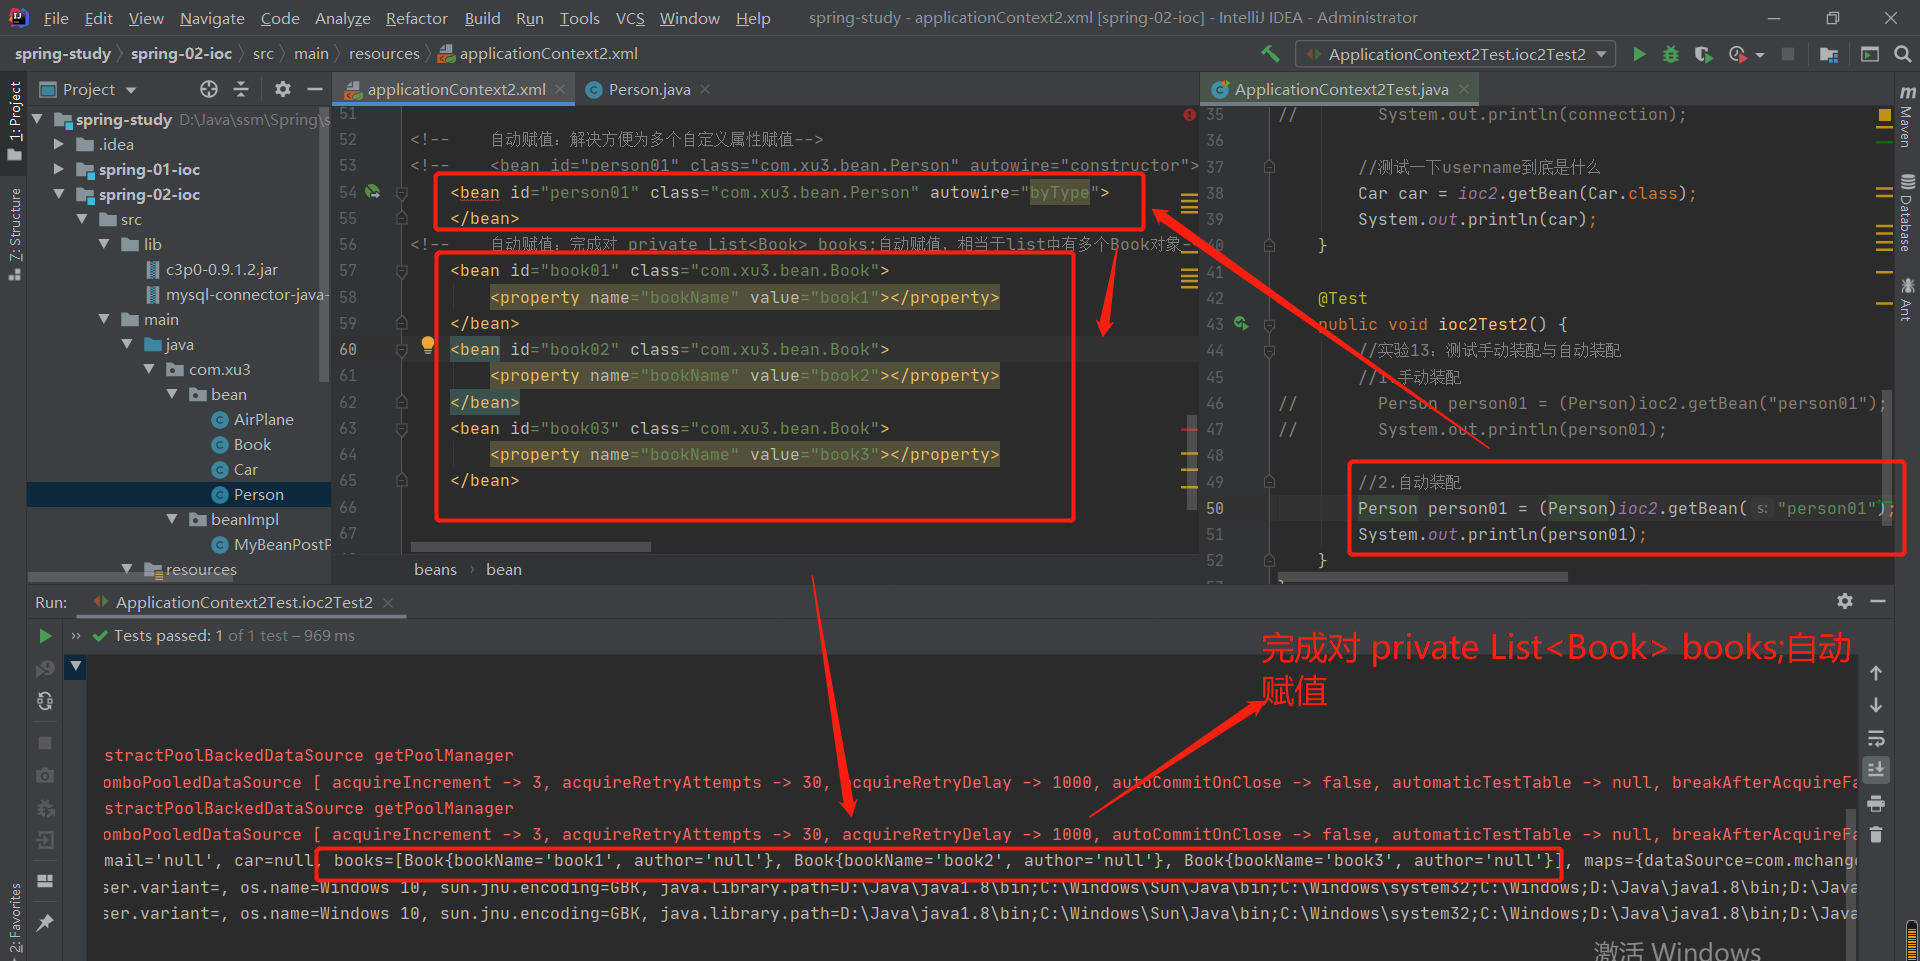
4.为list属性赋值
<!--    对list进行赋值-->
    <bean id="book01" class="com.xu1.bean.Book">
        <property name="bookName" value="东游记"></property>
    </bean>
    <bean id="person02" class="com.xu1.bean.Person">
        <property name="books">
        <!--     list标签中添加每一个元素       -->
            <list>
                <bean class="com.xu1.bean.Book" p:bookName="西游记" p:author="吴承恩"></bean>
                <!--  引用外部的一个元素-->
                <ref bean="book01"/>
            </list>
        </property>
    </bean>
test结果:

5. 为map属性赋值
<property name="maps">
    <!--private Map<String,Object> maps = new LinkedHashMap(为map进行赋值)-->
    <map>
    <!--    一个entry代表一个键值对   -->
        <entry key="key01" value="张三"></entry>
        <entry key="key02" value="18"></entry>
        <entry key="key03" value-ref="book01"></entry>
        <entry key="key04">
            <bean class="com.xu1.bean.Car">
                <property name="carName" value="宝马"></property>
            </bean>
        </entry>
        <entry key="key05">
            <!--   key里面还能设置map     -->
            <map></map>
        </entry>
    </map>
</property>
test结果:

6.为Properties properties类型赋值
<property name="properties">
<!--   相当于properties = new Properties();,其实和map大同小异,只不过key与value都是String类型   -->
    <props>
        <!--  key与value都是String类型,写在标签体中即可 -->
        <prop key="username">root</prop>
        <prop key="password">1234</prop>
    </props>
</property>

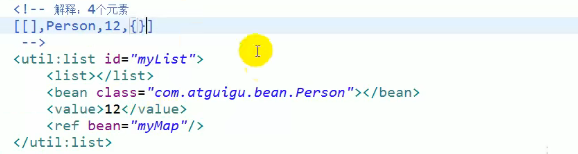
7.util名称空间可以创建一个外部引用的集合

8.util名称空间创建集合类型的bean:方便别人引用
<!--    util名称空间创建集合类型的bean:方便别人引用-->
    <!--  相当于new LinkedHashMap<>();  -->
    <util:map id="myMap">
        <!--    一个entry代表一个键值对   -->
        <entry key="key01" value="张三"></entry>
        <entry key="key02">
            <value>18</value>
        </entry>
        <entry key="key03" value-ref="book01"></entry>
        <entry key="key04">
            <bean class="com.xu1.bean.Car">
                <property name="carName" value="宝马"></property>
            </bean>
        </entry>
        <entry key="key05">
            <!--   key里面还能设置map     -->
            <map></map>
        </entry>
    </util:map>
    <bean id="person03" class="com.xu1.bean.Person">
        <property name="maps" ref="myMap"></property>
    </bean>
test结果:


补充:同样适用于list
9.为级联属性赋值
<!--级联属性赋值,属性的属性-->
    <bean id="person04" class="com.xu1.bean.Person">
        <!--  为car赋值的时候改变car的价格  -->
        <property name="car" ref="car01"></property>
        <property name="car.price" value="300000"></property>
    </bean>

2-8 实验五:配置通过静态工厂方法创建的bean,实例工厂方法创建的bean,FactoryBean(重点)
2-8-1:准备:

AirPlane.java
package com.xu1.bean;

/**
 * @auther xu
 * @Description
 * @date 2022/5/5 - 10:27
 * @Modified By:
 */
public class AirPlane {
    private String yc;//机翼的长度
    private Integer personNum;//载客量
    private String jzName;//机长name
    private String fjsName;//副驾驶name

    public AirPlane() {
    }

    public AirPlane(String yc, Integer personNum, String jzName, String fjsName) {
        this.yc = yc;
        this.personNum = personNum;
        this.jzName = jzName;
        this.fjsName = fjsName;
    }

    public String getYc() {
        return yc;
    }

    public void setYc(String yc) {
        this.yc = yc;
    }

    public Integer getPersonNum() {
        return personNum;
    }

    public void setPersonNum(Integer personNum) {
        this.personNum = personNum;
    }

    public String getJzName() {
        return jzName;
    }

    public void setJzName(String jzName) {
        this.jzName = jzName;
    }

    public String getFjsName() {
        return fjsName;
    }

    public void setFjsName(String fjsName) {
        this.fjsName = fjsName;
    }

    @Override
    public String toString() {
        return "AirPlane{" +
                "yc='" + yc + '\'' +
                ", personNum=" + personNum +
                ", jzName='" + jzName + '\'' +
                ", fjsName='" + fjsName + '\'' +
                '}';
    }
}
AirPlaneInstanceFactory.java:
package com.xu2.factory;

import com.xu1.bean.AirPlane;

/**
 * @auther xu
 * @Description 实例工厂
 * @date 2022/5/5 - 10:35
 * @Modified By:
 */
public class AirPlaneInstanceFactory {
    //new AirPlaneInstanceFactory().getAirPlane()
    public static AirPlane getAirPlane(String jzName) {
        System.out.println("AirPlaneInstanceFactory工厂正在为你造飞机");
        AirPlane airPlane = new AirPlane();
        airPlane.setJzName(jzName);
        airPlane.setFjsName("zhang3");
        airPlane.setPersonNum(300);
        airPlane.setYc("100.0m");
        return airPlane;
    }
}
AirPlaneStaticFactory.java
package com.xu2.factory;

import com.xu1.bean.AirPlane;

/**
 * @auther xu
 * @Description 静态工厂
 * @date 2022/5/5 - 10:35
 * @Modified By:
 */
public class AirPlaneStaticFactory {
    //AirPlaneStaticFactory.getAirPl()
    public static AirPlane getAirPlane(String jzName) {
        System.out.println("AirPlaneStaticFactory工厂正在为你造飞机");
        AirPlane airPlane = new AirPlane();
        airPlane.setJzName(jzName);
        airPlane.setFjsName("zhang3");
        airPlane.setPersonNum(300);
        airPlane.setYc("100.0m");
        return airPlane;
    }
}
实验5简单说明:
<!--    实验5:通过配置静态工厂方法创建bean,实例工厂方法创建bean,FactoryBean-->

<!--    bean默认创建实例是该框架利用反射技术实现 -->
<!--    <bean id="airPlane01" class="com.xu1.bean.AirPlane">-->
<!--        <property name="jzName" value="li4"></property>-->
<!--    </bean>-->

<!--
接下来===工厂模式:工厂帮我们创建对象;有一个专门帮我们创建对象的类,这个类就是工厂
AirPlane ap = AirPlaneFactory.getAirPlane(String jzName);
动态工厂:获取对象必须通过new来获取对象
静态工厂:获取对象时直接通过类名调用方法名来得到一个实例化对象
-->
2-8-2:配置通过静态工厂方法创建bean
<!--
1.静态工厂创建对象
class:指定静态工厂方法全类名
factory-method:指定具体的哪一个静态方法
constructor-arg:如果该静态方法需要参数,通过该表标签给参数赋值
-->
    <bean id="airPlane01" class="com.xu2.factory.AirPlaneStaticFactory" factory-method="getAirPlane">
        <constructor-arg name="jzName" value="li4"></constructor-arg>
    </bean>

2-8-3: 配置通过动态工厂方法创建bean
<!--
2.实例工厂的使用
第1步:获取实例工厂所对应的对象
第2步:配置我们要创建的AirPlane使用哪一个工厂创建以及调用的方法
     1>:factory-bean(指定使用哪一个动态工厂方法)
     2>:factory-method(指定该工厂所对应的方法)
-->
    <bean id="AirPlaneInstanceFactory01" class="com.xu2.factory.AirPlaneInstanceFactory"></bean>

    <bean id="airPlane02" class="com.xu1.bean.AirPlane" factory-bean="AirPlaneInstanceFactory01" factory-method="getAirPlane">
       <constructor-arg name="jzName" value="wang5"></constructor-arg>
    </bean>
test结果:

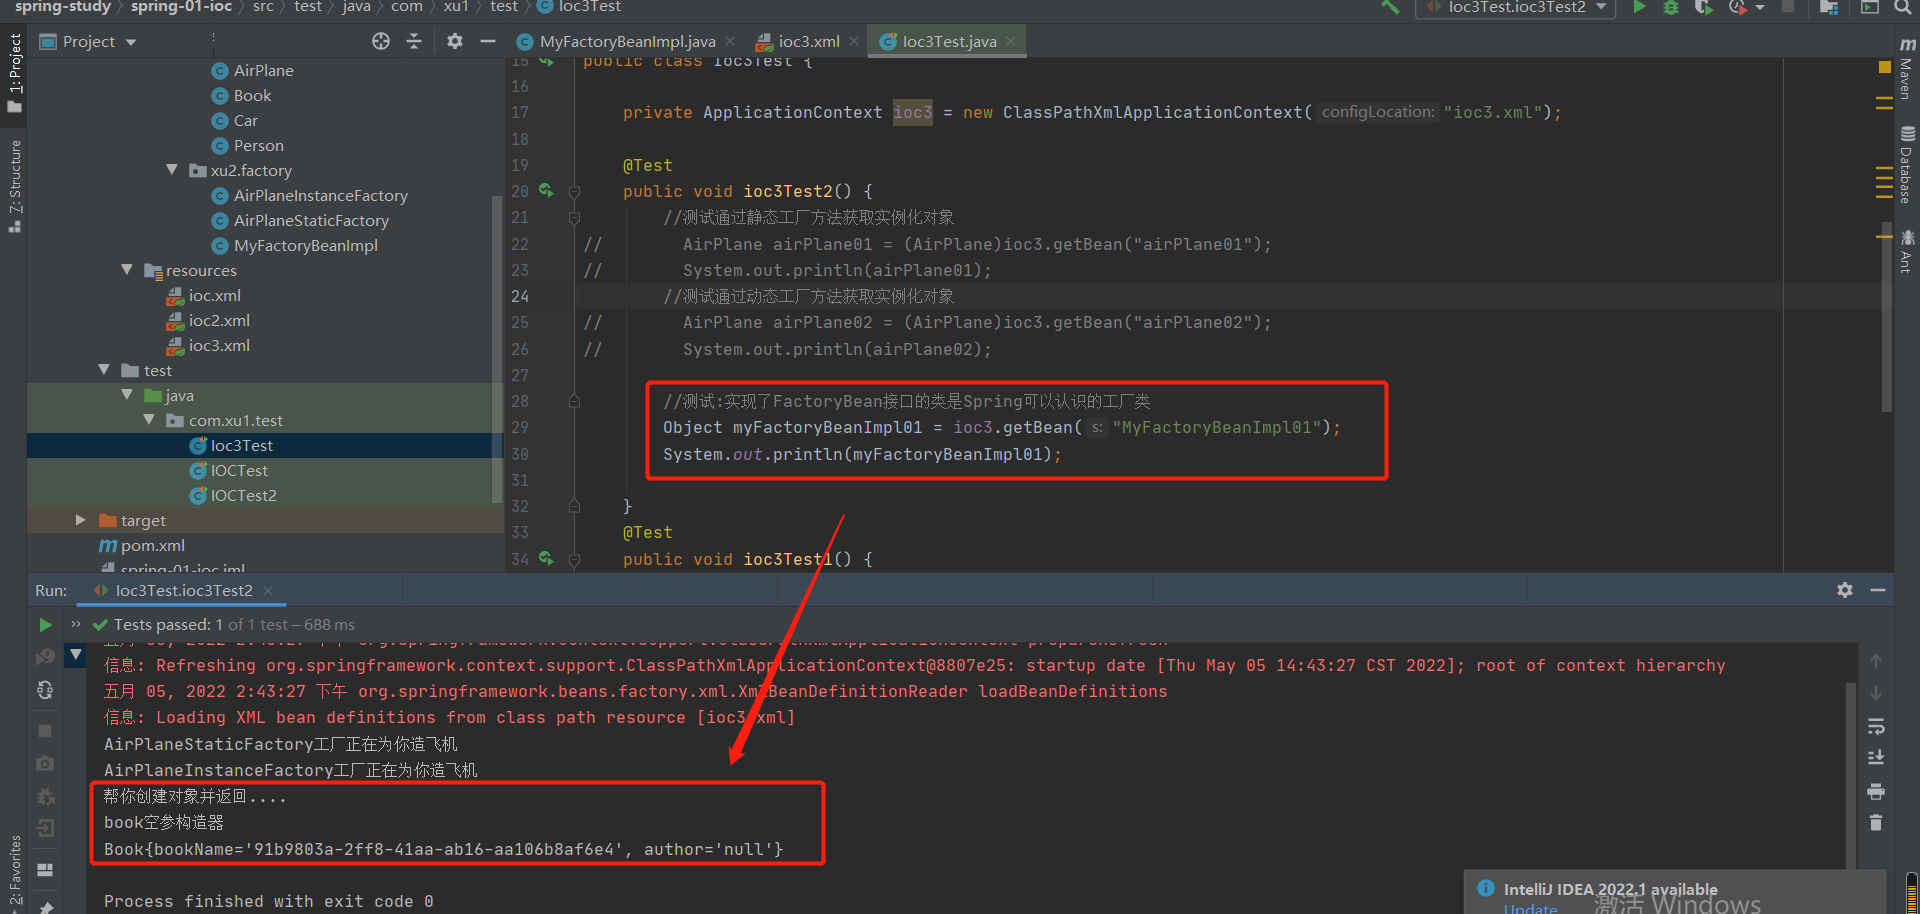
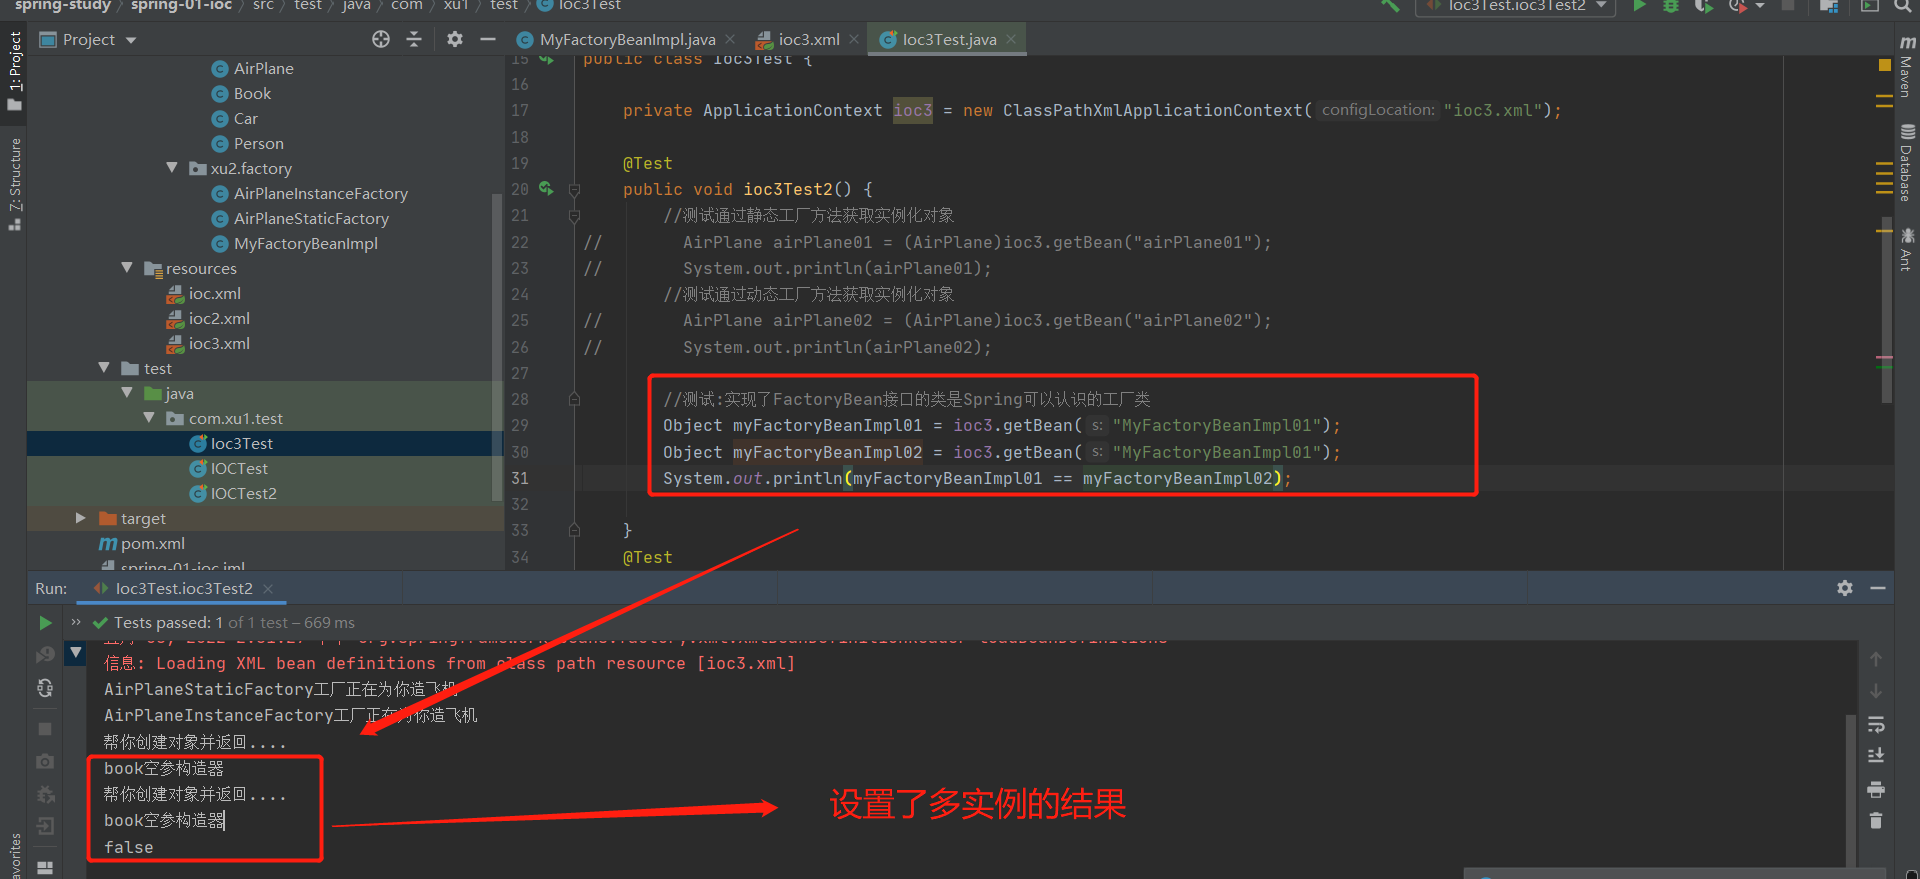
2-8-4:实现了FactoryBean接口的类是Spring可以认识的工厂类
1.实现了FactoryBean接口的工厂:
package com.xu2.factory;

import com.xu1.bean.Book;
import org.springframework.beans.factory.FactoryBean;

import java.util.UUID;

/**
 * @auther xu
 * @Description
 * 实现了FactoryBean接口的类是Spring可以认识的工厂类
 * Spring会自动的调用工厂方法创建实例
 *
 * 步骤:
 * 1.编写一个FactoryBean的实现类
 * 2.在Spring配置文件中进行注册
 * @date 2022/5/5 - 14:24
 * @Modified By:
 */
public class MyFactoryBeanImpl implements FactoryBean<Book> {

    /**
     *
     * @Description 工厂方法,返回创建的对象
     * @Author xu
     * @return
     * @throws
     * @Date 2022/5/5 14:25
     *
     */
    @Override
    public Book getObject() throws Exception {
        System.out.println("帮你创建对象并返回....");
        Book book = new Book();
        book.setBookName(UUID.randomUUID().toString() );
        return book;
    }

    /**
     *
     * @Description 返回创建的对象的类型
     * Spring会自动调用该方法来确定创建的对象是什么类型
     *
     * @Author xu
     * @return
     * @throws
     * @Date 2022/5/5 14:29
     *
     */
    @Override
    public Class<?> getObjectType() {
        return Book.class;
    }

    /**
     *
     * @Description
     * isSingleton:返回false不是单例,返回true是单例
     *
     * @Author xu
     * @return
     * @throws
     * @Date 2022/5/5 14:31
     *
     */
    @Override
    public boolean isSingleton() {
        return false;
    }
}
<!--
3.实现了FactoryBean接口的工厂
实现了FactoryBean接口的类是Spring可以认识的工厂类
 * Spring会自动的调用工厂方法创建实例
 *
 * 步骤:
 * 1.编写一个FactoryBean的实现类
 * 2.在Spring配置文件中进行注册

注意:如果设置了多实例,ioc容器启动的时候不会创建对象,获取的时候才创建对象
-->
    <bean id="MyFactoryBeanImpl01" class="com.xu2.factory.MyFactoryBeanImpl">

    </bean>
test结果:
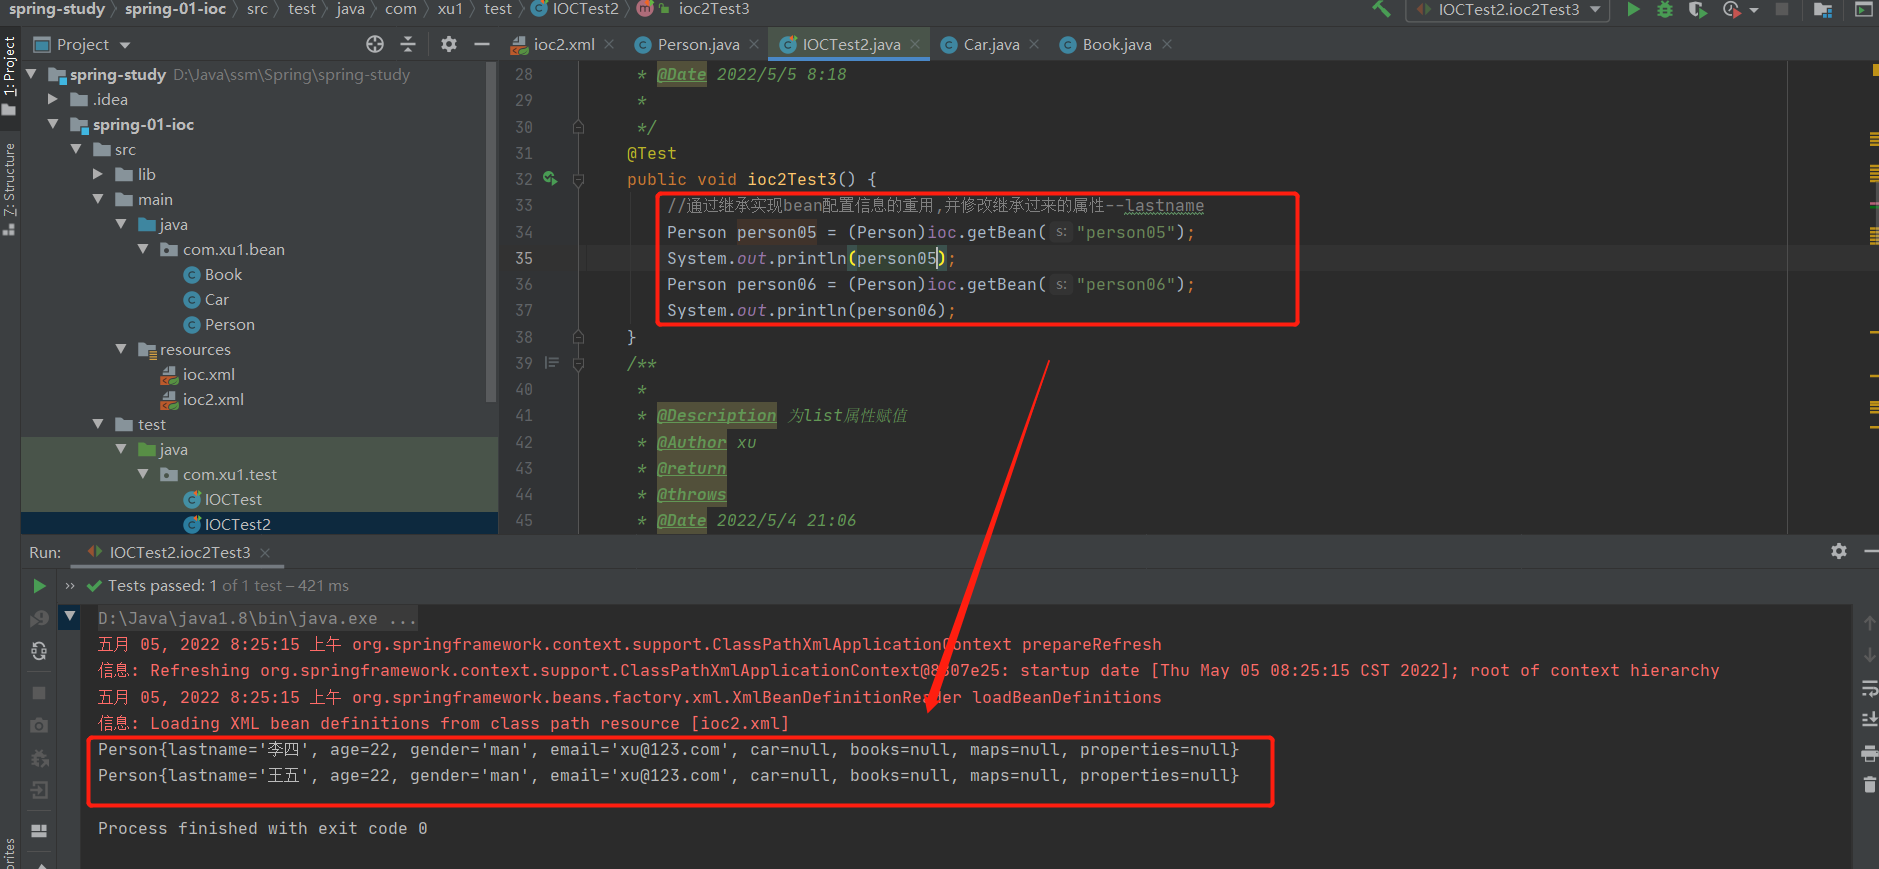
2-9 实验六,七:通过继承实现bean配置信息的重用,并修改继承过来的属性--lastname;设置abstract类型的bean
<!--    通过继承实现bean配置信息的重用-->
    <bean id="person05" class="com.xu1.bean.Person">
        <property name="lastname" value="李四"></property>
        <property name="age" value="22"></property>
        <property name="gender" value="man"></property>
        <property name="email" value="xu@123.com"></property>
    </bean>
    <!--  parent:指定当前bean配置信息继承于哪一个,既然是继承,class可以省略(一般不省略)  -->
    <bean id="person06" class="com.xu1.bean.Person" parent="person05">
        <!-- 修改继承过来的属性(lastname)  -->
        <property name="lastname" value="王五"></property>
    </bean>
test结果:
补充:
1.abstract="true" 将person05所对应的bean配置为抽象的,只能用来继承,不能获取实例对象
如下为实例化抽象的bean所报的错误:


2-10 实验8:bean之间的依赖
2-10-1 容器实例化时默认调用构造器的顺序


2-10-2:depends-on------调整调用构造器的顺序

2-11 实验9:bean作用域---创建单实例和多实例(重点)

2-11-1 创建单实例--singleton
<!-- 单实例 -->
<bean id="book01" class="com.xu1.bean.Book" scope="singleton"></bean>

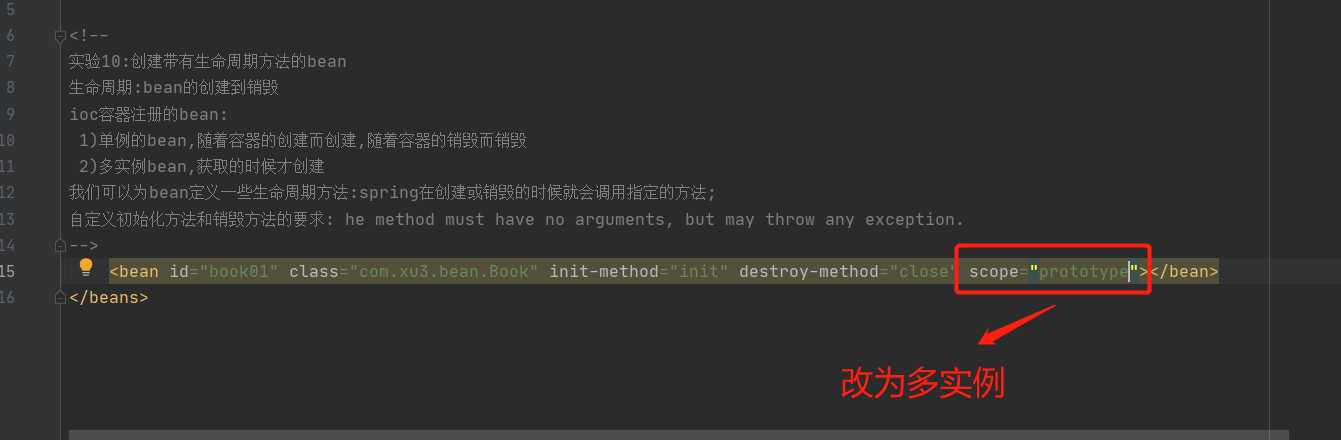
2-11-2 创建多实例--prototype
<!-- 多实例 -->
    <bean id="book01" class="com.xu1.bean.Book" scope="prototype"></bean>


2-12 实验10:创建带有生命周期方法的bean

2-12-1:单例:bean的生命周期-->:(容器启动)构造器--->初始化方法--->(容器关闭)销毁方法
<!--
实验10:创建带有生命周期方法的bean
生命周期:bean的创建到销毁
ioc容器注册的bean:
 1)单例的bean,随着容器的创建而创建,随着容器的销毁而销毁
 2)多实例bean,获取的时候才创建
我们可以为bean定义一些生命周期方法:spring在创建或销毁的时候就会调用指定的方法;
自定义初始化方法和销毁方法的要求: he method must have no arguments, but may throw any exception.
-->
    <bean id="book01" class="com.xu3.bean.Book" init-method="init" destroy-method="close"></bean>

test结果:

2-12-2:多实例bean的生命周期


2-13 实验11:设置bean的后置处理器
1.有初始化方法的bean(Book):
设置了处理器的bean执行顺序:容器启动(调用构造器)--postProcessBeforeInitialization---初始化方法---postProcessAfterInitialization---
容器关闭(销毁方法)

<!--
实验11:设置bean的后置处理器:BeanPostProcessor
Spring有一个接口,后置处理器:可以在bean的初始化前后调用方法
-->
    <bean id="book01" class="com.xu3.bean.Book" init-method="init" destroy-method="close"></bean>
    <bean id="beanPostProcessor" class="com.xu3.beanImpl.MyBeanPostProsessor"></bean>
后置处理器的实现类:
package com.xu3.beanImpl;

import org.springframework.beans.BeansException;
import org.springframework.beans.factory.config.BeanPostProcessor;

/**
 * @auther xu
 * @Description
 * 使用步骤:
 * 1.编写后置处理器的实现类
 * 2.将后置处理器注册在配置文件中
 * @date 2022/5/5 - 15:44
 * @Modified By:
 */
public class MyBeanPostProsessor implements BeanPostProcessor {

    /**
     *
     * @Description
     * BeforeInitialization:初始化之前调用
     * @Author xu
     * @return
     * @throws
     * @Date 2022/5/5 15:52
     *
     */
    public Object postProcessBeforeInitialization(Object bean, String beanName) throws BeansException {
        System.out.println("postProcessBeforeInitialization方法调用了"+"["+beanName+"]bean将要调用初始化方法,该bean形式为:"+bean);

        //返回bean
        return bean;
    }

    /**
     *
     * @Description
     * AfterInitialization:初始化之后调用
     * String beanName:bean在xml中配置的id
     * @Author xu
     * @return
     * @throws
     * @Date 2022/5/5 15:51
     *
     */
    public Object postProcessAfterInitialization(Object bean, String beanName) throws BeansException {
        System.out.println("postProcessAfterInitialization方法调用了"+"bean初始化方法调用完了...");
        return bean;
    }
}
test结果:

test2:如果bean(Car)没有初始化方法,也会执行处理器操作
总结:设置了处理器的bean执行顺序:容器启动(调用构造器)--postProcessBeforeInitialization----postProcessAfterInitialization---
<!--
实验11:设置bean的后置处理器:BeanPostProcessor
Spring有一个接口,后置处理器:可以在bean(Book)的初始化前后调用方法
如果bean(Car)没有初始化方法,也会执行处理器操作

-->
    <bean id="book01" class="com.xu3.bean.Book" init-method="init" destroy-method="close"></bean>
    <bean id="beanPostProcessor" class="com.xu3.beanImpl.MyBeanPostProsessor"></bean>

    <bean id="car01" class="com.xu3.bean.Car"></bean>

2-13 实验12:Spring管理连接池(重要)---数据库连接池是单例
1.获取连接池
是ComboPooledDataSource类型同样是DataSource类型:

application2.xml:
<?xml version="1.0" encoding="UTF-8"?>
<beans xmlns="http://www.springframework.org/schema/beans"
       xmlns:xsi="http://www.w3.org/2001/XMLSchema-instance"
       xsi:schemaLocation="http://www.springframework.org/schema/beans http://www.springframework.org/schema/beans/spring-beans.xsd">

<!--
实验12:引用外部属性文件
数据库连接池作为单实例是最好的;一个项目就一个连接池,连接池里面管理很多连接.连接是直接从连接池里面获取的.
可以让Spring帮我们创建连接池对象,管理连接池
-->
    <bean id="dataSource" class="com.mchange.v2.c3p0.ComboPooledDataSource">
        <property name="user" value="root"></property>
        <property name="password" value="draf19"></property>
        <property name="jdbcUrl" value="jdbc:mysql://localhost:3306/test"></property>
        <property name="driverClass" value="com.mysql.jdbc.Driver"></property>
    </bean>
</beans>
测试连接:
 @Test
    public void ioc2Test1() throws SQLException {
        //从容器中获取连接池
//        DataSource dataSource = (DataSource)ioc2.getBean("dataSource");
        DataSource dataSource = (DataSource)ioc2.getBean(ComboPooledDataSource.class);
        Connection connection = dataSource.getConnection();

        System.out.println(connection);
    }


2.引用外部属性文件--bean通过加载配置文件的方式获取获取连接的4个基本值,进而从数据库连接池中获取连接对象
1.所遇问题:Spring关键字--username

2.补充:username到底是什么
spring默认会优先加载系统环境变量,此时获取到的username的值实际上指的是当前计算机的用户名。而不是properties配置文件中指定的username的值。

text:


3.解决:为属性名添加一个前缀
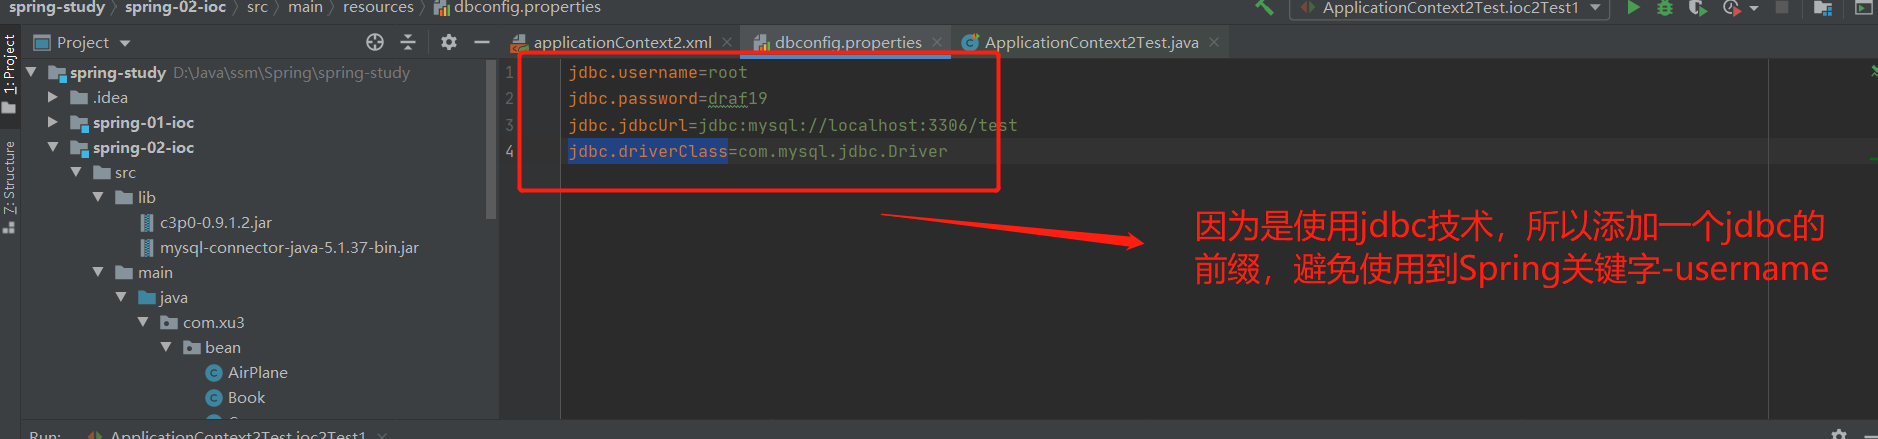

代码参考:
dbproperties.properties文件:
jdbc.username=root
jdbc.password=draf19
jdbc.jdbcUrl=jdbc:mysql://localhost:3306/test
jdbc.driverClass=com.mysql.jdbc.Driver
bean:
<!--
外部加载配置文件:
location="classpath:dbconfig.properties":表明加载的是当前类路径下的配置文件
-->
    <content:property-placeholder location="classpath:dbconfig.properties"></content:property-placeholder>
<!--    接下来就可以动态取出properties配置文件中某一个key所对应的值-->
    <bean id="dataSource02" class="com.mchange.v2.c3p0.ComboPooledDataSource">
        <property name="user" value="${jdbc.username}"></property>
        <property name="password" value="${jdbc.password}"></property>
        <property name="jdbcUrl" value="${jdbc.jdbcUrl}"></property>
        <property name="driverClass" value="${jdbc.driverClass}"></property>
    </bean>
    <bean id="car01" class="com.xu3.bean.Car">
        <property name="carName" value="${username}"></property>
    </bean>
test代码:
@Test
    public void ioc2Test1() throws SQLException {
        //从容器中获取连接池
//        DataSource dataSource = (DataSource)ioc2.getBean("dataSource");

//        DataSource dataSource = (DataSource)ioc2.getBean(DataSource.class);
//        Connection connection = dataSource.getConnection();
//        System.out.println(connection);

        //Bean通过加载配置文件的方式获取获取连接的4个基本值,进而从数据库连接池中获取连接对象
//        DataSource dataSource = (DataSource)ioc2.getBean("dataSource02",DataSource.class);
//        Connection connection = dataSource.getConnection();
//        System.out.println(connection);

        //测试一下username到底是什么
        Car car = ioc2.getBean(Car.class);
        System.out.println(car);

    }
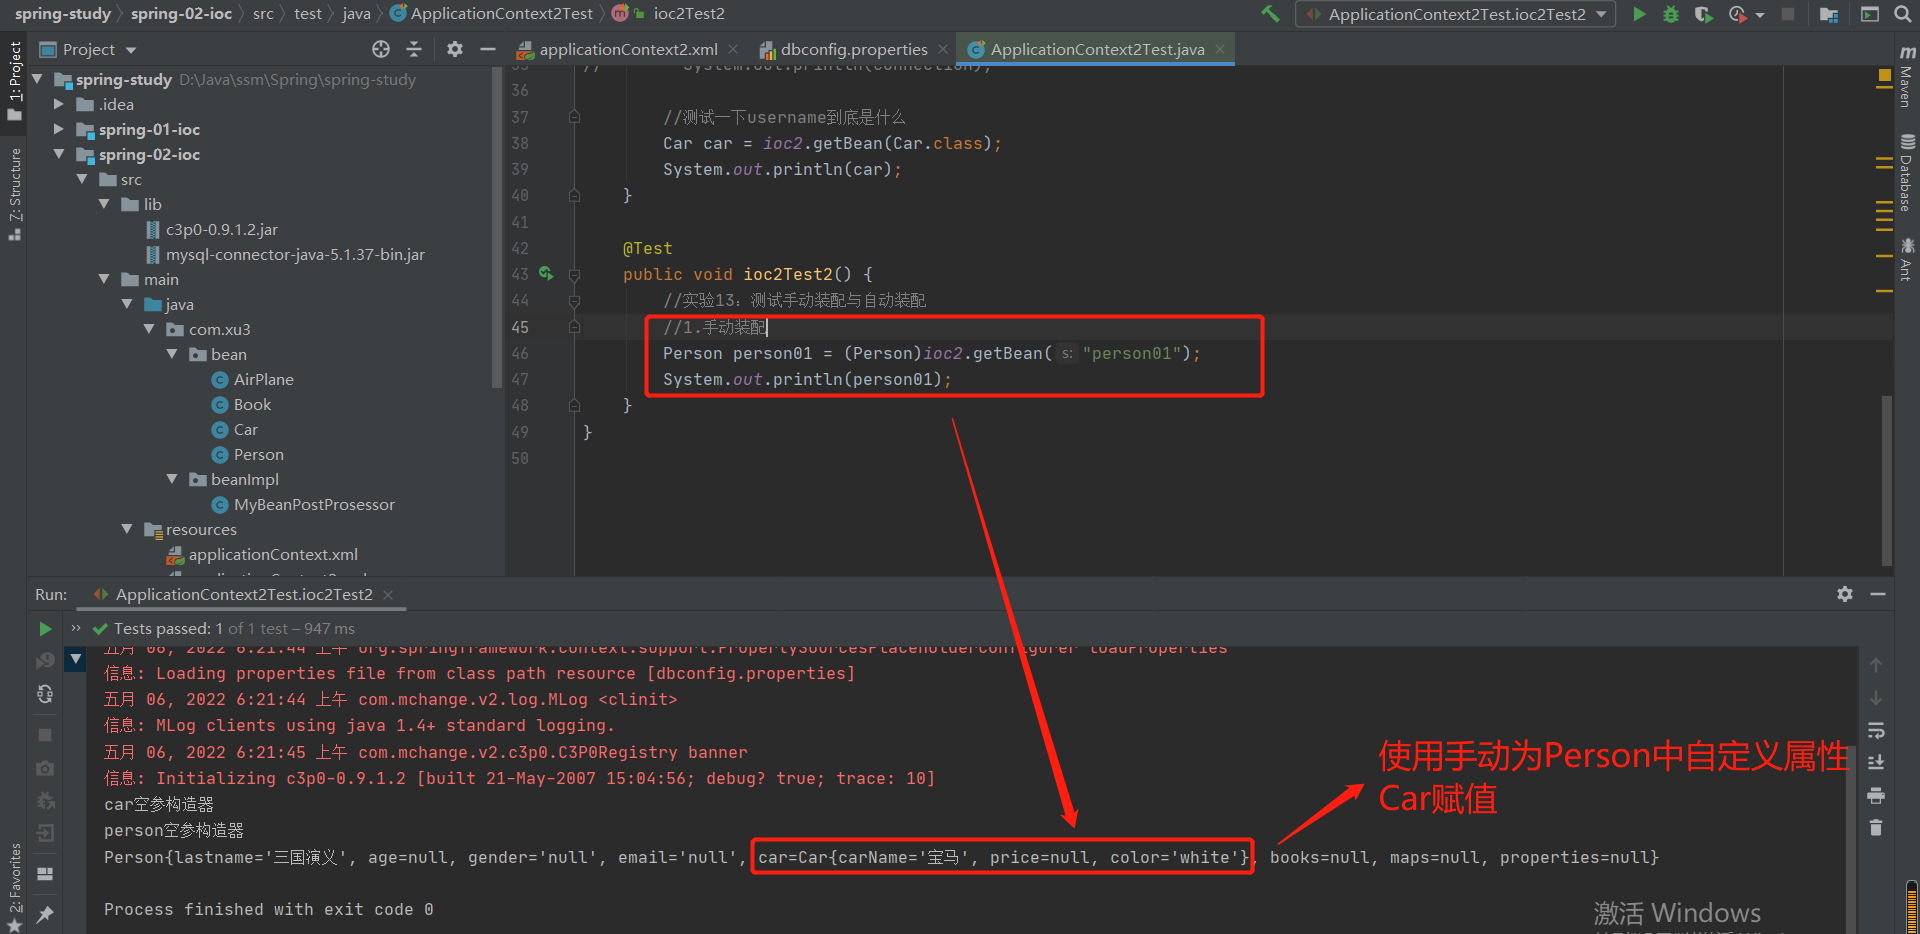
2-14 实验13:基于xml的自动装配---只针对自定义类型
1.基本使用--ref的手动装配
<!--    为Person里面的自定义类型的属性赋值-->
<!--    手动赋值:手动的为Person类中的自定义类型赋值(使用引用)-->
    <bean id="car02" class="com.xu3.bean.Car">
        <property name="carName" value="宝马"></property>
        <property name="color" value="white"></property>
    </bean>
    <bean id="person01" class="com.xu3.bean.Person">
        <property name="car" ref="car02"></property>
    </bean>
test结果:
2.自动装配
装配规则:
1.以属性名自动装配(eg:以Person类中的属性名car去自动装配)

失败实验:类属性名与组件属性名不一致导致自动装配的失败

解决:类属性名与组件属性名一致--successfu

2.以type自动装配


给list集合赋值
3.按照构造器进行赋值

1.类型
没有所对用类型的构造器:

有所对用类型的构造器:

2.类型装配失败,继续用id装配,id装配失败则赋值为空


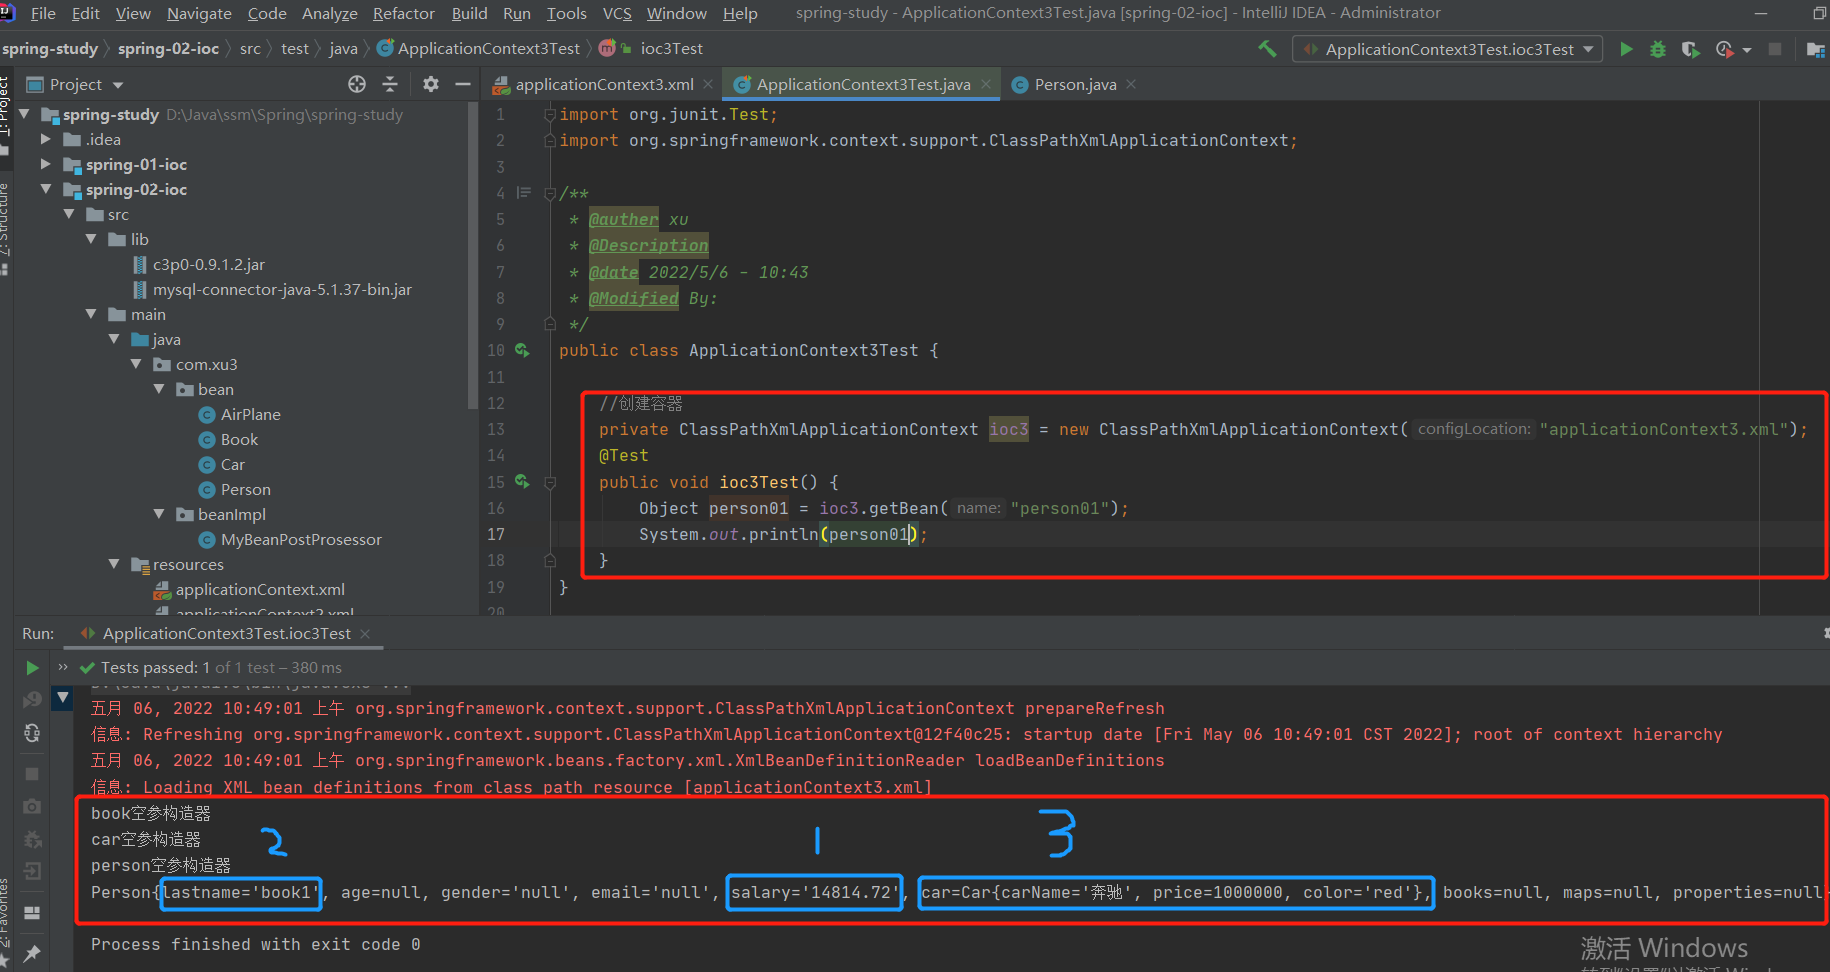
2-15 实验14:SpEL测试--Spring Expression Language

1.测试:
xml文件:
<?xml version="1.0" encoding="UTF-8"?>
<beans xmlns="http://www.springframework.org/schema/beans"
       xmlns:xsi="http://www.w3.org/2001/XMLSchema-instance" xmlns:p="http://www.springframework.org/schema/p"
       xsi:schemaLocation="http://www.springframework.org/schema/beans http://www.springframework.org/schema/beans/spring-beans.xsd">

    <bean id="book01" class="com.xu3.bean.Book">
        <property name="bookName" value="book1"></property>
    </bean>
    <bean id="car01" class="com.xu3.bean.Car" p:carName="奔驰" p:color="red" p:price="1000000"></bean>

    <bean id="person01" class="com.xu3.bean.Person">
<!--        使用字面量:以前是字符串,没法进行值的运算,现在可以在#{}里面进行值的运算-->
        <property name="salary" value="#{1234.56 *12}"></property>
<!--        引用其他bean的某个属性值(引用book01的bookName属性值)-->
        <property name="lastname" value="#{book01.bookName}"></property>
<!--       引用其他bean -->
        <property name="car" value="#{car01}"></property>

    </bean>
</beans>
Person类:
package com.xu3.bean;
import java.util.List;
import java.util.Map;
import java.util.Properties;
/**
* @auther xu
* @Description
* @date 2022/5/3 - 15:02
* @Modified By:
*/
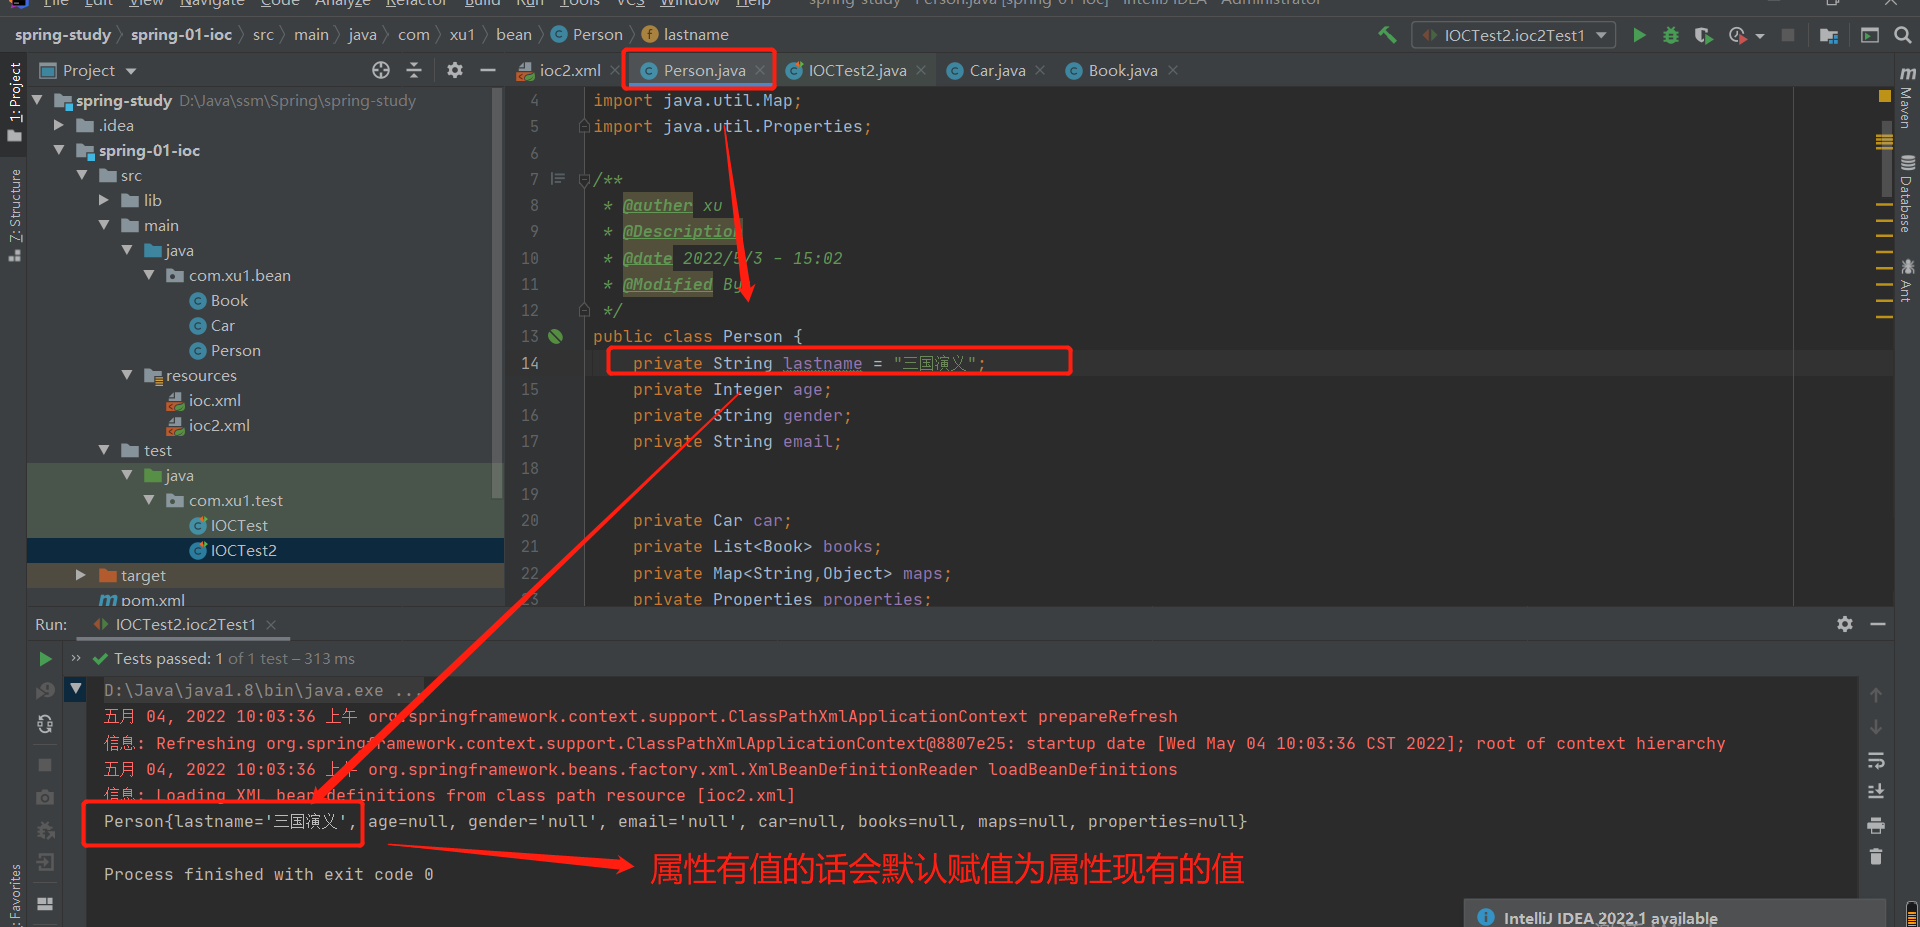
public class Person {
private String lastname = "三国演义";
private Integer age;
private String gender;
private String email;
private String salary;
public String getSalary() {
return salary;
}
public void setSalary(String salary) {
this.salary = salary;
}
private Car car;
private List<Book> books;
private Map<String,Object> maps;
private Properties properties;
public Car getCar() {
return car;
}
public void setCar(Car car) {
this.car = car;
}
public List<Book> getBooks() {
return books;
}
public void setBooks(List<Book> books) {
this.books = books;
}
public Map<String, Object> getMaps() {
return maps;
}
public void setMaps(Map<String, Object> maps) {
this.maps = maps;
}
public Properties getProperties() {
return properties;
}
public void setProperties(Properties properties) {
this.properties = properties;
}
public Person() {
// System.out.println("验证在容器创建好的时候就已经实例化了对象");
System.out.println("person空参构造器");
}
public Person(Car car) {
this.car = car;
}
public Person(String lastname, Integer age, String gender) {
super();
this.lastname = lastname;
this.age = age;
this.gender = gender;
System.out.println("参数中间是age...");
}
public Person(String lastname, String email, String gender) {
super();
this.lastname = lastname;
this.gender = gender;
this.email = email;
System.out.println("参数中间是email...");
}
public Person(String lastname, Integer age, String gender, String email) {
super();
this.lastname = lastname;
this.age = age;
this.gender = gender;
this.email = email;
System.out.println("验证确实调用了有参构造器");
}
public String getLastname() {
return lastname;
}
public void setLastname(String lastname) {
// System.out.println("验证property标签,调用了set方法进行赋值为:"+lastname);
// System.out.println("验证调用了该方法完成对属性的赋值(lixinting):"+lastname);
this.lastname = lastname;
}
public Integer getAge() {
return age;
}
public void setAge(Integer age) {
this.age = age;
}
public String getGender() {
return gender;
}
public void setGender(String gender) {
this.gender = gender;
}
public String getEmail() {
return email;
}
public void setEmail(String email) {
this.email = email;
}
@Override
public String toString() {
return "Person{" +
"lastname='" + lastname + '\'' +
", age=" + age +
", gender='" + gender + '\'' +
", email='" + email + '\'' +
", salary='" + salary + '\'' +
", car=" + car +
", books=" + books +
", maps=" + maps +
", properties=" + properties +
'}';
}
}
test结果:
2.调用静态方法和非静态方法规则以及test:

第2章---ioc容器--第3部分
2-16 实验15:通过注解分别创建Dao,Service,Controller(重要)
BookServlet.java:
package com.xu4.servlet;
import com.xu4.dao.BookDao;
import com.xu4.service.BookService;
import org.springframework.beans.factory.annotation.Autowired;
import org.springframework.beans.factory.annotation.Qualifier;
import org.springframework.stereotype.Controller;
import javax.annotation.Resource;
/**
* @auther xu
*
* @Description
* 属性的自动注入
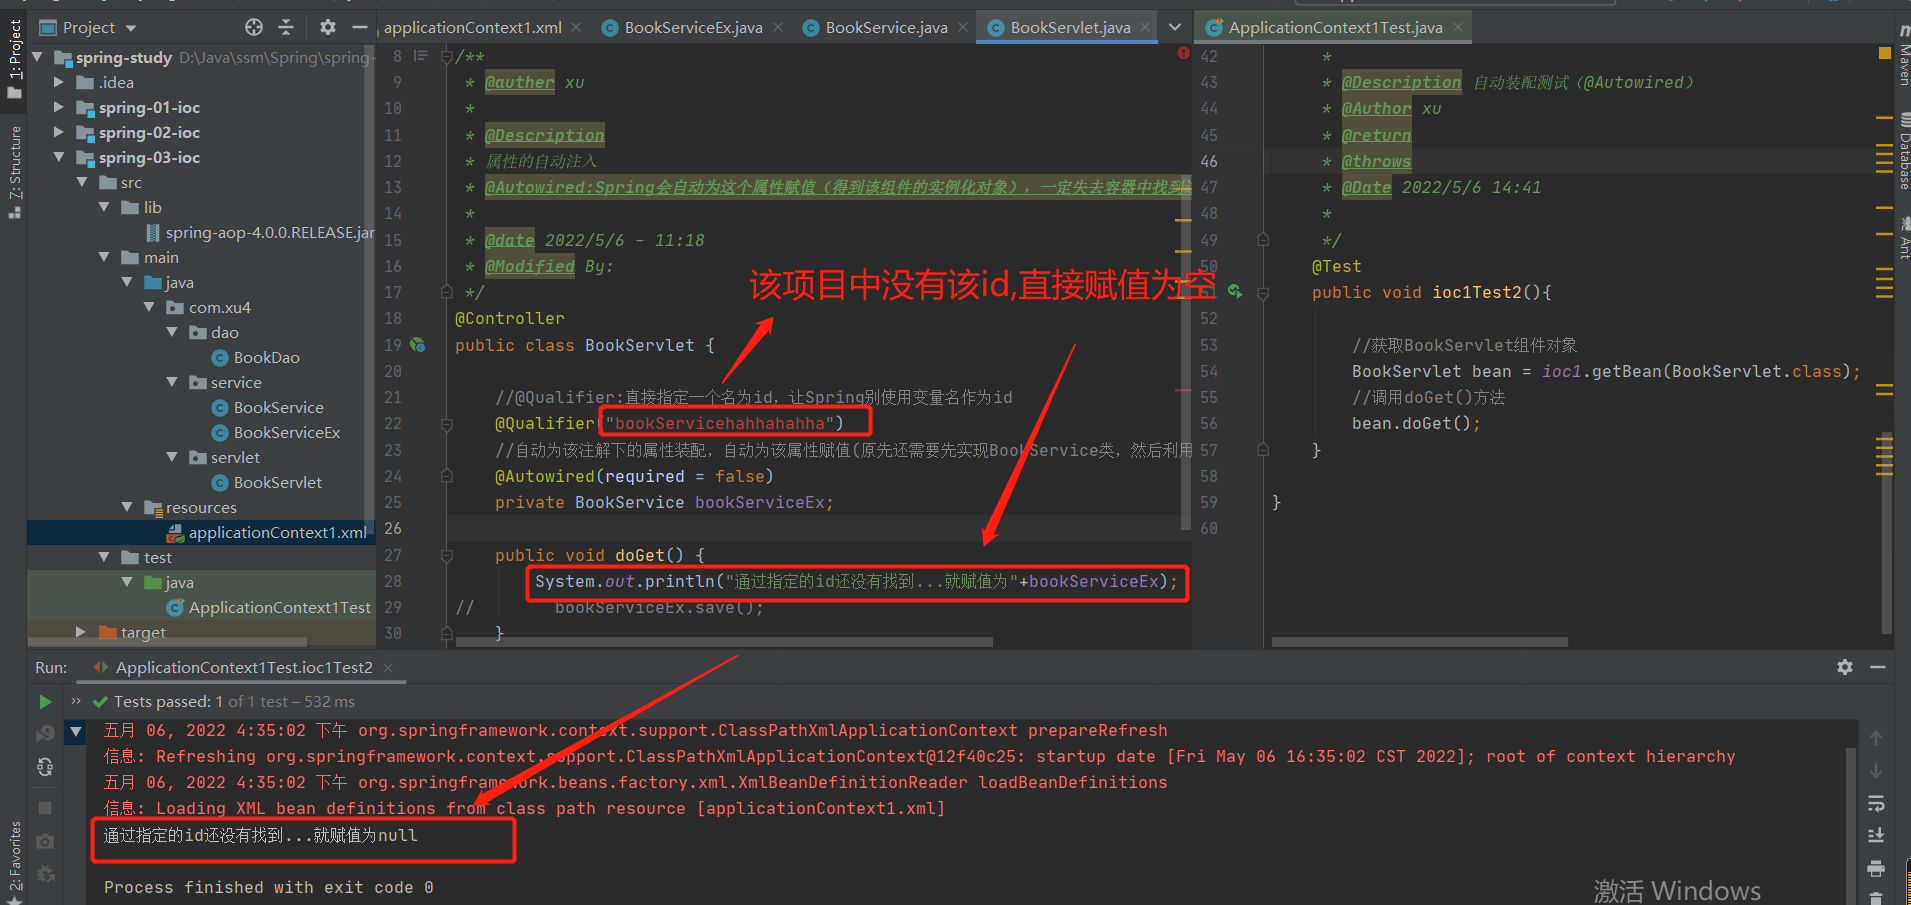
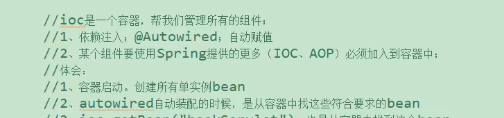
* @Autowired:Spring会自动为这个属性赋值(得到该组件的实例化对象),一定失去容器中找到这个属性对应的组件
*
* @date 2022/5/6 - 11:18
* @Modified By:
*/
@Controller
public class BookServlet {
//@Qualifier:直接指定一个名为id,让Spring别使用变量名作为id
// @Qualifier("bookServicehahhahahha")
//自动为该注解下的属性装配,自动为该属性赋值(原先还需要先实现BookService类,然后利用实现类的对象调用该方法)
// @Autowired
@Resource
private BookService bookServiceEx;
private BookDao bk;
public void doGet() {
System.out.println("通过指定的id还没有找到...就赋值为"+bookServiceEx);
// bookServiceEx.save();
}
/**
*
* @Description
* 方法上有@Autowired的方法
* 1.这个方法也会在bean创建的时候自动运行
* 2.这个方法上的每一个参数都会自动注入值
* @Author xu
* @Date 2022/5/6 20:15
*
*/
@Autowired
public void hahaha(BookDao bookDao,@Qualifier("bookService") BookService bookService1) {
System.out.println("Spring运行了这个方法。。。"+bookDao+"====>"+bookService1);
}
}
BookService.java:
package com.xu4.service;

import com.xu4.dao.BookDao;
import org.springframework.beans.factory.annotation.Autowired;
import org.springframework.stereotype.Service;

/**
 * @auther xu
 * @Description
 * @date 2022/5/6 - 11:18
 * @Modified By:
 */
@Service
public class BookService {

    @Autowired//自动为该属性装配
    private BookDao bookDao;
    public void save() {
        System.out.println("<bookservice>...正在调用dao帮你保存图书...");
        bookDao.saveBook();
    }
}
BookDao.java:
package com.xu4.dao;
import org.springframework.context.annotation.Scope;
import org.springframework.stereotype.Repository;
/**
* @auther xu
* @Description
* @date 2022/5/6 - 11:18
* @Modified By:
*/
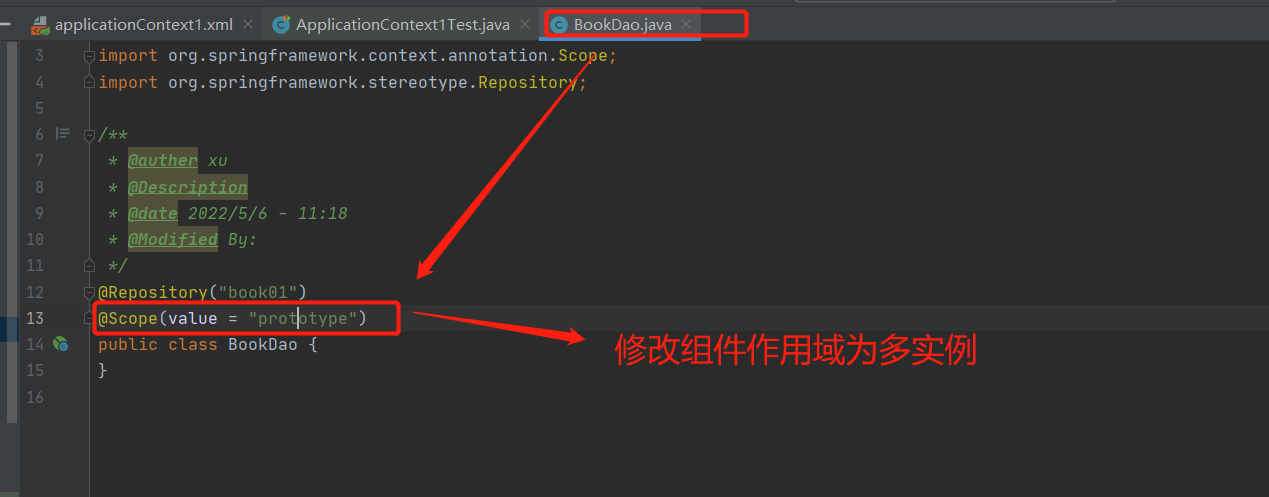
@Repository("book01")
//@Scope(value = "prototype")
public class BookDao {
public void saveBook() {
System.out.println("图书已经保存");
}
}
2-16-1:注解标签的说明以及使用规则

<?xml version="1.0" encoding="UTF-8"?>
<beans xmlns="http://www.springframework.org/schema/beans"
xmlns:xsi="http://www.w3.org/2001/XMLSchema-instance"
xmlns:context="http://www.springframework.org/schema/context"
xsi:schemaLocation="http://www.springframework.org/schema/beans http://www.springframework.org/schema/beans/spring-beans.xsd http://www.springframework.org/schema/context http://www.springframework.org/schema/context/spring-context.xsd">
<!--实验15:通过注解分别创建Dao,Service,Controller(重要)-->
<!--
使用注解将组件快速的加入到容器中需要一下几步:
1)给要添加的组件上标四个注解的任何一个
2)告诉Spring,自动扫描加了注解的组件;依赖context名称空间
3)一定要导入aop包,支持加注解模式的
-->
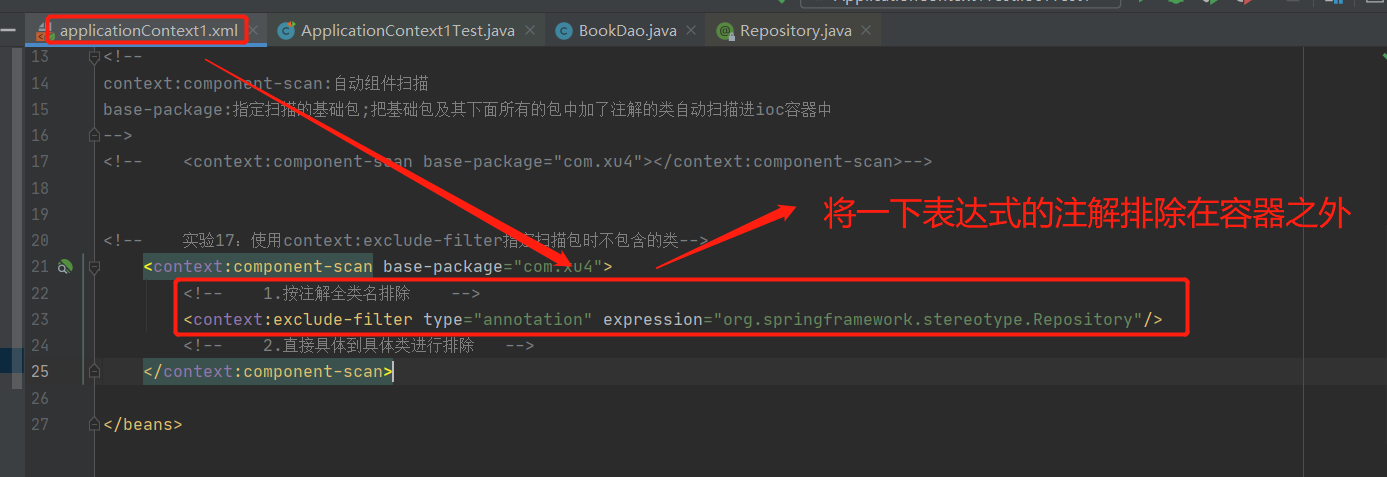
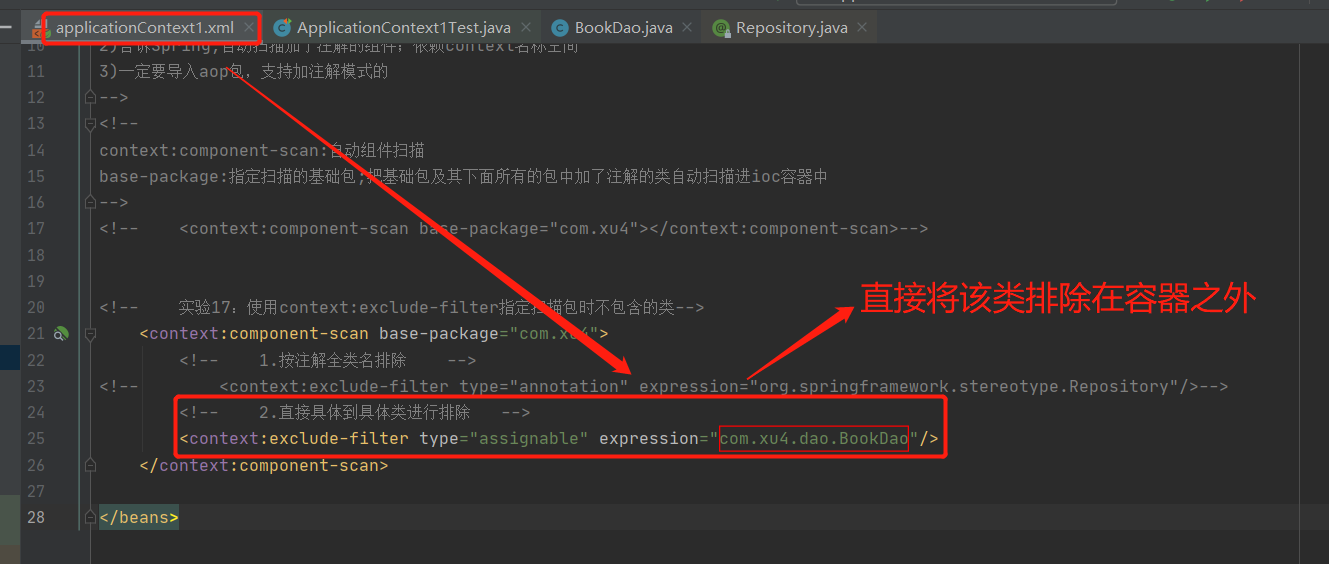
<!--
context:component-scan:自动组件扫描
base-package:指定扫描的基础包;把基础包及其下面所有的包中加了注解的类自动扫描进ioc容器中
-->
<context:component-scan base-package="com.xu4"></context:component-scan>
</beans>
import org.junit.Test;
import org.springframework.context.ApplicationContext;
import org.springframework.context.support.ClassPathXmlApplicationContext;

import java.sql.SQLException;

/**
 * @auther xu
 * @Description
 * @date 2022/5/5 - 17:24
 * @Modified By:
 */
public class ApplicationContext1Test {

    private static ApplicationContext ioc1 = new ClassPathXmlApplicationContext("applicationContext1.xml");
    /**
     *
     * @Description
     * 使用注解加入到容器中的组件和使用配置加入到容器中的组件行为是一样的
     * 1.组件的id,默认是组件的类名首字母小写
     * 2.组件的作用域,默认是单例的
     * @Author xu
     * @return
     * @throws
     * @Date 2022/5/6 11:47
     *
     */
    @Test
    public void ioc1Test1() {
        //获取加了注解的类扫描进容器中的组件对象:类型首字母小写
        Object bookDao1 = ioc1.getBean("bookDao");
        Object bookDao2 = ioc1.getBean("bookDao");
        System.out.println(bookDao1 == bookDao2);

        Object bookService = ioc1.getBean("bookService");
        Object bookServlet = ioc1.getBean("bookServlet");
    }


}

遇到问题:没有导入AOP包,运行也成功了

解决:我们虽然没有导入依赖,但是导入了jar包

2-16-2:可以直接在注解的后面更改组件所对应的id的名字


2-16-3:可以直接利用注解将组件的作用域修改为多实例

2-17 实验17:使用context:exclude-filter指定扫描时不包含的类

1.按注解全类名排除


2.直接具体到具体类进行排除

2-18: 实验16:使用context:exclude-filter指定扫描时不只包含的类

1.按注解全类名进行包含

2.直接具体到类进行包含。。。。(自己实验)
2-19:实验18:使用@Autowired注解实现--根据类型实现自动装配

代码参考:
BookServlet.java:
package com.xu4.servlet;

import com.xu4.service.BookService;
import org.springframework.beans.factory.annotation.Autowired;
import org.springframework.stereotype.Controller;

/**
 * @auther xu
 *
 * @Description
 * 属性的自动注入
 * @Autowired:Spring会自动为这个属性赋值(得到该组件的实例化对象),一定失去容器中找到这个属性对应的组件
 *
 * @date 2022/5/6 - 11:18
 * @Modified By:
 */
@Controller
public class BookServlet {

    @Autowired//自动为该注解下的属性装配,自动为该属性赋值(原先还需要先实现BookService类,然后利用实现类的对象调用该方法)
    private BookService bookService;

    public void doGet() {
        bookService.save();
    }
}
BookService.java:
package com.xu4.service;

import com.xu4.dao.BookDao;
import org.springframework.beans.factory.annotation.Autowired;
import org.springframework.stereotype.Service;

/**
 * @auther xu
 * @Description
 * @date 2022/5/6 - 11:18
 * @Modified By:
 */
@Service
public class BookService {

    @Autowired//自动为该属性装配
    private BookDao bookDao;
    public void save() {
        System.out.println("<bookservice>...正在调用dao帮你保存图书...");
        bookDao.saveBook();
    }
}
BookDao.java:
package com.xu4.dao;

import org.springframework.context.annotation.Scope;
import org.springframework.stereotype.Repository;

/**
 * @auther xu
 * @Description
 * @date 2022/5/6 - 11:18
 * @Modified By:
 */
@Repository("book01")
//@Scope(value = "prototype")
public class BookDao {
    public void saveBook() {
        System.out.println("图书已经保存");
    }
}
test结果:

2-20 实验19:如果资源类型的bean不止一个(拥有子类域父类关系的类)


test代码参考:
/**
 *
 * @Description 自动装配测试(@Autowired)
 * @Author xu
 * @return
 * @throws
 * @Date 2022/5/6 14:41
 *
 */
@Test
public void ioc1Test2(){

    //获取BookServlet组件对象
    BookServlet bean = ioc1.getBean(BookServlet.class);
    //调用doGet()方法
    bean.doGet();
}
2-21 实验20:根据成员变量名作为id还是找不到bean,可以使用@Qualifier注解直接指定想要的目标bean的id(重要)


2-22 实验21:@Autowired中的required属性,允许指定某一个属性不被设置
作用:保证自动装配的属性一定装配上,没有所对应的id,也将该属性赋值为null


通过给@Autowired注解设置required=false可以将其属性值赋值为null,避免报错:
实验22:方法上使用@Autowired,方法中的形式参数使用@Qualifier
1.@Autowired注解使用的范围:
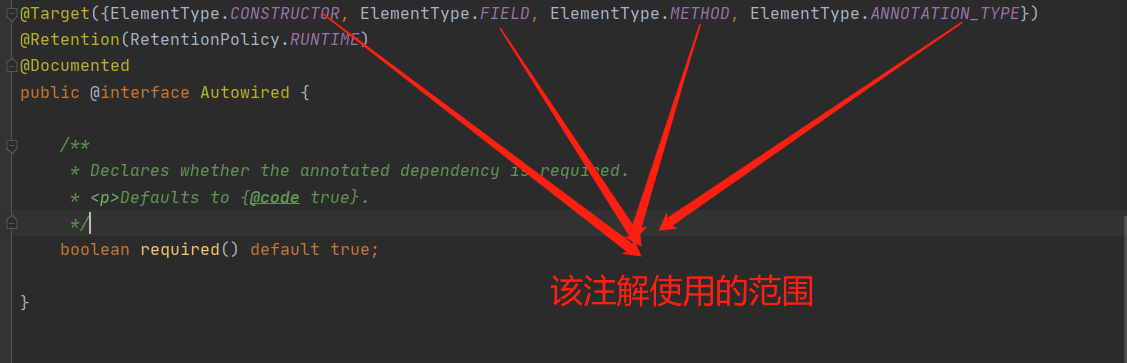
2.方法上使用@Autowired

注意:运用在方法上的@Autowired与运用在属性中一样---实现自动装配
3.对方法中的形式参数使用@Qualifier,为其自动装配,与对属性的自动装配一样

2-23:@Resource与@Autowired区别:


2-24 使用Spring单元测试


Spring测试类:
import com.xu4.servlet.BookServlet;

import org.junit.Test;
import org.junit.runner.RunWith;
import org.springframework.beans.factory.annotation.Autowired;
import org.springframework.context.ApplicationContext;
import org.springframework.test.context.ContextConfiguration;
import org.springframework.test.context.junit4.SpringJUnit4ClassRunner;

/**
 * @auther xu
 * @Description
 * @date 2022/5/6 - 20:56
 * @Modified By:
 */
@ContextConfiguration(locations = "classpath:applicationContext1.xml")//用于创建容器
@RunWith(SpringJUnit4ClassRunner.class)//使用单元测试模块
public class UseSpringJunit {
    private ApplicationContext ioc1 = null;

    @Autowired
    private BookServlet bookServlet;

    @Test
    public void test() {
        System.out.println(bookServlet);
    }
}
xml文件:
<?xml version="1.0" encoding="UTF-8"?>
<beans xmlns="http://www.springframework.org/schema/beans"
       xmlns:xsi="http://www.w3.org/2001/XMLSchema-instance"
       xmlns:context="http://www.springframework.org/schema/context"
       xsi:schemaLocation="http://www.springframework.org/schema/beans http://www.springframework.org/schema/beans/spring-beans.xsd http://www.springframework.org/schema/context http://www.springframework.org/schema/context/spring-context.xsd">
    <context:component-scan base-package="com.xu4"></context:component-scan>

</beans>
结果:


注意:
1.如果是在Junit测试中,无法实现想要一个组件对象就直接用,还是必须通过getBean();否则会导致无线创建容器,陷入死循环(创建容器---》创建组件--》创建容器---》。。。。死循环)。
2.该Spring测试执行的顺序:使用@ContextConfiguration(locations="")创建容器----》使用@Autowired注解注册组件,之后就可以使用了
2-25 实验23:使用泛型实现注解

test结果:

1.代码参考:

com.xu5.bean:
Book.java:
package com.xu5.bean;

/**
 * @auther xu
 * @Description
 * @date 2022/5/7 - 9:11
 * @Modified By:
 */
public class Book {
}
User.java:
package com.xu5.bean;

/**
 * @auther xu
 * @Description
 * @date 2022/5/7 - 9:13
 * @Modified By:
 */
public class User {
}
com.xu5.dao:
BaseDao.java
package com.xu5.dao;

/**
 * @auther xu
 * @Description
 * @date 2022/5/7 - 9:09
 * @Modified By:
 */
public abstract class BaseDao<T> {

    //模拟保存
    public abstract void save();
}
BookDao.java:
package com.xu5.dao;

import com.xu5.bean.Book;
import org.springframework.stereotype.Repository;

/**
 * @auther xu
 * @Description
 * @date 2022/5/7 - 9:09
 * @Modified By:
 */
@Repository
public class BookDao extends BaseDao<Book> {

    public void save() {
        System.out.println("保存图书。。。");
    }
}
UserDao.java
package com.xu5.dao;

import com.xu5.bean.User;
import org.springframework.stereotype.Repository;

/**
 * @auther xu
 * @Description
 * @date 2022/5/7 - 9:10
 * @Modified By:
 */
@Repository
public class UserDao extends BaseDao<User>{
    public void save() {
        System.out.println("保存用户。。。");
    }
}
com.xu5.Service:
BaseService.java:
package com.xu5.Service;

import com.xu5.dao.BaseDao;
import org.springframework.beans.factory.annotation.Autowired;

/**
 * @auther xu
 * @Description
 * @date 2022/5/7 - 9:19
 * @Modified By:
 */
public class BaseService<T> {
    @Autowired//加载到容器中(获取实例化对象)
    BaseDao<T> baseDao;

    public void save() {
        System.out.println("自动注入的dao:"+baseDao);
        baseDao.save();
    }
}
BookService.java:
package com.xu5.Service;

import com.xu5.bean.Book;
import com.xu5.dao.BookDao;
import org.springframework.beans.factory.annotation.Autowired;
import org.springframework.stereotype.Service;

/**
 * @auther xu
 * @Description
 * @date 2022/5/7 - 9:10
 * @Modified By:
 */
@Service
public class BookService extends BaseService<Book>{

}
UserService.java:
package com.xu5.Service;

import com.xu5.bean.User;
import com.xu5.dao.UserDao;
import org.springframework.beans.factory.annotation.Autowired;
import org.springframework.stereotype.Service;

/**
 * @auther xu
 * @Description
 * @date 2022/5/7 - 9:10
 * @Modified By:
 */
@Service
public class UserService extends BaseService<User>{

}
applicationContext1.xml:
<?xml version="1.0" encoding="UTF-8"?>
<beans xmlns="http://www.springframework.org/schema/beans"
       xmlns:xsi="http://www.w3.org/2001/XMLSchema-instance"
       xmlns:Context="http://www.springframework.org/schema/context"
       xsi:schemaLocation="http://www.springframework.org/schema/beans http://www.springframework.org/schema/beans/spring-beans.xsd http://www.springframework.org/schema/context http://www.springframework.org/schema/context/spring-context.xsd">

    <Context:component-scan base-package="com.xu5"></Context:component-scan>
</beans>
2.泛型依赖注入原理

3.带泛型的父类类型


2-26 总结:

第3章---AOP(第1部分)
3-1 AOP场景理解:核心代码与日志记录相结合理解


3-2 动态代理加日志总结:
LogUtils.java:
package com.xu5.utils;

import java.lang.reflect.Method;
import java.util.Arrays;

/**
 * @auther xu
 * @Description
 * @date 2022/5/8 - 20:34
 * @Modified By:
 */
public class LogUtils {
    public static void logStart(Method method, Object... args) {
        System.out.println(""+method.getName()+"方法执行了,其参数为"+ Arrays.asList(args) +"");
    }
    public static void logReturn(Method method,Object result) {
        System.out.println("["+method.getName()+"]方法执行完成,计算结果为:"+result);
    }

    public static void logException(Method method, Exception e) {
        System.out.println("["+method.getName()+"]出现异常,并且异常信息为:"+e.getCause());
    }

    public static void logEnd(Method method) {
        System.out.println("["+method.getName()+"]方法执行结束");
    }
}
CalculatorProxy.java:
package com.xu5.proxy;

import com.xu5.inter.Calculator;
import com.xu5.utils.LogUtils;

import java.lang.reflect.InvocationHandler;
import java.lang.reflect.InvocationTargetException;
import java.lang.reflect.Method;
import java.lang.reflect.Proxy;
import java.util.Arrays;

/**
 * @auther xu
 * @Description
 * @date 2022/5/7 - 11:25
 * @Modified By:
 */
public class CalculatorProxy {

  /**
   *
   * @Description
   * 为传入的参数对象创建一个动态代理对象
   *
   * Calculator calculator:被代理对象;(王宝强)
   * 返回:宋喆
   *
   * @param calculator
   * @Author xu
   * @return
   * @throws
   * @Date 2022/5/7 11:32
   *
   */
    public static Calculator getProxy(final Calculator calculator) {

      //定义被代理类的类加载器
      ClassLoader classLoader = calculator.getClass().getClassLoader();
      //被代理类要实现的接口列表
      Class<?>[] classes = calculator.getClass().getInterfaces();
      InvocationHandler invocationHandler = new InvocationHandler() {

        /**
         *
         * @Description
         * @param
         * proxy: 代理对象:给jdk使用,任何时候都不要动这个对象
         * method:当前将要执行的目标对象的方法
         * args:该方法执行多需要的参数(数组形式保存参数)
         *
         * @Author xu
         * @return
         * @throws
         * @Date 2022/5/8 17:17
         *
         */
        public Object invoke(Object proxy, Method method, Object[] args) throws Throwable {

          System.out.println("这是动态代理将要执行方法");
          Object result = null;
          try {
//              System.out.println(""+method.getName()+"方法执行了,其参数为"+ Arrays.asList(args) +"");
              LogUtils.logStart(method,args);
              //利用反射执行目标方法
              //目标方法执行后的返回值
              result = method.invoke(calculator, args);

//            System.out.println("["+method.getName()+"]方法执行完成,计算结果为:"+result);
            LogUtils.logReturn(method,result);
          } catch (Exception e) {
            LogUtils.logException(method,e);
//              System.out.println("["+method.getName()+"]出现异常,并且异常信息为:"+e.getCause());
          } finally {
//            System.out.println("["+method.getName()+"]方法执行结束");
            LogUtils.logEnd(method);
          }

          //返回值必须返回出去,外界才能拿到真正执行后的返回值
          return result;
        }
      };

      //生成一个代理对象
      Object proxyInstance = Proxy.newProxyInstance(classLoader, classes, invocationHandler);
      return (Calculator)proxyInstance;
    }
}
MyMathCalculator.java:
package com.xu5.Impl;

import com.xu5.inter.Calculator;

/**
 * @auther xu
 * @Description
 * @date 2022/5/7 - 10:57
 * @Modified By:
 */
public class MyMathCalculator implements Calculator {
    public int add(int i, int j) {
//        System.out.println("[add]方法开始了,它使用的参数是{"+i+","+j+"}");
        int result = i + j;
//        System.out.println("[add]方法运行完成,计算结果是:{"+result+"}");
        return result;
    }

    public int sub(int i, int j) {
        int result = i - j;
        return result;
    }

    public int mul(int i, int j) {
        int result = i * j;
        return result;
    }

    public int div(int i, int j) {
        int result = i / j;
        return result;
    }
}
执行结果:


总结:
1.add方法中并没有日志信息,但是通过代理对象,增添了日志信息,实现核心代码分离。
补充:解耦的理解:

2.动态代理的缺点

3.Spring底层使用动态代理,但是简化了动态代理的操作:

3-3 AOP的几个专业术语
切面类
横切关注点
通知方法
连接点
切入点
切入点表达式

3-4 AOP简单配置
3-4-1:导包

3-4-2:原理理解
1.原来的方法用注解替代


注意:Before不是Junit包中的Before

3-4-3 代码参考
Calculator.java
package com.xu6.inter;

/**
 * @auther xu
 * @Description
 * 接口一般不会加载到容器中;
 * ioc容器允许加载接口,加载了也不会创建对象,只是告诉容器中有这种接口的组件
 * @date 2022/5/7 - 10:53
 * @Modified By:
 */
public interface Calculator {

    public int add(int i, int j);
    public int sub(int i,int j);
    public int mul(int i,int j);
    public int div(int i,int j);
}
MyMathCalculator.java
package com.xu6.Impl;

import com.xu6.inter.Calculator;
import org.springframework.stereotype.Service;

/**
 * @auther xu
 * @Description
 * @date 2022/5/7 - 10:57
 * @Modified By:
 */
@Service
public class MyMathCalculator implements Calculator {
    public int add(int i, int j) {
//        System.out.println("[add]方法开始了,它使用的参数是{"+i+","+j+"}");
        int result = i + j;
//        System.out.println("[add]方法运行完成,计算结果是:{"+result+"}");
        return result;
    }

    public int sub(int i, int j) {
//        System.out.println("[sub]方法开始了,它使用的参数是{"+i+","+j+"}");
        int result = i - j;
//        System.out.println("[sub]方法运行完成,计算结果是:{"+result+"}");
        return result;
    }

    public int mul(int i, int j) {
//        System.out.println("[mul]方法开始了,它使用的参数是{"+i+","+j+"}");
        int result = i * j;
//        System.out.println("[mul]方法运行完成,计算结果是:{"+result+"}");
        return result;
    }

    public int div(int i, int j) {
//        System.out.println("[div]方法开始了,它使用的参数是{"+i+","+j+"}");
        int result = i / j;
//        System.out.println("[div]方法运行完成,计算结果是:{"+result+"}");
        return result;
    }
}
LogUtils.java:
package com.xu6.utils;

import org.aspectj.lang.annotation.*;
import org.springframework.stereotype.Component;

import java.lang.reflect.Method;


/**
 * @auther xu
 * @Description
 * 如何将这个类的(切面类)中的这些方法(通知方法)动态的在目标方法运行的各个位置切入其中
 * @date 2022/5/8 - 20:34
 * @Modified By:
 */
@Aspect//表明是切面类
@Component
public class LogUtils {

    //想在目标方法之前执行的方法-----注释
    //还需要写切入点表达式,目的是说明在哪一个目标方法使用前置--格式:execution(访问权限 返回值类型 方法签名)
    @Before("execution(public int com.xu6.Impl.MyMathCalculator.*(int,int))")
    public static void logStart() {
        System.out.println("【xxx】方法执行了,其参数为xxx");
    }
    @AfterReturning("execution(public int com.xu6.Impl.MyMathCalculator.*(int,int))")
    public static void logReturn() {
        System.out.println("[xxx]方法执行完成,计算结果为:");
    }

    @AfterThrowing("execution(public int com.xu6.Impl.MyMathCalculator.*(int,int))")
    public static void logException() {
        System.out.println("[xxx]出现异常,并且异常信息为:");
    }

    @After("execution(public int com.xu6.Impl.MyMathCalculator.*(int,int))")
    public static void logEnd() {
        System.out.println("[xxx]方法执行结束");
    }
}
AOPTest.java
import com.xu6.Impl.MyMathCalculator;
import com.xu6.inter.Calculator;
import org.junit.Test;
import org.springframework.context.ApplicationContext;
import org.springframework.context.support.ClassPathXmlApplicationContext;
/**
* @auther xu
* @Description
* @date 2022/5/7 - 11:09
* @Modified By:
*/
public class AOPTest {
//创建ioc容器
private ApplicationContext ioc1 = new ClassPathXmlApplicationContext("applicationContext1.xml");
@Test
public void test() {
//1.从容器中获取对象,注意,如果想要用类型获取代理对象,一定用他的接口类型,不要用它的本类
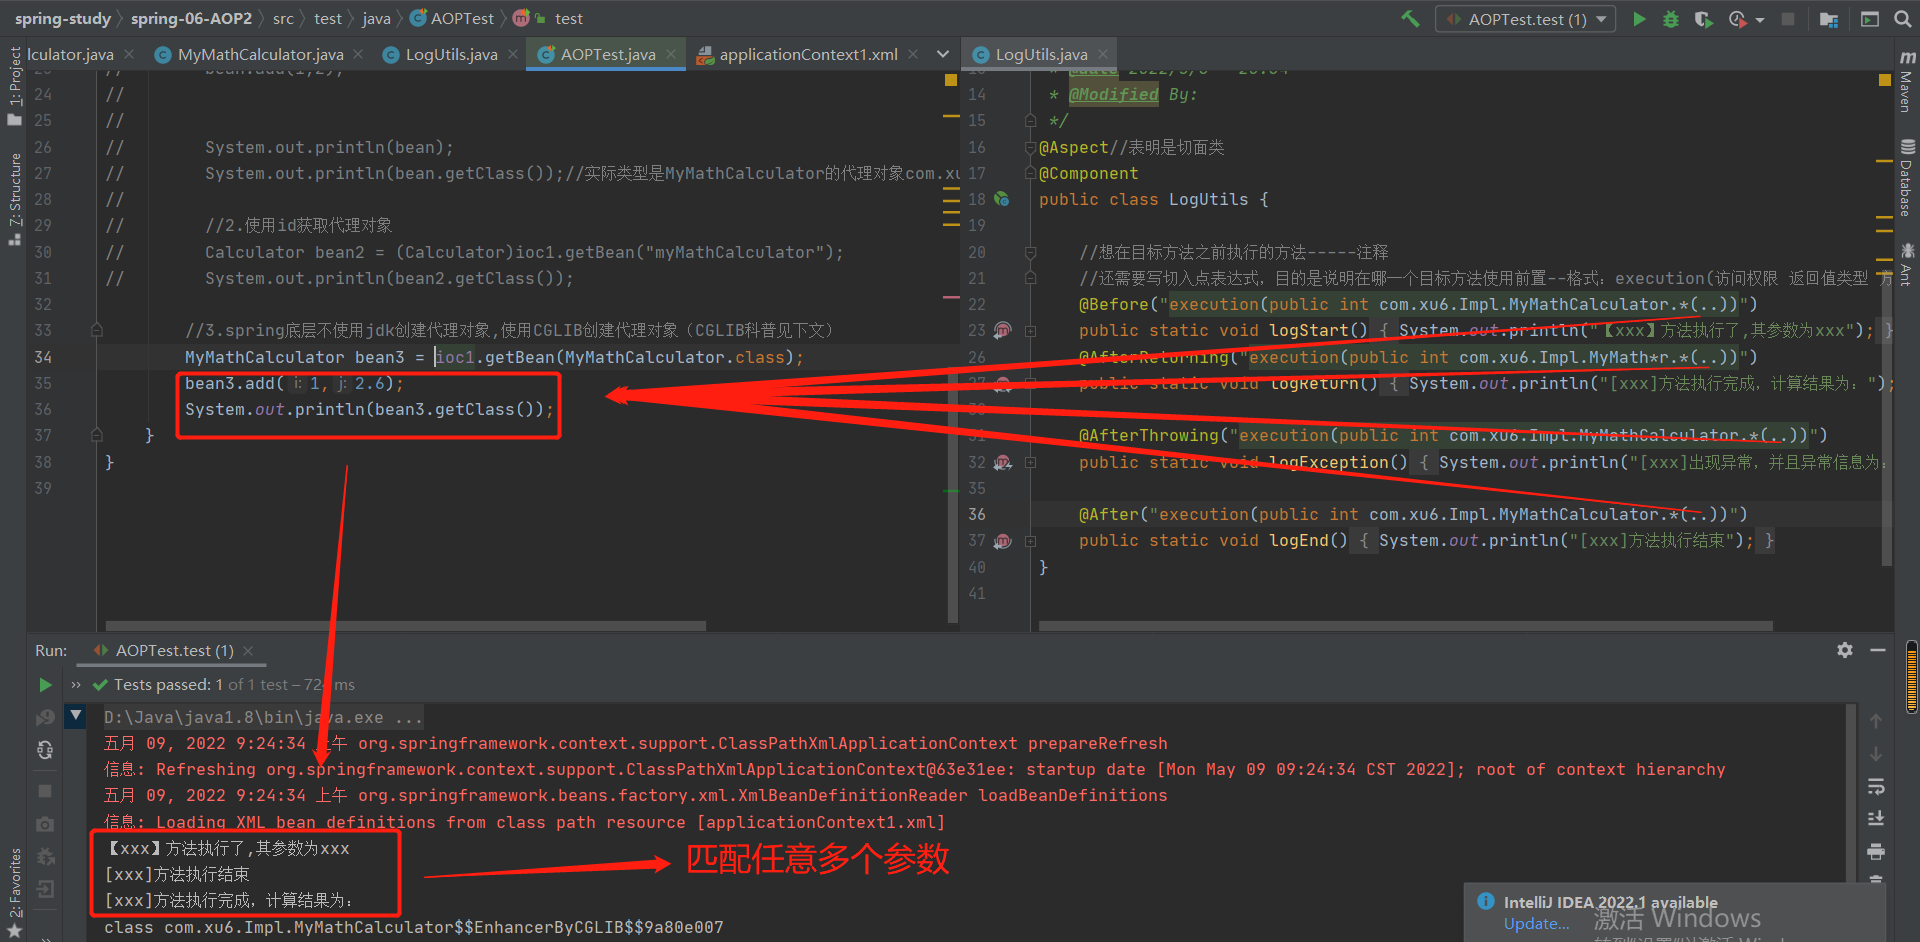
Calculator bean = (Calculator)ioc1.getBean(Calculator.class);
bean.add(1,2);
System.out.println(bean);
System.out.println(bean.getClass());//实际类型是MyMathCalculator的代理对象com.xun.proxy.$Proxy13
//2.使用id获取代理对象
Calculator bean2 = (Calculator)ioc1.getBean("myMathCalculator");
System.out.println(bean2.getClass());
}
}
applicationContext1.xml:
<?xml version="1.0" encoding="UTF-8"?>
<beans xmlns="http://www.springframework.org/schema/beans"
       xmlns:xsi="http://www.w3.org/2001/XMLSchema-instance"
       xmlns:content="http://www.springframework.org/schema/context"
       xmlns:aop="http://www.springframework.org/schema/aop"
       xsi:schemaLocation="http://www.springframework.org/schema/beans http://www.springframework.org/schema/beans/spring-beans.xsd http://www.springframework.org/schema/context http://www.springframework.org/schema/context/spring-context.xsd http://www.springframework.org/schema/aop http://www.springframework.org/schema/aop/spring-aop.xsd">
    <content:component-scan base-package="com.xu6"></content:component-scan>
    <aop:aspectj-autoproxy></aop:aspectj-autoproxy>
</beans>
3-4-4:几个注意点:
表明切面类:

需要导入的组件:

3-5 AOP细节1:IOC容器中保存的是组件的代理对象
3-5-1:通过实现类的接口创建代理对象原因


3-5-2 使用id获取代理对象

补充一下:以上通过接口类型以及id创建代理对象,Spring底层都是调用jdk创建代理对象的方式创建的,并且少了jdk创建代理对象要求被代理的对象必须要有实现类接口
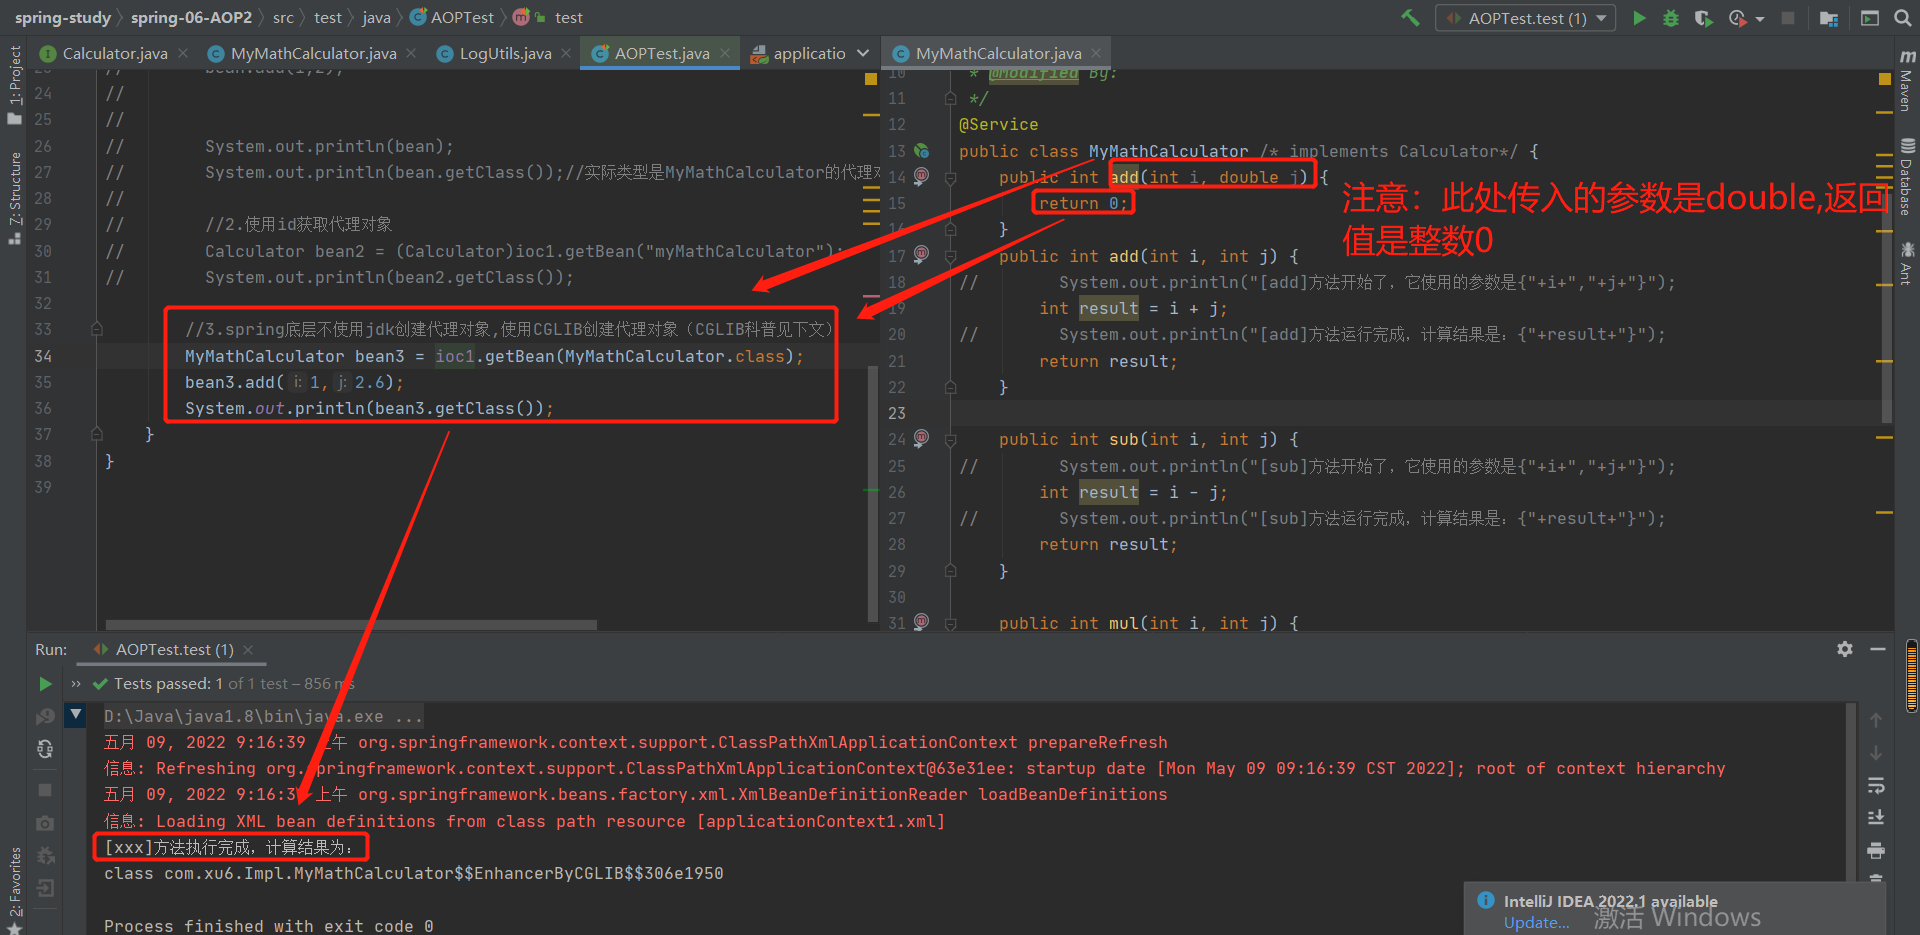
3-5-3 Spring底层不使用JDK创建代理对象,而是使用GCLIB创建代理对象


3-6 AOP: 细节2:AOP写入点表达式--通配符
3-6-1 匹配任意一个参数-----------*****号 :


3-6-2 匹配任意多个参数,任意多层路径----..号

1.匹配任意多个参数,任意类型的参数
2.匹配任意多层路径

总结一下:

补充:可以使用&&,||,!

3-7 AOP细节3 :通知方法的执行顺序


3-8 AOP细节4:JoinPoint:获取目标方法的详细信息


test结果:

3-9:AOP细节5:returning,throwing用来指定接收方法返回值,异常值的参数

test结果:

补充:
1.通知方法参数不要乱写:

也就是说,通知方法参数不能够乱写,每写一个参数,都需要告诉spring该参数是用来干嘛的(eg:如上,写了一个Object result参数,就需要用returning="result"告诉spring该参数是用来接收返回值的)
2.接收返回值,接受异常的参数引用类型尽量写大的


3-10:AOP 细节6:抽取可重用的切入点表达式

3-11:AOP细节7,8,9:环绕通知
第一部分:


总结:
proceed = pjp.proceed();//该语句就是利用反射进行的目标方法的调用,而proceed就是目标方法运行的返回结果
第2部分:代码实现
LogUtils.java(用环绕通知取代其他的4大通知)
package com.xu6.utils;

import org.aspectj.lang.JoinPoint;
import org.aspectj.lang.ProceedingJoinPoint;
import org.aspectj.lang.Signature;
import org.aspectj.lang.annotation.*;
import org.springframework.stereotype.Component;

import java.util.Arrays;


/**
 * @auther xu
 * @Description
 * 如何将这个类的(切面类)中的这些方法(通知方法)动态的在目标方法运行的各个位置切入其中
 * @date 2022/5/8 - 20:34
 * @Modified By:
 */
@Aspect//表明是切面类
@Component
public class LogUtils {

    /*
     *抽取可重用的切入点表达式:
     * 1.随便声明一个没有实现的返回void的空方法
     * 2.给方法上标注@Pointcut注解
     */
    @Pointcut("execution(public int com.xu6.Impl..MyMath*r.*(..))")
    public void myPoint(){}

    //想在目标方法之前执行的方法-----注释
    //还需要写切入点表达式,目的是说明在哪一个目标方法使用前置--格式:execution(访问权限 返回值类型 方法签名)
//    @Before("myPoint()")
    public static void logStart(JoinPoint joinPoint) {

        Object[] args = joinPoint.getArgs();//获取目标方法的参数所封装成的数组
        Signature signature = joinPoint.getSignature();//获取方法的签名
        String name = signature.getName();
        System.out.println("【"+name+"】方法执行了,其参数为"+ Arrays.asList(args)+"");
    }

    /*
     *切入表达式2种方法:
     * 1.最精确的:
     * public int com.xu6.Impl.MyMathCalculator.add(int,int)
     * 2.最模糊的:public不可以用*代替,但是可以省略,默认是public
     *       * *.*(..)
     *       第一个*:替代返回值类型
     *       *.*:所有类下的所有方法
     *
     */
    /*
     *对方法的返回值进行处理
     * 1.Object result:给该处理返回值的方法传入一个接受放回值的参数
     * 2.@AfterReturning(value = "execution(public int com.xu6.Impl..MyMath*r.*(..))",returning = "result"):
     * 指明返回的结果值有哪一个参数接收
     */
//    @AfterReturning(value = "myPoint()",returning = "result")
    public static void logReturn(JoinPoint joinPoint,Object result) {
        String name = joinPoint.getSignature().getName();
        System.out.println("["+name+"]方法执行完成,计算结果为:"+result);
    }

    /*
     * 同理:对异常处理与对返回值处理类似,throwing = "e":表明用e参数来接收异常信息
     */
//    @AfterThrowing(value = "myPoint()",throwing = "e")
    public static void logException(JoinPoint joinPoint,Exception e) {
        String name = joinPoint.getSignature().getName();
        System.out.println("【"+name+"】出现异常,并且异常信息为:"+e);
    }

//    @After("myPoint()")
    public static void logEnd(JoinPoint joinPoint) {
        String name = joinPoint.getSignature().getName();
        System.out.println("【"+name+"】方法执行结束");
    }

    @Around("myPoint()")
    public Object myAround(ProceedingJoinPoint pjp) throws Throwable {

        //使用反射技术获取目标方法的参数
        Object[] args = pjp.getArgs();

        //获取去方法名称
        String name = pjp.getSignature().getName();
        Object proceed = null;
        try {
            System.out.println("【环绕前置通知】【"+name+"方法开始】");//@Before
              //利用反射调用目标方法即可,相当于method.invoke(obj,args)
            proceed = pjp.proceed();
            System.out.println("【环绕返回通知】【"+name+"方法返回】,返回值是:"+proceed);//@AfterReturing
        } catch (Exception e) {
            System.out.println("【环绕异常通知】【"+name+"】方法出现异常,异常信息为:"+e.getCause());//@AfterThrowing
        } finally {
            System.out.println("【环绕后置通知】【"+name+"】方法结束");//@After
        }
       return proceed;
    }
}
MyMathCalculator.java
package com.xu6.Impl;

import com.xu6.inter.Calculator;
import org.springframework.stereotype.Service;

/**
 * @auther xu
 * @Description
 * @date 2022/5/7 - 10:57
 * @Modified By:
 */
@Service
public class MyMathCalculator /* implements Calculator*/ {
    public int add(int i, double j) {
        return 0;
    }
    public int add(int i, int j) {
        int result = i + j;
        System.out.println("方法内部执行add");
        return result;
    }

    public int sub(int i, int j) {
        int result = i - j;
        System.out.println("方法内部执行sub");
        return result;
    }

    public int mul(int i, int j) {
        int result = i * j;
        System.out.println("方法内部执行mul");
        return result;
    }

    public int div(int i, int j) {
        int result = i / j;
        System.out.println("方法内部执行div");
        return result;
    }
}
test结果:

第3部分:环绕通知与普通通知同时存在时的执行顺序


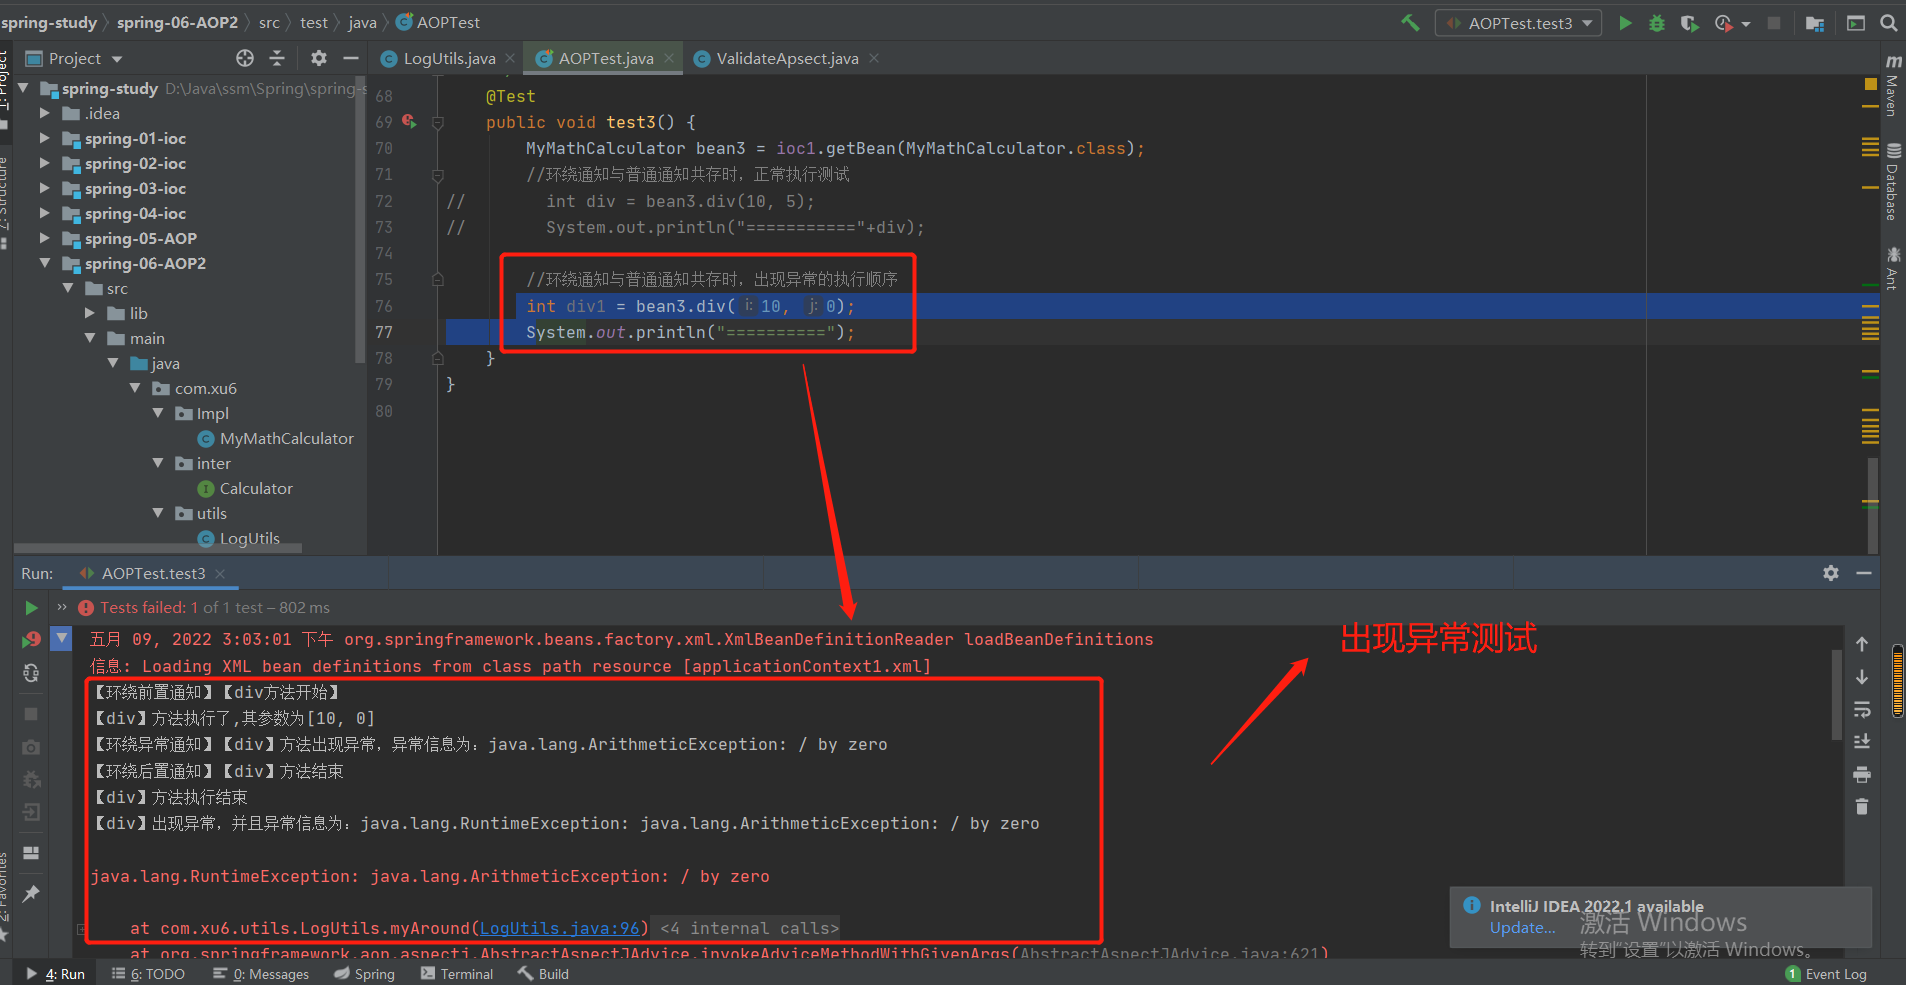
注意:因为环绕通知就是动态代理方法,涉及到可以改变对目标方法的执行,所以一般还是写普通方法,如果真是要对目标方法进行更改,再考虑使用环绕通知
3-12 AOP细节10:多切面运行顺序
1.代码参考:
package com.xu6.utils;

import org.aspectj.lang.JoinPoint;
import org.aspectj.lang.ProceedingJoinPoint;
import org.aspectj.lang.Signature;
import org.aspectj.lang.annotation.*;
import org.springframework.stereotype.Component;

import java.util.Arrays;


/**
 * @auther xu
 * @Description
 * 如何将这个类的(切面类)中的这些方法(通知方法)动态的在目标方法运行的各个位置切入其中
 * @date 2022/5/8 - 20:34
 * @Modified By:
 */
@Aspect//表明是切面类
@Component
public class LogUtils {

    /*
     *抽取可重用的切入点表达式:
     * 1.随便声明一个没有实现的返回void的空方法
     * 2.给方法上标注@Pointcut注解
     */
    @Pointcut("execution(public int com.xu6.Impl..MyMath*r.*(..))")
    public void myPoint(){}

    //想在目标方法之前执行的方法-----注释
    //还需要写切入点表达式,目的是说明在哪一个目标方法使用前置--格式:execution(访问权限 返回值类型 方法签名)
    @Before("myPoint()")
    public static void logStart(JoinPoint joinPoint) {

        Object[] args = joinPoint.getArgs();//获取目标方法的参数所封装成的数组
        Signature signature = joinPoint.getSignature();//获取方法的签名
        String name = signature.getName();
        System.out.println("【LogUtils--前置】【"+name+"】方法执行了,其参数为"+ Arrays.asList(args)+"");
    }

    /*
     *切入表达式2种方法:
     * 1.最精确的:
     * public int com.xu6.Impl.MyMathCalculator.add(int,int)
     * 2.最模糊的:public不可以用*代替,但是可以省略,默认是public
     *       * *.*(..)
     *       第一个*:替代返回值类型
     *       *.*:所有类下的所有方法
     *
     */
    /*
     *对方法的返回值进行处理
     * 1.Object result:给该处理返回值的方法传入一个接受放回值的参数
     * 2.@AfterReturning(value = "execution(public int com.xu6.Impl..MyMath*r.*(..))",returning = "result"):
     * 指明返回的结果值有哪一个参数接收
     */
    @AfterReturning(value = "myPoint()",returning = "result")
    public static void logReturn(JoinPoint joinPoint,Object result) {
        String name = joinPoint.getSignature().getName();
        System.out.println("【LogUtils--返回】【"+name+"】方法执行完成,计算结果为:"+result);
    }

    /*
     * 同理:对异常处理与对返回值处理类似,throwing = "e":表明用e参数来接收异常信息
     */
    @AfterThrowing(value = "myPoint()",throwing = "e")
    public static void logException(JoinPoint joinPoint,Exception e) {
        String name = joinPoint.getSignature().getName();
        System.out.println("【LogUtils--异常】【"+name+"】出现异常,并且异常信息为:"+e);
    }

    @After("myPoint()")
    public static void logEnd(JoinPoint joinPoint) {
        String name = joinPoint.getSignature().getName();
        System.out.println("【LogUtils--后置】【"+name+"】方法执行结束");
    }

//    @Around("myPoint()")
    public Object myAround(ProceedingJoinPoint pjp) throws Throwable {

        //使用反射技术获取目标方法的参数
        Object[] args = pjp.getArgs();

        //获取去方法名称
        String name = pjp.getSignature().getName();
        Object proceed = null;
        try {

            System.out.println("【环绕前置通知】【"+name+"方法开始】");//@Before
            //利用反射调用目标方法即可,就是method.invoke(obj,args)
            proceed = pjp.proceed();
            System.out.println("【环绕返回通知】【"+name+"方法返回】,返回值是:"+proceed);//@AfterReturing
        } catch (Exception e) {
            System.out.println("【环绕异常通知】【"+name+"】方法出现异常,异常信息为:"+e);//@AfterThrowing
            throw new RuntimeException(e);
        } finally {
            System.out.println("【环绕后置通知】【"+name+"】方法结束");//@After
        }
       return proceed;
    }
}
2.原理解析

3.验证:


4.加了环绕的运行顺序
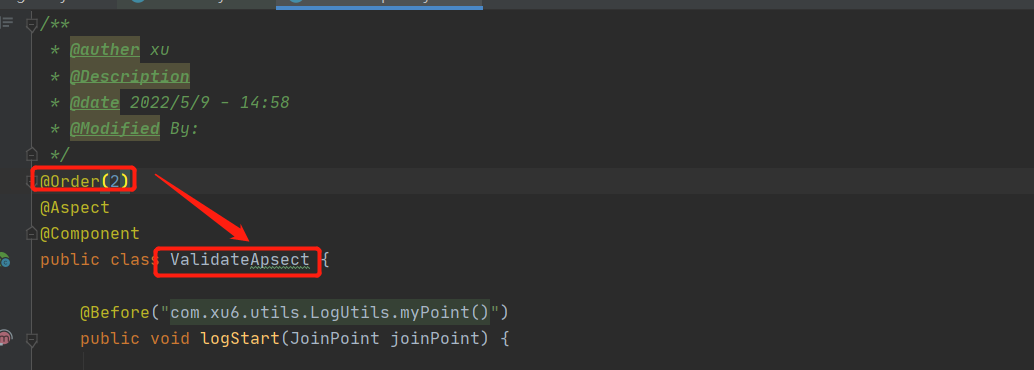
1.Order指定优先级(不必依赖类的首字母)

2.顺序探索


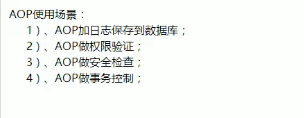
3-13:AOP的使用场景
3-14:基于配置的AOP
1.总结基于注解的AOP使用步骤:

2.代码参考
applicationContext1.xml:
<?xml version="1.0" encoding="UTF-8"?>
<beans xmlns="http://www.springframework.org/schema/beans"
       xmlns:xsi="http://www.w3.org/2001/XMLSchema-instance" xmlns:aop="http://www.springframework.org/schema/aop"
       xsi:schemaLocation="http://www.springframework.org/schema/beans http://www.springframework.org/schema/beans/spring-beans.xsd http://www.springframework.org/schema/context http://www.springframework.org/schema/context/spring-context.xsd http://www.springframework.org/schema/aop http://www.springframework.org/schema/aop/spring-aop.xsd">

<!--    基于配置的AOP-->

<!--    1.将目标类和切面类加载到容器中-->
    <bean id="myMathCalculator" class="com.xu7.Impl.MyMathCalculator"></bean>
    <bean id="validateApsect" class="com.xu7.utils.ValidateApsect"></bean>
    <bean id="logUtils" class="com.xu7.utils.LogUtils"></bean>


<!--    需要的AOP名称空间-->
    <aop:config>
        <aop:pointcut id="globlepoint" expression="execution(* com.xu7.Impl.*.*(..))"/>

        <aop:aspect ref="validateApsect" order="1">
            <aop:before method="logStart" pointcut-ref="globlepoint"></aop:before>
            <aop:after-returning method="logReturn" pointcut-ref="globlepoint" returning="result"></aop:after-returning>
            <aop:after-throwing method="logException" pointcut-ref="globlepoint" throwing="e"></aop:after-throwing>
            <aop:after method="logEnd" pointcut-ref="globlepoint"></aop:after>
        </aop:aspect>

        <!--    2.告诉spring哪一个是切面类:@Aspect-->
        <aop:aspect ref="logUtils" order="2">
            <!--   3.配置那个方法是前置通知,@Before("切入点表达式"),method指定方法名-->
            <aop:before method="logStart" pointcut="execution(* com.xu7.Impl.*.*(..))"></aop:before>
            <aop:after-returning method="logReturn" pointcut-ref="globlepoint" returning="result"></aop:after-returning>
            <aop:after-throwing method="logException" pointcut-ref="globlepoint" throwing="e"></aop:after-throwing>
            <aop:after method="logEnd" pointcut-ref="globlepoint"></aop:after>
            <aop:around method="myAround" pointcut-ref="globlepoint"></aop:around>
        </aop:aspect>


    </aop:config>

</beans>
com.xu7.util
LogUtil.java
package com.xu7.utils;

import org.aspectj.lang.JoinPoint;
import org.aspectj.lang.ProceedingJoinPoint;
import org.aspectj.lang.Signature;
import org.aspectj.lang.annotation.*;
import org.springframework.core.annotation.Order;
import org.springframework.stereotype.Component;

import java.util.Arrays;


/**
 * @auther xu
 * @Description
 * 如何将这个类的(切面类)中的这些方法(通知方法)动态的在目标方法运行的各个位置切入其中
 * @date 2022/5/8 - 20:34
 * @Modified By:
 */
public class LogUtils {

    public static void logStart(JoinPoint joinPoint) {

        Object[] args = joinPoint.getArgs();//获取目标方法的参数所封装成的数组
        Signature signature = joinPoint.getSignature();//获取方法的签名
        String name = signature.getName();
        System.out.println("【LogUtils--前置】【"+name+"】方法执行了,其参数为"+ Arrays.asList(args)+"");
    }


    public static void logReturn(JoinPoint joinPoint,Object result) {
        String name = joinPoint.getSignature().getName();
        System.out.println("【LogUtils--返回】【"+name+"】方法执行完成,计算结果为:"+result);
    }

    public static void logException(JoinPoint joinPoint,Exception e) {
        String name = joinPoint.getSignature().getName();
        System.out.println("【LogUtils--异常】【"+name+"】出现异常,并且异常信息为:"+e);
    }

    public static void logEnd(JoinPoint joinPoint) {
        String name = joinPoint.getSignature().getName();
        System.out.println("【LogUtils--后置】【"+name+"】方法执行结束");
    }

    public Object myAround(ProceedingJoinPoint pjp) throws Throwable {

        //使用反射技术获取目标方法的参数
        Object[] args = pjp.getArgs();

        //获取去方法名称
        String name = pjp.getSignature().getName();
        Object proceed = null;
        try {

            System.out.println("【环绕前置通知】【"+name+"方法开始】");//@Before
            //利用反射调用目标方法即可,就是method.invoke(obj,args)
            proceed = pjp.proceed();
            System.out.println("【环绕返回通知】【"+name+"方法返回】,返回值是:"+proceed);//@AfterReturing
        } catch (Exception e) {
            System.out.println("【环绕异常通知】【"+name+"】方法出现异常,异常信息为:"+e);//@AfterThrowing
            throw new RuntimeException(e);
        } finally {
            System.out.println("【环绕后置通知】【"+name+"】方法结束");//@After
        }
       return proceed;
    }
}
ValidateApsect.java:
package com.xu7.utils;

import org.aspectj.lang.JoinPoint;
import org.aspectj.lang.Signature;
import org.aspectj.lang.annotation.*;
import org.springframework.core.annotation.Order;
import org.springframework.stereotype.Component;

import java.util.Arrays;

/**
 * @auther xu
 * @Description
 * @date 2022/5/9 - 14:58
 * @Modified By:
 */
public class ValidateApsect {

    public void logStart(JoinPoint joinPoint) {

        Object[] args = joinPoint.getArgs();//获取目标方法的参数所封装成的数组
        Signature signature = joinPoint.getSignature();//获取方法的签名
        String name = signature.getName();
        System.out.println("【ValidateApsect--前置】【"+name+"】方法执行了,其参数为"+ Arrays.asList(args)+"");
    }

    public void logReturn(JoinPoint joinPoint,Object result) {
        String name = joinPoint.getSignature().getName();
        System.out.println("【ValidateApsect--返回】【"+name+"】方法执行完成,计算结果为:"+result);
    }

    public void logException(JoinPoint joinPoint,Exception e) {
        String name = joinPoint.getSignature().getName();
        System.out.println("【ValidateApsect--异常】【"+name+"】出现异常,并且异常信息为:"+e);
    }

    public void logEnd(JoinPoint joinPoint) {
        String name = joinPoint.getSignature().getName();
        System.out.println("【ValidateApsect--后置】【"+name+"】方法执行结束");
    }
}
com.xu7.inter:
Calculator.java
package com.xu7.inter;

/**
 * @auther xu
 * @Description
 * 接口一般不会加载到容器中;
 * ioc容器允许加载接口,加载了也不会创建对象,只是告诉容器中有这种接口的组件
 * @date 2022/5/7 - 10:53
 * @Modified By:
 */
public interface Calculator {

    public int add(int i, int j);
    public int sub(int i, int j);
    public int mul(int i, int j);
    public int div(int i, int j);
}
MyMathCalculator.java:
package com.xu7.Impl;

import org.springframework.stereotype.Service;

/**
 * @auther xu
 * @Description
 * @date 2022/5/7 - 10:57
 * @Modified By:
 */
@Service
public class MyMathCalculator /* implements Calculator*/ {
    public int add(int i, double j) {
        return 0;
    }
    public int add(int i, int j) {
        int result = i + j;
        System.out.println("方法内部执行add");
        return result;
    }

    public int sub(int i, int j) {
        int result = i - j;
        System.out.println("方法内部执行sub");
        return result;
    }

    public int mul(int i, int j) {
        int result = i * j;
        System.out.println("方法内部执行mul");
        return result;
    }

    public int div(int i, int j) {
        int result = i / j;
        System.out.println("方法内部执行div");
        return result;
    }
}
test结果:

3-15 使用配置还是使用注解
注解:快速方便
配置:功能完善(如果是引用外部文件的类,注解无法使用),重要的类使用配置,不重要的类使用注解。
第4章--jdbcTemplate
4-1:实验1:开始所需准备
准备:
1.导包

2.读取配置文件并创建组件
jdConfig.properties:
jdbc.username=root
jdbc.password=draf19
jdbc.jdbcUrl=jdbc:mysql://localhost:3306/jdbc_template
jdbc.driverClass=com.mysql.jdbc.Driver
applicationContext1.xml:
<?xml version="1.0" encoding="UTF-8"?>
<beans xmlns="http://www.springframework.org/schema/beans"
       xmlns:xsi="http://www.w3.org/2001/XMLSchema-instance"
       xmlns:content="http://www.springframework.org/schema/context"
       xsi:schemaLocation="http://www.springframework.org/schema/beans http://www.springframework.org/schema/beans/spring-beans.xsd http://www.springframework.org/schema/context http://www.springframework.org/schema/context/spring-context.xsd">
<!--    spring管理数据库连接池的组件-->
    <content:property-placeholder location="classpath:dbConfig.properties"></content:property-placeholder>
    <bean id="dataSource01" class="com.mchange.v2.c3p0.ComboPooledDataSource">
        <property name="user" value="${jdbc.username}"></property>
        <property name="password" value="${jdbc.password}"></property>
        <property name="jdbcUrl" value="${jdbc.jdbcUrl}"></property>
        <property name="driverClass" value="${jdbc.driverClass}"></property>
    </bean>

<!--使用spring管理jdbcTemplate-->
    <bean id="jdbcTemplate" class="org.springframework.jdbc.core.JdbcTemplate">
        <constructor-arg name="dataSource" ref="dataSource01"></constructor-arg>
    </bean>

</beans>
3.test

4-2:试验2:使用jdbcTemplate操作数据库

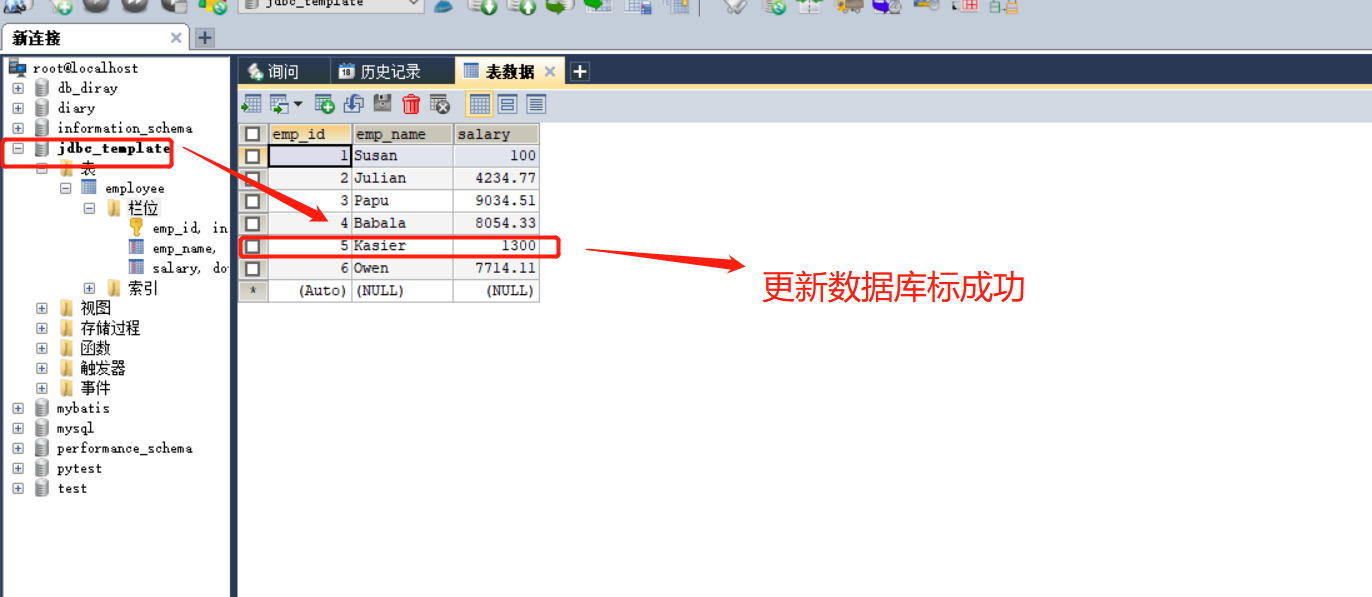
4-3 实验3:使用jdbcTemplate实现对数据库表的批量插入


4-4 实验4:将查询emp_id=5的数据封装为一个java对象返回
Employee.java:
package com.xu1.bean;

/**
 * @auther xu
 * @Description
 * @date 2022/5/10 - 15:25
 * @Modified By:
 */
public class Employee {
    private Integer empId;
    private String empName;
    private Double salary;

    public Employee() {
    }

    public Employee(Integer empId, String empName, Double salary) {
        this.empId = empId;
        this.empName = empName;
        this.salary = salary;
    }

    public Integer getEmpId() {
        return empId;
    }

    public void setEmpId(Integer empId) {
        this.empId = empId;
    }

    public String getEmpName() {
        return empName;
    }

    public void setEmpName(String empName) {
        this.empName = empName;
    }

    public Double getSalary() {
        return salary;
    }

    public void setSalary(Double salary) {
        this.salary = salary;
    }

    @Override
    public String toString() {
        return "Employee{" +
                "empId=" + empId +
                ", empName='" + empName + '\'' +
                ", salary=" + salary +
                '}';
    }
}

4-5 实验5:查询多条数据(工资大于4000)

4-6 实验6:查询最大工资

4-7:实验7:使用具名参数(sql语句不写问号--?)的sql语句插入一条数据

组件配置:


test结果:


4-8:实验8:重复实验7,只不过SqlParameterSource形式传入参数值


4-9 实验9:创建Employee,自动装配JdbcTemplate对象
EmployeeDao.java
package com.xu1.dao;

import com.xu1.bean.Employee;
import org.springframework.beans.factory.annotation.Autowired;
import org.springframework.jdbc.core.JdbcTemplate;
import org.springframework.stereotype.Repository;

/**
 * @auther xu
 * @Description
 * @date 2022/5/10 - 17:05
 * @Modified By:
 */
@Repository
public class EmployeeDao {
    @Autowired
    JdbcTemplate jdbcTemplate;

    public void saveEmployee(Employee employee) {
        //实验9:创建Employee,自动装配JdbcTemplate对象
        String sql = "INSERT INTO employee(emp_name,salary) VALUE(?,?)";
        jdbcTemplate.update(sql,employee.getEmpName(),employee.getSalary());
    }
}


第5章--声明事务
5-1 声明事务环境搭建
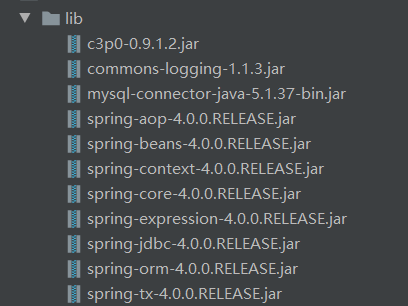
1.导包
2.代码参考
BookDao.java:
package com.xu1.dao;

import org.springframework.beans.factory.annotation.Autowired;
import org.springframework.jdbc.core.JdbcTemplate;
import org.springframework.stereotype.Repository;

/**
 * @auther xu
 * @Description
 * @date 2022/5/10 - 19:55
 * @Modified By:
 */
@Repository
public class BookDao {

    @Autowired
    JdbcTemplate jdbcTemplate;

    /**
     *
     * @Description
     * 1.减余额:减去某一个用户的余额
     *
     * @param
     * @Author xu
     * @return
     * @throws
     * @Date 2022/5/10 20:10
     *
     */
    public void updateBalance(String userName,int price) {
        String sql = "UPDATE ## account SET balance=balance-? WHERE userName=?";
        jdbcTemplate.update(sql,price,userName);
    }

    /**
     *
     * @Description
     * 2.获得某一本书的价格
     * @param
     * @Author xu
     * @return
     * @throws
     * @Date 2022/5/10 20:11
     *
     */
    public int getPrice(String isbn) {
        String sql = "SELECT price FROM book WHERE isbn=?";
        Integer price = jdbcTemplate.queryForObject(sql, Integer.class, isbn);
        return price;
    }

    /**
     *
     * @Description
     * 3.减库存:减去某一本书的库存
     * @param
     * @Author xu
     * @return
     * @throws
     * @Date 2022/5/10 20:17
     *
     */
    public void updateStock(String isbn) {
        String sql = "UPDATE book_stock SET stock=stock-1 WHERE isbn=?";
        jdbcTemplate.update(sql,isbn);
    }
}
BookService.java
package com.xu1.service;

import com.xu1.dao.BookDao;
import org.springframework.beans.factory.annotation.Autowired;
import org.springframework.stereotype.Service;

/**
 * @auther xu
 * @Description
 * @date 2022/5/10 - 20:20
 * @Modified By:
 */
@Service
public class BookService {
    @Autowired
    BookDao bookDao;

    public void checkout(String userName,String isbn) {
        //1.减库存
        bookDao.updateStock(isbn);
        int price = bookDao.getPrice(isbn);//得到这本书的单价
        //2.用户减余额
        bookDao.updateBalance(userName,price);
    }
}
applicationContext1.xml:
<?xml version="1.0" encoding="UTF-8"?>
<beans xmlns="http://www.springframework.org/schema/beans"
       xmlns:xsi="http://www.w3.org/2001/XMLSchema-instance"
       xmlns:content="http://www.springframework.org/schema/context"
       xsi:schemaLocation="http://www.springframework.org/schema/beans http://www.springframework.org/schema/beans/spring-beans.xsd http://www.springframework.org/schema/context http://www.springframework.org/schema/context/spring-context.xsd">

    <!--    扫描类-->
    <content:component-scan base-package="com.xu1"></content:component-scan>

    <!--    配置数据源-->
    <content:property-placeholder location="classpath:dbConfig.properties"></content:property-placeholder>
    <bean id="dataSource01" class="com.mchange.v2.c3p0.ComboPooledDataSource">
        <property name="user" value="${jdbc.username}"></property>
        <property name="password" value="${jdbc.password}"></property>
        <property name="jdbcUrl" value="${jdbc.jdbcUrl}"></property>
        <property name="driverClass" value="${jdbc.driverClass}"></property>
    </bean>

<!--使用spring管理jdbcTemplate,Spring提供一个类JdbcTemplate,我们用它来操作数据库
需要导入4个jar包:(Spring数据库模块)
spring-jdbc-4.0.0.RELEASE.jar
spring-orm-4.0.0.RELEASE.jar
spring-tx-4.0.0.RELEASE.jar
-->
    <bean id="jdbcTemplate" class="org.springframework.jdbc.core.JdbcTemplate">
        <constructor-arg name="dataSource" ref="dataSource01"></constructor-arg>
    </bean>


</beans>
dbConfig.properties:
jdbc.username=root
jdbc.password=draf19
jdbc.jdbcUrl=jdbc:mysql://localhost:3306/tx
jdbc.driverClass=com.mysql.jdbc.Driver
引出事务问题:


5-2 声明式事务
1.声明式事务与编程式事务


结果:


5-3 事务细节
5-3-1 细节1:timeout---事务超时异常

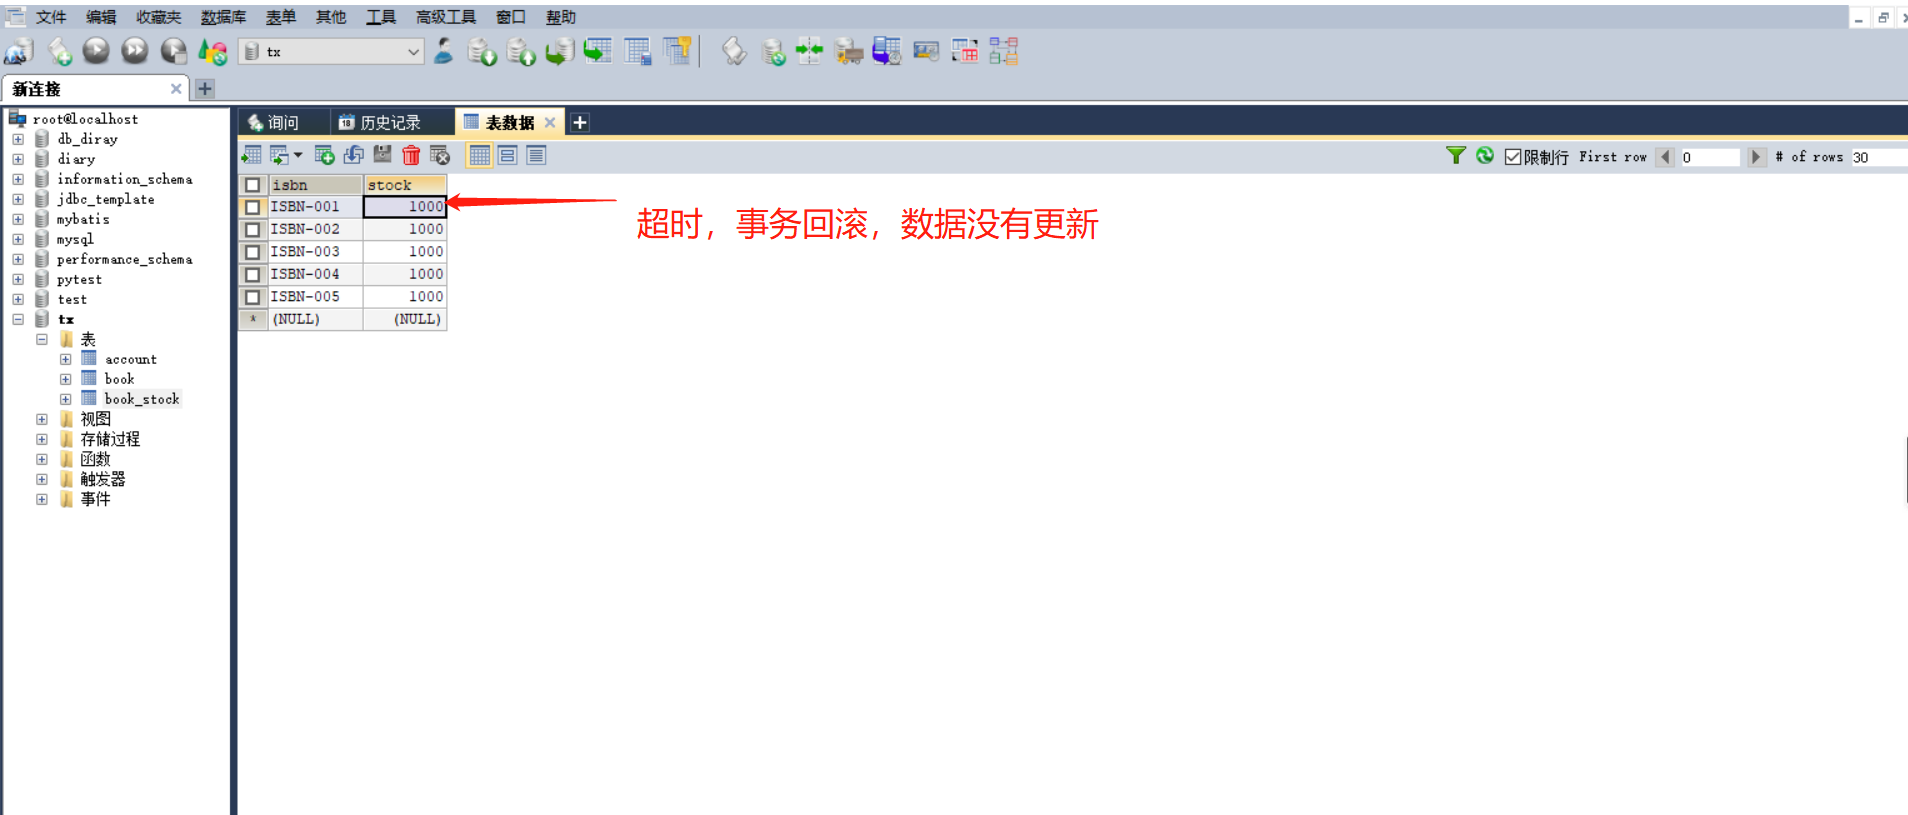

5-3-2 细节2:readOnly---只读
readOnly-boolean:设置事务为只读事务
可以对事务进行优化;
readOnly=true:加快查询速度,不用管事务那一堆操作

5-3-3 noRollbackFor-Class[]与noRollbackForClassName-String
1.编译时异常不会回滚:


2.运行时异常回滚
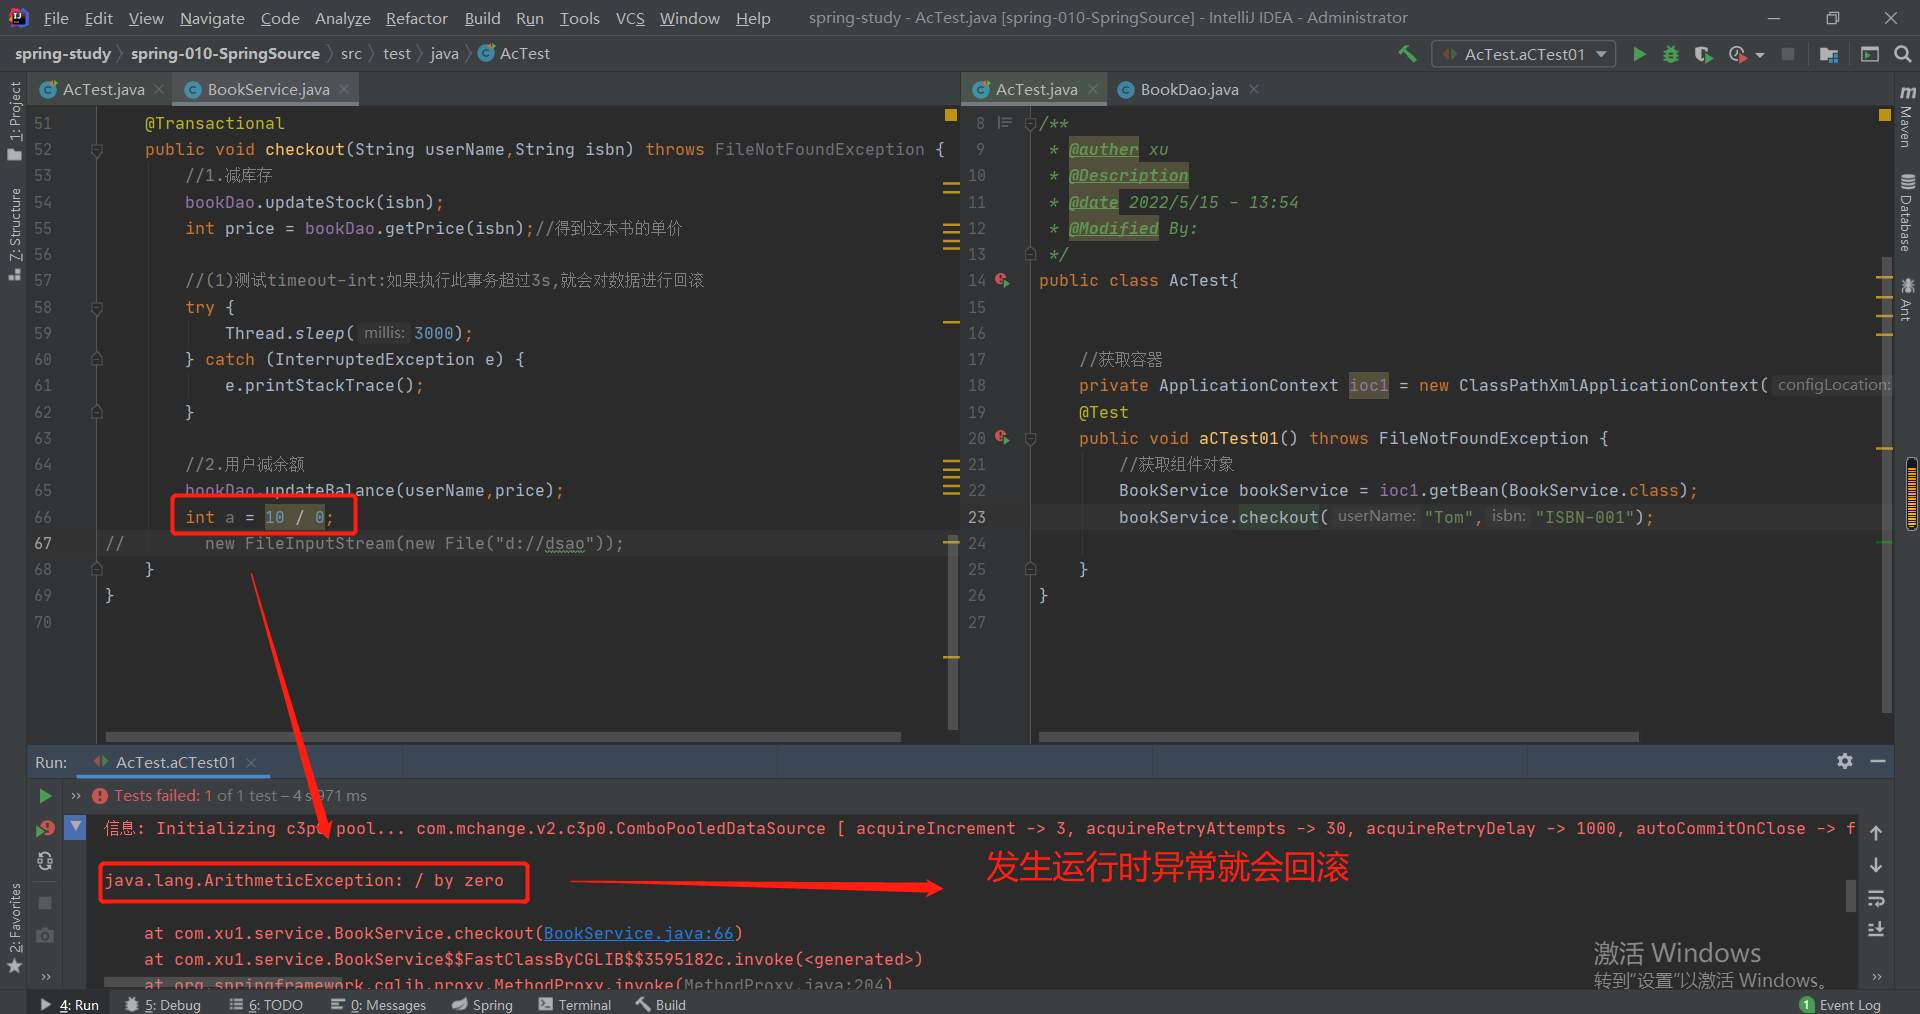
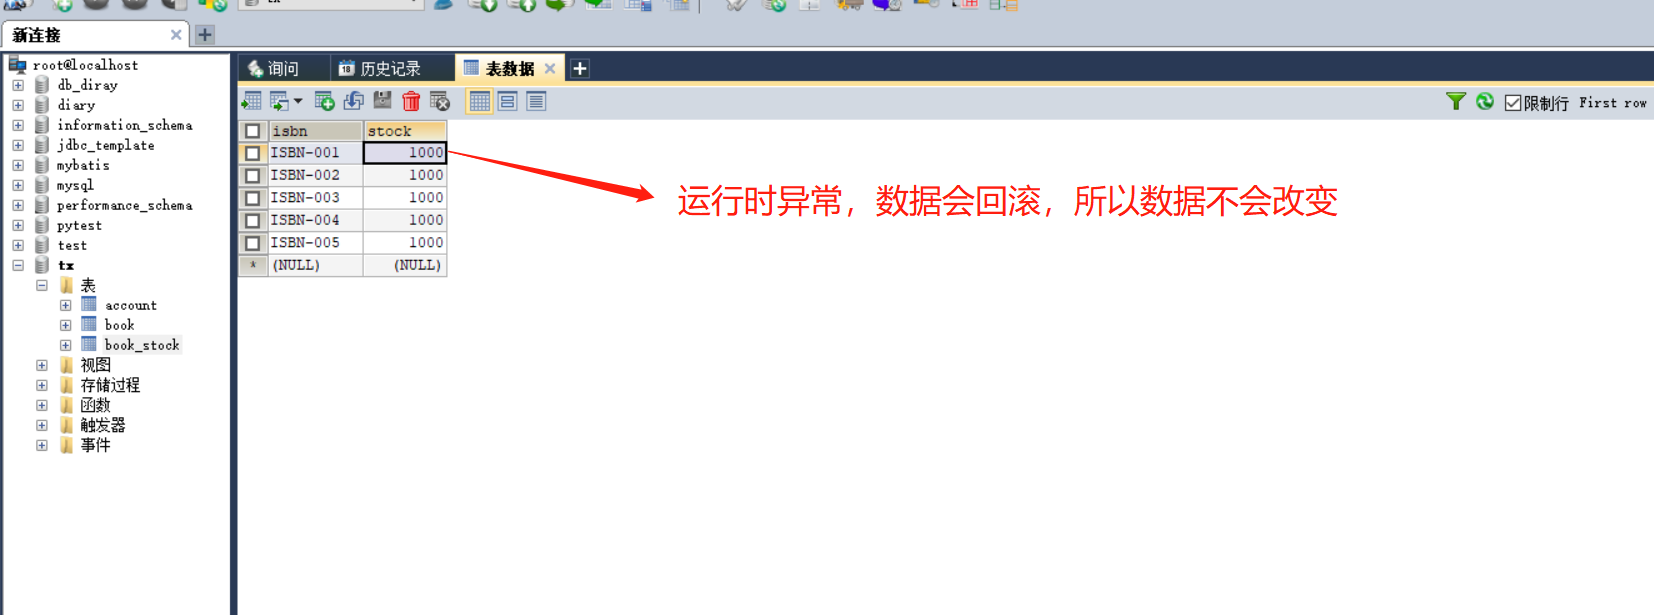

3.设置运行时异常不会回滚


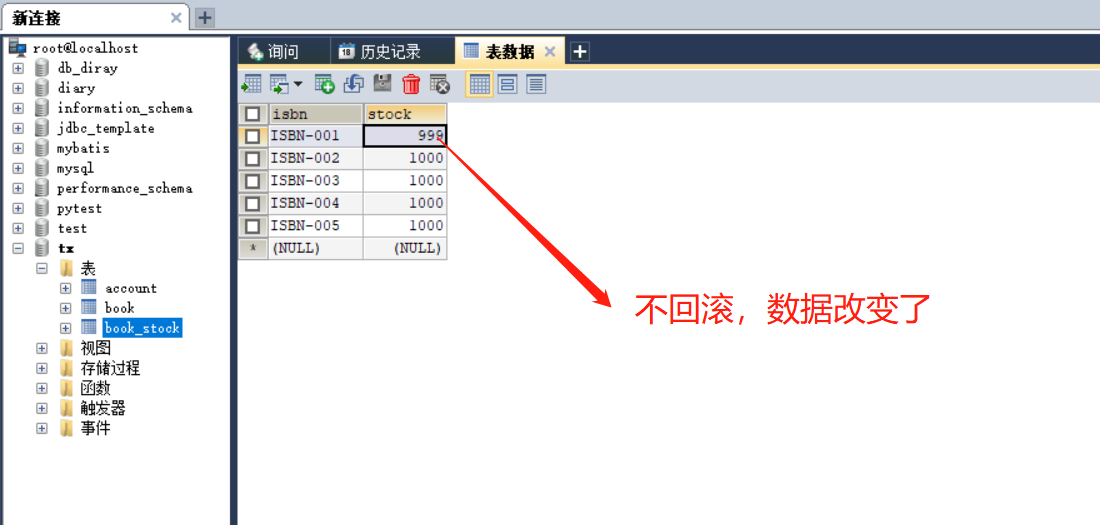
5-3-4 rollbackFor-Class[]与rollbackForClassName-String[]
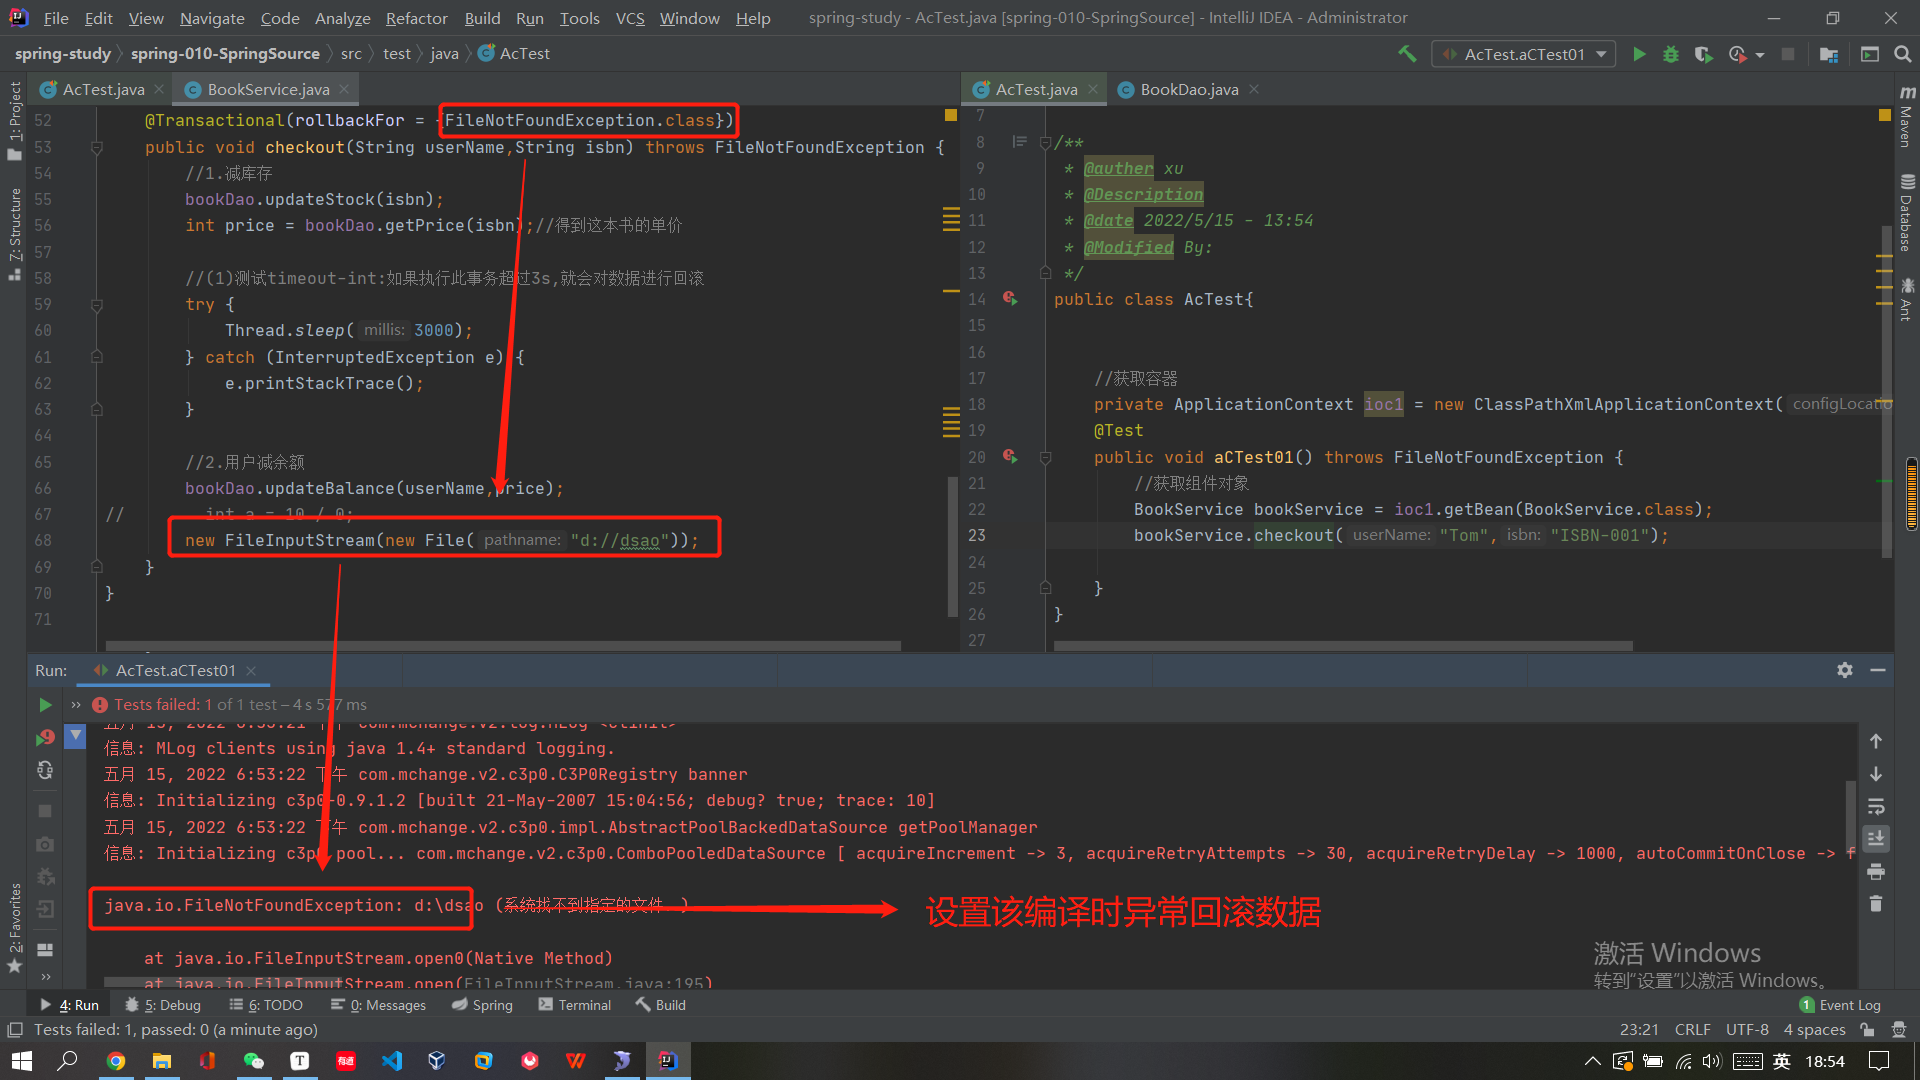


回滚不会改数据。
5-4 事务的隔离级别
5-4-1 数据库并发问题

5-4-2 事务的隔离级别

5-4-3 读未提交下---的脏读
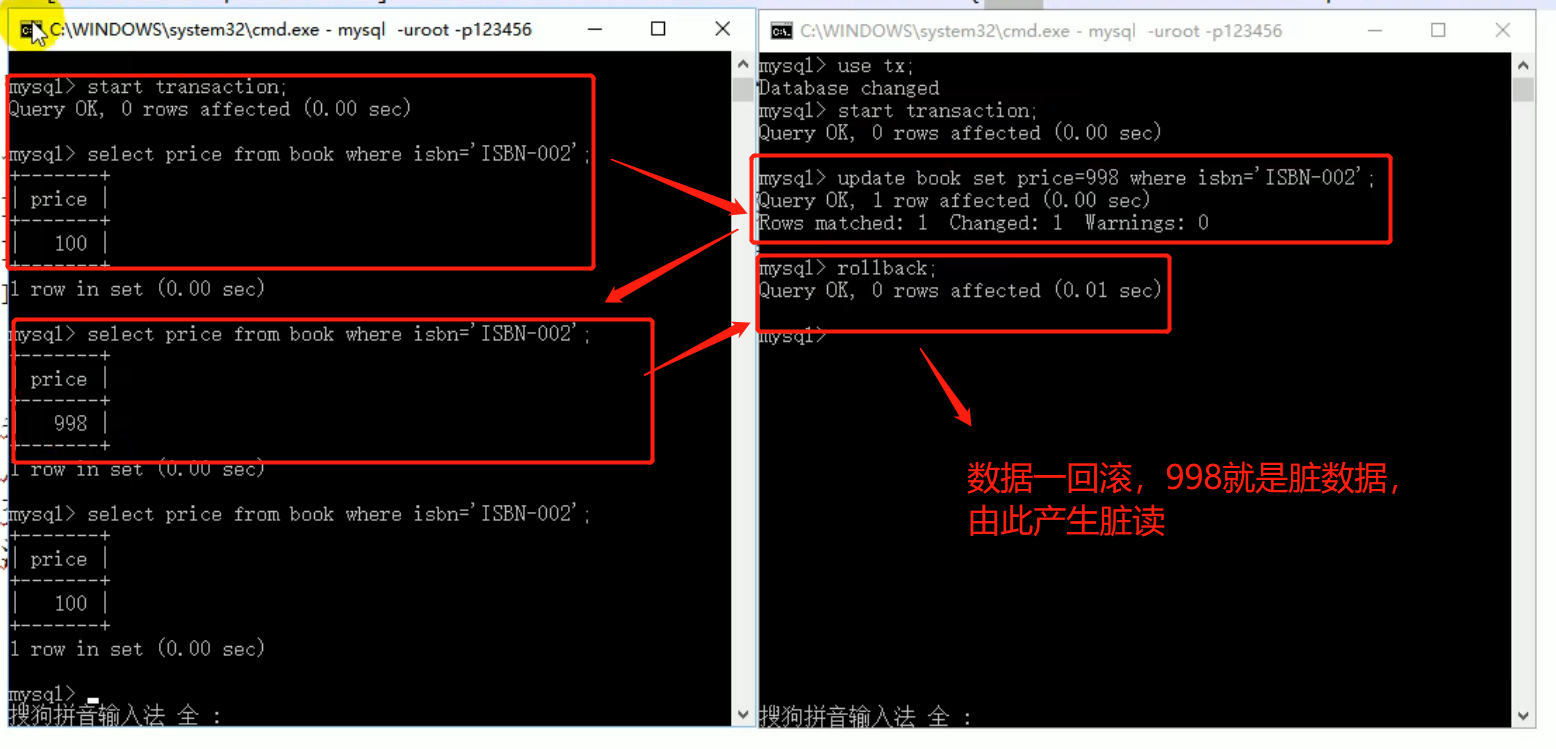
5-4-4 读已提交---不可重复读

5-4-5 可重复读

5-4-6 并发的修改同意数据下的排队


5-5 验证有事务的业务逻辑,容器中保存的是这个业务逻辑的代理对象

5-5 事务的传播行为
1.对事务的传播行为的介绍

spring定义的7中类传播行为:


2.propagation = Propagation.REQUIRED

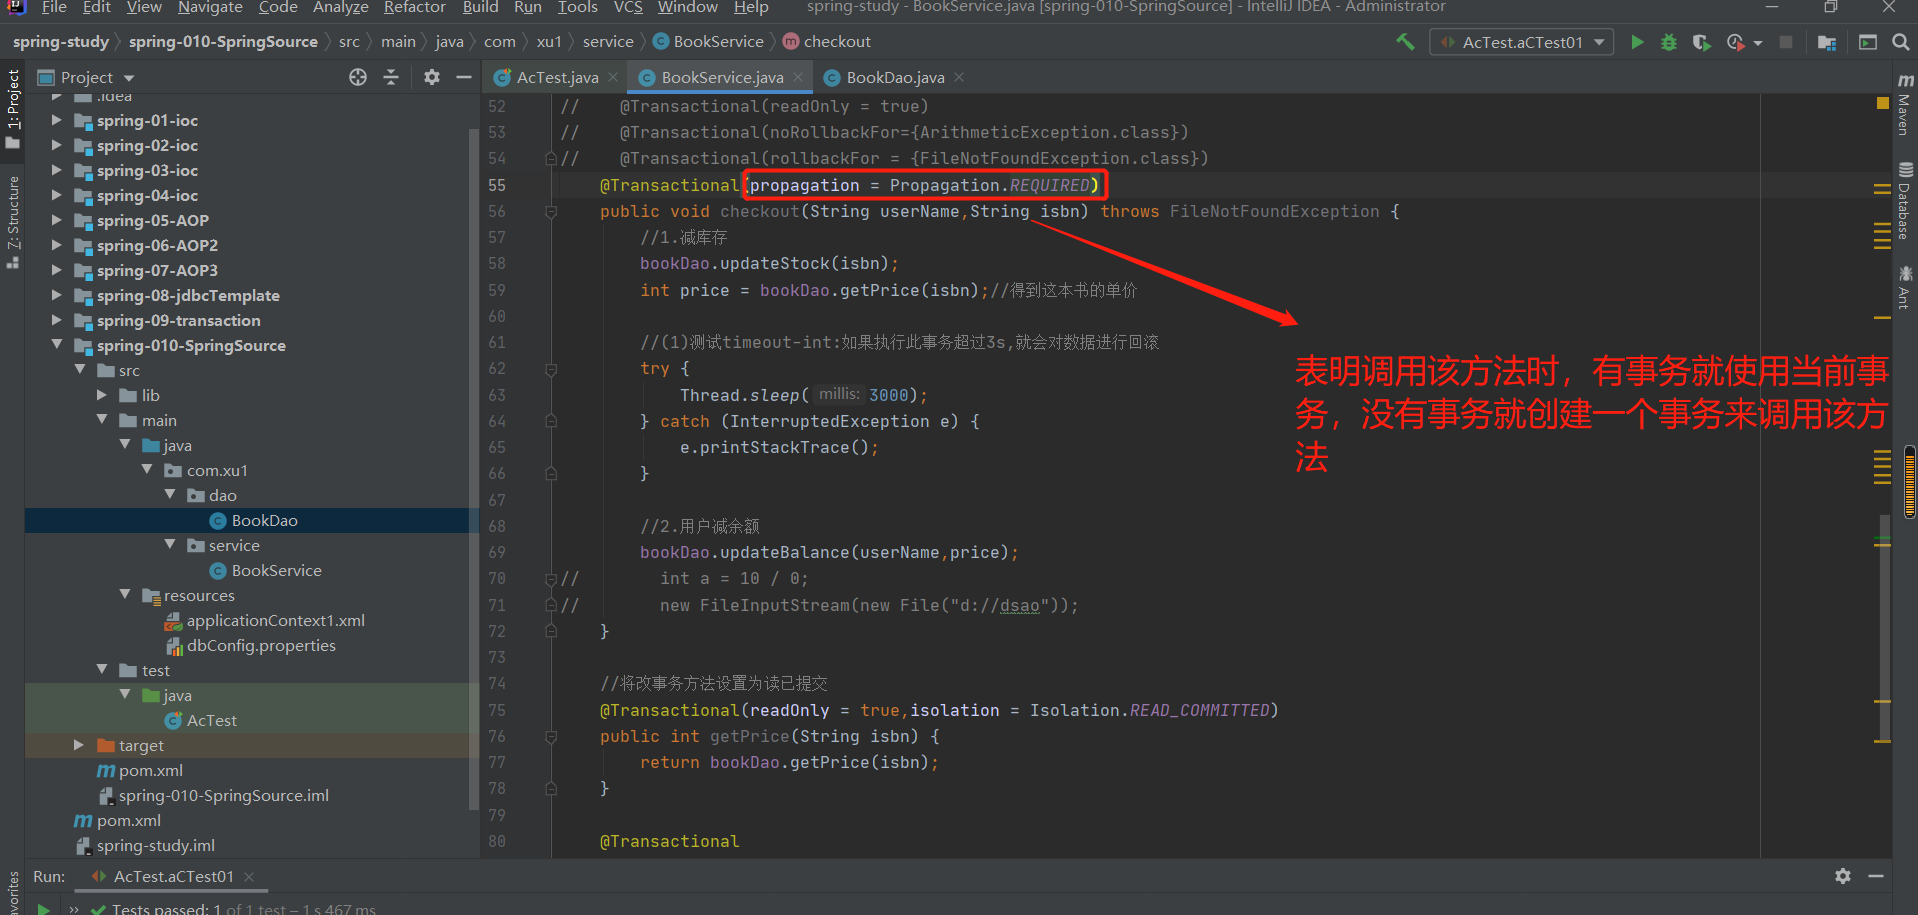


3.propagation = Propagation.REQUIRES_NEW


注意:如果主事务mulTx事务接收了新事务抛出的异常,也会触发主线程自动回滚
如果两个都是REDQUIRES_NEW,都是先将multx挂起,然后再执行新事务,并且如果multx事务出现了异常,不会导致新事物回滚。
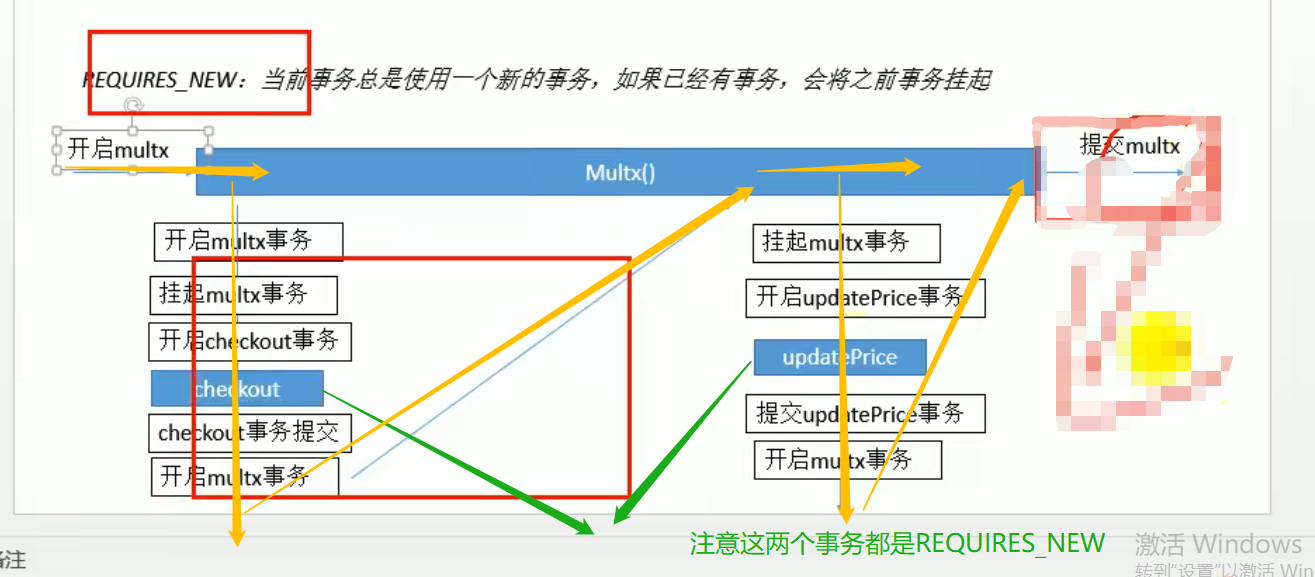
4.两个事务的底层原理

5-6 REQUIRED事务属性来源于大事务

验证:
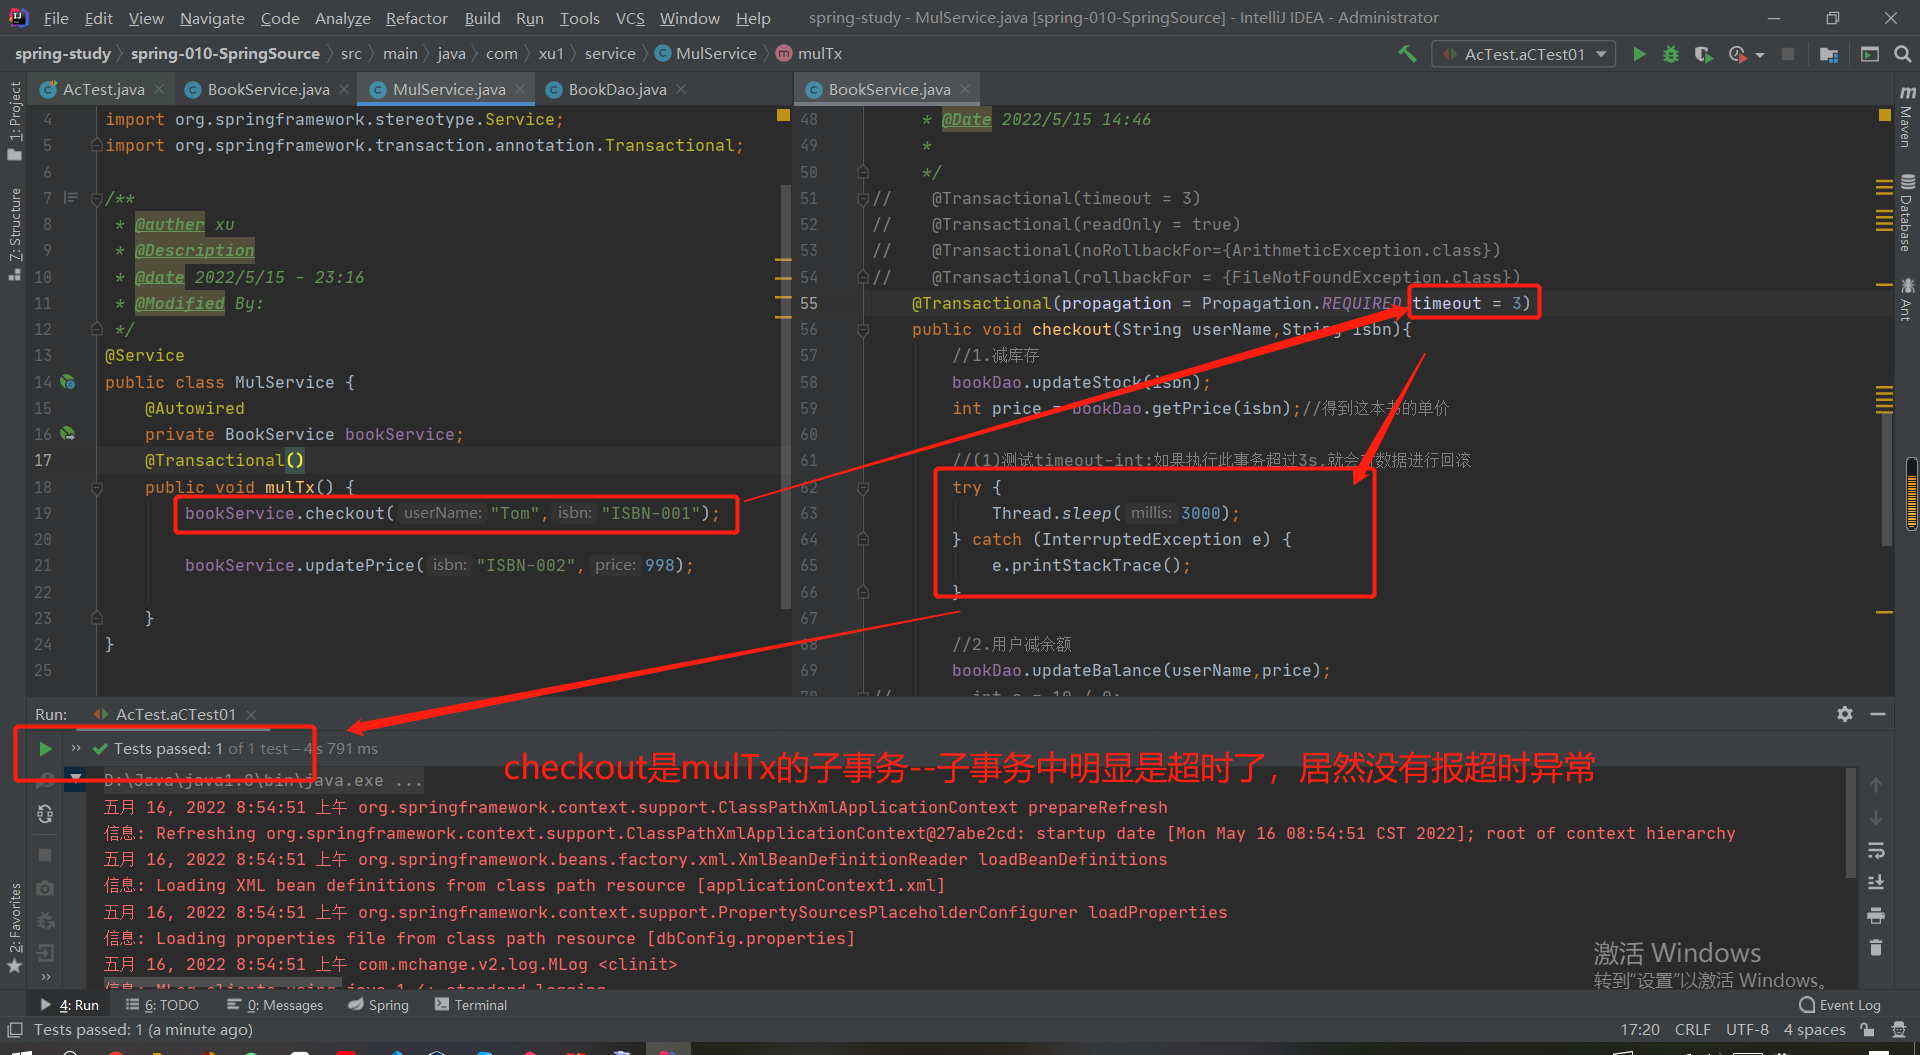

5-7本类事务方法之间的调用就只是一个事务
1.代码显示

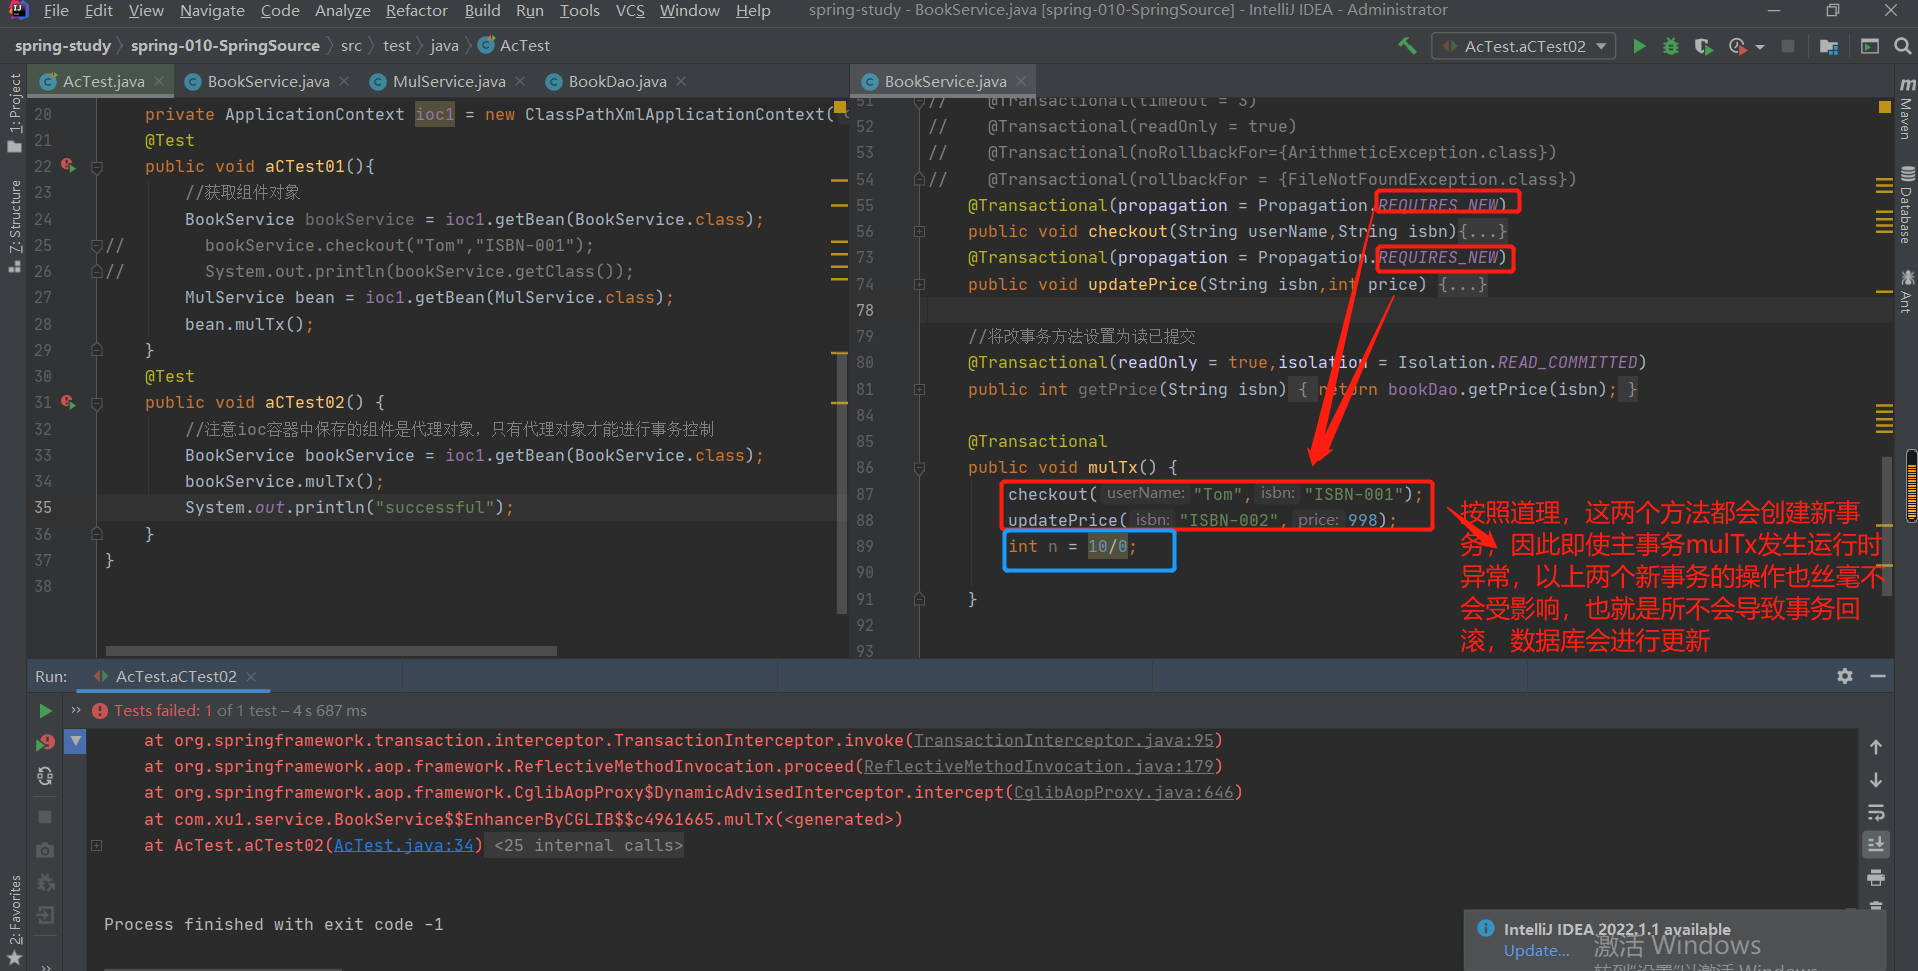

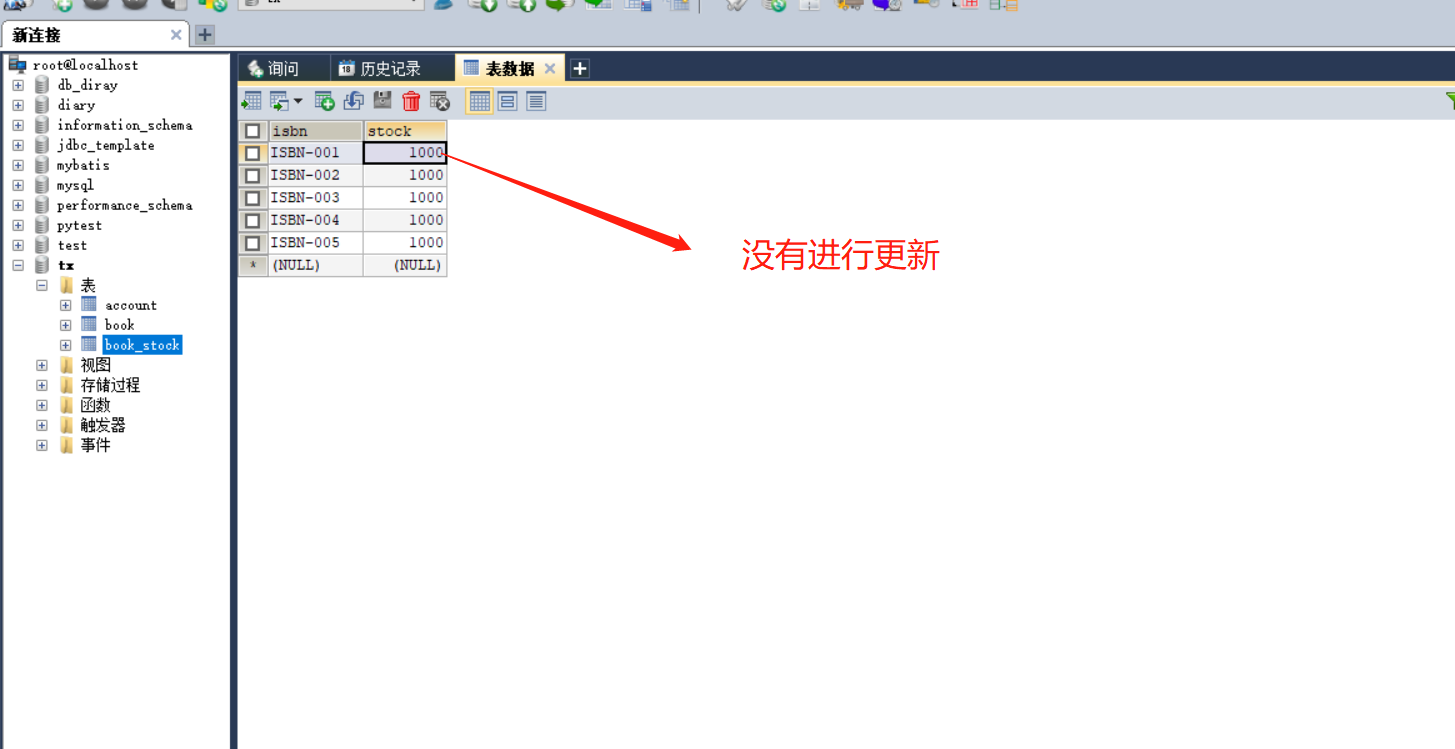
2.出错原因:
1.分析

@Transactional
public void mulTx() {
    checkout("Tom","ISBN-001");
    updatePrice("ISBN-002",998);
    int n = 10/0;

}

//相当于如下代码
@Transactional
public void mulTx() {
		 //1.减库存
        bookDao.updateStock(isbn);
        int price = bookDao.getPrice(isbn);//得到这本书的单价

        //(1)测试timeout-int:如果执行此事务超过3s,就会对数据进行回滚
        try {
            Thread.sleep(3000);
        } catch (InterruptedException e) {
            e.printStackTrace();
        }

        //2.用户减余额
        bookDao.updateBalance(userName,price);

		bookDao.updatePrice(isbn,price);

    	int n = 10/0;//造成运行时异常
}
所以说只有一个总的事务mulTx,当该事务发生运行时异常时,自然要进行事务的回滚,导致结账不成功,数据不会更改
2.需要将mulTx声明到MulService方法中,不要声明到BookService中,如下为正确做法

老师分析:

3.错误做法原因
那既然是代理对象出问题,我在BookService中创建BookSrviceProxy代理对象,调用该代理对象checkout,updatePrice方法不就行了:
会导致死循环:
5-8 基于xml配置的事务:依赖tx名称空间和aop名称空间(项目11)
applicationContext1.xml
<?xml version="1.0" encoding="UTF-8"?>
<beans xmlns="http://www.springframework.org/schema/beans"
       xmlns:xsi="http://www.w3.org/2001/XMLSchema-instance"
       xmlns:content="http://www.springframework.org/schema/context"
       xmlns:tx="http://www.springframework.org/schema/tx" xmlns:aop="http://www.springframework.org/schema/aop"

       xsi:schemaLocation="http://www.springframework.org/schema/beans
        http://www.springframework.org/schema/beans/spring-beans.xsd

        http://www.springframework.org/schema/context
        http://www.springframework.org/schema/context/spring-context.xsd

        http://www.springframework.org/schema/tx
        http://www.springframework.org/schema/tx/spring-tx.xsd http://www.springframework.org/schema/aop http://www.springframework.org/schema/aop/spring-aop.xsd"
>
<!--    类扫描-->
    <content:component-scan base-package="com.xu1"></content:component-scan>
<!--    1.配置外部配置文件-->
    <content:property-placeholder location="classpath:dbConfig.properties"></content:property-placeholder>
<!--    2.配置数据源-->
    <bean id="dataSource" class="com.mchange.v2.c3p0.ComboPooledDataSource">
        <property name="user" value="${jdbc.username}"></property>
        <property name="password" value="${jdbc.password}"></property>
        <property name="jdbcUrl" value="${jdbc.jdbcUrl}"></property>
        <property name="driverClass" value="${jdbc.driverClass}"></property>
    </bean>
<!--    3.配置jdbcTemplate操作数据库-->
    <bean id="jdbcTemplate" class="org.springframework.jdbc.core.JdbcTemplate">
        <property name="dataSource" value="#{dataSource}"></property>
    </bean>
<!--
4.配置声明式事务
第1步:spring中提供事务管理器(事务切面),配置这个事务管理器
第2步:开启基于注解的事务式事务:依赖tx名称空间
第3步:给事务加注解
-->
    <!--  第1步:spring中提供事务管理器(事务切面),配置这个事务管理器  -->
    <bean id="transactionManager" class="org.springframework.jdbc.datasource.DataSourceTransactionManager">
        <property name="dataSource" ref="dataSource"></property>
     </bean>
    <!--    第2步:开启基于注解的事务式事务:依赖tx名称空间 -->
    <tx:annotation-driven transaction-manager="transactionManager"></tx:annotation-driven>


<!--
5.基于xml配置的事务:依赖tx名称空间和aop名称空间
1)Spring提供事务管理器的(事务切面),配置这个事务管理器
2)配置事务方法
3)告诉spring那些方法是事务方法:(事务切面按照我们的切入点表达式去切入事务方法)

-->
    <bean id="bookService" class="com.xu1.service.BookService"></bean>
    <aop:config>
        <!--事务的切入点表达式-->
        <aop:pointcut id="txPoint" expression="execution(* com.xu1.se*.*.*(..))"/>
        <!-- 事务的建议:事务增强 advice-ref:指向事务管理器的配置  -->
        <aop:advisor advice-ref="myAdvice" pointcut-ref="txPoint"></aop:advisor>
    </aop:config>

<!--    配置事务管理器-->
    <tx:advice id="myAdvice" transaction-manager="transactionManager">
        <!-- 事务的属性 -->
        <tx:attributes>
            <!-- 指明那些方法是事务方法;切入点表达式只是说,事务管理器要切入这些方法,那些方法加事务使用tx:method指定的  -->
            <tx:method name="*"/>
            <tx:method name="checkout" propagation="REQUIRED" timeout="3"></tx:method>

            <tx:method name="get*" read-only="true"></tx:method>

        </tx:attributes>
    </tx:advice>


</beans>
dbConfig.properties
jdbc.username=root
jdbc.password=draf19
jdbc.jdbcUrl=jdbc:mysql://localhost:3306/tx
jdbc.driverClass=com.mysql.jdbc.Driver
BookDao.java
package com.xu1.dao;

import org.springframework.beans.factory.annotation.Autowired;
import org.springframework.jdbc.core.JdbcTemplate;
import org.springframework.stereotype.Component;
import org.springframework.stereotype.Repository;

/**
 * @auther xu
 * @Description
 * @date 2022/5/10 - 19:55
 * @Modified By:
 */
@Component
public class BookDao {
    @Autowired
    JdbcTemplate jdbcTemplate;

    /**
     *
     * @Description
     * 1.减余额:减去某一个用户的余额
     *
     * @param
     * @Author xu
     * @return
     * @throws
     * @Date 2022/5/10 20:10
     *
     */
    public void updateBalance(String userName,int price) {
        String sql = "UPDATE account SET balance=balance-? WHERE userName=?";
        jdbcTemplate.update(sql,price,userName);
    }

    /**
     *
     * @Description
     * 2.获得某一本书的价格
     * @param
     * @Author xu
     * @return
     * @throws
     * @Date 2022/5/10 20:11
     *
     */
    public int getPrice(String isbn) {
        String sql = "SELECT price FROM book WHERE isbn=?";
        Integer price = jdbcTemplate.queryForObject(sql, Integer.class, isbn);
        return price;
    }

    /**
     *
     * @Description
     * 3.减库存:减去某一本书的库存
     * @param
     * @Author xu
     * @return
     * @throws
     * @Date 2022/5/10 20:17
     *
     */
    public void updateStock(String isbn) {
        String sql = "UPDATE book_stock SET stock=stock-1 WHERE isbn=?";
        jdbcTemplate.update(sql,isbn);
    }

    //改图书价格
    public void updatePrice(String isbn,int price) {
        String sql = "update book set price = ? where isbn = ?";
        jdbcTemplate.update(sql,price,isbn);
    }


}
BookService.java:
package com.xu1.service;

import com.xu1.dao.BookDao;
import org.springframework.beans.factory.annotation.Autowired;
import org.springframework.stereotype.Service;
import org.springframework.transaction.annotation.Isolation;
import org.springframework.transaction.annotation.Propagation;
import org.springframework.transaction.annotation.Transactional;

import java.io.File;
import java.io.FileInputStream;
import java.io.FileNotFoundException;

/**
 * @auther xu
 * @Description
 * @date 2022/5/10 - 20:20
 * @Modified By:
 */
public class BookService {
    @Autowired
    BookDao bookDao;

    public void checkout(String userName,String isbn){
        //1.减库存
        bookDao.updateStock(isbn);
        int price = bookDao.getPrice(isbn);//得到这本书的单价

        //2.用户减余额
        bookDao.updateBalance(userName,price);
    }
    public void updatePrice(String isbn,int price) {
        bookDao.updatePrice(isbn,price);
//        int a = 10 / 0;
    }


    public int getPrice(String isbn) {
        return bookDao.getPrice(isbn);
    }

}
输出结果:


源码解析:(还需要看)
1.图示AOP各个切面类内部方法的执行顺序
2.spring容器启动创建bean

源码:

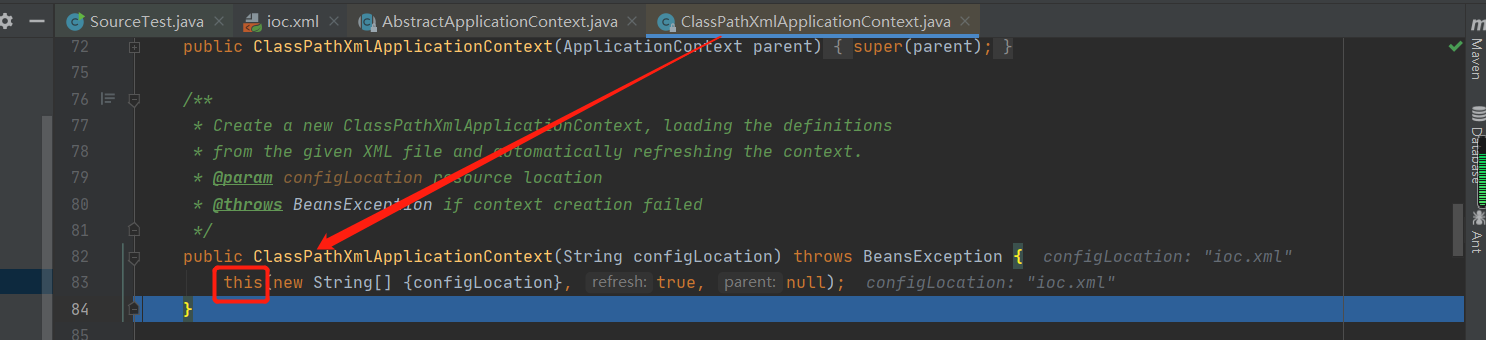


接下来详细分析refresh方法:
@Override
	public void refresh() throws BeansException, IllegalStateException {
		synchronized (this.startupShutdownMonitor) {
			// Prepare this context for refreshing.
			prepareRefresh();

			// Tell the subclass to refresh the internal bean factory.
			ConfigurableListableBeanFactory beanFactory = obtainFreshBeanFactory();

			// Prepare the bean factory for use in this context.
			prepareBeanFactory(beanFactory);

			try {
				// Allows post-processing of the bean factory in context subclasses.
				postProcessBeanFactory(beanFactory);

				// Invoke factory processors registered as beans in the context.
				invokeBeanFactoryPostProcessors(beanFactory);

				// Register bean processors that intercept bean creation.
				registerBeanPostProcessors(beanFactory);

				// Initialize message source for this context.
				initMessageSource();

				// Initialize event multicaster for this context.
				initApplicationEventMulticaster();

				// Initialize other special beans in specific context subclasses.
				onRefresh();

				// Check for listener beans and register them.
				registerListeners();

				// Instantiate all remaining (non-lazy-init) singletons.
				finishBeanFactoryInitialization(beanFactory);

				// Last step: publish corresponding event.
				finishRefresh();
			}

			catch (BeansException ex) {
				// Destroy already created singletons to avoid dangling resources.
				destroyBeans();

				// Reset 'active' flag.
				cancelRefresh(ex);

				// Propagate exception to caller.
				throw ex;
			}
		}
	}
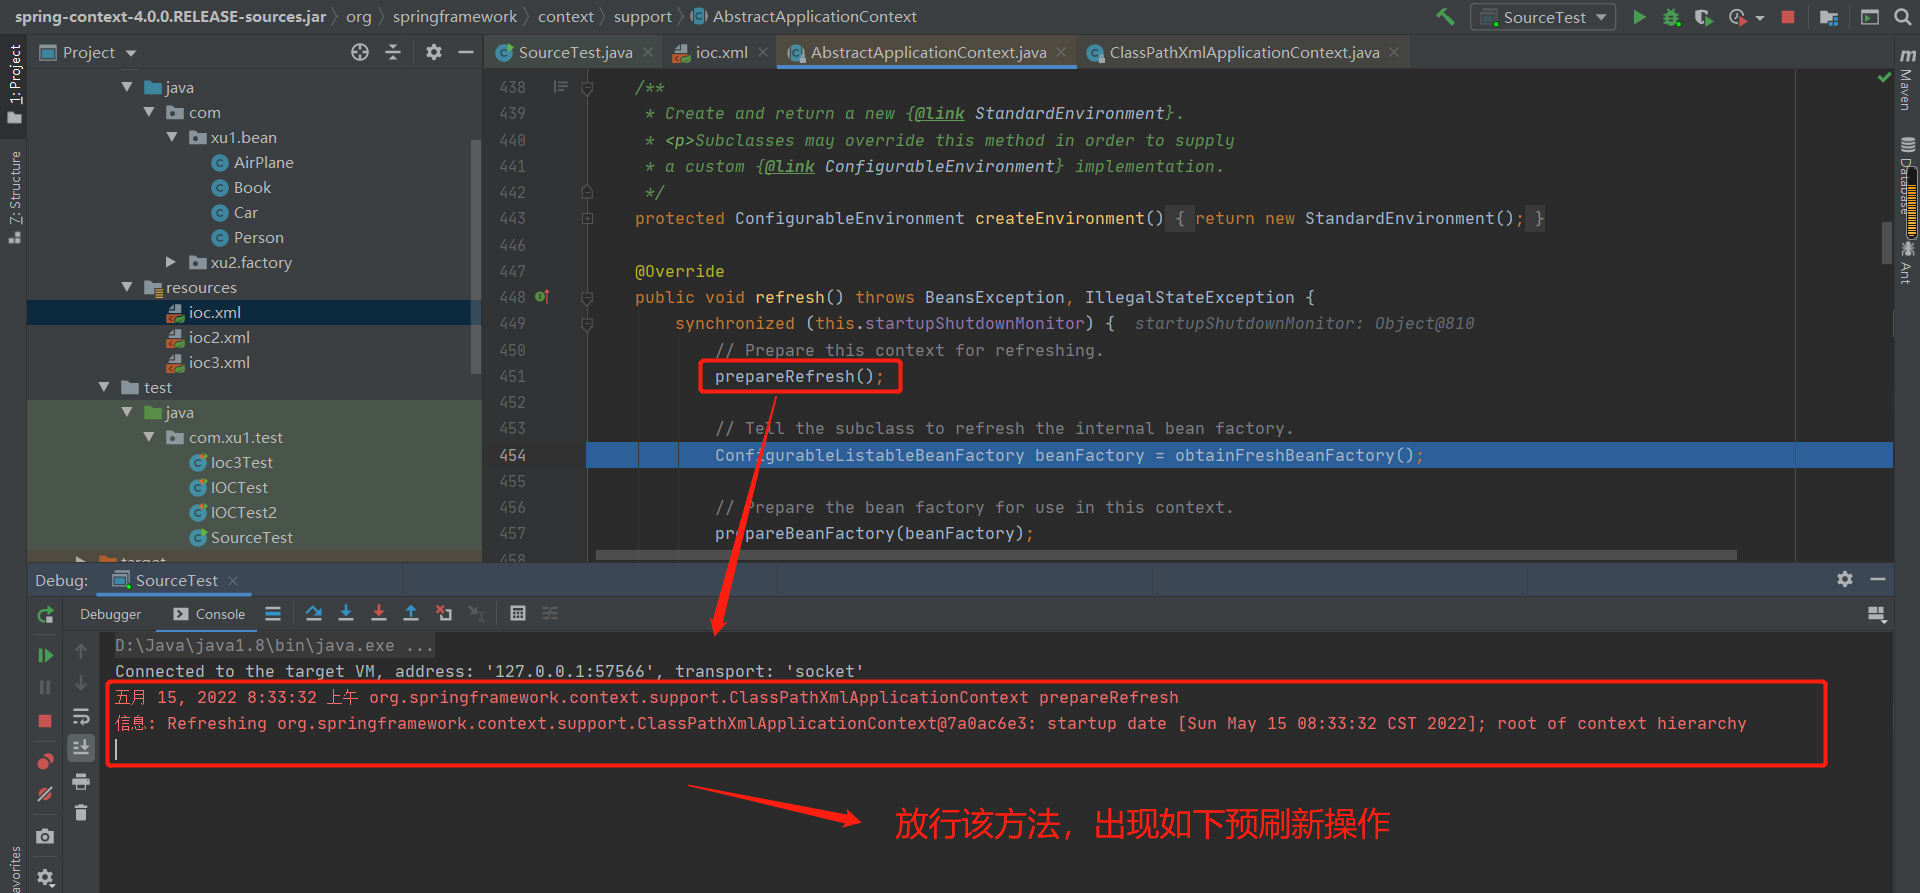

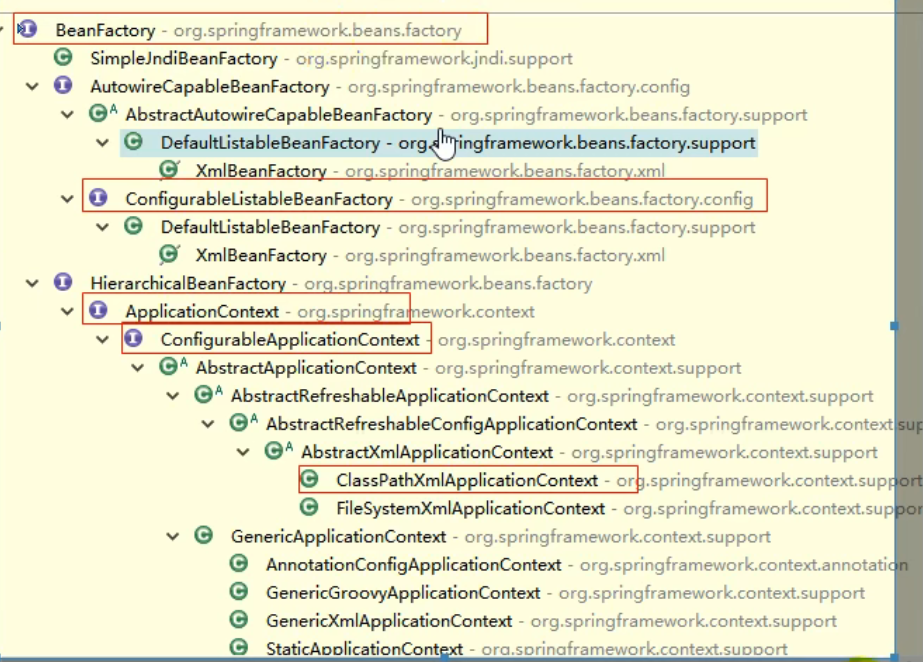

如下为解析的:person01,person02,person03,person04,person05,person06


/**
 * Finish the initialization of this context's bean factory,
 * initializing all remaining singleton beans.
 */
protected void finishBeanFactoryInitialization(ConfigurableListableBeanFactory beanFactory) {
   // Initialize conversion service for this context.
   if (beanFactory.containsBean(CONVERSION_SERVICE_BEAN_NAME) &&
         beanFactory.isTypeMatch(CONVERSION_SERVICE_BEAN_NAME, ConversionService.class)) {
      beanFactory.setConversionService(
            beanFactory.getBean(CONVERSION_SERVICE_BEAN_NAME, ConversionService.class));
   }

   // Initialize LoadTimeWeaverAware beans early to allow for registering their transformers early.
   String[] weaverAwareNames = beanFactory.getBeanNamesForType(LoadTimeWeaverAware.class, false, false);
   for (String weaverAwareName : weaverAwareNames) {
      getBean(weaverAwareName);
   }

   // Stop using the temporary ClassLoader for type matching.
   beanFactory.setTempClassLoader(null);

   // Allow for caching all bean definition metadata, not expecting further changes.
   beanFactory.freezeConfiguration();

   // Instantiate all remaining (non-lazy-init) singletons.
   beanFactory.preInstantiateSingletons();
}
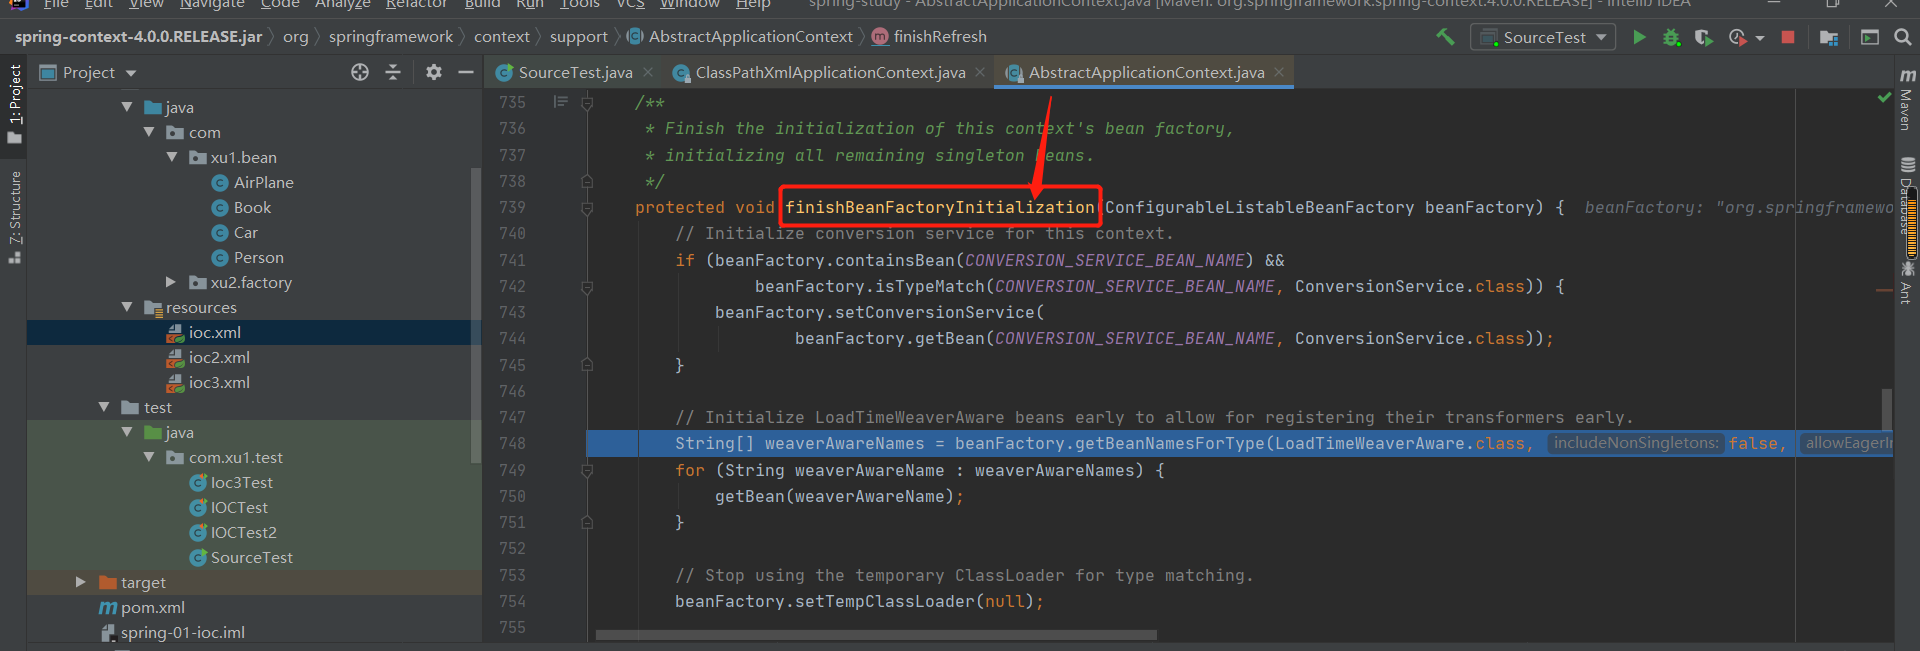

@Override
public void preInstantiateSingletons() throws BeansException {
   if (this.logger.isDebugEnabled()) {
      this.logger.debug("Pre-instantiating singletons in " + this);
   }
   List<String> beanNames;
   synchronized (this.beanDefinitionMap) {
      // Iterate over a copy to allow for init methods which in turn register new bean definitions.
      // While this may not be part of the regular factory bootstrap, it does otherwise work fine.
      beanNames = new ArrayList<String>(this.beanDefinitionNames);
   }
   for (String beanName : beanNames) {
      RootBeanDefinition bd = getMergedLocalBeanDefinition(beanName);
      if (!bd.isAbstract() && bd.isSingleton() && !bd.isLazyInit()) {
         if (isFactoryBean(beanName)) {
            final FactoryBean<?> factory = (FactoryBean<?>) getBean(FACTORY_BEAN_PREFIX + beanName);
            boolean isEagerInit;
            if (System.getSecurityManager() != null && factory instanceof SmartFactoryBean) {
               isEagerInit = AccessController.doPrivileged(new PrivilegedAction<Boolean>() {
                  @Override
                  public Boolean run() {
                     return ((SmartFactoryBean<?>) factory).isEagerInit();
                  }
               }, getAccessControlContext());
            }
            else {
               isEagerInit = (factory instanceof SmartFactoryBean &&
                     ((SmartFactoryBean<?>) factory).isEagerInit());
            }
            if (isEagerInit) {
               getBean(beanName);
            }
         }
         else {
            getBean(beanName);
         }
      }
   }
}


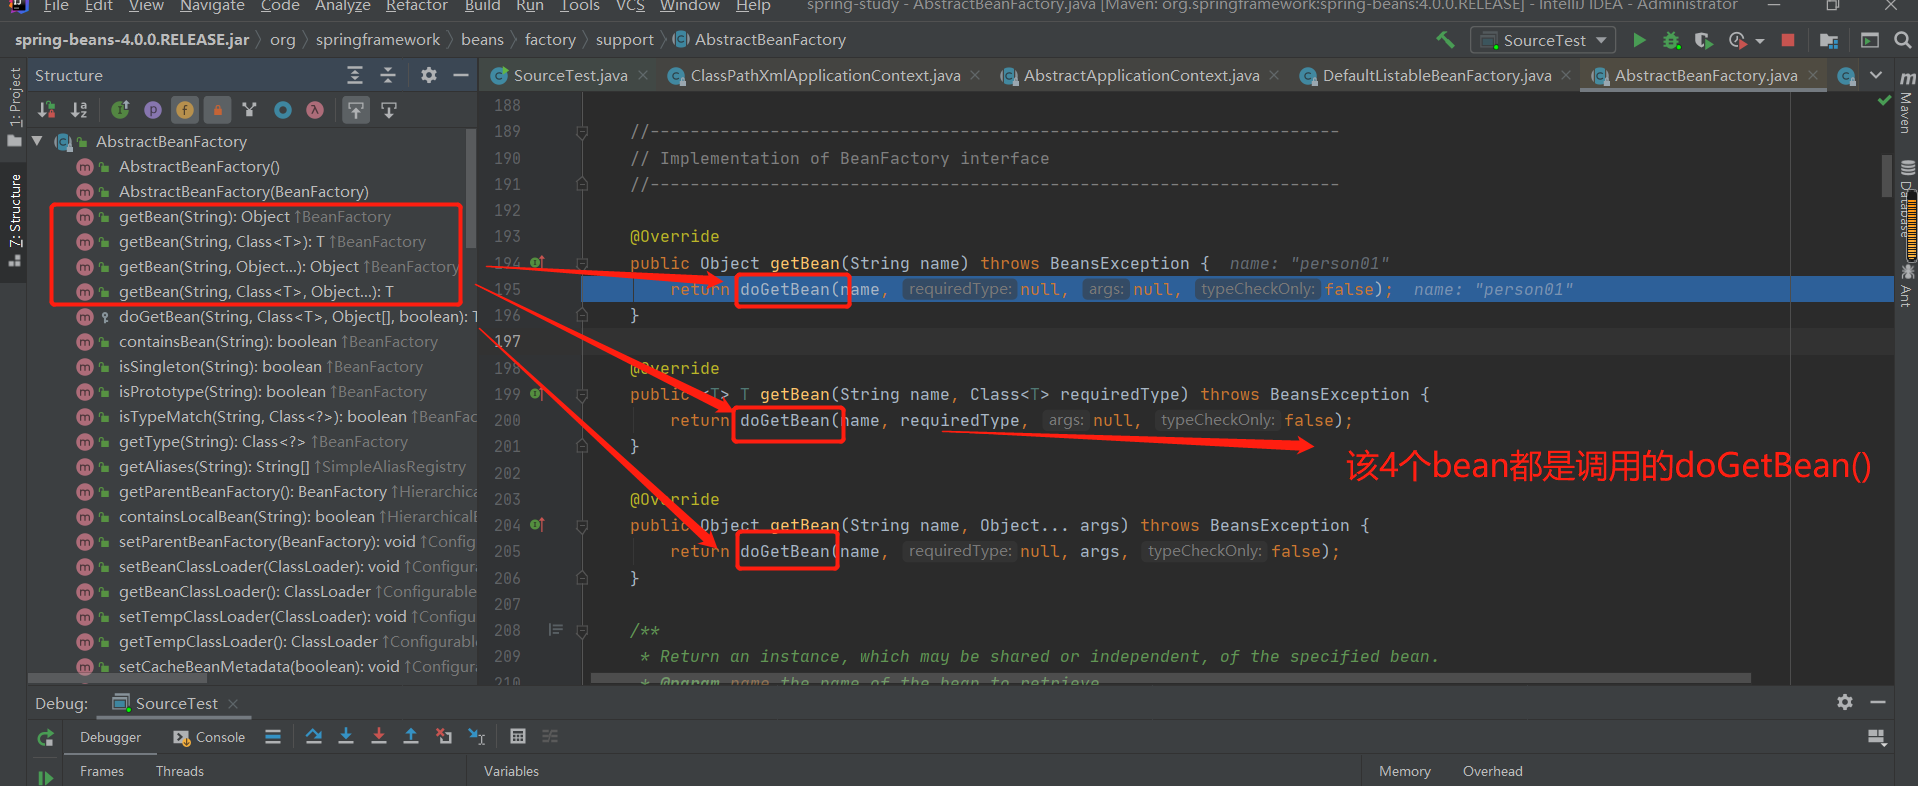
接下来研究doGetBean:
/**
 * Return an instance, which may be shared or independent, of the specified bean.
 * @param name the name of the bean to retrieve
 * @param requiredType the required type of the bean to retrieve
 * @param args arguments to use if creating a prototype using explicit arguments to a
 * static factory method. It is invalid to use a non-null args value in any other case.
 * @param typeCheckOnly whether the instance is obtained for a type check,
 * not for actual use
 * @return an instance of the bean
 * @throws BeansException if the bean could not be created
 */
@SuppressWarnings("unchecked")
protected <T> T doGetBean(
      final String name, final Class<T> requiredType, final Object[] args, boolean typeCheckOnly)
      throws BeansException {

   final String beanName = transformedBeanName(name);
   Object bean;

   // Eagerly check singleton cache for manually registered singletons.
   Object sharedInstance = getSingleton(beanName);
   if (sharedInstance != null && args == null) {
      if (logger.isDebugEnabled()) {
         if (isSingletonCurrentlyInCreation(beanName)) {
            logger.debug("Returning eagerly cached instance of singleton bean '" + beanName +
                  "' that is not fully initialized yet - a consequence of a circular reference");
         }
         else {
            logger.debug("Returning cached instance of singleton bean '" + beanName + "'");
         }
      }
      bean = getObjectForBeanInstance(sharedInstance, name, beanName, null);
   }

   else {
      // Fail if we're already creating this bean instance:
      // We're assumably within a circular reference.
      if (isPrototypeCurrentlyInCreation(beanName)) {
         throw new BeanCurrentlyInCreationException(beanName);
      }

      // Check if bean definition exists in this factory.
      BeanFactory parentBeanFactory = getParentBeanFactory();
      if (parentBeanFactory != null && !containsBeanDefinition(beanName)) {
         // Not found -> check parent.
         String nameToLookup = originalBeanName(name);
         if (args != null) {
            // Delegation to parent with explicit args.
            return (T) parentBeanFactory.getBean(nameToLookup, args);
         }
         else {
            // No args -> delegate to standard getBean method.
            return parentBeanFactory.getBean(nameToLookup, requiredType);
         }
      }

      if (!typeCheckOnly) {
         markBeanAsCreated(beanName);
      }

      try {
         final RootBeanDefinition mbd = getMergedLocalBeanDefinition(beanName);
         checkMergedBeanDefinition(mbd, beanName, args);

         // Guarantee initialization of beans that the current bean depends on.
         String[] dependsOn = mbd.getDependsOn();
         if (dependsOn != null) {
            for (String dependsOnBean : dependsOn) {
               if (isDependent(beanName, dependsOnBean)) {
                  throw new BeanCreationException("Circular depends-on relationship between '" +
                        beanName + "' and '" + dependsOnBean + "'");
               }
               registerDependentBean(dependsOnBean, beanName);
               getBean(dependsOnBean);
            }
         }

         // Create bean instance.
         if (mbd.isSingleton()) {
            sharedInstance = getSingleton(beanName, new ObjectFactory<Object>() {
               @Override
               public Object getObject() throws BeansException {
                  try {
                     return createBean(beanName, mbd, args);
                  }
                  catch (BeansException ex) {
                     // Explicitly remove instance from singleton cache: It might have been put there
                     // eagerly by the creation process, to allow for circular reference resolution.
                     // Also remove any beans that received a temporary reference to the bean.
                     destroySingleton(beanName);
                     throw ex;
                  }
               }
            });
            bean = getObjectForBeanInstance(sharedInstance, name, beanName, mbd);
         }

         else if (mbd.isPrototype()) {
            // It's a prototype -> create a new instance.
            Object prototypeInstance = null;
            try {
               beforePrototypeCreation(beanName);
               prototypeInstance = createBean(beanName, mbd, args);
            }
            finally {
               afterPrototypeCreation(beanName);
            }
            bean = getObjectForBeanInstance(prototypeInstance, name, beanName, mbd);
         }

         else {
            String scopeName = mbd.getScope();
            final Scope scope = this.scopes.get(scopeName);
            if (scope == null) {
               throw new IllegalStateException("No Scope registered for scope '" + scopeName + "'");
            }
            try {
               Object scopedInstance = scope.get(beanName, new ObjectFactory<Object>() {
                  @Override
                  public Object getObject() throws BeansException {
                     beforePrototypeCreation(beanName);
                     try {
                        return createBean(beanName, mbd, args);
                     }
                     finally {
                        afterPrototypeCreation(beanName);
                     }
                  }
               });
               bean = getObjectForBeanInstance(scopedInstance, name, beanName, mbd);
            }
            catch (IllegalStateException ex) {
               throw new BeanCreationException(beanName,
                     "Scope '" + scopeName + "' is not active for the current thread; " +
                     "consider defining a scoped proxy for this bean if you intend to refer to it from a singleton",
                     ex);
            }
         }
      }
      catch (BeansException ex) {
         cleanupAfterBeanCreationFailure(beanName);
         throw ex;
      }
   }

   // Check if required type matches the type of the actual bean instance.
   if (requiredType != null && bean != null && !requiredType.isAssignableFrom(bean.getClass())) {
      try {
         return getTypeConverter().convertIfNecessary(bean, requiredType);
      }
      catch (TypeMismatchException ex) {
         if (logger.isDebugEnabled()) {
            logger.debug("Failed to convert bean '" + name + "' to required type [" +
                  ClassUtils.getQualifiedName(requiredType) + "]", ex);
         }
         throw new BeanNotOfRequiredTypeException(name, requiredType, bean.getClass());
      }
   }
   return (T) bean;
}


public Object getSingleton(String beanName, ObjectFactory<?> singletonFactory) {
   Assert.notNull(beanName, "'beanName' must not be null");
   synchronized (this.singletonObjects) {
      Object singletonObject = this.singletonObjects.get(beanName);
      if (singletonObject == null) {
         if (this.singletonsCurrentlyInDestruction) {
            throw new BeanCreationNotAllowedException(beanName,
                  "Singleton bean creation not allowed while the singletons of this factory are in destruction " +
                  "(Do not request a bean from a BeanFactory in a destroy method implementation!)");
         }
         if (logger.isDebugEnabled()) {
            logger.debug("Creating shared instance of singleton bean '" + beanName + "'");
         }
         beforeSingletonCreation(beanName);
         boolean recordSuppressedExceptions = (this.suppressedExceptions == null);
         if (recordSuppressedExceptions) {
            this.suppressedExceptions = new LinkedHashSet<Exception>();
         }
         try {
            singletonObject = singletonFactory.getObject();
         }
         catch (BeanCreationException ex) {
            if (recordSuppressedExceptions) {
               for (Exception suppressedException : this.suppressedExceptions) {
                  ex.addRelatedCause(suppressedException);
               }
            }
            throw ex;
         }
         finally {
            if (recordSuppressedExceptions) {
               this.suppressedExceptions = null;
            }
            afterSingletonCreation(beanName);
         }
         addSingleton(beanName, singletonObject);
      }
      return (singletonObject != NULL_OBJECT ? singletonObject : null);
   }
}


/**
 * Add the given singleton object to the singleton cache of this factory.
 * <p>To be called for eager registration of singletons.
 * @param beanName the name of the bean
 * @param singletonObject the singleton object
 */
protected void addSingleton(String beanName, Object singletonObject) {
   synchronized (this.singletonObjects) {
      this.singletonObjects.put(beanName, (singletonObject != null ? singletonObject : NULL_OBJECT));
      this.singletonFactories.remove(beanName);
      this.earlySingletonObjects.remove(beanName);
      this.registeredSingletons.add(beanName);
   }
}
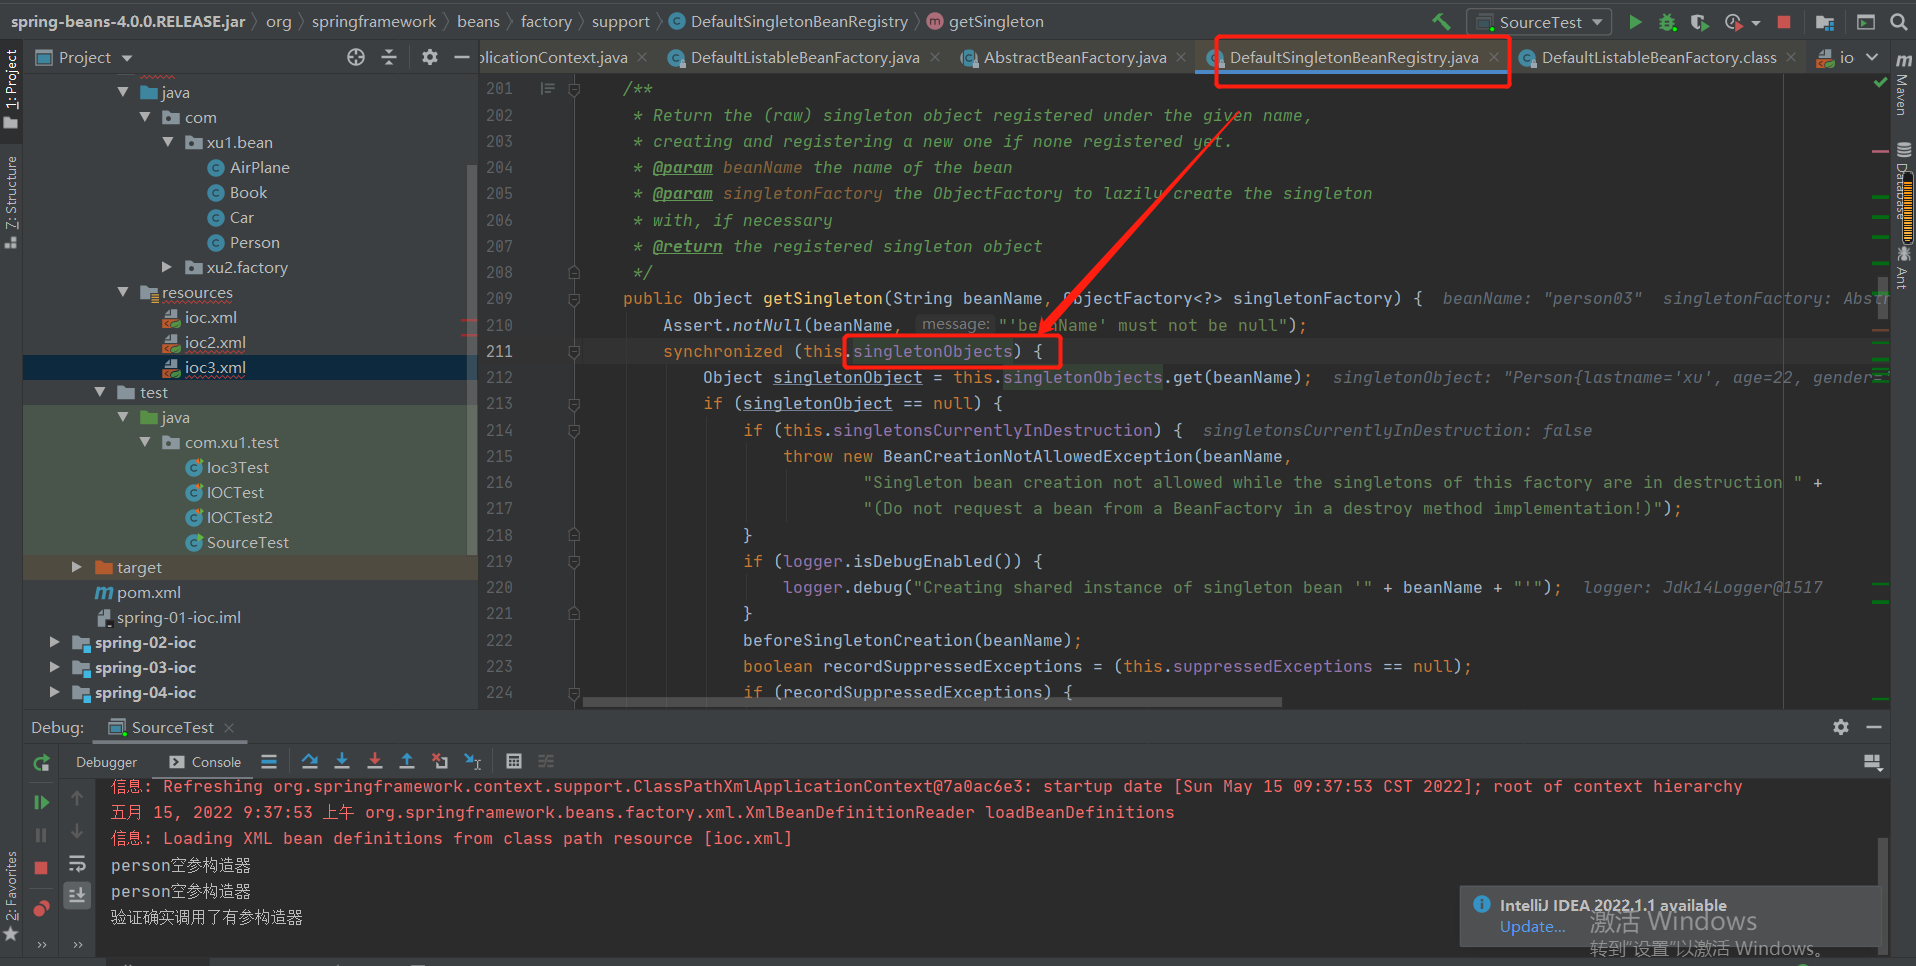

以后得到bean,只需要在该容器中拿即可。
总结一波:

科普
1.CGLIB包的介绍
代理为控制要访问的目标对象提供了一种途径。当访问对象时,它引入了一个间接的层。JDK自从1.3版本开始,就引入了动态代理,并且经常被用来动态地创建代理。JDK的动态代理用起来非常简单,但它有一个限制,就是使用动态代理的对象必须实现一个或多个接口。如果想代理没有实现接口的继承的类,该怎么办?现在我们可以使用CGLIB包
CGLIB是一个强大的高性能的代码生成包。它广泛的被许多AOP的框架使用,例如Spring AOP和dynaop,为他们提供方法的interception(拦截)。最流行的OR Mapping工具hibernate也使用CGLIB来代理单端single-ended(多对一和一对一)关联(对集合的延迟抓取,是采用其他机制实现的)。EasyMock和jMock是通过使用模仿(mock)对象来测试java代码的包。它们都通过使用CGLIB来为那些没有接口的类创建模仿(mock)对象。
CGLIB包的底层是通过使用一个小而快的字节码处理框架ASM,来转换字节码并生成新的类。除了CGLIB包,脚本语言例如Groovy和BeanShell,也是使用ASM来生成java的字节码。当然不鼓励直接使用ASM,因为它要求你必须对JVM内部结构包括class文件的格式和指令集都很熟悉。

 浙公网安备 33010602011771号