

Hive安装过程,集成本地Mysql
话不多说,简单粗暴:
1. Hive下载地址及下载方式:
官方网址:https://hive.apache.org/downloads.html
Linux下载方式:wget http://mirrors.tuna.tsinghua.edu.cn/apache/hadoop/common/hadoop-2.8.4/hadoop-2.8.4.tar.gz
存储路径、解压等不再详细赘述。
2. 下载MySql连接Jar包【Maven 仓库选择适当版本即可,本Demo使用 mysql-connector-java-5.1.45.jar】:
http://mvnrepository.com/artifact/mysql/mysql-connector-java
3. 增加Hive环境变量:
使用命令:vim /etc/profile
增加内容:
#HIVE
HIVE_HOME=/opt/apache-hive-2.3.3-bin
HIVE_CONF_DIR=$HIVE_HOME/conf
PATH=.:$PATH:$HADOOP_HOME/bin:$HIVE_HOME/bin
确认是否成功
hive –-version //注意:这里是两个 -
配置成功如下图所示:

4. 配置集成Mysql数据库
4.1 新建Hive数据库,用于保存Hive的元数据
1. 进入Mysql环境,如没有配置,可参考此连接安装。[Linux系统安装MySql服务]
2. 执行如下操作
mysql -u root -p -h localhost    //进入Mysql环境
Enter password:
mysql> CREATE DATABASE aaaTest;
mysql> USE aaaTest;
mysql> SOURCE [Hive目录]/scripts/metastore/upgrade/mysql/hive-schema-2.3.0.mysql.sql
mysql>
mysql> CREATE USER  'hadoop'@'%'  IDENTIFIED BY 'hadoop';    // 创建hadoop用户
mysql> GRANT ALL PRIVILEGES ON  *.* TO 'hadoop'@'%' WITH GRANT OPTION;  //将hive数据库下的所有表的所有权限赋给hadoop用户,并配置mysql为hive-site.xml中的连接密码
mysql> flush privileges;  // 刷新系统权限关系表
3. 格式化数据库
 cd hive目录/bin
 ./schematool --dbType mysql --initSchema
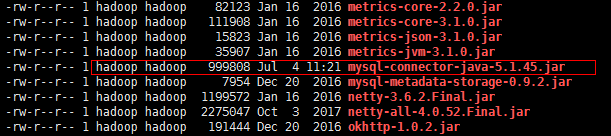
4.2 将下载好的MySql驱动,复制到Hive的lib目中:
4.3 到hive中的conf目录下,执行如下 操作:
cp hive-default.xml.template hive-site.xml
vim hive-site.xml
主要是配置Mysql的连接信息:
<?xml version="1.0" encoding="UTF-8" standalone="no"?>
<?xml-stylesheet type="text/xsl" href="configuration.xsl"?><!--
   Licensed to the Apache Software Foundation (ASF) under one or more
   contributor license agreements.  See the NOTICE file distributed with
   this work for additional information regarding copyright ownership.
   The ASF licenses this file to You under the Apache License, Version 2.0
   (the "License"); you may not use this file except in compliance with
   the License.  You may obtain a copy of the License at

       http://www.apache.org/licenses/LICENSE-2.0

   Unless required by applicable law or agreed to in writing, software
   distributed under the License is distributed on an "AS IS" BASIS,
   WITHOUT WARRANTIES OR CONDITIONS OF ANY KIND, either express or implied.
   See the License for the specific language governing permissions and
   limitations under the License.
--><configuration>
  <!-- WARNING!!! This file is auto generated for documentation purposes ONLY! -->
  <!-- WARNING!!! Any changes you make to this file will be ignored by Hive.   -->
  <!-- WARNING!!! You must make your changes in hive-site.xml instead.         -->
  <!-- Hive Execution Parameters -->

//增加如下代码【注意,一定要删除或注释文件中相同的配置。注意,注意,注意。否则会报错】
    <property>
        <name>javax.jdo.option.ConnectionUserName</name>  //删除文件中原有property
        <value>hadoop</value>
    </property>
    <property>
        <name>javax.jdo.option.ConnectionPassword</name>  //删除文件中原有property
        <value>hadoop</value>
    </property>
   <property>
        <name>javax.jdo.option.ConnectionURL</name>    //删除文件中原有property
        <value>jdbc:mysql://localhost:3306/aaaTest?createDatabaseIfNoExist=true</value>
        <!-- <value>jdbc:mysql://*.*.*.*:3306/aaaTest?createDatabaseIfNoExist=true</value> -->
    </property>
 </property>
    <property>
        <name>javax.jdo.option.ConnectionDriverName</name>  //删除文件中原有property
        <value>com.mysql.jdbc.Driver</value>
    </property>
//增加结束

//修改以下属性为  true
<property>
    <name>hive.metastore.local</name>  //修改文件中原有property
    <value>true</value>
  </property>
4.4 再次执行 hive 命令:

show databases;
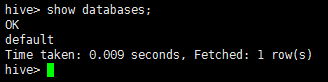
至此,Hive安装成功。
以上仅供参考,如果 有问题可留意及时沟通。
参考:
https://www.cnblogs.com/kinginme/p/7249533.html
https://www.cnblogs.com/kinginme/p/7233315.html
https://www.cnblogs.com/dxxblog/p/8193967.html
https://www.cnblogs.com/linbingdong/p/5829369.html


 浙公网安备 33010602011771号