RestFramework框架初识
一.前情提要
1.什么是编程
数据结构和算法
2.什么是rest?
(1).传统方式下的url
访问所有数据:
    127.0.0.1:8000/books/
    127.0.0.1:8000/get_all_books/

访问单条数据:
    127.0.0.1:8000/books/{id}/
    127.0.0.1:8000/books/{id}?method=get

创建数据:
    127.0.0.1:8000/books/add/
    127.0.0.1:8000/books/?type=create

修改数据:
    128.0.0.1:8000/books/update/

删除数据:
    128.0.0.1:8000/books/delete/

......
(2).rest下的url
url唯一代表资源,http请求方式来区分用户行为
url的设计规范:
    GET:    127.0.0.1:8000/books/       # 获取所有数据
    GET:    127.0.0.1:8000/books/{id}   # 获取单条数据
    POST:   127.0.0.1:8000/books/       # 增加数据
    DELETE: 127.0.0.1:8000/books/{id}   # 删除数据
    PUT:    127.0.0.1:8000/books/{id}   # 修改数据

数据响应规范:
    GET:    127.0.0.1:8000/books/       # 返回[{},{},{}]
    GET:    127.0.0.1:8000/books/{id}   # {}单条数据
    POST:   127.0.0.1:8000/books/       # {}添加成功的数据
    DELETE: 127.0.0.1:8000/books/{id}   # ""返回空
    PUT:    127.0.0.1:8000/books/{id}   # {}更新后完整的数据

错误处理:
    {"error":"message"}
3.回顾知识点:
(1).CBV: CBV(class base views) 就是在视图里使用类处理请求
urls.py部分:
from django.urls import path

from app01 import views

urlpatterns = [
    path('login/', views.LoginView.as_view()),
]
views.py部分:
from django.shortcuts import render, HttpResponse
from django.views import View

# Create your views here.

class LoginView(View):
    def get(self, request):
        return render(request, 'login.html')

    def post(self, request):
        return HttpResponse("post")
(2).classmethod & classonlymethod
- classmethod: 修饰符对应的函数不需要实例化,不需要 self 参数,但第一个参数需要是表示自身类的 cls 参数,可以来调用类的属性,类的方法,实例化对象等
class A(object):
    bar = 1
    def func1(self):
        print ('foo')
    @classmethod
    def func2(cls):
        print ('func2')
        print (cls.bar)
        cls().func1()   # 调用 foo 方法

A.func2()               # 不需要实例化
- classonlymethod: classmethod可以被一个实例调用,但是classonlymethod不能,它只能被类调用( ↓源码解释 )
class classonlymethod(classmethod):
    def __get__(self, instance, owner):
        if instance is not None:
            raise AttributeError("This method is available only on the view class.")
        return super(classonlymethod, self).__get__(instance, owner)


from django.utils.decorators import classonlymethod

class Person(object):
    def __init__(self, name, age):
        self.name = name
        self.age = age

    def show_info(self):
        print("show info method been executed")

    @classmethod
    def show_info2(cls):
        print("show info2 method been executed")

    @classonlymethod
    def show_info3(cls):
        print("show info3 method been executed")


p1 = Person("pizza", 18)
# 普通方法可以通过实例对象和类调用
# 通过实例调用时默认传入self作为第一个参数,不需要手动传入参数
# 通过类调用时,必须手动指定实例对象传递给该方法
p1.show_info()
Person.show_info(p1)

# 被classmethod装饰器装饰后的方法可以通过实例对象和类直接调用
# 默认传入类名作为第一个参数
p1.show_info2()
Person.show_info2()

p1.show_info3()      # 报错,Django框架实现了classonlymethd,不再允许实例对象调用被该装饰器装饰的方法
Person.show_info3()
(3).getattr, hasattr, setattr
- getattr() 函数用于返回一个对象属性值
>>>class A(object):
...     bar = 1
...
>>> a = A()
>>> getattr(a, 'bar')        # 获取属性 bar 值
1
>>> getattr(a, 'bar2')       # 属性 bar2 不存在,触发异常
Traceback (most recent call last):
  File "<stdin>", line 1, in <module>
AttributeError: 'A' object has no attribute 'bar2'
>>> getattr(a, 'bar2', 3)    # 属性 bar2 不存在,但设置了默认值
3
>>>
- hasattr() 函数用于判断对象是否包含对应的属性。
class Coordinate:
    x = 10
    y = -5
    z = 0

point1 = Coordinate()
print(hasattr(point1, 'x'))
print(hasattr(point1, 'y'))
print(hasattr(point1, 'z'))
print(hasattr(point1, 'no'))  # 没有该属性
- setattr() 函数对应函数 getattr(),用于设置属性值,该属性必须存在
>>>class A(object):
...     bar = 1
...
>>> a = A()
>>> getattr(a, 'bar')          # 获取属性 bar 值
1
>>> setattr(a, 'bar', 5)       # 设置属性 bar 值
>>> a.bar
5
class Person(object):
    def __init__(self, name, age):
        self.name = name
        self.age = age
        self._hobby = 'girls'

    def show_info(self):
        print("show info method been executed")


p1 = Person("pizza", 18)
# 查看该对象是否有show_info方法
print(hasattr(p1, "show_info"))
# 查看该对象是否有age属性
print(hasattr(p1, "age"))
print(hasattr(p1, "hahaha"))

greeting = "Hello World"
# 设置属性
setattr(p1, "hahaha", greeting)
print(hasattr(p1, "hahaha"))

func = getattr(p1, "show_info")
print(func)  # <bound method Person.show_info of <__main__.Person object at 0x102219d68>>
# 注意:直接调用,不需要传入self,getattr时已经绑定self到func了
func()

print(hasattr(Person, "show_info"))  # True
print(hasattr(Person, "name"))       # False
print(hasattr(Person, "country"))    # False
# 给Person类设置属性
setattr(Person, "country", "china")
print(hasattr(Person, "country"))    # True
print(hasattr(p1, "country"))        # True
(4).self定位
始终指向调用者
class Request(object):

    def show_request(self):
        print(self)


class NewRequest(Request):

    def show_request(self):
        print(self)


request = NewRequest()
# 调用方法的实例对象是哪个,self就指向哪个对象
request.show_request()
(5).http请求协议
沟通双方约定俗成的规范,解析数据的规则
Http请求报文包含三部分: 分别是请求行, 请求报文头, 请求报文体
POST /classbasedview/login/ HTTP/1.1
Host: 127.0.0.1:8000
Connection: keep-alive
Content-Length: 110
Cache-Control: max-age=0
Origin: http://127.0.0.1:8000
Upgrade-Insecure-Requests: 1
Content-Type: application/x-www-form-urlencoded
User-Agent: Mozilla/5.0 (Windows NT 10.0; Win64; x64) AppleWebKit/537.36 (KHTML, like Gecko) Chrome/70.0.3538.102 Safari/537.36
Accept: text/html,application/xhtml+xml,application/xml;q=0.9,image/webp,image/apng,*/*;q=0.8
Referer: http://127.0.0.1:8000/classbasedview/login/
Accept-Encoding: gzip, deflate, br
Accept-Language: zh-CN,zh;q=0.9
Cookie: csrftoken=JHQb0vR5sgT2FF1UCrznIkJyPkucrHso5Tf0K9tEnc1kS1LZ16TIB9mx2LNxuivY
注意: POST请求类型有formdata, 而get没有!
POST /classbasedview/login/ HTTP/1.1: 第一行表示请求行,分别是请求方式(POST),请求URL,HTTP协议版本
HOST: 请求行下面的都是请求报文, HOST表示请求的主机和端口号
Connection: 请求连接方式
Content-Length: 内容长度(字节)
Content-Type: 请求数据的编码协议,只有POST,DELETE等请求方式该部分内容(须重点记忆)
User-Agent: 客户端信息
Accept: 可接受的响应内容类型
Accept-Encoding: 采用什么方式对请求数据进行编码
Cookie: 服务端设置的cookie
csrfmiddlewaretoken=DScaV6Yxya9TiYychh4he3SapDbldYkkZ4BZFKA6t6hbvkihGWoC7Sv9C4uGgznU&user=zm&password=123
(6).form enctype
application/x-www-form-urlencoded
multipart/form-data
text/plain
(7).JavaScript object {name:"wahaha"} ==> json的转换方式
JSON.stringify(data) ==> python json.dumps()
JSON.parse(data) ===> python json.loads()
二.Django restframework
1.开始使用DRF
(1).DRF安装:
DRF官方文档中有详细介绍. 使用↓命令安装,首先安装Django,然后安装DRF
>>> pip install django
>>> pip install djangorestframework
1.APIView
2.解析器组件
3.序列化组件
4.认证组件
5.权限组件
6.频率组件
7.url控制器组件
8.分页器组件
9.响应器组件
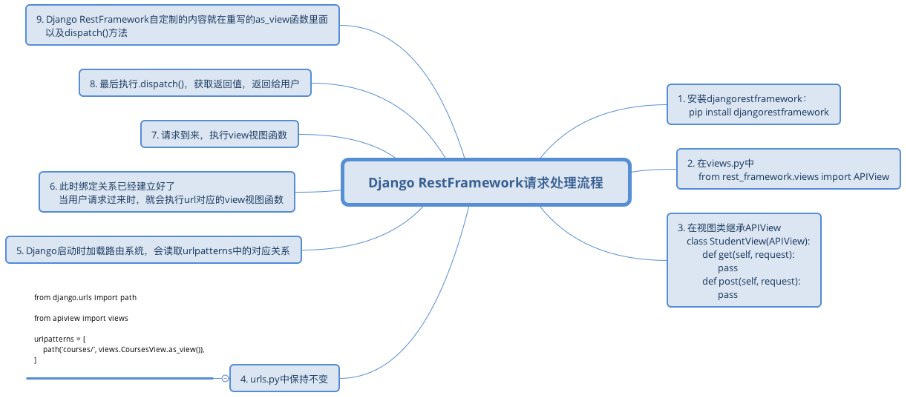
2.回顾Django View请求流程
(1).分析一下Django中的views.View类的源码, 请看下图:

3.Django RestFramework的APIView是如何对Django框架的View进行功能扩展的
from django.shortcuts import HttpResponse

import json

from .models import Courses

# 引入APIView
from rest_framework.views import APIView
# Create your views here.


class CoursesView(APIView):  # 继承APIView而不是原来的View
    def get(self, request):
        courses = list()

        for item in Courses.objects.all():
            course = {
                "title": item.title,
                "description": item.description
            }

            courses.append(course)

        return HttpResponse(json.dumps(courses, ensure_ascii=False))
(1).DRF APIView请求流程源码:
(2).Ajax发送JSON数据给服务器
<!DOCTYPE html>
<html lang="en">
<head>
  <meta charset="UTF-8">
  <title>Title</title>
  <script src="https://cdn.bootcss.com/jquery/3.3.1/jquery.min.js"></script>
  <script src="/static/jquery-1.10.2.min.js"></script>
</head>
<body>
  <form action="" method="post" enctype="application/x-www-form-urlencoded">
    {% csrf_token %}
    用户名: <input type="text" name="username"/>
    密码:  <input type="password" name="password"/>
    提交:  <input type="submit" value="提交"/>
  </form>

  <hr>
  <button class="btn">点击发送Ajax请求</button>

  <script>
    $(".btn").click(function () {
      $.ajax({
        url: '',
        type: 'post',
        contentType: 'application/json',
        data: JSON.stringify({
          username: "hehe",
          password: 123
        }
        ),
        success: function (data) {
          console.log(data);
        }
      })
    })

  </script>

</body>
</html>
通过如上代码已知,Content-Type用来定义发送数据的编码协议, 所以,在上面的代码中,我们指定Content-Type为application/json,即可将我们的Json数据发送到后端
4.postman工具介绍
安装POSTMAN,官网下载安装
(1).发送get请求
请看下面的图片:
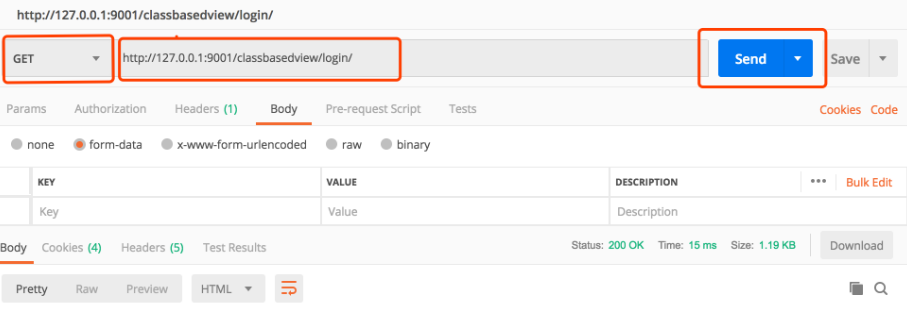
如图所示,在下拉框中选择GET方式发送请求,在地址栏输入请求url,然后点击send发送即可发送GET请求到后端服务器。
(2).以urlencoded协议发送post请求
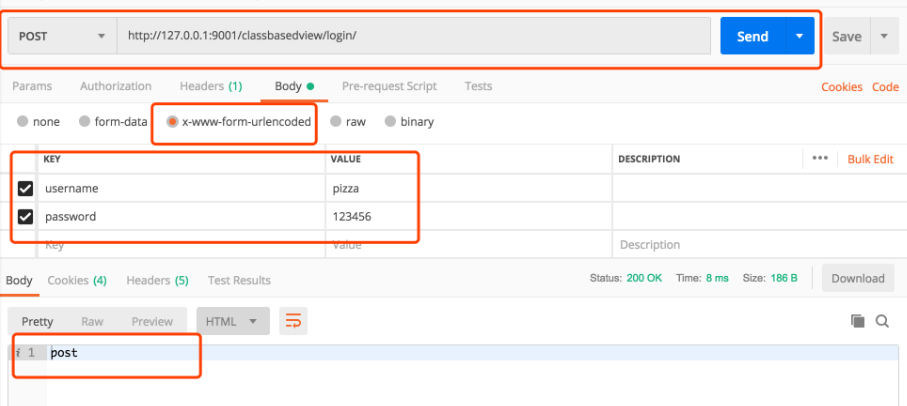
选择POST,输入地址,然后在下面的选项框中选择Body,之后选择x-www-form-urlencoded协议,输入key和value,点击Send,即可以urlencoded方式发送post请求,并且在最下面的提示框中可以查看到服务器返回的信息
(3).以JSON协议发送POST请求
最后,请看下图,以Json协议发送POST请求:
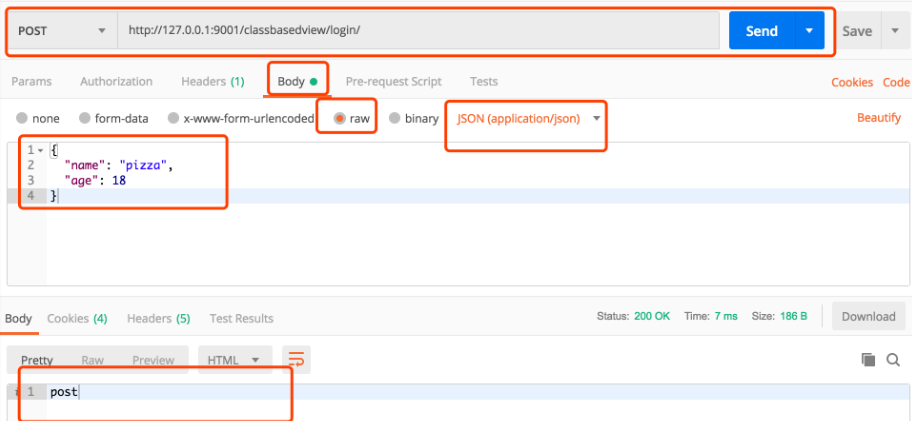
前面都一致,在Body框中,选择raw选项,然后选择application/json,最后输入Json格式的数据,点击Send即可以Json协议发送POST请求。
4.Django Rest Framework -APIView源码分析
(1).as_view()
先从URLconfig中入手,由于BookView是一个基于类的视图,所以我们将URL指向as_view()类方法
path(r'books/',views.BookView.as_view()),
此时,我们的BookView以经不是继承自Django.views中的View了,而是restframework.views中的APIView
(2).安装Django RestFramework
pip install djangorestframework
(3).BookView视图类:
from django.shortcuts import render,HttpResponse
#导入APIView
from rest_framework.views import APIView

#继承自APIView
class BookView(APIView):

    def get(self,request):
        return HttpResponse('get....')

    def post(self,request):
        return HttpResponse('post....')
(4).as_view():由于BookView没有实现as_view()方法,Django启动时,调用as_view()是APIView中的as_view()
@classmethod
def as_view(cls, **initkwargs):
    """
    将原始类存储在视图函数上
    这允许我们在执行url反向查找时发现有关视图的信息。
    """
    ...
    #由于APIView是继承自django.views中的View(上篇博客接触过)
    #调用父类(View)中的as_view()
    view = super(APIView, cls).as_view(**initkwargs)
    view.cls = cls
    view.initkwargs = initkwargs

    # 提示: 基于会话的身份验证被明确地CSRF验证
    # 所有其他身份验证都免予使用CSRF。
    # 跳过CSRF验证
    return csrf_exempt(view)
在APIView中的as_view()方法什么都没做,只是调用了父类的as_view()方法; as_view()方法会返回self.dispatch(),由于BookView没有实现这个方法,所以我们查看APIView中dispatch()都做了哪些工作
(5).dispatch():和Django.view中View类的dispatch()派遣相同,额外添加了一些功能
# Note: 在“派遣”需要被改写的情况下,可以在"as_view"范围内对CSRF进行豁免,以防止意外移除这一豁免。
def dispatch(self, request, *args, **kwargs):
    """
    和django.views中View的dispatch()调度差不多,
    但是有额外的钩子用于启动、终结和异常处理。
    """
    self.args = args
    self.kwargs = kwargs
    request = self.initialize_request(request, *args, **kwargs)
    self.request = request
    self.headers = self.default_response_headers  # deprecate?
    try:
        self.initial(request, *args, **kwargs)

        # 获取适当的程序处理方法,这里的调度和django  View的调度一样
        if request.method.lower() in self.http_method_names:
            handler = getattr(self, request.method.lower(),
                              self.http_method_not_allowed)
        else:
            handler = self.http_method_not_allowed

        # 调用HTTP请求处理方法,并返回
        response = handler(request, *args, **kwargs)

    except Exception as exc:
        response = self.handle_exception(exc)

    self.response = self.finalize_response(request, response, *args, **kwargs)
    return self.response
APIView中的dispatch()和Django中的dispatch()类似,不同之处,APIView对request请求对象进行了重新封装
(6).request:APIView和request对象进行了重新封装
def dispatch(self, request, *args, **kwargs):
    """
    `.dispatch()` is pretty much the same as Django's regular dispatch,
    but with extra hooks for startup, finalize, and exception handling.
    """
    self.args = args
    self.kwargs = kwargs
    request = self.initialize_request(request, *args, **kwargs)
    self.request = request
    self.headers = self.default_response_headers  # deprecate?

    ....
默认的是django.core.handlers.wsgi.WSGIRequest对象,通过调用initialize_request()将其封装成rest_framework.request.Request, 通过type(request)来查看
(7).initialize_request(): 做了哪些工作
def initialize_request(self, request, *args, **kwargs):
    parser_context = self.get_parser_context(request)

    # 返回了一个reuqest请求对象
    return Request(
        request,
        parsers=self.get_parsers(),
        authenticators=self.get_authenticators(),
        negotiator=self.get_content_negotiator(),
        parser_context=parser_context
    )
Request类: 完善request请求的一些注意事项 ,例如用户登录,检测权限等
class Request(object):

    def __init__(self, request, parsers=None, authenticators=None,
                 negotiator=None, parser_context=None):
        ...
        #将原始的WSGIReqeust对象复制给_request
        self._request = request

        ....

    #调用旧的request.GET
    @property
    def query_params(self):return self._request.GET

    #调用旧的request.POST
    @property
    def POST(self):return QueryDict('', encoding=self._request._encoding)
之后使用的request,都是restfromwork封装的Reqeust对象
2.APIView的使用
from res_framework.views import APIView

class LoginView(APIView):
    def get(self, request):
        pass

 浙公网安备 33010602011771号