手撕coreML之yolov2 object detection物体检测(含源代码)
一些闲话:
前面我有篇博客 https://www.cnblogs.com/riddick/p/10434339.html ,大致说了下如何将pytorch训练的.pth模型转换为mlmodel,部署在IOS端进行前向预测。只是介绍了下类接口,并没有示例,因此有可能会陷入没有demo你说个p的境地。因此,今天就拿实际的模型来说上一说。
其实coreML的demo,github上有很多,但是大部分都是用swift写的,而对于从C/C++语言过来的同学来说,Objective-C或许会更容易看懂一些。所以这次就以yolov2实现的object detection为例,创建Objective-C工程并用真机调试,来实现前向预测(并且附源代码)。
当然,为了偷懒起见,模型并不是我训练的,模型来自这里:https://github.com/syshen/YOLO-CoreML 。该仓库使用swift实现的,有兴趣的可以对比着看。yolov2的mlmodel模型文件,请看上面仓库的readMe中这句话:
execute download.sh to download the pre-trained model % sh download.sh
闲话少说,进入正题:
一、创建xcode工程,选择编程语言为Objective-C。将模型添加到xcode工程中,我将模型名字改为yoloModel,并且量化到了16bit。当然使用原始模型200多MB也完全OK。
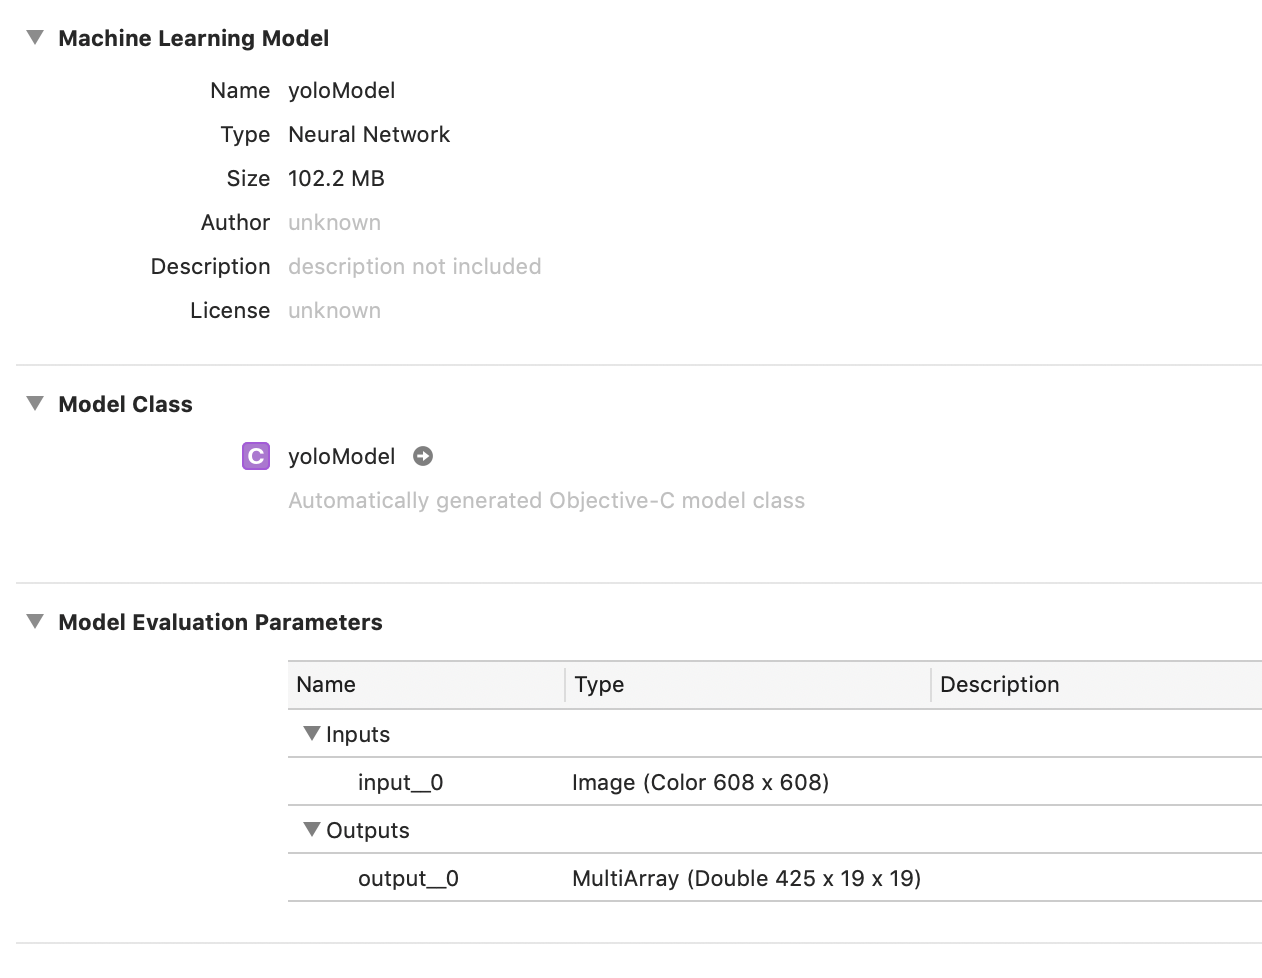
二、模型添加到工程后,会自动生成yoloModel类头文件,如下:


//
// yoloModel.h
//
// This file was automatically generated and should not be edited.
//

#import <Foundation/Foundation.h>
#import <CoreML/CoreML.h>
#include <stdint.h>

NS_ASSUME_NONNULL_BEGIN


/// Model Prediction Input Type
API_AVAILABLE(macos(10.13.2), ios(11.2), watchos(4.2), tvos(11.2)) __attribute__((visibility("hidden")))
@interface yoloModelInput : NSObject<MLFeatureProvider>

/// input__0 as color (kCVPixelFormatType_32BGRA) image buffer, 608 pixels wide by 608 pixels high
@property (readwrite, nonatomic) CVPixelBufferRef input__0;
- (instancetype)init NS_UNAVAILABLE;
- (instancetype)initWithInput__0:(CVPixelBufferRef)input__0;
@end


/// Model Prediction Output Type
API_AVAILABLE(macos(10.13.2), ios(11.2), watchos(4.2), tvos(11.2)) __attribute__((visibility("hidden")))
@interface yoloModelOutput : NSObject<MLFeatureProvider>

/// output__0 as 425 x 19 x 19 3-dimensional array of doubles
@property (readwrite, nonatomic, strong) MLMultiArray * output__0;
- (instancetype)init NS_UNAVAILABLE;
- (instancetype)initWithOutput__0:(MLMultiArray *)output__0;
@end


/// Class for model loading and prediction
API_AVAILABLE(macos(10.13.2), ios(11.2), watchos(4.2), tvos(11.2)) __attribute__((visibility("hidden")))
@interface yoloModel : NSObject
@property (readonly, nonatomic, nullable) MLModel * model;
- (nullable instancetype)init;
- (nullable instancetype)initWithContentsOfURL:(NSURL *)url error:(NSError * _Nullable * _Nullable)error;
- (nullable instancetype)initWithConfiguration:(MLModelConfiguration *)configuration error:(NSError * _Nullable * _Nullable)error API_AVAILABLE(macos(10.14), ios(12.0), watchos(5.0), tvos(12.0)) __attribute__((visibility("hidden")));
- (nullable instancetype)initWithContentsOfURL:(NSURL *)url configuration:(MLModelConfiguration *)configuration error:(NSError * _Nullable * _Nullable)error API_AVAILABLE(macos(10.14), ios(12.0), watchos(5.0), tvos(12.0)) __attribute__((visibility("hidden")));

/**
    Make a prediction using the standard interface
    @param input an instance of yoloModelInput to predict from
    @param error If an error occurs, upon return contains an NSError object that describes the problem. If you are not interested in possible errors, pass in NULL.
    @return the prediction as yoloModelOutput
*/
- (nullable yoloModelOutput *)predictionFromFeatures:(yoloModelInput *)input error:(NSError * _Nullable * _Nullable)error;

/**
    Make a prediction using the standard interface
    @param input an instance of yoloModelInput to predict from
    @param options prediction options
    @param error If an error occurs, upon return contains an NSError object that describes the problem. If you are not interested in possible errors, pass in NULL.
    @return the prediction as yoloModelOutput
*/
- (nullable yoloModelOutput *)predictionFromFeatures:(yoloModelInput *)input options:(MLPredictionOptions *)options error:(NSError * _Nullable * _Nullable)error;

/**
    Make a prediction using the convenience interface
    @param input__0 as color (kCVPixelFormatType_32BGRA) image buffer, 608 pixels wide by 608 pixels high:
    @param error If an error occurs, upon return contains an NSError object that describes the problem. If you are not interested in possible errors, pass in NULL.
    @return the prediction as yoloModelOutput
*/
- (nullable yoloModelOutput *)predictionFromInput__0:(CVPixelBufferRef)input__0 error:(NSError * _Nullable * _Nullable)error;

/**
    Batch prediction
    @param inputArray array of yoloModelInput instances to obtain predictions from
    @param options prediction options
    @param error If an error occurs, upon return contains an NSError object that describes the problem. If you are not interested in possible errors, pass in NULL.
    @return the predictions as NSArray<yoloModelOutput *>
*/
- (nullable NSArray<yoloModelOutput *> *)predictionsFromInputs:(NSArray<yoloModelInput*> *)inputArray options:(MLPredictionOptions *)options error:(NSError * _Nullable * _Nullable)error API_AVAILABLE(macos(10.14), ios(12.0), watchos(5.0), tvos(12.0)) __attribute__((visibility("hidden")));
@end

NS_ASSUME_NONNULL_END
模型名称为yoloModel,那么自动生成的类头文件就是"yoloModel.h",生成的类名也叫 yoloModel。
模型的输入名称为input_0,输出为output_0。那么自动生成的API接口就会带有input_0, output_0字段:举个栗子如下:
- (nullable yoloModelOutput *)predictionFromInput__0:(CVPixelBufferRef)input__0 error:(NSError * _Nullable * _Nullable)error;
三、在viewDidLoad里面写调用的demo。当然,从调用demo和自动生成的yoloModel类之间还有很多工作要做,比如说,图像的预处理,比如说得到预测output之后还要对其进行解析得到矩形框信息等,所以我中间封装了一层,这是后话:
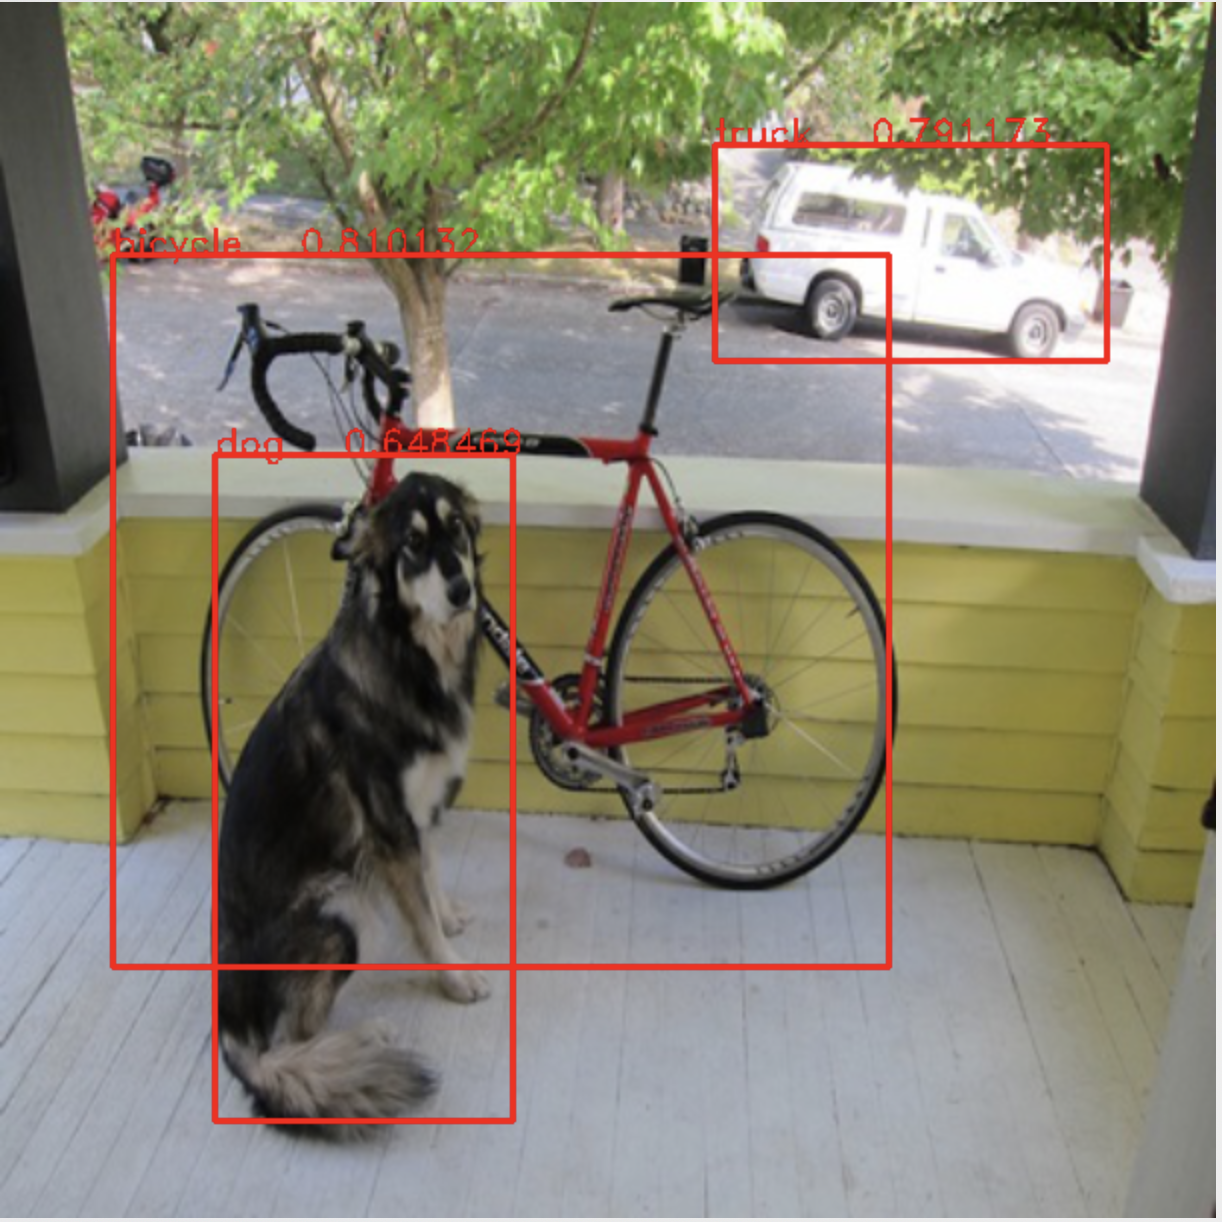
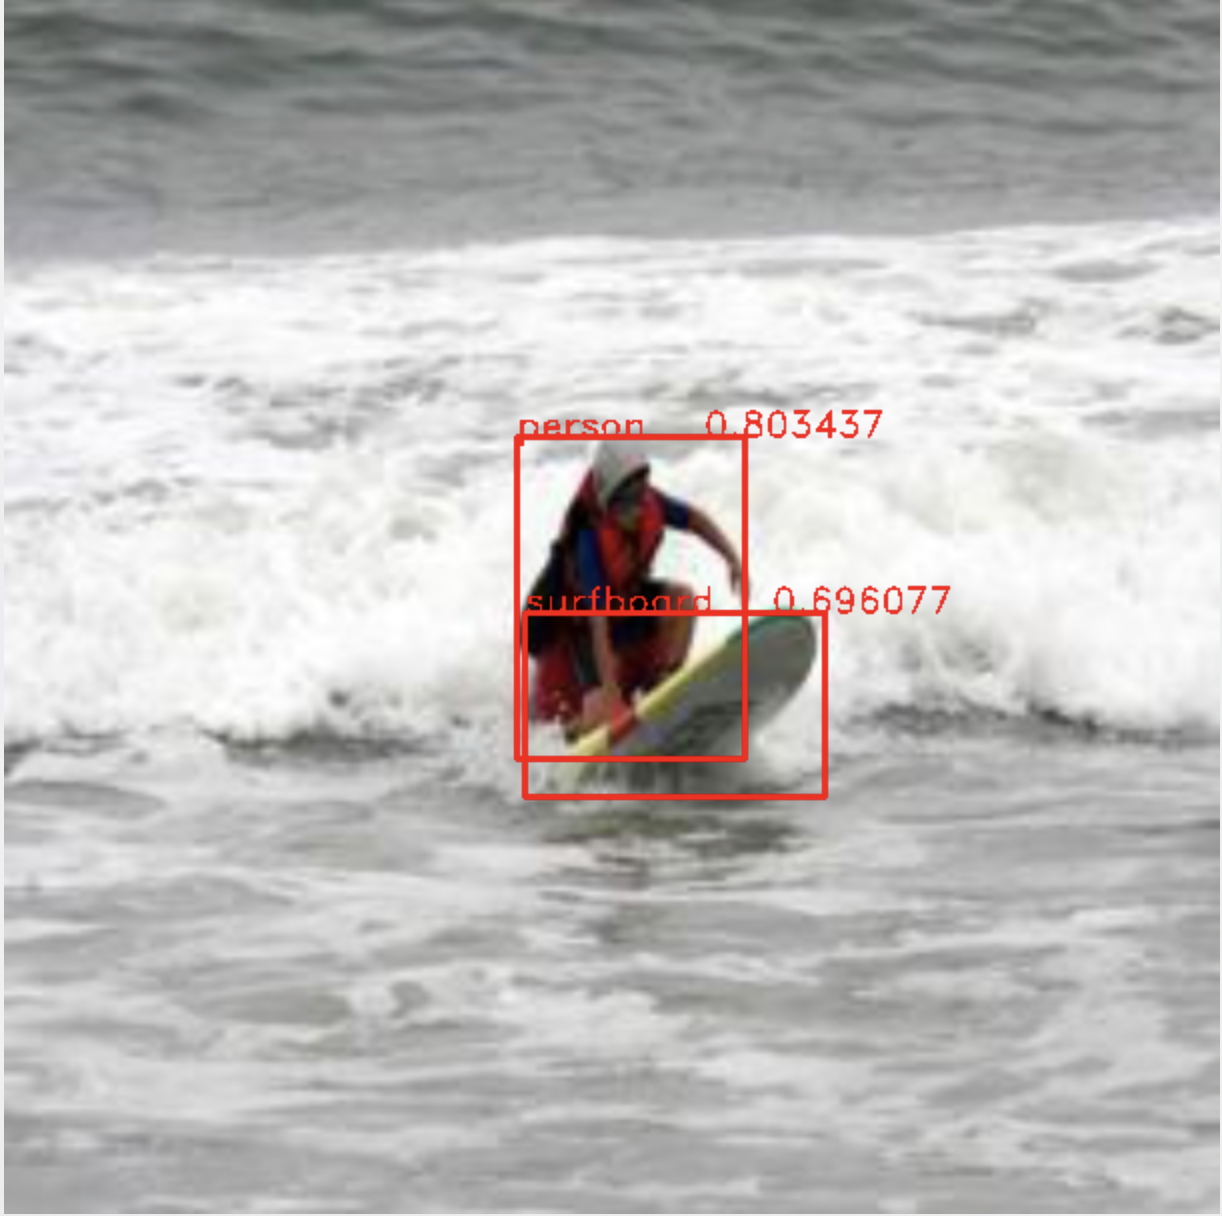
- (void)viewDidLoad {
    [super viewDidLoad];
    // Do any additional setup after loading the view, typically from a nib.

    //load image
    NSString* imagePath_=[[NSBundle mainBundle] pathForResource:@"dog416" ofType:@"jpg"];
    std::string imgPath = std::string([imagePath_ UTF8String]);
    cv::Mat image = cv::imread(imgPath);
    cv::cvtColor(image, image, CV_BGR2RGBA);


    //set classtxt path
    NSString* classtxtPath_ = [ [NSBundle mainBundle] pathForResource:@"classtxt" ofType:@"txt"];
    std::string classtxtPath = std::string([classtxtPath_ UTF8String]);

    //init Detection
    bool useCpuOny = false;
    MLComputeUnits computeUnit = MLComputeUnitsAll;
    cv::Size scaleSize(608, 608);
    CDetectObject objectDetection;
    objectDetection.init(useCpuOny, computeUnit, classtxtPath, scaleSize);

    //run detection
    std::vector<DetectionInfo> detectionResults;
    objectDetection.implDetection(image, detectionResults);

    //draw rectangles
    cv::Mat showImage;
    cv::resize(image, showImage, scaleSize);
    for (int i=0; i<detectionResults.size();i++)
    {
        cv::rectangle(showImage,detectionResults[i].box, cv::Scalar(255, 0,0), 3);
    }

    //show in iphone
    cv::cvtColor(showImage, showImage, cv::COLOR_RGBA2BGRA);
    [self showUIImage:showImage];
}
上面加粗的地方就是自己封装的类CDetectObject,该类暴露的两个接口是init和implDetection。
init接收设置的计算设备信息、类别标签文件的路径,以及模型接收的图像尺寸大小。
implDetection接收输入的图像(RGBA格式),输出检测结果结构体信息,里面包含每个目标属于的类别名、置信度、以及矩形框信息。
struct DetectionInfo {
    std::string name;
    float confidence;
    cv::Rect2d box;
};
四、来让我们看看都要做哪些初始化init操作
包括计算设备的设置、模型初始化、一些基本参数的初始化、和加载标签文件信息。
//init model
int CDetectObject::init(const BOOL useCpuOnly, const MLComputeUnits computeUnit, const std::string& classtxtPath, const cv::Size& scaleSize){

    //init configuration
    option = [[MLPredictionOptions alloc] init];
    option.usesCPUOnly = useCpuOnly;

    config = [ [MLModelConfiguration alloc] init];
    config.computeUnits = computeUnit;

    NSError* err;
    Model = [[yoloModel alloc] initWithConfiguration:config error:&err];

    //init paramss
    inputSize = scaleSize;
    maxBoundingBoxes = 10;
    confidenceThreshold = 0.5;
    nmsThreshold = 0.6;
    // anchor boxes
    anchors = {0.57273, 0.677385, 1.87446, 2.06253, 3.33843, 5.47434, 7.88282, 3.52778, 9.77052, 9.16828};

    //load labels
    int ret = loadClasstxt(classtxtPath, classes);

    return ret;
}
五、再来看看执行预测时要做些什么:
首先,对图像预处理,包括resize到模型要求的尺寸等。
其次,将预处理后的结果送给prediction,得到预测结果。调用coreML自动生成的类预测接口就在这里了。
然后,将预测得到的结果进行解析,根据yolov2模型的输出feature结构来解析出上面DetectionInfo里面的信息。
最后,解析出来后会有大量矩形框,为了去除重复的矩形框信息,需要做一个nmsBox来除去重复量高的矩形框,得到最终结果。
int CDetectObject::implDetection(const cv::Mat& image, std::vector<DetectionInfo>& detectionResults){

    if(image.empty()){
        NSLog(@"Error! image is empty!");
        return -1;
    }

    //preprocessing
    cv::Mat inputImage;
    preprocessImage(image,  inputImage);

    //prediction
    MLMultiArray* outFeature = predictImageScene(inputImage);

    //analyze the output
    std::vector<int> idxList;
    std::vector<float> confidenceList;
    std::vector<cv::Rect> boxesList;
    parseFeature(outFeature, idxList, confidenceList, boxesList);

    //nms box
    std::vector<int> indices;
    cv::dnn::NMSBoxes(boxesList, confidenceList, confidenceThreshold, nmsThreshold, indices);

    //get result
    for (int i=0; i<indices.size(); i++){
        int idx = indices[i];
        DetectionInfo objectInfo;
        objectInfo.name = classes[idxList[idx]];
        objectInfo.confidence = confidenceList[idx];
        objectInfo.box = boxesList[idx];
        detectionResults.push_back(objectInfo);
    }

    return 0;
}
预测函数:
MLMultiArray* CDetectObject::predictImageScene(const cv::Mat& imgTensor) {
    //preprocess image

    //convert to cvPixelbuffer
    ins::PixelBufferPool mat2pixelbuffer;
    CVPixelBufferRef buffer = mat2pixelbuffer.GetPixelBuffer(imgTensor);

    //predict from image
    NSError *error;
    yoloModelInput  *input = [[yoloModelInput alloc] initWithInput__0:buffer];

    yoloModelOutput *output = [Model predictionFromFeatures:input options:option error:&error];

    return output.output__0;
}
解析feature函数:
void CDetectObject::parseFeature(MLMultiArray* feature, std::vector<int>& ids, std::vector<float>& confidences, std::vector<cv::Rect>& boxes){

    NSArray<NSNumber*>* featureShape = feature.shape;
    int d0 = [[featureShape objectAtIndex:0] intValue];
    int d1 = [[featureShape objectAtIndex:1] intValue];
    int d2 = [[featureShape objectAtIndex:2] intValue];

    int stride0 = [feature.strides[0] intValue];
    int stride1 = [feature.strides[1] intValue];
    int stride2 = [feature.strides[2] intValue];

    int blockSize = 32;
    int gridHeight = d1;
    int gridWidth = d2;
    int boxesPerCell = 5;//Int(anchors.count/5)
    int numClasses = (int)classes.size();

    double* pdata = (double*)feature.dataPointer;

    for (int cy =0; cy< gridHeight; cy++){
        for (int cx =0; cx< gridWidth; cx++){
            for (int b=0; b<boxesPerCell; b++){
                int channel = b*(numClasses + 5);

                int laterId= cx*stride2+cy*stride1;
                float tx = (float)pdata[channel*stride0 + laterId];
                float ty = (float)pdata[(channel+1)*stride0 + laterId];
                float tw = (float)pdata[(channel+2)*stride0 + laterId];
                float th = (float)pdata[(channel+3)*stride0 + laterId];
                float tc = (float)pdata[(channel+4)*stride0 + laterId];

                // The predicted tx and ty coordinates are relative to the location
                // of the grid cell; we use the logistic sigmoid to constrain these
                // coordinates to the range 0 - 1. Then we add the cell coordinates
                // (0-12) and multiply by the number of pixels per grid cell (32).
                // Now x and y represent center of the bounding box in the original
                // 608x608 image space.
                float x = (float(cx) + sigmoid(tx)) * blockSize;
                float y = (float(cy) + sigmoid(ty)) * blockSize;

                // The size of the bounding box, tw and th, is predicted relative to
                // the size of an "anchor" box. Here we also transform the width and
                // height into the original 608x608 image space.
                float w = exp(tw) * anchors[2*b] * blockSize;
                float h = exp(th) * anchors[2*b + 1] * blockSize;

                // The confidence value for the bounding box is given by tc. We use
                // the logistic sigmoid to turn this into a percentage.
                float confidence = sigmoid(tc);
                std::vector<float> classesProb(numClasses);
                for (int i = 0; i < numClasses; ++i) {
                    int offset = (channel+5+i)*stride0 + laterId;
                    classesProb[i] =  (float)pdata[offset];
                }
                softmax(classesProb);

                // Find the index of the class with the largest score.
                auto max_itr = std::max_element(classesProb.begin(), classesProb.end());
                int index = int(max_itr - classesProb.begin());

                // Combine the confidence score for the bounding box, which tells us
                // how likely it is that there is an object in this box (but not what
                // kind of object it is), with the largest class prediction, which
                // tells us what kind of object it detected (but not where).
                float confidenceInClass = classesProb[index] * confidence;
                if(confidence>confidenceThreshold){
                // Since we compute 19x19x5 = 1805 bounding boxes, we only want to
                // keep the ones whose combined score is over a certain threshold.
                //if (confidenceInClass > confidenceThreshold){
                    cv::Rect2d rect =cv::Rect2d(float(x-w*0.5), float(y-h*0.5), float(w), float(h));
                    ids.push_back(index);
                    confidences.push_back(confidenceInClass);
                    boxes.push_back(rect);
                }
            }
        }
    }
}
六、来看看预测结果如何:
开发环境:MacOS Mojave (10.14.3), Xcode10.2 , Iphone XS (IOS 12.2), opencv2framework.
上面代码我放在码云git上:https://gitee.com/rxdj/yolov2_object_detection.git 。
仅供参考,如有错误,望不吝赐教。

 浙公网安备 33010602011771号