Netty 中的 handler 和 ChannelPipeline 分析
上一节我们讲了 Netty 的启动流程,从启动流程入手分析了 Reactor 模型的第一步:channel 如何绑定 Selector。然后讲到了 EventLoop 在启动的时候发挥了什么作用。整个启动类我们从头到尾过了一遍,今天我们来解决上节遗留的问题:Selector 如何将请求交给对应的 handler处理。
1. handler 的初始化
还是先从启动类入手:
ServerBootstrap server = new ServerBootstrap().group(bossGroup,workGroup)
  .channel(NioServerSocketChannel.class)
  .childHandler(new ServerChannelInitializer());
跟到childHandler(ChannelHandler childHandler)方法里面:
public ServerBootstrap childHandler(ChannelHandler childHandler) {
  if (childHandler == null) {
    throw new NullPointerException("childHandler");
  }
  this.childHandler = childHandler;
  return this;
}
这里做了一个赋值的操作。那么 childHandler是在哪里被使用呢?用 idea 的查看引用功能可以看到:
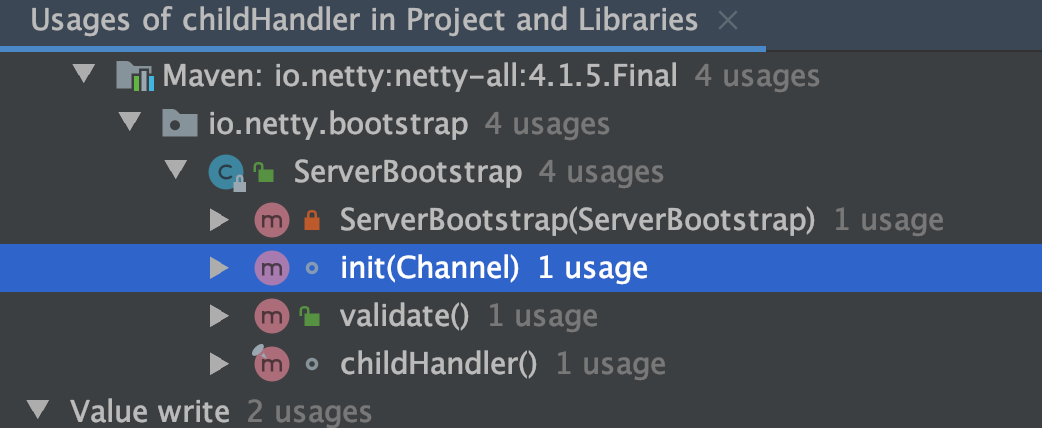
这里有个 int()方法看似比较关键,继续跟进:
// 这是ServerBootStrapt对 他父类初始化 channel的实现, 用于初始化 NioServerSocketChannel
void init(Channel channel) throws Exception {
  //ChannelOption 是在配置 Channel 的 ChannelConfig 的信息
  final Map<ChannelOption<?>, Object> options = options0();
  synchronized (options) {
    // 把 NioserverSocketChannel 和 options Map传递进去, 给Channel里面的属性赋值
    // 这些常量值全是关于和诸如TCP协议相关的信息
    channel.config().setOptions(options);
  }
	  //再次一波 给Channel里面的属性赋值  attrs0()是获取到用户自定义的业务逻辑属性 --  AttributeKey
  final Map<AttributeKey<?>, Object> attrs = attrs0();
  // 这个map中维护的是 程序运行时的 动态的 业务数据 , 可以实现让业务数据随着
  //netty的运行原来存进去的数据还能取出来
  synchronized (attrs) {
    for (Entry<AttributeKey<?>, Object> e: attrs.entrySet()) {
      @SuppressWarnings("unchecked")
      AttributeKey<Object> key = (AttributeKey<Object>) e.getKey();
      channel.attr(key).set(e.getValue());
    }
  }

	// ChannelPipeline 本身 就是一个重要的组件, 他里面是一个一个的处理器,
  //说他是高级过滤器,交互的数据 会一层一层经过它
	// 下面直接就调用了 p , 说明,在channel调用pipeline方法之前, pipeline已经被创建出来了
	// 在创建NioServerSocketChannel这个通道对象时,在他的顶级抽象父类(AbstractChannel)中创建了一个默认的pipeline对象
	// ChannelHandlerContext 是 ChannelHandler和Pipeline 交互的桥梁
  ChannelPipeline p = channel.pipeline();
	// workerGroup 处理IO线程
  final EventLoopGroup currentChildGroup = childGroup;
  //添加我们自定义的 Initializer
  final ChannelHandler currentChildHandler = childHandler;
  final Entry<ChannelOption<?>, Object>[] currentChildOptions;
  final Entry<AttributeKey<?>, Object>[] currentChildAttrs;
  synchronized (childOptions) {
    currentChildOptions = childOptions.entrySet().toArray(newOptionArray(childOptions.size()));
  }
  synchronized (childAttrs) {
    currentChildAttrs = childAttrs.entrySet().toArray(newAttrArray(childAttrs.size()));
  }
   //默认 往NioServerSocketChannel的管道里面添加了一个 ChannelInitializer
  p.addLast(new ChannelInitializer<Channel>() {
    @Override
    public void initChannel(Channel ch) throws Exception {
      final ChannelPipeline pipeline = ch.pipeline();
      //这个handler 针对bossgroup的Channel
      //给他添加上我们在server类中添加的handler()里面添加处理器
      ChannelHandler handler = config.handler();
      if (handler != null) {
        //将ServerSocketChannel的Handler添加到pipeline
        pipeline.addLast(handler);
      }

      ch.eventLoop().execute(new Runnable() {
        @Override
        public void run() {
          //将ServerBootstrapAcceptor添加到ServerSocketChannel的pipeline
          pipeline.addLast(new ServerBootstrapAcceptor(
            currentChildGroup, currentChildHandler, currentChildOptions, currentChildAttrs));
        }
      });
    }
  });
}
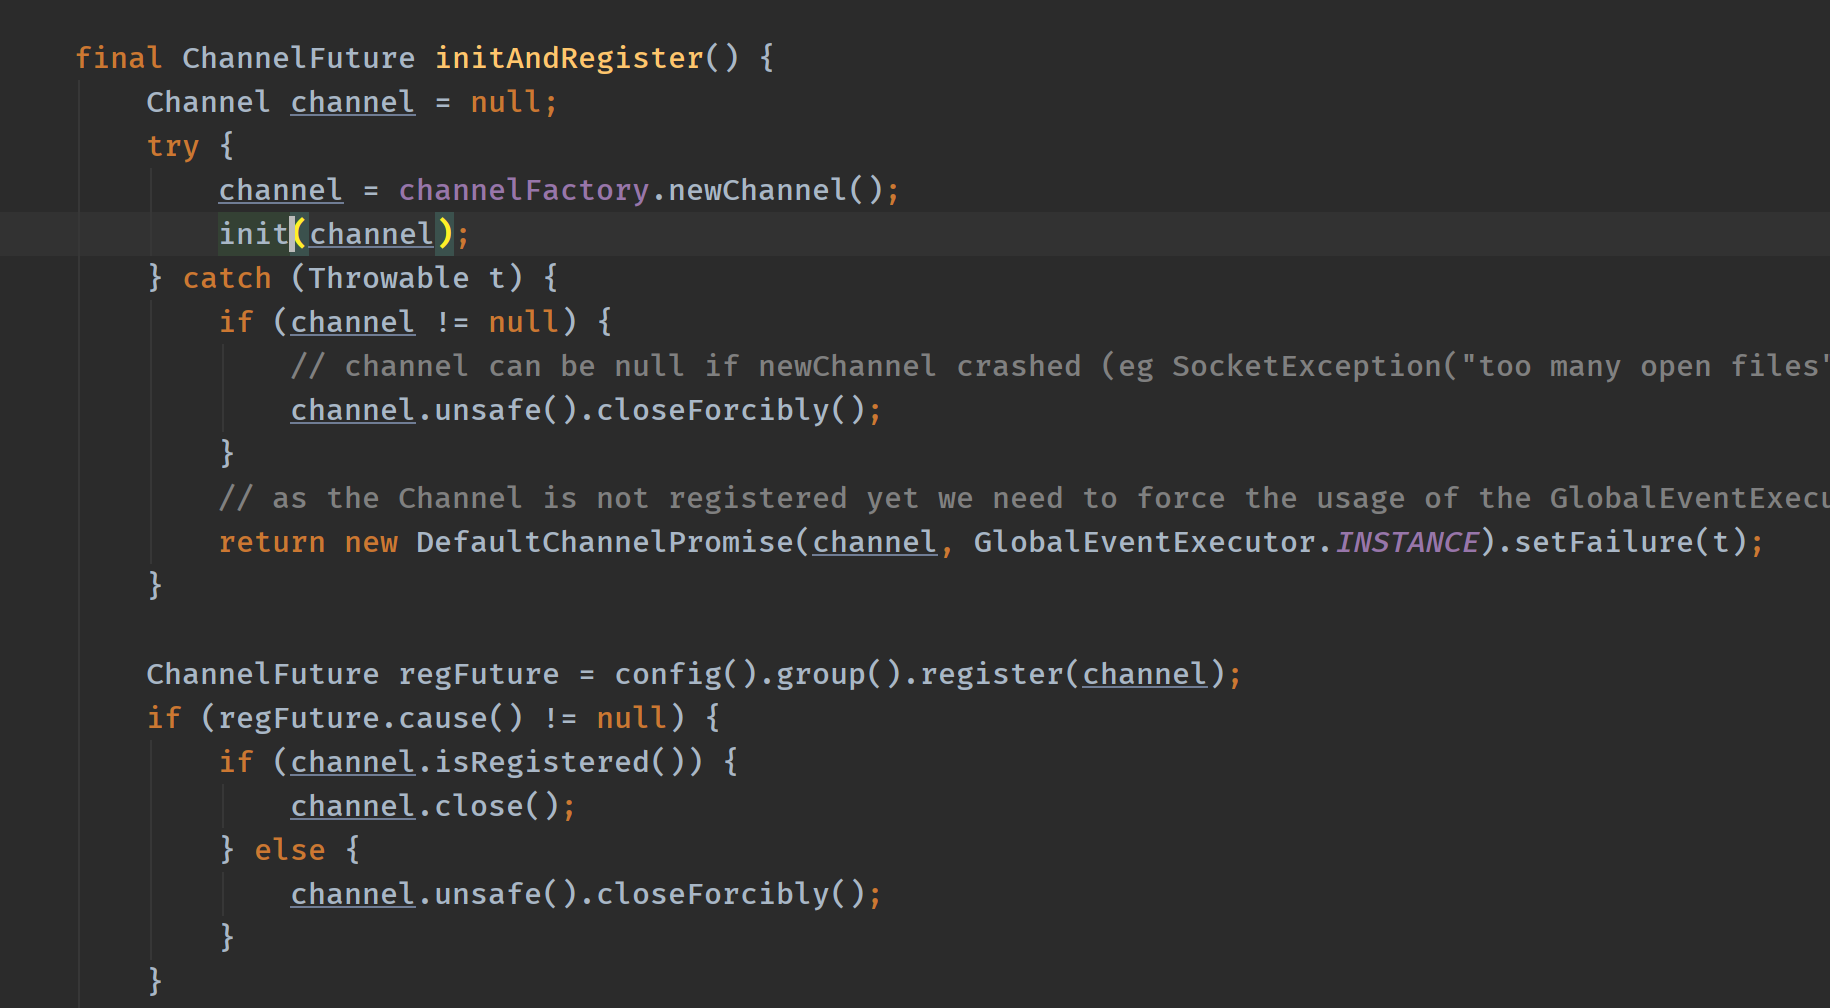
init()方法的传参是 channel,感觉很好奇是被哪里调用的,往上找它的调用链:
-AbstractBootstrap.doBind()/Bootstrap.doResolveAndConnect()->
  -AbstractBootstrap.initAndRegister()->
  	-AbstractBootstrap.init(Channel channel)
从调用链上看是不是很熟悉,是我们上一节分析过了的初始化里面的逻辑。上一节 在分析Bootstrap#initAndRegister方法的时候,在这里初始化了 channel 并 绑定到 Reactor 线程上。但是唯独漏掉了 init() 方法:
因为这里的东西太多,还是单独抽出来一节来聊才通透。
可以看到 init()传入的是某个 ServerSocketChannel创建连接时候创建的 channel,回到init()方法内部:
ChannelPipeline p = channel.pipeline();
从 channel 中获取ChannelPipeline 对象,即一个 channel 是跟一个特定的 ChannelPipeline 绑定的。这里又引申出另一个关键点:ChannelPipeline,我们喝口茶再讨论。
2. ChannelPipeline
ChannelPipeline 是一个接口,实现类有两个:
DefaultChannelPipeline
EmbeddedChannelPipeline
其中 EmbeddedChannelPipeline 又继承了 DefaultChannelPipeline,所以我们来看一下 DefaultChannelPipeline的实现,首先看默认的构造方法:
protected DefaultChannelPipeline(Channel channel) {
  this.channel = ObjectUtil.checkNotNull(channel, "channel");
  succeededFuture = new SucceededChannelFuture(channel, null);
  voidPromise =  new VoidChannelPromise(channel, true);

  tail = new TailContext(this);
  head = new HeadContext(this);

  head.next = tail;
  tail.prev = head;
}
从构造方法上看,这很显然是在构造一个链表的结构。不难看出 ChannelPipeline 内部应该是保存了一个链式的存储逻辑。那链表中保存的又是什么呢?是很多的ChannelPipeline 对象吗?我们看看 tail 是什么类型:
final AbstractChannelHandlerContext head;
final AbstractChannelHandlerContext tail;
很显然 ChannelPipeline 里面又包装了一层,即我们插入到 ChannelPipeline 中的 handler 被包装为 ChannelHandlerContext 对象。
回想到我们自己的 ServerChannelInitializer,是不是通过 pipeline.addLast()方法来添加各种 handler 的处理逻辑呢,ChannelPipeline 的类声明上有很大一段 doc,不看白不看:
/**
 * A list of {@link ChannelHandler}s which handles or intercepts inbound events and outbound operations of a
 * {@link Channel}.  {@link ChannelPipeline} implements an advanced form of the
 * <a href="http://www.oracle.com/technetwork/java/interceptingfilter-142169.html">Intercepting Filter</a> pattern
 * to give a user full control over how an event is handled and how the {@link ChannelHandler}s in a pipeline
 * interact with each other.
 *
 * <h3>Creation of a pipeline</h3>
 * 每一个channel 都有自己的pipeline,就是在channel 创建的时候自动创建一个pipeline
 * Each channel has its own pipeline and it is created automatically when a new channel is created.
 *ChannelPipeline是一个处理或者拦截Channel的出栈事件或者入栈操作的ChannelHandler列表,
 *ChannelPipeline实现了一种高效的拦截过滤器模式的形式来让用户完全控制一个事件怎样处理
 *和pipeline的ChannelHandler怎样和其他ChannelHandler交互。
 *
 * <h3>How an event flows in a pipeline</h3>
 * 下面的图描述了一个I/O事件一般是怎样在ChannelPipeline里的ChannelHandler处理的,
 * 一个I/O事件要么被ChannelInboundHandler处理,要么里边的事件传播方法转发给最近的一个处理器,比如
 * ChannelHandlerContext#fireChannelRead(Object)和ChannelHandlerContext#write(Object)。
 * The following diagram describes how I/O events are processed by {@link ChannelHandler}s in a {@link ChannelPipeline}
 * typically. An I/O event is handled by either a {@link ChannelInboundHandler} or a {@link ChannelOutboundHandler}
 * and be forwarded to its closest handler by calling the event propagation methods defined in
 * {@link ChannelHandlerContext}, such as {@link ChannelHandlerContext#fireChannelRead(Object)} and
 * {@link ChannelHandlerContext#write(Object)}.
 *
 * <pre>
 *                                                 I/O Request
 *                                            via {@link Channel} or
 *                                        {@link ChannelHandlerContext}
 *                                                      |
 *  +---------------------------------------------------+---------------+
 *  |                           ChannelPipeline         |               |
 *  |                                                  \|/              |
 *  |    +---------------------+            +-----------+----------+    |
 *  |    | Inbound Handler  N  |            | Outbound Handler  1  |    |
 *  |    +----------+----------+            +-----------+----------+    |
 *  |              /|\                                  |               |
 *  |               |                                  \|/              |
 *  |    +----------+----------+            +-----------+----------+    |
 *  |    | Inbound Handler N-1 |            | Outbound Handler  2  |    |
 *  |    +----------+----------+            +-----------+----------+    |
 *  |              /|\                                  .               |
 *  |               .                                   .               |
 *  | ChannelHandlerContext.fireIN_EVT() ChannelHandlerContext.OUT_EVT()|
 *  |        [ method call]                       [method call]         |
 *  |               .                                   .               |
 *  |               .                                  \|/              |
 *  |    +----------+----------+            +-----------+----------+    |
 *  |    | Inbound Handler  2  |            | Outbound Handler M-1 |    |
 *  |    +----------+----------+            +-----------+----------+    |
 *  |              /|\                                  |               |
 *  |               |                                  \|/              |
 *  |    +----------+----------+            +-----------+----------+    |
 *  |    | Inbound Handler  1  |            | Outbound Handler  M  |    |
 *  |    +----------+----------+            +-----------+----------+    |
 *  |              /|\                                  |               |
 *  +---------------+-----------------------------------+---------------+
 *                  |                                  \|/
 *  +---------------+-----------------------------------+---------------+
 *  |               |                                   |               |
 *  |       [ Socket.read() ]                    [ Socket.write() ]     |
 *  |                                                                   |
 *  |  Netty Internal I/O Threads (Transport Implementation)            |
 *  +-------------------------------------------------------------------+
 * </pre>
 * 通过上图可以看到入栈的和出栈的处理器互不干扰。
 *在左图,一个入栈事件是从下到上的顺序被绑定的处理器处理的,一个入栈处理器通常处理从I/O线程生成的数据,
 *一个入栈事件是从下到上的顺序被绑定的处理器处理的,一个入栈处理器通常处理从I/O线程生成的数据,
 * An inbound event is handled by the inbound handlers in the bottom-up direction as shown on the left side of the
 * diagram.  An inbound handler usually handles the inbound data generated by the I/O thread on the bottom of the
 * diagram.  The inbound data is often read from a remote peer via the actual input operation such as
 * {@link SocketChannel#read(ByteBuffer)}.  If an inbound event goes beyond the top inbound handler, it is discarded
 * silently, or logged if it needs your attention.
 * <p>
 *右图,一个出栈事件会被出栈处理器处理,一个出栈处理器生成或者传输出栈数据,比如写请求,
 *如果一个出栈事件超出最底层的处理器,那么他将会被I/O,线程处理,与其关联的SocketChannel#write(ByteBuffer)操作。
 * An outbound event is handled by the outbound handler in the top-down direction as shown on the right side of the
 * diagram.  An outbound handler usually generates or transforms the outbound traffic such as write requests.
 * If an outbound event goes beyond the bottom outbound handler, it is handled by an I/O thread associated with the
 * {@link Channel}. The I/O thread often performs the actual output operation such as
 * {@link SocketChannel#write(ByteBuffer)}.
 * <p>
 * For example, let us assume that we created the following pipeline:
 * <pre>
 * {@link ChannelPipeline} p = ...;
 * p.addLast("1", new InboundHandlerA());//入栈处理器
 * p.addLast("2", new InboundHandlerB());//入栈处理器
 * p.addLast("3", new OutboundHandlerA());//出栈处理器
 * p.addLast("4", new OutboundHandlerB());//出栈处理器
 * p.addLast("5", new InboundOutboundHandlerX());//既是入栈又是出栈处理器
 * </pre>
 *在前边提到的例子中,以Inbound开头的都是入栈处理器,以Outbound开头的都是出栈处理器。
 * In the example above, the class whose name starts with {@code Inbound} means it is an inbound handler.
 * The class whose name starts with {@code Outbound} means it is a outbound handler.
 * <p>
 * In the given example configuration, the handler evaluation order is 1, 2, 3, 4, 5 when an event goes inbound.
 * When an event goes outbound, the order is 5, 4, 3, 2, 1.  On top of this principle, {@link ChannelPipeline} skips
 * the evaluation of certain handlers to shorten the stack depth:
 * <ul>
 * <li>3 and 4 don't implement {@link ChannelInboundHandler}, and therefore the actual evaluation order of an inbound
 *     event will be: 1, 2, and 5.</li>
 * <li>1 and 2 don't implement {@link ChannelOutboundHandler}, and therefore the actual evaluation order of a
 *     outbound event will be: 5, 4, and 3.</li>
 * <li>If 5 implements both {@link ChannelInboundHandler} and {@link ChannelOutboundHandler}, the evaluation order of
 *     an inbound and a outbound event could be 125 and 543 respectively.</li>
 * </ul>
 *
 * <h3>Forwarding an event to the next handler</h3>
 *
 * As you might noticed in the diagram shows, a handler has to invoke the event propagation methods in
 * {@link ChannelHandlerContext} to forward an event to its next handler.  Those methods include:
 *一个处理器调用ChannelHandlerContext的事件传播方法转发给下一个处理器,这些方法包括:
 * <ul>
 * <li>Inbound event propagation methods:
 *     <ul>
 * 入栈事件传播方法
 *     <li>{@link ChannelHandlerContext#fireChannelRegistered()}</li>
 *     <li>{@link ChannelHandlerContext#fireChannelActive()}</li>
 *     <li>{@link ChannelHandlerContext#fireChannelRead(Object)}</li>
 *     <li>{@link ChannelHandlerContext#fireChannelReadComplete()}</li>
 *     <li>{@link ChannelHandlerContext#fireExceptionCaught(Throwable)}</li>
 *     <li>{@link ChannelHandlerContext#fireUserEventTriggered(Object)}</li>
 *     <li>{@link ChannelHandlerContext#fireChannelWritabilityChanged()}</li>
 *     <li>{@link ChannelHandlerContext#fireChannelInactive()}</li>
 *     <li>{@link ChannelHandlerContext#fireChannelUnregistered()}</li>
 *     </ul>
 * </li>
 * <li>Outbound event propagation methods:
 *     <ul>
 * 出栈事件传播方法
 *     <li>{@link ChannelHandlerContext#bind(SocketAddress, ChannelPromise)}</li>
 *     <li>{@link ChannelHandlerContext#connect(SocketAddress, SocketAddress, ChannelPromise)}</li>
 *     <li>{@link ChannelHandlerContext#write(Object, ChannelPromise)}</li>
 *     <li>{@link ChannelHandlerContext#flush()}</li>
 *     <li>{@link ChannelHandlerContext#read()}</li>
 *     <li>{@link ChannelHandlerContext#disconnect(ChannelPromise)}</li>
 *     <li>{@link ChannelHandlerContext#close(ChannelPromise)}</li>
 *     <li>{@link ChannelHandlerContext#deregister(ChannelPromise)}</li>
 *     </ul>
 * </li>
 * </ul>
 *
 * and the following example shows how the event propagation is usually done:
 *
 * <pre>
 * public class MyInboundHandler extends {@link ChannelInboundHandlerAdapter} {
 *     {@code @Override}
 *     public void channelActive({@link ChannelHandlerContext} ctx) {
 *         System.out.println("Connected!");
 *         ctx.fireChannelActive();
 *     }
 * }
 *
 * public clas MyOutboundHandler extends {@link ChannelOutboundHandlerAdapter} {
 *     {@code @Override}
 *     public void close({@link ChannelHandlerContext} ctx, {@link ChannelPromise} promise) {
 *         System.out.println("Closing ..");
 *         ctx.close(promise);
 *     }
 * }
 * </pre>
 *
 * <h3>Building a pipeline</h3>
 * <p>
 * A user is supposed to have one or more {@link ChannelHandler}s in a pipeline to receive I/O events (e.g. read) and
 * to request I/O operations (e.g. write and close).  For example, a typical server will have the following handlers
 * in each channel's pipeline, but your mileage may vary depending on the complexity and characteristics of the
 * protocol and business logic:
 *
 * <ol>
 * <li>Protocol Decoder - translates binary data (e.g. {@link ByteBuf}) into a Java object.</li>
 * <li>Protocol Encoder - translates a Java object into binary data.</li>
 * <li>Business Logic Handler - performs the actual business logic (e.g. database access).</li>
 * </ol>
 *
 * and it could be represented as shown in the following example:
 *
 * <pre>
 * static final {@link EventExecutorGroup} group = new {@link DefaultEventExecutorGroup}(16);
 * ...
 *
 * {@link ChannelPipeline} pipeline = ch.pipeline();
 *
 * pipeline.addLast("decoder", new MyProtocolDecoder());
 * pipeline.addLast("encoder", new MyProtocolEncoder());
 *
 * // Tell the pipeline to run MyBusinessLogicHandler's event handler methods
 * // in a different thread than an I/O thread so that the I/O thread is not blocked by
 * // a time-consuming task.
 * //如果你的业务逻辑是完全同步的或者完成的非常快,你不需要添加提供特别的线程池去异步执行,反之,
 * //你就需要一个异步的处理逻辑以保证不要阻塞IO的速度
 * // If your business logic is fully asynchronous or finished very quickly, you don't
 * // need to specify a group.
 * pipeline.addLast(group, "handler", new MyBusinessLogicHandler());
 * </pre>
 *
 * <h3>Thread safety</h3>
 * <p>
 * A {@link ChannelHandler} can be added or removed at any time because a {@link ChannelPipeline} is thread safe.
 * For example, you can insert an encryption handler when sensitive information is about to be exchanged, and remove it
 * after the exchange.
 */
上面的注释解释了 ChannelPipeline 做了什么事情:这是一个 handler 的 list,handler 用于处理或拦截入站事件和出站事件,pipeline 实现了过滤器的高级形式,以便用户完全控制事件如何处理以及 handler 在 pipeline 中如何交互。
再把视线收回到 init() 方法,在 init()中调用 p.addLast() 方法,将 ChannelInitializer 插入到链表的末端。
接着看addLast()方法:
@Override
public final ChannelPipeline addLast(EventExecutorGroup group, String name, ChannelHandler handler) {
  final AbstractChannelHandlerContext newCtx;
  synchronized (this) {
    //检查 Channelhandler 的名字是否重复, 如果不重复, 则调用 newContext() 方法为这个Handler 创建一个对应的 DefaultChannelHandlerContext 实例
    // 检查handler是否是@Sharable,是否已添加
    checkMultiplicity(handler);
		//为了添加一个 handler 到pipeline 中, 必须把此 handler 包装成 ChannelHandlerContext
    newCtx = newContext(group, filterName(name, handler), handler);

    addLast0(newCtx);

    // 如果 registered 为 false,则表示这个channel还未注册到EventLoop上.
    // 在这种情况下,我们添加一个Task到PendingHandlerCallback中,
    // 等到这个channel注册成功之后,将会调用立即调用 ChannelHandler.handlerAdded(...) 方法,已达到channel添加的目的

    if (!registered) {
      newCtx.setAddPending();
      callHandlerCallbackLater(newCtx, true);
      return this;
    }

    EventExecutor executor = newCtx.executor();
    if (!executor.inEventLoop()) {
      newCtx.setAddPending();
      executor.execute(new Runnable() {
        @Override
        public void run() {
          callHandlerAdded0(newCtx);
        }
      });
      return this;
    }
  }
  callHandlerAdded0(newCtx);
  return this;
}

// 检查是否重复
private static void checkMultiplicity(ChannelHandler handler) {
  // handler是否为ChannelHandlerAdapter类型,不是则不做处理
  if (handler instanceof ChannelHandlerAdapter) {
    ChannelHandlerAdapter h = (ChannelHandlerAdapter) handler;
    // 判断handler是否添加了Sharable注解 && 是否添加过了
    if (!h.isSharable() && h.added) {
      throw new ChannelPipelineException(
        h.getClass().getName() +
        " is not a @Sharable handler, so can't be added or removed multiple times.");
    }
    h.added = true;
  }
}

// 创建新的节点
private AbstractChannelHandlerContext newContext(EventExecutorGroup group, String name, ChannelHandler handler) {
  // 调用DefaultChannelHandlerContext的构造函数
  return new DefaultChannelHandlerContext(this, childExecutor(group), name, handler);
}
在 addLast() 方法中, 首先检查 Channelhandler 的名字是否重复,如果不重复则调用 newContext() 方法为这个 Handler 创建一个对应的 DefaultChannelHandlerContext 实例,并与之关联起来( Context 中有一个 handler 属性保存着对应的 handler 实例)。
checkMultiplicity()方法中使用一个成员变量 added 标识一个 Channel 是否已经添加过,如果当前要添加的Handler 是非共享并且已经添加过那就抛出异常,否则标识该 Handler 已经添加。由此可见一个 Handler 如果是 Sharable 的就可以无限次被添加到 Pipeline 中,我们客户端代码如果要让一个 Handler 被共用,只需要加一个 @Sharable 标注即。
为了添加一个 handler 到 pipeline 中, 必须把此 handler 包装成 ChannelHandlerContext。先看一下创建 ChannelHandlerContext 的这一句:
newCtx = newContext(group, filterName(name, handler), handler);
filterName()这个方法其实作用还是挺重要,即你再 addLast()方法中给当前 handler 取的名字,在这里做检查:
private String filterName(String name, ChannelHandler handler) {
    if (name == null) {
        // 1.如果传入的name为空 则生成
        // Netty生成的name默认为=> 简单类名#0
        // 如果简单类名#0已存在则将基数+1 生成name为简单类名#1 以此递增
        return generateName(handler);
    }
    // 2.检查是否有重名 检查通过则返回
    checkDuplicateName(name);
    return name;
}
这个方法用于给handler创建一个唯一性的名字。
继续跟进newContext(),在上面的代码中我们看到新实例化了一个 newCtx 对象,并将 handler 作为参数传递到构造方法中。 那么 DefaultChannelHandlerContext 会做什么呢?继续看看:
private final ChannelHandler handler;

DefaultChannelHandlerContext(
  DefaultChannelPipeline pipeline, EventExecutor executor, String name, ChannelHandler handler) {
  super(pipeline, executor, name, isInbound(handler), isOutbound(handler));
  if (handler == null) {
    throw new NullPointerException("handler");
  }
  this.handler = handler;
}

private static boolean isInbound(ChannelHandler handler) {
  return handler instanceof ChannelInboundHandler;
}

private static boolean isOutbound(ChannelHandler handler) {
  return handler instanceof ChannelOutboundHandler;
}
上面是 DefaultChannelHandlerContext 的构造函数,我们看到在调用父类构造器中传入两个方法:
isInbound(handler)
isOutbound(handler)
从方法名称上大概可以知道:一个是判断当前 handler 是否是进入事件的处理器,另一个是判断当前 handler 是否是返回事件的处理器。这两个 boolean 变量会传递到父类 AbstractChannelHandlerContext 中, 并初始化父类的这两个字段:inbound 与 outbound。
- inbound 为真时, 表示对应的 ChannelHandler 实现了 ChannelInboundHandler 方法;
- outbound 为真时, 表示对应的 ChannelHandler 实现了 ChannelOutboundHandler 方法。
插播要点:
Netty是如何判断ChannelHandler类型的?
在添加ChannelHandler并创建 ChannelHandlerContext 的时候,通过 instanceof 判断 handler 是否是 ChannelInboundHandler 和 ChannelOutboundHanler,并将结果保存到 AbstractChannelHandlerContext 的 inbound 和 outbound 两个boolean 变量中。
在添加ChannelHandler并创建ChannelHandlerContext的时候,通过instanceof判断handler是否是ChannelInboundHandler和ChannelOutboundHanler,并将结果保存到AbstractChannelHandlerContext的inbound和outbound两个boolean变量中。
而我们在自定义的 ServerChannelInitializer 类中是继承了 ChannelInitializer:
public class ServerChannelInitializer  extends ChannelInitializer<SocketChannel> {
@Override
protected void initChannel(SocketChannel socketChannel) throws Exception {
        ChannelPipeline pipeline = socketChannel.pipeline();

        // 字符串解码 和 编码
        pipeline.addLast("decoder", new StringDecoder());
        pipeline.addLast("encoder", new StringEncoder());

        // 自己的逻辑Handler
        pipeline.addLast("handler", new HwServerHandler());
        }

}
Netty 中通过ChannelPipeline来保证 ChannelHandler 之间的处理顺序。每一个 Channel 对象创建的时候,都会自动创建一个关联的 ChannelPipeline 对象,我们可以通过 io.netty.channel.Channel对象的pipeline()方法获取这个对象实例。

ChannelInitializer 又是实现ChannelInboundHandler接口,那这就意味着
DefaultChannelHandlerContext 的 inbound = true,outbound = false。
即在初始化 handler 的时候默认所有的 handler 都是入栈处理器。
当创建好 Context 之后,就将这个Context 插入到 Pipeline 的双向链表中:
private void addLast0(AbstractChannelHandlerContext newCtx) {
  AbstractChannelHandlerContext prev = tail.prev;
  newCtx.prev = prev;
  newCtx.next = tail;
  prev.next = newCtx;
  tail.prev = newCtx;
}
以上就是新增 handler 插入pipeline 的过程,下面接着看 Pipeline 节点的删除功能。
netty 有个最大的特性之一就是 Handler 可插拔,做到动态编织 pipeline,比如在首次建立连接的时候,需要通过进行权限认证,在认证通过之后,就可以将此 context 移除,下次 pipeline 在传播事件的时候就就不会调用到权限认证处理器。
下面是权限认证 Handler 最简单的实现,第一个数据包传来的是认证信息,如果校验通过,就删除此 Handler,否则,直接关闭连接:
// 鉴权Handler
public class AuthHandler extends SimpleChannelInboundHandler<ByteBuf> {

    ...

    @Override
    protected void channelRead0(ChannelHandlerContext ctx, ByteBuf data) throws Exception {
        if (verify(authDataPacket)) {
            ctx.pipeline().remove(this);
        } else {
            ctx.close();
        }
    }

    private boolean verify(ByteBuf byteBuf) {
        //...
    }

    @Override
    public void handlerRemoved(ChannelHandlerContext ctx) throws Exception {
        System.out.println("AuthHandler has been removed ! ");
    }
}
我们来看看 DefaultChannelPipeline 中的 remove 方法:
public class DefaultChannelPipeline implements ChannelPipeline {

    ...

    // 从Pipeline中删除ChannelHandler
    @Override
    public final ChannelPipeline remove(ChannelHandler handler) {
        remove(getContextOrDie(handler));
        return this;
    }

    ...

	// 获取 ChannelHandler ,获取不到就抛出异常
    private AbstractChannelHandlerContext getContextOrDie(ChannelHandler handler) {
        AbstractChannelHandlerContext ctx = (AbstractChannelHandlerContext) context(handler);
        if (ctx == null) {
            throw new NoSuchElementException(handler.getClass().getName());
        } else {
            return ctx;
        }
    }

    ...

    // 删除
    private AbstractChannelHandlerContext remove(final AbstractChannelHandlerContext ctx) {
        // ctx不能为heand与tail
        assert ctx != head && ctx != tail;

        synchronized (this) {
            // 从pipeline中删除ChannelHandlerContext节点
            remove0(ctx);

            // 如果为false,则表明channel还没有注册到eventloop上
            // 在删除这种场景下,我们先添加一个Task,一旦channel注册成功就会调用这个Task,这个Task就会立即调用ChannelHandler.handlerRemoved(...)方法,来从pipeline中删除context。
            if (!registered) {
                callHandlerCallbackLater(ctx, false);
                return ctx;
            }

            EventExecutor executor = ctx.executor();
            if (!executor.inEventLoop()) {
                executor.execute(new Runnable() {
                    @Override
                    public void run() {
                        // 回调 handlerRemoved 方法
                        callHandlerRemoved0(ctx);
                    }
                });
                return ctx;
            }
        }
        // 回调 handlerRemoved 方法
        callHandlerRemoved0(ctx);
        return ctx;
    }

 	...

    // 删除节点 ChannelHandlerContext
    private static void remove0(AbstractChannelHandlerContext ctx) {
        AbstractChannelHandlerContext prev = ctx.prev;
        AbstractChannelHandlerContext next = ctx.next;
        prev.next = next;
        next.prev = prev;
    }

    ...

    private void callHandlerRemoved0(final AbstractChannelHandlerContext ctx) {
        // Notify the complete removal.
        try {
            try {
                // 回调 handlerRemoved 方法
                // 也就是我们前面例子 AuthHandler 中的 handlerRemoved() 方法
                ctx.handler().handlerRemoved(ctx);
            } finally {
                // 设置为ctx 状态为 REMOVE_COMPLETE
                ctx.setRemoved();
            }
        } catch (Throwable t) {
            fireExceptionCaught(new ChannelPipelineException(
                    ctx.handler().getClass().getName() + ".handlerRemoved() has thrown an exception.", t));
        }
    }

    ...

}
好了, 删除的逻辑就分析到这里了。通过以上的分析,我们先总结一下:能发现在 handler 初始化的时候有三个关键的对象:
- ChannelHandler
- ChannelPipeline
- ChannelHandlerContext
他们之间的关系是:ChannelHandler 通过 ChannelPipeline 来封装一个双向链表维持各个 handler 关系。在 ChannelPipeline 中 不能包装 ChannelPipeline 对象,原因是处理的逻辑都是有上下文关联的,所以封装了 ChannelHandlerContext 对象来包装 handler ,维护处理逻辑以及他们之间的上下文关系。
另外,ChannelHandler 又分为两个大类的事件:
- ChannelInboundHandler:处理输入数据和所有类型的状态变化
- ChannelOutboundHandler:处理输出数据,可以拦截所有操作
除了分开的 输入 和 输出 事件以外, Netty 还提供了一个 支持同时处理输入和输出事件的全能处理器:ChannelDuplexHandler,ChannelDuplexHandler 则同时实现了 ChannelInboundHandler 和 ChannelOutboundHandler 接口。如果一个所需的 ChannelHandler 既要处理入站事件又要处理出站事件,推荐继承此类。
从 ChannelPipeline 类的 doc 文档中给的注释看:
 * <pre>
 *                                                 I/O Request
 *                                            via {@link Channel} or
 *                                        {@link ChannelHandlerContext}
 *                                                      |
 *  +---------------------------------------------------+---------------+
 *  |                           ChannelPipeline         |               |
 *  |                                                  \|/              |
 *  |    +---------------------+            +-----------+----------+    |
 *  |    | Inbound Handler  N  |            | Outbound Handler  1  |    |
 *  |    +----------+----------+            +-----------+----------+    |
 *  |              /|\                                  |               |
 *  |               |                                  \|/              |
 *  |    +----------+----------+            +-----------+----------+    |
 *  |    | Inbound Handler N-1 |            | Outbound Handler  2  |    |
 *  |    +----------+----------+            +-----------+----------+    |
 *  |              /|\                                  .               |
 *  |               .                                   .               |
 *  | ChannelHandlerContext.fireIN_EVT() ChannelHandlerContext.OUT_EVT()|
 *  |        [ method call]                       [method call]         |
 *  |               .                                   .               |
 *  |               .                                  \|/              |
 *  |    +----------+----------+            +-----------+----------+    |
 *  |    | Inbound Handler  2  |            | Outbound Handler M-1 |    |
 *  |    +----------+----------+            +-----------+----------+    |
 *  |              /|\                                  |               |
 *  |               |                                  \|/              |
 *  |    +----------+----------+            +-----------+----------+    |
 *  |    | Inbound Handler  1  |            | Outbound Handler  M  |    |
 *  |    +----------+----------+            +-----------+----------+    |
 *  |              /|\                                  |               |
 *  +---------------+-----------------------------------+---------------+
 *                  |                                  \|/
 *  +---------------+-----------------------------------+---------------+
 *  |               |                                   |               |
 *  |       [ Socket.read() ]                    [ Socket.write() ]     |
 *  |                                                                   |
 *  |  Netty Internal I/O Threads (Transport Implementation)            |
 *  +-------------------------------------------------------------------+
inbound 事件和 outbound 事件的流向是不一样的,inbound 的传递方式是通过调用相应的 ChannelHandlerContext.fireIN_EVT() 方法, 而 outbound 方法的的传递方式是通过调用 ChannelHandlerContext.OUT_EVT() 方法。
inbound 事件
ChannelInboundHandler 中有如下方法:

ChannelInboundHandler 中的方法具体说明见下表:
| 方法名 | 方法说明 |
|---|---|
| channelInactive | 激活事件,绑定端口成功后调用pipeline.fireChannelActive() |
| channelInactive | 非激活事件,连接关闭后调用pipeline.fireChannelInactive() |
| channelRead | 读事件,channel 有数据时调用pipeline.fireChannelRead() |
| channelReadComplete | 读完事件,channel 读完之后调用pipeline.fireChannelReadComplete() |
| channelRegistered | 注册事件,channel 注册到 EventLoop 上后调用,例如服务岗启动时pipeline.fireChannelRegistered() |
| channelUnregistered | 注销事件,channel 从 EventLoop 上注销后调用,例如关闭连接成功后pipeline.fireChannelUnregistered() |
| channelWritabilityChanged | 可写状态变更事件,当一个 Channel 的可写的状态发生改变的时候执行,可以保证写的操作不要太快,防止 OOM,pipeline.fireChannelWritabilityChanged() |
| exceptionCaught | 异常事件 说明:我们可以看出,Inbound 事件都是由 I/O 线程触发,用户实现部分关注的事件被动调用 |
| userEventTriggered | 用户事件触发,例如心跳检测ctx.fireUserEventTriggered(evt) |
我们可以看出,Inbound 事件都是由I/O线程触发,Netty 为了更好的处理 channel 中的数据,给 JDK 原生的channel 添加了 pipeline 组件,Netty 会把原生 JDK 的 channel 中的数据导向这个 pipeline,从 pipeline 中的 header 开始往下传播,用户对这个过程拥有百分百的控制权,可以把数据拿出来处理也可以往下传播。一直传播到tail节点,tail节点会进行回收。如果在传播的过程中最终没到尾节点自己也没回收就会面临内存泄露的问题。
所以对于 inbound 事件,操作者是有 100% 的主动权来控制应该做什么,在什么时候做什么。下面以channelRead() 事件的传播为例,来分析 inbound 事件的传播。
我们在客户端新增3个 handler 用于处理事件:
public class InBoundHandlerA extends ChannelInboundHandlerAdapter {
    public void channelRead(ChannelHandlerContext ctx, Object msg) throws Exception {
        System.out.println("InBoundHandlerA: " + msg);
        ctx.fireChannelRead(msg);
    }
}
public class InBoundHandlerB extends ChannelInboundHandlerAdapter {
    public void channelRead(ChannelHandlerContext ctx, Object msg) throws Exception {
        System.out.println("InBoundHandlerB: " + msg);
        ctx.fireChannelRead(msg);
    }
    public void channelActive(ChannelHandlerContext ctx) {
        ctx.channel().pipeline().fireChannelRead("hello world");  // 1
			  // ctx.fireChannelRead("hello world"); // 2
    }
}
public class InBoundHandlerC extends ChannelInboundHandlerAdapter {
    public void channelRead(ChannelHandlerContext ctx, Object msg) throws Exception {
        System.out.println("InBoundHandlerC: " + msg);
        ctx.fireChannelRead(msg);
    }
}
此刻客户端处理事件的顺序为:
在新连接接入时,会先回调 channelActive()方法,此时 InBoundHandlerB 的 channelActive() 方法得到执行,触发客户端 pipeline.fireChannelRead()方法,将 channlRead 事件传播至 pipeline。在实际工作中一般是由 NioEventLoop 轮询到读IO事件,并触发NioByteUnsafe.read()操作。
这里为了分析方便,使用 InBoundHandlerB 的 channelActive() 方法模拟触发客户端 channel 读取到数据并传播至 pipeline 的逻辑,并分为两种情况分析:
ctx.channel().pipeline().fireChannelRead("hello world");: 调用pipeline#fireChannelRead()方法传播事件;ctx.fireChannelRead("hello world");: 调用ChannelHandlerContext#fireChannelRead()方法传播事件。
分析两种触发方式的区别。
ctx.channel().pipeline().fireChannelRead("hello world");: 调用pipeline#fireChannelRead()方法传播事件。
// DefaultChannelPipeline
public final ChannelPipeline fireChannelRead(Object msg) {
    AbstractChannelHandlerContext.invokeChannelRead(head, msg);
    return this;
}
// AbstractChannelHandlerContext
static void invokeChannelRead(final AbstractChannelHandlerContext next, Object msg) {
    final Object m = next.pipeline.touch(ObjectUtil.checkNotNull(msg, "msg"), next);
    EventExecutor executor = next.executor();
    if (executor.inEventLoop()) {
        next.invokeChannelRead(m);
    } else {
        executor.execute(new Runnable() {
            @Override
            public void run() {
                next.invokeChannelRead(m);
            }
        });
    }
}
// HeadContext
private void invokeChannelRead(Object msg) {
    if (invokeHandler()) {
        try {
            ((ChannelInboundHandler) handler()).channelRead(this, msg);
        } catch (Throwable t) {
            notifyHandlerException(t);
        }
    } else {
        fireChannelRead(msg);
    }
}
DefaultChannelPipeline.fireChannelRead()方法首先调用到 HeadContext.channelRead() 方法:
// HeadContext
public void channelRead(ChannelHandlerContext ctx, Object msg) throws Exception {
    ctx.fireChannelRead(msg);
}
HeadContext.channelRead()方法将事件往后传播:
// HeadContext
public ChannelHandlerContext fireChannelRead(final Object msg) {
    invokeChannelRead(findContextInbound(), msg);
    return this;
}
private AbstractChannelHandlerContext findContextInbound() {
  // 遍历链表
    AbstractChannelHandlerContext ctx = this;
    do {
      // 往后查找inbound handler
        ctx = ctx.next;
    } while (!ctx.inbound);
    return ctx;
}
此时找到 InBoundHandlerA,并调用invokeChannelRead()方法:
static void invokeChannelRead(final AbstractChannelHandlerContext next, Object msg) {
    final Object m = next.pipeline.touch(ObjectUtil.checkNotNull(msg, "msg"), next);
    EventExecutor executor = next.executor();
    if (executor.inEventLoop()) {
        next.invokeChannelRead(m);
    } else {
        executor.execute(new Runnable() {
            @Override
            public void run() {
                next.invokeChannelRead(m);
            }
        });
    }
}
private void invokeChannelRead(Object msg) {
    if (invokeHandler()) {
        try {
            ((ChannelInboundHandler) handler()).channelRead(this, msg);
        } catch (Throwable t) {
            notifyHandlerException(t);
        }
    } else {
        fireChannelRead(msg);
    }
}
就这样,InBoundHandlerA 的 channelRead() 方法就会回调到。类似 InBoundHandlerC、InBoundHandlerB的 channelRead()方法也会回调到。最终 channelRead()事件到达 TailContext:
public void channelRead(ChannelHandlerContext ctx, Object msg) throws Exception {
    onUnhandledInboundMessage(msg);
}
protected void onUnhandledInboundMessage(Object msg) {
    try {
        logger.debug(
                "Discarded inbound message {} that reached at the tail of the pipeline. " +
                        "Please check your pipeline configuration.", msg);
    } finally {
        ReferenceCountUtil.release(msg);
    }
}
根据上面的分析可知,通过 pipleline 触发 inbound 事件传播时,从 HeadContext 开始传播。对于 inbound 事件,会按照 ChannelInboundHandler 添加的顺序处理该事件,HeadContext 首先处理该事件,然后依次传递到 pipeline 中的 ChannelInboundHandler 中。
ctx.fireChannelRead("hello world");: 调用ChannelHandlerContext#fireChannelRead()方法传播事件。
public ChannelHandlerContext fireChannelRead(final Object msg) {
    invokeChannelRead(findContextInbound(), msg);
    return this;
}
通过调用 ChannelHandlerContext#fireChannelRead()方法传播 channelRead 事件时,直接查找到当前节点的下一个 inbound节点,将事件传播至该节点,不会从 HeadContext 开始传递。
以上就是 inbound 事件的大概传播过程,我们要注意一点:inbound 事件是按照 addLast()的添加顺序依次执行的。下面接着看 outbound 事件。
outbound事件
ChannelOutboundHandler 中有如下方法:
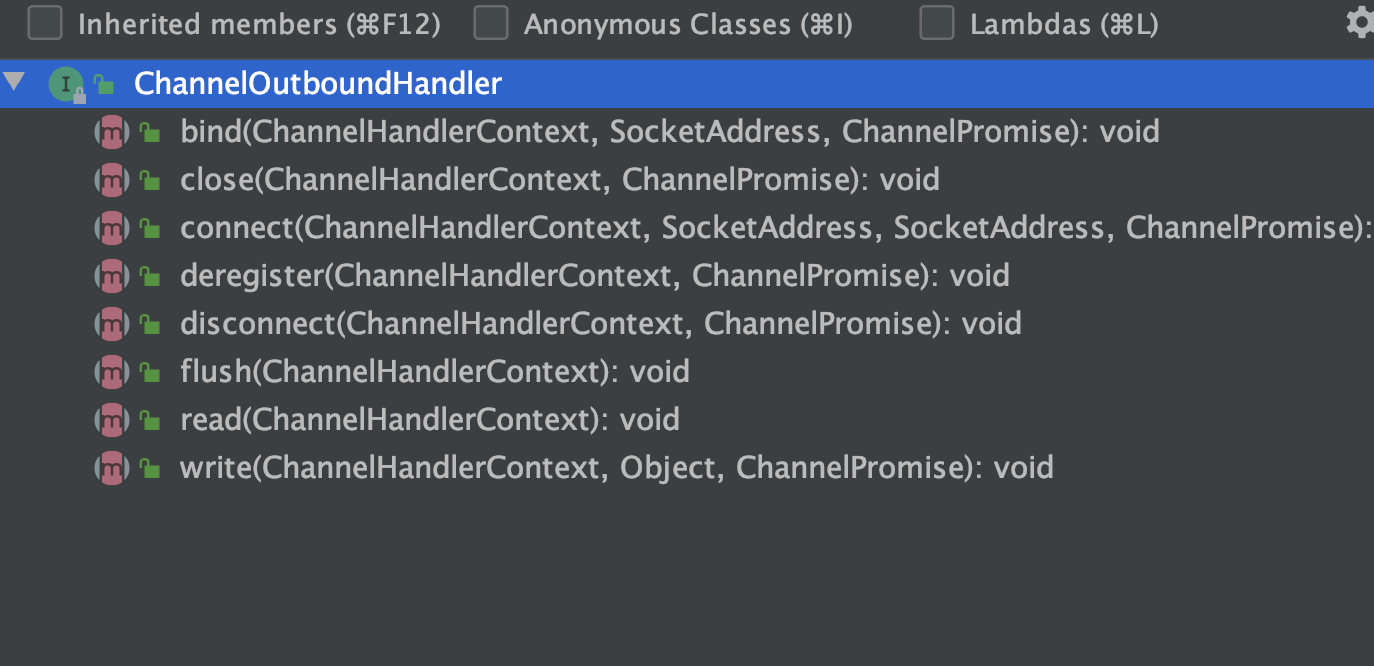
ChannelOutboundHandler 中的事件看起来见名知意:
| 方法名 | 方法说明 |
|---|---|
| bind | 绑定端口 |
| close | 关闭 channel |
| connect | 用于客户端,连接一个远程机器 |
| disconnect | 关闭远程连接 |
| deregister | 执行断开连接 disconnect 操作后调用,将 channel 从 EventLoop 中注销 |
| flush | 将通道排队的数据刷新到远程机器上 |
| read | 用于新接入连接时,注册成功多路复用器上后,修改监听为 OP_READ 操作位 |
| write | 向通道写数据 |
从 ChannelOutboundHandler 接口的定义可以看出,outbound 事件包括端口绑定 bind、连接 connect、断开连接 disconnect、关闭连接 close、取消 channel 在 EventLoop 的注册、读写数据、刷新数据等。这些操作一般都是由用户主动触发的,这与 inbound 事件(如 channelRead)被动触发的情况不同。
下面以write事件的传播为例,来分析outbound事件的传播细节。在服务端新增3个事件处理器:
public class OutBoundHandlerA extends ChannelOutboundHandlerAdapter {
    public void write(ChannelHandlerContext ctx, Object msg, ChannelPromise promise) throws Exception {
        System.out.println("OutBoundHandlerA: " + msg);
        ctx.write(msg, promise);
    }
}
public class OutBoundHandlerB extends ChannelOutboundHandlerAdapter {
    public void write(ChannelHandlerContext ctx, Object msg, ChannelPromise promise) throws Exception {
        System.out.println("OutBoundHandlerB: " + msg);
        ctx.write(msg, promise);
    }
    public void handlerAdded(final ChannelHandlerContext ctx) {
      	// 定时任务。模拟用户写操作
        ctx.executor().schedule(() -> {
            ctx.channel().write("hello world"); // 1
				// ctx.write("hello world"); // 2
        }, 3, TimeUnit.SECONDS);
    }
}
public class OutBoundHandlerC extends ChannelOutboundHandlerAdapter {
    public void write(ChannelHandlerContext ctx, Object msg, ChannelPromise promise) throws Exception {
        System.out.println("OutBoundHandlerC: " + msg);
        ctx.write(msg, promise);
    }
}
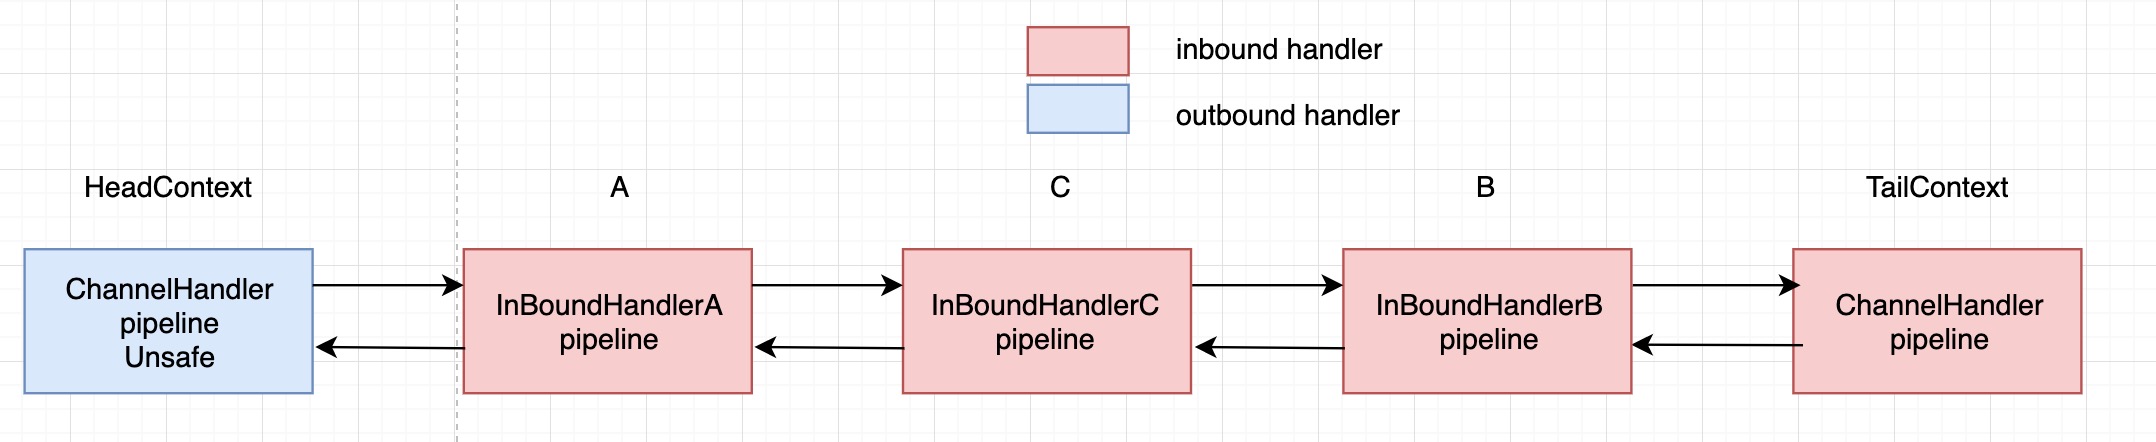
此时客户端 channel pipeline 的结构如下图:

还记得我们上面看 ChannelPipeline 的 doc 分析, 入站事件是从前到后的顺序执行,出站事件是从后往前执行的吗?按照这逻辑,可以看到在新连接接入时,会先回调 OutBoundHandlerB#handlerAdded()方法,该方法会调度一个定时任务,模拟用户触发的写操作,将 write 事件传播至 pipeline。
这里分两种情况进行分析,介绍两种触发方式的区别:
ctx.channel().write("hello world");: 调用channel(也即pipeline)#write()方法传播事件;ctx.write("hello world");: 调用ChannelHandlerContext#write()方法传播事件。
ctx.channel().write("hello world");: 调用channel(也即pipeline)#write()方法传播事件。
// DefaultChannelPipeline
public final ChannelFuture write(Object msg) {
    return tail.write(msg);
}
// TailContext
public ChannelFuture write(Object msg) {
    return write(msg, newPromise());
}
// TailContext
public ChannelFuture write(final Object msg, final ChannelPromise promise) {
    try {
        if (!validatePromise(promise, true)) {
            ReferenceCountUtil.release(msg);
            // cancelled
            return promise;
        }
    } catch (RuntimeException e) {
        ReferenceCountUtil.release(msg);
        throw e;
    }
  	// 这里
    write(msg, false, promise);

    return promise;
}
// TailContext
private void write(Object msg, boolean flush, ChannelPromise promise) {
  	// 找到下一个outbound handler
    AbstractChannelHandlerContext next = findContextOutbound();
    EventExecutor executor = next.executor();
    if (executor.inEventLoop()) {
        if (flush) {
            next.invokeWriteAndFlush(m, promise);
        } else {
            next.invokeWrite(m, promise);
        }
    } else {
        AbstractWriteTask task;
        if (flush) {
            task = WriteAndFlushTask.newInstance(next, m, promise);
        }  else {
            task = WriteTask.newInstance(next, m, promise);
        }
        safeExecute(executor, task, promise, m);
    }
}
执行 ctx.channel().write("hello world");时,会调用到 TailContxt.write()方法。TailContxt.write()方法中首先找出下一个 outbound handler:
// TailContext
private AbstractChannelHandlerContext findContextOutbound() {
    AbstractChannelHandlerContext ctx = this;
    do {
       	// 反向遍历
        ctx = ctx.prev;
    } while (!ctx.outbound);
    return ctx;
}
findContextOutbound()方法通过链表反向遍历的方式查找下一个 outbound handler,这里是找到了OutBoundHandlerB,并调用 OutBoundHandlerB.invokeWrite()方法。
// OutBoundHandlerB对应的ChannelHandlerContext
private void invokeWrite(Object msg, ChannelPromise promise) {
    if (invokeHandler()) {
        invokeWrite0(msg, promise);
    } else {
        write(msg, promise);
    }
}
// OutBoundHandlerB对应的ChannelHandlerContext
private void invokeWrite0(Object msg, ChannelPromise promise) {
    try {
        ((ChannelOutboundHandler) handler()).write(this, msg, promise);
    } catch (Throwable t) {
        notifyOutboundHandlerException(t, promise);
    }
}
// OutBoundHandlerB
public void write(ChannelHandlerContext ctx, Object msg, ChannelPromise promise) throws Exception {
    System.out.println("OutBoundHandlerB: " + msg);
    ctx.write(msg, promise);
}
在调用完 OutBoundHandlerB.write() 方法后,通过ctx.write(msg, promise);继续传播事件:
// OutBoundHandlerB对应的ChannelHandlerContext
public ChannelFuture write(final Object msg, final ChannelPromise promise) {
    try {
        if (!validatePromise(promise, true)) {
            ReferenceCountUtil.release(msg);
            // cancelled
            return promise;
        }
    } catch (RuntimeException e) {
        ReferenceCountUtil.release(msg);
        throw e;
    }
    write(msg, false, promise);

    return promise;
}
// OutBoundHandlerB对应的ChannelHandlerContext
private void write(Object msg, boolean flush, ChannelPromise promise) {
    AbstractChannelHandlerContext next = findContextOutbound();
    final Object m = pipeline.touch(msg, next);
    EventExecutor executor = next.executor();
    if (executor.inEventLoop()) {
        if (flush) {
            next.invokeWriteAndFlush(m, promise);
        } else {
            next.invokeWrite(m, promise);
        }
    } else {
        AbstractWriteTask task;
        if (flush) {
            task = WriteAndFlushTask.newInstance(next, m, promise);
        }  else {
            task = WriteTask.newInstance(next, m, promise);
        }
        safeExecute(executor, task, promise, m);
    }
}
跟上面类似的逻辑,调用ctx.write(msg, promise);时直接查找下一个 outbound handler,这里是OutBoundHandlerC。接下来是通过next.invokeWrite(m, promise);调用 OutBoundHandlerC.write()方法,与上面相同。就这样,write 事件将传播至 HeadContext。
// HeadContext
public void write(ChannelHandlerContext ctx, Object msg, ChannelPromise promise) throws Exception {
    unsafe.write(msg, promise);
}
HeadContext 将调用 NioByteUnsafe.write()方法,最终处理这个写出的数据:
public final void write(Object msg, ChannelPromise promise) {

    ChannelOutboundBuffer outboundBuffer = this.outboundBuffer;
    if (outboundBuffer == null) {
        safeSetFailure(promise, WRITE_CLOSED_CHANNEL_EXCEPTION);
        ReferenceCountUtil.release(msg);
        return;
    }

    int size;
    try {
      	// mas转换,比如堆内存转为直接内存
        msg = filterOutboundMessage(msg);
       	// 计算消息的大小
        size = pipeline.estimatorHandle().size(msg);
        if (size < 0) {
            size = 0;
        }
    } catch (Throwable t) {
        safeSetFailure(promise, t);
        ReferenceCountUtil.release(msg);
        return;
    }
		// 消息添加到ChannelOutboundBuffer
    outboundBuffer.addMessage(msg, size, promise);
}
根据上面的分析可知,通过 channel(也即pipleline)触发 outbound 事件传播时,从 TailContext 开始传播。对于 outbound 事件,会按照 ChannelOutboundHandler 添加的顺序逆序处理该事件,TailContext 由于是 inbound 类型的 ChannelHandler,它直接将 outbound 事件传播至下一个 outbound 节点,然后逐渐传递到 pipeline 中的 HeadContext 节点,最终事件由 HeadContext 节点处理。
ctx.write("hello world");: 调用ChannelHandlerContext#write()方法传播事件。
// OutBoundHandlerB对应的ChannelHandlerContext
public ChannelFuture write(Object msg) {
    return write(msg, newPromise());
}
public ChannelFuture write(final Object msg, final ChannelPromise promise) {

  	// ... 省略

    write(msg, false, promise);

    return promise;
}
private void write(Object msg, boolean flush, ChannelPromise promise) {
    // 直接查找下一个outbound handler
    AbstractChannelHandlerContext next = findContextOutbound();
    final Object m = pipeline.touch(msg, next);
    EventExecutor executor = next.executor();
    if (executor.inEventLoop()) {
        if (flush) {
            next.invokeWriteAndFlush(m, promise);
        } else {
            next.invokeWrite(m, promise);
        }
    } else {
        AbstractWriteTask task;
        if (flush) {
            task = WriteAndFlushTask.newInstance(next, m, promise);
        }  else {
            task = WriteTask.newInstance(next, m, promise);
        }
        safeExecute(executor, task, promise, m);
    }
}
调用 ChannelHandlerContext#write()方法传播 outbound 事件时,直接从当前节点开始反向遍历 context 链表,查找下一个 outbound handler,并调用其 write 方法,然后将 write 事件传播至 HeadContext。outbound事件传播我们就先分析到这里。
记住一个要点就是:Outbound类型的事件是从链表的 tail 开始传播的,所以执行的顺序和我们的添加进去的顺序相反。
异常事件的传播
上面都是正常的事件,那如果是发生异常的情况,异常会以什么样的方式传播下去呢?我们来写个demo。
在服务端添加如下的 handler:
ServerBootstrap b = new ServerBootstrap();
b.group(bossGroup, workerGroup)
  .channel(NioServerSocketChannel.class)
  .childOption(ChannelOption.TCP_NODELAY, true)
  .childHandler(new ChannelInitializer<SocketChannel>() {
    @Override
    public void initChannel(SocketChannel ch) {
      ch.pipeline().addLast(new InBoundHandlerA());
      ch.pipeline().addLast(new InBoundHandlerB());
      ch.pipeline().addLast(new InBoundHandlerC());
      ch.pipeline().addLast(new OutBoundHandlerA());
      ch.pipeline().addLast(new OutBoundHandlerB());
      ch.pipeline().addLast(new OutBoundHandlerC());
    }
  });
Handler 如下:
public class InBoundHandlerA extends ChannelInboundHandlerAdapter {
    public void exceptionCaught(ChannelHandlerContext ctx, Throwable cause) throws Exception {
        System.out.println("InBoundHandlerA.exceptionCaught()");
        ctx.fireExceptionCaught(cause);
    }
}
public class InBoundHandlerB extends ChannelInboundHandlerAdapter {
    public void channelRead(ChannelHandlerContext ctx, Object msg) throws Exception {
      	// 抛出异常
        throw new RunTimeException("from InBoundHandlerB");
    }
    public void exceptionCaught(ChannelHandlerContext ctx, Throwable cause) throws Exception {
        System.out.println("InBoundHandlerB.exceptionCaught()");
        ctx.fireExceptionCaught(cause);
    }
}
public class InBoundHandlerC extends ChannelInboundHandlerAdapter {
    public void exceptionCaught(ChannelHandlerContext ctx, Throwable cause) throws Exception {
        System.out.println("InBoundHandlerC.exceptionCaught()");
        ctx.fireExceptionCaught(cause);
    }
}
public class OutBoundHandlerA extends ChannelOutboundHandlerAdapter {
    public void exceptionCaught(ChannelHandlerContext ctx, Throwable cause) throws Exception {
        System.out.println("OutBoundHandlerA.exceptionCaught()");
        ctx.fireExceptionCaught(cause);
    }
}
public class OutBoundHandlerB extends ChannelOutboundHandlerAdapter {
    public void exceptionCaught(ChannelHandlerContext ctx, Throwable cause) throws Exception {
        System.out.println("OutBoundHandlerB.exceptionCaught()");
        ctx.fireExceptionCaught(cause);
    }
}
public class OutBoundHandlerC extends ChannelOutboundHandlerAdapter {
    public void exceptionCaught(ChannelHandlerContext ctx, Throwable cause) throws Exception {
        System.out.println("OutBoundHandlerC.exceptionCaught()");
        ctx.fireExceptionCaught(cause);
    }
}
public class BusinessException extends Exception {
    public BusinessException(String message) {
        super(message);
    }
}
从 InBoundHandlerB 的定义可以看出,在接收到 channelRead 事件时将抛出 RunTimeException,这种情况模拟了 inbound 事件在 pipeline 传播以及处理过程中发生的异常。下面先来分析 inbound 事件传播过程中发生异常时,异常事件传播的细节。
1.inbound事件传播过程中发生异常
假设 channel 读取到了一定数据,并回调了InBoundHandlerB.channelRead()方法,此时抛出RunTimeException 异常:
public void channelRead(ChannelHandlerContext ctx, Object msg) throws Exception {
    throw new BusinessException("from InBoundHandlerB");
}
private void invokeChannelRead(Object msg) {
    if (invokeHandler()) {
        try {
          	// handler(): InBoundHandlerB
            ((ChannelInboundHandler) handler()).channelRead(this, msg);
        } catch (Throwable t) {
            notifyHandlerException(t);
        }
    } else {
        fireChannelRead(msg);
    }
}
此时将进入notifyHandlerException(t);:
private void notifyHandlerException(Throwable cause) {
    if (inExceptionCaught(cause)) {
        if (logger.isWarnEnabled()) {
            logger.warn(
                    "An exception was thrown by a user handler " +
                            "while handling an exceptionCaught event", cause);
        }
        return;
    }

    invokeExceptionCaught(cause);
}
notifyHandlerException()方法直接调用invokeExceptionCaught(cause);传播异常事件:
private void invokeExceptionCaught(final Throwable cause) {
    if (invokeHandler()) {
        try {
            handler().exceptionCaught(this, cause);
        } catch (Throwable error) {
            // ...
        }
    } else {
        fireExceptionCaught(cause);
    }
}
在 inbound 事件传播过程中发生异常时,首先调用发生异常所在 handler 的 exceptionCaught 方法,即 InBoundHandlerB.exceptionCaught():
// InBoundHandlerB
public void exceptionCaught(ChannelHandlerContext ctx, Throwable cause) throws Exception {
    System.out.println("InBoundHandlerB.exceptionCaught()");
    ctx.fireExceptionCaught(cause);
}
然后调用ctx.fireExceptionCaught(cause);继续传播异常事件:
// InBoundHandlerB对应的ChannelHandlerContext
public ChannelHandlerContext fireExceptionCaught(final Throwable cause) {
  	// next: InBoundHandlerC
  	 // 直接调用next节点的exceptionCaught方法
    invokeExceptionCaught(next, cause);
    return this;
}
static void invokeExceptionCaught(final AbstractChannelHandlerContext next, final Throwable cause) {
    ObjectUtil.checkNotNull(cause, "cause");
    EventExecutor executor = next.executor();
    if (executor.inEventLoop()) {
        next.invokeExceptionCaught(cause);
    } else {
        try {
            executor.execute(new Runnable() {
                @Override
                public void run() {
                    next.invokeExceptionCaught(cause);
                }
            });
        } catch (Throwable t) {
            if (logger.isWarnEnabled()) {
                logger.warn("Failed to submit an exceptionCaught() event.", t);
                logger.warn("The exceptionCaught() event that was failed to submit was:", cause);
            }
        }
    }
}
private void invokeExceptionCaught(final Throwable cause) {
    if (invokeHandler()) {
        try {
            handler().exceptionCaught(this, cause); // InBoundHandlerC
        } catch (Throwable error) {
            // ..
        }
    } else {
        fireExceptionCaught(cause);
    }
}
可以看到,在异常发生节点 InBoundHandlerB 继续传播事件时,是直接调用了 InBoundHandlerB 对应 context 节点的 next 节点 InBoundHandlerC#exceptionCaught() 方法,而不管下一个节点是 inbound 还是 outbound 类型。异常事件按顺序经过 InBoundHandlerB、InBoundHandlerC、OutBoundHandlerA、OutBoundHandlerB、OutBoundHandlerC,最终到达 TailContext:
public void exceptionCaught(ChannelHandlerContext ctx, Throwable cause) throws Exception {
    onUnhandledInboundException(cause);
}
protected void onUnhandledInboundException(Throwable cause) {
    try {
        logger.warn(
                "An exceptionCaught() event was fired, and it reached at the tail of the pipeline. " +
                        "It usually means the last handler in the pipeline did not handle the exception.",
                cause);
    } finally {
        ReferenceCountUtil.release(cause);
    }
}
如果 TailContext 之前的 handler 都未处理该异常事件,在 TailContext 将以 warn 日志的方式记录该异常信息,并释放内存。
2.outbound事件传播过程中发生异常
下面以channel.writeAndFlush()事件的传播为例,分析 outbound 事件传播过程中发生异常时,异常事件的传播细节。
// AbstractChannelHandlerContext
private void write(Object msg, boolean flush, ChannelPromise promise) {
		 // 某个outbound handler
    AbstractChannelHandlerContext next = findContextOutbound();
    final Object m = pipeline.touch(msg, next);
    EventExecutor executor = next.executor();
    if (executor.inEventLoop()) {
        if (flush) {
            next.invokeWriteAndFlush(m, promise);
        } else {
            next.invokeWrite(m, promise);
        }
    } else {
        AbstractWriteTask task;
        if (flush) {
            task = WriteAndFlushTask.newInstance(next, m, promise);
        }  else {
            task = WriteTask.newInstance(next, m, promise);
        }
        safeExecute(executor, task, promise, m);
    }
}
private void invokeWriteAndFlush(Object msg, ChannelPromise promise) {
    if (invokeHandler()) {
        invokeWrite0(msg, promise);
        // 异常捕获
        invokeFlush0();
    } else {
        writeAndFlush(msg, promise);
    }
}
假设 writeAndFlush 事件传播至 context 链表中的某个节点,因此将调用以上的 invokeWriteAndFlush() 方法。继续看 invokeWrite0(msg, promise);中的逻辑:
private void invokeWrite0(Object msg, ChannelPromise promise) {
    try {
        ((ChannelOutboundHandler) handler()).write(this, msg, promise);
    } catch (Throwable t) {
        notifyOutboundHandlerException(t, promise);
    }
}
private static void notifyOutboundHandlerException(Throwable cause, ChannelPromise promise) {
    if (!(promise instanceof VoidChannelPromise)) {
      	// promise设置为失败
        PromiseNotificationUtil.tryFailure(promise, cause, logger);
    }
}
可见,如果在 ChannelOutboundHandler.write() 方法中发生异常,只是调用notifyOutboundHandlerException()方法,将promise设置为失败状态,不抛出任何异常。
再来看 invokeFlush0();的逻辑:
private void invokeFlush0() {
    try {
        ((ChannelOutboundHandler) handler()).flush(this);
    } catch (Throwable t) {
        notifyHandlerException(t);
    }
}
可见,如果在ChannelOutboundHandler.flush()方法中发生异常,将调用notifyHandlerException()方法:
private void notifyHandlerException(Throwable cause) {
    // ...省略

    invokeExceptionCaught(cause);
}
 private void invokeExceptionCaught(final Throwable cause) {
    if (invokeHandler()) {
        try {
            handler().exceptionCaught(this, cause);
        } catch (Throwable error) {
            // 省略...
        }
    } else {
        fireExceptionCaught(cause);
    }
}
同样的,会触发异常事件从当前节点向后传播,最后到达TailContext。
插播要点:
对于ChannelHandler的添加应该遵循什么样的顺序?
对于 inbound 事件的传播,事件的处理顺序与 ChannelInboundHandler 的添加顺序相同;
对于 outbound 事件的传播,事件的处理顺序与 ChannelOutboundHandler 的添加顺序相反。对于异常事件的传播,事件的处理顺序与 ChannelHandler 的添加顺序相同,与 inbound、outbound 无关。
用户手动触发事件传播,不同的触发方式有什么样的区别?
ctx.channel.xxx(): 对于 inbound 事件,从 pipeline 头部节点 head 开始传播;对于 outbound 事件,从 pipeline尾 部节点 tail 开始传播。ctx.xxx(): 对于 inbound 事件,从当前节点下一节点开始传播(指向尾部tail);对于 outbound 事件,从当前节点下一节点开始传播(指向头部head)。
xxx()方法指 fireChannelRead、write 等方法。
无论我们是调用 inbound 中的方法,还是 outbound 中的方法,当你在某一个 handler 中捕获了一个事件,如果你还想继续让该事件传下去,那么你就应该在处理逻辑之后调用 ChannelHandlerContext 继续将事件传递下去。
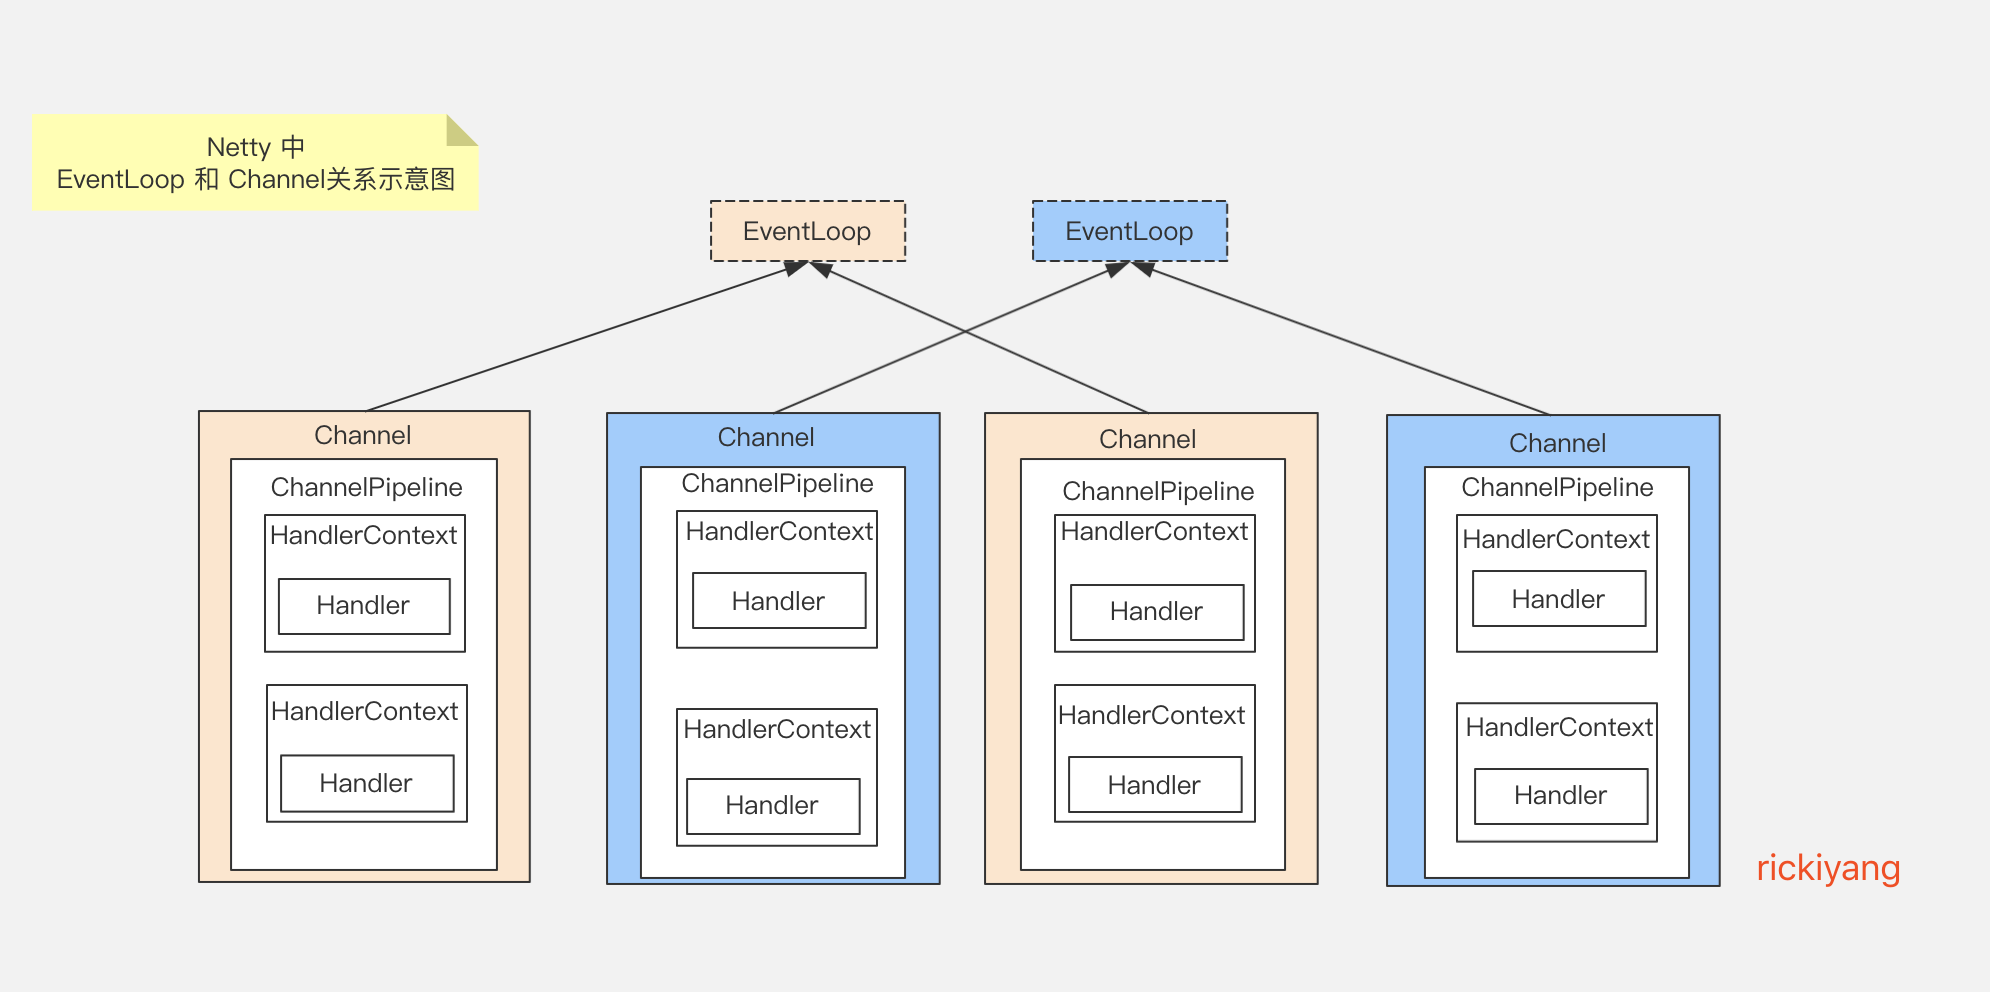
这里再重新画一张完整的图,展示EventLoop,Channel,以及 handler 的关系:
3. 自定义 handler 如何实现
Netty 自身提供了一些 handler,包括编解码处理,心跳检测,超时检测等等。那如果是我们自定义的处理器改如何实现呢?
拿 inbound 事件来举例,Netty 提供两种方式供我们实现 ChannelHandler,一种是继承 ChannelInboundHandlerAdapter,一种是继承 SimpleChannelInboundHandler。
// ChannelInboundHandlerAdapter
public class ServerHandler1 extends ChannelInboundHandlerAdapter {
    // todo
}


// SimpleChannelInboundHandler
public class ServerHandler2 extends SimpleChannelInboundHandler<Object> {
   // todo
}
这两个类从名字上可知道大概的区别,ChannelInboundHandlerAdapter相当于是一个简写版,SimpleChannelInboundHandler是完整版,各取所需。SimpleChannelInboundHandler 是一个泛型类,而 ChannelInboundHandlerAdapter 并不是一个泛型类。这里的泛型主要用于消息格式转换使用。在使用 ChannelInboundHandlerAdapter 进行操作时,我们需要自己转换消息格式,而 SimpleChannelInboundHandler 就是 Netty 帮我们转换消息格式,只要我们在泛型中声明转换的类型,并且这个类型支持被转换,那么我们就可以使用这个转换后的消息进行操作。
本节我们就到这里打住,没说到的也不说了,口干舌燥!自己有点晕菜了。代码太绕,大家努力学习。

 浙公网安备 33010602011771号