Java--GUI编程(一)
2020-04-11
19:42:22
GUI:图形用户界面(Graphical User Interface)
今天开始进入了AWT的学习:万事如期而至

进行窗口界面化首先需要一个Frame。
Frame
这个Frame是基本的窗口。
frame中可以添加各种组件。eg:panel、button、TextArea、Label…
首先尝试着做一个小窗口
public class MyFrame extends Frame {
    //可能存在多个窗口,我们需要一个计数器
    static int id = 0;
    MyFrame(){}
    MyFrame(String title,Color color ,int x,int y ,int w ,int h){
        super("MyFrame"+ (id++));
        setResizable(false);
        setBackground(color);
        setBounds(x,y,w,h);
        setVisible(true);
    }
}
这是封装后的一个小窗口。
上面也是基本的属性设置。
Panel面板
public class TestPanel {
    public static void main(String[] args) {
        Frame frame = new Frame();
        Panel panel = new Panel();

        frame.setLayout(null);

        frame.setBounds( 300,300,500,500);
        frame.setBackground(Color.GREEN);

        panel.setBounds(300,300,200,200);
        panel.setBackground(Color.RED);

        frame.addWindowListener(new WindowAdapter() {
            @Override
            public void windowClosing(WindowEvent e) {
                int i = 0;
                System.exit(i);
            }
        });


        frame.add(panel);
        frame.setVisible(true);


    }
}
现在到了最重要的一个point:
三种布局管理器:
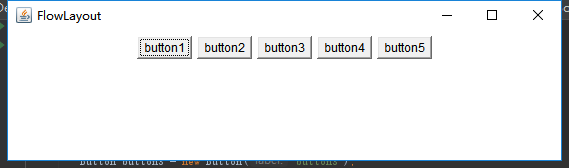
1、流式布局:FlowLayout
这是一种自动的布局的管理器:
可以选动设置成靠左、居中、靠右 三种形式
在这个布局中添加组件时,这个管理器都会自动的为你排布局面。
public class TestFlowLayout {
    public static void main(String[] args) {
        Frame frame = new Frame("FlowLayout");
        frame.setLayout(new FlowLayout(FlowLayout.CENTER));

        Button button1 = new Button("button1");
        Button button2 = new Button("button2");
        Button button3 = new Button("button3");
        Button button4 = new Button("button4");
        Button button5 = new Button("button5");

        frame.add(button1);
        frame.add(button2);
        frame.add(button3);
        frame.add(button4);
        frame.add(button5);

        frame.addWindowListener(new WindowAdapter() {
            @Override
            public void windowClosing(WindowEvent e) {
                System.exit(0);
            }
        });

        frame.pack();
        frame.setVisible(true);

    }
}
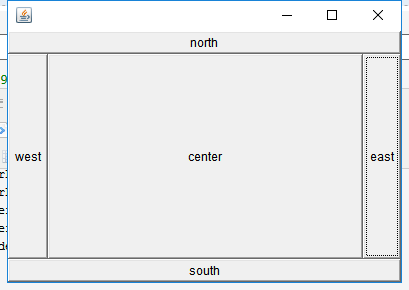
2、东南西北中布局:BorderLayout
这个布局管理器需要你自行的为你的组件分配到这个布局的各个位置。
public class TestBordLayout {
    public static void main(String[] args) {
        Frame frame = new Frame();
        frame.setLayout(new BorderLayout());
        //东南西北中布局需要自行定义方向

        Button east = new Button("east");
        Button west = new Button("west");
        Button north = new Button("north");
        Button south = new Button("south");
        Button center = new Button("center");

        frame.add(east,BorderLayout.EAST);
        frame.add(west,BorderLayout.WEST);
        frame.add(north,BorderLayout.NORTH);
        frame.add(south,BorderLayout.SOUTH);
        frame.add(center,BorderLayout.CENTER);

        frame.pack();
        frame.setVisible(true);
        frame.addWindowListener(new WindowAdapter() {
            @Override
            public void windowClosing(WindowEvent e) {
                System.exit(0);
            }
        });
    }
}
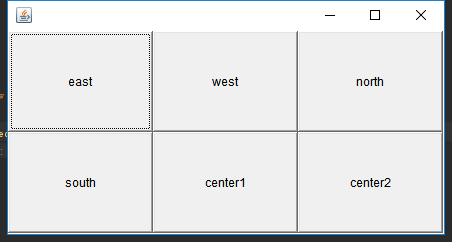
3、表格布局:GirdLayout
这个布局管理器需要你自动的为你的组件分配到这个布局的各个位置。
你可以自行的设置这个布局的行列数。
public class TestGirdLayout {
    public static void main(String[] args) {
        Frame frame = new Frame();

        //表格布局  自动填充
        frame.setLayout(new GridLayout(2,3));

        Button east = new Button("east");
        Button west = new Button("west");
        Button north = new Button("north");
        Button south = new Button("south");
        Button center1 = new Button("center1");
        Button center2 = new Button("center2");

        frame.add(east );
        frame.add(west );
        frame.add(north );
        frame.add(south );
        frame.add(center1);
        frame.add(center2);

        frame.pack();
        frame.setVisible(true);

        frame.addWindowListener(new WindowAdapter() {
            @Override
            public void windowClosed(WindowEvent e) {
                System.exit(0);
            }
        });
    }
}
最后的最后,我们来做一个练习题:
用今天所学的做一个面板如图:
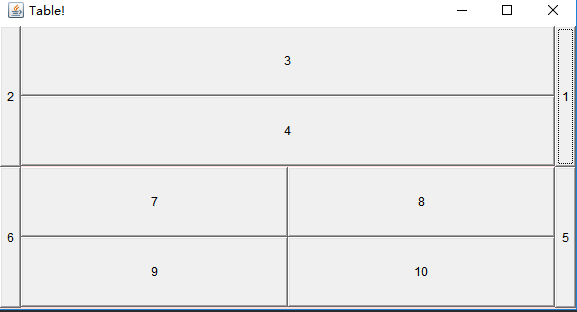
public class Demo {
    public static void main(String[] args) {
        Frame frame = new Frame("Table!");
        frame.setLayout(new GridLayout(2,1));
        frame.setBounds(300,300,500,500);
        frame.setBackground(new Color(255, 223, 220));


        Panel p1 = new Panel(new BorderLayout());
        Panel p2 = new Panel(new GridLayout(2,1));
        Panel p3 = new Panel(new BorderLayout());
        Panel p4 = new Panel(new GridLayout(2,2));

        p1.add(new Button("1"),BorderLayout.EAST);
        p1.add(new Button("2"),BorderLayout.WEST);
        p2.add(new Button("3"));
        p2.add(new Button("4"));
        p1.add(p2,BorderLayout.CENTER);

        p3.add(new Button("5"),BorderLayout.EAST);
        p3.add(new Button("6"),BorderLayout.WEST);
        int i = 4;
        for (int i1 = 0; i1 < i; i1++) {
            p4.add(new Button( String.valueOf(i1 + 7)));
        }
        p3.add(p4,BorderLayout.CENTER);

        frame.add(p1);
        frame.add(p3);

        frame.addWindowListener(new WindowAdapter() {
            @Override
            public void windowClosed(WindowEvent e) {
                System.exit(0);
            }
        });
        frame.setVisible(true);

    }
}

 浙公网安备 33010602011771号