python之路[5] - 常用模块-迁
内置标准模块
time & datetime模块
| Directive | Meaning |
|---|---|
%a |
Locale’s abbreviated weekday name. |
%A |
Locale’s full weekday name. |
%b |
Locale’s abbreviated month name. |
%B |
Locale’s full month name. |
%c |
Locale’s appropriate date and time representation. |
%d |
Day of the month as a decimal number [01,31]. |
%H |
Hour (24-hour clock) as a decimal number [00,23]. |
%I |
Hour (12-hour clock) as a decimal number [01,12]. |
%j |
Day of the year as a decimal number [001,366]. |
%m |
Month as a decimal number [01,12]. |
%M |
Minute as a decimal number [00,59]. |
%f |
显示毫秒 |
%p |
Locale’s equivalent of either AM or PM. |
%S |
Second as a decimal number [00,61]. |
%U |
Week number of the year (Sunday as the first day of the week) as a decimal number [00,53]. All days in a new year preceding the first Sunday are considered to be in week 0. |
%w |
Weekday as a decimal number [0(Sunday),6]. |
%W |
Week number of the year (Monday as the first day of the week) as a decimal number [00,53]. All days in a new year preceding the first Monday are considered to be in week 0. |
%x |
Locale’s appropriate date representation. |
%X |
Locale’s appropriate time representation. |
%y |
Year without century as a decimal number [00,99]. |
%Y |
Year with century as a decimal number. |
%z |
Time zone offset indicating a positive or negative time difference from UTC/GMT of the form +HHMM or -HHMM, where H represents decimal hour digits and M represents decimal minute digits [-23:59, +23:59]. |
%Z |
Time zone name (no characters if no time zone exists). |
%% |
A literal '%' character. |
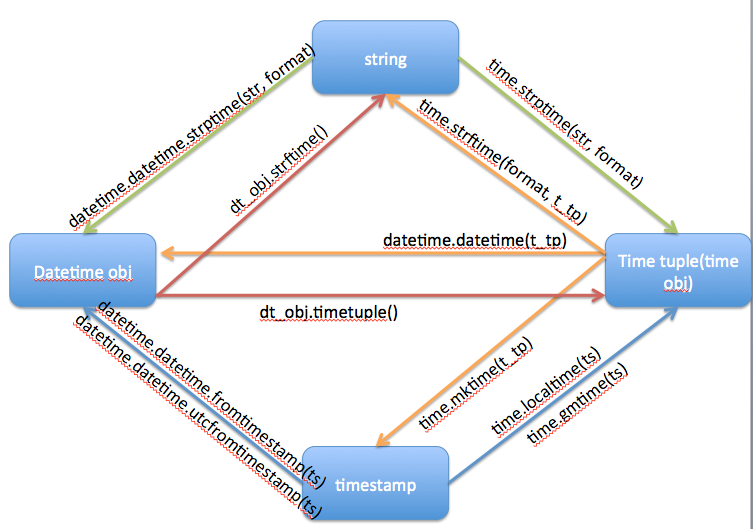
时间转换
time模块
import time
start_time = time.perf_counter() # 获取到程序计时器,常用于获取两个指令之间的耗时
time_tp = time_dt.timetuple()    # datetime转tuple
time_ts = time.mktime(time_tp) # tuple转timestamp
# 日期字符串 转成  时间戳
# string_2_struct = time.strptime("2016/05/22","%Y/%m/%d") #将 日期字符串 转成 struct时间对象格式
# time.strftime('%Y-%m-%d %H:%M:%S',time.localtime())  #将本地时间转为字符串
# #
# struct_2_stamp = time.mktime(string_2_struct) #将struct时间对象转成时间戳
# print(struct_2_stamp)

#将时间戳转为字符串格式
# print(time.gmtime(time.time()-86640)) #将utc时间戳转换成struct_time格式,将时间戳转换为UTC时区(0时区)的struct_time,所以跟现在的时区可能不一致
# print(time.strftime("%Y-%m-%d %H:%M:%S",time.gmtime()) ) #将utc struct_time格式转成指定的字符串格式
# print(time.clock()) #返回处理器时间,3.3开始已废弃 , 改成了time.process_time()测量处理器运算时间,不包括sleep时间,不稳定,mac上测不出来
# print(time.altzone)  #返回与utc时间的时间差,以秒计算\
# print(time.asctime()) #返回时间格式"Fri Aug 19 11:14:16 2016",
# print(time.localtime()) #返回本地时间 的struct time对象格式
# print(time.gmtime(time.time()-800000)) #返回utc时间的struc时间对象格式
# print(time.asctime(time.localtime())) #返回时间格式"Fri Aug 19 11:14:16 2016",
# print(time.ctime()) #返回Fri Aug 19 12:38:29 2016 格式, 同上,也可以将timestamp快速转为字符串格式:time.ctime(mytime)
datatime模块
import datetime
datetime.datetime.now().strftime('%Y-%m-%dT%H:%M:%S.%f+0800') # 将时间快速转换为想要的格式字符串
print(datetime.datetime.now()) #返回 2016-08-19 12:47:03.941925
print(datetime.date.fromtimestamp(time.time()) )  # 时间戳直接转成日期格式 2016-08-19
print(datetime.datetime.now())  # 当前时间

c_time  = datetime.datetime.now()
print(c_time.replace(minute=3,hour=2)) #时间替换

(datetime.datetime.now() + datetime.timedelta(**{'days':-a})).strftime("%Y-%m-%d %H:%M") #带有变量的时间设定

datetime.date 的用法
now = datetime.date.today()
datetime.date(2018, 10, 12)  # 不带time,也没有时区
时间加减
import datetime

print(datetime.datetime.now())  # 当前时间
print(datetime.datetime.now() + datetime.timedelta(days=-1)) # 当前时间-1天
print(datetime.datetime.now() + datetime.timedelta(3)) #当前时间+3天
print(datetime.datetime.now() + datetime.timedelta(-3)) #当前时间-3天
print(datetime.datetime.now() + datetime.timedelta(hours=3)) #当前时间+3小时
print(datetime.datetime.now() + datetime.timedelta(minutes=30)) #当前时间+30
random模块
随机数
import random
random.randrange(1,5)    产生1-5 之间的随机数 1,2,3,4
random.uniform()            产生一个浮点的随机数
random.randint(10,100) 从10-100产生一个整数
random.choice(['2323','gf','32']) 给定序列产生一个元素
chars = random.choice(string.letters+string.digits) 产生一对随机的字符和数字
生成随机验证码


import random
checkcode = ''
for i in range(4):
    current = random.randrange(0,4)
    if current != i:
        temp = chr(random.randint(65,90))
    else:
        temp = random.randint(0,9)
    checkcode += str(temp)
print checkcode
OS模块
系统相关
os.utime('345',(133023213,133343453))
os.name  获取机器的平台类型,posix == linux,nt == windows
系统路径变量
os.sys.path  获取系统当前的环境路径
os.linesep  输出当前平台使用的行终止符 ,win下是 "\t\n" linux下是 "\n"
os.sep 输出操作系统特定的路径分隔符 ,win下是 "\\" linux下是 "\n"
os.pathsep 输出当前系统的环境变量分割符,win是";" Linux是":"
目录处理
os.chdir()/fchdir() 改变当前工作目录/通过一个文件描述符改变当前工作目录
os.chroot() 改变当前进程的根目录
os.listdir() 列出指定目录的文件,列出当前目录的文件 os.getcwd()/getcwdu() 获取当前的绝对目录, 但返回一个 Unicode 对象 os.mkdir()/makedirs() 创建目录/创建多层目录 os.rmdir()/removedirs() 删除目录/删除多层目录
os.curdir 返回当前目录 ('.')
os.pardir 获取当前工作目录的父目录字符串名称 ('..')
os.umask(0) 指定一个umask默认值,对mkdir() 及 makedirs() 可以创建一个777的文件
os.path.join(cwd,os.listdir(cwd)[0]) 完整文件及路径 '/tmp/example/filetest.txt'
os.path.isfile(path) 文件确认
os.path.isdir(path) 路径确认
os.path.isabs() 是否是绝对路径
os.path.exists() 是否存在目录或文件
os.path.islink() 是否是一个超链接
os.path.ismount() 是否存在一个挂载点
os.path.samefile() 是否是相同文件
os.path.split(path) 拆分文件名 ('/tmp/example', 'filetest.txt')
os.path.splitext(os.path.basename(path)) 拆分后缀 ('filetest', '.ext')
os.path.splitdrive() 返回(dirvename, pathname)元祖
os.path.basename('/tmp/jee-kepler/workspace/yx/.project') 获取文件名 .project
os.path.dirname('/tmp/jee-kepler/workspace/yx/.project') 获取目录 '/tmp/jee-kepler/workspace/yx/.project'
os.path.abspath('tmp') 取到一个绝对路径:'/opt/zgt/tmp',如果是 "/"的话 就是绝对路径, 可以根据不同的os来转移路径,比如/var/lib/blob_files/myfile.blob转 C:\var\lib\blob_files\myfile.blob
os.path.dirname(os.path.abspath(__file__)) 取脚本的所在目录(绝对路径)
os.path.expanduser("~/blob_files/myfile.blob") 当前用户家目录转义符:'/home/richard/blob_files/myfile.blob'
遍历目录中的文件
for root, subFolders, files in os.walk(rootdir):
   if '.svn' in subFolders: subFolders.remove('.svn') # 排除特定目录
   for file in files:
        do_something_about_file

# ('/home/richard/Work/PythonLearn/Project/jumpserver-master/.svn/pristine/9b', [], ['9bc1aa7a6dd105524bc85289e66e0447f95b9e6f.svn-base', '9b764d076813fae11be37769a2e4ea604e4a39c1.svn-base', '9b815c166e249b631a6d253364111d4f3e2c3b58.svn-base', '9b07dd8315a6cdd906cb12b510063261594c112d.svn-base'])
文件处理
os.mkfifo()/mknod() 创建命名管道/创建文件系统节点 os.remove/unlink() Delete file 删除文件 os.rename('test', 'filetest.txt')/renames() 重命名文件 os.symlink() 创建符号链接 os.utime() 更新时间戳 os.tmpfile() 创建并打开('w+b')一个新的临时文件 os.walk() 生成一个目录树下的所有文件名 目录/文件夹 具体见9-21 zip压缩案例 os.stat('file123') 文件状态,通过st_size获取文件大小
os.path.getctime('/tmp') 文件ctime
os.path.getatime()
os.path.getmtime()
os.path.getsize()  类似与 os.stat()
文件描述符操作
os.open() 底层的操作系统 open (对于文件, 使用标准的内建 open() 函数) os.read()/write() 根据文件描述符读取/写入数据 os.dup()/dup2() 复制文件描述符号/功能相同, 但是是复制到另一个文件描述符设备号 os.getpid() 获取当前进程号 os.makedev() 从 major 和 minor 设备号创建一个原始设备号,major()/minor() 从原始设备号获得 major/minor 设备
环境变量
获取环境变量
>>> os.getenv("LANG")
'zh_CN.UTF-8'
设置环境变量
os.environ["DEBUSSY"] = "1"
此方法可以用于cx_Oracle数据库查询
import os
os.environ['NLS_LANG'] = 'SIMPLIFIED CHINESE_CHINA.UTF8'
import os
filename = os.environ.get('PYTHONSTARTUP')
if filename and os.path.isfile(filename):
execfile(filename)
访问/权限
access() 检验权限模式
chmod() 改变权限模式
chown()/lchown() 改变 owner 和 group ID/功能相同, 但不会跟踪链接
umask() 设置默认权限模式
sys模块
sys.platform 返回操作系统平台名称
sys.version 版本
sys.modules['sys']  内建函数定义
sys.argv       命令行参数,第一个[0] 是程序本身
sys.exit(n)        退出程序,正常退出时exit(0)
sys.maxint         最大的Int值
sys.path           返回模块的搜索路径,初始化时使用PYTHONPATH环境变量的值
#打印进度条
import sys,time
for i in range(50):
    sys.stdout.write('#')
    sys.stdout.flush()
    time.sleep(0.5)
shutil 模块
高级的 文件、文件夹、压缩包 处理模块
shutil.copyfileobj(fsrc, fdst[, length])
将文件内容拷贝到另一个文件中,可以部分内容
def copyfileobj(fsrc, fdst, length=16*1024):
    """copy data from file-like object fsrc to file-like object fdst"""
    while 1:
        buf = fsrc.read(length)
        if not buf:
            break
        fdst.write(buf)
shutil.copyfile(src, dst)
拷贝文件
def copyfile(src, dst):
    """Copy data from src to dst"""
    if _samefile(src, dst):
        raise Error("`%s` and `%s` are the same file" % (src, dst))

    for fn in [src, dst]:
        try:
            st = os.stat(fn)
        except OSError:
            # File most likely does not exist
            pass
        else:
            # XXX What about other special files? (sockets, devices...)
            if stat.S_ISFIFO(st.st_mode):
                raise SpecialFileError("`%s` is a named pipe" % fn)

    with open(src, 'rb') as fsrc:
        with open(dst, 'wb') as fdst:
            copyfileobj(fsrc, fdst)
shutil.copymode(src, dst)
仅拷贝权限。内容、组、用户均不变
def copymode(src, dst):
    """Copy mode bits from src to dst"""
    if hasattr(os, 'chmod'):
        st = os.stat(src)
        mode = stat.S_IMODE(st.st_mode)
        os.chmod(dst, mode)
shutil.copystat(src, dst)
拷贝状态的信息,包括:mode bits, atime, mtime, flags
def copystat(src, dst):
    """Copy all stat info (mode bits, atime, mtime, flags) from src to dst"""
    st = os.stat(src)
    mode = stat.S_IMODE(st.st_mode)
    if hasattr(os, 'utime'):
        os.utime(dst, (st.st_atime, st.st_mtime))
    if hasattr(os, 'chmod'):
        os.chmod(dst, mode)
    if hasattr(os, 'chflags') and hasattr(st, 'st_flags'):
        try:
            os.chflags(dst, st.st_flags)
        except OSError, why:
            for err in 'EOPNOTSUPP', 'ENOTSUP':
                if hasattr(errno, err) and why.errno == getattr(errno, err):
                    break
            else:
                raise
shutil.copy(src, dst)
拷贝文件和权限
def copy(src, dst):
    """Copy data and mode bits ("cp src dst").

    The destination may be a directory.

    """
    if os.path.isdir(dst):
        dst = os.path.join(dst, os.path.basename(src))
    copyfile(src, dst)
    copymode(src, dst)
shutil.copy2(src, dst)
拷贝文件和状态信息
def copy2(src, dst):
    """Copy data and all stat info ("cp -p src dst").

    The destination may be a directory.

    """
    if os.path.isdir(dst):
        dst = os.path.join(dst, os.path.basename(src))
    copyfile(src, dst)
    copystat(src, dst)
shutil.ignore_patterns(*patterns)
shutil.copytree(src, dst, symlinks=False, ignore=None)
递归的去拷贝文件
例如:copytree(source, destination, ignore=ignore_patterns('*.pyc', 'tmp*'))
def ignore_patterns(*patterns):
    """Function that can be used as copytree() ignore parameter.

    Patterns is a sequence of glob-style patterns
    that are used to exclude files"""
    def _ignore_patterns(path, names):
        ignored_names = []
        for pattern in patterns:
            ignored_names.extend(fnmatch.filter(names, pattern))
        return set(ignored_names)
    return _ignore_patterns

def copytree(src, dst, symlinks=False, ignore=None):
    """Recursively copy a directory tree using copy2().

    The destination directory must not already exist.
    If exception(s) occur, an Error is raised with a list of reasons.

    If the optional symlinks flag is true, symbolic links in the
    source tree result in symbolic links in the destination tree; if
    it is false, the contents of the files pointed to by symbolic
    links are copied.

    The optional ignore argument is a callable. If given, it
    is called with the `src` parameter, which is the directory
    being visited by copytree(), and `names` which is the list of
    `src` contents, as returned by os.listdir():

        callable(src, names) -> ignored_names

    Since copytree() is called recursively, the callable will be
    called once for each directory that is copied. It returns a
    list of names relative to the `src` directory that should
    not be copied.

    XXX Consider this example code rather than the ultimate tool.

    """
    names = os.listdir(src)
    if ignore is not None:
        ignored_names = ignore(src, names)
    else:
        ignored_names = set()

    os.makedirs(dst)
    errors = []
    for name in names:
        if name in ignored_names:
            continue
        srcname = os.path.join(src, name)
        dstname = os.path.join(dst, name)
        try:
            if symlinks and os.path.islink(srcname):
                linkto = os.readlink(srcname)
                os.symlink(linkto, dstname)
            elif os.path.isdir(srcname):
                copytree(srcname, dstname, symlinks, ignore)
            else:
                # Will raise a SpecialFileError for unsupported file types
                copy2(srcname, dstname)
        # catch the Error from the recursive copytree so that we can
        # continue with other files
        except Error, err:
            errors.extend(err.args[0])
        except EnvironmentError, why:
            errors.append((srcname, dstname, str(why)))
    try:
        copystat(src, dst)
    except OSError, why:
        if WindowsError is not None and isinstance(why, WindowsError):
            # Copying file access times may fail on Windows
            pass
        else:
            errors.append((src, dst, str(why)))
    if errors:
        raise Error, errors
shutil.rmtree(path[, ignore_errors[, onerror]])
递归的去删除文件
def rmtree(path, ignore_errors=False, onerror=None):
    """Recursively delete a directory tree.

    If ignore_errors is set, errors are ignored; otherwise, if onerror
    is set, it is called to handle the error with arguments (func,
    path, exc_info) where func is os.listdir, os.remove, or os.rmdir;
    path is the argument to that function that caused it to fail; and
    exc_info is a tuple returned by sys.exc_info().  If ignore_errors
    is false and onerror is None, an exception is raised.

    """
    if ignore_errors:
        def onerror(*args):
            pass
    elif onerror is None:
        def onerror(*args):
            raise
    try:
        if os.path.islink(path):
            # symlinks to directories are forbidden, see bug #1669
            raise OSError("Cannot call rmtree on a symbolic link")
    except OSError:
        onerror(os.path.islink, path, sys.exc_info())
        # can't continue even if onerror hook returns
        return
    names = []
    try:
        names = os.listdir(path)
    except os.error, err:
        onerror(os.listdir, path, sys.exc_info())
    for name in names:
        fullname = os.path.join(path, name)
        try:
            mode = os.lstat(fullname).st_mode
        except os.error:
            mode = 0
        if stat.S_ISDIR(mode):
            rmtree(fullname, ignore_errors, onerror)
        else:
            try:
                os.remove(fullname)
            except os.error, err:
                onerror(os.remove, fullname, sys.exc_info())
    try:
        os.rmdir(path)
    except os.error:
        onerror(os.rmdir, path, sys.exc_info())
shutil.move(src, dst)
递归的去移动文件
def move(src, dst):
    """Recursively move a file or directory to another location. This is
    similar to the Unix "mv" command.

    If the destination is a directory or a symlink to a directory, the source
    is moved inside the directory. The destination path must not already
    exist.

    If the destination already exists but is not a directory, it may be
    overwritten depending on os.rename() semantics.

    If the destination is on our current filesystem, then rename() is used.
    Otherwise, src is copied to the destination and then removed.
    A lot more could be done here...  A look at a mv.c shows a lot of
    the issues this implementation glosses over.

    """
    real_dst = dst
    if os.path.isdir(dst):
        if _samefile(src, dst):
            # We might be on a case insensitive filesystem,
            # perform the rename anyway.
            os.rename(src, dst)
            return

        real_dst = os.path.join(dst, _basename(src))
        if os.path.exists(real_dst):
            raise Error, "Destination path '%s' already exists" % real_dst
    try:
        os.rename(src, real_dst)
    except OSError:
        if os.path.isdir(src):
            if _destinsrc(src, dst):
                raise Error, "Cannot move a directory '%s' into itself '%s'." % (src, dst)
            copytree(src, real_dst, symlinks=True)
            rmtree(src)
        else:
            copy2(src, real_dst)
            os.unlink(src)
shutil.make_archive(base_name, format,...)
创建压缩包并返回文件路径,例如:zip、tar
- base_name: 压缩包的文件名,也可以是压缩包的路径。只是文件名时,则保存至当前目录,否则保存至指定路径,
如:www =>保存至当前路径
如:/Users/wupeiqi/www =>保存至/Users/wupeiqi/ - format: 压缩包种类,“zip”, “tar”, “bztar”,“gztar”
- root_dir: 要压缩的文件夹路径(默认当前目录)
- owner: 用户,默认当前用户
- group: 组,默认当前组
- logger: 用于记录日志,通常是logging.Logger对象
#将 /Users/wupeiqi/Downloads/test 下的文件打包放置当前程序目录

import shutil
ret = shutil.make_archive("wwwwwwwwww", 'gztar', root_dir='/Users/wupeiqi/Downloads/test')


#将 /Users/wupeiqi/Downloads/test 下的文件打包放置 /Users/wupeiqi/目录
import shutil
ret = shutil.make_archive("/Users/wupeiqi/wwwwwwwwww", 'gztar', root_dir='/Users/wupeiqi/Downloads/test')
def make_archive(base_name, format, root_dir=None, base_dir=None, verbose=0,
                 dry_run=0, owner=None, group=None, logger=None):
    """Create an archive file (eg. zip or tar).

    'base_name' is the name of the file to create, minus any format-specific
    extension; 'format' is the archive format: one of "zip", "tar", "bztar"
    or "gztar".

    'root_dir' is a directory that will be the root directory of the
    archive; ie. we typically chdir into 'root_dir' before creating the
    archive.  'base_dir' is the directory where we start archiving from;
    ie. 'base_dir' will be the common prefix of all files and
    directories in the archive.  'root_dir' and 'base_dir' both default
    to the current directory.  Returns the name of the archive file.

    'owner' and 'group' are used when creating a tar archive. By default,
    uses the current owner and group.
    """
    save_cwd = os.getcwd()
    if root_dir is not None:
        if logger is not None:
            logger.debug("changing into '%s'", root_dir)
        base_name = os.path.abspath(base_name)
        if not dry_run:
            os.chdir(root_dir)

    if base_dir is None:
        base_dir = os.curdir

    kwargs = {'dry_run': dry_run, 'logger': logger}

    try:
        format_info = _ARCHIVE_FORMATS[format]
    except KeyError:
        raise ValueError, "unknown archive format '%s'" % format

    func = format_info[0]
    for arg, val in format_info[1]:
        kwargs[arg] = val

    if format != 'zip':
        kwargs['owner'] = owner
        kwargs['group'] = group

    try:
        filename = func(base_name, base_dir, **kwargs)
    finally:
        if root_dir is not None:
            if logger is not None:
                logger.debug("changing back to '%s'", save_cwd)
            os.chdir(save_cwd)

    return filename
shutil 对压缩包的处理是调用 ZipFile 和 TarFile 两个模块来进行的,详细:
import zipfile

# 压缩
z = zipfile.ZipFile('laxi.zip', 'w')
z.write('a.log')
z.write('data.data')
z.close()

# 解压
z = zipfile.ZipFile('laxi.zip', 'r')
z.extractall()
z.close()

zipfile 压缩解压
import tarfile

# 压缩
tar = tarfile.open('your.tar','w')
tar.add('/Users/wupeiqi/PycharmProjects/bbs2.zip', arcname='bbs2.zip')
tar.add('/Users/wupeiqi/PycharmProjects/cmdb.zip', arcname='cmdb.zip')
tar.close()

# 解压
tar = tarfile.open('your.tar','r')
tar.extractall()  # 可设置解压地址
tar.close()

tarfile 压缩解压
json & pickle & shelve
用于序列化的两个模块
- json,用于字符串 和 python数据类型间进行转换
- pickle,用于python特有的类型 和 python的数据类型间进行转换
Json、pickle模块提供了四个功能:dumps、dump、loads、load
json序列化和反序列化
注意字段中有datatime属性需要特殊处理:
class datetimeToJson(json.JSONEncoder):
    """docstring for datatimeToJson"""
    def default(self, obj):
        if isinstance(obj, (datetime.datetime,)):
            return obj.isoformat()
        else:
            return super().default(obj)

json.dumps({'data':format_data},cls=datetimeToJson,sort_keys=True,indent=4,separators=(',',':'))
import json
import datetime
import dateutil.parser
import decimal  #小数

CONVERTERS = {
    'datetime': dateutil.parser.parse,
    'decimal': decimal.Decimal,
}

class MyJSONEncoder(json.JSONEncoder):
    def default(self, obj):
        if isinstance(obj, (datetime.datetime,)):
            return {"val": obj.isoformat(), "_spec_type": "datetime"}
        elif isinstance(obj, (decimal.Decimal,)):
            return {"val": str(obj), "_spec_type": "decimal"}
        else:
            return super().default(obj)


def object_hook(obj):
    _spec_type = obj.get('_spec_type')
    if not _spec_type:
        return obj

    if _spec_type in CONVERTERS:
        return CONVERTERS[_spec_type](obj['val'])
    else:
        raise Exception('Unknown {}'.format(_spec_type))


def main():
    data = {
        "hello": "world",
        "thing": datetime.datetime.now(),
        "other": decimal.Decimal(0)
    }
    thing = json.dumps(data, cls=MyJSONEncoder)
    print(json.loads(thing, object_hook=object_hook))

if __name__ == '__main__':
    main()
import pickle

data = {'k1':123,k2:"666"}
p_str = pickle.dumps(data)
print p_str

with open('res.pk', 'w') as fp:
    pickle.dump(data, fp)

f = open('res.pk', 'r')
p_str = f.loads()
----------------------------------------------------
import json
j_str = json.dumps(data)
print j_str


with open('res.json', 'w') as fp:
    json.dump(data, fp)
| Pickle 每次序列化生成的字符串有独立头尾,pickle.load() 只会读取一个完整的结果, 所以你只需要在 load 一次之后再 load 一次, 就能读到第二次序列化的 ['asd', ('ss', 'dd')]。如果不知道文件里有多少 pickle 对象, 可以在 while 循环中反复 load 文件对象,直到抛出异常为止IOError 或 EOFError |
shelve
shelve模块是一个简单的k,v将内存数据通过文件持久化的模块,可以持久化任何pickle可支持的python数据格式
import shelve

d = shelve.open('shelve_test','w',writeback=True) #打开一个文件,打开写回

class Test(object):
    def __init__(self,n):
        self.n = n

t = Test(123)
t2 = Test(123334)

name = ["alex","rain","test"]
d["test"] = name #持久化列表
d["t1"] = t      #持久化类
d["t2"] = t2

d.close()
save和open函数
def Save(k,v):
    s = shelve.open("test.dat",writeback=True)
    try:
        s[k] = v
    except Exception,e:
        print(e)
    finally:
        s.close()

def Open(k):
    s = shelve.open("test.dat",writeback=True)
    try:
        assert s[k] is not None
    except Exception,e:
        return []
    finally:
        return s[k]
        s.close()
xml处理模块
xml是实现不同语言或程序之间进行数据交换的协议,跟json差不多,但json使用起来更简单,不过,古时候,在json还没诞生的黑暗年代,大家只能选择用xml呀,至今很多传统公司如金融行业的很多系统的接口还主要是xml。
xml的格式如下,就是通过<>节点来区别数据结构的:
<?xml version="1.0"?>
<data>
    <country name="Liechtenstein">
        <rank updated="yes">2</rank>
        <year>2008</year>
        <gdppc>141100</gdppc>
        <neighbor name="Austria" direction="E"/>
        <neighbor name="Switzerland" direction="W"/>
    </country>
    <country name="Singapore">
        <rank updated="yes">5</rank>
        <year>2011</year>
        <gdppc>59900</gdppc>
        <neighbor name="Malaysia" direction="N"/>
    </country>
    <country name="Panama">
        <rank updated="yes">69</rank>
        <year>2011</year>
        <gdppc>13600</gdppc>
        <neighbor name="Costa Rica" direction="W"/>
        <neighbor name="Colombia" direction="E"/>
    </country>
</data>
xml协议在各个语言里的都 是支持的,在python中可以用以下模块操作xml
import xml.etree.ElementTree as ET

tree = ET.parse("xmltest.xml")
root = tree.getroot()
print(root.tag)

#遍历xml文档
for child in root:
    print(child.tag, child.attrib)
    for i in child:
        print(i.tag,i.text)

#只遍历year 节点
for node in root.iter('year'):
    print(node.tag,node.text)
import xml.etree.ElementTree as ET

tree = ET.parse("xmltest.xml")
root = tree.getroot()

#修改
for node in root.iter('year'):
    new_year = int(node.text) + 1
    node.text = str(new_year)
    node.set("updated","yes")

tree.write("xmltest.xml")


#删除node
for country in root.findall('country'):
   rank = int(country.find('rank').text)
   if rank > 50:
     root.remove(country)

tree.write('output.xml')
import xml.etree.ElementTree as ET


new_xml = ET.Element("namelist")
name = ET.SubElement(new_xml,"name",attrib={"enrolled":"yes"})
age = ET.SubElement(name,"age",attrib={"checked":"no"})
sex = ET.SubElement(name,"sex")
sex.text = '33'
name2 = ET.SubElement(new_xml,"name",attrib={"enrolled":"no"})
age = ET.SubElement(name2,"age")
age.text = '19'

et = ET.ElementTree(new_xml) #生成文档对象
et.write("test.xml", encoding="utf-8",xml_declaration=True)

ET.dump(new_xml) #打印生成的格式
ConfigParser模块
用于生成和修改常见配置文档,当前模块的名称在 python 3.x 版本中变更为 configparser。
来看一个好多软件的常见文档格式如下
[DEFAULT]
ServerAliveInterval = 45
Compression = yes
CompressionLevel = 9
ForwardX11 = yes

[bitbucket.org]
User = hg

[topsecret.server.com]
Port = 50022
ForwardX11 = no
如果想用python生成一个这样的文档怎么做呢?
import configparser

config = configparser.ConfigParser()
config["DEFAULT"] = {'ServerAliveInterval': '45',
                      'Compression': 'yes',
                     'CompressionLevel': '9'}

config['bitbucket.org'] = {}
config['bitbucket.org']['User'] = 'hg'
config['topsecret.server.com'] = {}
topsecret = config['topsecret.server.com']
topsecret['Host Port'] = '50022'     # mutates the parser
topsecret['ForwardX11'] = 'no'  # same here
config['DEFAULT']['ForwardX11'] = 'yes'
with open('example.ini', 'w') as configfile:
   config.write(configfile)
>>> import configparser
>>> config = configparser.ConfigParser()
>>> config.sections()
[]
>>> config.read('example.ini')
['example.ini']
>>> config.sections()
['bitbucket.org', 'topsecret.server.com']
>>> 'bitbucket.org' in config
True
>>> 'bytebong.com' in config
False
>>> config['bitbucket.org']['User']
'hg'
>>> config['DEFAULT']['Compression']
'yes'
>>> topsecret = config['topsecret.server.com']
>>> topsecret['ForwardX11']
'no'
>>> topsecret['Port']
'50022'
>>> for key in config['bitbucket.org']: print(key)
...
user
compressionlevel
serveraliveinterval
compression
forwardx11
>>> config['bitbucket.org']['ForwardX11']
'yes'
[section1]
k1 = v1
k2:v2

[section2]
k1 = v1

import ConfigParser

config = ConfigParser.ConfigParser()
config.read('i.cfg')

# ########## 读 ##########
#secs = config.sections()
#print secs
#options = config.options('group2')
#print options

#item_list = config.items('group2')
#print item_list

#val = config.get('group1','key')
#val = config.getint('group1','key')

# ########## 改写 ##########
#sec = config.remove_section('group1')
#config.write(open('i.cfg', "w"))

#sec = config.has_section('wupeiqi')
#sec = config.add_section('wupeiqi')
#config.write(open('i.cfg', "w"))


#config.set('group2','k1',11111)
#config.write(open('i.cfg', "w"))

#config.remove_option('group2','age')
#config.write(open('i.cfg', "w"))
argparse模块
argparse是命令行的解析器,类似configparse和optparse
基本使用:
import argparse
import sys

parser = argparse.ArgumentParser(description='test parsing arguments')

parser.add_argument('pos1', nargs='*')
parser.add_argument('pos2')
parser.add_argument('-o1')
parser.add_argument('-o2')
parser.add_argument('pos3', nargs='*')

print sys.argv
# arg = parser.parse_args(sys.argv[1:])
arg = parser.parse_known_args(sys.argv[1:])
print arg

# print parser.print_help()
假设将上面的代码保存在 test.py 文件中,在命令行中做如下测试:
input:   python test.py a b c -o1 d e -o2 f g h

output:

['test.py', 'a', 'b', 'c', '-o1', 'd', 'e', '-o2', 'f', 'g', 'h']
(Namespace(o1='d', o2='f', pos1=['a', 'b'], pos2='c', pos3=[]), ['e', 'g', 'h'])
高级用法
import argparse,inspect

class  C(object):
  """docstring for  C"""
  def __init__(self):
    parser = argparse.ArgumentParser()
    parser.add_argument('--u')
    parser.add_argument('--p')
    subparsers = parser.add_subparsers()

    for name in dir(self):
      if not name.startswith("_"):
        # print name
        #### test
        p = subparsers.add_parser(name)
        method = getattr(self, name)
        argnames = inspect.getargspec(method).args[1:]
        #### ['arg1', 'arg2']
        for argname in argnames:
          p.add_argument(argname)
        p.set_defaults(func=method, argnames=argnames)

    self.args = parser.parse_args()
    # print self.args
    ## Namespace(arg1='1', arg2='2', argnames=['arg1', 'arg2'], func=<bound method C.test of <__main__.C object at 0x7fbec7984f10>>, p='123', u='gt')

  def test(self,arg1,arg2):
    print("go: ",arg1,arg2)


  def test2(self,arg1,arg2):
    print("go2: ",arg1,arg2)

  def __call__(self):
    a = self.args
    # callargs = [ getattr(a, name) for name in a.argnames ]
    # print type(callargs)
    # ['1', '3']
    # self.args.func(*callargs)
    self.args.func('1','3')

c = C()
c()
 python test.py --u gt --p 123 test2 1 3
('go2: ', '1', '3')
fire模块
相比configparser和argparser来说,使用fire模块来生成命令行模式最为方便
安装:
pip install fire
# 场景1
test_fire.py
import fire

def add(a, b):
    count = a + b
    return count

if __name__ == '__main__':
    fire.Fire(add)
当不接参数时,执行python test_fire.py会显示帮助信息
$ python test_fire.py
Fire trace:
1. Initial component
2. ('The function received no value for the required argument:', 'a')

Type:        function
String form: <function add at 0x7f901e025ea0>
File:        test_fire.py
Line:        3

Usage:       test_fire.py A B
             test_fire.py --a A --b B
帮助信息里显示了fire.Fire()的参数类型(function)、文件路径、文档字符串、参数用法等信息
执行:
$ python test_fire.py 1 2
3
# 场景2
import fire

def add(a, b):
    count = a + b
    return count

def sub(a, b):
    result = a - b
    return result

if __name__ == '__main__':
    fire.Fire()

# 场景3
import fire

class Calculator(object):
    def add(self, a, b):
        count = a + b
        return count

    def sub(self, a, b):
        result = a - b
        return result

    def data(self, d):
        print(type(d))
        return d

if __name__ == '__main__':
    fire.Fire(Calculator())    #这里用类名Calculator或者类的实例化对象Calculator()结果都是一样的
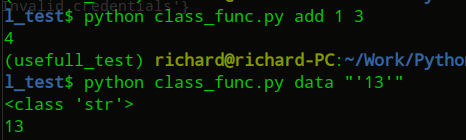
使用 "'3'" 来指定输入的是一个str类型的参数
pyyaml模块
常用方法
import yaml
try:
    from yaml import CLoader as Loader, CDumper as Dumper
except ImportError:
    from yaml import Loader, Dumper

def yaml_parser(yml_filename):
    '''
    load yaml file and return
    :param yml_filename
    : return
    '''
    try:
         yaml_file = open(yml_filename, 'r')
         data = yaml.load(yaml_file)
         return data
    except Exception as e:
         print e
一个yml文件
ubuntu_test:
    ip_addr: 192.168.10.1
    port: 22

server1:
    ip_addr: 192.168.1.3
    port: 44
    username: gt
正常load引入后会创建一个字典
{'ubuntu_test':{'ip_addr':'192.168.10.1','port':22},'server1':{'ip_addr':'192.168.1.3','port':44,'username':'gt'}}
执行系统命令:subprocess,os...
可以执行shell命令的相关模块和函数有:
- os.system
- os.spawn*
- os.popen* --废弃
- popen2.* --废弃
- commands.* --废弃,3.x中被移除,用 subprocess.commands代替
- subprocess
os.system
os.system('service %s %s' % (servicename,action))
commands
import commands
result = commands.getoutput('cmd')
result = commands.getstatus('cmd')
result = commands.getstatusoutput('cmd')
subprocess
call
执行命令,返回状态码
ret = subprocess.call(["ls", "-l"], shell=False)
ret = subprocess.call("ls -l", shell=True)
shell = True ,允许 shell 命令是字符串形式
windows系统下:
res = call(('dir','f:'),shell=True)
check_call
执行命令,如果命令结果为0,就正常返回,否则抛异常
subprocess.check_call(["ls", "-l"])
check_output
执行命令,如果状态码是 0 ,则返回执行结果,否则抛异常
subprocess.check_output(["echo", "Hello World!"])
subprocess.check_output("exit 1", shell=True)
#接收字符串格式命令,返回元组形式,第1个元素是执行状态,第2个是命令结果
>>> subprocess.getstatusoutput('ls /bin/ls')
(0, '/bin/ls')

#接收字符串格式命令,并返回结果
>>> subprocess.getoutput('ls /bin/ls')
'/bin/ls'

#执行命令,并返回结果,注意是返回结果,不是打印,下例结果返回给res
>>> res=subprocess.check_output(['ls','-l'])
>>> res
b'total 0\ndrwxr-xr-x 12 alex staff 408 Nov 2 11:05 OldBoyCRM\n'
#上面那些方法,底层都是封装的subprocess.Popen,用于执行复杂的系统命令
terminate() 杀掉所启动进程
communicate() 等待任务结束
stdin 标准输入
stdout 标准输出
stderr 标准错误
pid
The process ID of the child process.
#例子
>>> p = subprocess.Popen("df -h|grep disk",stdin=subprocess.PIPE,stdout=subprocess.PIPE,shell=True)
>>> p.stdout.read()
b'/dev/disk1 465Gi 64Gi 400Gi 14% 16901472 104938142 14% /\n'
>>> f = Popen(('uname', '-a'), stdout=PIPE).stdout
print f.readlines()
- args:shell命令,可以是字符串或者序列类型(如:list,元组)
- bufsize:指定缓冲。0 无缓冲,1 行缓冲,其他 缓冲区大小,负值 系统缓冲
- stdin, stdout, stderr:分别表示程序的标准输入、输出、错误句柄
- preexec_fn:只在Unix平台下有效,用于指定一个可执行对象(callable object),它将在子进程运行之前被调用
- close_sfs:在windows平台下,如果close_fds被设置为True,则新创建的子进程将不会继承父进程的输入、输出、错误管道。
所以不能将close_fds设置为True同时重定向子进程的标准输入、输出与错误(stdin, stdout, stderr)。 - shell:同上
- cwd:用于设置子进程的当前目录
- env:用于指定子进程的环境变量。如果env = None,子进程的环境变量将从父进程中继承。
- universal_newlines:不同系统的换行符不同,True -> 同意使用 \n
- startupinfo与createionflags只在windows下有效
将被传递给底层的CreateProcess()函数,用于设置子进程的一些属性,如:主窗口的外观,进程的优先级等等
终端输入的命令分为两种:
- 输入即可得到输出,如:ifconfig
- 输入进行某环境,依赖再输入,如:python
需要交互的命令示例
import subprocess

obj = subprocess.Popen(["python"], stdin=subprocess.PIPE, stdout=subprocess.PIPE, stderr=subprocess.PIPE)
obj.stdin.write('print 1 \n ')
obj.stdin.write('print 2 \n ')
obj.stdin.write('print 3 \n ')
obj.stdin.write('print 4 \n ')

out_error_list = obj.communicate(timeout=10)
print out_error_list
import subprocess

def mypass():
    mypass = '123' #or get the password from anywhere
    return mypass

echo = subprocess.Popen(['echo',mypass()],
                        stdout=subprocess.PIPE,
                        )

sudo = subprocess.Popen(['sudo','-S','iptables','-L'],
                        stdin=echo.stdout,
                        stdout=subprocess.PIPE,
                        )

end_of_pipe = sudo.stdout

print "Password ok \n Iptables Chains %s" % end_of_pipe.read()
logging日志模块
logging的日志可以分为 debug(), info(), warning(), error() and critical() 5个级别,下面我们看一下怎么用。
例子1
import logging

logging.warning("user [alex] attempted wrong password more than 3 times")
logging.critical("server is down")

#输出
WARNING:root:user [alex] attempted wrong password more than 3 times
CRITICAL:root:server is down
例子2: 输出到控制台
import logging
logger = logging.getLogger(__name__) #这是最基本的入口,该方法参数可以为空,默认的logger名称是root,如果在同一个程序中一直都使用同名的logger,其实会拿到同一个实例,使用这个技巧就可以跨模块调用同样的logger来记录日志。

def main():
    logger.error("hostname match error,please check %s" % HostFile)
    logger.warning("warning")
   logger.info("info")

if __name__ == '__main__':
    logging.basicConfig(level=logging.INFO,
                    format='%(levelname)s [%(asctime)s] [%(pathname)s L%(lineno)d] %(message)s')

    main()
例子3:打印到终端,同时打印到文件
import logging
import logging.handlers
LOG_FILE = 'Ldap.log'
logger = logging.getLogger('Ldap')    # 获取名为Ldap的logger
logger.setLevel(logging.INFO)
handler = logging.handlers.RotatingFileHandler(LOG_FILE, maxBytes = 1024*1024) # 实例化handler
formatter = logging.Formatter('%(asctime)s- %(levelname)s - %(message)s')   # 实例化formatter
handler.setFormatter(formatter)      # 为handler添加formatter
logger.addHandler(handler)

# 同时也输出到console
conshd = logging.StreamHandler()
conshd.setFormatter(formatter)
logger.addHandler(conshd)
其他说明
- logging.basicConfig()函数是一个一次性的简单配置工具使,也就是说只有在第一次调用该函数时会起作用,后续再次调用该函数时完全不会产生任何操作的,多次调用的设置并不是累加操作
- 日志器(Logger)是有层级关系的,上面调用的logging模块级别的函数所使用的日志器是
RootLogger类的实例,其名称为'root',它是处于日志器层级关系最顶层的日志器,且该实例是以单例模式存在的 - 如果要记录的日志中包含变量数据,可使用一个格式字符串作为这个事件的描述消息,第二个参数带入值(*args)传递,logger.info|warning|error(msg, *args, **kwarg)
- *args使用方法:
logging.warning('%s is %d years old.', 'Tom', 10),输出内容为WARNING:root:Tom is 10 years old. - **kwargs里面有三个参数:
- exc_info: 其值为布尔值,如果该参数的值设置为True,则会将异常异常信息添加到日志消息中。如果没有异常信息则添加None到日志信息中
- stack_info: 其值也为布尔值,默认值为False。如果该参数的值设置为True,栈信息将会被添加到日志信息中
- extra: 这是一个字典(dict)参数,它可以用来自定义消息格式中所包含的字段,但是它的key不能与logging模块定义的字段冲突
- *args使用方法:
日志格式
|
%(name)s |
Logger的名字 |
|
%(levelno)s |
数字形式的日志级别 |
|
%(levelname)s |
文本形式的日志级别 |
|
%(pathname)s |
调用日志输出函数的模块的完整路径名,可能没有 |
|
%(filename)s |
调用日志输出函数的模块的文件名 |
|
%(module)s |
调用日志输出函数的模块名 |
|
%(funcName)s |
调用日志输出函数的函数名 |
|
%(lineno)d |
调用日志输出函数的语句所在的代码行 |
|
%(created)f |
当前时间,用UNIX标准的表示时间的浮 点数表示 |
|
%(relativeCreated)d |
输出日志信息时的,自Logger创建以 来的毫秒数 |
|
%(asctime)s |
字符串形式的当前时间。默认格式是 “2003-07-08 16:49:45,896”。逗号后面的是毫秒 |
|
%(thread)d |
线程ID。可能没有 |
|
%(threadName)s |
线程名。可能没有 |
|
%(process)d |
进程ID。可能没有 |
|
%(message)s |
用户输出的消息
|
如果想同时把log打印在屏幕和文件日志里,就需要了解一点复杂的知识 了
Python 使用logging模块记录日志涉及四大模块:
1 logger提供了应用程序可以直接使用的接口;
每个程序在输出信息之前都要获得一个Logger。Logger通常对应了程序的模块名,比如聊天工具的图形界面模块可以这样获得它的Logger:
LOG=logging.getLogger(”chat.gui”)
而核心模块可以这样:
LOG=logging.getLogger(”chat.kernel”)

Logger.setLevel(lel):指定最低的日志级别,低于lel的级别将被忽略。debug是最低的内置级别,critical为最高
Logger.addFilter(filt)、Logger.removeFilter(filt):添加或删除指定的filter
Logger.addHandler(hdlr)、Logger.removeHandler(hdlr):增加或删除指定的handler
Logger.debug()、Logger.info()、Logger.warning()、Logger.error()、Logger.critical():可以设置的日志级别
2 handler将(logger创建的)日志记录发送到合适的目的输出;
handler对象负责发送相关的信息到指定目的地。Python的日志系统有多种Handler可以使用。有些Handler可以把信息输出到控制台,有些Logger可以把信息输出到文件,还有些 Handler可以把信息发送到网络上。如果觉得不够用,还可以编写自己的Handler。可以通过addHandler()方法添加多个多handler
Handler.setLevel(lel):指定被处理的信息级别,低于lel级别的信息将被忽略
Handler.setFormatter():给这个handler选择一个格式
Handler.addFilter(filt)、Handler.removeFilter(filt):新增或删除一个filter对象


每个Logger可以附加多个Handler。接下来我们就来介绍一些常用的Handler:
1) logging.StreamHandler
使用这个Handler可以向类似与sys.stdout或者sys.stderr的任何文件对象(file object)输出信息。它的构造函数是:
StreamHandler([strm])
其中strm参数是一个文件对象。默认是sys.stderr


2) logging.FileHandler
和StreamHandler类似,用于向一个文件输出日志信息。不过FileHandler会帮你打开这个文件。它的构造函数是:
FileHandler(filename[,mode])
filename是文件名,必须指定一个文件名。
mode是文件的打开方式。参见Python内置函数open()的用法。默认是’a',即添加到文件末尾。

3) logging.handlers.RotatingFileHandler
这个Handler类似于上面的FileHandler,但是它可以管理文件大小。当文件达到一定大小之后,它会自动将当前日志文件改名,然后创建 一个新的同名日志文件继续输出。比如日志文件是chat.log。当chat.log达到指定的大小之后,RotatingFileHandler自动把 文件改名为chat.log.1。不过,如果chat.log.1已经存在,会先把chat.log.1重命名为chat.log.2。。。最后重新创建 chat.log,继续输出日志信息。它的构造函数是:
RotatingFileHandler( filename[, mode[, maxBytes[, backupCount]]])
其中filename和mode两个参数和FileHandler一样。
maxBytes用于指定日志文件的最大文件大小。如果maxBytes为0,意味着日志文件可以无限大,这时上面描述的重命名过程就不会发生。
backupCount用于指定保留的备份文件的个数。比如,如果指定为2,当上面描述的重命名过程发生时,原有的chat.log.2并不会被更名,而是被删除。


4) logging.handlers.TimedRotatingFileHandler
这个Handler和RotatingFileHandler类似,不过,它没有通过判断文件大小来决定何时重新创建日志文件,而是间隔一定时间就 自动创建新的日志文件。重命名的过程与RotatingFileHandler类似,不过新的文件不是附加数字,而是当前时间。它的构造函数是:
TimedRotatingFileHandler( filename [,when [,interval [,backupCount]]])
其中filename参数和backupCount参数和RotatingFileHandler具有相同的意义。
interval是时间间隔。
when参数是一个字符串。表示时间间隔的单位,不区分大小写。它有以下取值:
S 秒
M 分
H 小时
D 天
W 每星期(interval==0时代表星期一)
midnight 每天凌晨
3 filter提供了细度设备来决定输出哪条日志记录
4 formatter决定日志记录的最终输出格式
日志重复输出的坑
第一坑
import logging

logging.basicConfig(level=logging.DEBUG)

fmt = '%(levelname)s:%(message)s'
console_handler = logging.StreamHandler()
console_handler.setFormatter(logging.Formatter(fmt))
logging.getLogger().addHandler(console_handler)

logging.info('hello!')

# INFO:root:hello!
# INFO:hello!
上面这个例子出现了重复日志,因为在第3行调用basicConfig()方法时系统会默认创建一个handler,如果你再添加一个控制台handler时就会出现重复日志。
第二坑
import logging

def get_logger():
    fmt = '%(levelname)s:%(message)s'
    console_handler = logging.StreamHandler()
    console_handler.setFormatter(logging.Formatter(fmt))
    logger = logging.getLogger('App')
    logger.setLevel(logging.INFO)
    logger.addHandler(console_handler)
    return logger

def call_me():
    logger = get_logger()
    logger.info('hi')

call_me()
call_me()

# INFO:hi
# INFO:hi
# INFO:hi
在这个例子里hi居然打印了三次,如果再调用一次call_me()呢?我告诉你会打印6次。why? 因为你每次调用get_logger()方法时都会给它加一个新的handler。正常的做法应该是全局只配置logger一次。
有时候配置了log会出现重复输出,以下配置就不会再重复了
log.propagate = False
warnings
去掉Python warning类型的告警
import warnings
warnings.filterwarnings("ignore")
import warnings
# 忽略warning告警
warnings.filterwarnings("ignore")

from requests.packages.urllib3.exceptions import InsecureRequestWarning
# 禁用安全请求警告
requests.packages.urllib3.disable_warnings(InsecureRequestWarning)

# 设置告警级别(INFO的日志不再输出)
logging.getLogger("urllib3").setLevel(logging.WARNING)
logging.getLogger("requests").setLevel(logging.WARNING)
设置不同模块的日志等级
比如requests模块,当我们设置logging.INFO之后,会发出大量不需要的日志
INFO [2017-11-08 16:40:49,245] [/usr/lib/python2.6/site-packages/urllib3/connectionpool.py L203] Starting new HTTP connection (1): 1-1.vcenter
INFO [2017-11-08 16:40:49,246] [/usr/lib/python2.6/site-packages/urllib3/connectionpool.py L203] Starting new HTTP connection (1): 1-1.weibo
INFO [2017-11-08 16:40:49,248] [/usr/lib/python2.6/site-packages/urllib3/connectionpool.py L203] Starting new HTTP connection (1): 1-2.urmcore
当然可以通过设置 logging.basicConfig的默认level为WARNING来避免,但是业务代码logging等级也要对应改了。
后来看了requests的代码,发现可以在logging.getLogger配置requests的等级
logging.basicConfig(level=logging.INFO,
                    format='%(levelname)s [%(asctime)s] [%(pathname)s L%(lineno)d] %(message)s')
logging.getLogger("requests").setLevel(logging.WARNING)
下面是requests官方文档中说明的各种阶段的日志等级.
INFO: New connections (HTTP or HTTPS)
INFO: Dropped connections
INFO: Redirects
WARN: Connection pool full (if this happens often increase the connection pool size)
WARN: Retrying the connection
DEBUG: Connection details: method, path, HTTP version, status code and response length
通过上面的方法学到了一招,很多时候我们python项目中模块是自己可控的,创立一个日志对象,然后所有的模块都import引入。 但是如果开源的项目怎么搞?
可以使用 logger = logging.getLogger(__name__) ,对于调用方可以使用getLogger获取和配置对象的日志. 比如, logging.getLogger(“test”).setLevel(logging.DEBUG)
不同模块继承日志
def set_log(name='root',level=LOG_LEVEL):
    """
    return a log file object
    根据提示设置log打印
    """
    if not os.path.isfile(LOG_FILE):
        os.mknod(LOG_FILE)
        os.chmod(LOG_FILE, 0777)
    log_level_total = {'debug': logging.DEBUG, 'info': logging.INFO, 'warning': logging.WARN, 'error': logging.ERROR,
                       'critical': logging.CRITICAL}
    logger_f = logging.getLogger(name)
    logger_f.setLevel(logging.DEBUG)
    fh = logging.FileHandler(LOG_FILE)
    fh.setLevel(log_level_total.get(level, logging.DEBUG))
    formatter = logging.Formatter('%(asctime)s - [%(filename)s:%(lineno)d:%(funcName)s] - %(levelname)s - %(message)s')
    fh.setFormatter(formatter)
    logger_f.addHandler(fh)

    # 同时也输出到console
    conshd = logging.StreamHandler()
    conshd.setFormatter(formatter)
    logger_f.addHandler(conshd)

    return logger_f

# logger = set_log(LOG_LEVEL)  正常情况是应该只有logger,可是我多个模块调用貌似没有继承的关系,
其他模块只需要
logger = logging.getLogger(__name__)
dnspython模块
安装
pip install dnspython
dnsMan管理用例
class dnsMan(object):
    """
    实例化dns管理
    param:

    """

    if DNS_ENV == 'prod':
        server_ip = '192.168.102.54'
        keyname = 'dnskey'
        key = '6666=='

    elif DNS_ENV == 'ora':
        server_ip = '192.168.21.104'
        keyname = 'zgtkey'
        key = '666=='


    def __init__(self, zone, name,record=None):
        self.server_ip = dnsMan.server_ip
        self.keyname = dnsMan.keyname
        self.key = dnsMan.key
        self.zone = zone
        self.name = name
        self.domainName = "%s.%s" % (self.name,self.zone)
        self.up = self.up()
        self.record = record
        self.timeout = 1

    def up(self):
        keyring = dns.tsigkeyring.from_text({self.keyname:self.key})
        up = dns.update.Update(self.zone,keyring=keyring)
        return up

    def add(self,ttl,type,ip):
        self.up.add(self.name,ttl,type,*ip)
        self.commit()

    def absent(self):
        # 删除整个name中的所有IP --> 就是删除域名,不能解析地址,要域名何用?
        self.up.delete(self.name)
        self.commit()

    def delete(self,type,ip):
        self.up.delete(self.name,type,*ip)   # 删除多个ip中个某个
        self.commit()

    def replace(self,ttl,type,ip):
        '''
        替换原来的所有列表,
        [IP1,IP2,IP3] --> [IP1,IP2,IP4] 需要写上IP1 IP2
        '''
        self.up.replace(self.name,ttl,type,*ip)
        self.commit()

    def resolver(self):
        try:
            my_resolver = dns.resolver.Resolver()
            my_resolver.nameservers = [self.server_ip]
            my_resolver.lifetime=self.timeout
            answer = my_resolver.query(qname=self.domainName)
            # print domainName,":resolver address from ",SERVER_IP
            nameResponse = sorted([ one.address for one in answer ])
            # logger.info(nameResponse)
        except dns.exception.SyntaxError:
            logger.warning("dns occurrence SyntaxError")
        except Exception,e:
            logger.warning(e)
        else:
            return nameResponse
        return ['']

    def commit(self):
        dns.query.tcp(self.up,self.server_ip,timeout=self.timeout)
python-ldap模块
安装
# rhel6 只要 client devel 等安装一下就能使用了[注意6.4 6.3有区别的,要加一个rhel5的 repo 才能装24]
yum install openldap
yum install openldap24-libs
yum install openldap-clients
yum install openldap-devel
yum install openssl-devel
yum install openldap24-libs-devel
sudo yum install python-devel
sudo yum install openldap-devel
*** version requirement for the libraries was >= 2.4.11


# ubuntu、debian
sudo apt-get install libsasl2-dev python-dev libldap2-dev libssl-dev
sudo apt-get install -y python-dev libldap2-dev libsasl2-dev libssl-dev


# rhel6 需要这个lib
rpm -ql openldap24-libs


pip install python-ldap

当openldap路径跟默认不符时:
找到目录,修改 setup.cfg
/usr/local/Python-2.7.6/bin/build/python-ldap

[_ldap]
library_dirs = /opt/openldap-RE24/lib /usr/lib
include_dirs = /opt/openldap-RE24/include /usr/include/sasl /usr/include

修改为:
[_ldap]
library_dirs = /usr/lib64/openldap24 /usr/lib/openldap24 /usr/lib64 /opt/openldap-RE24/lib /usr/lib
include_dirs = /usr/include/openldap24 /opt/openldap-RE24/include /usr/include/sasl /usr/include

./pip install python-ldap
api调用:
>>> import ldap
>>> l = ldap.initialize('ldap://1.1.1.1:389')
>>> l.search_s('ou=People,dc=ecp,dc=com',ldap.SCOPE_SUBTREE,'(cn=zgt*)')
l.search_s('dc=ecp,dc=com',ldap.SCOPE_SUBTREE,'objectclass=*')

May 29 10:32:17 Kqzte11 slapd[1171]: conn=193 fd=12 ACCEPT from IP=192.168.102.40:43666 (IP=0.0.0.0:389)
May 29 10:32:17 Kqzte11 slapd[1171]: conn=193 op=0 SRCH base="ou=People,dc=ecp,dc=com" scope=2 deref=0 filter="(cn=zgt*)"
May 29 10:32:17 Kqzte11 slapd[1171]: conn=193 op=0 SEARCH RESULT tag=101 err=0 nentries=2 text=
May 29 10:32:30 Kqzte11 slapd[1171]: conn=193 op=1 UNBIND
May 29 10:32:30 Kqzte11 slapd[1171]: conn=193 fd=12 closed

cc = ldap.initialize('ldap://127.0.0.1')  # 初始化链接
ldap.set_option(ldap.OPT_REFERRALS, 0)
cc.simple_bind_s("uid=zgt,ou=People,dc=ecp,dc=com", "1") # 绑定用户
完整的ldap事例:
#-*- coding: UTF-8 -*-
# from django.conf import settings
import sys,ldap
import logging
import logging.handlers


LDAP_HOST = 'ldap://10.0.0.2'
USER = 'cn=Manager,dc=gaotao,dc=com'
PASSWORD = 'gaotao'
BASE_DN = 'dc=gaotao,dc=com'

"log info"
#LOG_FILE = '/var/log/.PyLogin/Ldap.log'
LOG_FILE = 'Ldap.log'
logger = logging.getLogger('Ldap')    # 获取名为Ldap的logger
logger.setLevel(logging.INFO)
handler = logging.handlers.RotatingFileHandler(LOG_FILE, maxBytes = 1024*1024) # 实例化handler
formatter = logging.Formatter('%(asctime)s- %(levelname)s - %(message)s')   # 实例化formatter
handler.setFormatter(formatter)      # 为handler添加formatter
logger.addHandler(handler)

conshd = logging.StreamHandler()
conshd.setFormatter(formatter)
logger.addHandler(conshd)

class LDAP(object):
    def __init__(self,ldap_host=None,base_dn=None,user=None,password=None):
        if not ldap_host:
            ldap_host = LDAP_HOST
        if not base_dn:
            self.base_dn = BASE_DN
        if not user:
            self.user = USER
        if not password:
            self.password = PASSWORD
        try:
            ldap.set_option(ldap.OPT_PROTOCOL_VERSION, ldap.VERSION3)
            self.ldapconn = ldap.initialize(ldap_host)
            self.ldapconn.simple_bind_s(self.user,self.password)
        except ldap.LDAPError,e:
            logger.error(e)
        except ldap.INVALID_CREDENTIALS,e:
            print str(e)


    def ldap_get_vaild(self,uid=None,passwd=None):
        target_cn = self.ldap_search_dn(uid)
        try:
            logger.info('target_cn: %s' % target_cn)
            self.ldapconn.simple_bind_s(target_cn,passwd)
        except ldap.INVALID_CREDENTIALS,e:
            logger.warn('ldap_get_vaild user: %s %s' % (uid,e))
        except Exception,e:
            logger.error('ldap_get_vaild user: %s %s' % (uid,e))
        else:
            logger.info('user:%s check vaild success' % uid)
            return True

        return False


    def ldap_search_dn(self,uid=None):
        searchScope = ldap.SCOPE_SUBTREE
        retrieveAttributes = None
        searchFilter = "uid=" + uid
        try:
            self.ldapconn.simple_bind_s(self.user,self.password)
            logger.info('Manager bind success!')
            ldap_result_id = self.ldapconn.search(self.base_dn, searchScope, searchFilter, retrieveAttributes)
            result_type, result_data = self.ldapconn.result(ldap_result_id, 0)

            if result_type == ldap.RES_SEARCH_ENTRY:
                #dn = result[0][0]
                return result_data[0][0]
        except ldap.LDAPError, e:
            logger.warn('ldap_search_dn user: %s %s' % (uid,e))
        except Exception,e:
            logger.error('ldap_get_vaild user: %s %s' % (uid,e))


    #查询用户记录,返回需要的信息
    def ldap_get_user(self,uid=None):
        searchScope = ldap.SCOPE_SUBTREE
        retrieveAttributes = None
        searchFilter = "uid=" + uid
        try:
            ldap_result_id = self.ldapconn.search(self.base_dn, searchScope, searchFilter, retrieveAttributes)
            result_type, result_data = self.ldapconn.result(ldap_result_id, 0)
            if result_type == ldap.RES_SEARCH_ENTRY:
                logger.info('get user [%s] info success:[%s]' % (uid,result_data))
                return result_data
            else:
                return None
        except ldap.LDAPError, e:
            logger.warn('ldap_get_user user: %s %s' % (uid,e))
        except Exception, e:
            logger.error('ldap_get_vaild user: %s %s' % (uid,e))


    #修改用户密码
    def ldap_update_pass(self,uid=None,oldpass=None,newpass=None):
        #modify_entry = [(ldap.MOD_REPLACE,'userpassword',newpass)]
        target_cn = self.ldap_search_dn(uid)
        try:
            try:
                #需要绑定manager才有权限改密码
                self.ldapconn.simple_bind_s(self.user,self.password)
                self.ldapconn.passwd_s(target_cn,oldpass,newpass)
                logger.info('user: %s modify passwd success' % uid )
                return True
            except ldap.LDAPError,e:
                logger.warn('user: %s %s' % (uid,e))
                return False
        except Exception, e:
            logger.error('ldap_update_pass: %s %s' % (uid,e))

    #所有用户清单
    def ldap_get_all_users(self,uid='zgt'):
        searchFilter = "(objectClass=*)"
        target_cn = self.ldap_search_dn(uid).split(',',1)[1]
        ldap_result = self.ldapconn.search_s(target_cn,ldap.SCOPE_SUBTREE,searchFilter,['cn'])
        return ldap_result

if __name__ == '__main__' :
    MyLdap=LDAP()
    # print MyLdap.ldap_update_pass('zgt','1','555555')
    # for dn,entry in MyLdap.ldap_get_all_users():
    #    if len(entry.values()) > 0:
    #        print entry.values()[0][0],MyLdap.ldap_get_user(entry.values()[0][0])['uid']
    # MyLdap.ldap_get_vaild('gaotao','666666')  #  验证用户有效性
    # print MyLdap.ldap_get_user('gaotao')
    #with open('2','r')  as f:
    #    for i in f.readlines():
    #        print i,MyLdap.ldap_get_user(i.strip('\n'))['uid']


    # if len(sys.argv)>2:
    #    if MyLdap.ldap_get_vaild(sys.argv[1],sys.argv[2]):
    #        sys.exit(0)
    # sys.exit(1)
ip地址相关:netaddr,pyip
使用python将IP段范围转换成CIDR
因为最近在整理用于某些工具使用的IP段,像一些IP范围如:64.233.56.37-64.233.56.215,某些软件不支持,只支持像:64.233.56.37/26这样的CIDR格式。
>>> startip = '64.233.53.1'
>>> endip = '64.233.56.215'
>>> cidrs = netaddr.iprange_to_cidrs(startip, endip)
>>> for k, v in enumerate(cidrs):
...     iplist = v
...     print iplist
...
64.233.53.1/32
64.233.53.2/31
64.233.53.4/30
64.233.53.8/29
64.233.53.16/28
64.233.53.32/27
64.233.53.64/26
64.233.53.128/25
64.233.54.0/23
64.233.56.0/25
64.233.56.128/26
64.233.56.192/28
64.233.56.208/29

这就是求出连续的ip地址段
常用方法 【https://netaddr.readthedocs.io/en/latest/tutorial_01.html】
# 判断是否是回环地址
>>> IPAddress('127.0.0.1').is_loopback()
True
>>> IPAddress('::1').is_loopback()
True


# 判断是否是私有地址
>>> IPAddress('172.24.0.1').is_private()
True
>>> IPAddress('10.0.0.1').is_private()
True
>>> IPAddress('192.168.0.1').is_private()
True
>>> IPAddress('fc00::1').is_private()
True
urllib、urllib2、requests模块
如果没有传送data参数,urllib2使用GET方式的请求。
GET和POST请求的不同之处是POST请求通常有"副作用",
它们会由于某种途径改变系统状态(例如提交成堆垃圾到你的门口)。
urllib和urllib2,一个GET的提交事例
import urllib
import urllib2
url = 'http://mysite.com'
params = urllib.urlencode({'k1':'ee','k2':444})
req_url = url + "?" + params
response = urllib2.urlopen(req_url, timeout=3)
result = response.read()
requests是上两个包的再封装
headers = {
        "Authorization" : token,
    }
cookies = dict(cookies_are='working')
data = {
        "ipList": ip,
        "beginDate": begin,
        "endDate": end
    }

r = requests.get(url="http://www.ce.com/get",
          params=params,  # 参数,跟在url后面
                            data=data,      # 数据,在body里面
          cookies=cookies,
          headers=headers,
          allow_redirects=True,  #是否允许重定向
          timeout=0.1,       # 设置连接超时时间,对下载无关
          verify=False)
r.url  # url
r.text  # 响应内容
r.encoding # 编码
r.content # 二进制内容体
r.status # 获取状态 r.status_code == requests.codes.ok
r.raise_for_status()  # 抛出一个异常,如果是正常的话,是None
r.cookies['example_cookie_name']  #获取cookie

r = requests.post('http://httpbin.org/post', data = {'key':'value'})
r = requests.put('http://httpbin.org/put', data = {'key':'value'})
r = requests.delete('http://httpbin.org/delete')
r = requests.head('http://httpbin.org/get')
r = requests.options('http://httpbin.org/get')

# 获取一张二进制的图片
>>> from PIL import Image
>>> from io import BytesIO
>>> i = Image.open(BytesIO(r.content))

# 获取json数据
>>> import requests
>>> r = requests.get('https://api.github.com/events')
>>> r.json()
[{u'repository': {u'open_issues': 0, u'url': 'https://github.com/...
注意的是,成功调用 r.json() 并**不**意味着响应的成功。有的服务器会在失败的响应中包含一个 JSON 对象(比如 HTTP 500 的错误细节)。这种 JSON 会被解码返回。要检查请求是否成功,请使用 r.raise_for_status() 或者检查 r.status_code 是否和你的期望相同。

# post一个json内容
>>> url = 'https://api.github.com/some/endpoint'
>>> payload = {'some': 'data'}
>>> r = requests.post(url, json=payload)

# 原始响应内容
>>> r = requests.get('https://api.github.com/events', stream=True)
>>> r.raw
<requests.packages.urllib3.response.HTTPResponse object at 0x101194810>
>>> r.raw.read(10)
'\x1f\x8b\x08\x00\x00\x00\x00\x00\x00\x03

# post一个文件
>>> url = 'http://httpbin.org/post'
>>> files = {'file': open('report.xls', 'rb')}
>>> r = requests.post(url, files=files)
GET、POST方法
class HttpClient(object):
    '''
          根据url地址来创建post实例,传入不通的值
    '''
    def __init__(self,url):
        #post url
        self.url = url

    def get(self,data):
        """Respond to a POST request."""
        req = urllib2.Request(
                              url = self.url,
                              headers = {'Content-Type' : 'application/json'},
                              data = data
                              )
        response = urllib2.urlopen(req)
        return response.read()

    def post(self,data):
        ret = urllib.urlopen(self.url,data)
        return ret.read()
pycurl模块
使用上比urllib方便
c = pycurl.Curl() #创建一个curl对象 c.setopt(pycurl.CONNECTTIMEOUT, 5) #连接的等待时间,设置为0则不等待 c.setopt(pycurl.TIMEOUT, 5) #请求超时时间 c.setopt(pycurl.NOPROGRESS, 0) #是否屏蔽下载进度条,非0则屏蔽 c.setopt(pycurl.MAXREDIRS, 5) #指定HTTP重定向的最大数 c.setopt(pycurl.FORBID_REUSE, 1) #完成交互后强制断开连接,不重用 c.setopt(pycurl.FRESH_CONNECT,1) #强制获取新的连接,即替代缓存中的连接 c.setopt(pycurl.DNS_CACHE_TIMEOUT,60) #设置保存DNS信息的时间,默认为120秒 c.setopt(pycurl.URL,"http://www.baidu.com") #指定请求的URL c.setopt(pycurl.USERAGENT,"Mozilla/5.2 (compatible; MSIE 6.0; Windows NT 5.1; SV1; .NET CLR 1.1.4322; .NET CLR 2.0.50324)") #配置请求HTTP头的User-Agent c.setopt(pycurl.HEADERFUNCTION, getheader) #将返回的HTTP HEADER定向到回调函数getheader c.setopt(pycurl.FOLLOWLOCATION,1) #自动重定向,注意和MAXREDIRS值有关 c.setopt(pycurl.WRITEFUNCTION, getbody) #将返回的内容定向到回调函数getbody c.setopt(pycurl.WRITEHEADER, fileobj) #将返回的HTTP HEADER定向到fileobj文件对象 c.setopt(pycurl.WRITEDATA, fileobj) #将返回的HTML内容定向到fileobj文件对象 c.setopt(pycurl.POSTFIELDS, data) # 使用post方法请求接口 c.getinfo(pycurl.HTTP_CODE) #返回的HTTP状态码 c.getinfo(pycurl.TOTAL_TIME) #传输结束所消耗的总时间 c.getinfo(pycurl.NAMELOOKUP_TIME) #DNS解析所消耗的时间 c.getinfo(pycurl.CONNECT_TIME) #建立连接所消耗的时间 c.getinfo(pycurl.PRETRANSFER_TIME) #从建立连接到准备传输所消耗的时间 c.getinfo(pycurl.STARTTRANSFER_TIME) #从建立连接到传输开始消耗的时间 c.getinfo(pycurl.REDIRECT_TIME) #重定向所消耗的时间 c.getinfo(pycurl.SIZE_UPLOAD) #上传数据包大小 c.getinfo(pycurl.SIZE_DOWNLOAD) #下载数据包大小 c.getinfo(pycurl.SPEED_DOWNLOAD) #平均下载速度 c.getinfo(pycurl.SPEED_UPLOAD) #平均上传速度 c.getinfo(pycurl.HEADER_SIZE) #HTTP头部大小
举例1
class WebStatus(object):
    def __init__(self, url):
        try:
            self.url = url
            self.curl = pycurl.Curl()
            self.string = StringIO.StringIO()
            # 连接等待时间,0则不等待
            self.curl.setopt(pycurl.CONNECTTIMEOUT, 5)
            # 超时时间
            self.curl.setopt(pycurl.TIMEOUT, 10)
            # 下载进度条,非0则屏蔽
            self.curl.setopt(pycurl.NOPROGRESS, 1)
            # 指定HTTP重定向最大次数
            self.curl.setopt(pycurl.MAXREDIRS, 5)
            # 完成交互后强制断开连接,不重用
            self.curl.setopt(pycurl.FORBID_REUSE, 1)
            # 设置DNS信息保存时间,默认为120秒
            self.curl.setopt(pycurl.DNS_CACHE_TIMEOUT, 30)
            self.curl.setopt(pycurl.WRITEFUNCTION, self.string.write)
            # 设置请求的Url
            self.curl.setopt(pycurl.URL, self.url)
        except Exception as e:
            logger.error("%s: [%s]" % (self.url,e))

    def get(self,**kwargs):
        try:
         self.curl.perform()
        except Exception as e:
            logger.error("%s: [%s]" % (self.url,e))
        else:
            logger.debug("curl %s done by pid %s" % (self.url,os.getpid()))

    def post(self):
        try:
            # self.curl.setopt(pycurl.USERAGENT, "pycurl")
            self.curl.setopt(self.curl.POSTFIELDS, urllib.urlencode(kwargs['data']))
            self.curl.perform()
        except Exception as e:
            logger.error("%s: [%s]" % (self.url,e))
        else:
            logger.debug("%s done by pid %s" % (self.url,os.getpid()))

    def request_value(self):
        data = {
            "HttpCode": self.curl.getinfo(pycurl.HTTP_CODE),
            "SpeedDownload": self.curl.getinfo(pycurl.SPEED_DOWNLOAD),
            "ConnectTime": self.curl.getinfo(pycurl.CONNECT_TIME),
            "TotalTime": self.curl.getinfo(pycurl.TOTAL_TIME),
            "DnslookupTime": self.curl.getinfo(pycurl.NAMELOOKUP_TIME),
            "RedirectTime": self.curl.getinfo(pycurl.REDIRECT_TIME),
            "RedirectCount": self.curl.getinfo(pycurl.REDIRECT_COUNT)
        }

        return data

ws = WebStatus(url)
ws.get()
print ws.request_value()[func]
inspect查看代码
获取内置代码参数
import inspect
var=''

class one():
    def __init__(self):
        global var      #声明是全局变量
        var = '123'

    def pp(self):
        self.var='3455' #定义局部变量
        print var,self.var   #打印全局及局部变量

class two():
    def __init__(self):
        global var

    def pp2(self,id):
        print var

# two().pp2()
# one().pp()

# 所有代码
# print inspect.getsource(one)

# 看所有参数
# print inspect.getargspec(two.pp2)
argnames = inspect.getargspec(two.pp2).args[1:]
print argnames  # ['id']

# 看文件的绝对路径
# print inspect.getabsfile(two)
将变量名转化为字符串
def varname(p):
    """
    将变量名 转化为字符串
    """
    for line in inspect.getframeinfo(inspect.currentframe().f_back)[3]:
        m = re.search(r'\bvarname\s*\(\s*([A-Za-z_][A-Za-z0-9_]*)\s*\)', line)
    if m:
        return m.group(1)

vdict = {'123':{'ac':{'sd3':{'eds':'2sss'}}},'hh':['123s','ssw']}
print varname(vdict)
>> vdict  <==字符串
diff 实用的比较工具
实用jsondiff比较字典或者json的不同value的变化
from jsondiff import diff
>>> x1={'dd':'3s',"k":["123","kk"]}
>>> x={'dd':'3ss',"k":["123","ll"]}

>>> diff(x, x1, syntax='symmetric')  # 不同的字典值
{'dd': ['3ss', '3s'], 'k': {insert: [(1, 'kk')], delete: [(1, 'll')]}}

>>> diff(x, x1)
{'dd': '3s'}
Counter模块
内置的Counter模块,尤其在计算对象的个数非常方便
- 拥有字典的访问方法
由于c是字典的子类,因此继承了字典的访问删除等方法
from collections import Counter
>>> c = Counter('abcdeabcdabcaba')
>>>  c.items()
dict_items([('b', 4), ('c', 3), ('a', 5), ('d', 2), ('e', 1)])


# 统计重复个数大于2的
>>> [ k for k,c in c.items() if c>2 ]
['a', 'b', 'c']
Counter类独有方法
# 最多的前三位
>>> c.most_common(2)
[('a', 5), ('b', 4)]

# 更新计数器对象c
>>> c.update('bbbb')
>>> c.most_common(2)
[('b', 8), ('a', 5)]
常用操作
sum(c.values())  # 所有计数的总数
c.clear()  # 重置Counter对象,注意不是删除
list(c)  # 将c中的键转为列表
set(c)  # 将c中的键转为set
dict(c)  # 将c中的键值对转为字典
c.items()  # 转为(elem, cnt)格式的列表
Counter(dict(list_of_pairs))  # 从(elem, cnt)格式的列表转换为Counter类对象
c.most_common()[:-n:-1]  # 取出计数最少的n-1个元素
c += Counter()  # 移除0和负值
uuid模块
UUID是根据MAC以及当前时间等创建的不重复的随机字符串
>>> import uuid

    # make a UUID based on the host ID and current time
    >>> uuid.uuid1()    # doctest: +SKIP
    UUID('a8098c1a-f86e-11da-bd1a-00112444be1e')

    # make a UUID using an MD5 hash of a namespace UUID and a name
    >>> uuid.uuid3(uuid.NAMESPACE_DNS, 'python.org')
    UUID('6fa459ea-ee8a-3ca4-894e-db77e160355e')

    # make a random UUID
    >>> uuid.uuid4()    # doctest: +SKIP
    UUID('16fd2706-8baf-433b-82eb-8c7fada847da')

    # make a UUID using a SHA-1 hash of a namespace UUID and a name
    >>> uuid.uuid5(uuid.NAMESPACE_DNS, 'python.org')
    UUID('886313e1-3b8a-5372-9b90-0c9aee199e5d')

    # make a UUID from a string of hex digits (braces and hyphens ignored)
    >>> x = uuid.UUID('{00010203-0405-0607-0809-0a0b0c0d0e0f}')

    # convert a UUID to a string of hex digits in standard form
    >>> str(x)
    '00010203-0405-0607-0809-0a0b0c0d0e0f'

    # get the raw 16 bytes of the UUID
    >>> x.bytes
    b'\x00\x01\x02\x03\x04\x05\x06\x07\x08\t\n\x0b\x0c\r\x0e\x0f'

    # make a UUID from a 16-byte string
    >>> uuid.UUID(bytes=x.bytes)
    UUID('00010203-0405-0607-0809-0a0b0c0d0e0f')
cProfile
python 内置了丰富的性能分析工具,如 profile,cProfile 与 hotshot 等。其中 Profiler 是 python 自带的一组程序,能够描述程序运行时候的性能,并提供各种统计帮助用户定位程序的性能瓶颈。Python 标准模块提供三种 profilers:cProfile,profile 以及 hotshot。
import profile
def a():
    sum = 0
    for i in range(1, 10001):
        sum += i
    return sum

def b():
    sum = 0
    for i in range(1, 100):
        sum += a()
    return sum
if __name__ == "__main__":
   profile.run("b()")
结果:
         104 function calls in 0.034 seconds

   Ordered by: standard name

   ncalls  tottime  percall  cumtime  percall filename:lineno(function)
        1    0.000    0.000    0.033    0.033 :0(exec)
        1    0.000    0.000    0.000    0.000 :0(setprofile)
        1    0.000    0.000    0.033    0.033 <string>:1(<module>)
        1    0.000    0.000    0.034    0.034 profile:0(b())
        0    0.000             0.000          profile:0(profiler)
       99    0.033    0.000    0.033    0.000 profile_test.py:2(a)
        1    0.000    0.000    0.033    0.033 profile_test.py:8(b)
其中输出每列的具体解释如下:
●ncalls:表示函数调用的次数;●tottime:表示指定函数的总的运行时间,除掉函数中调用子函数的运行时间;●percall:(第一个 percall)等于 tottime/ncalls;●cumtime:表示该函数及其所有子函数的调用运行的时间,即函数开始调用到返回的时间;●percall:(第二个 percall)即函数运行一次的平均时间,等于 cumtime/ncalls;●filename:lineno(function):每个函数调用的具体信息;如果需要将输出以日志的形式保存,只需要在调用的时候加入另外一个参数。如 profile.run(“profileTest()”,”testprof”)。也可以在命令行中执行
import os

def a():
    sum = 0
    for i in range(1, 10001):
        sum += i
    return sum

def b():
    sum = 0
    for i in range(1, 100):
        sum += a()
    return sum

print b()
运行命令查看性能分析结果
python -m cProfile test.py
将性能分析结果保存到result文件
python3.6 -m cProfile -o result profile_test.py
$ python3.6
Python 3.6.9 |Anaconda, Inc.| (default, Jul 30 2019, 19:07:31)
[GCC 7.3.0] on linux
Type "help", "copyright", "credits" or "license" for more information.
>>> import pstats
>>> p=pstats.Stats('result')
>>> p.print_stats()
Mon Mar 30 11:12:40 2020    result

         104 function calls in 0.034 seconds

   Random listing order was used

   ncalls  tottime  percall  cumtime  percall filename:lineno(function)
        1    0.000    0.000    0.034    0.034 {built-in method builtins.exec}
        1    0.000    0.000    0.000    0.000 {built-in method builtins.print}
        1    0.000    0.000    0.034    0.034 profile_test.py:25(b)
       99    0.034    0.000    0.034    0.000 profile_test.py:19(a)
        1    0.000    0.000    0.034    0.034 profile_test.py:17(<module>)
        1    0.000    0.000    0.000    0.000 {method 'disable' of '_lsprof.Profiler' objects}


<pstats.Stats object at 0x7fccd16b1550>

 浙公网安备 33010602011771号