

linux安装mysql (rpm + yum + deb)
Mysql数据库的版本:mysql-5.7.26
方式一:rpm安装MySQL
一 安装前准备
1、检查是否已经安装过mysql,执行命令
[root@localhost /]# rpm -qa | grep mysql

执行结果显示,有三个安装包,进行删除
[root@localhost ~]# yum remove mysql qt5-qtbase-mysql-5.9.2-3.el7.x86_64

如果出现上述类似结果(此为安装完成后的版本),可以看出我们已经安装了mysql-server-5.7.26-1.el7.x86_64, mysql-community-common-5.7.26-1.el7.x86_64
执行删除命令
[root@localhost /]# rpm -e --nodeps mysql-server-5.7.26-1.el7.x86_64
再次执行查询命令,查看是否删除
[root@localhost /]# rpm -qa | grep mysql

2、查询所有Mysql对应的文件夹
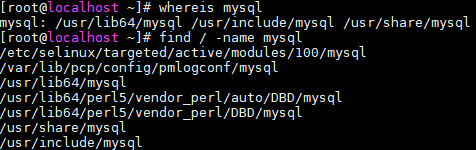
删除相关目录或文件
[root@localhost /]# rm -rf /usr/lib64/mysql /usr/include/mysql /usr/share/mysql
验证是否删除完毕
[root@localhost /]# whereis mysql
mysql:
[root@localhost /]# find / -name mysql
[root@localhost /]#
3、检查mysql用户组和用户是否存在,如果没有,则创建
[root@localhost /]# cat /etc/group | grep mysql
[root@localhost /]# cat /etc/passwd |grep mysql
[root@localhost /]# groupadd mysql
[root@localhost /]# useradd -r -g mysql mysql
[root@localhost /]#
4、从官网下载是用于Linux的Mysql安装包
直接到mysql官网 https://dev.mysql.com/downloads/repo/yum/ 选择所需版本进行下载。

二 安装Mysql
1、在执行wget命令的目录下或你的上传目录下找到Mysql安装包:
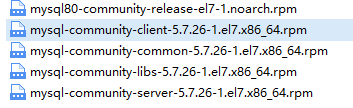
2、执行安装命令:
rpm -ivh mysql-community-common-5.7.26-1.el7.x86_64.rpm
rpm -ivh mysql-community-libs-5.7.26-1.el7.x86_64.rpm
rpm -ivh mysql-community-client-5.7.26-1.el7.x86_64.rpm
rpm -ivh mysql-community-server-5.7.26-1.el7.x86_64.rpm
rpm -ivh mysql80-community-release-el7-1.noarch.rpm

出现如上错误,根据提示:1.要先安装mysql-community-common
2.依赖mariadb,需要删除mariadb (据说centos7 默认mariadb)
删除mariadb命令: rpm -e --nodeps mariadb-libs-5.5.41-2.el7_0.x86_64

出现如上错误,需要在安装命令加上 :
--force --nodeps
3、安装完成后启动
systemctl start mysqld
4、查看初始密码
a: grep "password" /var/log/mysqld.log
b: cat /var/log/mysqld.log | grep password

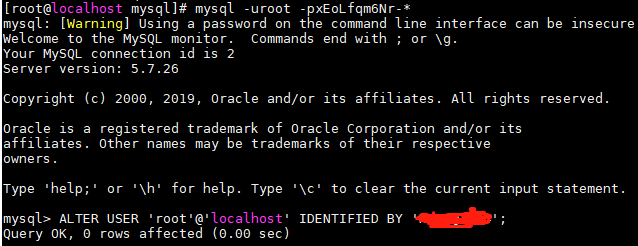
5、使用初始密码登录mysql
mysql -uroot -pxEoLfqm6Nr-*
注:此处可能会遇到密码错误,或者格式不对的等异常, 如果出现此问题导致不能登录mysql,使用下面方法:
关闭mysq服务:
systemctl stop mysqld
设置mysql不校验权限:
systemctl set-environment MYSQLD_OPTS="--skip-grant-tables"
启动mysq服务:
systemctl start mysqld
登录mysql:
mysql -uroot
继续步骤6,在步骤7进入”注“步骤
6、设置密码
先执行刷新权限,否则可能报错:
flush privileges;
ALTER USER 'root'@'localhost' IDENTIFIED BY 'mysql@2020';
或者 ALTER USER 'root'@'%' IDENTIFIED BY 'mysql@2020';
7、退出mysql
quit
注:如果设置了步骤5中的不校验权限,需要进入如下操作
关闭mysq服务:
systemctl stop mysqld
设置mysql校验权限:
systemctl unset-environment MYSQLD_OPTS
启动mysq服务:
systemctl start mysqld
8、使用新密码登录
mysql -uroot -pmysql@2020
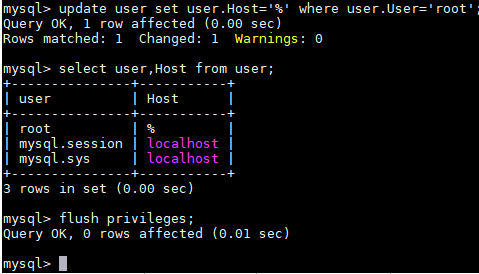
9、开放远程连接
mysql>use mysql;
msyql>update user set user.Host='%' where user.User='root';
mysql>flush privileges;
![]()
10、设置开机自动启动
方式二:yum安装MySQL
配置MySQL
方式三:deepin(debian) deb安装MySQL
5. 登录
mysql -uroot -p
输入密码进入数据库
卸载
查看MySQL的依赖项:
将列出来的相关依赖依次移除
sudo apt-get remove mysql-common
sudo apt-get remove mysql-apt-config
删除mysql
sudo apt-get autoremove --purge mysql-8.0
dpkg -l|grep ^rc|awk '{print$2}'|sudo xargs dpkg -P清除残留数据
再次查看mysql依赖
dpkg --list|grep mysql
清除完毕
~

 浙公网安备 33010602011771号