CentOS 9搭建编译 NextCloud 27.0.0服务
一、安装 CentOS 9操作系统
我用的PD虚拟机,系统下载地址:https://www.centos.org/centos-stream/
按照系统引导安装即可
二、安装 Apache 2.4.57 和 php 8.2.7
参考:https://www.cmdschool.org/archives/11922
2.1 环境配置
IP Address = 192.168.43.29
OS Type = CentOS 9 arm64
2.1.1 环境配置
2.1.2 升级系统版本
dnf update -y
2.1.3 安装编译环境
dnf -y install gcc gcc-c++ make expat-devel libtool
2.1.4 安装常用工具
dnf install -y wget net-tools vim bzip2 openssh-clients
2.1.5 下载apache软件包
cd ~
wget https://mirrors.tuna.tsinghua.edu.cn/apache/apr/apr-1.7.4.tar.gz
wget https://mirrors.tuna.tsinghua.edu.cn/apache/apr/apr-util-1.6.3.tar.gz
wget https://mirror.bit.edu.cn/apache/httpd/httpd-2.4.57.tar.gz
2.1.6 下载php安装包
cd ~
wget https://www.php.net/distributions/php-8.2.7.tar.bz2
如以上安装包存在过时的情况或你需要其他版本请从以下页面下载,
http://apr.apache.org/download.cgi
http://www.apache.org/dyn/closer.cgi/httpd/
http://www.php.net/releases/
2.1.7 防火墙配置
firewall-cmd --permanent --add-service http
firewall-cmd --reload
firewall-cmd --list-all
2.1.8 关闭SELinux
sed -i 's/SELINUX=enforcing/SELINUX=disabled/g' /etc/selinux/config
setenforce 0
2.2 编译部署APR
2.2.1 清理旧的apr包
dnf remove -y arp apr-util apr-util-ldap
2.2.2 解压软件包
cd ~
tar -xf apr-1.7.4.tar.gz
tar -xf apr-util-1.6.3.tar.gz
2.2.3 预编译APR
cd ~/apr-1.7.4
./configure --prefix=/usr
2.2.4 编译并安装APR
make
make install
2.2.5 预编译APR-Util
cd ~/apr-util-1.6.3
./configure --prefix=/usr \
            --with-apr=/usr
2.2.6 编译并安装APR-Util
make
make install
2.3 编译部署Apache HTTPD
2.3.1 解压软件包
cd ~
tar -xf httpd-2.4.57.tar.gz
2.3.2 预编译软件包
cd ~/httpd-2.4.57
./configure --bindir=/usr/bin/ \
            --sbindir=/usr/sbin/ \
            --sysconfdir=/etc/httpd/ \
            --libdir=/usr/lib64/  \
            --mandir=/usr/share/man/ \
            --includedir=/usr/include/ \
            --enable-so
如果遇到如下错误提示,
configure: error: pcre-config for libpcre not found. PCRE is required and available from http://pcre.org/
则需要安装以下包解决依赖关系,
dnf install -y pcre-devel
2.3.3 预编和安装软件包
make
make install
2.3.4 创建运行用户
groupadd  -g 48 apache
useradd -u 48 -g 48 -d /usr/share/httpd -s /sbin/nologin apache
2.3.5 修改运行用户以及配置
sed -i "s/User daemon/User apache/g" /etc/httpd/httpd.conf
sed -i "s/Group daemon/Group apache/g" /etc/httpd/httpd.conf
sed -i "s/\#ServerName www.example.com\:80/ServerName localhost\:80/g" /etc/httpd/httpd.conf
2.3.6 测试服务启动与关闭
apachectl -f /etc/httpd/httpd.conf -k start
apachectl -f /etc/httpd/httpd.conf -k stop
2.3.7 检查服务启动
netstat -antp | grep httpd
ps -ef | grep httpd
2.3.8 检查服务
2.4 安装优化与定制
2.4.1 配置服务
vim /etc/systemd/system/httpd.service
增加如下配置:
[Unit]
Description=httpd service
After=syslog.target network.target

[Service]
Type=forking
PIDFile=/usr/local/apache2/logs/httpd.pid
ExecStart=/bin/sh -c '/usr/sbin/apachectl -f /etc/httpd/httpd.conf -k start'
ExecStop=/bin/sh -c '/usr/sbin/apachectl -f /etc/httpd/httpd.conf -k stop'
ExecReload=/bin/sh -c '/usr/sbin/apachectl -f /etc/httpd/httpd.conf -k graceful'
ExecStartPost=/bin/sh -c '/usr/bin/chown apache:apache -R /usr/local/apache2/logs/httpd.pid'

[Install]
WantedBy=multi-user.target
重载使配置生效:
systemctl daemon-reload
2.4.2 启动服务并开机启动
systemctl start httpd.service
systemctl enable httpd.service
2.4.3 新增配置文件目录
mkdir /etc/httpd/conf.d
echo 'Include /etc/httpd/conf.d/*.conf' >> /etc/httpd/httpd.conf
2.4.4 优化目录结构
mkdir /var/www
ln -s /usr/local/apache2/htdocs /var/www/html
ln -s /usr/local/apache2/logs /var/log/httpd
2.4.5 配置日志切割
修改配置文件:
vim /etc/logrotate.d/httpd
加入如下配置:
/usr/local/apache2/logs/*log {
    missingok
    notifempty
    sharedscripts
    delaycompress
    postrotate
        systemctl reload httpd > /dev/null 2>/dev/null || true
    endscript
}
你可以使用如下命令测试日志切割,
logrotate /etc/logrotate.d/httpd
2.5 编译安装PHP
2.5.1 清理php安装包
dnf remove `rpm -qa | grep php`
2.5.2 解压安装包
cd ~/
tar -xf php-8.2.7.tar.bz2
2.5.3 安装前构建
cd ~/php-8.2.7
./configure --bindir=/usr/bin/ \
            --sbindir=/usr/sbin/ \
            --sysconfdir=/etc/ \
            --libdir=/usr/lib64/  \
            --mandir=/usr/share/man/ \
            --includedir=/usr/include/ \
            --with-apxs2=/usr/bin/apxs
注:如果需要使用MySQL数据库,请使用如下参数编译,
cd ~/php-8.2.7
./configure --bindir=/usr/bin/ \
            --sbindir=/usr/sbin/ \
            --sysconfdir=/etc/ \
            --libdir=/usr/lib64/  \
            --mandir=/usr/share/man/ \
            --includedir=/usr/include/ \
            --with-apxs2=/usr/bin/apxs \
            --with-pdo-mysql
注:如果需要使用PostgreSQL数据库,请使用如下参数编译(注,不同版本的PostgreSQL实际路径有所不同),
如PostgreSQL9.6版本,
cd ~/php-8.2.7
./configure --bindir=/usr/bin/ \
            --sbindir=/usr/sbin/ \
            --sysconfdir=/etc/ \
            --libdir=/usr/lib64/  \
            --mandir=/usr/share/man/ \
            --includedir=/usr/include/ \
            --with-apxs2=/usr/bin/apxs \
            --with-pdo-pgsql=/usr/pgsql-9.6/
如PostgreSQL10版本,
cd ~/php-7.4.3
./configure --bindir=/usr/bin/ \
            --sbindir=/usr/sbin/ \
            --sysconfdir=/etc/ \
            --libdir=/usr/lib64/  \
            --mandir=/usr/share/man/ \
            --includedir=/usr/include/ \
            --with-apxs2=/usr/bin/apxs \
            --with-pdo-pgsql=/usr/pgsql-10/
如果遇到以下错误提示,
configure: error: libxml2 not found. Please check your libxml2 installation.
则需要安装以下包解决依赖关系,
dnf install -y libxml2-devel
如果遇到以下错误提示,
configure: error: Package requirements (sqlite3 > 3.7.4) were not met:
则需要安装以下包解决依赖关系,
dnf install -y sqlite-devel
根据提示解决安装的依赖关系(可选,适用于PostgreSQL数据库),请根据当前的具体版本安装,
dnf install -y postgresql96-devel
dnf install -y postgresql10-devel
注:以上根据实际选一个版本即可
2.5.4 编译并安装
make
make install | tee install.log
2.5.5 配置php.ini
cp php.ini-development /etc/php.ini
ln -s /etc/php.ini /usr/lib64/
2.5.6 修改时区
sed -i 's/;date.timezone =/date.timezone = Asia\/Shanghai/g' /etc/php.ini
2.6 Apache加载并优化PHP
2.6.1 确认模块编译成功
find /usr/ -name libphp\*.so
可见如下显示:
/usr/local/apache2/modules/libphp7.so
2.6.2 确认模块已经加载
grep modules/libphp /etc/httpd/httpd.conf
可见如下显示,否则请手动添加,
LoadModule php7_module modules/libphp7.so
注:适合于PHP 7
LoadModule php5_module modules/libphp5.so
注:适合于PHP 5
2.6.3 配置后缀和session的位置
vim /etc/httpd/conf.d/php.conf
加入如下配置:
#
# Cause the PHP interpreter to handle files with a .php extension.
#
<FilesMatch \.php$>
SetHandler application/x-httpd-php
</FilesMatch>

#
# Allow php to handle Multiviews
#
AddType text/html .php

#
# Add index.php to the list of files that will be served as directory
# indexes.
#
DirectoryIndex index.php

#
# Uncomment the following lines to allow PHP to pretty-print .phps
# files as PHP source code:
#
#<FilesMatch \.phps$>
# SetHandler application/x-httpd-php-source
#</FilesMatch>

#
# Apache specific PHP configuration options
# those can be override in each configured vhost
#
php_value session.save_handler "files"
php_value session.save_path "/var/lib/php/session"
配置session目录:
mkdir -p /var/lib/php/session
chown apache:apache /var/lib/php/session
chmod 775 /var/lib/php/session
2.6.4 重启服务是配置生效
systemctl restart httpd.service
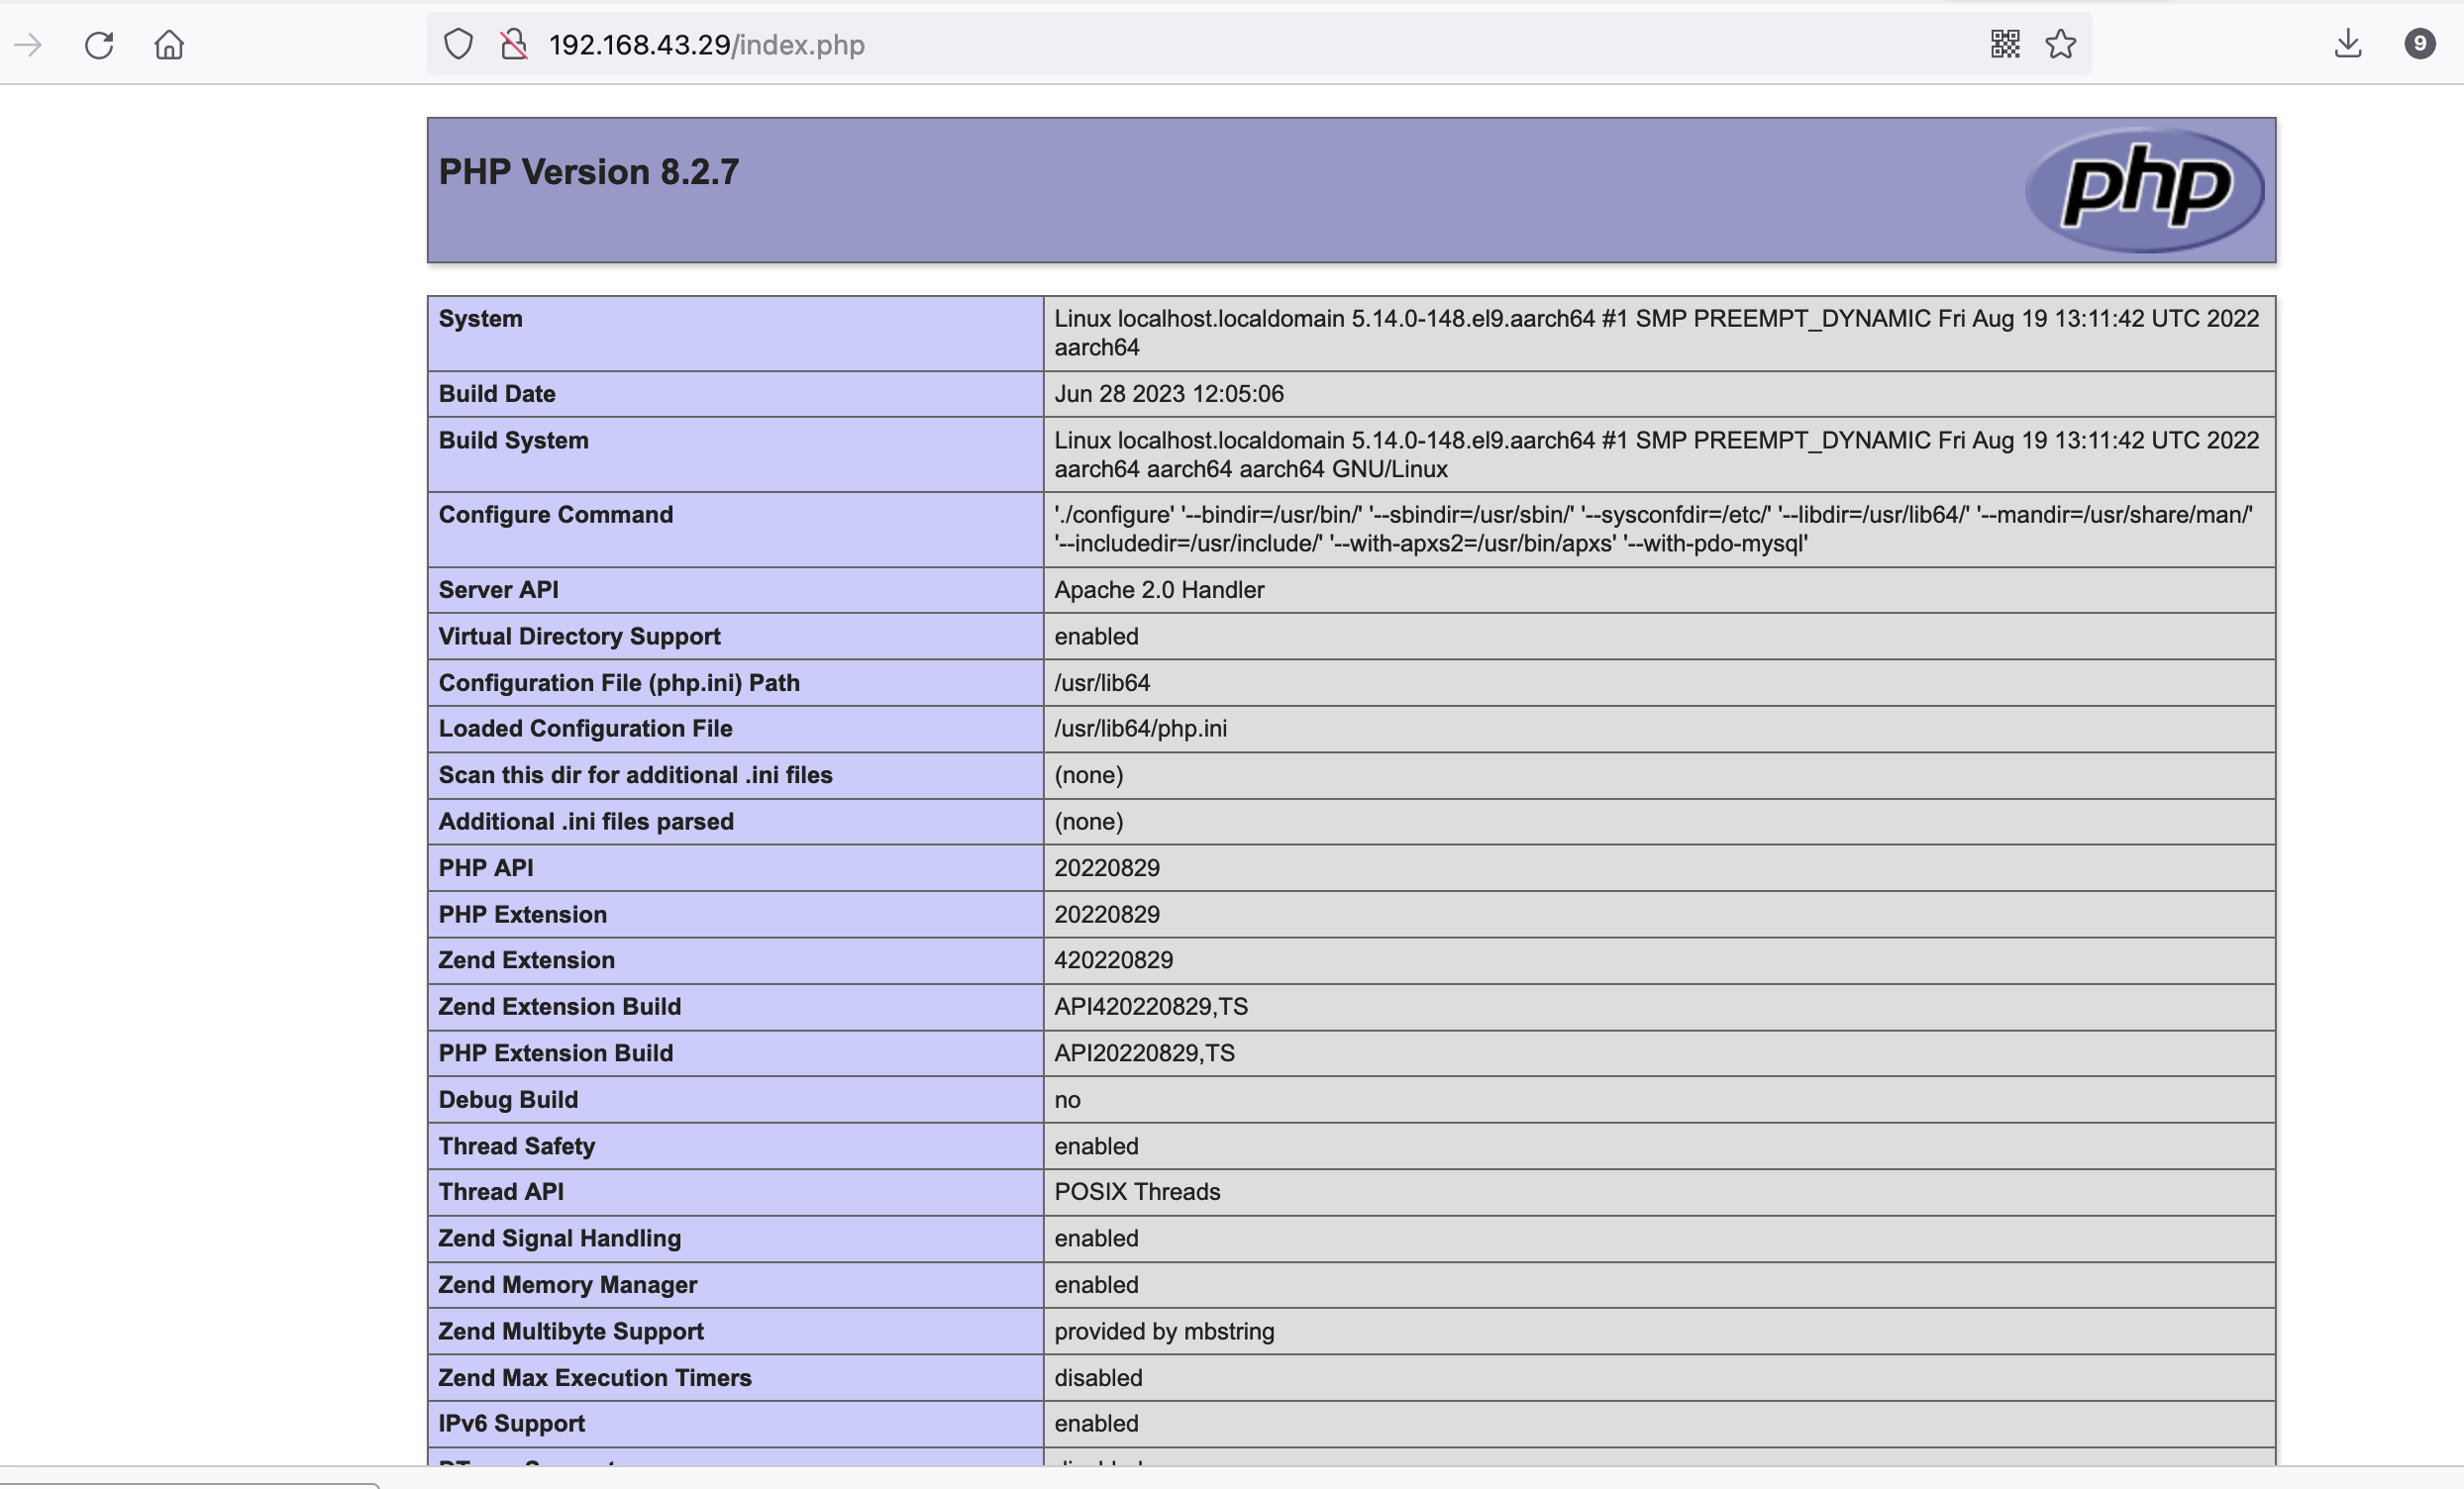
2.7 测试PHP
2.7.1 添加测试代码
mkdir -p /var/www/html
echo '<?php phpinfo(); ?>' > /var/www/html/index.php
2.7.2 访问测试连接
http://192.168.43.29/index.php
三、NextCloud 部署
3.1 安装前的准备
3.1.1 修改目录访问权限
vim /etc/httpd/httpd.conf
修改如下行:
<Directory />
    AllowOverride none
    #Require all denied
</Directory>
另外,也可以使用以下命令配置,
sed -i '/AllowOverride none/{:a;n;s/Require all denied/\#Require all denied/g;}' /etc/httpd/httpd.conf
重启服务使配置生效
systemctl restart httpd.service
3.1.2 下载源码包
cd ~
wget https://download.nextcloud.com/server/releases/nextcloud-27.0.0.tar.bz2
3.1.3 解压源码包
cd ~
tar -xf nextcloud-27.0.0.tar.bz2
3.1.4 安装编译所需的软件包
dnf install -y autoconf
3.2 部署nextcloud
3.2.1 配置源码包
cd ~
mv nextcloud /var/www/
chown -R apache:apache /var/www/nextcloud
chmod -R 755 /var/www/nextcloud
3.2.2 配置apache
vim /etc/httpd/conf.d/nextcloud.conf
配置如下:
<VirtualHost *:80>
  DocumentRoot /var/www/nextcloud/
  ServerName  nextcloud.cmdschool.org

  RewriteEngine on
  RewriteCond %{HTTP_HOST} ^nextcloud\.com\.org$
  RewriteRule ^/?(.*)$ https://nextcloud.cmdschool.org/$1 [L,R]
</VirtualHost>

<VirtualHost *:443>
  DocumentRoot /var/www/nextcloud/
  ServerName  nextcloud.cmdschool.org

  Header always set Strict-Transport-Security "max-age=63072000; includeSubdomains; preload"
</VirtualHost>

<Directory /var/www/nextcloud/>
  Require all granted
  AllowOverride All
  Options FollowSymLinks MultiViews

  <IfModule mod_dav.c>
    Dav off
  </IfModule>
</Directory>
根据以上配置,你需要使用以下命令开启重写功能,
sed -i "s/\#LoadModule rewrite\_module modules\/mod\_rewrite\.so/LoadModule rewrite\_module modules\/mod\_rewrite.so/g" /etc/httpd/httpd.conf

(注:原博客这里有 SSL 的配置和证书有关的,本人实践中为简单起见去掉了,若需要请参考原博客)
然后,我们建议你使用如下命令检查当前的配置是否有语法错误,
httpd -t
3.2.3 重启Apache服务
systemctl restart httpd.service
3.3 安装所需的模块
3.3.1 获取需要的模块
通过访问连接的方式获取欠缺的模块信息,详细请参考下图,
https://nextcloud.cmdschool.org或者http://192.168.43.29/index.php或者http://192.168.43.29/nextcloud
(注:本人忘记截图了,就借用原博客作者的图)

另外,临时性的名称解析你可以按下键盘的【Win+R】键,然后输入如下命令,
notepad \Windows\System32\drivers\etc\hosts
然后加入如下配置,
192.168.43.29 nextcloud.cmdschool.org

再另外,Mac 用户请自行搜索修改域名解析的方法。
3.3.2 编译安装模块zip
cd ~/php-7.4.3/ext/zip
phpize
./configure
make
make install
如果你遇到以下错误提示,
configure: error: Package requirements (libzip >= 0.11 libzip != 1.3.1 libzip != 1.7.0) were not met:
可按照如下方法解决依赖关系,
dnf install -y libzip-devel

本人实践中执行“dnf install -y libzip-devel”命令怎么都报错找不到参数,即找不到libzip,无法用此命令安装,故最终探索借鉴如下博客的指导安装:
https://blog.csdn.net/u011837804/article/details/130308915
本人认为其中最重要的一点应该是:
zlib.output_compression = Off
改为
zlib.output_compression = On
3.3.3 编译安装模块mbstring
cd ~/php-7.4.3/ext/mbstring
phpize
./configure
make
make install
如果你遇到以下错误提示,
configure: error: Package requirements (oniguruma) were not met:
可按照如下方法解决依赖关系:
https://www.cmdschool.org/archives/11872
我拷贝如下:
1 基础知识
1.1 Oniguruma的简介
– Oniguruma是一个现代而灵活的正则表达式库
– Oniguruma含不同传统语言留存至今的不同正则表达式实现
1.2 Oniguruma支持的字符编码
ASCII,UTF-8,UTF-16BE,UTF-16LE,UTF-32BE,UTF-32LE,EUC-JP,EUC-TW,EUC-KR,EUC-CN,Shift_JIS,Big5,GB18030,KOI8-R,CP1251, ISO-8859-1,ISO-8859-2,ISO-8859-3,ISO-8859-4,ISO-8859-5,ISO-8859-6,ISO-8859-7,ISO-8859-8,ISO- 8859-9,ISO-8859-10,ISO-8859-11,ISO-8859-13,ISO-8859-14,ISO-8859-15,ISO-8859-16
2 最佳实践
2.1 准备编译环境
dnf -y install gcc gcc-c++ make expat-devel autoconf automake libtool
2.2 卸载系统已有的版本
dnf remove -y oniguruma
2.3 准备安装包
cd ~
wget https://github.com/kkos/oniguruma/archive/v6.9.6.tar.gz -O oniguruma-6.9.6.tar.gz
tar -xf oniguruma-6.9.6.tar.gz
2.4 准备编译环境
cd ~/oniguruma-6.9.6
autoreconf -vfi
2.5 预编译程序
cd ~/oniguruma-6.9.6
./configure --prefix=/usr
2.6 编译并安装程序
cd ~/oniguruma-6.9.6
make
make install
另外,卸载请使用如下命令,
make uninstall
3.3.4 编译安装模块gd
cd ~/php-7.4.3/ext/gd/
phpize
./configure \
	--enable-shared \
	--disable-static \
	--enable-gd \
	--with-external-gd \
	--with-webp \
	--with-jpeg \
	--with-xpm \
	--with-freetype \
	--with-gnu-ld
make
make install
如果你遇到以下错误提示,
configure: error: Package requirements (gdlib >= 2.1.0) were not met:
可按照如下方法解决依赖关系,
dnf install -y gd-devel
如果你遇到以下错误提示,
configure: error: Package requirements (libpng) were not met:
可按照如下方法解决依赖关系,
dnf install -y libpng-devel
如果你遇到以下错误提示,
configure: error: Package requirements (libjpeg) were not met:
可按照如下方法解决依赖关系,
dnf install -y libjpeg-turbo-devel
如果你遇到以下错误提示,
configure: error: Package requirements (libwebp) were not met:
可按照如下方法解决依赖关系,
dnf install -y libwebp-devel
如果你遇到以下错误提示,
configure: error: Package requirements (libpng) were not met:
可按照如下方法解决依赖关系,
dnf install -y libpng-devel
3.3.5 编译安装模块zlib
cd ~/php-7.4.3/ext/zlib
cp config0.m4 config.m4
phpize
./configure
make
make install
3.3.6 编译安装模块curl
cd ~/php-7.4.3/ext/curl
phpize
./configure
make
make install
如果你遇到以下错误提示,
configure: error: Package requirements (libcurl >= 7.15.5) were not met:
可按照如下方法解决依赖关系,
dnf install -y libcurl-devel
3.3.7 编译安装模块openssl
cd ~/php-7.4.3/ext/openssl/
cp config0.m4 config.m4
phpize
./configure
make
make install
3.3.8~3.3.17 均为可选动态模块(可选)
这部分动态模块本人均没有安装,暂不记录,若需要请参考原博客
3.3.18 动态加载模块
echo 'extension=zip.so' >> /etc/php.ini
echo 'extension=mbstring.so' >> /etc/php.ini
echo 'extension=gd.so' >> /etc/php.ini
echo 'extension=zlib.so' >> /etc/php.ini
echo 'extension=curl.so' >> /etc/php.ini
echo 'extension=openssl.so' >> /etc/php.ini
echo 'extension=ldap.so' >> /etc/php.ini
echo 'extension=intl.so' >> /etc/php.ini
echo 'extension=pcntl.so' >> /etc/php.ini
echo 'extension=bcmath.so' >> /etc/php.ini
echo 'extension=gmp.so' >> /etc/php.ini
echo 'extension=imagick.so' >> /etc/php.ini
echo 'zend_extension=opcache.so' >> /etc/php.ini
echo 'extension=exif.so' >> /etc/php.ini
echo 'extension=ftp.so' >> /etc/php.ini
echo 'extension=smbclient.so' >> /etc/php.ini
3.3.19 优化相关参数
vim /etc/php.ini
修改如下参数,
memory_limit = 512M
post_max_size = 1024M
upload_max_filesize = 1024M
date.timezone = Asia/Shanghai
另外,也可使用以下快速命令处理,
sed -i "s/memory_limit = 128M/memory_limit = 512M/g" /etc/php.ini
sed -i "s/post_max_size = 8M/post_max_size = 1024M/g" /etc/php.ini
sed -i "s/upload_max_filesize = 2M/upload_max_filesize = 1024M/g" /etc/php.ini
3.3.20 重启服务使配置生效
systemctl restart httpd.service
3.4 配置数据库连接
3.4.1 创建数据库
mysql -uroot -p
输入如下配置:
create database if not exists nextcloud;
grant all privileges on nextcloud.* TO 'nextcloud'@'localhost' IDENTIFIED BY 'nextcloudpwd';
flush privileges;
3.4.2 连接数据库
通过访问连接可发现所有模块安装好后即可进行数据库连接等操作,详细请参考下图,
https://nextcloud.cmdschool.org
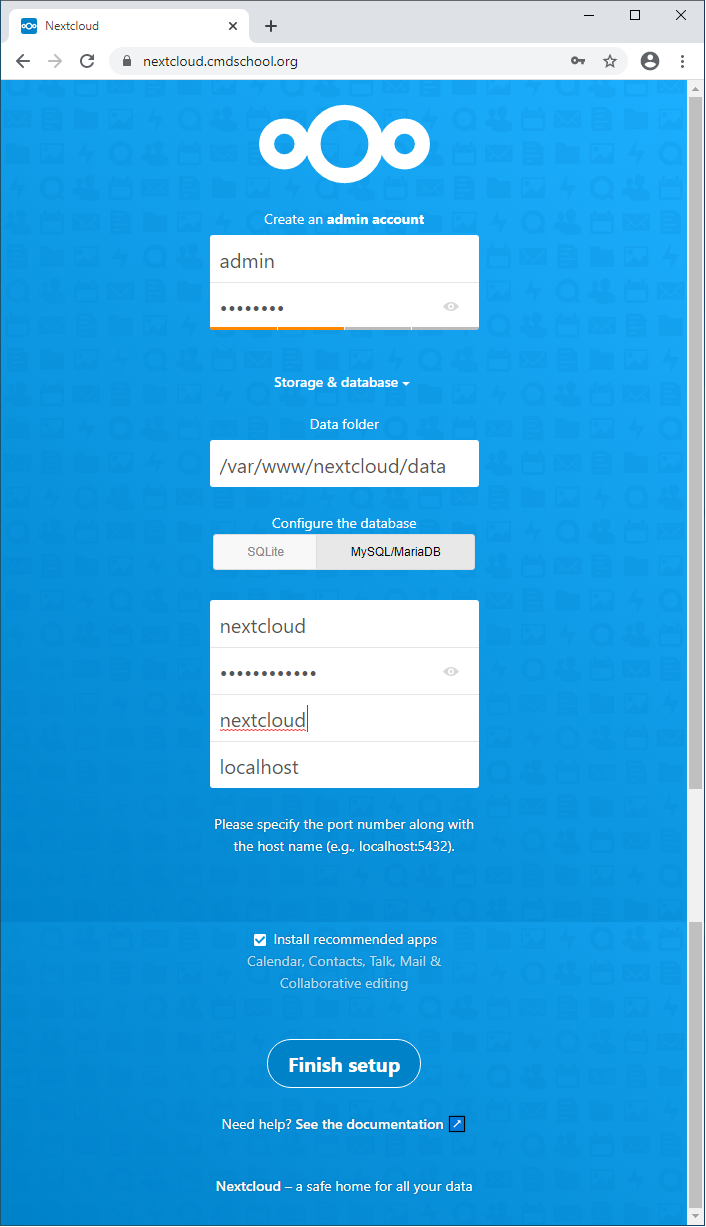
注:
– 如果无法连接请将“localhost”改为“127.0.0.1”
– 界面操作不再详述,请自行摸索
若为实验,也可选择 SQLLite 直接使用看效果。
3.5 启用nextCloud的缓存加速
这里本人暂没实践,仅作备注
参考文档:
1、如何部署CentOS 8.x nextCloud?:https://www.cmdschool.org/archives/11856
2、如何编译安装Apache+PHP7.4.3?:https://www.cmdschool.org/archives/11922
3、如何编译安装oniguruma?:https://www.cmdschool.org/archives/11872
4、linux 安装php8.1 ZipArchive和libzip最新版扩展安装:https://blog.csdn.net/u011837804/article/details/130308915

 浙公网安备 33010602011771号