


插槽
插槽
Vue 实现了一套内容分发的 API,将 <slot> 元素作为承载分发内容的出口。
<navigation-link url="/profile">
  Your Profile
</navigation-link>
然后你在 <navigation-link> 的模板中可能会写为:
<a
  v-bind:href="url"
  class="nav-link"
>
  <slot></slot> //slot的内容就是组件内部内容
</a>
当组件渲染的时候,<slot></slot> 将会被替换为“Your Profile”。插槽内可以包含任何模板代码,包括 HTML:
Slot 是组件内部的占位符,solt元素作为组件模板之中的内容分发插槽。 元素自身将被替换。一个不带 name 的 <slot> 出口会带有隐含的名字“default”。
只有匿名插槽,若child标签有内容,看模板组件中有几个slot就渲染几次内容, 且slot标签添加样式无效。拥有命名的插槽不能被不含slot属性的标签内容替换,会显示slot的默认值(具名slot具有对应性);
单个和多个具名插槽
我们可以在一个 <template> 元素上使用 v-slot 指令,并以 v-slot 的参数的形式提供其名称:还是以<slot name='xxx'></slot> 来渲染
<Child>
  <template v-slot:header>
    <h1>Here might be a page title</h1>
  </template>

  <p>A paragraph for the main content.</p>
  <p>And another one.</p>

  <template v-slot:footer>
    <p>Here's some contact info</p>
  </template>
</Child>
现在 <template> 元素中的所有内容都将会被传入相应的插槽。任何没有被包裹在带有 v-slot 的 <template> 中的内容都会被视为默认插槽的内容。
然而,如果你希望更明确一些,仍然可以在一个 <template> 中包裹默认插槽的内容:
<Child>
  <template v-slot:header>
    <h1>Here might be a page title</h1>
  </template>

  <template v-slot:default>
    <p>A paragraph for the main content.</p>
    <p>And another one.</p>
  </template>

  <template v-slot:footer>
    <p>Here's some contact info</p>
  </template>
</Child>
注意 v-slot 只能添加在 <template> 上或自定义组件上
老写法
 <div id="app">
        <me-component>
            <h1 slot="header">我是header</h1>
            <h1 slot="footer">我是footerr</h1>
        </me-component>
    </div>
<script >
    Vue.component('me-component', {
        template:
                `<div>
                    <p>你好</p>
                    <slot name="header"></slot>
                    <slot name="footer"></slot>
                </div>`
    })
    var vm = new Vue({
        el:"#app"
    })
作用域插槽
使用时候子组件标签中要有标签,再通过scopeName.childProp就可以调用子组件模板中的childProp绑定的数据,所以作用域插槽是一种子传父传参的方式,解决了普通slot在parent中无法访问child数据的去问题;
作用域插槽代表性的用例是列表组件,允许在parent父组件上对列表项进行自定义显示,如下该items的所有列表项都可以通过slot定义后传递给父组件使用,也就是说数据是相同的,不同的场景页面可以有不同的展示方式
<!DOCTYPE html>
<html lang="en">
<head>
    <meta charset="UTF-8">
    <title>Slot</title>
    <style type="text/css">
        .panel{
            width: 400px;
            border: 1px solid #ccc;
        }
        .panel>*{
            padding: 15px;
            border-bottom: 1px solid #ccc;
        }
        .footer{
            border: none;
        }
    </style>
    <script src="https://unpkg.com/vue/dist/vue.js"></script>
</head>
<body>
    <div id="app">
        <Child>
            <template v-slot:default='aaa'><!-- 以default接受bing传来的值 并且命名 -->
                <span style="color: red">{{aaa.bbb}}</span><!-- 显示内容 -->
                <span>{{aaa.ccc}}</span>   //传来的bind以属性的方式调用

            </template>
        </Child>
    </div>

    <template id="child" >
        <div>
            <div class="panel">
                <div class="title">这是标题</div>
                <div class="content" style="color: blue">
                    <slot v-bind:bbb='msg'><!-- 这里绑定数据,并且传到父组件 -->
                    {{demo}} <!-- 默认内容 -->
                </slot>
                </div>
                 <p><slot v-bind:ccc="demo"></slot></p> //可以传多个bind上去
                <div class="footer">这是页脚</div>
            </div>
        </div>
    </template>
</body>
<script type="text/javascript">
    new Vue({
        el:"#app",
        data:{
        },
        components:{
            Child:{
                template:"#child",/*对应id=child的template*/
                data(){ /*组件数据*/
                    return{
                        msg:"这是内容这是内容这是内容这是内容这是内容这是内容这是内容这是内容这是内容这是内容这是内容这是内容这是内容这是内容这是内容这是内容这是内容这是内容这是内",
                        demo:"aaaaaaaa"
                    }

                }
            }
        }
    })
</script>
</html>
动态指令参数也可以用在 v-slot 上,来定义动态的插槽名:
  <Child>
<template v-slot:[dynamicSlotName]>
    ...
  </template>
</Child>
独占默认插槽的缩写
在上述情况下,当被提供的内容只有默认插槽时,组件的标签才可以被当作插槽的模板来使用。这样我们就可以把 v-slot 直接用在组件上:
例
           <template v-slot:default='bbb'><!-- 以default接受bing传来的值 并且命名 -->
                <span style="color: red">{{bbb.aaa}}</span><!-- 显示内容 -->
            </template>
这种写法还可以更简单。就像假定未指明的内容对应默认插槽一样,不带参数的 v-slot 被假定对应默认插槽:
       <template v-slot:='bbb'><!-- 以default接受bing传来的值 并且命名 -->
                <span style="color: red">{{bbb.aaa}}</span><!-- 显示内容 -->
            </template>
注意默认插槽的缩写语法不能和具名插槽混用,因为它会导致作用域不明确:
只要出现多个插槽,请始终为所有的插槽使用完整的基于 <template> 的语法:
<current-user>
  <template v-slot:default="slotProps">
    {{ slotProps.user.firstName }}
  </template>

  <template v-slot:other="otherSlotProps">
    ...
  </template>
</current-user>
解构插槽Prop
作用域插槽的内部工作原理是将你的插槽内容包括在一个传入单个参数的函数里:
function (slotProps) { // 插槽内容 }
这意味着 v-slot 的值实际上可以是任何能够作为函数定义中的参数的 JavaScript 表达式。所以在支持的环境下 (单文件组件或现代浏览器),你也可以使用 ES2015 解构来传入具体的插槽 prop,如下:
<current-user v-slot="{ user }">
  {{ user.firstName }}
</current-user>
这样可以使模板更简洁,尤其是在该插槽提供了多个 prop 的时候。它同样开启了 prop 重命名等其它可能,例如将 user 重命名为 person:
你甚至可以定义后备内容,用于插槽 prop 是 undefined 的情形:
<current-user v-slot="{ user = { firstName: 'Guest' } }"> {{ user.firstName }} </current-user>
动态插槽名
动态指令参数也可以用在 v-slot 上,来定义动态的插槽名:
<base-layout>
  <template v-slot:[dynamicSlotName]>
    ...
  </template>
</base-layout>
缩写
跟 v-on 和 v-bind 一样,v-slot 也有缩写,即把参数之前的所有内容 (v-slot:) 替换为字符 #。例如 v-slot:header 可以被重写为 #header:
<base-layout>
  <template #header>
    <h1>Here might be a page title</h1>
  </template>

  <p>A paragraph for the main content.</p>
  <p>And another one.</p>

  <template #footer>
    <p>Here's some contact info</p>
  </template>
</base-layout>
然而,和其它指令一样,该缩写只在其有参数的时候才可用。这意味着以下语法是无效的:
<!-- 这样会触发一个警告 -->
<current-user #="{ user }">
  {{ user.firstName }}
</current-user>
如果你希望使用缩写的话,你必须始终以明确插槽名取而代之:
<current-user #default="{ user }">
  {{ user.firstName }}
</current-user>
示例
插槽 prop 允许我们将插槽转换为可复用的模板,这些模板可以基于输入的 prop 渲染出不同的内容。这在设计封装数据逻辑同时允许父级组件自定义部分布局的可复用组件时是最有用的。
例如,我们要实现一个 <todo-list> 组件,它是一个列表且包含布局和过滤逻辑:
<ul>
  <li
    v-for="todo in filteredTodos"
    v-bind:key="todo.id"
  >
    {{ todo.text }}
  </li>
</ul>
我们可以将每个 todo 作为父级组件的插槽,以此通过父级组件对其进行控制,然后将 todo 作为一个插槽 prop 进行绑定:
<ul>
  <li
    v-for="todo in filteredTodos"
    v-bind:key="todo.id"
  >
    <!--
    我们为每个 todo 准备了一个插槽,
    将 `todo` 对象作为一个插槽的 prop 传入。
    -->
    <slot name="todo" v-bind:todo="todo">
      <!-- 后备内容 -->
      {{ todo.text }}
    </slot>
  </li>
</ul>
现在当我们使用 <todo-list> 组件的时候,我们可以选择为 todo 定义一个不一样的 <template> 作为替代方案,并且可以从子组件获取数据:
<todo-list v-bind:todos="todos">
  <template v-slot:todo="{ todo }">
    <span v-if="todo.isComplete">✓</span>
    {{ todo.text }}
  </template>
</todo-list>
$slots
你可以通过 this.$slots 访问静态插槽的内容,每个插槽都是一个 VNode 数组:
render: function (createElement) {
  // `<div><slot></slot></div>`
  return createElement('div', this.$slots.default)
}
实例
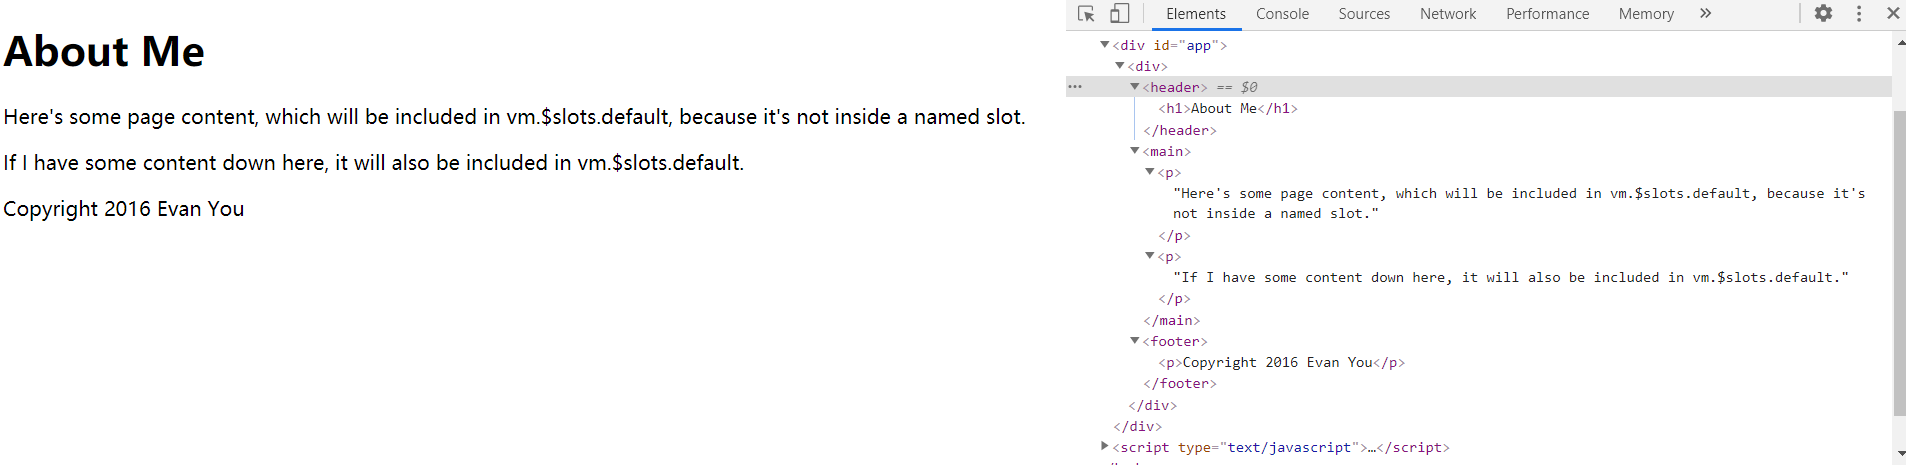
<!DOCTYPE html>
<html lang="en">
<head>
    <meta charset="UTF-8">
    <title>Slot</title>
    <style type="text/css">
        .panel{
            width: 400px;
            border: 1px solid #ccc;
        }
        .panel>*{
            padding: 15px;
            border-bottom: 1px solid #ccc;
        }
        .footer{
            border: none;
        }
    </style>
    <script src="https://unpkg.com/vue/dist/vue.js"></script>
</head>
<body>
<div id="app">
       <blog-post>
        <template v-slot:header>
            <h1>About Me</h1>
        </template>
        <p>Here's some page content, which will be included in vm.$slots.default, because it's not inside a named slot.</p>
        <template v-slot:footer>
            <p>Copyright 2016 Evan You</p>
        </template>
        <p>If I have some content down here, it will also be included in vm.$slots.default.</p>
        </blog-post>
</div>
</body>
<script type="text/javascript">
    Vue.component('blog-post', {
        render: function (createElement) {
            var header = this.$slots.header/*获取到了v-slot:header内容*/
            var body   = this.$slots.default/*获取到了没具名的插槽内容*/
            var footer = this.$slots.footer/*获取到了v-slot"footer内容*/
            return createElement('div', [
                createElement('header', header),
                createElement('main', body),
                createElement('footer', footer)
            ])
        }
    })
    new Vue({
        el:"#app",
        data:{
        }
    })
</script>
</html>
VM.$scopedSlots
访问作用域插槽,每个作用域插槽都是一个返回若干 VNode 的函数:
<!DOCTYPE html>
<html lang="en">
<head>
    <meta charset="UTF-8">
    <title>Slot</title>
    <style type="text/css">
        .panel{
            width: 400px;
            border: 1px solid #ccc;
        }
        .panel>*{
            padding: 15px;
            border-bottom: 1px solid #ccc;
        }
        .footer{
            border: none;
        }
    </style>
    <script src="https://unpkg.com/vue/dist/vue.js"></script>
</head>
<body>
<div id="app">
    <a-a v-bind:message="demo">  <!--用props绑定data中的demo-->
        <template v-slot:default="props">
            <h1 >{{props.text}}</h1>
        </template>
    </a-a>
</div>
</body>
<script type="text/javascript">
    Vue.component("a-a", {
        props: {/*设置props配置和默认值*/
            message:{
                type:String,
                default:'你好'
            }
        },
        render: function (createElement) {
            // `<div><slot v-bind:text="message"></slot></div>`
            return createElement('div',
                [
                    this.$scopedSlots.default({   /*访问到作用域插槽,并向里面传值*/
                        text: this.message
                    })
                ]);
        }
    });
    new Vue({
        el:"#app",
        data:{
            msg:'aaaaaaaa',
            demo:'bbbbbbb'
        }
    })
</script>
</html>
如果要用渲染函数向子组件中传递作用域插槽,可以利用 VNode 数据对象中的 scopedSlots 字段:
render: function (createElement) {
  // `<div><child v-slot="props"><span>{{ props.text }}</span></child></div>`
  return createElement('div', [
    createElement('child', {
      // 在数据对象中传递 `scopedSlots`
      // 格式为 { name: props => VNode | Array<VNode> }
      scopedSlots: {
        default: function (props) {
          return createElement('span', props.text)
        }
      }
    })
  ])
}
个人


 浙公网安备 33010602011771号