vue生命周期
https://segmentfault.com/a/1190000009677699?utm_source=sf-related
vue 2.0生命周期
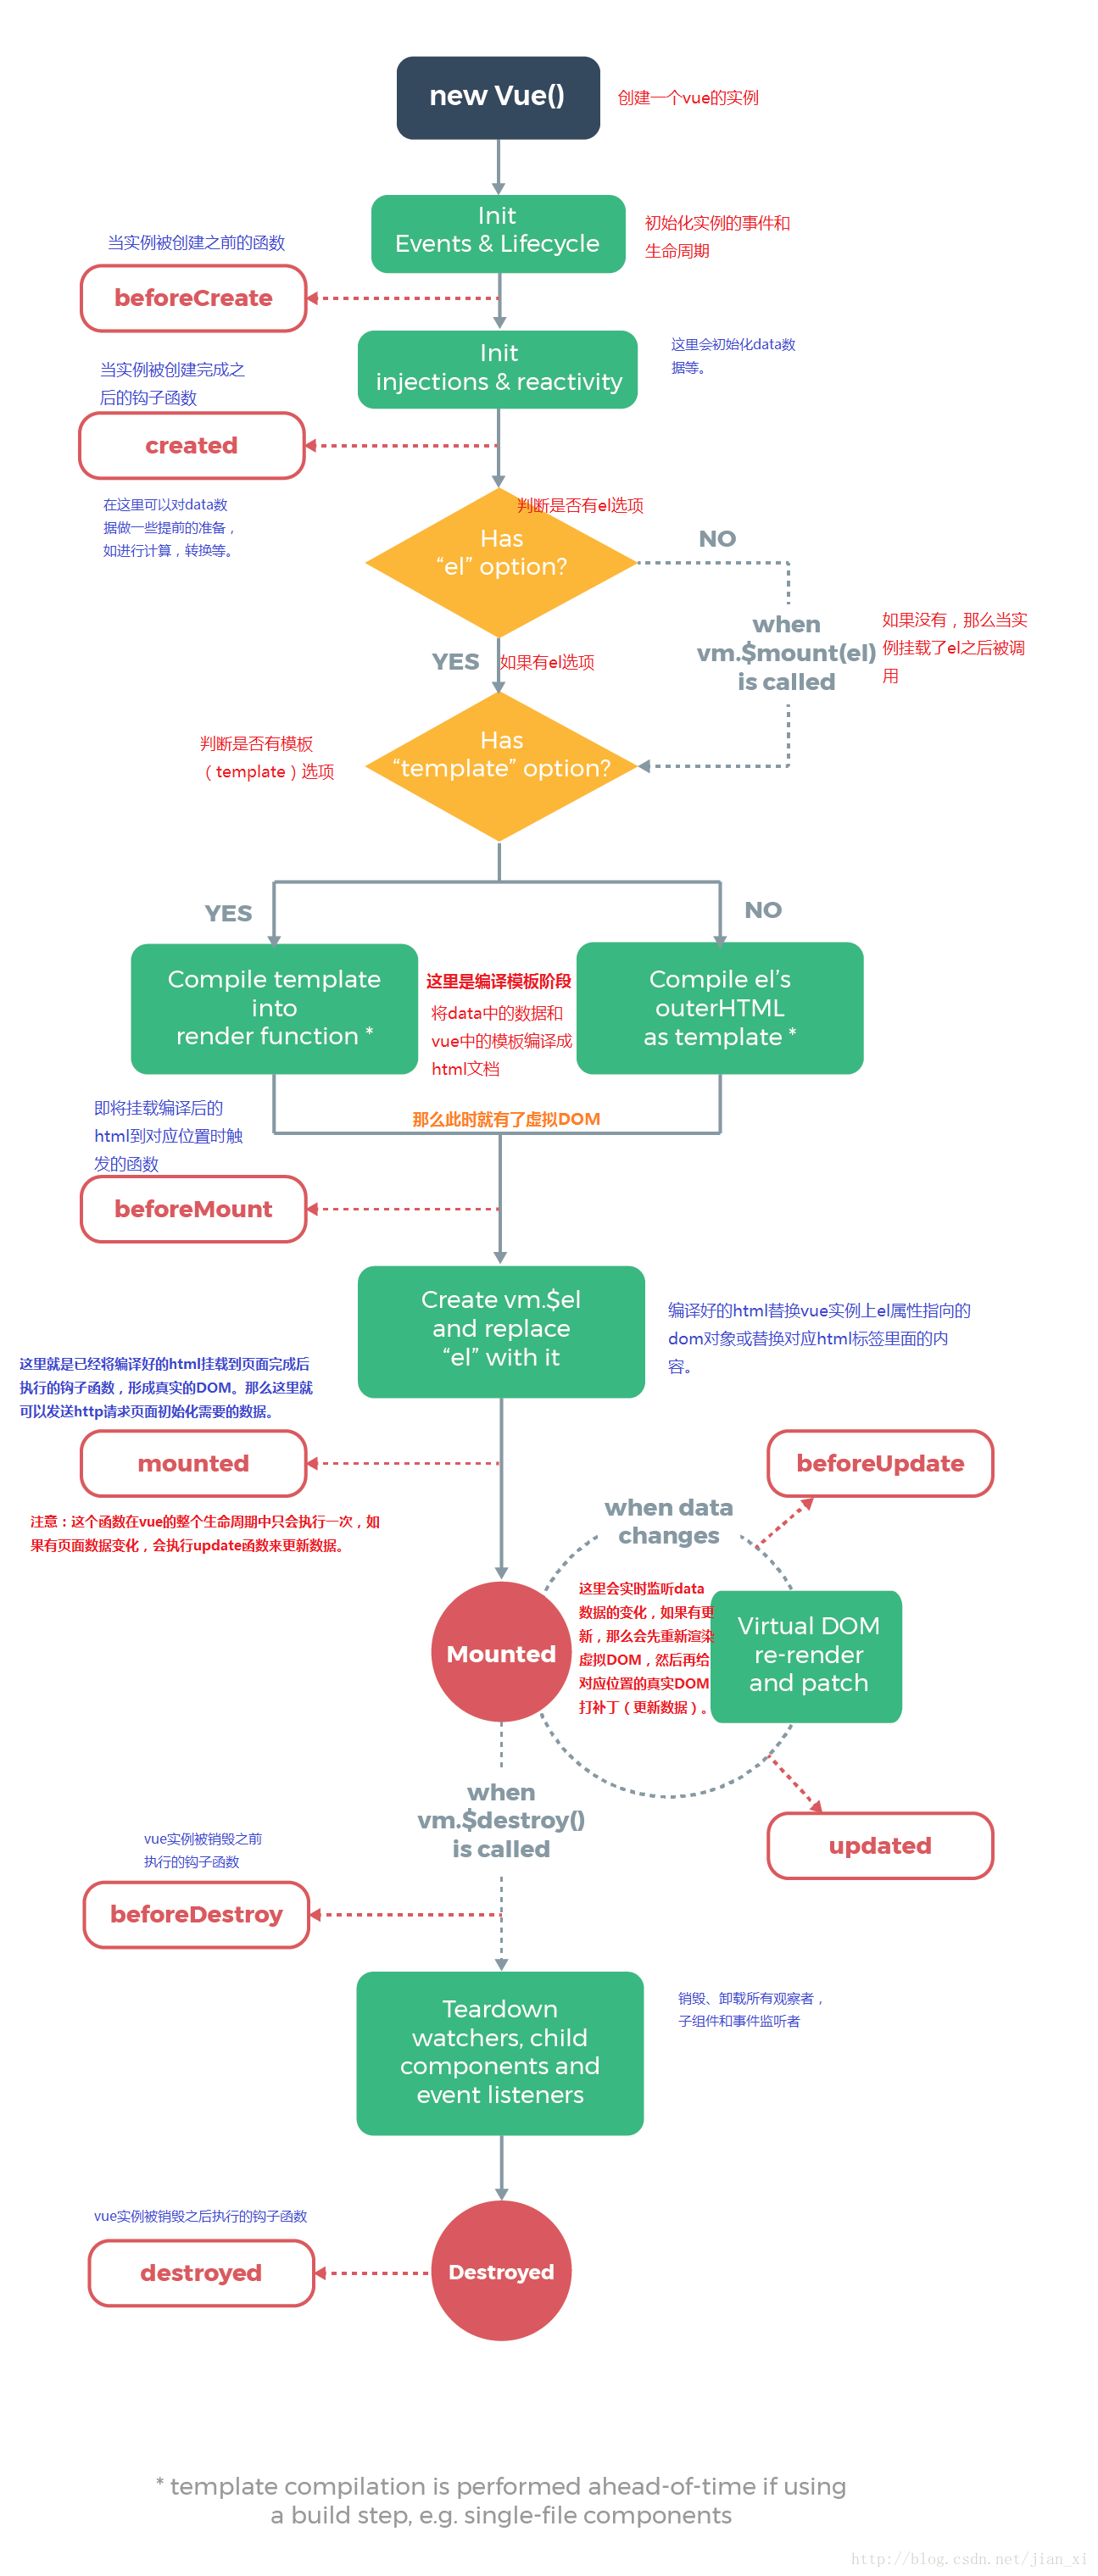
步骤
| new vue | 创建vue实例 |
| init events & lifecycle | 初始化事件和生命周期 |
| beforeCreate | 组件刚被创建,组建属性计算之前,如data属性等 |
| init injections & reactivity | 通过依赖注入导入依赖项 |
| created | 组件实例创建完成,属性已绑定,此时DOM还未生成 |
| el属性 | 检查vue配置,即new Vue{}里面的el项是否存在,有就继续检查template项。没有则等到手动绑定调用vm.$mount() |
| template | 检查配置中的template项,如果没有template进行填充被绑定区域,则被绑定区域的el对象的outerHTML(即整个#app DOM对象,包括<div id=”app” >和</div>标签)都作为被填充对象替换掉填充区域 |
| beforeMount | 模板编译,挂载之前 |
| create vm.$el and replace “el” with it | 编译,并替换了被绑定元素 |
| mounted | 编译、挂载完成、可进行DOM操作 |
| Before update | 组件更新之前 |
| updated | 组件更新之后 |
| destroy | 当vm.$destroy()被调用,开始拆卸组件和监听器,生命周期终结 |
第一步,构造函数生成Vue实例、第二步,初始化事件和生命周期 初始完后 可以使用beforeCreate生命周期钩子函数(事件配置前调用),第三步,初始化
<!DOCTYPE html>
<html>
<head>
    <title></title>
    <script type="text/javascript" src="https://cdn.jsdelivr.net/vue/2.1.3/vue.js"></script>
</head>
<body>

<div id="app">
     <p>{{ message }}</p>
</div>

<script type="text/javascript">

  var app = new Vue({
      el: '#app',
      data: {
          message : "hello vue"
      },
       beforeCreate: function () {
                console.group('beforeCreate 创建前状态===============》');
               console.log("%c%s", "color:red" , "el     : " + this.$el); //undefined
               console.log("%c%s", "color:red","data   : " + this.$data); //undefined
               console.log("%c%s", "color:red","message: " + this.message)
        },
        created: function () {
            console.group('created 创建完毕状态===============》');
            console.log("%c%s", "color:red","el     : " + this.$el); //undefined
               console.log("%c%s", "color:red","data   : " + this.$data); //已被初始化
               console.log("%c%s", "color:red","message: " + this.message); //已被初始化
        },
        beforeMount: function () {
            console.group('beforeMount 挂载前状态===============》');
            console.log("%c%s", "color:red","el     : " + (this.$el)); //已被初始化
            console.log(this.$el);
               console.log("%c%s", "color:red","data   : " + this.$data); //已被初始化
               console.log("%c%s", "color:red","message: " + this.message); //已被初始化
        },
        mounted: function () {
            console.group('mounted 挂载结束状态===============》');
            console.log("%c%s", "color:red","el     : " + this.$el); //已被初始化
            console.log(this.$el);
               console.log("%c%s", "color:red","data   : " + this.$data); //已被初始化
               console.log("%c%s", "color:red","message: " + this.message); //已被初始化
        },
        beforeUpdate: function () {
            console.group('beforeUpdate 更新前状态===============》');
            console.log("%c%s", "color:red","el     : " + this.$el);
            console.log(this.$el);
               console.log("%c%s", "color:red","data   : " + this.$data);
               console.log("%c%s", "color:red","message: " + this.message);
        },
        updated: function () {
            console.group('updated 更新完成状态===============》');
            console.log("%c%s", "color:red","el     : " + this.$el);
            console.log(this.$el);
               console.log("%c%s", "color:red","data   : " + this.$data);
               console.log("%c%s", "color:red","message: " + this.message);
        },
        beforeDestroy: function () {
            console.group('beforeDestroy 销毁前状态===============》');
            console.log("%c%s", "color:red","el     : " + this.$el);
            console.log(this.$el);
               console.log("%c%s", "color:red","data   : " + this.$data);
               console.log("%c%s", "color:red","message: " + this.message);
        },
        destroyed: function () {
            console.group('destroyed 销毁完成状态===============》');
            console.log("%c%s", "color:red","el     : " + this.$el);
            console.log(this.$el);
               console.log("%c%s", "color:red","data   : " + this.$data);
               console.log("%c%s", "color:red","message: " + this.message)
        }
    })
</script>
</body>
</html>
按F12可以看到
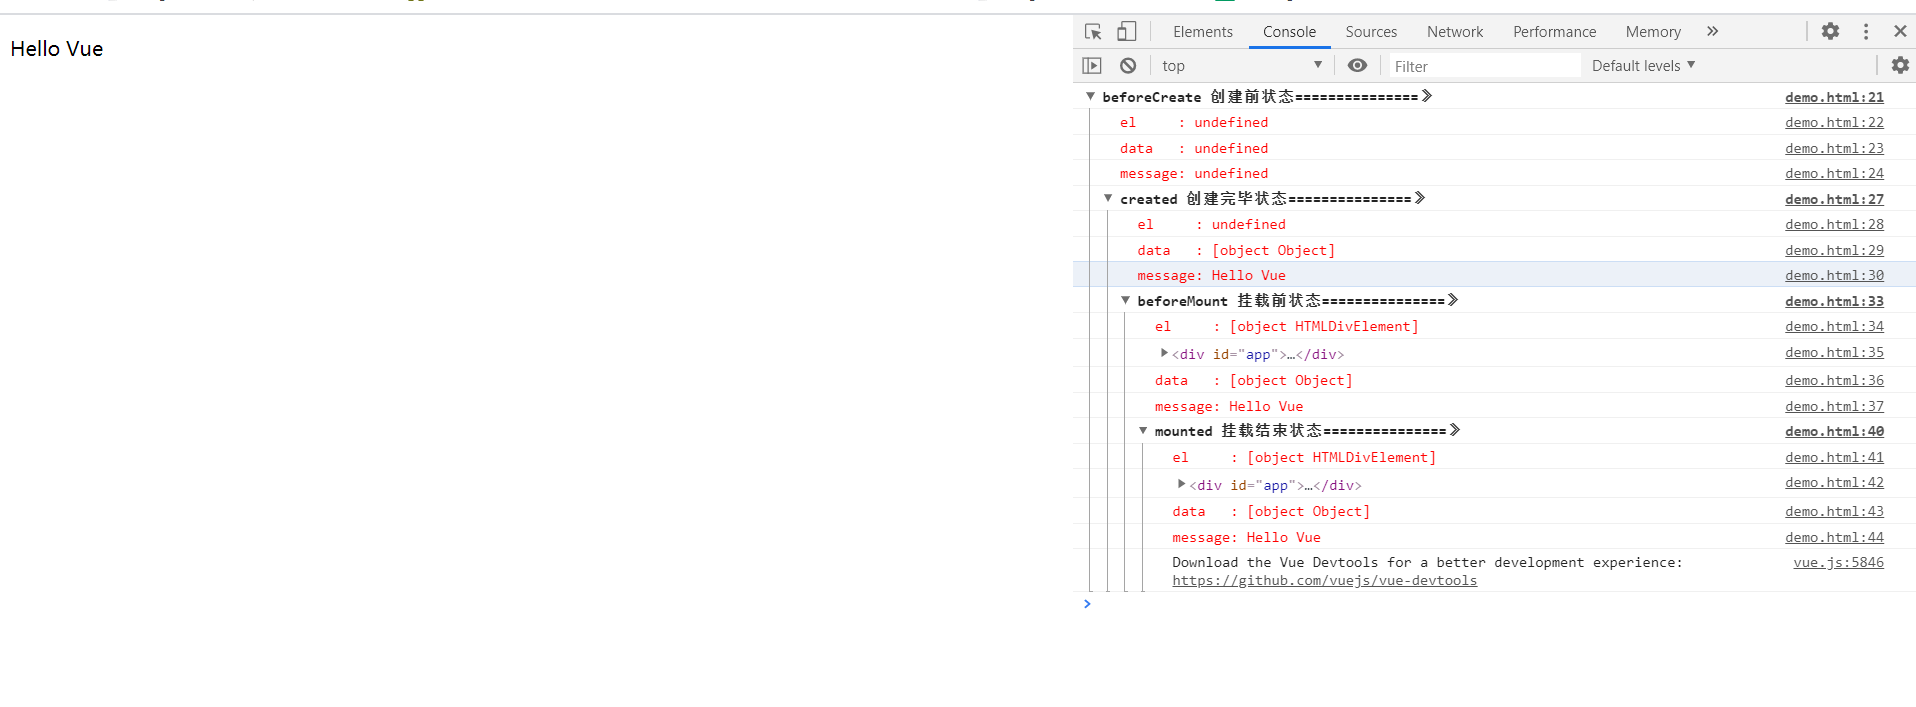
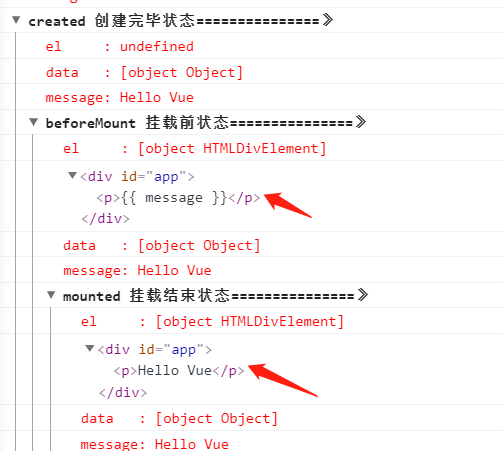
可知
beforeCreate
在实例初始化之后,数据观测和事件、生命周期初始化配置之前被调用。
created
实例已经创建完成之后被调用。在这一步,实例已完成以下的配置:数据观测,属性和方法的运算,事件回调。然而,挂载阶段还没开始,$el 属性目前不可见。
beforeMount
在挂载开始之前被调用:相关的 render 函数首次被调用,此时有了虚拟DOM。
mounted
el 被新创建的 vm.$el 替换,并挂载到实例上去之后调用该钩子,渲染为真实DOM。
beforeUpdate
在数据更新之前时调用,发生在虚拟 DOM 重新渲染和打补丁之前。 你可以在这个钩子中进一步地更改状态,这不会触发附加的重渲染过程。
updated
由于数据更改导致的虚拟 DOM 重新渲染和打补丁,在这之后会调用该钩子。
当这个钩子被调用时,组件 DOM 已经更新,所以你现在可以执行依赖于 DOM 的操作。然而在大多数情况下,你应该避免在此期间更改状态,因为这可能会导致更新无限循环。
值得注意的是:该钩子在服务器端渲染期间不被调用。
beforeDestroy
实例销毁之前调用。此时,实例仍然是可用的。
destroyed
vue 实例销毁后调用。调用后,vue 实例指示的所有东西都会解绑,所有的事件监听器会被卸载移除,所有的子实例也会被销毁。
值得注意的是:该钩子在服务器端渲染期间不被调用。
数据更新
在控制台里输入app.message = '数据更新'后
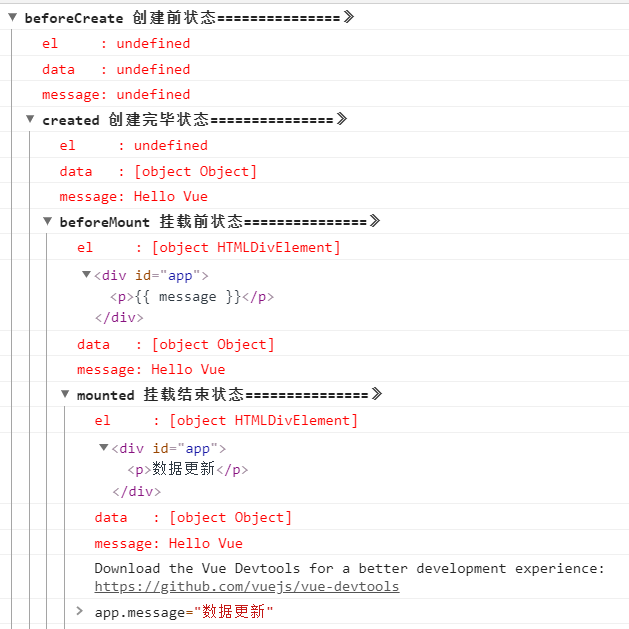
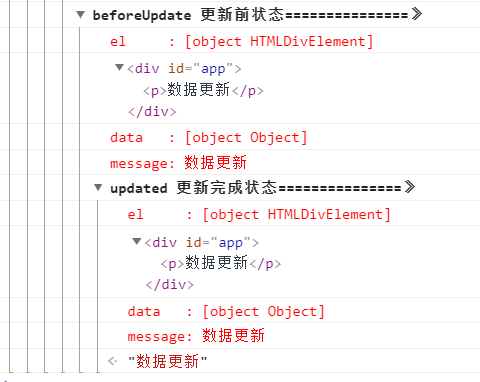
由此可知,数据更新只会触发updated
VUE实例解耦
在控制台输入app.destroy()
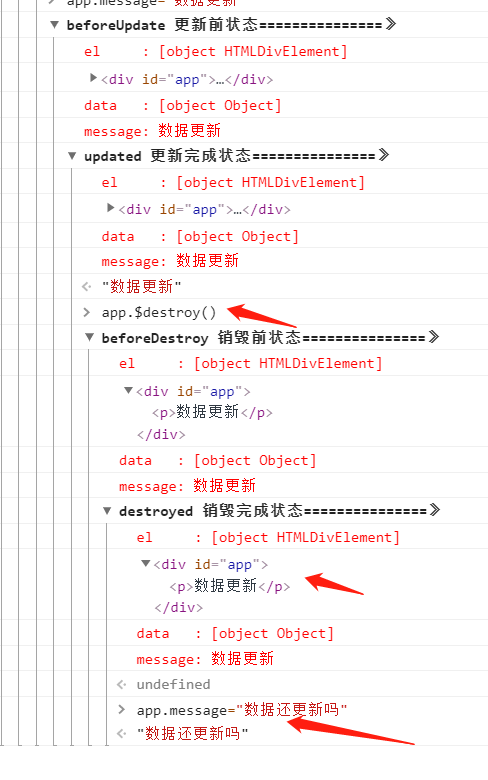
由图知
执行完destroy操作后,data里的数据没有变化,但是Dom结构还存在,也就是Vue实例不再受控制了,完成了解耦
生命周期与勾子函数总结
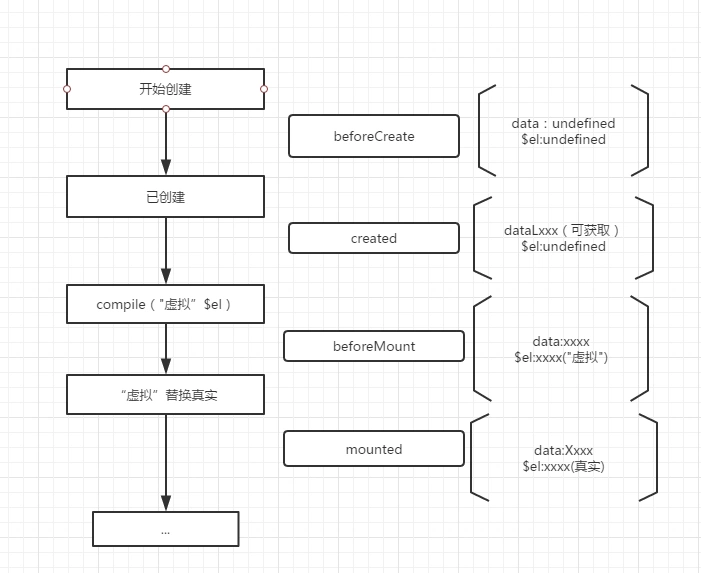
生命周期钩子函数使用
beforecreate : 举个例子:可以在这加个loading事件
created :在这结束loading,还做一些初始化,实现函数自执行
mounted : 在这发起后端请求,拿回数据,配合路由钩子做一些事情
beforeDestory: 你确认删除XX吗? destoryed :当前组件已被删除,清空相关内容。
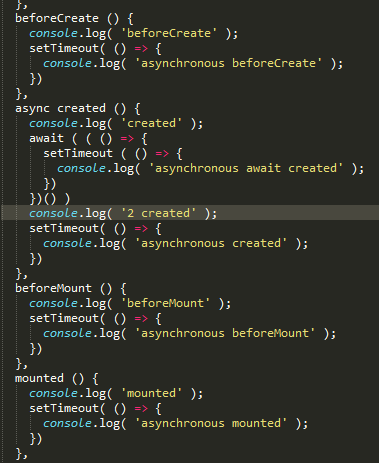
主要测试代码如下: 主要是测试前四个生命周期beforeCreate,created,beforeMount,mounted,里面同步和异步的执行顺序,其它的类似。

result:在控制台可以看到:
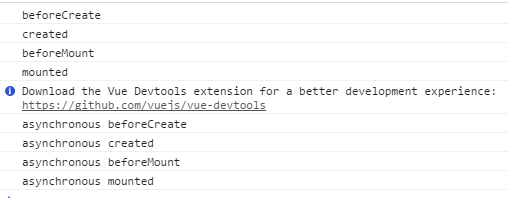
从上图可以看出生命周期都是同步的,异步都在生命周期之后执行。
在看一段有意思的代码:
附上结果:
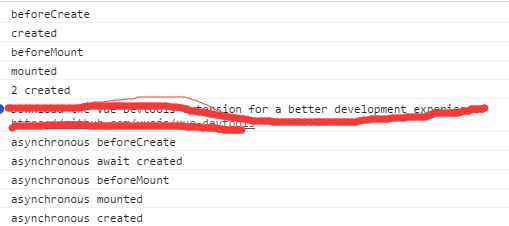
加async和await的目的主要为了异步请求使用同步的写法,在await的之后就可以直接拿到数据,这样的写法既优雅也好理解,其实不用也可以的,不过推荐使用!


 浙公网安备 33010602011771号