
Vue开发之路由进阶
1.路由组件传参
在一个页面中,需要根据路由获得参数,然后在页面进行逻辑处理,可以通过$route来获取相关参数
但是这样一来,页面组件与路由耦合太高,为了解耦,页面组件可以在更大程度上进行复用,可以使用路由组组传参
路由组件传参有三种形式
1.1 第一种:布尔模式
适用于在动态路由匹配中,有动态路由参数的路由配置中
在前面的例子里,定义了一个动态路由参数的路由
修改src/router/router/js文件
import Home from '@/views/Home.vue'

export default [
    {
        path: '/',
        name: 'home',
        alias:'/home_page',
        component: Home,
    }, {
        path: '/about',
        name: 'about',
        component: () => import('@/views/About.vue'),
    },{
        path:'/argu/:name',
        name:'argu',
        component:() => import('@/views/argu.vue'),
        props:true
    }
]
修改src/views/argu.vue文件内容为:
<template>
    <div>
        {{ $route.params.name }}
    </div>
</template>

<script>
export default {

}
</script>
用浏览器打开URL:http://localhost:8080/#/argu/orange,效果如下
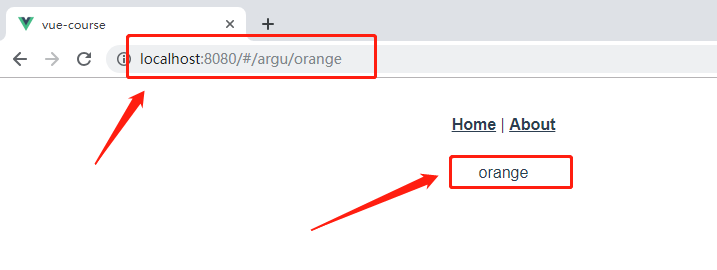
在上面的argu页面,可以通过$route对象获取动态路由中的参数,此时也可以使用布尔模式获取动态路由中定义的参数
修改src/router/router/js文件,定义布尔模式来获取动态路由参数
import Home from '@/views/Home.vue'

export default [
    {
        path: '/',
        name: 'home',
        alias:'/home_page',
        component: Home,
    }, {
        path: '/about',
        name: 'about',
        component: () => import('@/views/About.vue'),
    },{
        path:'/argu/:name',
        name:'argu',
        component:() => import('@/views/argu.vue'),
        props:true		// 定义布尔模式获取路由参数
    }
]
修改src/views/argu.vue文件
<template>
    <div>
        {{ name }}
    </div>
</template>

<script>
export default {
    props:{
        name:{
            type:String,			// 定义name的值的类型,String表示name的值必须为字符串,Number表示name的值为整数
            default:'renpingsheng'	// 定义默认值,可以省略
        }
    }
}
</script>
更改路由的参数,效果如下

1.2 第二种:对象模式
普通路由的传值,例如在about路由页面中传参
修改src/router/router.js文件,在about路由中传值
import Home from '@/views/Home.vue'

export default [
    {
        path: '/',
        name: 'home',
        alias:'/home_page',
        component: Home,
    }, {
        path: '/about',
        name: 'about',
        component: () => import('@/views/About.vue'),
        props:{
            fruit:"banana"
        }
    },{
        path:'/argu/:name',
        name:'argu',
        component:() => import('@/views/argu.vue'),
        props:true
    }
]
然后修改src/views/About.vue文件
<template>
<div class="about">
    <h1>This is an about page</h1>
    <b>{{ fruit }}</b>
</div>
</template>
<script>
export default {
    props:{
        fruit:{
            type:String,
            default:'apple'		// 默认值,如果路由中没的传递任何值则在页面上显示默认值
        }
    }
}
</script>
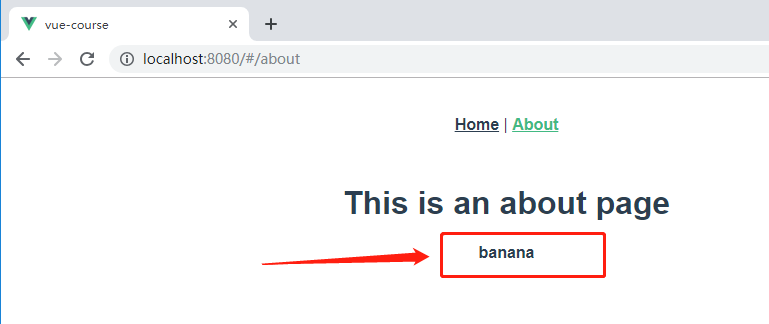
由于/about路由中传递了fruit的值,所以页面显示效果如下
此时如果在路由的props属性中没有传递fruit的值
import Home from '@/views/Home.vue'

export default [
    {
        path: '/',
        name: 'home',
        alias:'/home_page',
        component: Home,
    }, {
        path: '/about',
        name: 'about',
        component: () => import('@/views/About.vue'),
        props:{
            // fruit:"banana"       // 把传递参数的这一行注释
        }
    },{
        path:'/argu/:name',
        name:'argu',
        component:() => import('@/views/argu.vue'),
        props:true
    }
]
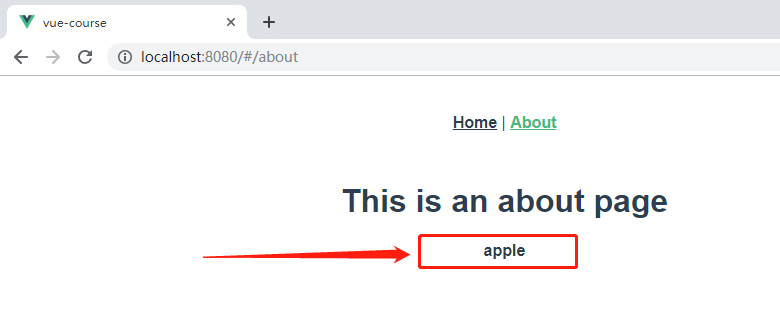
src/views/About.vue文件内容不变,则页面上就会显示About.vue文件中props属性中定义的默认值,显示效果如下
1.3 第三种:函数模式
适合在传入的属性中能够根据当前的路由进行逻辑判断,从而设置传入组件的属性值
修改src/router/router/js文件,修改home路由
import Home from '@/views/Home.vue'

export default [
    {
        path: '/',
        name: 'home',
        alias:'/home_page',
        component: Home,
        props: route => ({
            fruit: route.query.params
        })
    }, {
        path: '/about',
        name: 'about',
        component: () => import('@/views/About.vue'),
        props:{
            // fruit:"banana"
        }
    },{
        path:'/argu/:name',
        name:'argu',
        component:() => import('@/views/argu.vue'),
        props:true
    }
]
修改src/views/Home.vue文件
<template>
<div class="home">
    <b>{{ fruit }}</b>
    <br>
    <button @click="handleClick">返回上一页</button>
</div>
</template>

<script>

export default {
    name: 'home',
    props:{
        fruit:{
            type: String,
            default:'strawberry'
        }
    },
    methods:{
        handleClick () {
            this.$router.push({
            name:`argu`,
            params:{
                name:'banana'
            }
            })
        }
    }
}
</script>
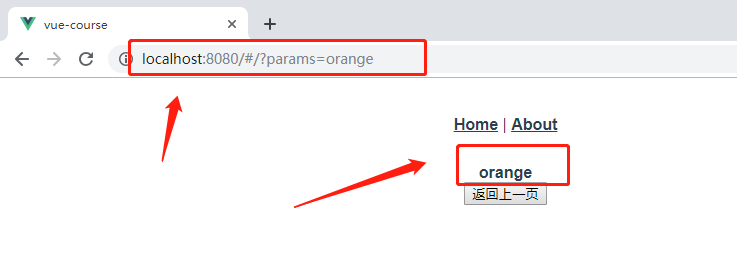
此时用浏览器打开URL: http://localhost:8080/#/?params=orange,显示效果如下
删除URL中添加的params键值对,页面显示效果如下

当URL中包含params键值对时,页面上就会显示URL中params的值
当URL中没有传入params键值对时,页面上就会显示props中定义的默认值
2.导航守卫
导航守卫在实际开发中都会用到的技能,大致相当于后端开发中的中间件功能
能够在路由发生跳转到导航结束这个阶段内进行一些相应的逻辑处理
比如用户打开某个需要登录的页面时判断用户是否登录,如果用户已经登录则直接打开页面
如果用户没有登录就跳转到登录页面
再比如用户在一个页面编辑了内容,当用户跳转到别的页面时提醒用户是否保存等功能都可以由导航守卫来完成
2.1 全局守卫
全局守卫就是在全局设置的守卫
修改src/router/index.js文件,添加全局守卫
import Vue from 'vue'
import Router from 'vue-router'
import routes from './router'

Vue.use(Router)

const router = new Router({
    routes
})

const IS_LOGINED = true			// 模拟用户是否登录

router.beforeEach((to,from,next) => {
    if(to.name !== 'login'){
        if(IS_LOGINED) next()
        else next({name:'login'})
    }else{
        if(IS_LOGINED) next({name:'home'})
        else next()
    }
})
export default router
修改src/router/router.js文件,添加login命名路由
import Home from '@/views/Home.vue'

export default [
    {
        path: '/',
        name: 'home',
        alias:'/home_page',
        component: Home,
        props: route => ({
            fruit: route.query.params
        })
    }, {
        path: '/about',
        name: 'about',
        component: () => import('@/views/About.vue'),
        props:{
            // fruit:"banana"
        }
    },{
        path:'/argu/:name',
        name:'argu',
        component:() => import('@/views/argu.vue'),
        props:true
    },{
        path:'/login',
        name:'login',
        component:() => import('@/views/login.vue')
    }
]
然后在src/views/目录下新建login.vue文件,文件内容如下
<template>
    <div>
        <b>this is login page</b>
    </div>
</template>

<script>
export default {

}
</script>
在浏览器中输入路由列表中已配置的任何URL,都会进入对应的页面
当把src/router/index.js文件中IS_LOGINED的值设置为false时
import Vue from 'vue'
import Router from 'vue-router'
import routes from './router'

Vue.use(Router)

const router = new Router({
    routes
})

const IS_LOGINED = false

router.beforeEach((to,from,next) => {
    if (to.name !== 'login') {
        if (IS_LOGINED) next()
        else next({ name: 'login' })
    } else {
        if (IS_LOGINED) next({ name: 'home' })
        else next()
    }
})
export default router
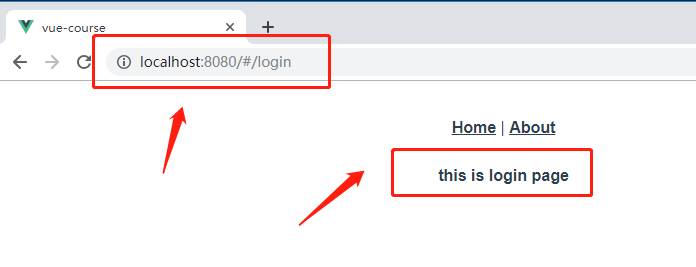
在浏览器中输入任何URL,都会进入login页面
每个守卫方法接收三个参数:
to: Route: 即将要进入的目标 路由对象
from: Route: 当前导航正要离开的路由
next: Function: 一定要调用该方法来 resolve 这个钩子。执行效果依赖 next 方法的调用参数。
其中,next方法可以传入的参数:
    next(): 进行管道中的下一个钩子。如果全部钩子执行完了,则导航的状态就是 confirmed (确认的)。
    next(false): 中断当前的导航。如果浏览器的 URL 改变了 (可能是用户手动或者浏览器后退按钮),那么 URL 地址会重置到 from 路由对应的地址。
    next('/') 或者 next({ path: '/' }): 跳转到一个不同的地址。当前的导航被中断,然后进行一个新的导航。你可以向 next 传递任意位置对象,且允许设置诸如 replace: true、name: 'home' 之类的选项以及任何用在 router-link 的 to prop 或 router.push 中的选项。
一定要确保在所有路由守卫最后要执行next方法,否则钩子就不会被 resolved
2.2 后置守卫
后置守卫不能阻止页面的跳转
修改src/router/index.js文件,设置后置守卫
import Vue from 'vue'
import Router from 'vue-router'
import routes from './router'

Vue.use(Router)

const router = new Router({
    routes
})

const IS_LOGINED = true

router.beforeEach((to,from,next) => {
    if (to.name !== 'login') {
        if (IS_LOGINED) next()
        else next({ name: 'login' })
    } else {
        if (IS_LOGINED) next({ name: 'home' })
        else next()
    }
})

router.afterEach((to, from) => {
    console.log(from)
    console.log(to)
})
export default router
先用浏览器打开home页面,再跳转到about页面,根据后置守卫中打印出的结果
2.3 beforeResolve前端守卫
beforeResolve也是全局守卫,beforeResolve作用于导航被确认之前在所有组件内守卫以及异步路由被解析之后守卫被调用
导航被确认的表示所有导航钩子都结束,则表示导航被确认
2.4 路由独享守卫
路由独享守卫是在路由列表中配置的,例如在home路由中配置一个只在home路由中被调用的守卫
修改src/router/router.js文件,为home路由添加路由独享守卫
import Home from '@/views/Home.vue'
export default [
{
path: '/',
name: 'home',
alias:'/home_page',
component: Home,
props: route => ({
fruit: route.query.params
}),
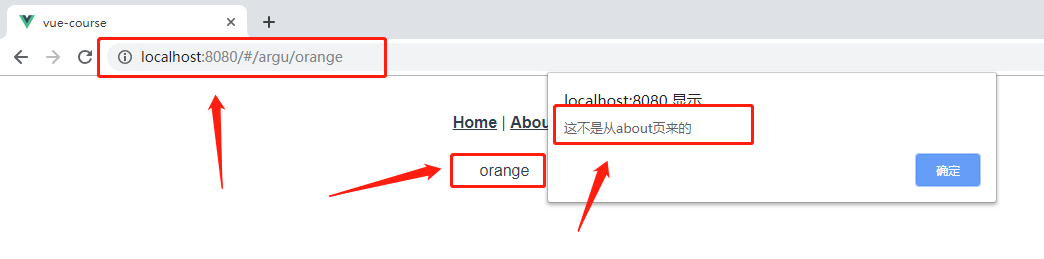
beforeEnter:(to,from,next) => {
if(from.name === 'about') alert("这是从about页来的")
else alert("这不是从about页来的")
next()
}
}, {
path: '/about',
name: 'about',
component: () => import('@/views/About.vue'),
props:{
// fruit:"banana"
}
},{
path:'/argu/:name',
name:'argu',
component:() => import('@/views/argu.vue'),
props:true
},{
path:'/login',
name:'login',
component:() => import('@/views/login.vue')
}
]
此时,用浏览器打开home页,然后跳转到about页,再从about页跳转回到home页,则会弹出对话框

取消弹出框,在浏览器中输入URL: http://localhost:8080/#/argu/orange,再从argu页面进入home页面,则会弹出对话框
如果添加了beforeEnter路由独享守卫,在进行逻辑处理后,一定要调用 next()方法,否则不会进行跳转
2.5 组件内守卫
每一个组件都可以有三个钩子
注释其他的守卫,修改src/views/Home.vue文件,添加组件内守卫
<template>
<div class="home">
    <b>{{ fruit }}</b>
    <br>
    <button @click="handleClick">返回上一页</button>
</div>
</template>

<script>

export default {
    name: 'home',
    props:{
        fruit:{
            type: String,
            default:'strawberry'
        }
    },
    beforeRouteEnter(to,from,next){
        console.log(this)
        console.log(from.name)
        console.log(to.name)
        next()
    },
    methods:{
        handleClick () {
            this.$router.push({
            name:`argu`,
            params:{
                name:'banana'
            }
            })
        }
    }
}
</script>
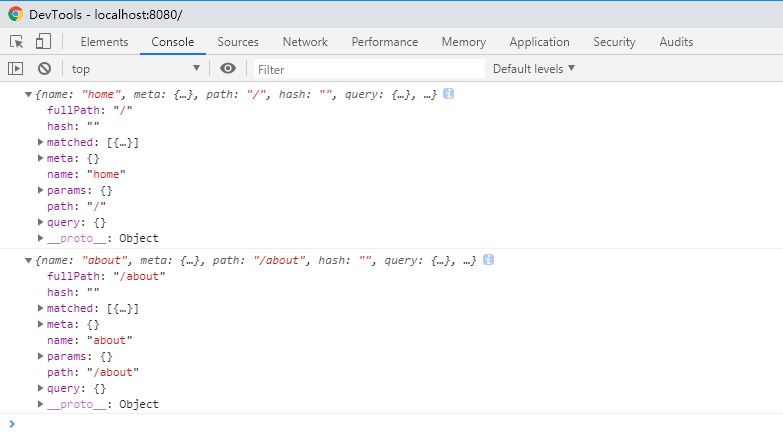
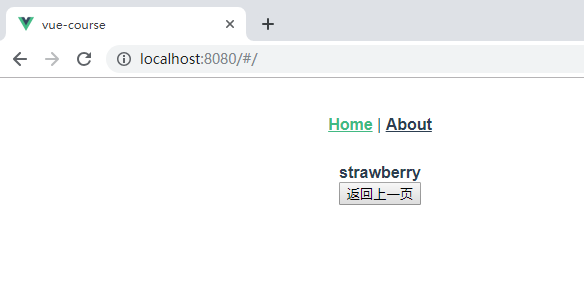
用浏览器打开URL: http://localhost:8080/#/,然后跳转到About页面,再跳转回Home页
在浏览器的调试页面可以看到

当直接打开Home页面时,from.name的值是null,to.name的值为home
而当从About页面跳转到Home页面时,from.name的值是about,to.name的值仍然是home
组件内守卫是在路由已经被触发,在进入对应页面调用,此时对应页面还没有渲染,所以在组件内守卫中调用this时,是获取不到当前组件的实例的,正如上面的例子里其值为undefined
跟路由独享守卫一样,如果添加了beforeRouteEnter守卫,在进行逻辑处理后,一定要调用 next()方法,否则不会进行跳转
如果想在组件内守卫中获取当前组件的实例,可以在next方法中获取
修改src/views/Home.vue文件,在组件内守卫的next方法中获取组件实例
<template>
<div class="home">
    <b>{{ fruit }}</b>
    <br>
    <button @click="handleClick">返回上一页</button>
</div>
</template>

<script>

export default {
    name: 'home',
    props:{
        fruit:{
            type: String,
            default:'strawberry'
        }
    },
    beforeRouteEnter(to,from,next){
        next( vm => {
            console.log(vm)
            console.log(vm.$root)
        })
    },
    methods:{
        handleClick () {
            this.$router.push({
            name:`argu`,
            params:{
                name:'banana'
            }
            })
        }
    }
}
</script>
刷新浏览器,打印结果如下

可以通过回调函数的方式来获取当前组件的实例,然后就可以获取某个属性的结果了
修改src/views/Home.vue文件,添加beforeRouteLeave守卫
<template>
<div class="home">
    <b>{{ fruit }}</b>
    <br>
    <button @click="handleClick">返回上一页</button>
</div>
</template>

<script>

export default {
    name: 'home',
    props:{
        fruit:{
            type: String,
            default:'strawberry'
        }
    },
    beforeRouteEnter(to,from,next){
        next( vm => {
            console.log(vm)
            console.log(vm.$root)
        })
    },
    beforeRouteLeave(to,from,next){
        const is_leave = confirm("您确定要离开本页面吗?")
        if(is_leave) next()
        else next(false)
    },
    methods:{
        handleClick () {
            this.$router.push({
            name:`argu`,
            params:{
                name:'banana'
            }
            })
        }
    }
}
</script>
刷新浏览器,显示效果如下
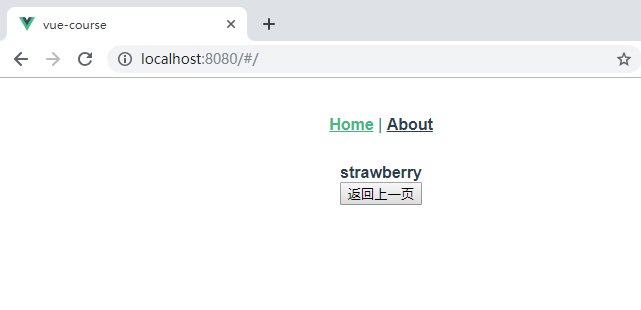
点击About标签后,显示效果如下
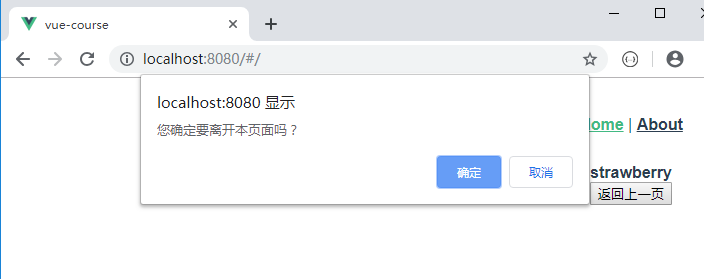
点击确定按钮,页面会跳转到About页面
如果点击取消按钮,则页面不会跳转,仍然会停留在Home页面
在这个守卫被调用时,页面已经渲染好了,所以可以在beforeRouteLeave组件里使用this来获取组件实例
比如我们一个网页发表一篇博客,当误操作点击跳转到其他页面时,此时就可以使用这个守卫来提示用户是否保存当前的编辑内容
2.6 beforeRouteUpdate守卫
修改src/views/argu.vue文件,添加beforeRouteUpdate守卫
<template>
    <div>
        {{ name }}
    </div>
</template>

<script>
export default {
    props:{
        name:{
            type:String,
        }
    },
    beforeRouteUpdate(to,from,next){
        console.log(to.name, from.name)
    }
}
</script>
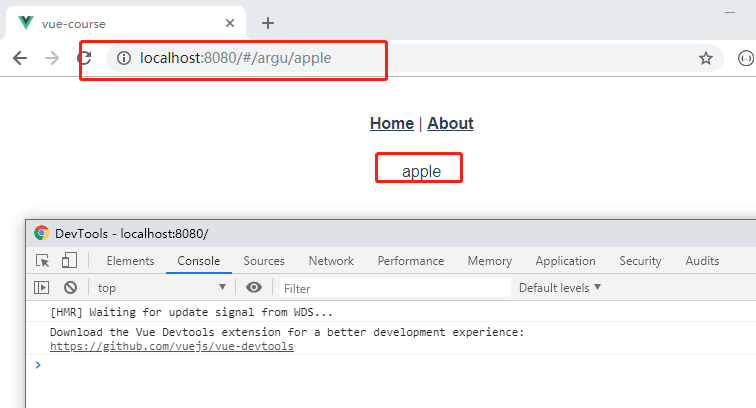
使用浏览器打开URL:http://localhost:8080/#/argu/apple,此时在浏览器的调试页面不会打印任何数据
修改URL为:http://localhost:8080/#/argu/orange,页面显示效果如下
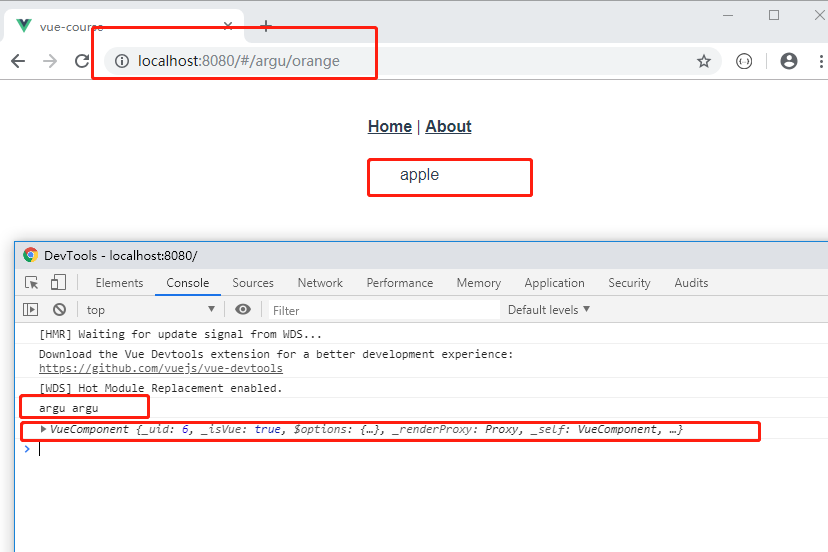
第一次进入argu页面时,没有打印任何内容,说明beforeRouteUpdate守卫没有被调用
当路由不改变,路由参数改变时,argu组件被复用,beforeRouteUpdate守卫才被调用
与beforeRouteLeave守卫一样,在beforeRouteUpdate守卫里,页面已经渲染好了,所以可以使用this来获取组件实例
3.一个完整的导航解析流程
导航被触发,不管是使用this.$router.push方式触发,还是在浏览器中直接输入URL的方式触发,
在失活的组件(即将离开的页面组件)里调用离开守卫 beforeRouteLeave
调用全局的前置守卫 beforeEach
在重用的组件里调用 beforeRouteUpdate
调用路由独享守卫 beforeEnter
解析异步路由组件
在被激活的组件(即将进入的页面组件)里调用beforeRouteEnter
调用全局的解析守卫 beforeResolve
导航被确认
调用全局的后置守卫 afterEash
触发DOM更新
用创建好的实例调用 beforeRouterEnter守卫里传给next的回调函数
4.路由切换的动态效果
路由的切换其实就是一个路由注销,另一个路由加载
修改src/App.vue文件,
<template>
<div id="app">
    <div id="nav">
    <router-link v-bind:to="{ name:'home'}">Home</router-link> |
    <router-link :to="{ name:'about'}">About</router-link>
    </div>
    <transition-group name="router">
    <router-view key="defalut"/>
    <router-view key="view1" name="view1"/>
    <router-view key="view2" name="view2"/>
    </transition-group>
</div>
</template>

<style lang="less">
.router-enter{
    opacity: 0;
}
.router-enter-active{
    transition: opacity 2s ease;
}
.router-enter-to {
    opacity:1;
}
.router-leave{
    opacity:1;
}
.router-leave-active{
    transition:opacity 2s ease;
}
.router-leave-to {
    opacity:0;
}
#app {
font-family: 'Avenir', Helvetica, Arial, sans-serif;
-webkit-font-smoothing: antialiased;
-moz-osx-font-smoothing: grayscale;
text-align: center;
color: #2c3e50;
}
#nav {
padding: 30px;
}

#nav a {
font-weight: bold;
color: #2c3e50;
}

#nav a.router-link-exact-active {
color: #42b983;
}
</style>
刷新浏览器,切换路由时,可以看到路由切换时,页面都有动态效果

 浙公网安备 33010602011771号