
一、Nginx + Tomcat 负载均衡测试(负载均衡+部分静态图片处理)
环境说明: nginx+tomcat @ubuntu
ok 首先你得有一个Ubuntu或者什么其他的linux.安装jdk tomcat nginx 等.. 记得配置环境变量
本测试环境的配置如下:
jdk /usr/java/jdk1.7 Nginx /usr/nginx-1.4.2 redis /usr/redis3.2.5-1 tomcat /usr/apache/tomcat-7-1 /usr/apache/tomcat-7-2 /usr/apache/tomcat-7-3 |
1配置tomcat
Linux系统下怎样配置多个Tomcat同时运行呢:
如何在同一系统里同时启动多个Tomcat.
(1)配置环境变量vi /etc/profile
在最后加上配置, 比如这里加了3台tomcat
#--------------------------------------------------------------------
#set tomcat path @olddoor
###  first tomcat  ###
CATALINA_BASE=/usr/apache/tomcat-7-1
CATALINA_HOME=/usr/apache/tomcat-7-1
TOMCAT_HOME=/usr/apache/tomcat-7-1
export CATALINA_BASE CATALINA_HOME TOMCAT_HOME

###  second tomcat ###
CATALINA_2_BASE=/usr/apache/tomcat-7-2
CATALINA_2_HOME=/usr/apache/tomcat-7-2
TOMCAT_2_HOME=/usr/apache/tomcat_7-2
export CATALINA_2_BASE CATALINA_2_HOME TOMCAT_2_HOME

### third tomcat ###
CATALINA_3_BASE=/usr/apache/tomcat-7-3
CATALINA_3_HOME=/usr/apache/tomcat-7-3
TOMCAT_HOME=/usr/apache/tomcat-7-3
export CATALINA_3_BASE CATALINA_3_HOME TOMCAT_3_HOME

#set java path--------------------------------------------------------
JAVA_HOME=/usr/java/jdk1.7
export JRE_HOME=$JAVA_HOME/jre
export CLASSPATH=$JAVA_HOME/lib:$JRE_HOME/lib:$CLASSPATH
export PATH=$JAVA_HOME/bin:$JRE_HOME/bin:$PATH
(2) 3台tomcat的端口号记得在server.xml修改.
(3) 然后修改tomcat的bin目录下的catalina.sh, 加入代码
以tomcat2为例
   export JAVA_HOME=
  export PATH=
  export CLASSPATH=
  ###以上三个环境变量就是JAVA的环境变量可以不写###
  export CATALINA_BASE=$CATALINA_2_BASE  #配置对应的tomcat变量即可
  export CATALINA_HOME=$CATALINA_2_HOME
搞定. 启动3个tomcat试一下效果.
默认访问的tomcat-1的index.jsp如下
<html>
<head>
<meta http-equiv="Content-Type" content="text/html; charset=ISO-8859-1">
<title>Insert title here</title>
</head>
<body>
hello<br/>
<img id="img1" src=/test/static/404-1.jpg />
<img id="img1" src=/test/jpgs/123.jpg />
</body>
</html>
tomcat-2 和tomcat-3的index.jsp 中的404图片名字分别为404-2.jsp 和404-3.jpg
最后访问效果
tomcat-1:

tomcat-2

tomcat3

tomcat2和tomcat3的webapps目录下并未放置jpgs/123.jpg图片所以找不到.
2配置nginx
修改nginx.conf
#user  nobody;  # user  root root #Nginx所在的用户和用户组
user  root root; #Nginx所在的用户和用户组
worker_processes  1;# 启动的工作进程数量
#错误日志存放路径
#error_log  logs/error.log;
#error_log  logs/error.log  notice;
#error_log  logs/error.log  info;
error_log  logs/error.log  info;  #add by olddoor-----------

#pid        logs/nginx.pid;

#add by olddoor-----------

#add end------------------

events {
    worker_connections  1024;
}


http {
    include       mime.types;
    default_type  application/octet-stream;
    #定义日志格式
    #log_format  main  '$remote_addr - $remote_user [$time_local] "$request" '
    #                  '$status $body_bytes_sent "$http_referer" '
    #                  '"$http_user_agent" "$http_x_forwarded_for"';

    #access_log  logs/access.log  main;

    sendfile        on;
    #tcp_nopush     on;

    #keepalive_timeout  0;
    keepalive_timeout  65;

    #gzip  on;
	#add by olddor---------------------
	upstream localhost {
	#发到localhost上的请求,通过Nginx转发到实际处理请求的服务器
           server 192.168.64.132:8080 weight=1;
           server 192.168.64.132:8081 weight=1;
		   server 192.168.64.132:8082 weight=1;
    }
	#add by olddor over----------------
    server {
        listen       8000;  #宿主机访问虚拟机的80端口好像有点问题,建议不使用80端口
        server_name  localhost;

        #charset koi8-r;

        #access_log  logs/host.access.log  main;

        location / {
			proxy_connect_timeout   3; #add by olddoor
			proxy_send_timeout      30; #add by olddoor
			proxy_read_timeout      30; #add by olddoor
            proxy_pass http://localhost;  #add by olddoor
            #root   html; #ignore by olddoor
            #index  index.html index.htm; #ignore by olddoor
        }
		location  /test/jpgs/ {
            alias /data/imgs/;
        }

		#location /jpgs


        #error_page  404              /404.html;

        # redirect server error pages to the static page /50x.html
        #
        error_page   500 502 503 504  /50x.html;
        location = /50x.html {
            root   html;
        }


        # deny access to .htaccess files, if Apache's document root
        # concurs with nginx's one
        #
        #location ~ /\.ht {
        #    deny  all;
        #}
    }


    # another virtual host using mix of IP-, name-, and port-based configuration
    #
    #server {
    #    listen       8000;
    #    listen       somename:8080;
    #    server_name  somename  alias  another.alias;

    #    location / {
    #        root   html;
    #        index  index.html index.htm;
    #    }
    #}


    # HTTPS server
    #
    #server {
    #    listen       443;
    #    server_name  localhost;

    #    ssl                  on;
    #    ssl_certificate      cert.pem;
    #    ssl_certificate_key  cert.key;

    #    ssl_session_timeout  5m;

    #    ssl_protocols  SSLv2 SSLv3 TLSv1;
    #    ssl_ciphers  HIGH:!aNULL:!MD5;
    #    ssl_prefer_server_ciphers   on;

    #    location / {
    #        root   html;
    #        index  index.html index.htm;
    #    }
    #}

}
通过
server 192.168.64.132:8080 weight=1;
server 192.168.64.132:8081 weight=1;
server 192.168.64.132:8082 weight=1;
的配置完成3台tomcat的轮询负载均衡.
访问时候使用 192.168.64.132:8000/test 取代192.168.64.132:8080/test , 192.168.64.132:8081/test , 192.168.64.132:8082/test
3 使用nginx管理部分静态数据
配置方式可以直接拦截指定路径的 jpg之类的文件.
这里只拦截目录
location /test/jpgs/ {
alias /data/imgs/; #即拦截 /test/jpgs/请求->匹配物理路径: /data/imgs/
}
注意alias 和root 的拦截逻辑略有不同.
在linux服务器上创建对应的文件夹并上传图片123.jpg
启动三台tomcat以及Nginx服务器. 然后进行测试:
继续通过192.168.64.132:8080/test访问可以看到效果是:

两张图片的来源都是tomcat-1

而访问192.168.64.132:8000/test 使用nginx服务则
随机显示第一张图片. 而第二张123.jpg 则显示的是nginx指定目录的图片而非tomcat上的图片.
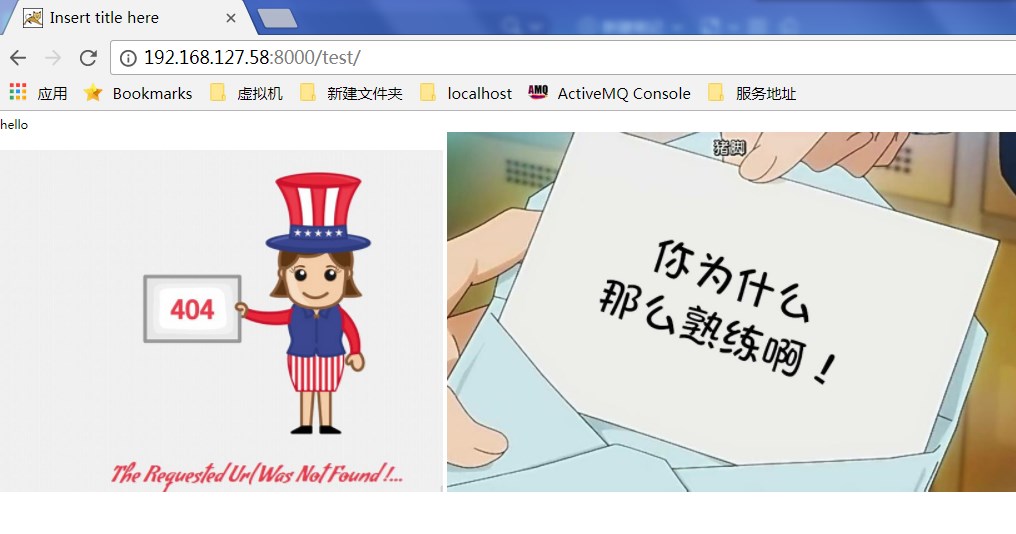
或者是
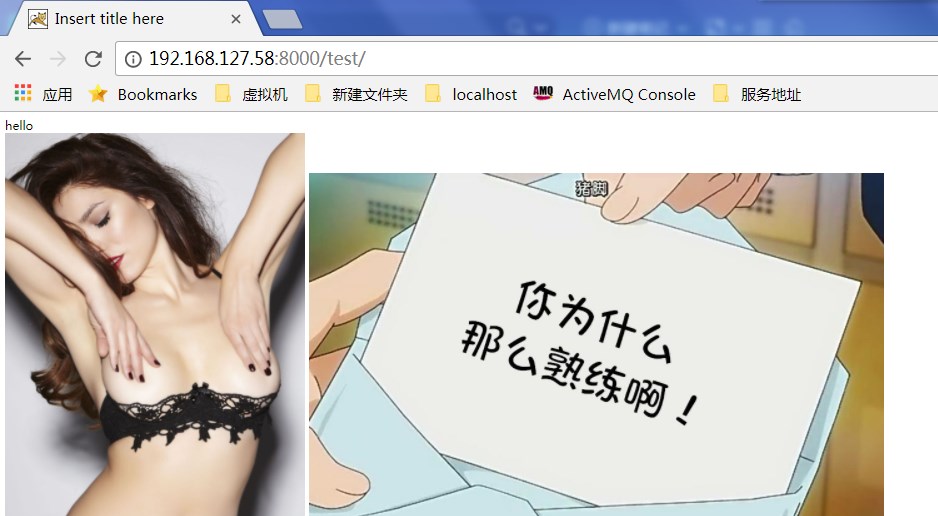
2张图片来源都是nginx, 只是第一个是nginx到tomcat上获取. 第二张图片被拦截到/data/imgs上获取.

以404-2为例

4 性能测试对比
使用ab工具的压力测试方法和结果,ab是针对apache的性能测试工具,可以只安装ab工具。
ubuntu安装ab
apt-get install apache2-utilscentos安装ab
yum install httpd-tools通过命令测试:
ab -kc 1000 -n 1000 http://192.168.64.132:8080/test/
这个指令会使用1000个并发,进行连接1000次测试tomcat-1
ab -kc 1000 -n 1000 http://192.168.64.132:80/test/
这个指令会使用1000个并发,进行连接1000次测试nginx
对比结果:
8080
#用于描述每个请求处理时间的分布情况,例如:50% 28 50%请求处理时间不超过28毫秒 (这里所指的处理时间是指:Time per request )
Percentage of the requests served within a certain time (ms)
  50%     28
  66%     32
  75%     34
  80%     35
  90%     53
  95%     62
  98%     65
  99%     66
 100%   1823 (longest request)
second表示当前测试的服务器每秒可以处理16.54个静态html的请求事务,后面的mean表示平均。这个数值表示当前机器的整体性能,值越大越好。
Requests per second:    547.04 [#/sec] (mean)
Time per request:       1828.016 [ms] (mean)
Time per request:       1.828 [ms] (mean, across all concurrent requests)
Transfer rate:          76.93 [Kbytes/sec] received
80 nginx在小规模请求下响应速度慢于直接请求tomcat, 而处理能力nginx明显强于tomcat
Percentage of the requests served within a certain time (ms)
  50%    107
  66%    201
  75%    243
  80%    257
  90%    334
  95%    360
  98%   1116
  99%   1117
 100%   1118 (longest request)
second表示当前测试的服务器每秒可以处理16.54个静态html的请求事务,后面的mean表示平均。这个数值表示当前机器的整体性能,值越大越好。
Requests per second:    873.38 [#/sec] (mean)
Time per request:       1144.983 [ms] (mean)
Time per request:       1.145 [ms] (mean, across all concurrent requests)
Transfer rate:          216.83 [Kbytes/sec] received
当请求改为1000个并发,进行连接1000次后
8080已经无法及时响应
This is ApacheBench, Version 2.3 <$Revision: 1528965 $>
Copyright 1996 Adam Twiss, Zeus Technology Ltd, http://www.zeustech.net/
Licensed to The Apache Software Foundation, http://www.apache.org/

Benchmarking localhost (be patient)
Total of 9967 requests completed
而80还是稳稳的
Server Hostname:        localhost
Server Port:            80

Time taken for tests:   1.145 seconds
Complete requests:      1000
Failed requests:        551
   (Connect: 0, Receive: 0, Length: 551, Exceptions: 0)
Non-2xx responses:      1000
Keep-Alive requests:    0
Total transferred:      254220 bytes
HTML transferred:       105792 bytes
second表示当前测试的服务器每秒可以处理16.54个静态html的请求事务,后面的mean表示平均。这个数值表示当前机器的整体性能,值越大越好。
Requests per second:    873.38 [#/sec] (mean)
Time per request:       1144.983 [ms] (mean)
Time per request:       1.145 [ms] (mean, across all concurrent requests)
Transfer rate:          216.83 [Kbytes/sec] received

Connection Times (ms)
              min  mean[+/-sd] median   max
Connect:       16   26   4.6     27      33
Processing:    16  155 174.5     88    1101
Waiting:       13  155 174.6     88    1101
Total:         44  181 172.5    107    1118

Percentage of the requests served within a certain time (ms)
  50%    107
  66%    201
  75%    243
  80%    257
  90%    334
  95%    360
  98%   1116
  99%   1117
 100%   1118 (longest request)
tips 如需将屏幕上的测试结果生成为文本文件, 可以在测试时候配合|tee 命令
如:
ab -kc 1000 -n 1000 http://192.168.64.132:80/test/ |tee /usr/111.txt #将结果保存到/usr/111.txt中二、Nginx + Tomcat +Redis (用户session会话集中管理)
在上例的基础上新增Redis, 用于集中管理用户会话session
效果如图

配置过程
1 、实验环境介绍:
安装nginx、tomcat、redis服务
| 软件 | version | ip:port |
|---|---|---|
| Nginx | 1.4.6 | 192.168.127.58 : 8000 |
| Redis | 3.2.5-1 | 192.168.127.58 : 7001 |
| tomcat-7-1 | 7.0.73 | 192.168.127.58:8080 |
| tomcat-7-2 | 7.0.73 | 192.168.127.58:8081 |
| tomcat-7-3 | 7.0.73 | 192.168.127.58:8082 |
2、测试:
编写id.jsp 放到3个tomcat的 /webapps/test下
<body>
 response from tomcat_3<br/>
<%=session.getId() %>
</body>此时分别访问192.168.127.58:8080/test/id.jsp 和 192.168.127.58:8081/test/id.jsp 192.168.127.58:8082/test/id.jsp 地址,因为访问的是不同web服务器,所以各自显示不同的页面内容及session值肯定不同。
3、配置tomcat的session管理(持久化到redis中):
- 添加jedis-2.0.0.jar、tomcat-redis-session-manager-1.2-tomcat-7-java-7、commons-pool-1.3.jar 三个jar到tomcat的lib目录下;
- 修改tomcat的conf/context.xml 文件;
<!--配置对应redis的服务端口 并非后台端口-->
<Valve className="com.radiadesign.catalina.session.RedisSessionHandlerValve" />
<Manager className="com.radiadesign.catalina.session.RedisSessionManager"
             host="localhost"
             port="7001"
             database="0"
             maxInactiveInterval="60"  />
4 配置Nginx的负载均衡
本文第一部分已经做了。跳过
5、验证:
访问
和
的结果都是一样的 session id
response from tomcat_1
E47C459C5B9800294F408D0FFCFEFFD8

response from tomcat_2
E47C459C5B9800294F408D0FFCFEFFD8

response from tomcat_3
E47C459C5B9800294F408D0FFCFEFFD8- 使用 redis-cli 连接 redis 服务器,查看会显示有 “E47C459C5B9800294F408D0FFCFEFFD8” key的 session 数据,value为序列化数据。

redis 查询所有的key
keys *

 浙公网安备 33010602011771号