技术博客--SSM整合
SSM的实际应用
技术概述
SSM是时下运用较多的一个Java开发框架。使用SSM可以减少编码;SSM极具规范性和重用性,易扩展、易维护。学习该技术是想要开发企业级Java应用,个人认为技术难点是结果集的映射、Spring配置文件、AOP、Ajax和JSON。
技术详述
使用SSM整合模仿线上商城后台,完成对产品信息的陈列,发货后的状态修改等。在此想重点对产品列表模块进行描述。
- Product实体类,定义相应字段
public class Product {
    private Integer id;

    private String name;

    private String subTitle;

    private Float originalPrice;
...
}
- Mapper接口
public interface ProductMapper {
    /**
     * 产品列表
     * @return List
     */
    List<Product> list();

    /**
     * 通过id获取产品
     * @param id
     * @return
     */
    Product queryById(Integer id);
}
ProductMapper.xml指定映射的sql和结果集(截取部分)
 <select id="list" resultType="com.cc.tmall.pojo.Product">
            select a.id,a.name,a.subTitle,a.originalPrice,a.promotePrice,a.stock,a.cid,b.name as 'category',a.createDate
            from product a,category b
            where a.cid=b.id

    </select>
    <select id="queryById" resultType="com.cc.tmall.pojo.Product">
        select a.id,a.name,a.subTitle,a.originalPrice,a.promotePrice,a.stock,a.cid,b.name as 'category',a.createDate from product a,category b
        where a.cid=b.id and a.id=#{id}
    </select>
- Service接口
public interface ProductService {
    /**
     * 获取产品列表
     * @return
     */
    List<Product> list();

    /**
     * 通过Id查询产品
     * @param id
     * @return
     */
    Product queryById(Integer id);
}
- ProductServiceImpl实现类
@Service
public class ProductServiceImpl implements ProductService{
    @Autowired
    ProductMapper productMapper;

    @Override
    public List<Product> list() {
        return productMapper.list();
    }

    @Override
    public Product queryById(Integer id) {
        return productMapper.queryById(id);
    }
}
在list()方法中,通过其自动装配的一个ProductMapper对象的list()方法来获取所有的分类对象。
- 商品列表控制器类
@Controller    //声明当前类为控制器
@RequestMapping("") //访问时无其他地址
public class ProductController {
    @Autowired //自动装配
    ProductService productService;
    @Autowired
    CategoryService categoryService;
        @RequestMapping("/productList")
    public String list(Model model){
        List<Product> list=productService.list();
            model.addAttribute("products",list);
        return "admin/listProduct";
    }
}
list()方法中,通过productService.list()获取所有的Product对象,放进”list“中,服务端跳转至 "admin/listProduct"视图。
- 新建jsp界面
listProduct.jsp(截取部分)
<table class="table table-striped table-bordered table-hover" id="dataTables-example">
                                    <thead>
                                    <tr>
                                        <th>产品id</th>
                                        <th>产品类别</th>
                                        <th>产品名称</th>
                                        <th>产品小标题</th>
                                        <th>原价格</th>
                                        <th>优惠价格</th>
                                        <th>库存数量</th>
                                        <th>编辑产品</th>
                                        <th>编辑图片</th>
                                        <th>编辑属性</th>
                                        <th>删除产品</th>
                                    </tr>
                                    </thead>
                                    <tbody>
                                    <c:forEach items="${products}" var="p">
                                        <tr>
                                            <td>${p.id}</td>
                                            <td>${p.category}</td>
                                            <td>${p.name}</td>
                                            <td>${p.subTitle}</td>
                                            <td>${p.originalPrice}</td>
                                            <td>${p.promotePrice}</td>
                                            <td>${p.stock}</td>

                                            <td><a href="edit_product?id=${p.id}"><span class="glyphicon glyphicon-edit"></span></a></td>
                                            <td><a href="editProductImage?product_id=${p.id}"><span class="glyphicon glyphicon-picture"></span></a></td>
                                            <td><a href="listPropertyValue?product_id=${p.id}&category_id=${category.id}"><span class="glyphicon glyphicon-list"></span></a></td>
                                            <td><a href="deleteProduct?id=${p.id}"><span class="glyphicon glyphicon-trash"></span></a></td>
                                        </tr>
                                    </c:forEach>
                                    </tbody>
                                </table>
Controller中的Model携带数据跳转至jsp,jsp作为视图层显示数据。
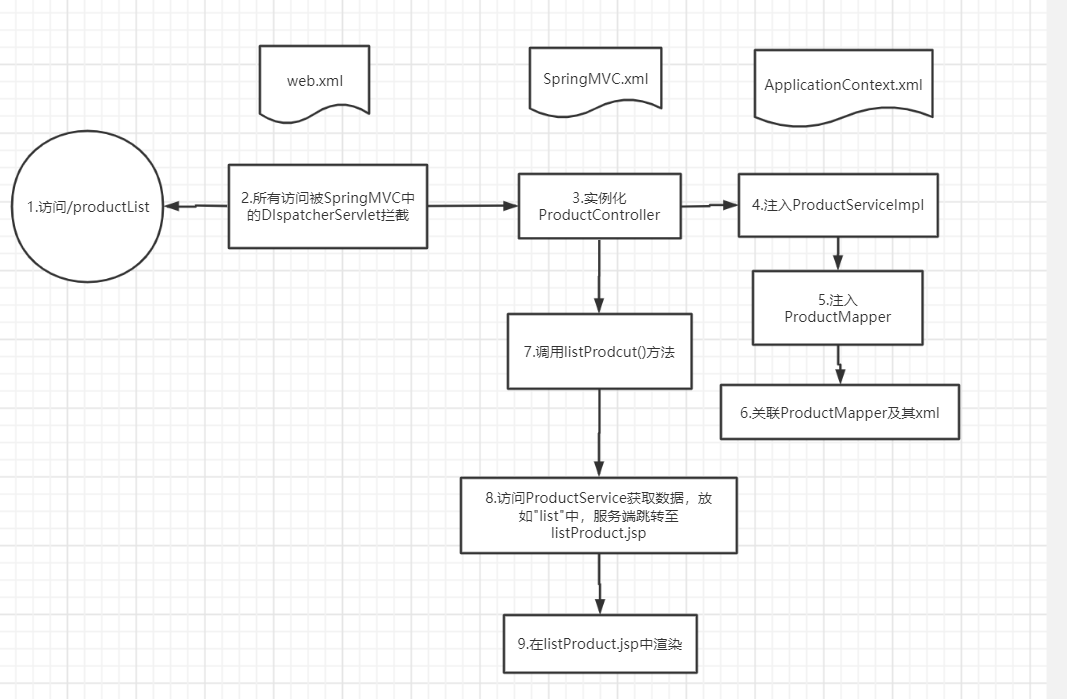
- 流程图
困难解决
认为最困难的还是配置文件的问题。配置文件非常多,而且内容也很复杂,一开始搭建环境的时候经常搞混掉。看了n篇整合博客才大致梳理清楚。
- 基本环境搭建
-
新建Maven,添加web支持,导入相关pom依赖;
<dependencies> <!--Junit--> <dependency> <groupId>junit</groupId> <artifactId>junit</artifactId> <version>4.12</version> </dependency> <!--数据库驱动--> <dependency> <groupId>mysql</groupId> <artifactId>mysql-connector-java</artifactId> <version>5.1.47</version> </dependency> <!-- 数据库连接池 --> <dependency> <groupId>com.mchange</groupId> <artifactId>c3p0</artifactId> <version>0.9.5.2</version> </dependency> <!--Servlet - JSP --> <dependency> <groupId>javax.servlet</groupId> <artifactId>servlet-api</artifactId> <version>2.5</version> </dependency> <dependency> <groupId>javax.servlet.jsp</groupId> <artifactId>jsp-api</artifactId> <version>2.2</version> </dependency> <dependency> <groupId>javax.servlet</groupId> <artifactId>jstl</artifactId> <version>1.2</version> </dependency> <!--Mybatis--> <dependency> <groupId>org.mybatis</groupId> <artifactId>mybatis</artifactId> <version>3.5.2</version> </dependency> <dependency> <groupId>org.mybatis</groupId> <artifactId>mybatis-spring</artifactId> <version>2.0.2</version> </dependency> <!--Spring--> <dependency> <groupId>org.springframework</groupId> <artifactId>spring-webmvc</artifactId> <version>5.1.9.RELEASE</version> </dependency> <dependency> <groupId>org.springframework</groupId> <artifactId>spring-jdbc</artifactId> <version>5.1.9.RELEASE</version> </dependency> </dependencies> -
Maven资源过滤设置
<build> <resources> <resource> <directory>src/main/java</directory> <includes> <include>**/*.properties</include> <include>**/*.xml</include> </includes> <filtering>false</filtering> </resource> <resource> <directory>src/main/resources</directory> <includes> <include>**/*.properties</include> <include>**/*.xml</include> </includes> <filtering>false</filtering> </resource> </resources> </build> -
建立基本结构和配置框架
包括pojo、dao、service、controller以及mybatis-config.xml、applicationContext.xml
- Mybatis
- 数据库配置文件 database.properties
- IDEA关联数据库
- 编写MyBatis核心配置文件
- 编写具体实现(参考详述部分)
- Spring
- 编写Spring整合MyBatis的相关配置文件spring-dao.xml
包含关联数据库文件以及数据库连接池。
- Spring整合Service
包含bean扫描、Impl注入IOC容器以及配置事务管理器等。
- SpringMVC
- web.xml
<?xml version="1.0" encoding="UTF-8"?>
<web-app xmlns="http://xmlns.jcp.org/xml/ns/javaee"
         xmlns:xsi="http://www.w3.org/2001/XMLSchema-instance"
         xsi:schemaLocation="http://xmlns.jcp.org/xml/ns/javaee http://xmlns.jcp.org/xml/ns/javaee/web-app_4_0.xsd"
         version="4.0">

    <!--DispatcherServlet-->
    <servlet>
        <servlet-name>DispatcherServlet</servlet-name>
        <servlet-class>org.springframework.web.servlet.DispatcherServlet</servlet-class>
        <init-param>
            <param-name>contextConfigLocation</param-name>
            <!--加载的是总的配置文件!-->
            <param-value>classpath:applicationContext.xml</param-value>
        </init-param>
        <load-on-startup>1</load-on-startup>
    </servlet>
    <servlet-mapping>
        <servlet-name>DispatcherServlet</servlet-name>
        <url-pattern>/</url-pattern>
    </servlet-mapping>
    <!--encodingFilter-->
    <filter>
        <filter-name>encodingFilter</filter-name>
        <filter-class>
            org.springframework.web.filter.CharacterEncodingFilter
        </filter-class>
        <init-param>
            <param-name>encoding</param-name>
            <param-value>utf-8</param-value>
        </init-param>
    </filter>
    <filter-mapping>
        <filter-name>encodingFilter</filter-name>
        <url-pattern>/*</url-pattern>
    </filter-mapping>

    <!--Session过期时间-->
    <session-config>
        <session-timeout>15</session-timeout>
    </session-config>

</web-app>
- spring-mvc.xml
<?xml version="1.0" encoding="UTF-8"?>
<beans xmlns="http://www.springframework.org/schema/beans"
       xmlns:xsi="http://www.w3.org/2001/XMLSchema-instance"
       xmlns:context="http://www.springframework.org/schema/context"
       xmlns:mvc="http://www.springframework.org/schema/mvc"
       xsi:schemaLocation="http://www.springframework.org/schema/beans
    http://www.springframework.org/schema/beans/spring-beans.xsd
    http://www.springframework.org/schema/context
    http://www.springframework.org/schema/context/spring-context.xsd
    http://www.springframework.org/schema/mvc
    https://www.springframework.org/schema/mvc/spring-mvc.xsd">

    <!-- 配置SpringMVC -->
    <!-- 1.开启SpringMVC注解驱动 -->
    <mvc:annotation-driven />
    <!-- 2.静态资源默认servlet配置-->
    <mvc:default-servlet-handler/>

    <!-- 3.配置jsp 显示ViewResolver视图解析器 -->
    <bean class="org.springframework.web.servlet.view.InternalResourceViewResolver">
        <property name="viewClass" value="org.springframework.web.servlet.view.JstlView" />
        <property name="prefix" value="/WEB-INF/jsp/" />
        <property name="suffix" value=".jsp" />
    </bean>
    <!-- 4.扫描web相关的bean -->
    <context:component-scan base-package="com.cc.controller" />
</beans>
- Spring配置整合文件,applicationContext.xml
<?xml version="1.0" encoding="UTF-8"?>
<beans xmlns="http://www.springframework.org/schema/beans"
       xmlns:xsi="http://www.w3.org/2001/XMLSchema-instance"
       xsi:schemaLocation="http://www.springframework.org/schema/beans
        http://www.springframework.org/schema/beans/spring-beans.xsd">

    <import resource="spring-dao.xml"/>
    <import resource="spring-service.xml"/>
    <import resource="spring-mvc.xml"/>

</beans>
配置工作终于到此结束。
总结
这一次SSM框架的学习总体来说其实是比较仓促的。但是模仿天猫后台这个经典项目让我大致地对SSM框架的原理和整合有一个浅层的了解。最大体会是结果集映射一定要注意名字的对应,分清楚mapping和request以及return的重定向。后续计划跟随b站up主进行其他项目的模仿学习和搭建。
参考文献
-
blog:SSM工作流程与原理详解 作者:阿波罗的手
-
blog:基于SSM模仿Tmall平台 作者:RichardYee

 浙公网安备 33010602011771号