Netty源码分析
server端
先从官方demo入手:
package io.netty.example.discard;

import io.netty.buffer.ByteBuf;

import io.netty.channel.ChannelHandlerContext;
import io.netty.channel.ChannelInboundHandlerAdapter;

/**
 * Handles a server-side channel.
 */
public class DiscardServerHandler extends ChannelInboundHandlerAdapter { // (1)

    @Override
    public void channelRead(ChannelHandlerContext ctx, Object msg) { // (2)
        // Discard the received data silently.
        ((ByteBuf) msg).release(); // (3)
    }

    @Override
    public void exceptionCaught(ChannelHandlerContext ctx, Throwable cause) { // (4)
        // Close the connection when an exception is raised.
        cause.printStackTrace();
        ctx.close();
    }
}
package io.netty.example.discard;

import io.netty.bootstrap.ServerBootstrap;

import io.netty.channel.ChannelFuture;
import io.netty.channel.ChannelInitializer;
import io.netty.channel.ChannelOption;
import io.netty.channel.EventLoopGroup;
import io.netty.channel.nio.NioEventLoopGroup;
import io.netty.channel.socket.SocketChannel;
import io.netty.channel.socket.nio.NioServerSocketChannel;

/**
 * Discards any incoming data.
 */
public class DiscardServer {

    private int port;

    public DiscardServer(int port) {
        this.port = port;
    }

    public void run() throws Exception {
        EventLoopGroup bossGroup = new NioEventLoopGroup(); // (1)
        EventLoopGroup workerGroup = new NioEventLoopGroup();
        try {
            ServerBootstrap b = new ServerBootstrap(); // (2)
            b.group(bossGroup, workerGroup)
             .channel(NioServerSocketChannel.class) // (3)
             .childHandler(new ChannelInitializer<SocketChannel>() { // (4)
                 @Override
                 public void initChannel(SocketChannel ch) throws Exception {
                     ch.pipeline().addLast(new DiscardServerHandler());
                 }
             })
             .option(ChannelOption.SO_BACKLOG, 128)          // (5)
             .childOption(ChannelOption.SO_KEEPALIVE, true); // (6)

            // Bind and start to accept incoming connections.
            ChannelFuture f = b.bind(port).sync(); // (7)

            // Wait until the server socket is closed.
            // In this example, this does not happen, but you can do that to gracefully
            // shut down your server.
            f.channel().closeFuture().sync();
        } finally {
            workerGroup.shutdownGracefully();
            bossGroup.shutdownGracefully();
        }
    }

    public static void main(String[] args) throws Exception {
        int port = 8080;
        if (args.length > 0) {
            port = Integer.parseInt(args[0]);
        }

        new DiscardServer(port).run();
    }
}
代码解释如下:
NioEventLoopGroupis a multithreaded event loop that handles I/O operation. Netty provides variousEventLoopGroupimplementations for different kind of transports. We are implementing a server-side application in this example, and therefore twoNioEventLoopGroupwill be used. The first one, often called 'boss', accepts an incoming connection. The second one, often called 'worker', handles the traffic of the accepted connection once the boss accepts the connection and registers the accepted connection to the worker. How many Threads are used and how they are mapped to the createdChannels depends on theEventLoopGroupimplementation and may be even configurable via a constructor.ServerBootstrapis a helper class that sets up a server. You can set up the server using aChanneldirectly. However, please note that this is a tedious process, and you do not need to do that in most cases.- Here, we specify to use the
NioServerSocketChannelclass which is used to instantiate a newChannelto accept incoming connections. - The handler specified here will always be evaluated by a newly accepted
Channel. TheChannelInitializeris a special handler that is purposed to help a user configure a newChannel. It is most likely that you want to configure theChannelPipelineof the newChannelby adding some handlers such asDiscardServerHandlerto implement your network application. As the application gets complicated, it is likely that you will add more handlers to the pipeline and extract this anonymous class into a top-level class eventually. - You can also set the parameters which are specific to the
Channelimplementation. We are writing a TCP/IP server, so we are allowed to set the socket options such astcpNoDelayandkeepAlive. Please refer to the apidocs ofChannelOptionand the specificChannelConfigimplementations to get an overview about the supportedChannelOptions. - Did you notice
option()andchildOption()?option()is for theNioServerSocketChannelthat accepts incoming connections.childOption()is for theChannels accepted by the parentServerChannel, which isNioServerSocketChannelin this case. - We are ready to go now. What's left is to bind to the port and to start the server. Here, we bind to the port
8080of all NICs (network interface cards) in the machine. You can now call thebind()method as many times as you want (with different bind addresses.)
看得出来,先是做了一些设置,最终启动是在io.netty.bootstrap.AbstractBootstrap.bind(int)这里。前面给ServerBootstrap设置的参数释义见上面官方释义。
我们这里就从bind入手。
最终调用的是io.netty.bootstrap.AbstractBootstrap.doBind(SocketAddress),贴下这个方法的代码看下:
private ChannelFuture doBind(final SocketAddress localAddress) {
     // 创建channel、初始化channel并注册到bossGroup
        final ChannelFuture regFuture = initAndRegister();
        final Channel channel = regFuture.channel();
        if (regFuture.cause() != null) {
            return regFuture;
        }

        if (regFuture.isDone()) {
            // At this point we know that the registration was complete and successful.
            ChannelPromise promise = channel.newPromise();
       // 绑定端口
            doBind0(regFuture, channel, localAddress, promise);
            return promise;
        } else {
            // Registration future is almost always fulfilled already, but just in case it's not.
            final PendingRegistrationPromise promise = new PendingRegistrationPromise(channel);
            regFuture.addListener(new ChannelFutureListener() {
                @Override
                public void operationComplete(ChannelFuture future) throws Exception {
                    Throwable cause = future.cause();
                    if (cause != null) {
                        // Registration on the EventLoop failed so fail the ChannelPromise directly to not cause an
                        // IllegalStateException once we try to access the EventLoop of the Channel.
                        promise.setFailure(cause);
                    } else {
                        // Registration was successful, so set the correct executor to use.
                        // See https://github.com/netty/netty/issues/2586
                        promise.registered();

                        doBind0(regFuture, channel, localAddress, promise);
                    }
                }
            });
            return promise;
        }
    }
这个方法主要干了两件事,创建channel并初始化然后绑定到bossGroup,还有就是绑定端口。
下面我们重点看下这两个地方。
initAndRegister
final ChannelFuture initAndRegister() { Channel channel = null; try {
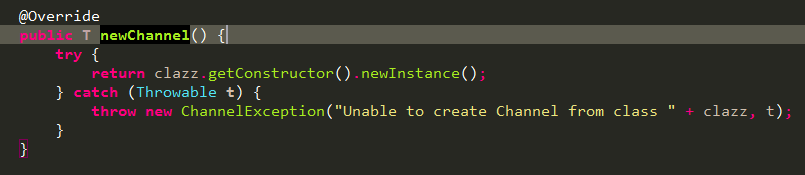
// 调用之前设置的channel类型的无参构造方法创建channel,方法内容如下图 channel = channelFactory.newChannel();
// 初始化channel init(channel); } catch (Throwable t) { if (channel != null) { // channel can be null if newChannel crashed (eg SocketException("too many open files")) channel.unsafe().closeForcibly(); // as the Channel is not registered yet we need to force the usage of the GlobalEventExecutor return new DefaultChannelPromise(channel, GlobalEventExecutor.INSTANCE).setFailure(t); } // as the Channel is not registered yet we need to force the usage of the GlobalEventExecutor return new DefaultChannelPromise(new FailedChannel(), GlobalEventExecutor.INSTANCE).setFailure(t); } // 注册channel到bossGroup ChannelFuture regFuture = config().group().register(channel); if (regFuture.cause() != null) { if (channel.isRegistered()) { channel.close(); } else { channel.unsafe().closeForcibly(); } } // If we are here and the promise is not failed, it's one of the following cases: // 1) If we attempted registration from the event loop, the registration has been completed at this point. // i.e. It's safe to attempt bind() or connect() now because the channel has been registered. // 2) If we attempted registration from the other thread, the registration request has been successfully // added to the event loop's task queue for later execution. // i.e. It's safe to attempt bind() or connect() now: // because bind() or connect() will be executed *after* the scheduled registration task is executed // because register(), bind(), and connect() are all bound to the same thread. return regFuture; }
创建channel
调用channel方法传进来的class创建channel,NIO传输使用的是io.netty.channel.socket.nio.NioServerSocketChannel
NioServerSocketChannel部分代码如下:
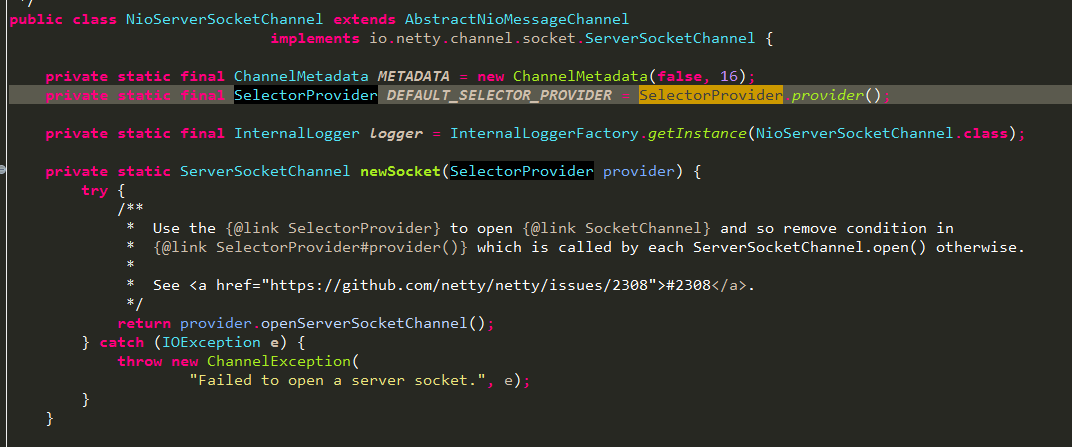
看到后是不是很熟悉,java.nio的api,获取java.nio.channels.ServerSocketChannel
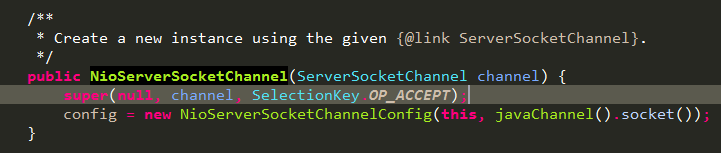
最终调用下面的构造方法:

两行代码,一个是调用父类构造方法,一个是创建config对象。config对象用于对外暴露channel的配置,可用于动态配置channel
我们先看下父类构造方法做了什么:
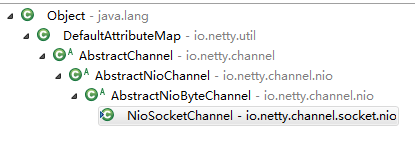
继承关系如下图所示:
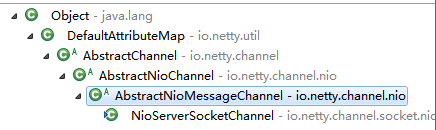
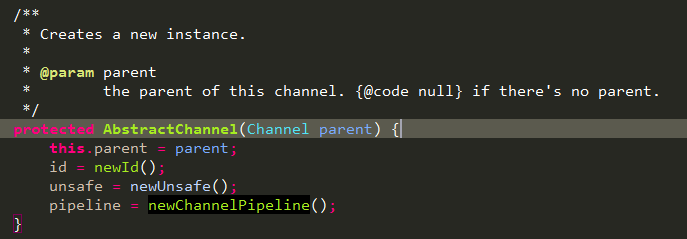
AbstractChannel构造方法如下,创建一个DefaultChannelId,NioMessageUnsafe【用于操作消息】,DefaultChannelPipeline【用于组织channelHandler】
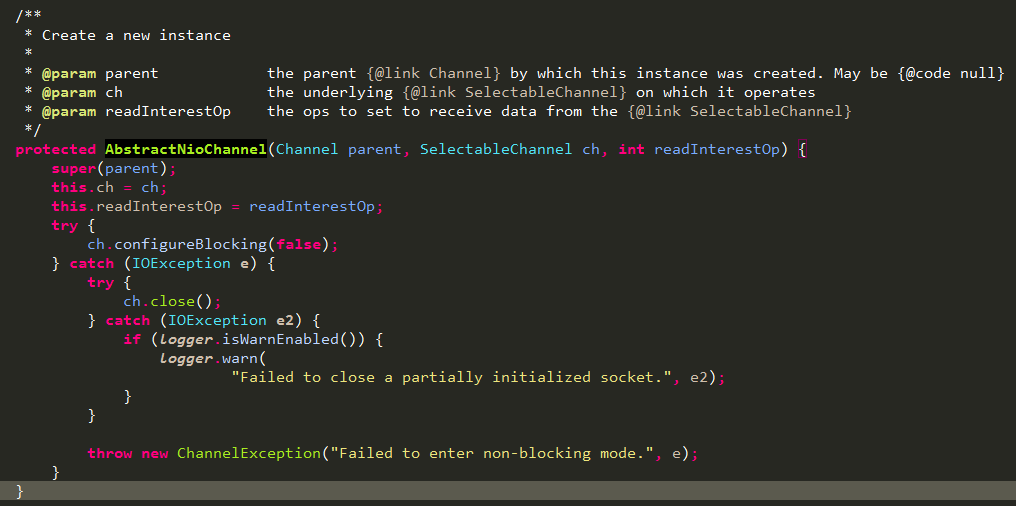
AbstractNioChannel构造方法如下,保存jdk的ServerSocketChannel以及感兴趣的操作readInterestOp,设置channel为非阻塞。父类的构造方法如上面描述。
至此,channel的创建已经完成了,至于里面那些DefaultChannelId,NioMessageUnsafe,DefaultChannelPipeline我们在后面用到的地方再详解,这样不至于把大家带跑偏,还是那句话,先拉通主线逻辑。
回到io.netty.bootstrap.AbstractBootstrap.initAndRegister()方法,创建完channel后就是init了,这里调用的是子类重写的方法io.netty.bootstrap.ServerBootstrap.init(Channel)
注意,这里的channel是包装了jdk中ServerSocketChannel的NioServerSocketChannel。
void init(Channel channel) throws Exception {
        final Map<ChannelOption<?>, Object> options = options0();
        synchronized (options) {
       // 设置TCP连接属性
            setChannelOptions(channel, options, logger);
        }

        final Map<AttributeKey<?>, Object> attrs = attrs0();
        synchronized (attrs) {
            for (Entry<AttributeKey<?>, Object> e: attrs.entrySet()) {
                @SuppressWarnings("unchecked")
                AttributeKey<Object> key = (AttributeKey<Object>) e.getKey();
                channel.attr(key).set(e.getValue());
            }
        }

        ChannelPipeline p = channel.pipeline();

        final EventLoopGroup currentChildGroup = childGroup;
        final ChannelHandler currentChildHandler = childHandler;
        final Entry<ChannelOption<?>, Object>[] currentChildOptions;
        final Entry<AttributeKey<?>, Object>[] currentChildAttrs;
        synchronized (childOptions) {
            currentChildOptions = childOptions.entrySet().toArray(newOptionArray(0));
        }
        synchronized (childAttrs) {
            currentChildAttrs = childAttrs.entrySet().toArray(newAttrArray(0));
        }
     // pipeline的addLast方法在下面单独分析
        p.addLast(new ChannelInitializer<Channel>() {
            @Override
            public void initChannel(final Channel ch) throws Exception {
                final ChannelPipeline pipeline = ch.pipeline();
                ChannelHandler handler = config.handler();
                if (handler != null) {
                    pipeline.addLast(handler);
                }

                ch.eventLoop().execute(new Runnable() {
                    @Override
                    public void run() {
              // 由下面addLast分析得知,执行到这里,channel还未注册,所以会把context加入到pendingHandlerCallbackHead
              // 链表中,等到initAndRegister中的config().group().register(channel)执行时会调用handlerAdded,从而调用initChannel
                        pipeline.addLast(new ServerBootstrapAcceptor(
                                ch, currentChildGroup, currentChildHandler, currentChildOptions, currentChildAttrs));
                    }
                });
            }
        });
    }
pipeline的addLast最终调用的是io.netty.channel.DefaultChannelPipeline.addLast(EventExecutorGroup, String, ChannelHandler),如下面所示:
public final ChannelPipeline addLast(EventExecutorGroup group, String name, ChannelHandler handler) {
        final AbstractChannelHandlerContext newCtx;
        synchronized (this) {
            checkMultiplicity(handler);
       // 创建DefaultChannelHandlerContext,context中关联了pipeline和handler
            newCtx = newContext(group, filterName(name, handler), handler);
       // DefaultChannelPipeline是双向链表,在构造方法中就创建好了head和tail,这里将新建的context加入链表tail前面
            addLast0(newCtx);

            // If the registered is false it means that the channel was not registered on an eventloop yet.
            // In this case we add the context to the pipeline and add a task that will call
            // ChannelHandler.handlerAdded(...) once the channel is registered.
            if (!registered) {
                newCtx.setAddPending();
          // 此时channel并没有注册到eventLoop中
         // 将context放入pendingHandlerCallbackHead链表中,等待channel被注册了再依次调用链表中context的callHandlerAdded0
                callHandlerCallbackLater(newCtx, true);
                return this;
            }
       // 通过pipeline获取eventLoop,pipeline.channel().eventLoop
       // 这里注意了,一开始channel并没有注册到eventLoop中,所以registered=false,就像上面注释描述的那样,
        // 将context放入pendingHandlerCallbackHead链表中,等待channel被注册了再依次调用链表中context的callHandlerAdded0
           EventExecutor executor = newCtx.executor();
            if (!executor.inEventLoop()) {
                newCtx.setAddPending();
                executor.execute(new Runnable() {
                    @Override
                    public void run() {
              // 这里会调用之前pipeline.addLast传进来的ChannelInitializer的initChannel方法
              // 方法内容见下面贴图
                        callHandlerAdded0(newCtx);
                    }
                });
                return this;
            }
        }
        callHandlerAdded0(newCtx);
        return this;
    }
由上面代码可知, context的handler就是调用pipeline的addLast传入的参数,也就是ChannelInitializer
ChannelInitializer的handlerAdded如下,这里最终会调用当初传参进来是重写的initChannel:

至此,总结下pipeline的addLast,实际上创建一个 Context 对象包装了 pipeline 和 handler,然后通过同步或者异步的方式,间接执行 handler 的 自定义方法-------initChannel 方法。而这个 context 同时也加入到了 pipeline 的链表中。
config().group().register(channel)
现在拉回到initAndRegister方法,channel的创建,init都看完了,剩下的config().group().register(channel)我们看下。
config返回的是ServerBootstrapConfig,group返回的其实就是bossGroup,对应的是父类的方法:
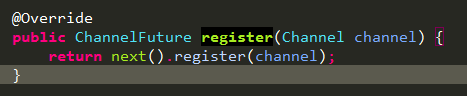
io.netty.channel.MultithreadEventLoopGroup.register(Channel)
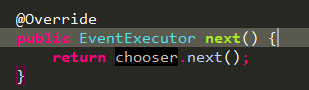
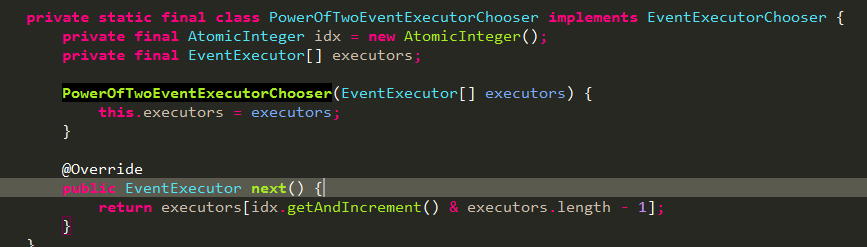
next方法如下,通过chooser从数组中选择下一个eventLoop:
注意,eventLoopGroup是一个数组,数组中的元素eventLoop其实是只有一个线程的线程池
MultithreadEventExecutorGroup构造方法中chooser通过factory创建,

这里根据数据长度是否是偶数来返回对应chooser,这里是netty的一个性能压榨的地方,isPowerOfTwo判断是否是偶数时采用的位运算,
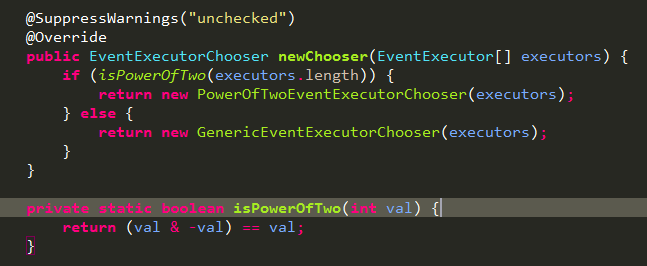
如果数组长度是偶数,返回PowerOfTwoEventExecutorChooser,这个chooser的next采用的位运算,这也是性能提高的一个点,所以设置值的时候尽量设置为偶数,默认值也是偶数,Runtime.getRuntime().availableProcessors()乘以2。
从bossGroup中选中一个EventExecutor,这里对应的就是NioEventLoop,调用其register方法,这里调用的是io.netty.channel.SingleThreadEventLoop.register(Channel),方法内容如下图所示:

最终调用channel的unsafe对象的register。还有印象吗?就是创建channel时,父类的构造方法中创建了这个对象。调用的是io.netty.channel.nio.AbstractNioMessageChannel.newUnsafe()重写的这个方法,new的是io.netty.channel.nio.AbstractNioMessageChannel.NioMessageUnsafe.NioMessageUnsafe()对象。
这里unsafe最终调用的是io.netty.channel.AbstractChannel.AbstractUnsafe.register(EventLoop, ChannelPromise)这个register,我们看下这个方法内容:
public final void register(EventLoop eventLoop, final ChannelPromise promise) { if (eventLoop == null) { throw new NullPointerException("eventLoop"); } if (isRegistered()) { promise.setFailure(new IllegalStateException("registered to an event loop already")); return; } if (!isCompatible(eventLoop)) { promise.setFailure( new IllegalStateException("incompatible event loop type: " + eventLoop.getClass().getName())); return; } // 将eventLoop和channel绑定,通过channel的eventLoop方法提交的任务都通过同一个线程池执行
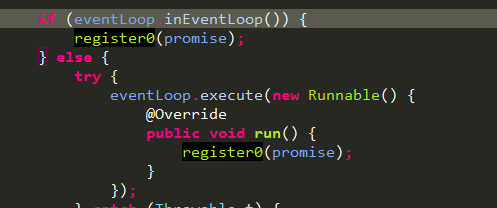
// 这才是调用group的register的意义,让channel绑定到其中一个eventLoop AbstractChannel.this.eventLoop = eventLoop; if (eventLoop.inEventLoop()) {
// 这是这个方法的核心,注册这个channel,在这里会将jvm的ServerSocketChannel注册到selector register0(promise); } else { try { eventLoop.execute(new Runnable() { @Override public void run() { register0(promise); } }); } catch (Throwable t) { logger.warn( "Force-closing a channel whose registration task was not accepted by an event loop: {}", AbstractChannel.this, t); closeForcibly(); closeFuture.setClosed(); safeSetFailure(promise, t); } } }
方法不是很长,重点在io.netty.channel.AbstractChannel.AbstractUnsafe.register0(ChannelPromise),下面我们看看这个方法:
private void register0(ChannelPromise promise) {
            try {
                // check if the channel is still open as it could be closed in the mean time when the register
                // call was outside of the eventLoop
                if (!promise.setUncancellable() || !ensureOpen(promise)) {
                    return;
                }
                boolean firstRegistration = neverRegistered;
         // 真正的注册,向jvm的ServerSocketChannel注册到感兴趣事件,详细的说明见下面。
                doRegister();
                neverRegistered = false;
                registered = true;

                // Ensure we call handlerAdded(...) before we actually notify the promise. This is needed as the
                // user may already fire events through the pipeline in the ChannelFutureListener.
                pipeline.invokeHandlerAddedIfNeeded();

                safeSetSuccess(promise);
                pipeline.fireChannelRegistered();
                // Only fire a channelActive if the channel has never been registered. This prevents firing
                // multiple channel actives if the channel is deregistered and re-registered.
                if (isActive()) {
                    if (firstRegistration) {
                        pipeline.fireChannelActive();
                    } else if (config().isAutoRead()) {
                        // This channel was registered before and autoRead() is set. This means we need to begin read
                        // again so that we process inbound data.
                        //
                        // See https://github.com/netty/netty/issues/4805
                        beginRead();
                    }
                }
            } catch (Throwable t) {
                // Close the channel directly to avoid FD leak.
                closeForcibly();
                closeFuture.setClosed();
                safeSetFailure(promise, t);
            }
        }
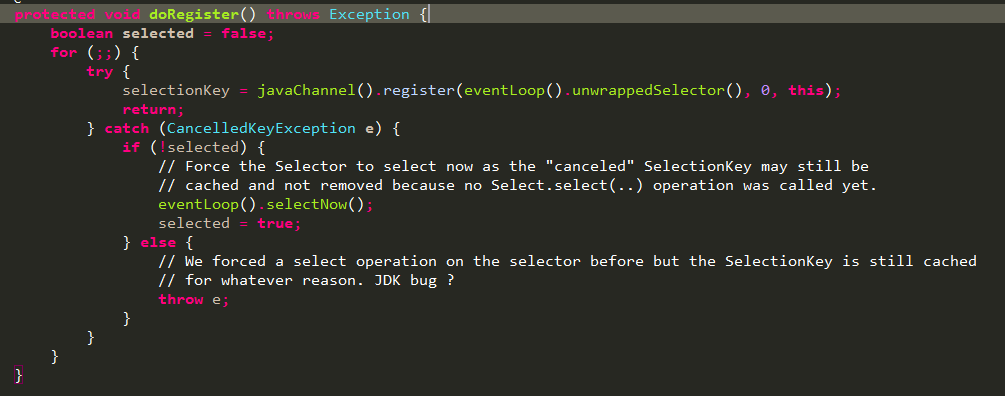
doRegister方法如下,该方法在一个自旋中向JDK中注册感兴趣的事件。留意下这里的注释描述,这里同时还把自己(NioServerSocketChannel)作为attach绑定了该selectKey上。大家可能奇怪,为什么注册的是0,而不是16Accpet事件呢?在最后的时候还是会删除这个读事件,重新注册accpet事件的。
回到io.netty.channel.AbstractChannel.AbstractUnsafe.register0(ChannelPromise)方法,doRegister后调用pipeline.invokeHandlerAddedIfNeeded(),下面我们看下这个方法:
由上面得知,执行到register0方法时当前线程肯定是就是eventLoop中的线程,如下所示:
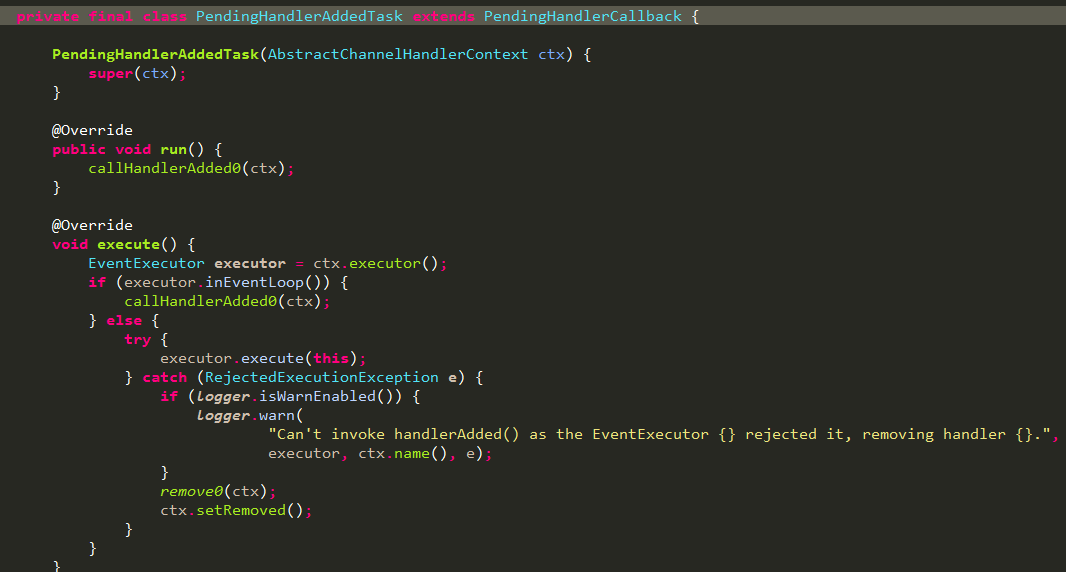
所以这里assert肯定就是true。还记得之前在io.netty.bootstrap.ServerBootstrap.init(Channel)方法中init channel时调用pipeline的addLast方法吗?在那个方法里面,如上面分析那样,由于当时channel还未注册到eventLoop中,所以就创建了PendingHandlerAddedTask任务,包装了新建的context,并将task加入到pendingHandlerCallbackHead对应的链表尾端,等待后续被执行。现在的这个地方就是执行pendingHandlerCallbackHead的时候了:


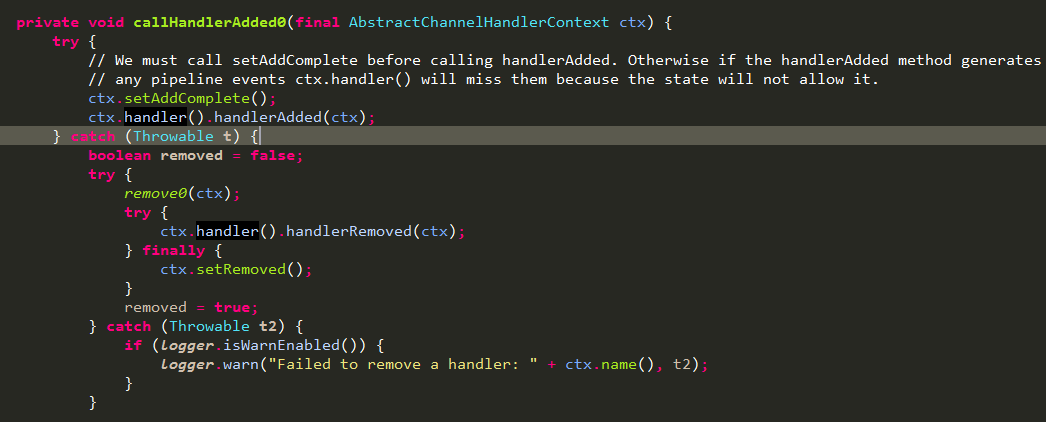
从上面看就是执行task的execute方法,下面就是贴出的task代码,execute方法将callHandlerAdded0的调用放入channel对应的eventLoop线程池中执行,如果当前线程就是eventLoop中的线程就直接执行,减少线程切换,提高性能。callHandlerAdded0方法上面已经分析了,调用context对应的handler的handlerAdded方法,而ChannelInitializer的handlerAdded会调用initChannel方法,这样就完整串起来了,是不是很有才。哈哈。
我们把视线再拉回到io.netty.channel.AbstractChannel.AbstractUnsafe.register0(ChannelPromise),执行完invokeHandlerAddedIfNeeded方法后safeSetSuccess设置promise状态为成功,pipeline.fireChannelRegistered通知通告pipeline的headContext逐个通知ChannelRegistered事件。

到这里,io.netty.bootstrap.AbstractBootstrap.initAndRegister()方法基本分析完了,还有前面遗留的一个地方,在子类的io.netty.bootstrap.ServerBootstrap.init(Channel)方法最后往pipeline添加了一个ServerBootstrapAcceptor handler,现在来看下这个contextHandler,从名字可以看出来,这个handler是处理accept事件的,如下图所示,构造方法中保存了childHandler属性,这个handler是在用户编写netty代码时调用io.netty.bootstrap.ServerBootstrap.childHandler(ChannelHandler)方法传进来的,具体用处等后面分析这些重写的方法时再指出来。

至此,io.netty.bootstrap.AbstractBootstrap.initAndRegister()方法算是基本分析完了,我们回到io.netty.bootstrap.AbstractBootstrap.doBind(SocketAddress)方法看看,
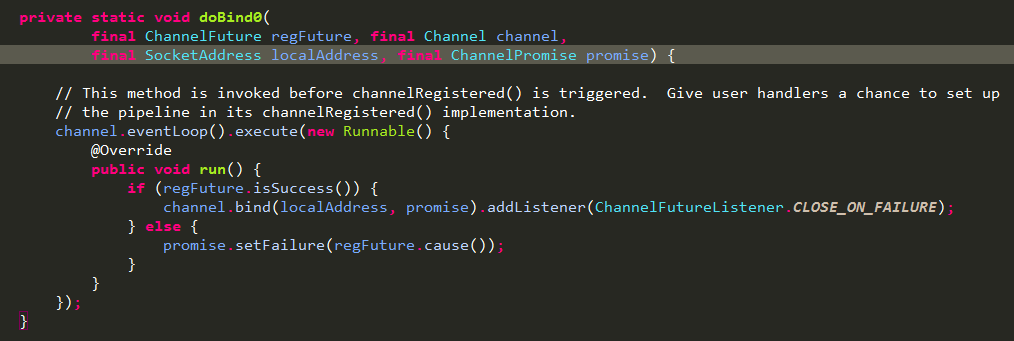
后面重点就是绑定端口了,也就是io.netty.bootstrap.AbstractBootstrap.doBind0(ChannelFuture, Channel, SocketAddress, ChannelPromise)方法。

往channel注册的eventLoop提交一个任务,异步任务中调用channel的bind方法绑定端口,并添加监听。
io.netty.channel.DefaultChannelPipeline.bind(SocketAddress, ChannelPromise)如下:

调用tailContext的bind方法,从tail往前寻找outbound类型的context,并以此往前传递调用context的invokeBind:
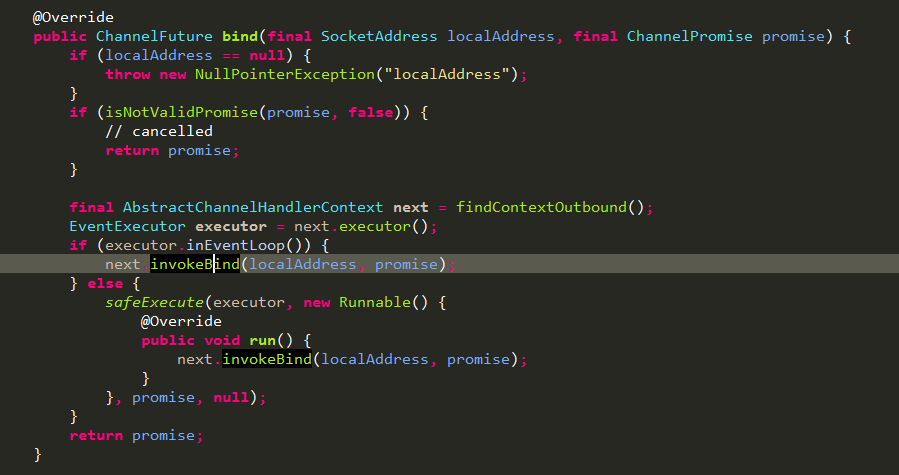
context的invokeBind调用的是handler的bind方法:

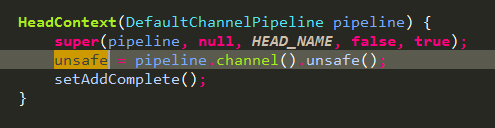
这里我们重点看下headContext,HeadContext既是HandlerContext又是Handler,如下图所示:

handler方法返回的是自己:
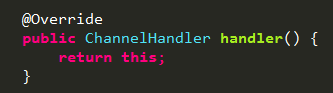
所以这里实际调用的就是io.netty.channel.DefaultChannelPipeline.HeadContext.bind(ChannelHandlerContext, SocketAddress, ChannelPromise),我们看下这个方法:

调用了unsafe的bind方法,由构造方法可知,unsafe为channel中获取的unsafe:
由前面的分析可知,channel的unsafe是io.netty.channel.nio.AbstractNioMessageChannel.NioMessageUnsafe对象,这里调用父类的bind方法io.netty.channel.AbstractChannel.AbstractUnsafe.bind(SocketAddress, ChannelPromise):
public final void bind(final SocketAddress localAddress, final ChannelPromise promise) {
            assertEventLoop();

            if (!promise.setUncancellable() || !ensureOpen(promise)) {
                return;
            }

            // See: https://github.com/netty/netty/issues/576
            if (Boolean.TRUE.equals(config().getOption(ChannelOption.SO_BROADCAST)) &&
                localAddress instanceof InetSocketAddress &&
                !((InetSocketAddress) localAddress).getAddress().isAnyLocalAddress() &&
                !PlatformDependent.isWindows() && !PlatformDependent.maybeSuperUser()) {
                // Warn a user about the fact that a non-root user can't receive a
                // broadcast packet on *nix if the socket is bound on non-wildcard address.
                logger.warn(
                        "A non-root user can't receive a broadcast packet if the socket " +
                        "is not bound to a wildcard address; binding to a non-wildcard " +
                        "address (" + localAddress + ") anyway as requested.");
            }

            boolean wasActive = isActive();
            try {
         // 执行真正的绑定端口动作
                doBind(localAddress);
            } catch (Throwable t) {
                safeSetFailure(promise, t);
                closeIfClosed();
                return;
            }

            if (!wasActive && isActive()) {
                invokeLater(new Runnable() {
                    @Override
                    public void run() {
              // 异步执行pipeline的ChannelActive事件通知
              // 这里也是同样地从headContext顺序往后执行context的invokeChannelActive方法
              // invokeChannelActive方法最终还是执行对应的handler的channelActive方法
                        pipeline.fireChannelActive();
                    }
                });
            }

            safeSetSuccess(promise);
        }
我们这里重点看两个地方,也就是上面代码注释的地方:
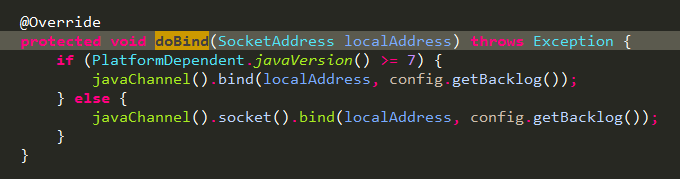
io.netty.channel.socket.nio.NioServerSocketChannel.doBind(SocketAddress),根据jvm版本选择不同的方式绑定端口:
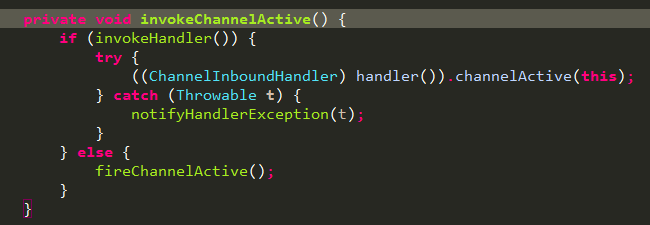
端口绑定成功后,pipeline通知channelActive事件,context中执行invokeChannelActive方法,实际是执行对应handler的channelActive方法:
io.netty.channel.AbstractChannelHandlerContext.invokeChannelActive()
这里重点看下io.netty.channel.DefaultChannelPipeline.HeadContext.channelActive(ChannelHandlerContext):
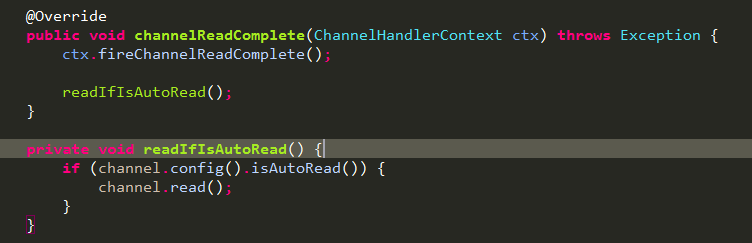
先让channelActive事件往下传递,再调用readIfIsAutoRead方法,方法中调用了channel的read方法:
io.netty.channel.AbstractChannel.read()
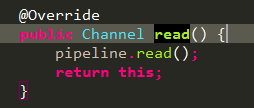
这里调用的是pipeline的read方法:
io.netty.channel.DefaultChannelPipeline.read()
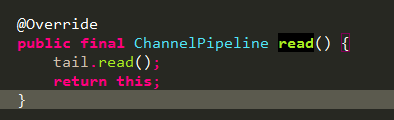
这里调用的是tailContext的read:
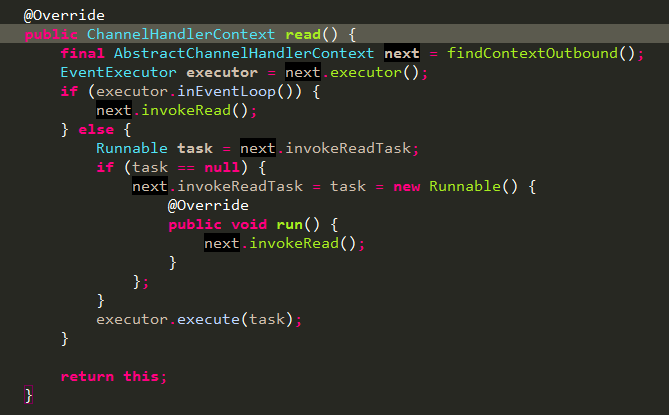
最终调用的是handler的read方法:
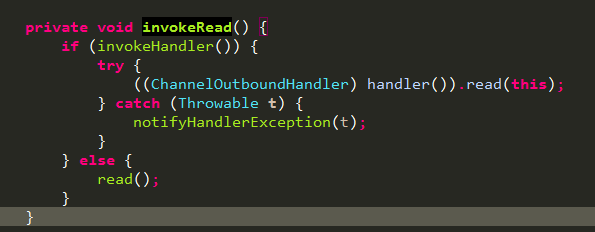
这里看下io.netty.channel.DefaultChannelPipeline.HeadContext.read(ChannelHandlerContext)
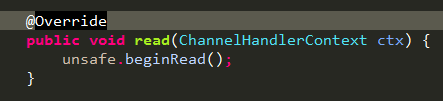
又回到了unsafe这里,io.netty.channel.AbstractChannel.AbstractUnsafe.beginRead():
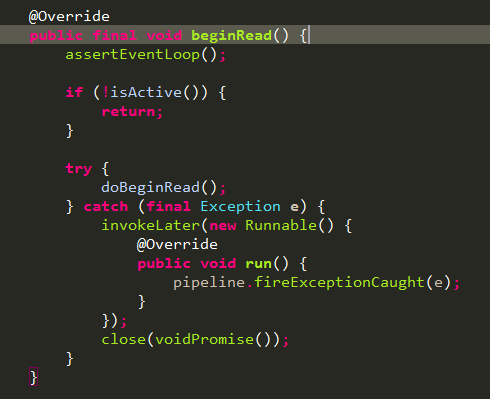
重点是doBeginRead方法,异常后触发ExceptionCaught事件,这个事件在io.netty.bootstrap.ServerBootstrap.ServerBootstrapAcceptor.exceptionCaught(ChannelHandlerContext, Throwable)中有处理。可以联系起来看下。
下面看下doBeginRead方法:
io.netty.channel.nio.AbstractNioChannel.doBeginRead()
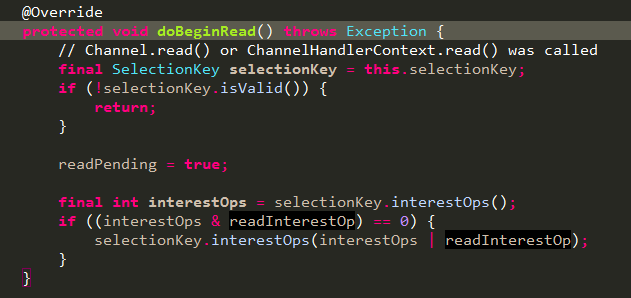
之前register的时候设置的是0,这里重新设置为readInterestOp,也就是创建channel时构造方法传进来的accept事件:
至此,一个netty服务端算是启动完成了。
总结一下:
1.首先创建2个EventLoopGroup线程池数组。数组默认大小CPU核数*2,方便chooser选择线程池时提高性能。BootStrap将boss设置为group属性,将worker设置为childer属性。
2.通过bind方法启动,内部重要方法为initAndRegister和dobind方法。
3.initAndRegister方法会反射创建NioServerSocketChannel及其相关的NIO的对象,pipeline、unsafe,pipeline中维护的是handlerContext双向链表,构造方法中初始化了headContext节点和tailContext节点。同时也给channel创建了NioServerSocketChannelConfig对象供外界提供配置信息。在最后向pipeline添加ServerBootstrapAcceptor handler。这个handler用于分配接受的请求给worker线程池数组。
4.每次往pipeline中添加handler都会创建一个包装了handler的Context作为pipeline的节点并添加到链表tail前面。注册过程中会调用NioServerSocketChannel的doRegister方法注册读事件。
5.在initAndRegister方法成功之后调用doBind0方法,该方法会调用NioServerSocketChannel.doBind方法对JDK的channel进行端口绑定,之后再调用pipeline的fireChannelActive通知channelActive事件,最后会调用AbstractNioChannel.doBeginRead方法将selectionKey感兴趣事件设置为Accept,最终完成Netty服务器的所有启动,并开始监听连接事件。
6.eventLoop中自带selector,以及线程循环获取selector上的事件,所以,io.netty.channel.nio.AbstractNioChannel.doRegister()需要将jvm的nioChannel注册到nettyChannel绑定的eventLoop中的Selector上,以及表明感兴趣的事件。这里还将nettyChannel作为attachment传入。
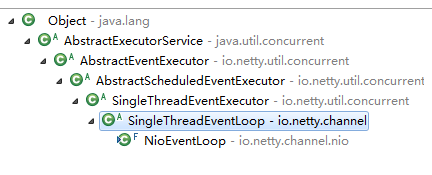
NioEventLoop
io.netty.channel.nio.NioEventLoop是只有一个线程的线程池,为什么是一个线程?避免线程竞争,切换,提高性能。为什么是线程池?因为这里有任务的概念,跟线程池天然的任务队列处理不谋而合,下面就分析下这个类。
继承关系如下:、
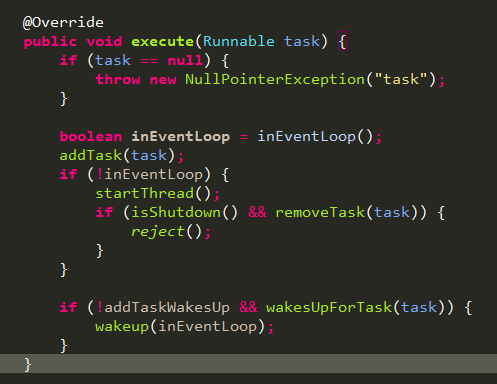
从上面分析可知,每次往eventLoop提交任务都是通过channel的eventLoop方法获取对应的eventLoop对象,然后调用io.netty.util.concurrent.SingleThreadEventExecutor.execute(Runnable)方法完成任务提交。
我们看下这个方法,先往任务队列中添加一个任务,然后尝试启动一个线程消耗任务,startThread内部保证了只启动一个线程,inEventLoop判断跟大部分使用此方法的地方目的意义,提高性能,这里判断如果是非eventLoop的中的线程才去调用startThread:
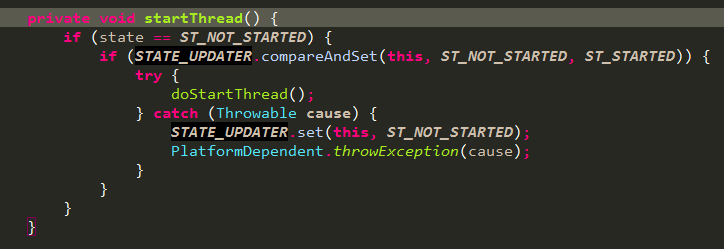
startThread方法如下,第一层判断为了提高性能,第二层判断确保只启动一个线程:
doStartThread主要内容如下,通过executor提交了一个任务,任务中主要就是执行了SingleThreadEventExecutor.this.run()方法,改方法内部处理selector事件并消耗任务队列中的任务:
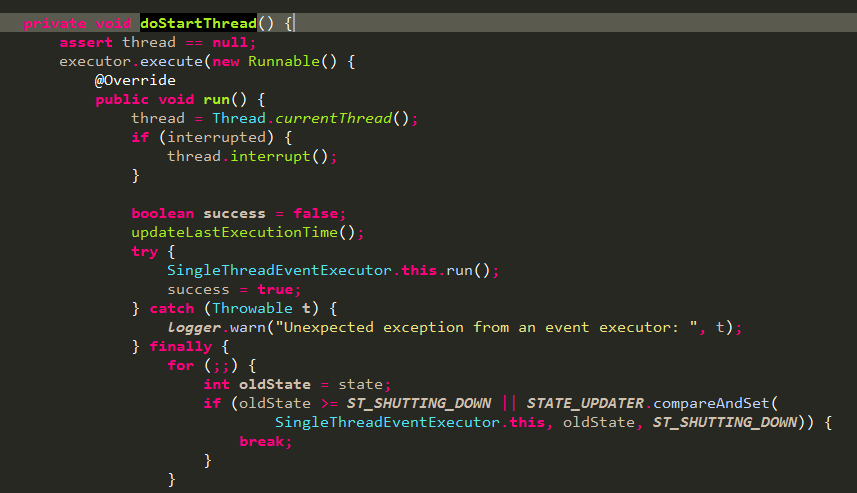
我们看下executor是哪里来的:
从io.netty.util.concurrent.SingleThreadEventExecutor.SingleThreadEventExecutor代码可知executor由构造方法传入,而io.netty.channel.nio.NioEventLoopGroup是eventLoop数组,管理这eventLoop,所以NioEventLoop就是在这里创建的,我们看下NioEventLoopGroup的父类构造方法io.netty.util.concurrent.MultithreadEventExecutorGroup.MultithreadEventExecutorGroup(int, Executor, EventExecutorChooserFactory, Object...)
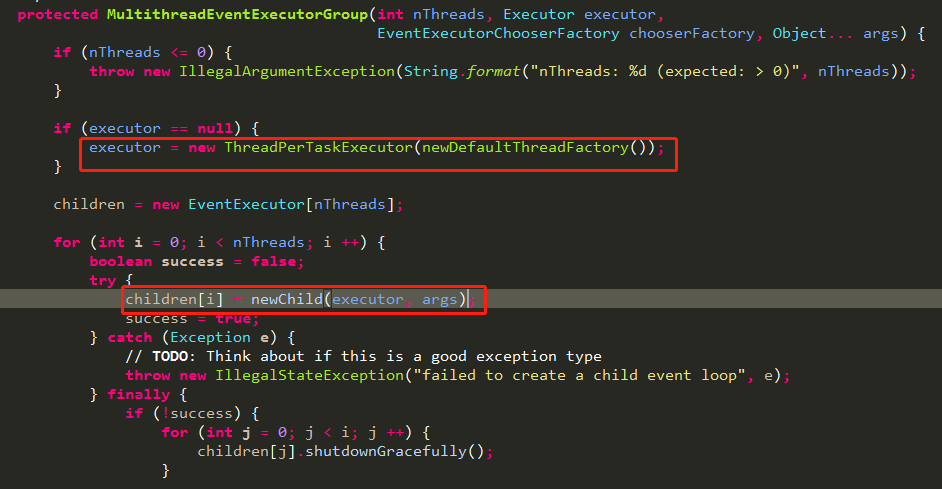
通常我们创建NioEventLoopGroup对象的时候都没有传参数,所以这里采用的默认ThreadPerTaskExecutor,我们看下这个类的execute方法:

通过threadFactory创建一个新线程并传入任务启动线程。
看下threadFactory,io.netty.util.concurrent.DefaultThreadFactory:

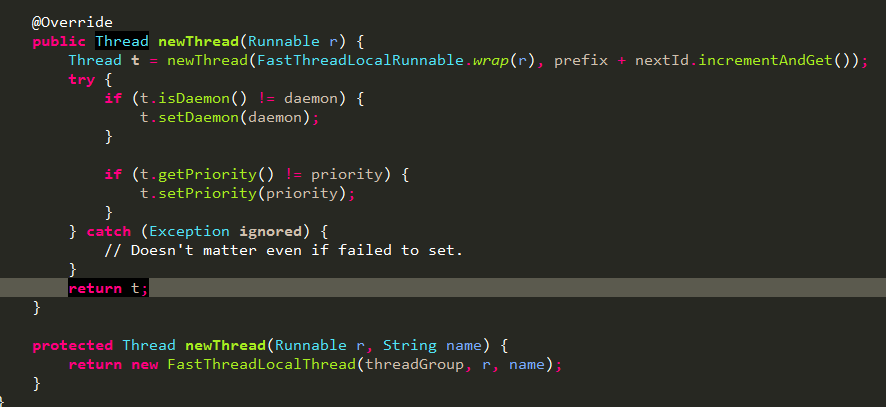
由上面可知,最终创建的是io.netty.util.concurrent.FastThreadLocalThread.FastThreadLocalThread(ThreadGroup, Runnable, String)对象。
回到io.netty.util.concurrent.SingleThreadEventExecutor.doStartThread()方法,Runnable执行有着落了,下面看下SingleThreadEventExecutor.this.run()内容:
run方法在NioEventLoop中重写了,我们看下io.netty.channel.nio.NioEventLoop.run()方法:
protected void run() {
        for (;;) {
            try {
                switch (selectStrategy.calculateStrategy(selectNowSupplier, hasTasks())) {
                    case SelectStrategy.CONTINUE:
                        continue;
                    case SelectStrategy.SELECT:
                        select(wakenUp.getAndSet(false));

                        // 'wakenUp.compareAndSet(false, true)' is always evaluated
                        // before calling 'selector.wakeup()' to reduce the wake-up
                        // overhead. (Selector.wakeup() is an expensive operation.)
                        //
                        // However, there is a race condition in this approach.
                        // The race condition is triggered when 'wakenUp' is set to
                        // true too early.
                        //
                        // 'wakenUp' is set to true too early if:
                        // 1) Selector is waken up between 'wakenUp.set(false)' and
                        //    'selector.select(...)'. (BAD)
                        // 2) Selector is waken up between 'selector.select(...)' and
                        //    'if (wakenUp.get()) { ... }'. (OK)
                        //
                        // In the first case, 'wakenUp' is set to true and the
                        // following 'selector.select(...)' will wake up immediately.
                        // Until 'wakenUp' is set to false again in the next round,
                        // 'wakenUp.compareAndSet(false, true)' will fail, and therefore
                        // any attempt to wake up the Selector will fail, too, causing
                        // the following 'selector.select(...)' call to block
                        // unnecessarily.
                        //
                        // To fix this problem, we wake up the selector again if wakenUp
                        // is true immediately after selector.select(...).
                        // It is inefficient in that it wakes up the selector for both
                        // the first case (BAD - wake-up required) and the second case
                        // (OK - no wake-up required).

                        if (wakenUp.get()) {
                            selector.wakeup();
                        }
                        // fall through
                    default:
                }

                cancelledKeys = 0;
                needsToSelectAgain = false;
          // ioRatio值范围大于等于0,小于100,含义为分配select和执行任务是时间比例,默认为50,
          // 也就是processSelectedKeys执行时间和runAllTasks执行时间相同,见setIoRatio注释
                final int ioRatio = this.ioRatio;
          // 如果配置为100%,执行完processSelectedKeys后就执行队列中的一个任务就返回
                if (ioRatio == 100) {
                    try {
                        processSelectedKeys();
                    } finally {
                        // Ensure we always run tasks.
                        runAllTasks();
                    }
                } else {
            // 如果不是100%,根据processSelectedKeys执行消耗的时间以及百分比计算runAllTasks执行时间
                    final long ioStartTime = System.nanoTime();
                    try {
                        processSelectedKeys();
                    } finally {
                        // Ensure we always run tasks.
                        final long ioTime = System.nanoTime() - ioStartTime;
                        runAllTasks(ioTime * (100 - ioRatio) / ioRatio);
                    }
                }
            } catch (Throwable t) {
                handleLoopException(t);
            }
            // Always handle shutdown even if the loop processing threw an exception.
            try {
                if (isShuttingDown()) {
                    closeAll();
                    if (confirmShutdown()) {
                        return;
                    }
                }
            } catch (Throwable t) {
                handleLoopException(t);
            }
        }
    }
processSelectedKeys
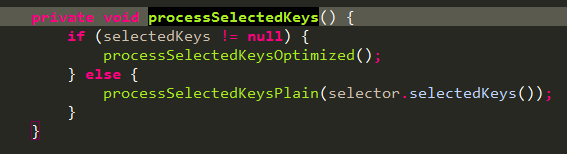
我们先来看下selectedKeys,什么时候为null,什么时候不为null?看下赋值的地方:
io.netty.channel.nio.NioEventLoop.openSelector()的差不多下图所示位置赋值的:
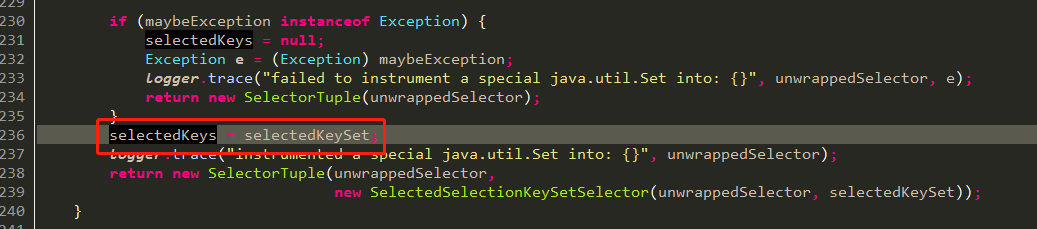
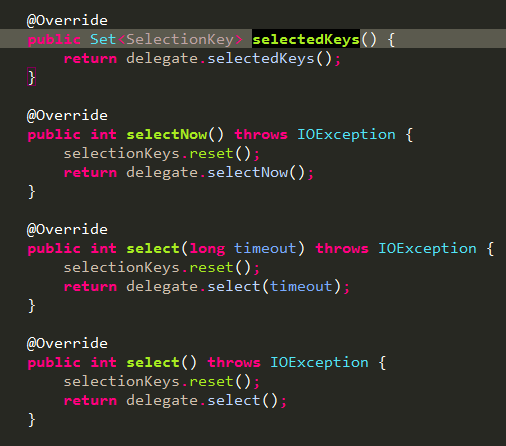
selectedKeySet这个对象在上图所示代码前面new了一个对象,这里的重点要关注下AccessController.doPrivileged包裹的内容,通过反射将新建的SelectedSelectionKeySet对象设值到unwrappedSelector对应的Selector对象中,:结合上面赋值给实例变量selectedKeys一起看的话,只要反射没有发生异常,maybeException就不为null,selectedKeys = selectedKeySet就能顺利赋值,所以unwrappedSelector本身的select方法调用就会自动给selectedKeys对应的集合添加元素,这也是为什么在NIOEventLoop中的代码看不到给selectedKeys添加元素的原因。善于思考的人肯定会想到谁去清理这个set集合呢?答案在这里,netty用io.netty.channel.nio.SelectedSelectionKeySetSelector类包装了jvm的select,看下重写的select相关的方法就明白了,调用jvm的select方法前reset了SelectedSelectionKeySet集合:

回到io.netty.channel.nio.NioEventLoop.processSelectedKeys()方法,processSelectedKeysOptimized和processSelectedKeysPlain内容差不多,processSelectedKeysOptimized处理的selectedKey是通过上面反射方式自动添加到selectedKeys集合中的,processSelectedKeysPlain处理的是selector.selectedKeys()方式自己获取的selectedKeys集合。
两个方法共同的逻辑如下,attachment是register的时候赋值的,这一点上面已经分析过了:
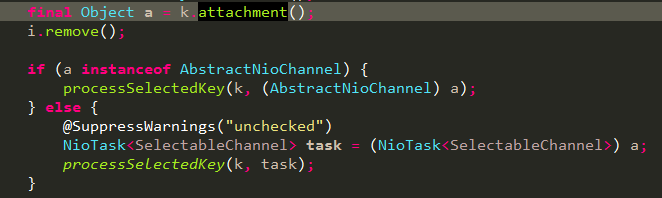
这里我们分析下io.netty.channel.nio.NioEventLoop.processSelectedKey(SelectionKey, AbstractNioChannel):
private void processSelectedKey(SelectionKey k, AbstractNioChannel ch) {
        final AbstractNioChannel.NioUnsafe unsafe = ch.unsafe();
     // selectionKey是否有效
        if (!k.isValid()) {
            final EventLoop eventLoop;
            try {
                eventLoop = ch.eventLoop();
            } catch (Throwable ignored) {
                // If the channel implementation throws an exception because there is no event loop, we ignore this
                // because we are only trying to determine if ch is registered to this event loop and thus has authority
                // to close ch.
                return;
            }
            // Only close ch if ch is still registered to this EventLoop. ch could have deregistered from the event loop
            // and thus the SelectionKey could be cancelled as part of the deregistration process, but the channel is
            // still healthy and should not be closed.
            // See https://github.com/netty/netty/issues/5125
            if (eventLoop != this || eventLoop == null) {
                return;
            }
            // close the channel if the key is not valid anymore
            unsafe.close(unsafe.voidPromise());
            return;
        }

        try {
       // 获取就绪的事件
            int readyOps = k.readyOps();
            // We first need to call finishConnect() before try to trigger a read(...) or write(...) as otherwise
            // the NIO JDK channel implementation may throw a NotYetConnectedException.
       // OP_CONNECT事件,注释内容说的很清楚,看注释。
            if ((readyOps & SelectionKey.OP_CONNECT) != 0) {
                // remove OP_CONNECT as otherwise Selector.select(..) will always return without blocking
                // See https://github.com/netty/netty/issues/924
                int ops = k.interestOps();
                ops &= ~SelectionKey.OP_CONNECT;
                k.interestOps(ops);

                unsafe.finishConnect();
            }

            // Process OP_WRITE first as we may be able to write some queued buffers and so free memory.
            if ((readyOps & SelectionKey.OP_WRITE) != 0) {
                // Call forceFlush which will also take care of clear the OP_WRITE once there is nothing left to write
                ch.unsafe().forceFlush();
            }

            // Also check for readOps of 0 to workaround possible JDK bug which may otherwise lead
            // to a spin loop
       // 这是重点,将read和accept交给unsafe处理
            if ((readyOps & (SelectionKey.OP_READ | SelectionKey.OP_ACCEPT)) != 0 || readyOps == 0) {
                unsafe.read();
            }
        } catch (CancelledKeyException ignored) {
            unsafe.close(unsafe.voidPromise());
        }
    }
重中之重:NioEventLoop是负责channel事件处理的,注册上来的有负责IO的channel还有child的负责数据读写的channel,继承关系如下:
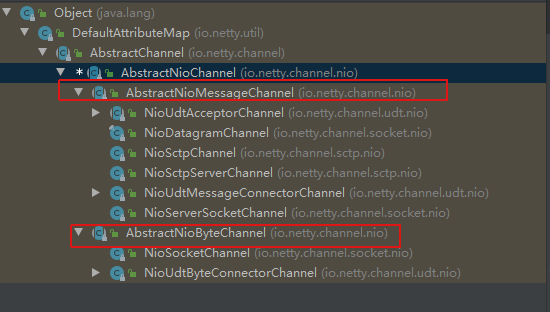
AbstractNioMessageChannel是负责IO的,AbstractNioByteChannel是负责accept后数据读写的。所以上面unsafe.read()是调用对应的NioMessageUnsafe或者NioByteUnsafe处理channel。
NioMessageUnsafe分析如下,一言以概之,NioMessageUnsafe负责创建NioSocketChannel,并通过ServerBootstrapAcceptor将NioSocketChannel交给workerGroup处理,NioSocketChannel实际上是AbstractNioByteChannel子类【如上图】,所以workerGroup中的NioEventLoop处理key事件时就调用NioByteUnsafe的read处理channel的数据读写。
这里再详细看下io.netty.channel.nio.AbstractNioMessageChannel.NioMessageUnsafe.read()方法:
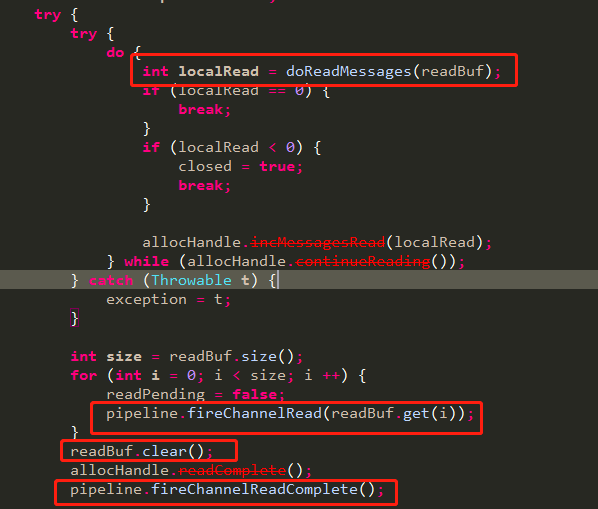
doReadMessages方法如下,用netty的NioSocketChannel包装SocketChannel,并添加到buf,回到上面之后调用pipeline.fireChannelRead通知ChannelRead事件,
我们看下NioSocketChannel继承关系,在io.netty.channel.AbstractChannel.AbstractChannel(Channel)父类中会新建一个pipeline,前面已经看过了:
上面NIOServerSocketChannel对应的pipeline中处理ChannelRead事件的一个重要角色就是之前initchannel时添加的io.netty.bootstrap.ServerBootstrap.ServerBootstrapAcceptor,这个handler的channelRead内容如下,主要职责就是将bossGroup侦测到的OP_READ或者OP_ACCEPT事件对应的channel交给workerGroup处理,这里的重点就是上面提到的包装类NioSocketChannel:
public void channelRead(ChannelHandlerContext ctx, Object msg) {
            final Channel child = (Channel) msg;
       // 将创建ServerBootstrap时调用的
       // io.netty.bootstrap.ServerBootstrap.childHandler(ChannelHandler)方法入参handler添加到
       // 上面创建的NioSocketChannel对应的pipeline中
            child.pipeline().addLast(childHandler);
       // 设置感兴趣的事件
            setChannelOptions(child, childOptions, logger);

            for (Entry<AttributeKey<?>, Object> e: childAttrs) {
                child.attr((AttributeKey<Object>) e.getKey()).set(e.getValue());
            }

            try {
         // 将刚刚新建的的NioSocketChannel注册到childGroup中,让childGroup中的某个eventLoop线程去处理
         // NioSocketChannel上面后续的事件
                childGroup.register(child).addListener(new ChannelFutureListener() {
                    @Override
                    public void operationComplete(ChannelFuture future) throws Exception {
                        if (!future.isSuccess()) {
                            forceClose(child, future.cause());
                        }
                    }
                });
            } catch (Throwable t) {
                forceClose(child, t);
            }
        }
这里特别说明下,jvm的java.nio.channels.Selector.selectNow()或者java.nio.channels.Selector.select(long)选中的key有两个维度,一个是所有注册到该select上的channel中发生的事件,另一个就是同一个channel上上一次轮询结束到本次轮询间隙过程中所有的事件,换言之,同一个channel上的并发连接请求,一次select就可以将这些事件都选中返回给上层应用,底层有专门的队列缓存并发连接上来的请求。所以,SelectionKey里面包含了SelectableChannel信息,对于ServerSocketChannel对象来说,选中的key对于的都是同一个ServerSocketChannel对象,通过该对象的accept方法在非阻塞状态下立即返回一个java.nio.channels.SocketChannel对象。
对应netty这里,bossGroup中的一个eventLoop自旋注册到自身的selector中的ServerSocketChannel上是否有事件发生,如果有,循环selectedKeys集合,调用netty的abstractChannel中的unsafe触发read,从ServerSocketChannel中accept一个java.nio.channels.SocketChannel对象,并包装进io.netty.channel.socket.nio.NioSocketChannel.NioSocketChannel对象,然后就到了NIOServerSocketChannel的pipeline中传递read事件,其中重要的就是ServerBootstrapAcceptor这个handler,先往这个childchannel对应的pipeline中添加当初最开始创建NIOSocketChannel时调用childHandler添加的用户自定义处理handler,再将之前包装的NioSocketChannel对象交给workerGroup中的某个eventLoop处理后续读写数据操作。
现在,真的结束了,终于结束了,篇幅很长,慢慢消化吧。

 浙公网安备 33010602011771号