


SpringBoot 7.SpringBoot 结合 Thymeleaf
一、引入 Thymeleaf 依赖
     <!-- Spring boot - thymeleaf -->
        <dependency>
            <groupId>org.springframework.boot</groupId>
            <artifactId>spring-boot-starter-thymeleaf</artifactId>
        </dependency>
        <!-- 引入此依赖,再设置 spring.thymeleaf.mode=LEGACYHTML5,可以解决 thymeleaf 严格模式问题 -->
        <dependency>
            <groupId>net.sourceforge.nekohtml</groupId>
            <artifactId>nekohtml</artifactId>
        </dependency>
二、在 application.properties 中对 Thymeleaf 进行配置
# Thymeleaf
spring.thymeleaf.prefix=/WEB-INF/views/
spring.thymeleaf.suffix=.html
spring.thymeleaf.content-type=text/html
spring.thymeleaf.cache=false
spring.thymeleaf.mode=LEGACYHTML5
设置后台返回视图url的前缀、后缀、以及 contentType
设置thymeleaf是否缓存以及其模式(HTML 和 LEGACYHTML5)。
当我们使用 HTML 模式的时候,你在 thymeleaf 模板的 html 中如果使用了没有闭合的 dom 标签,那么他就会报错,因此需要加入上述所说的 nekohtml 依赖,以及设置对应的 mode为 LEGACYHTML5。
三、创建 index.html

<!DOCTYPE html>
<html xmlns:th="http://www.thymeleaf.org">
<head>
<meta charset="UTF-8" />
<meta http-equiv="X-UA-Compatible" content="IE=edge" />
<meta name="viewport" content="width=device-width, initial-scale=1" />
<meta name="author" content="ChengRuan" />

<title>title</title>
</head>
<body>
    <h1>Hello RCDDUP!!!</h1>
</body>
</html>
四、创建 PageController.java
<!DOCTYPE html>
<html xmlns:th="http://www.thymeleaf.org">
<head>
<meta charset="UTF-8" />
<meta http-equiv="X-UA-Compatible" content="IE=edge" />
<meta name="viewport" content="width=device-width, initial-scale=1" />
<meta name="author" content="ChengRuan" />

<title>title</title>
</head>
<body>
    <h1 th:text="'Hello RCDDUP!!!'"></h1>
</body>
</html>
五、启动 App.java
由于我将 server.port设置为9090,所以启动的url为:http://localhost:9090/index
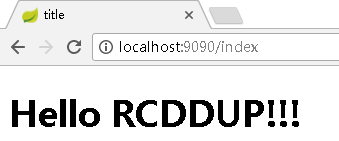
好了,我们成功使用了 Thymeleaf。
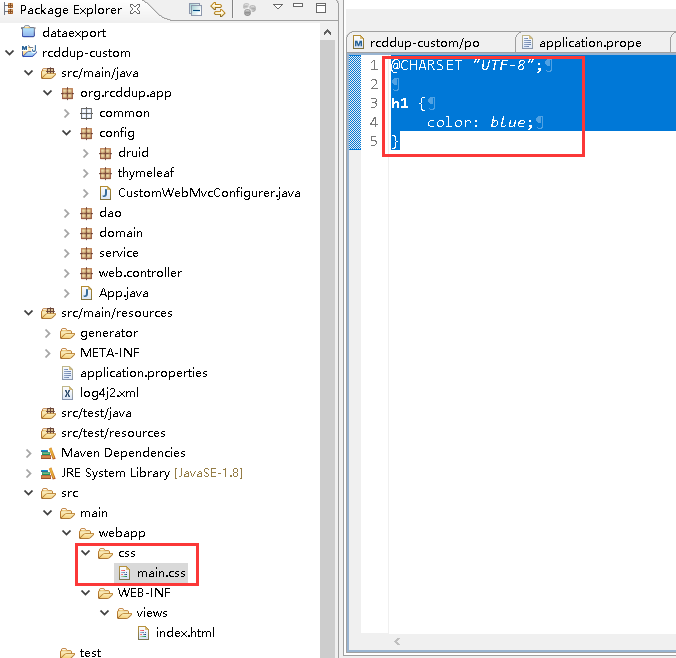
六、解决静态资源(css、js等)问题
在 CustomWebMvcConfigurer.java 中重写 addResourceHandlers() 方法。
可以简写为:registry.addResourceHandler("/images/**","/css/**","/js/**").addResourceLocations("/images/","/css/","/js/");
package org.rcddup.app.config;

import org.mybatis.spring.annotation.MapperScan;
import org.springframework.context.annotation.Configuration;
import org.springframework.web.servlet.config.annotation.ResourceHandlerRegistry;
import org.springframework.web.servlet.config.annotation.WebMvcConfigurerAdapter;

@Configuration
@MapperScan(basePackages = { "org.rcddup.app.dao" })
public class CustomWebMvcConfigurer extends WebMvcConfigurerAdapter {

  // 静态资源处理
    @Override
    public void addResourceHandlers(ResourceHandlerRegistry registry) {
        registry.addResourceHandler("/images/**").addResourceLocations("/images/");
        registry.addResourceHandler("/css/**").addResourceLocations("/css/");
        registry.addResourceHandler("/js/**").addResourceLocations("/js/");
        super.addResourceHandlers(registry);
    }

}
1.创建 main.css
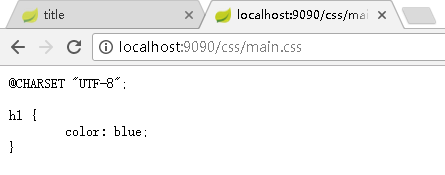
然后我们访问:http://localhost:9090/css/main.css
在 index.html 中引入 main.css
<!DOCTYPE html>
<html xmlns:th="http://www.thymeleaf.org">
<head>
<meta charset="UTF-8" />
<meta http-equiv="X-UA-Compatible" content="IE=edge" />
<meta name="viewport" content="width=device-width, initial-scale=1" />
<meta name="author" content="ChengRuan" />

<link href="/css/main.css" rel="stylesheet">

<title>title</title>
</head>
<body>
    <h1 th:text="'Hello RCDDUP!!!'"></h1>
</body>
</html>
然后我们访问 index 页面,http://localhost:9090/index

这样我们就解决了静态资源的问题,可以很好的在 html 中引入你的静态资源了。

 浙公网安备 33010602011771号