

Silverlight开发历程—3DEffects实现3D特效
3DEffects也称Perspective Transforms(透明变形),实现UIElement 的三维效果主要对象是Projection 类,位于System.Window.Media.Projection命名空间下。
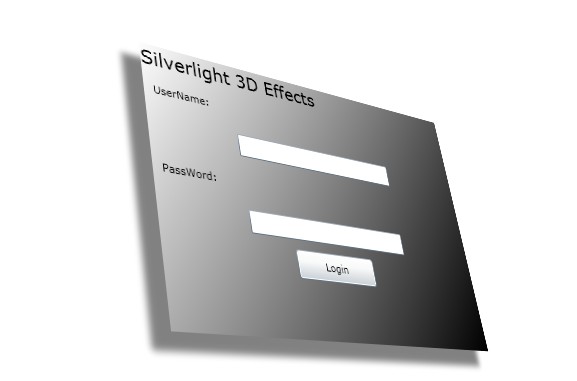
下面是一个利用3D特效制作一个三维效果的用户登录界面:
XAML:
 <Grid x:Name="LayoutRoot" Background="White" >
        <StackPanel Width="400"  Height="280" Margin="150,50,150,116">
            <!--投影特效-->
            <StackPanel.Effect>
                <DropShadowEffect BlurRadius="10" Direction="220" Color="Black" Opacity="0.5" ShadowDepth="25">
                </DropShadowEffect>
            </StackPanel.Effect>
            <!--3D 特效-->
            <StackPanel.Projection>
                <PlaneProjection  RotationZ="-10"  RotationX="-30" RotationY="-40" />
            </StackPanel.Projection>
            <!--渐变-->
            <StackPanel.Background>
                <LinearGradientBrush>
                    <GradientStop Offset="0" Color="White" />
                    <GradientStop Offset="1" Color="Black" />
                </LinearGradientBrush>
            </StackPanel.Background>
            <!--内容-->
            <TextBlock Text="Silverlight 3D Effects" FontSize="20" />
            <TextBlock Text="UserName:"  Margin="10" />
            <TextBox Margin="10" Width="200" />
            <TextBlock Text="PassWord:"  Margin="10" />
            <TextBox Margin="10" Width="200" />
            <Button Width="100" Height="30" Content="Login"/>
        </StackPanel>
    </Grid>
运行结果:
Projectino 包括三个重要的属性,分别是 RotationX、RotationY、TotationZ,分别代表三维空间的X轴、Y轴、Z轴.
RotationX 属性指定围绕对象的水平轴旋转
RotationY 属性围绕旋转中心的 y 轴旋转。
RotationZ 属性围绕旋转中心的 z 轴(直接穿过对象平面的直线)旋转
下面分别从Projection的X轴、Y轴、Z轴不同视角来查看旋转视角的效果:
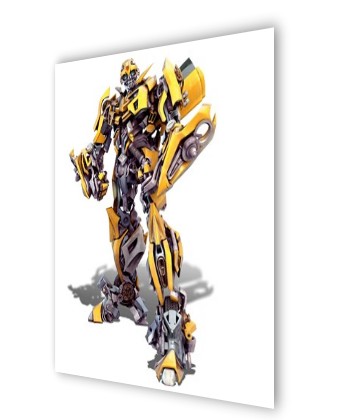
X 轴旋转:
Grid x:Name="LayoutRoot" Background="White">
        <Image Stretch="None"  Source="../images/jiqiren2.jpg">
            <!--添加模糊效果-->
            <Image.Effect>
                <DropShadowEffect BlurRadius="20" Direction="250" Opacity="0.5" Color="Black" />
            </Image.Effect>
            <Image.Projection>
                <PlaneProjection RotationX="-60"  />
            </Image.Projection>
        </Image>
    </Grid>
效果:

Y轴视角:
<Grid x:Name="LayoutRoot" Background="White">
        <Image Stretch="None"  Source="../images/jiqiren2.jpg">
            <!--添加模糊效果-->
            <Image.Effect>
                <DropShadowEffect BlurRadius="20" Direction="250" Opacity="0.5" Color="Black" />
            </Image.Effect>
            <Image.Projection>
                <PlaneProjection RotationY="-60"  />
            </Image.Projection>
        </Image>
    </Grid>
效果:
Z轴视角:
<Grid x:Name="LayoutRoot" Background="White">
        <Image Stretch="None"  Source="../images/jiqiren2.jpg">
            <!--添加模糊效果-->
            <Image.Effect>
                <DropShadowEffect BlurRadius="20" Direction="250" Opacity="0.5" Color="Black" />
            </Image.Effect>
            <Image.Projection>
                <PlaneProjection RotationZ="45"  />
            </Image.Projection>
        </Image>
    </Grid>
效果:

下面我们看一下 X轴、Y轴、Z轴的旋转轨迹:

Projection除了对X、Y、Z轴的值旋转之外,还允许调整Projection对Silverlight目标对象进行基于三维空间的定位。
LocalOffsetX 沿旋转对象X轴平定位一个对象。
LocalOffsetY 沿旋转对象 Y 轴平定位一个对象。
LocalOffsetZ 沿旋转对象Z 轴平定位一个对象。
GlobalOffsetX 沿屏幕对齐的 x 轴定位一个对象。
GlobalOffsetY 沿屏幕对齐的 y 轴定位一个对象。
GlobalOffsetZ 沿屏幕对齐的 z 轴定位一个对象。
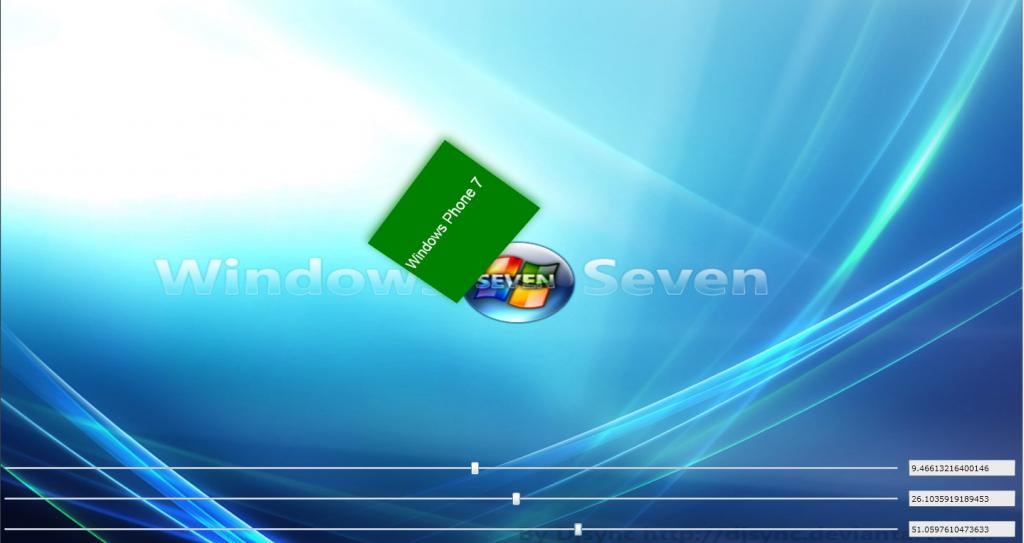
下面为了更好的体会对象的X轴,Y轴,Z轴的旋转效果,我们做一个例子可以通过拖动进度条来更改X轴,Y轴,Z轴的值:
XAML:
    <Grid x:Name="LayoutRoot">
        <Grid.RowDefinitions>
            <RowDefinition Height="*" />
            <RowDefinition Height="Auto"/>
            <RowDefinition Height="Auto"/>
            <RowDefinition Height="Auto"/>
        </Grid.RowDefinitions>
        <Grid.ColumnDefinitions>
            <ColumnDefinition Width="*" />
            <ColumnDefinition Width="Auto" />
        </Grid.ColumnDefinitions>
        <Grid.Background>
            <ImageBrush ImageSource="../images/widows7.jpg" />
        </Grid.Background>
        <!--3D 元素-->
        <Grid Width="200" Height="160" Background="Green" >
            <TextBlock Foreground="White" Text="Windows Phone 7" Grid.Column="0" FontFamily="Arial" FontSize="22" Margin="6,58,6,20">
            </TextBlock>
            <Grid.Effect>
                <DropShadowEffect Direction="50" BlurRadius="60" Color="Green" Opacity="0.8" />
            </Grid.Effect>
            <Grid.Projection>
                <PlaneProjection  x:Name="prots" />
            </Grid.Projection>
        </Grid>
        <!--Silder 控件和元素之间的TwoWay 数据绑定用来设置Projection属性-->
        <Slider Height="23" Grid.Column="0" Grid.Row="1" Maximum="180" Minimum="-180" Value="{Binding RotationX,Mode=TwoWay,ElementName=prots}" />
        <Slider Height="23" Grid.Column="0" Grid.Row="2" Maximum="180" Minimum="-180" Value="{Binding RotationY,Mode=TwoWay,ElementName=prots}"/>
        <Slider Height="23" Grid.Column="0" Grid.Row="3" Maximum="180" Minimum="-180" Value="{Binding RotationZ,Mode=TwoWay,ElementName=prots}"/>
        <!--用TextBox显示 坐标-->
        <TextBox  Height="23" Width="150" Grid.Column="1"  Grid.Row="1" Margin="10" IsReadOnly="True" Text="{Binding RotationX,Mode=TwoWay,ElementName=prots}"/>
        <TextBox  Height="23" Width="150" Grid.Column="1"  Grid.Row="2" Margin="10" IsReadOnly="True" Text="{Binding RotationY,Mode=TwoWay,ElementName=prots}"/>
        <TextBox  Height="23" Width="150" Grid.Column="1"  Grid.Row="3" Margin="10" IsReadOnly="True" Text="{Binding RotationZ,Mode=TwoWay,ElementName=prots}"/>
    </Grid>
效果:

 浙公网安备 33010602011771号