Nginx反向代理+PHP服务器搭建
Nginx环境搭建
下载解压Nginx源码包
可以通过已有的压缩包
这里也可以通过yum的在线下载
wget http://nginx.org/download/nginx-1.13.7.tar.gz
tar -zxf nginx-1.14.2.tar.gz -C [目标路径]

安装nginx
进入解压后的源码包内
cd nginx-1.14.2/

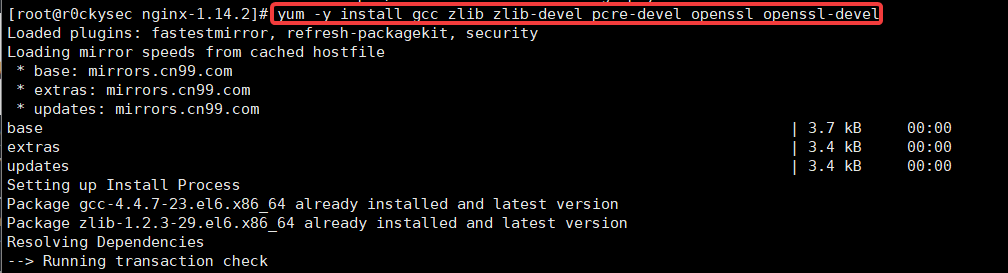
执行命令之前,要做一件事情,解决依赖,不然安装不了nginx
一键安装依赖包
yum -y install gcc zlib zlib-devel pcre-devel openssl openssl-devel
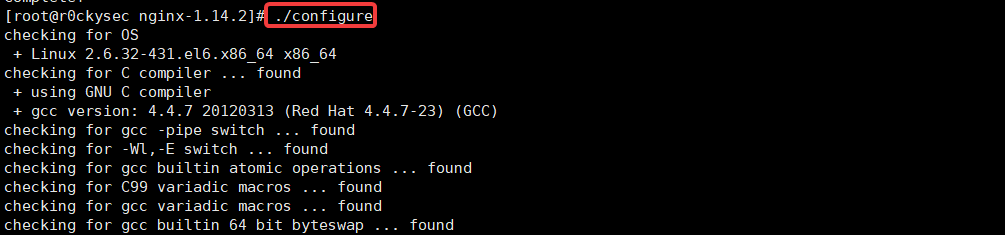
开始安装nginx
执行 ./configure
以下表示成功

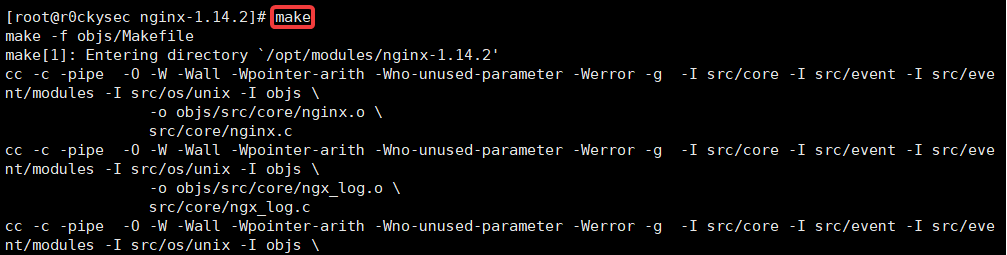
编译 make
安装 make install

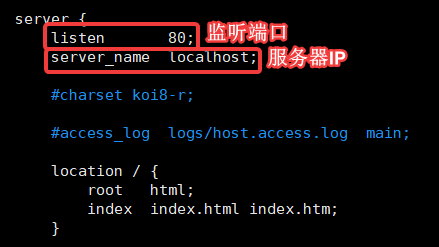
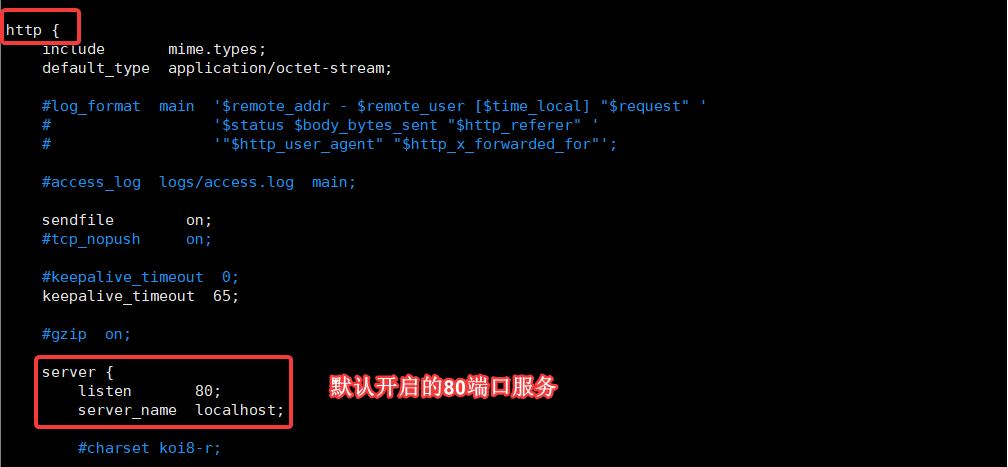
设置配置文件
vim conf/nginx.conf
启动命令
nginx启动命令在 /usr/local/nginx/sbin/ 目录下
可以拷贝到 /usr/bin/ 快捷启动
./nginx 启动
指定配置文件启动
nginx -c /usr/local/nginx/conf/nginx.conf
./nginx -s stop 关闭
./nginx -s reload 重启

iptables需要开启80端口否则无法访问,
iptables -I INPUT -p tcp --dport 80 -j ACCEPT

简单配置端口转发
进入配置文件
vim conf/nginx.conf
创建一个新的应用服务器来转发端口
server {
    # 监听8090端口
	listen	8090;
	location / {
        # 访问8090端口转发到80端口的应用服务器上
    	proxy_pass  http://127.0.0.1:80;
	}
}

重启nginx nginx -s reload

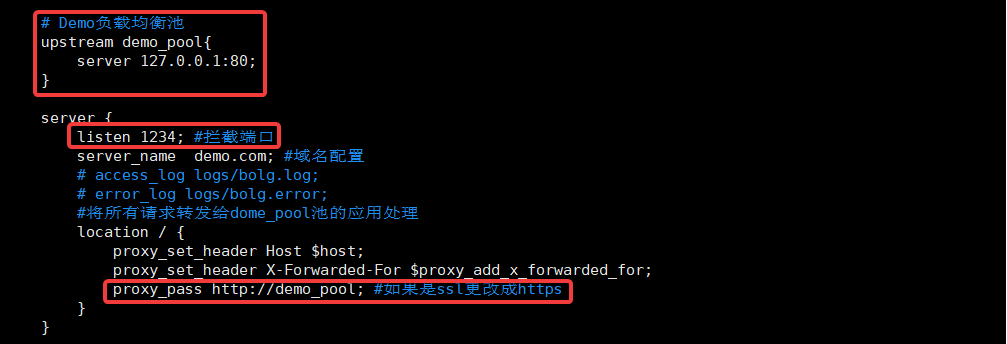
通过配置负载均衡池配置端口转发
进入配置文件
vim conf/nginx.conf
# 配置负载均衡池
upstream demo_pool{
	server 127.0.0.1:80;
}
server {
        listen 1234; #拦截端口
        server_name  demo.com; #域名配置
        # access_log logs/bolg.log;
        # error_log logs/bolg.error;
        #将所有请求转发给dome_pool池的应用处理
        location / {
            proxy_set_header Host $host;
            proxy_set_header X-Forwarded-For $proxy_add_x_forwarded_for;
            proxy_pass http://demo_pool; #如果是ssl更改成https
    }
}
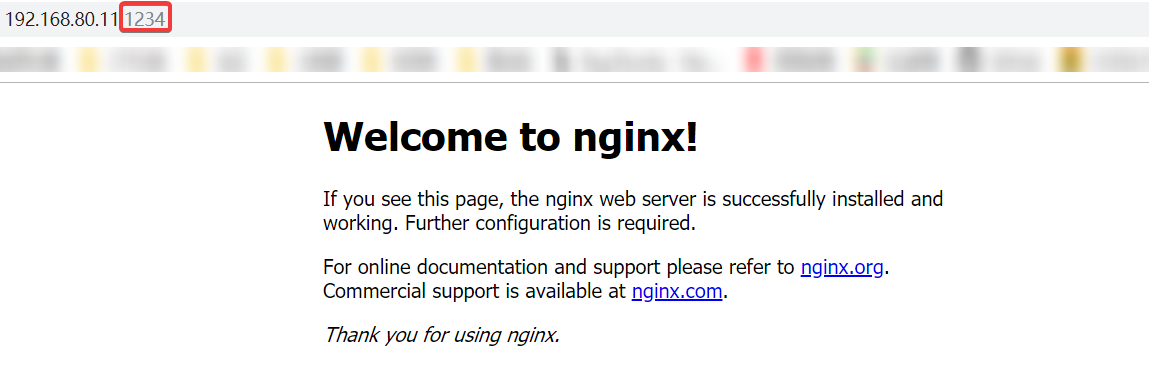
访问 http://192.168.80.11:1234
server_name的匹配
server {
listen 80;
server_name www;
location / {
default_type text/html;
content_by_lua '
ngx.say("<p>www</p>")
';
}
}
server {
listen 80;
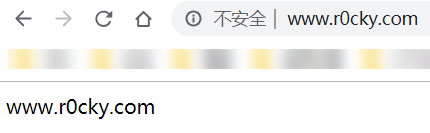
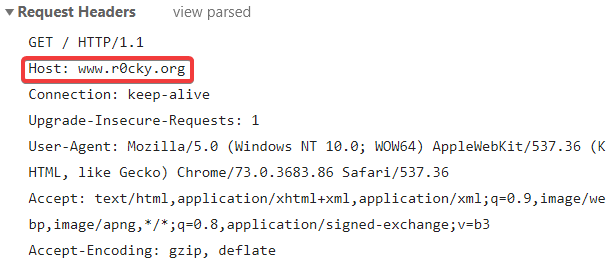
server_name www.r0cky.com;
location / {
default_type text/html;
content_by_lua '
ngx.say("<p>www.r0cky.com</p>")
';
}
}
server {
listen 80;
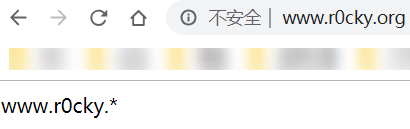
server_name www.r0cky.*;
location / {
default_type text/html;
content_by_lua '
ngx.say("<p>www.r0cky.*</p>")
';
}
}
server {
listen 80;
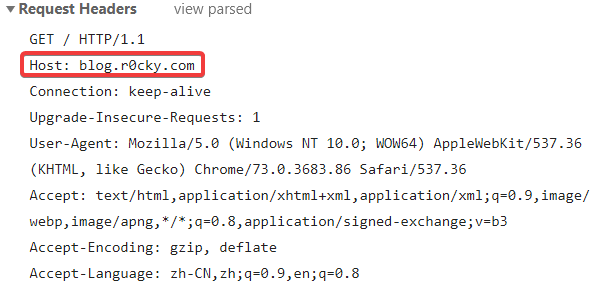
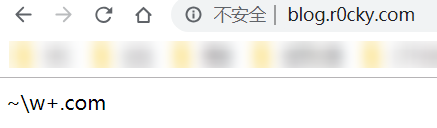
server_name ~\w+.com;
location / {
default_type text/html;
content_by_lua '
ngx.say("<p>~\w+.com</p>")
';
}
}
server {
listen 80;
server_name ~.*r0cky.com;
location / {
default_type text/html;
content_by_lua '
ngx.say("<p>~.*r0cky.com</p>")
';
}
}
不同的域名会通过请求头中的HOST字段,匹配到特定的server块,转发到对应的应用服务器中去。
hosts
192.168.80.11	www.r0cky.com
192.168.80.11	www.r0cky.org
192.168.80.11	blog.r0cky.com
192.168.80.11	r0cky.com

匹配顺序
server_name与host匹配优先级如下:
- 完全匹配
- 通配符在前的,如.test.com
- 在后的,如www.test.*
- 正则匹配,如~^.www.test.com$
如果都不匹配
- 优先选择listen配置项后有default或default_server的
- 找到匹配listen端口的第一个server块
PHP安装部署
服务器基础环境和依赖安装
如果系统自带 Apache、PHP、MySQL,先卸载
yum remove httpd
yum remove php
yum remove mysql
升级所有软件包
yum update -y
# 安装可能用到的软件包,大部分其实已经内置在系统中
# gcc:GNU 编译器套装
# gcc-c++:GCC 的 C++ 支持
# autoconf:在sh下制作供编译、安装和打包软件的配置脚本的工具
# libjpeg-turbo-static:处理 JPEG 图像数据格式的自由库
# libpng:处理 PNG 图像数据格式的自由库
# freetype: 字体光栅化库
# libxml2: 解析XML文档的函数库
# zlib: 提供数据压缩之用的库
# glibc:C函数库
# glib2:跨平台的、用C语言编写的五个底层库的集合
# bzip2:比传统的 gzip 或者 ZIP 的压缩效率更高的库
# ncurses:虚拟终端中的“类GUI”应用软件工具箱
# curl:利用URL语法在命令行下工作的文件传输工具
# e2fsprogs:用以维护ext2,ext3和ext4文件系统的工具程序集
# krb5-libs:网络身份验证系统
# libidn:通过IETF国际域名(IDN)实施字符串预处理、Punycode 和 IDNA规格定义的工具
# openssl:安全通信软件包
# openldap:轻型目录访问协议
# nss-pam-ldapd:使用目录服务器的 nsswitch 模块
# openldap-clients:LDAP 客户端实用工具
# openldap-servers:LDAP 服务
# bison:自动生成语法分析器程序
# lrzsz:远程上传和下载文件
# libmcrypt:mcrypt 算法库
# mhash:mhash 算法库
# ImageMagick:用于查看、编辑位图文件以及进行图像格式转换的开放源代码软件套装
# libmemcached: memcache 客户端
安装依赖
先安装
yum install -y epel-release
yum -y install gcc gcc-c++ autoconf libjpeg-turbo-static libjpeg-turbo-devel libpng libpng-devel freetype freetype-devel libxml2 libxml2-devel pcre pcre-devel zlib zlib-devel glibc glibc-devel glib2 glib2-devel bzip2 bzip2-devel ncurses ncurses-devel curl curl-devel e2fsprogs e2fsprogs-devel krb5-libs krb5-devel libidn libidn-devel openssl openssl-devel openldap openldap-devel nss-pam-ldapd openldap-clients openldap-servers bison lrzsz libmcrypt libmcrypt-devel mcrypt mhash ImageMagick ImageMagick-devel libmemcached libmemcached-devel
yum install gcc bison bison-devel zlib-devel libmcrypt-devel mcrypt mhash-devel openssl-devel libxml2-devel libcurl-devel bzip2-devel readline-devel libedit-devel sqlite-devel jemalloc jemalloc-devel

创建用户和用户组
groupadd www
useradd -g www -s /sbin/nologin -M www
解压PHP安装包
tar -zxf php-5.6.40.tar.gz
预编译安装
cd php-5.6.40/
./configure --prefix=/usr/local/php --with-config-file-path=/usr/local/php/etc --with-mysql --with-mysqli --with-curl --with-mcrypt --with-gd --with-openssl --with-mhash --with-xmlrpc --with-gettext --with-bz2 --with-zlib --with-iconv-dir=/usr/local --with-freetype-dir --with-jpeg-dir --with-png-dir --with-libxml-dir --enable-xml --enable-bcmath --enable-shmop --enable-sysvsem --enable-inline-optimization --enable-mbregex --enable-mbstring --enable-gd-native-ttf --enable-pcntl --enable-sockets --enable-zip --enable-soap --enable-ftp --enable-exif --enable-opcache --enable-fpm --with-fpm-user=www --with-fpm-group=www --without-pear
参数说明
""" 安装路径 """
--prefix=/usr/local/php56 \
""" php.ini 配置文件路径 """
--with-config-file-path=/usr/local/php56/etc \
""" 优化选项 """
--enable-inline-optimization \
--disable-debug \
--disable-rpath \
--enable-shared \
""" 启用 opcache,默认为 ZendOptimizer+(ZendOpcache) """
--enable-opcache \
""" FPM """
--enable-fpm \
--with-fpm-user=www \
--with-fpm-group=www \
""" MySQL """
--with-mysql=mysqlnd \
--with-mysqli=mysqlnd \
--with-pdo-mysql=mysqlnd \
""" 国际化与字符编码支持 """
--with-gettext \
--enable-mbstring \
--with-iconv \
""" 加密扩展 """
--with-mcrypt \
--with-mhash \
--with-openssl \
""" 数学扩展 """
--enable-bcmath \
""" Web 服务,soap 依赖 libxml """
--enable-soap \
--with-libxml-dir \
""" 进程,信号及内存 """
--enable-pcntl \
--enable-shmop \
--enable-sysvmsg \
--enable-sysvsem \
--enable-sysvshm \
""" socket & curl """
--enable-sockets \
--with-curl \
""" 压缩与归档 """
--with-zlib \
--enable-zip \
--with-bz2 \
""" GNU Readline 命令行快捷键绑定 """
--with-readline
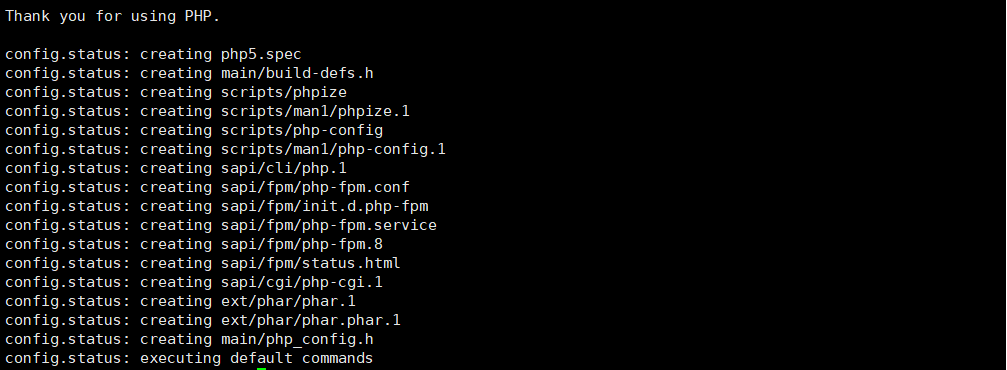
安装
make && make install

配置PHP
配置文件
cp php.ini-development /usr/local/php/etc/php.ini
php-fpm 服务
复制启动脚本到 init.d 目录并修改权限
cp /usr/local/php/etc/php-fpm.conf.default /usr/local/php/etc/php-fpm.conf
cp sapi/fpm/init.d.php-fpm /etc/init.d/php-fpm
chmod +x /etc/init.d/php-fpm 或者 chmod 700 /etc/init.d/php-fpm
启动 php-fpm
service php-fpm start
php-fpm 可用参数 start | stop | force-quit | restart | reload | status
方便启动
两种方法
-
创建快捷方式
ln -s /usr/local/php/bin/php /usr/bin/ln -s /etc/init.d/php-fpm /usr/bin/php-fpm -
设置环境变量
vim ~/.bash_profilePATH=$PATH:$HOME/bin 改为: PATH=$PATH:$HOME/bin:/usr/local/php/bin使环境变量生效
~/.bash_profile
查看版本
php -v

Nginx+PHP配置
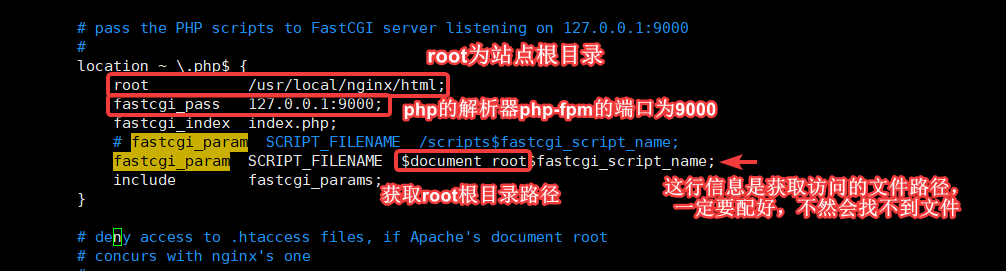
修改Nginx的配置文件
# pass the PHP scripts to FastCGI server listening on 127.0.0.1:9000
#
location ~ \.php$ {
	root           /usr/local/nginx/html;
	fastcgi_pass   127.0.0.1:9000;
	fastcgi_index  index.php;
	# fastcgi_param  SCRIPT_FILENAME  /scripts$fastcgi_script_name;
	fastcgi_param  SCRIPT_FILENAME  $document_root$fastcgi_script_name;
	include        fastcgi_params;
}

访问 192.168.80.11/index.php

初期环境搭建完成!可以开始渗透复现了。后期完善Mysql等环境

 浙公网安备 33010602011771号