
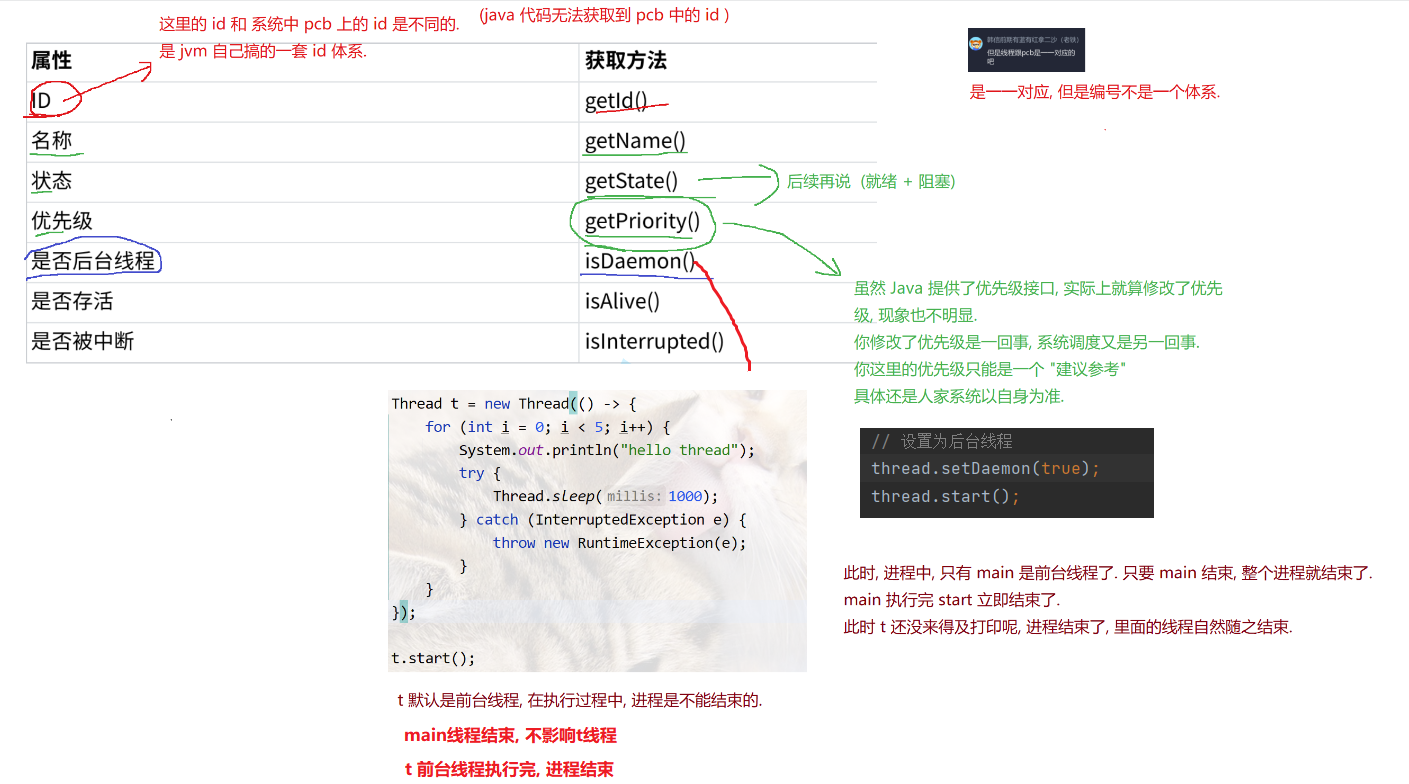
了解Thread类
了解Thread类
1. Thread类中的构造方法
可以给线程起名字
查看代码
 public class Test {

    public static void main(String[] args) {
        Thread t1 = new Thread( () -> {
            while (true) {
                System.out.println("hello t1");
                try {
                    Thread.sleep(1000);
                } catch (InterruptedException e) {
                    throw new RuntimeException(e);
                }
            }
        }, "自定义线程");

        t1.start();
    }

}
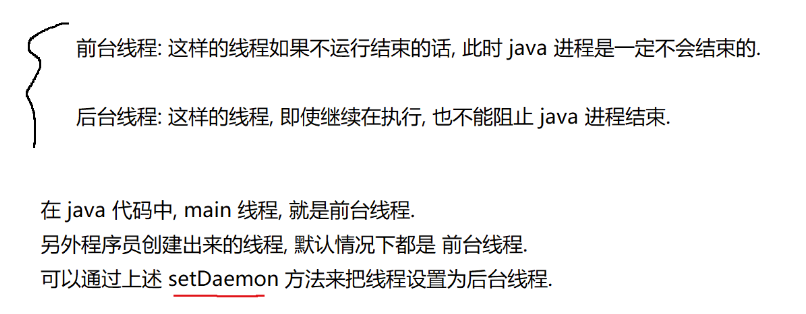
2. 设置/判断 后台进程
一个线程创建出来, 默认是前台线程, 所有前台线程执行完, 整个进程就结束了
后台线程不影响进程结束, 就算后台线程还没执行完, 只要前台线程执行完, 进程就结束
查看代码
public class Test {

    public static void main(String[] args) {
        Thread t1 = new Thread( () -> {
            while (true) {
                System.out.println("hello t1");
                try {
                    Thread.sleep(1000);
                } catch (InterruptedException e) {
                    throw new RuntimeException(e);
                }
            }
        }, "自定义线程");

        // 把 t1线程 设置成后台线程
        t1.setDaemon(true);
        t1.start();
    }

}
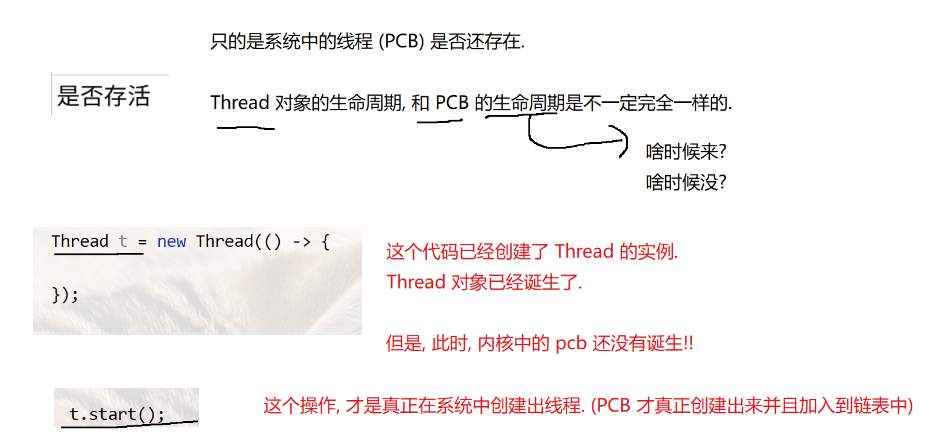
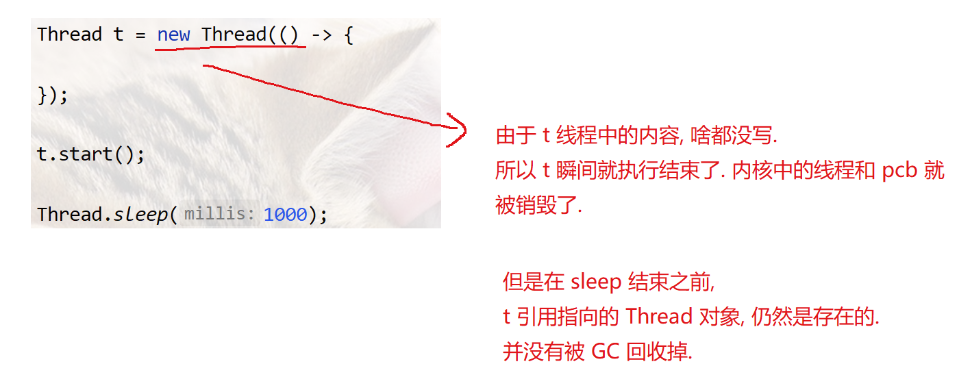
3. 是否存活
查看代码
class Test {
    public static void main(String[] args) throws InterruptedException {
        Thread t = new Thread( () -> {

        });
        t.start();

        // 主线程 睡1s
        Thread.sleep(2000);
        // 判断 t线程是否存在
        // false
        System.out.println(t.isAlive());
    }
}
查看代码
class Test {
    public static void main(String[] args) throws InterruptedException {
        Thread t = new Thread( () -> {
            try {
                Thread.sleep(2000);
            } catch (InterruptedException e) {
                throw new RuntimeException(e);
            }
        });
        t.start();

        // 主线程 睡1s
        Thread.sleep(2000);
        // 判断 t线程是否存在
        System.out.println(t.isAlive());
    }
}
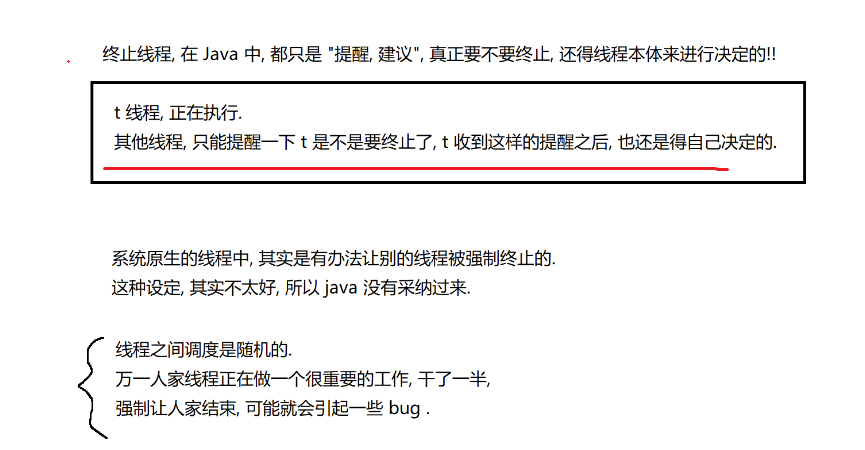
4. 终止一个线程
在 java 中, 线程自己控制, 是否结束
例子1:
查看代码
class Demo10 {
    private static boolean isRunning = true;

    public static void main(String[] args) {

        Thread t = new Thread(() -> {
            while (isRunning) {
                System.out.println("hello thread");
                try {
                    Thread.sleep(1000);
                } catch (InterruptedException e) {
                    throw new RuntimeException(e);
                }
            }
            System.out.println("t 线程已经结束了");
        });
        t.start();

        try {
            Thread.sleep(3000);
        } catch (InterruptedException e) {
            throw new RuntimeException(e);
        }

        // 3s 之后, 主线程修改 isRunning 的值, 从而通知 t 结束.
        System.out.println("控制 t 线程结束");
        isRunning = false;
    }
}

查看代码
 class Demo10 {
    // private static boolean isRunning = true;

    public static void main(String[] args) {

        boolean isRunning = true;

        Thread t = new Thread(() -> {
            while (isRunning) {
                System.out.println("hello thread");
                try {
                    Thread.sleep(1000);
                } catch (InterruptedException e) {
                    throw new RuntimeException(e);
                }
            }
            System.out.println("t 线程已经结束了");
        });
        t.start();

        try {
            Thread.sleep(3000);
        } catch (InterruptedException e) {
            throw new RuntimeException(e);
        }

        // 3s 之后, 主线程修改 isRunning 的值, 从而通知 t 结束.
        //System.out.println("控制 t 线程结束");
        //isRunning = false;
    }
}
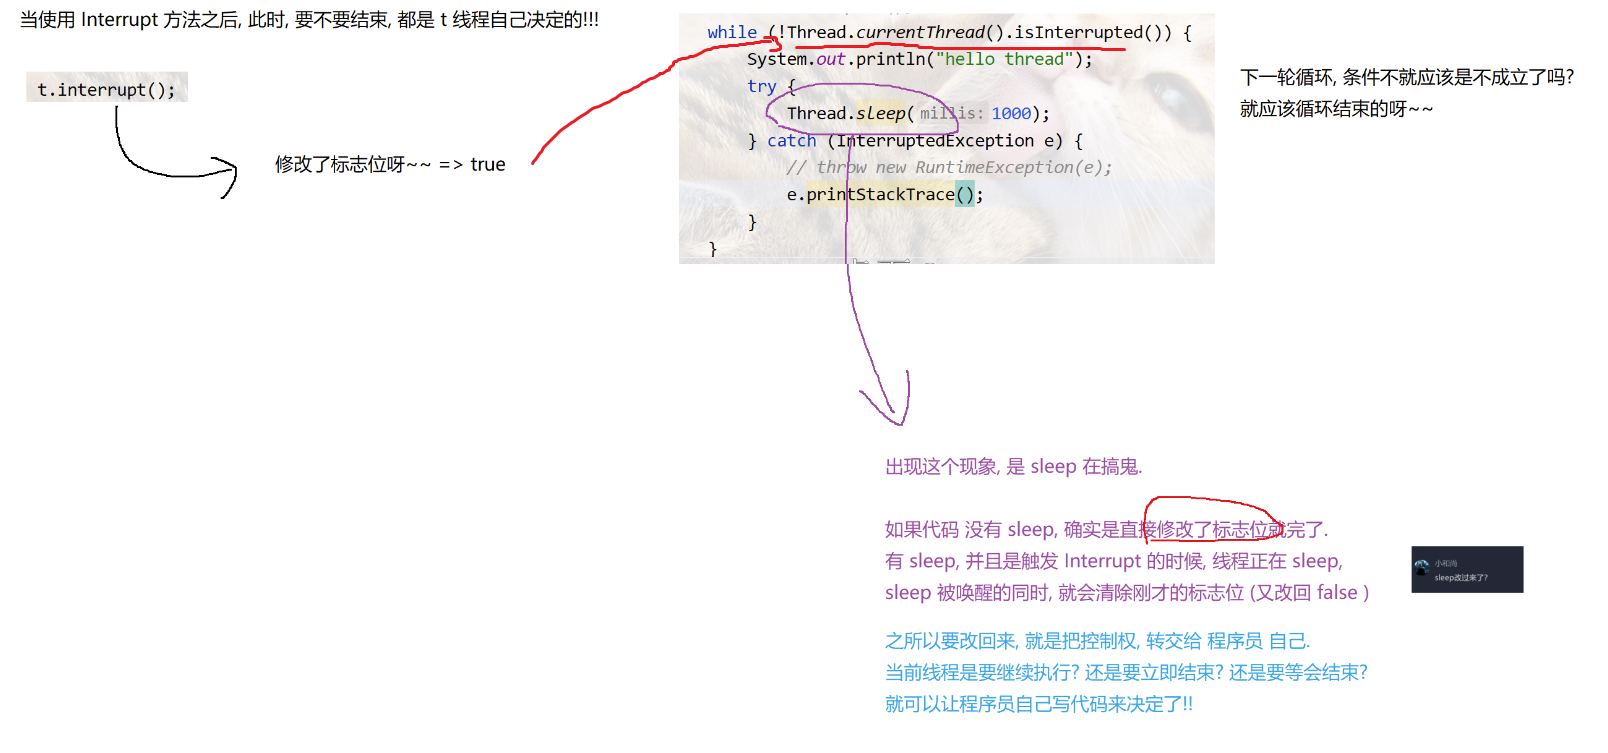
例子2:
class Demo11 {

    public static void main(String[] args) {
        Thread t = new Thread( () -> {
            // 不能这么写, 因为t还未初始化
           //t.isInterrupted();

            // Thread.currentThread() 获取当前 线程对象t
            while (!Thread.currentThread().isInterrupted()) {
                System.out.println("hello thread");
                try {
                    // 线程休眠被打断, 标志位重新设置为true
                    Thread.sleep(1000);
                } catch (InterruptedException e) {
                    // 这里自己决定, 线程是继续执行,立即结束,还是等会结束
                    throw new RuntimeException(e);
                    // e.printStackTrace();

                }
            }
        });

        t.start();

        try {
            Thread.sleep(3000);
        } catch (InterruptedException e) {
            //throw new RuntimeException(e);
            e.printStackTrace();
        }
        // 设置标志位为true, 中断线程
        t.interrupt();
    }
}
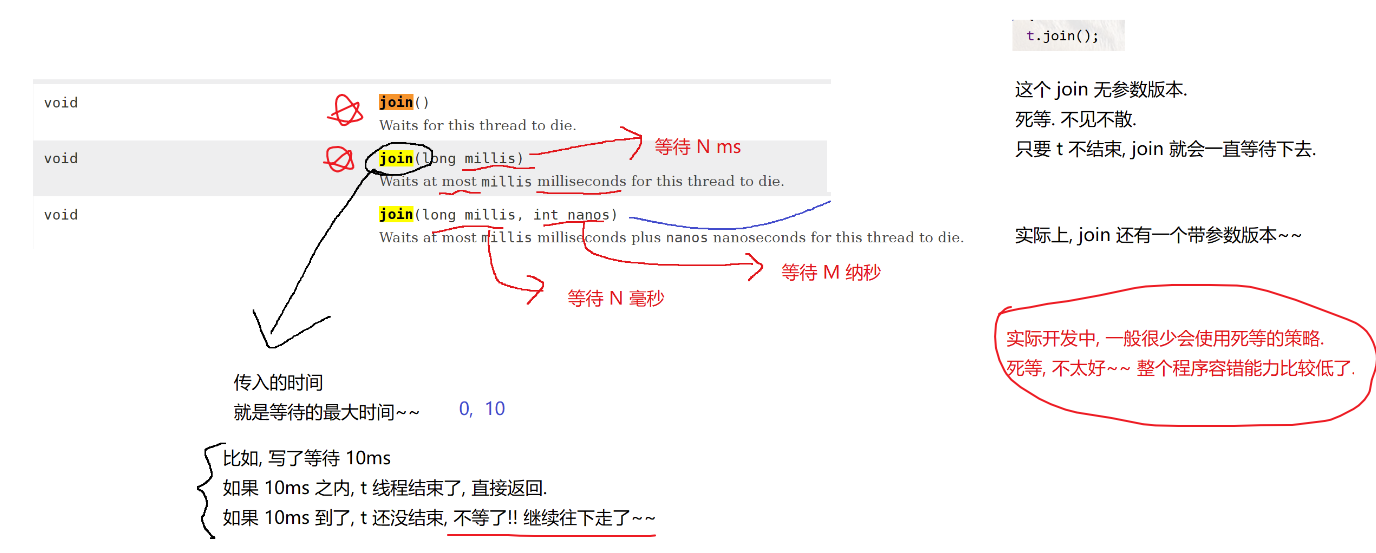
5. 设置线程之间的结束顺序
多个线程之间是抢占式执行, 哪个线程先执行完,哪个线程最后执行完, 这是不确定的
通过线程等待, 确定线程结束的先后顺序
例子1:
查看代码
package demo2;

class Demo12 {
    public static void main(String[] args) throws InterruptedException {
        Thread t = new Thread( () -> {
            for (int i = 0; i < 5; i++) {
                System.out.println("hello thread");
                try {
                    Thread.sleep(1000);
                } catch (InterruptedException e) {
                    e.printStackTrace();
                }
            }
            System.out.println("thread end");
        });

        t.start();

        for (int i = 0; i < 3; i++) {
            System.out.println("hello main");
            try {
                Thread.sleep(1000);
            } catch (InterruptedException e) {
                e.printStackTrace();
            }
        }
        // main方法内部调用 t.join(), main线程阻塞, 等待 t 线程执行完
        t.join();
        System.out.println("main end");
    }
}
例子2:
查看代码
class Demo13 {
    public static void main(String[] args) throws InterruptedException {

        Thread t1 = new Thread(() -> {
            for (int i = 0; i < 3; i++) {
                System.out.println("t1");
                try {
                    Thread.sleep(1000);
                } catch (InterruptedException e) {
                    e.printStackTrace();
                }
            }
        });

        Thread t2 = new Thread(() -> {
            for (int i = 0; i < 3; i++) {
                System.out.println("t2");
                try {
                    Thread.sleep(1000);
                } catch (InterruptedException e) {
                    e.printStackTrace();
                }
            }
        });


        t1.start();
        t2.start();

        // main 线程阻塞,  等待 t1 线程执行完
        // t2线程会执行的, main 线程阻塞 不影响 t2线程执行
        t1.join();
        System.out.println("main end");
    }
}
查看代码
class Demo13 {
    public static void main(String[] args) throws InterruptedException {
        Thread t2 = new Thread(() -> {
            for (int i = 0; i < 4; i++) {
                System.out.println("t2");
                try {
                    Thread.sleep(1000);
                } catch (InterruptedException e) {
                    e.printStackTrace();
                }
            }
        });

        Thread t1 = new Thread(() -> {
            // t1 一进来先等待 t2 结束
            try {
                // 这里的sleep是必要的, 因为得确保t2线程启动
                //Thread.sleep(500);

                // t1阻塞, 等待t2执行完
                t2.join();
            } catch (InterruptedException e) {
                e.printStackTrace();
            }

            for (int i = 0; i < 3; i++) {
                System.out.println("t1");
                try {
                    Thread.sleep(1000);
                } catch (InterruptedException e) {
                    e.printStackTrace();
                }
            }
        });

        t1.start();
        //Thread.sleep(500);
        t2.start();

        // main 只等 t1
        // main等待t1线程执行完
        t1.join();
        System.out.println("main end");
    }
}
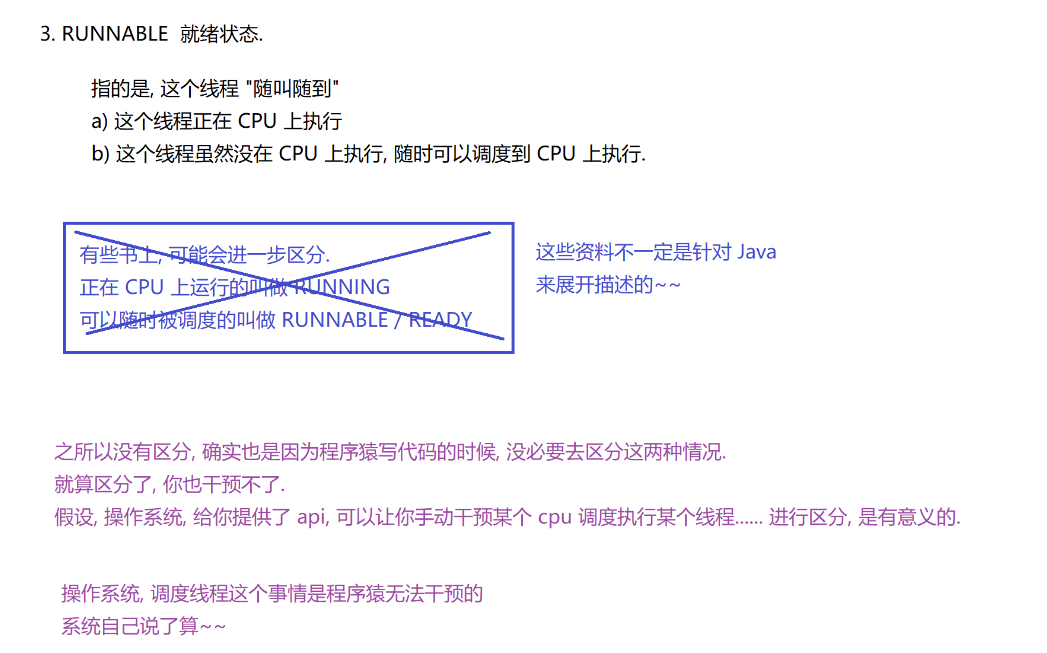
6. 了解线程的状态
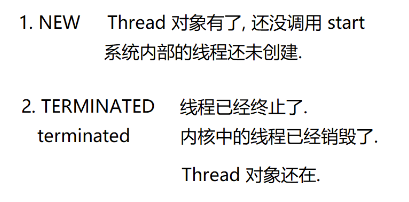
查看代码
class Demo17 {
    public static void main(String[] args) throws InterruptedException {
        Thread t = new Thread(() -> {
            System.out.println("hello");
        });
        System.out.println(t.getState());
        t.start();

        // main线程死等, 等待t线程执行完
        t.join();

        // t线程执行完后, 内核中pcb对象销毁
        System.out.println(t.getState());
    }
}
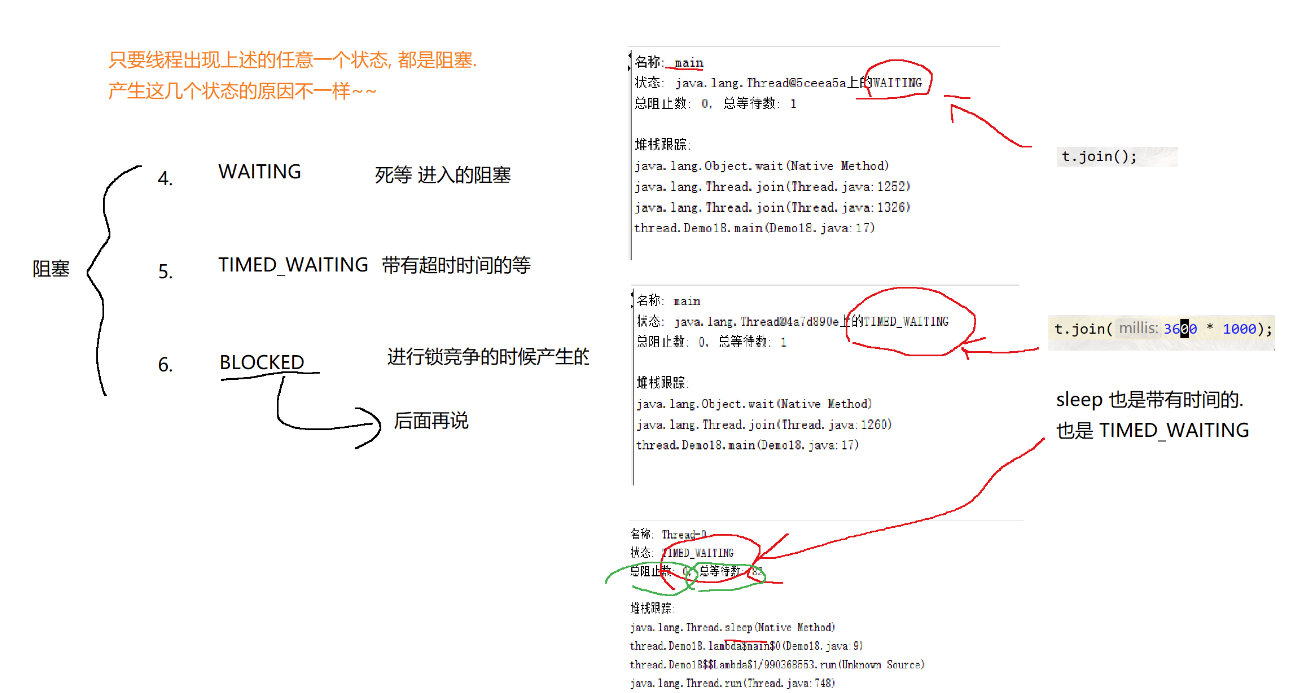
查看代码
class Demo18 {
    public static void main(String[] args) throws InterruptedException {
        Thread t = new Thread(() -> {
            while (true) {
                System.out.println("hello thread");
                try {
                    Thread.sleep(1000);
                } catch (InterruptedException e) {
                    e.printStackTrace();
                }
            }
        });
        t.start();
        // 死等版本的 join -> waiting
        //t.join();

        // 有时间版本 -> time-wainting
        // t.join(3600 * 1000);
    }
}

 浙公网安备 33010602011771号