

OAuth2 合并服务器,刷新令牌,删除令牌
6. 合并服务器
在项目比较小时,考虑到节省服务器资源,会考虑将授权服务器和资源服务器合并到一个项目中,避免启动多个 Java 进程。良心的艿艿,编写了四种授权模式的示例,如下图所示:

- 基于授权码模式的示例:lab-68-demo01-authorization-code-server
- 基于简化模式的示例:lab-68-demo01-implicit-server
- 基于客户端模式的示例:lab-68-demo01-client-credentials-server
具体的代码实现,实际和上述每个授权模式对应的小节是基本一致的,只是说将代码“放”在了一个项目中。嘿嘿~
7. 刷新令牌
在 OAuth2.0 中,一共有两类令牌:
- 访问令牌(Access Token)
- 刷新令牌(Refresh Token)
在访问令牌过期时,我们可以使用刷新令牌向授权服务器获取一个新的访问令牌。
可能会胖友有疑惑,为什么会有刷新令牌呢?每次请求资源服务器时,都会在请求上带上访问令牌,这样它的泄露风险是相对高的。
因此,出于安全性的考虑,访问令牌的过期时间比较短,刷新令牌的过期时间比较长。这样,如果访问令牌即使被盗用走,那么在一定的时间后,访问令牌也能在较短的时间吼过期。当然,安全也是相对的,如果使用刷新令牌后,获取到新的访问令牌,访问令牌后续又可能被盗用。
艿艿整理了下,大家常用开放平台的令牌过期时间,让大家更好的理解:
| 开放平台 | Access Token 有效期 | Refresh Token 有效期 |
|---|---|---|
| 微信开放平台 | 2 小时 | 未知 |
| 腾讯开放平台 | 90 天 | 未知 |
| 小米开放平台 | 90 天 | 10 年 |
7.1 示例项目
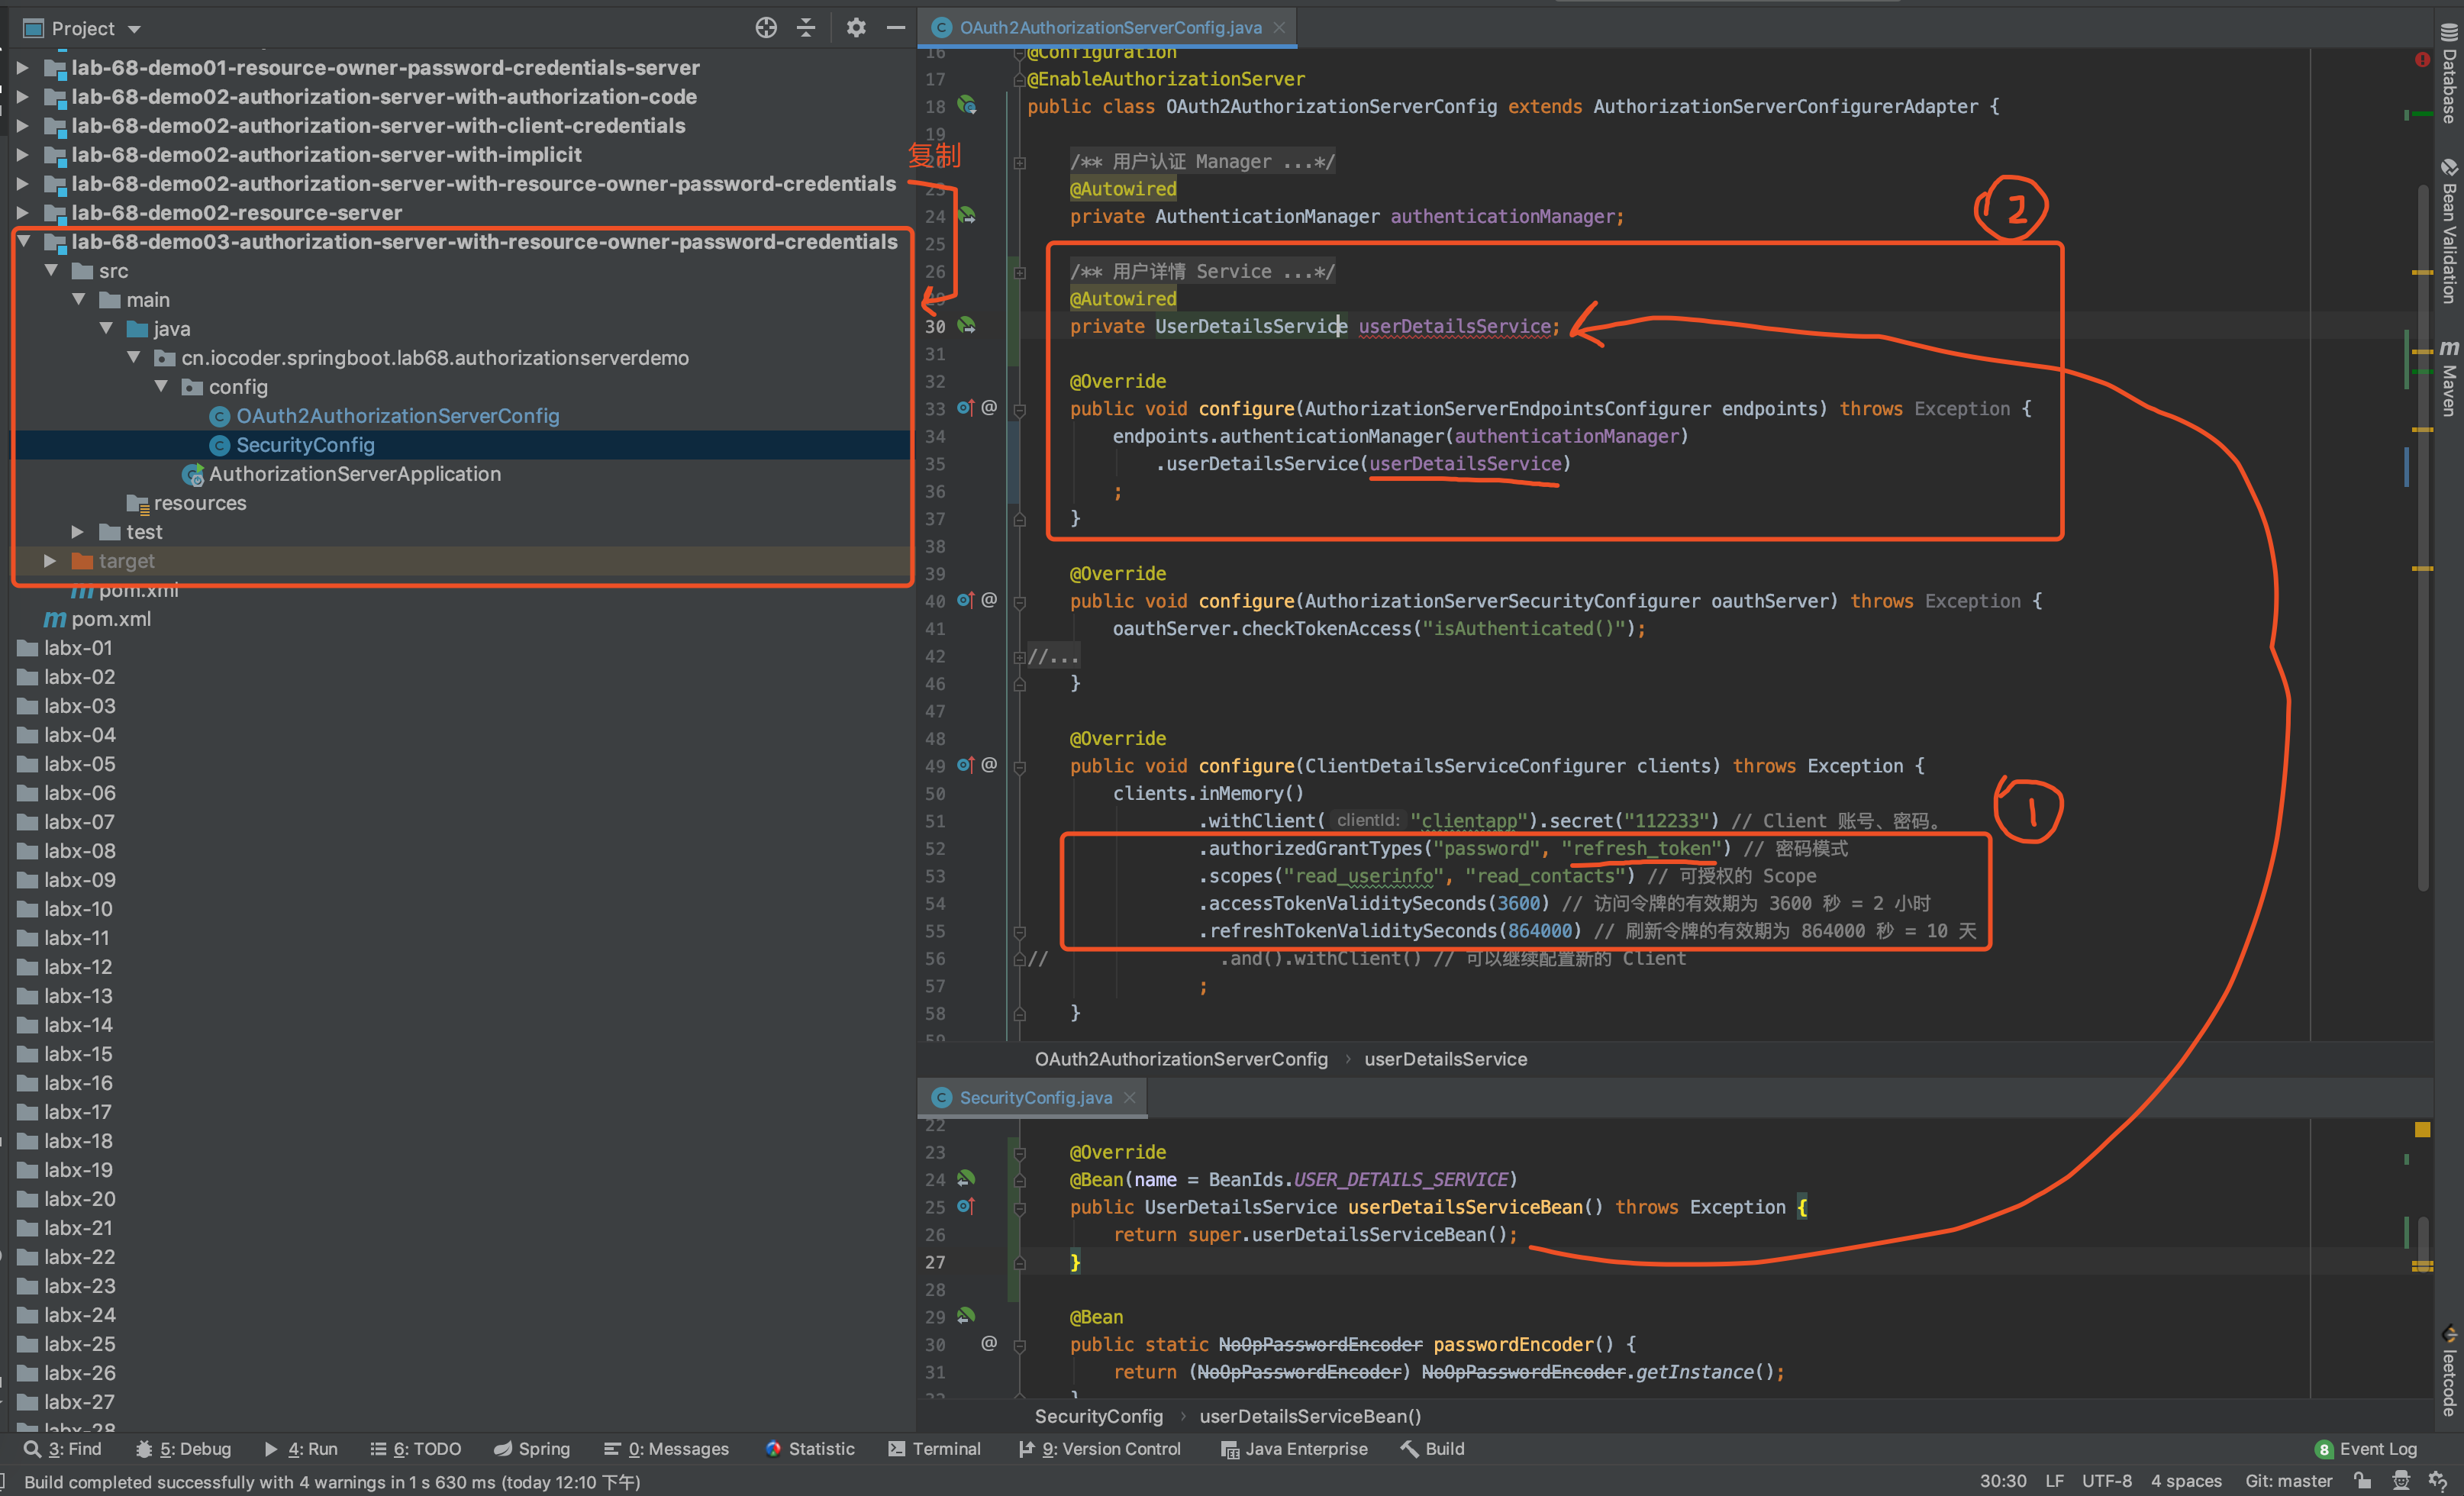
下面,复制出 lab-68-demo03-authorization-server-with-client-credentials 项目,搭建提供访问令牌的授权服务器。改动点如下图所示:
@Configuration
@EnableAuthorizationServer
public class OAuth2AuthorizationServerConfig extends AuthorizationServerConfigurerAdapter {

    /**
     * 用户认证 Manager
     */
    @Autowired
    private AuthenticationManager authenticationManager;


    @Autowired
    private UserDetailsService userDetailsService;


    //配置使用的 AuthenticationManager 实现用户认证的功能
    @Override
    public void configure(AuthorizationServerEndpointsConfigurer endpoints) throws Exception{
        endpoints.authenticationManager(authenticationManager)
                .userDetailsService(userDetailsService);
    }

//    @Override
//    public void configure(AuthorizationServerEndpointsConfigurer endpoints) throws Exception {
//        endpoints.authenticationManager(authenticationManager);
//    }

    //设置 /oauth/check_token 端点,通过认证后可访问。
    //这里的认证,指的是使用 client-id + client-secret 进行的客户端认证,不要和用户认证混淆。
    //其中,/oauth/check_token 端点对应 CheckTokenEndpoint 类,用于校验访问令牌的有效性。
    //在客户端访问资源服务器时,会在请求中带上访问令牌。
    //在资源服务器收到客户端的请求时,会使用请求中的访问令牌,找授权服务器确认该访问令牌的有效性。
    @Override
    public void configure(AuthorizationServerSecurityConfigurer oauthServer) throws Exception {
        oauthServer.checkTokenAccess("isAuthenticated()");
    }

    //进行 Client 客户端的配置。
    //设置使用基于内存的 Client 存储器。实际情况下,最好放入数据库中,方便管理。
/*
*
* 创建一个 Client 配置。如果要继续添加另外的 Client 配置,可以在 <4.3> 处使用 #and() 方法继续拼接。
* 注意,这里的 .withClient("clientapp").secret("112233") 代码段,就是 client-id 和 client-secret。
*补充知识:可能会有胖友会问,为什么要创建 Client 的 client-id 和 client-secret 呢?
*通过 client-id 编号和 client-secret,授权服务器可以知道调用的来源以及正确性。这样,
*即使“坏人”拿到 Access Token ,但是没有 client-id 编号和 client-secret,也不能和授权服务器发生有效的交互。
*/
    @Override
    public void configure(ClientDetailsServiceConfigurer clients) throws Exception {
        clients.inMemory() // <4.1>
                .withClient("clientapp").secret("112233") // <4.2> Client 账号、密码。
                .authorizedGrantTypes("password","refresh_token") //
                .scopes("read_userinfo", "read_contacts") // <4.2> 可授权的 Scope
                .accessTokenValiditySeconds(3000)
                .refreshTokenValiditySeconds(864000)
//                .and().withClient() // <4.3> 可以继续配置新的 Client
        ;
    }

}
@Configuration
@EnableWebSecurity
public class    SecurityConfig extends WebSecurityConfigurerAdapter {

    @Override
    @Bean(name = BeanIds.AUTHENTICATION_MANAGER)
    public AuthenticationManager authenticationManagerBean() throws Exception {
        return super.authenticationManagerBean();
    }

    @Override
    @Bean(name = BeanIds.USER_DETAILS_SERVICE)
    public UserDetailsService userDetailsServiceBean() throws Exception {
        return super.userDetailsServiceBean();
    }


    @Bean
    public static NoOpPasswordEncoder passwordEncoder() {
        return (NoOpPasswordEncoder) NoOpPasswordEncoder.getInstance();
    }

    @Override
    protected void configure(AuthenticationManagerBuilder auth) throws Exception {
        auth.
                // 使用内存中的 InMemoryUserDetailsManager
                        inMemoryAuthentication()
                // 不使用 PasswordEncoder 密码编码器
                .passwordEncoder(passwordEncoder())
                // 配置 yunai 用户
                .withUser("yunai").password("1024").roles("USER");
    }

}
① 在 OAuth2AuthorizationServerConfig 的 #configure(ClientDetailsServiceConfigurer clients) 方法中,在配置的 Client 的授权模式中,额外新增 "refresh_token" 刷新令牌。
通过 #accessTokenValiditySeconds(int accessTokenValiditySeconds) 方法,设置访问令牌的有效期。
通过 #refreshTokenValiditySeconds(int refreshTokenValiditySeconds) 方法,设置刷新令牌的有效期。
② 在 OAuth2AuthorizationServerConfig 的 #configure(AuthorizationServerEndpointsConfigurer endpoints) 方法中,设置使用的 userDetailsService 用户详情 Service。
而该 userDetailsService 是在 SecurityConfig 的 #userDetailsServiceBean() 方法创建的 UserDetailsService Bean。
友情提示:如果不进行 UserDetailsService 的设置,在使用刷新令牌获取新的访问令牌时,会抛出异常。
7.2 简单测试
执行 AuthorizationServerApplication 启动授权服务器。下面,我们使用 Postman 模拟一个 Client。
① POST 请求 http://localhost:8080/oauth/token 地址,使用密码模式进行授权。如下图所示:
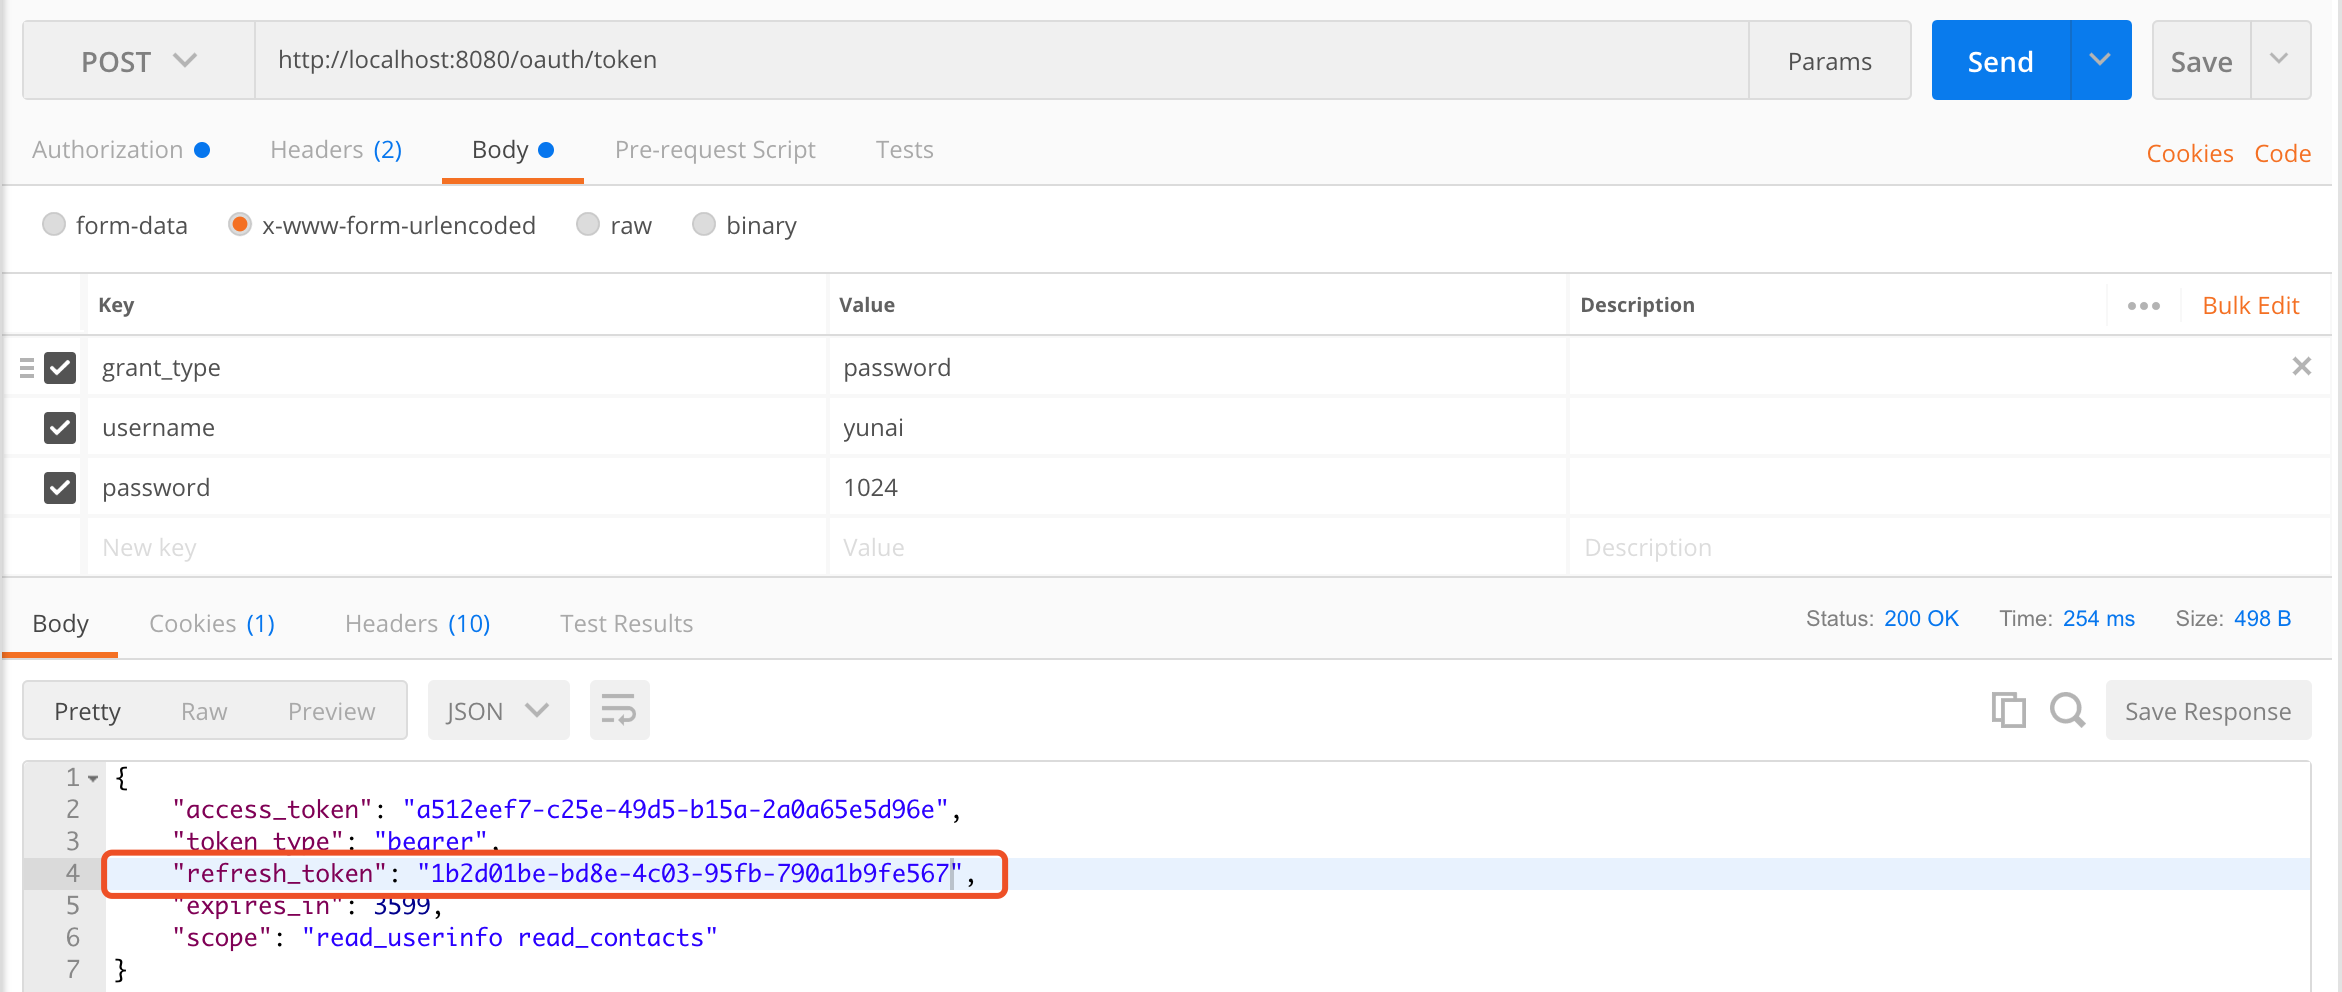
额外多返回了 refresh_token 刷新令牌。
② POST 请求 http://localhost:8080/oauth/token 地址,使用刷新令牌模式进行授权。如下图所示:
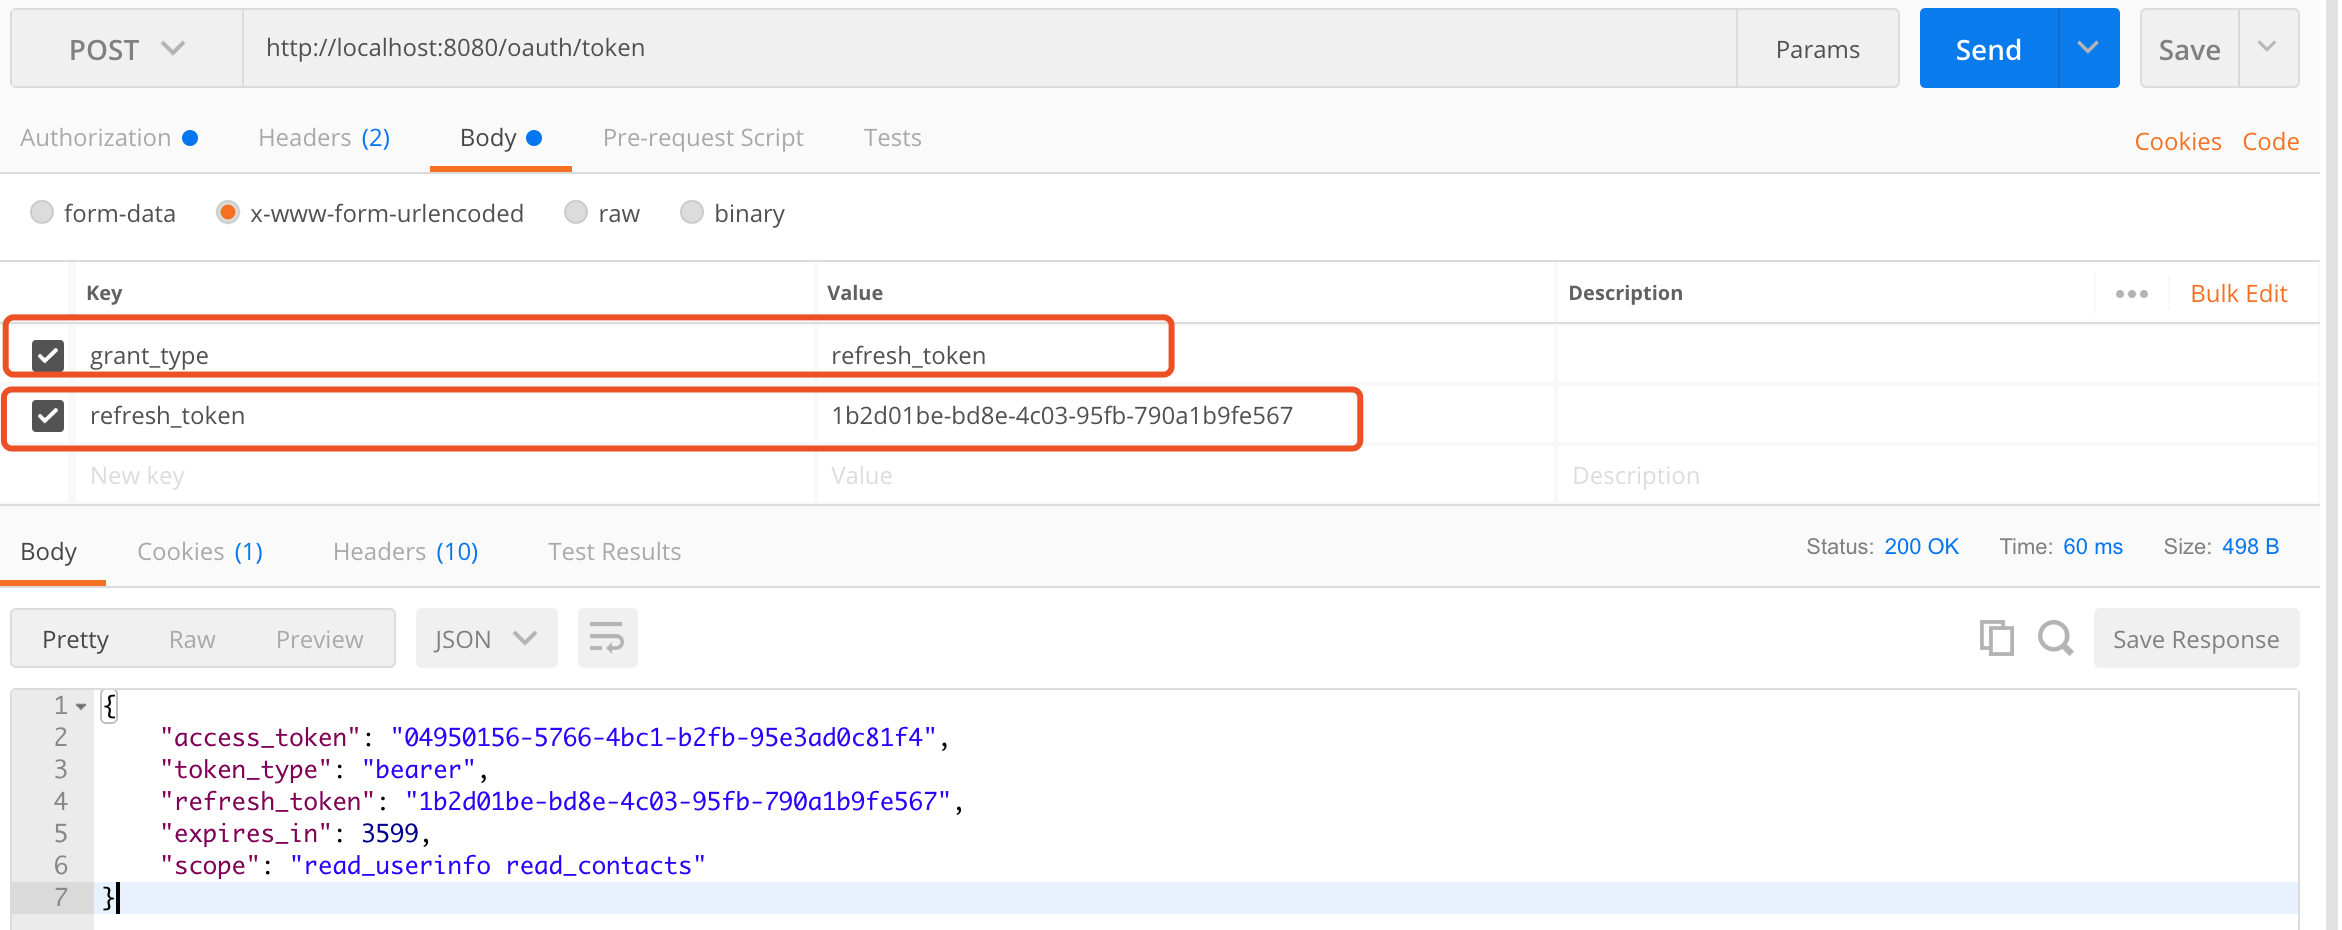
请求说明:
- 通过 Basic Auth 的方式,填写
client-id+client-secret作为用户名与密码,实现 Client 客户端有效性的认证。
- 请求参数
grant_type为"refresh_token",表示使用刷新令牌模式。
- 请求参数
refresh_token,表示刷新令牌。
在响应中,返回了新的 access_token 访问令牌。注意,老的 access_token 访问令牌会失效,无法继续使用。
8. 删除令牌
在用户登出系统时,我们会有删除令牌的需求。虽然说,可以通过客户端本地删除令牌的方式实现。但是,考虑到真正的彻底的实现删除令牌,必然服务端自身需要删除令牌。
友情提示:客户端本地删除令牌的方式实现,指的是清楚本地 Cookie、localStorage 的令牌缓存。
在 Spring Security OAuth2 中,并没有提供内置的接口,所以需要自己去实现。笔者参看 《Spring Security OAuth2 – Simple Token Revocation》 文档,实现删除令牌的 API 接口。
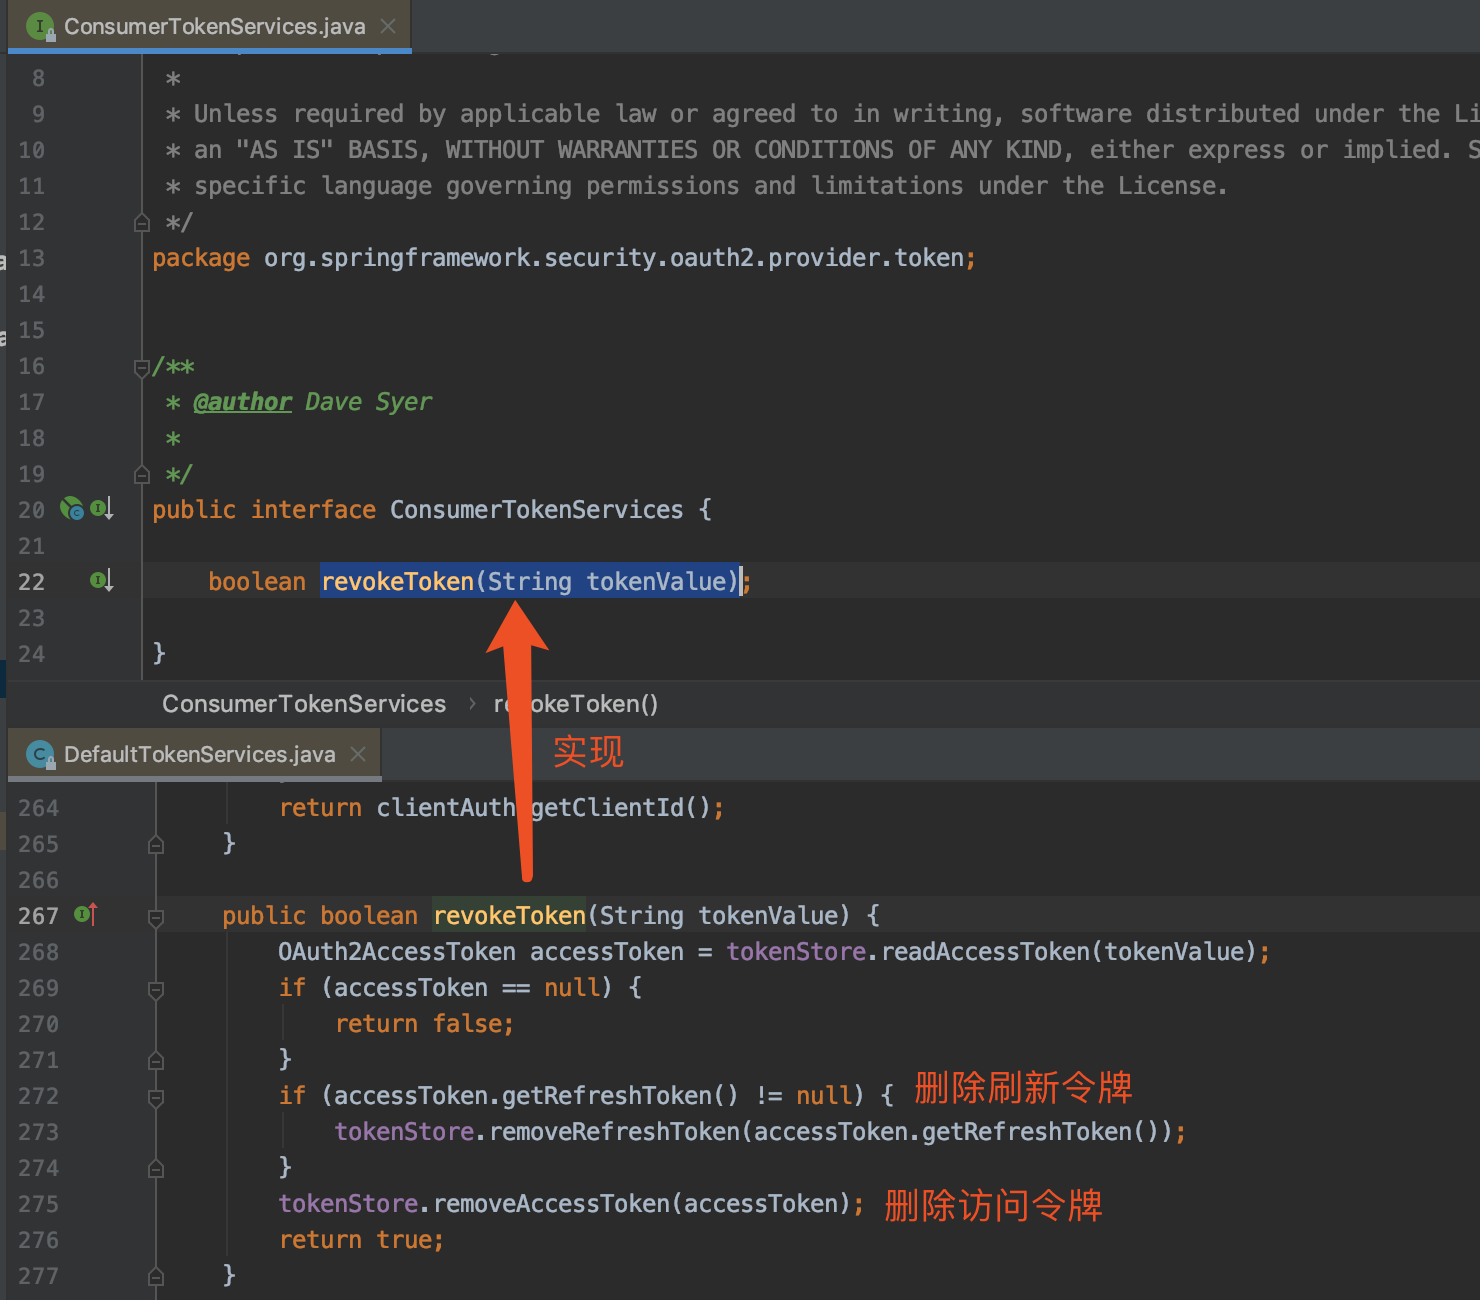
具体的实现,通过调用 ConsumerTokenServices 的 #revokeToken(String tokenValue) 方法,删除访问令牌和刷新令牌。如下图所示:
8.1 示例项目
下面,我们直接在授权服务器 lab-68-demo03-authorization-server-with-resource-owner-password-credentials 项目,修改接入删除令牌的功能。改动点如下图所示:
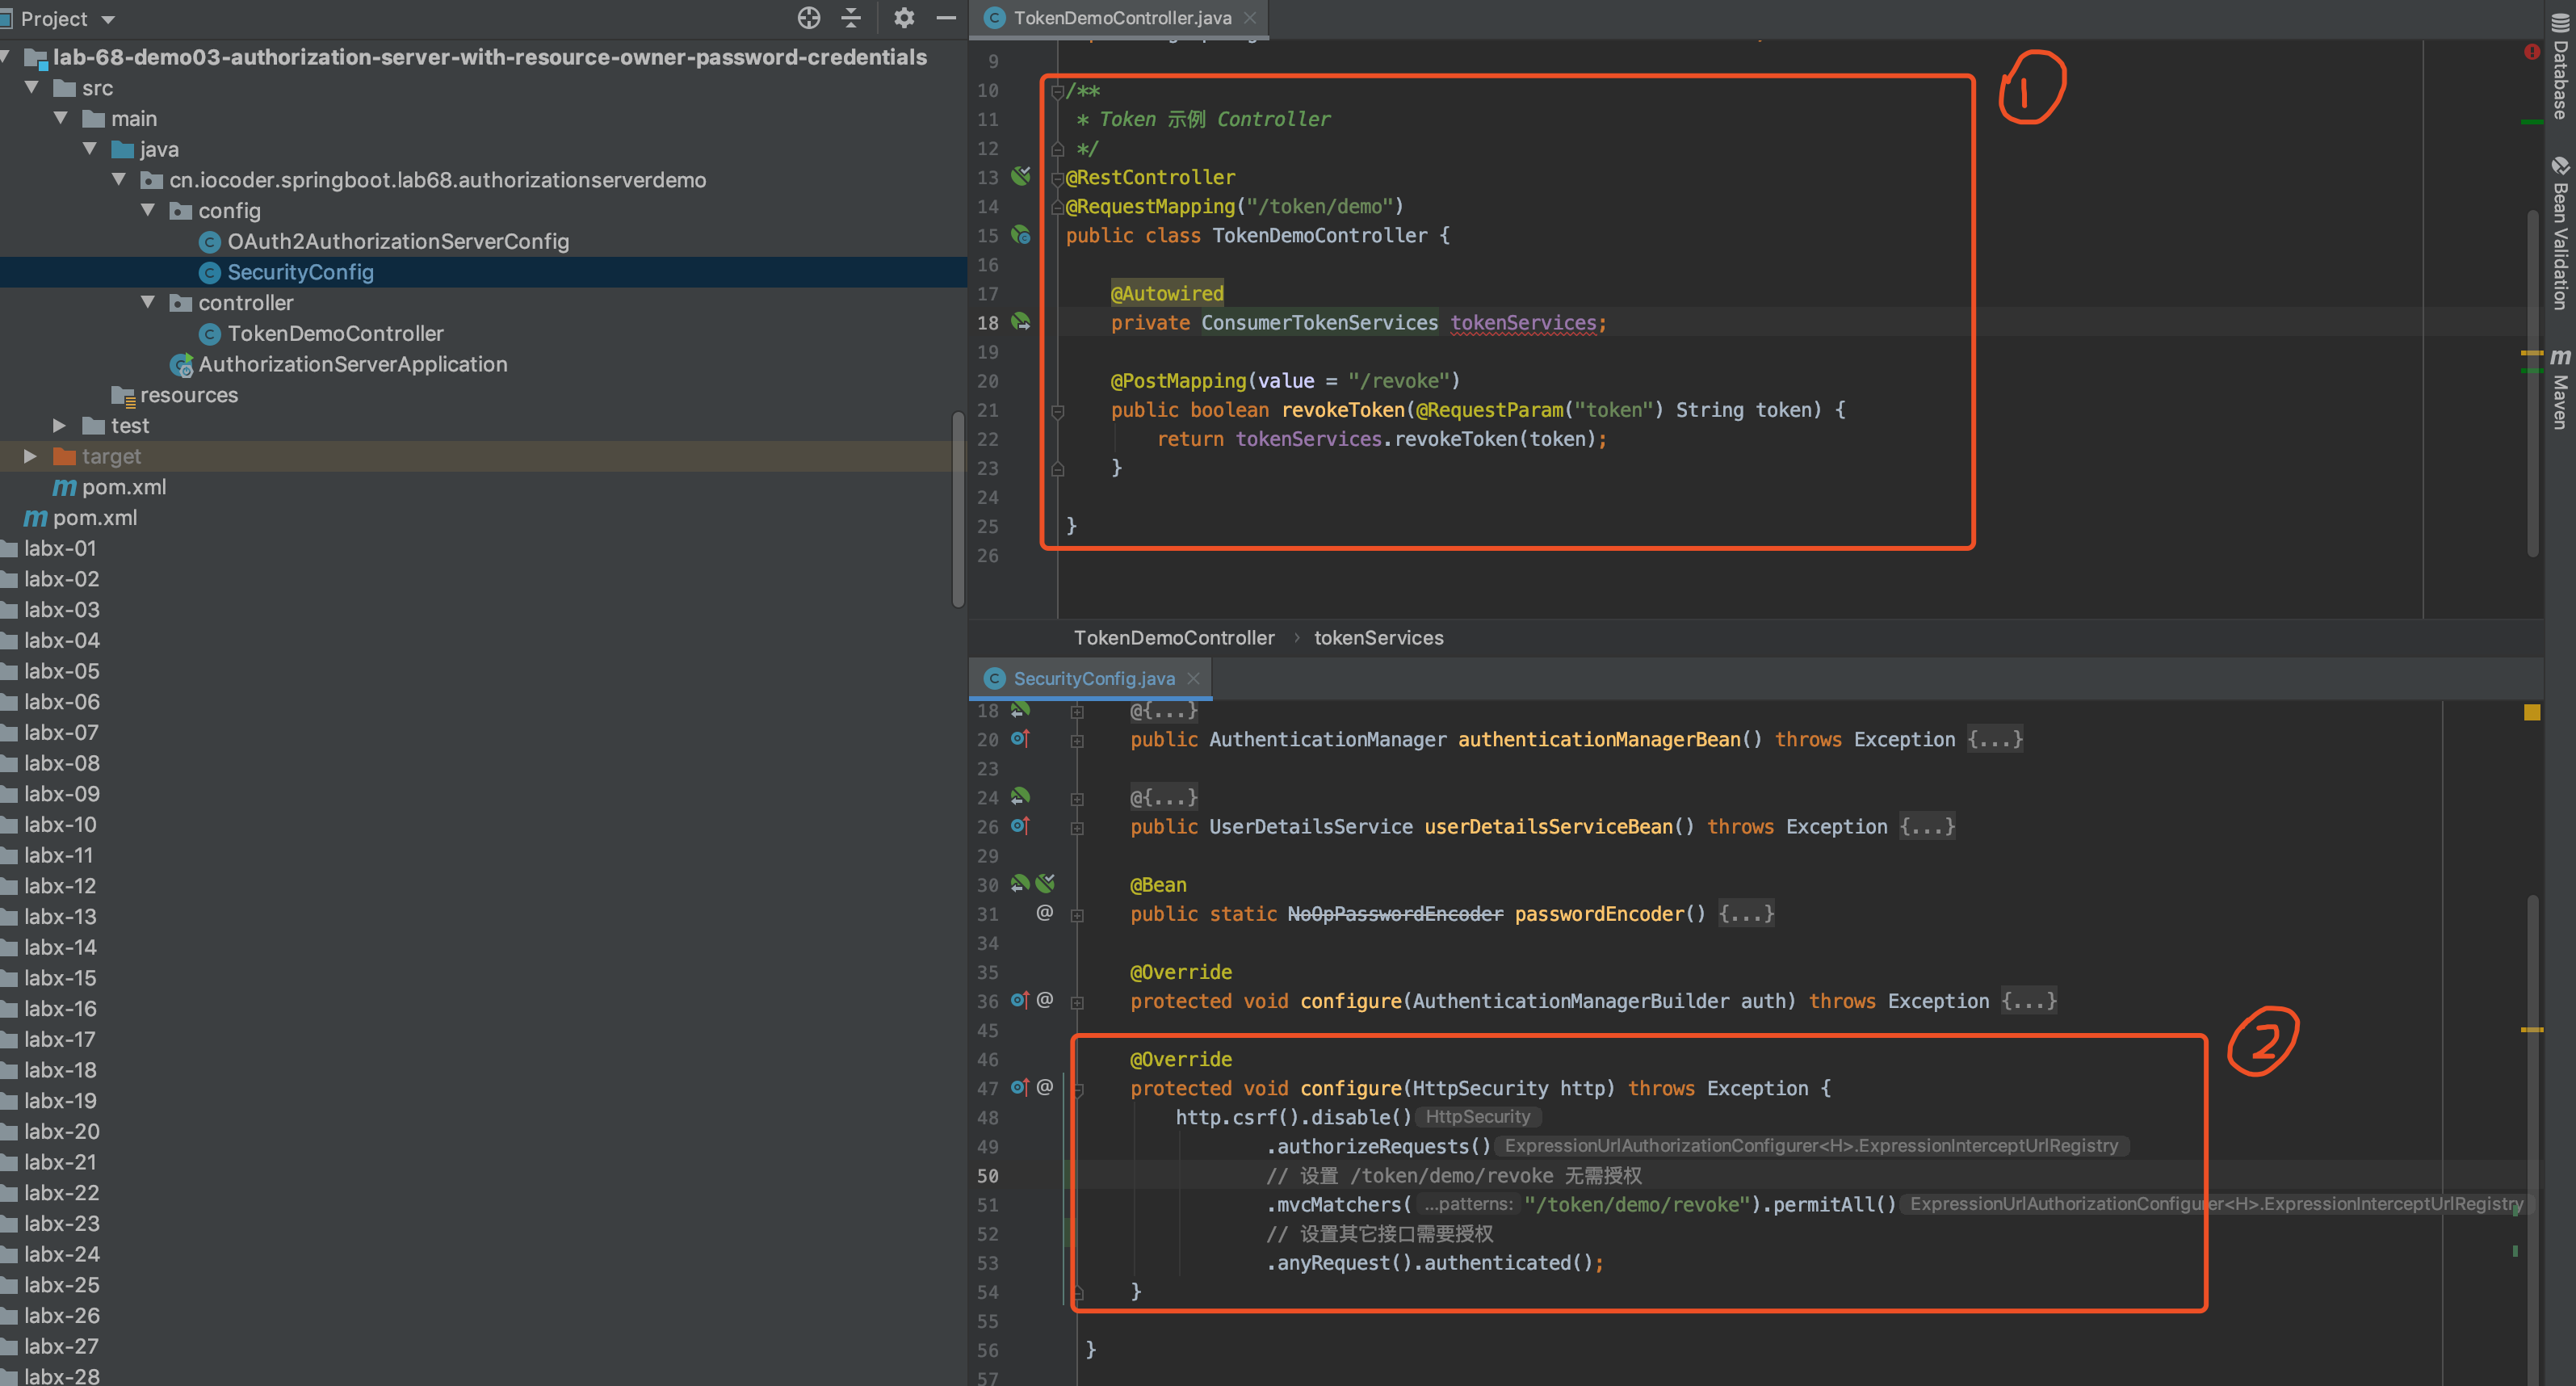
① 创建 TokenDemoController 类,提供 /token/demo/revoke 接口,调用 ConsumerTokenServices 的 #revokeToken(String tokenValue) 方法,删除访问令牌和刷新令牌。代码如下:
@RestController
@RequestMapping("/token/demo")
public class TokenDemoController {

    @Autowired
    private ConsumerTokenServices tokenServices;

    @PostMapping(value = "/revoke")
    public boolean revokeToken(@RequestParam("token") String token) {
        return tokenServices.revokeToken(token);
    }

}
② 在 SecurityConfig 配置类,设置 /token/demo/revoke 接口无需授权,方便测试。代码如下:
// SecurityConfig.java

@Override
protected void configure(HttpSecurity http) throws Exception {
    http.csrf().disable()
            .authorizeRequests()
            // 设置 /token/demo/revoke 无需授权
            .mvcMatchers("/token/demo/revoke").permitAll()
            // 设置其它接口需要授权
            .anyRequest().authenticated();
}
8.2 简单测试
执行 AuthorizationServerApplication 启动授权服务器。下面,我们使用 Postman 模拟一个 Client。
① POST 请求 http://localhost:8080/oauth/token 地址,使用密码模式进行授权。如下图所示:

② POST 请求 http://localhost:8080/token/demo/revoke 地址,删除令牌。如下图所示:
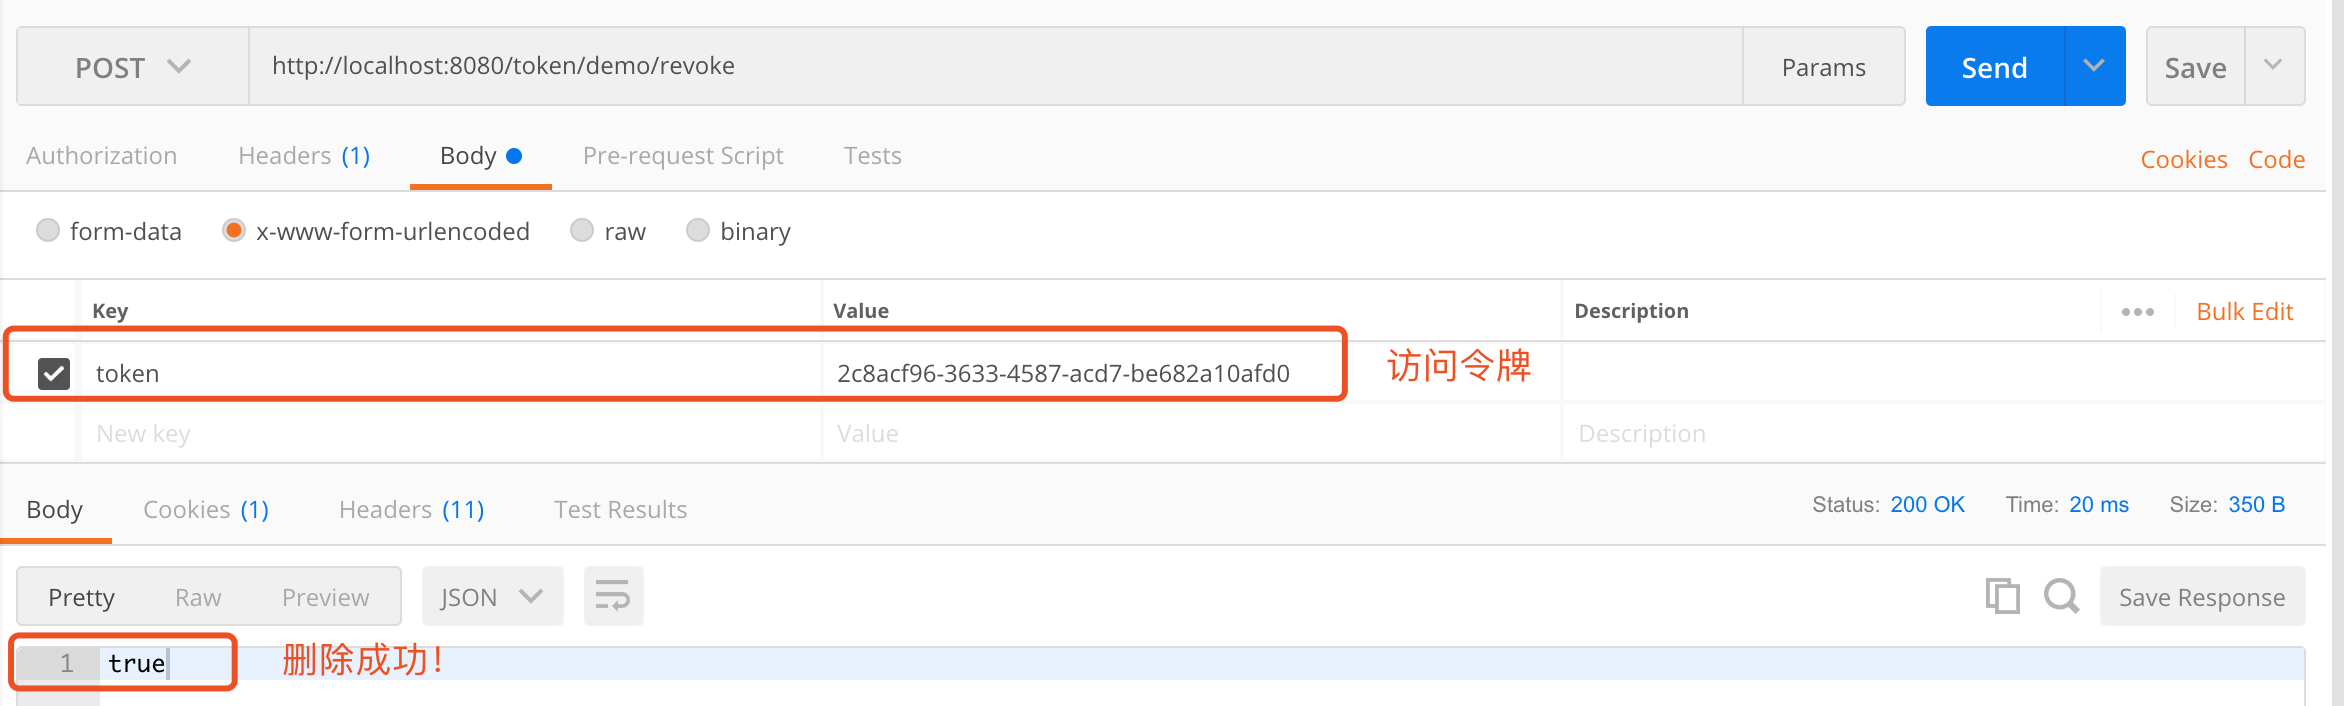
删除成功。后续,胖友可以自己调用授权服务器的 oauth/check_token 接口,测试访问令牌是否已经被删除。
666. 彩蛋
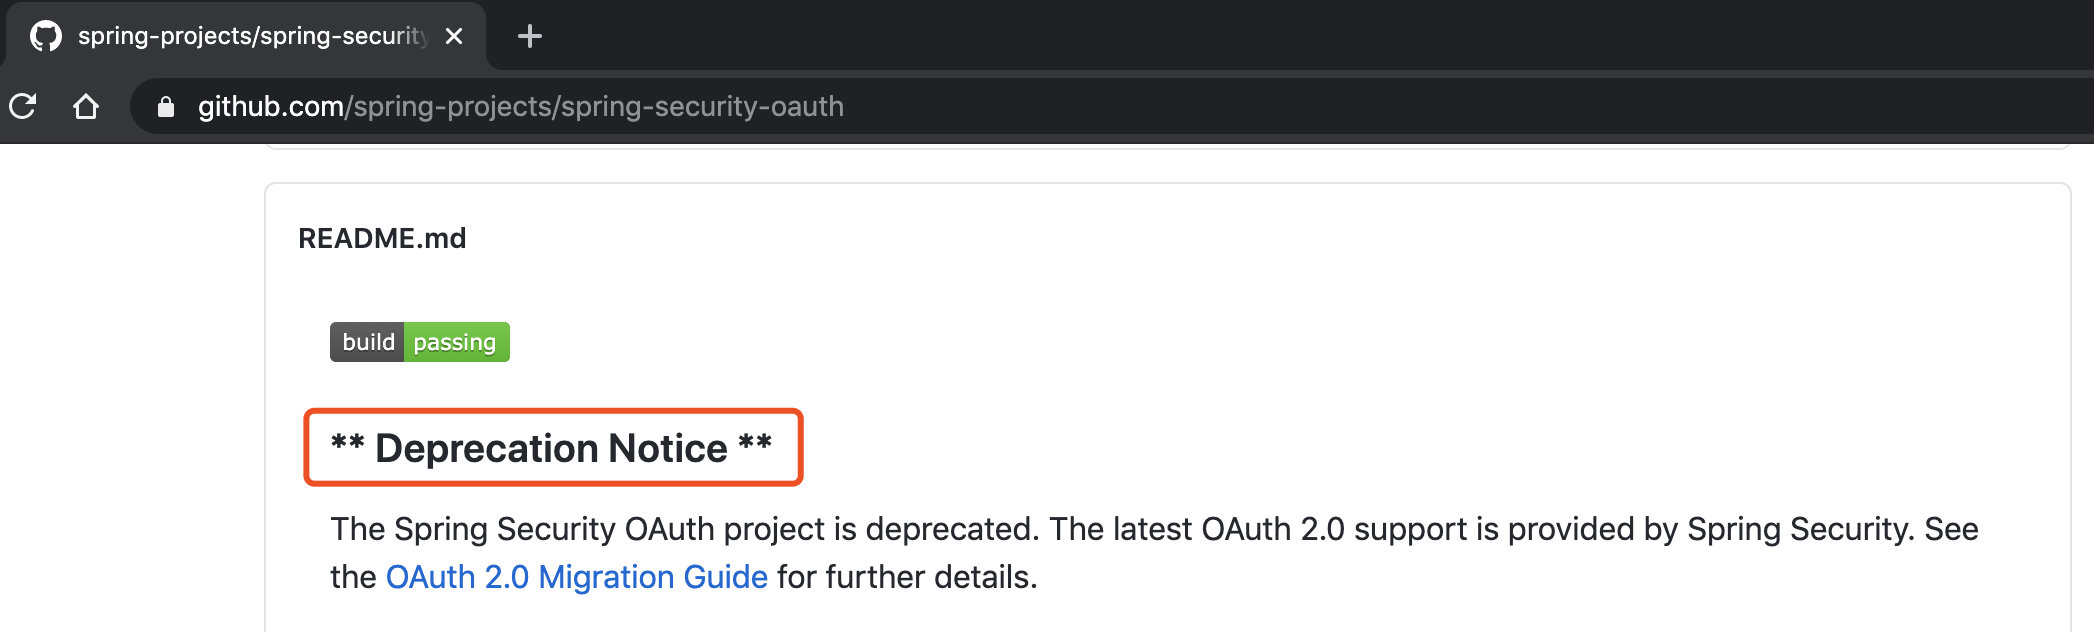
至此,我们完整学习 Spring Security OAuth 框架。不过 Spring 团队宣布该框架处于 Deprecation 废弃状态。如下图所示:
同时,Spring 团队正在实现新的 Spring Authorization Server 授权服务器,目前还处于 Experimental 实验状态。
实际项目中,根据艿艿了解到的情况,很少项目会直接采用 Spring Security OAuth 框架,而是自己参考它进行 OAuth2.0 的实现。并且,一般只会实现密码授权模式。
在本文中,我们采用基于内存的 InMemoryTokenStore,实现访问令牌和刷新令牌的存储。它会存在两个明显的缺点:
- 重启授权服务器时,令牌信息会丢失,导致用户需要重新授权。
- 多个授权服务器时,令牌信息无法共享,导致用户一会授权成功,一会授权失败。
因此,下一篇《芋道 Spring Security OAuth2 存储器》文章,我们来学习 Spring Security OAuth 提供的基于数据库和 Redis的存储器。走起~

 浙公网安备 33010602011771号