
OAuth2 客户端模式
5. 客户端模式
客户端模式,指客户端以自己的名义,而不是以用户的名义,向授权服务器进行认证。
严格地说,客户端模式并不属于 OAuth 框架所要解决的问题。在这种模式中,用户直接向客户端注册,客户端以自己的名义要求授权服务器提供服务,其实不存在授权问题。
旁白君:我们对接微信公众号时,就采用的客户端模式。我们的后端服务器就扮演“客户端”的角色,与微信公众号的后端服务器进行交互。
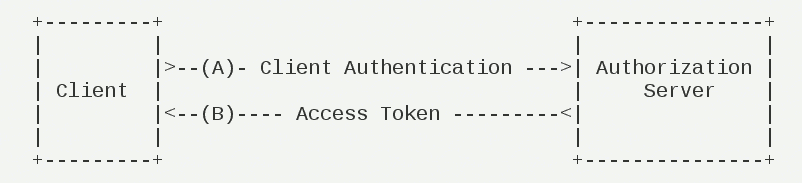
- (A)客户端向授权服务器进行身份认证,并要求一个访问令牌。
- (B)授权服务器确认无误后,向客户端提供访问令牌。
下面,我们来新建两个项目,搭建一个客户端模式的使用示例。如下图所示:

5.1 搭建授权服务器
复制出 lab-68-demo02-authorization-server-with-client-credentials 项目,修改搭建授权服务器。改动点如下图所示:

@Configuration
@EnableAuthorizationServer
public class OAuth2AuthorizationServerConfig extends AuthorizationServerConfigurerAdapter {

    /**
     * 用户认证 Manager
     */
    @Autowired
    private AuthenticationManager authenticationManager;

    //配置使用的 AuthenticationManager 实现用户认证的功能
    @Bean
    public static NoOpPasswordEncoder passwordEncodeF(){

        return (NoOpPasswordEncoder) NoOpPasswordEncoder.getInstance();
    }

    //设置 /oauth/check_token 端点,通过认证后可访问。
    //这里的认证,指的是使用 client-id + client-secret 进行的客户端认证,不要和用户认证混淆。
    //其中,/oauth/check_token 端点对应 CheckTokenEndpoint 类,用于校验访问令牌的有效性。
    //在客户端访问资源服务器时,会在请求中带上访问令牌。
    //在资源服务器收到客户端的请求时,会使用请求中的访问令牌,找授权服务器确认该访问令牌的有效性。
    @Override
    public void configure(AuthorizationServerSecurityConfigurer oauthServer) throws Exception {
        oauthServer.checkTokenAccess("isAuthenticated()");
    }

    //进行 Client 客户端的配置。
    //设置使用基于内存的 Client 存储器。实际情况下,最好放入数据库中,方便管理。
/*
*
* 创建一个 Client 配置。如果要继续添加另外的 Client 配置,可以在 <4.3> 处使用 #and() 方法继续拼接。
* 注意,这里的 .withClient("clientapp").secret("112233") 代码段,就是 client-id 和 client-secret。
*补充知识:可能会有胖友会问,为什么要创建 Client 的 client-id 和 client-secret 呢?
*通过 client-id 编号和 client-secret,授权服务器可以知道调用的来源以及正确性。这样,
*即使“坏人”拿到 Access Token ,但是没有 client-id 编号和 client-secret,也不能和授权服务器发生有效的交互。
*/
    @Override
    public void configure(ClientDetailsServiceConfigurer clients) throws Exception {
        clients.inMemory() // <4.1>
                .withClient("clientapp").secret("112233") // <4.2> Client 账号、密码。
                .authorizedGrantTypes("client_credentials") // <4.2> 客户端模式
                .redirectUris("http://127.0.0.1:9090/callback02")
                .scopes("read_userinfo", "read_contacts") // <4.2> 可授权的 Scope
//                .and().withClient() // <4.3> 可以继续配置新的 Client
        ;
    }

}
① 删除 SecurityConfig 配置类,因为客户端模式下,无需 Spring Security 提供用户的认证功能。
但是,Spring Security OAuth 需要一个 PasswordEncoder Bean,否则会报错,因此我们在 OAuth2AuthorizationServerConfig 类的 #passwordEncoder() 方法进行创建。
② 修改 OAuth2AuthorizationServerConfig 类,设置使用 "client_credentials" 客户端模式。
5.1.1 简单测试
执行 AuthorizationServerApplication 启动授权服务器。下面,我们使用 Postman 模拟一个 Client。
① POST 请求 http://localhost:8080/oauth/token 地址,使用客户端模式进行授权。如下图所示:

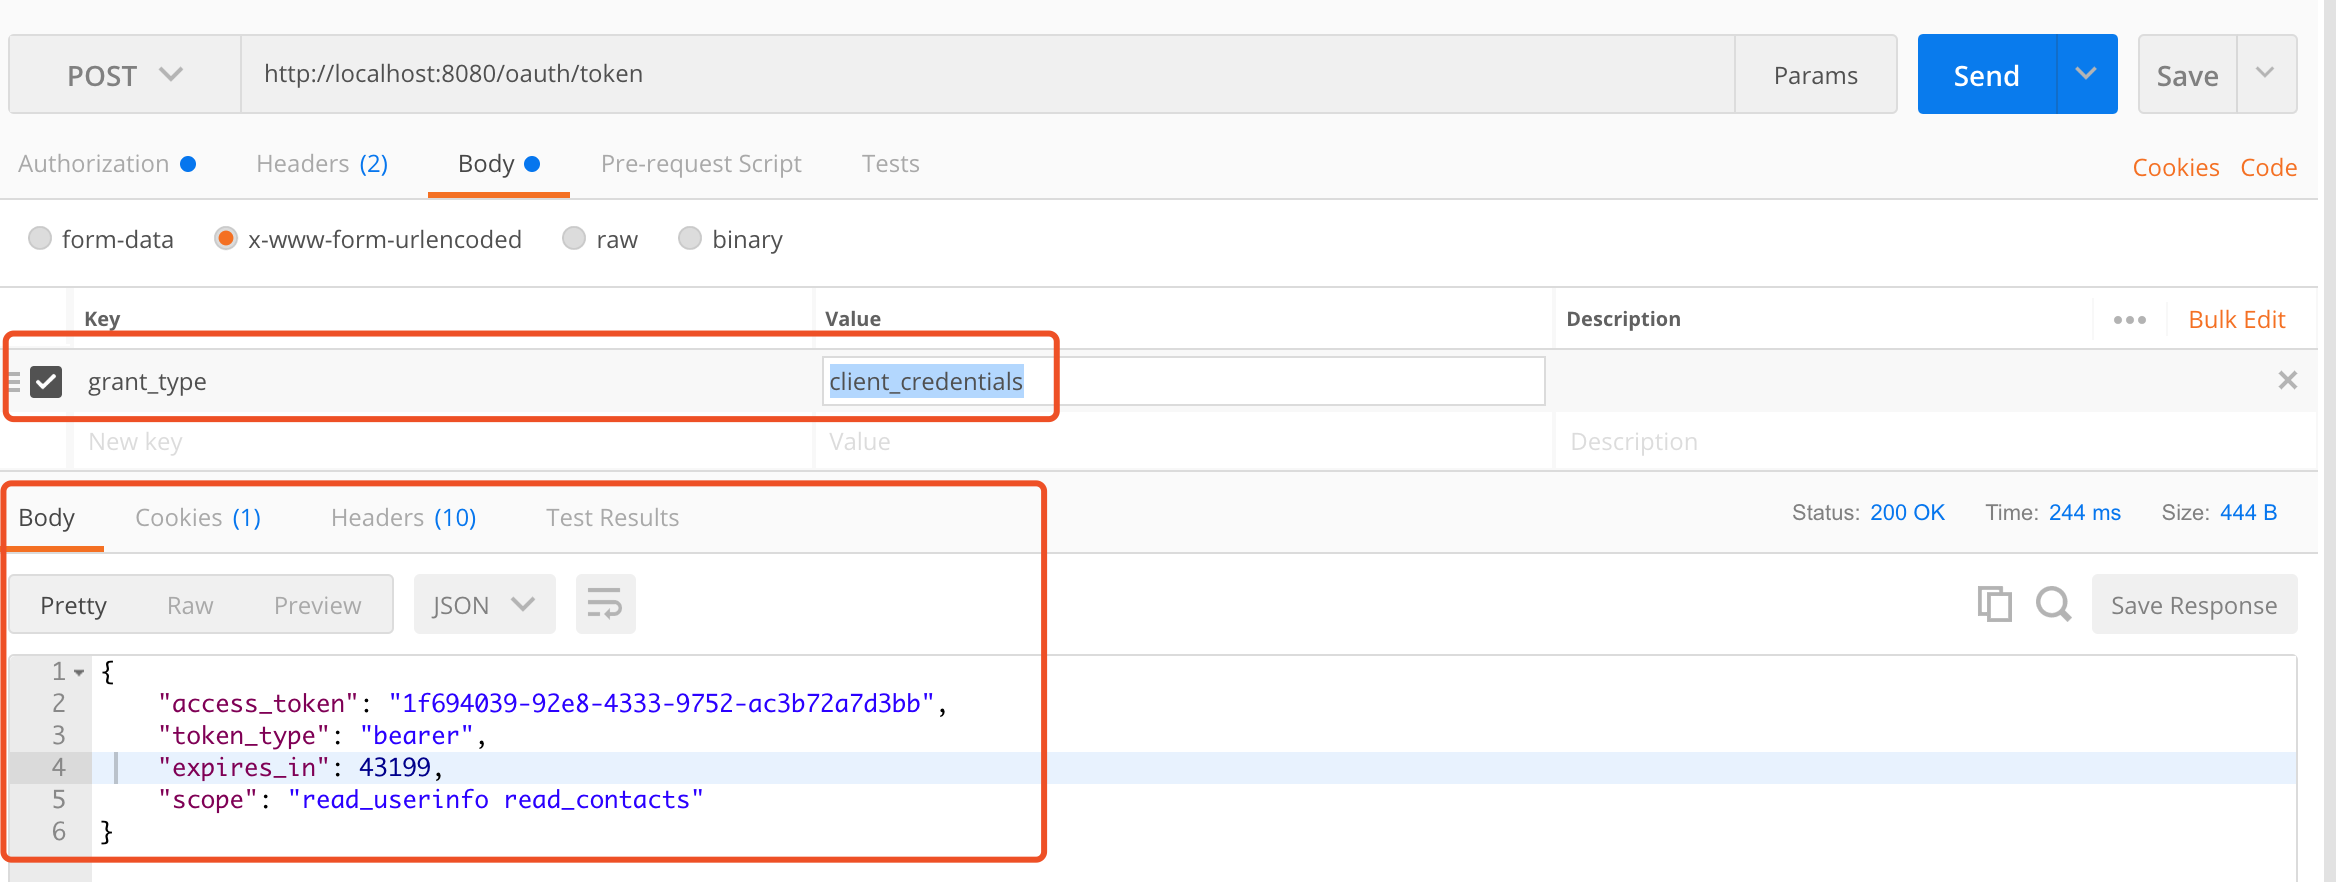
请求说明:
- 通过 Basic Auth 的方式,填写
client-id+client-secret作为用户名与密码,实现 Client 客户端有效性的认证。
- 请求参数
grant_type为"client_credentials",表示使用客户端模式。
响应就是访问令牌,胖友自己瞅瞅即可。
5.2 搭建资源服务器
复制 lab-68-demo02-resource-server 项目,修改点如下图所示:

① 新建 ClientLoginController 类,提供 /client-login 接口,实现调用授权服务器,进行客户端模式的授权,获得访问令牌。代码如下:
@RestController
@RequestMapping("/")
public class ClientLoginController {

    @Autowired
    private OAuth2ClientProperties oauth2ClientProperties;

    @Value("${security.oauth2.access-token-uri}")
    private String accessTokenUri;

    @PostMapping("/client-login")
    public OAuth2AccessToken login() {
        // 创建 ClientCredentialsResourceDetails 对象
        ClientCredentialsResourceDetails resourceDetails = new ClientCredentialsResourceDetails();
        resourceDetails.setAccessTokenUri(accessTokenUri);
        resourceDetails.setClientId(oauth2ClientProperties.getClientId());
        resourceDetails.setClientSecret(oauth2ClientProperties.getClientSecret());
        // 创建 OAuth2RestTemplate 对象
        OAuth2RestTemplate restTemplate = new OAuth2RestTemplate(resourceDetails);
        restTemplate.setAccessTokenProvider(new ClientCredentialsAccessTokenProvider());
        // 获取访问令牌
        return restTemplate.getAccessToken();
    }

}
代码比较简单,还是使用 OAuth2RestTemplate 进行请求授权服务器,胖友自己瞅瞅哈。
② 在 OAuth2ResourceServerConfig 配置类中,设置 /client-login 接口无需权限验证,不然无法调用哈。
5.2.1 简单测试
执行 ResourceServerApplication 启动资源服务器。
① 使用「5.1.1 简单测试」小节获得的访问令牌,请求 <127.0.0.1:9090/api/example/hello> 接口时带上,则请求会被通过。如下图所示:

② 请求 http://127.0.0.1:9090/client-login 接口,使用客户端模式进行授权,获得访问令牌。如下图所示:
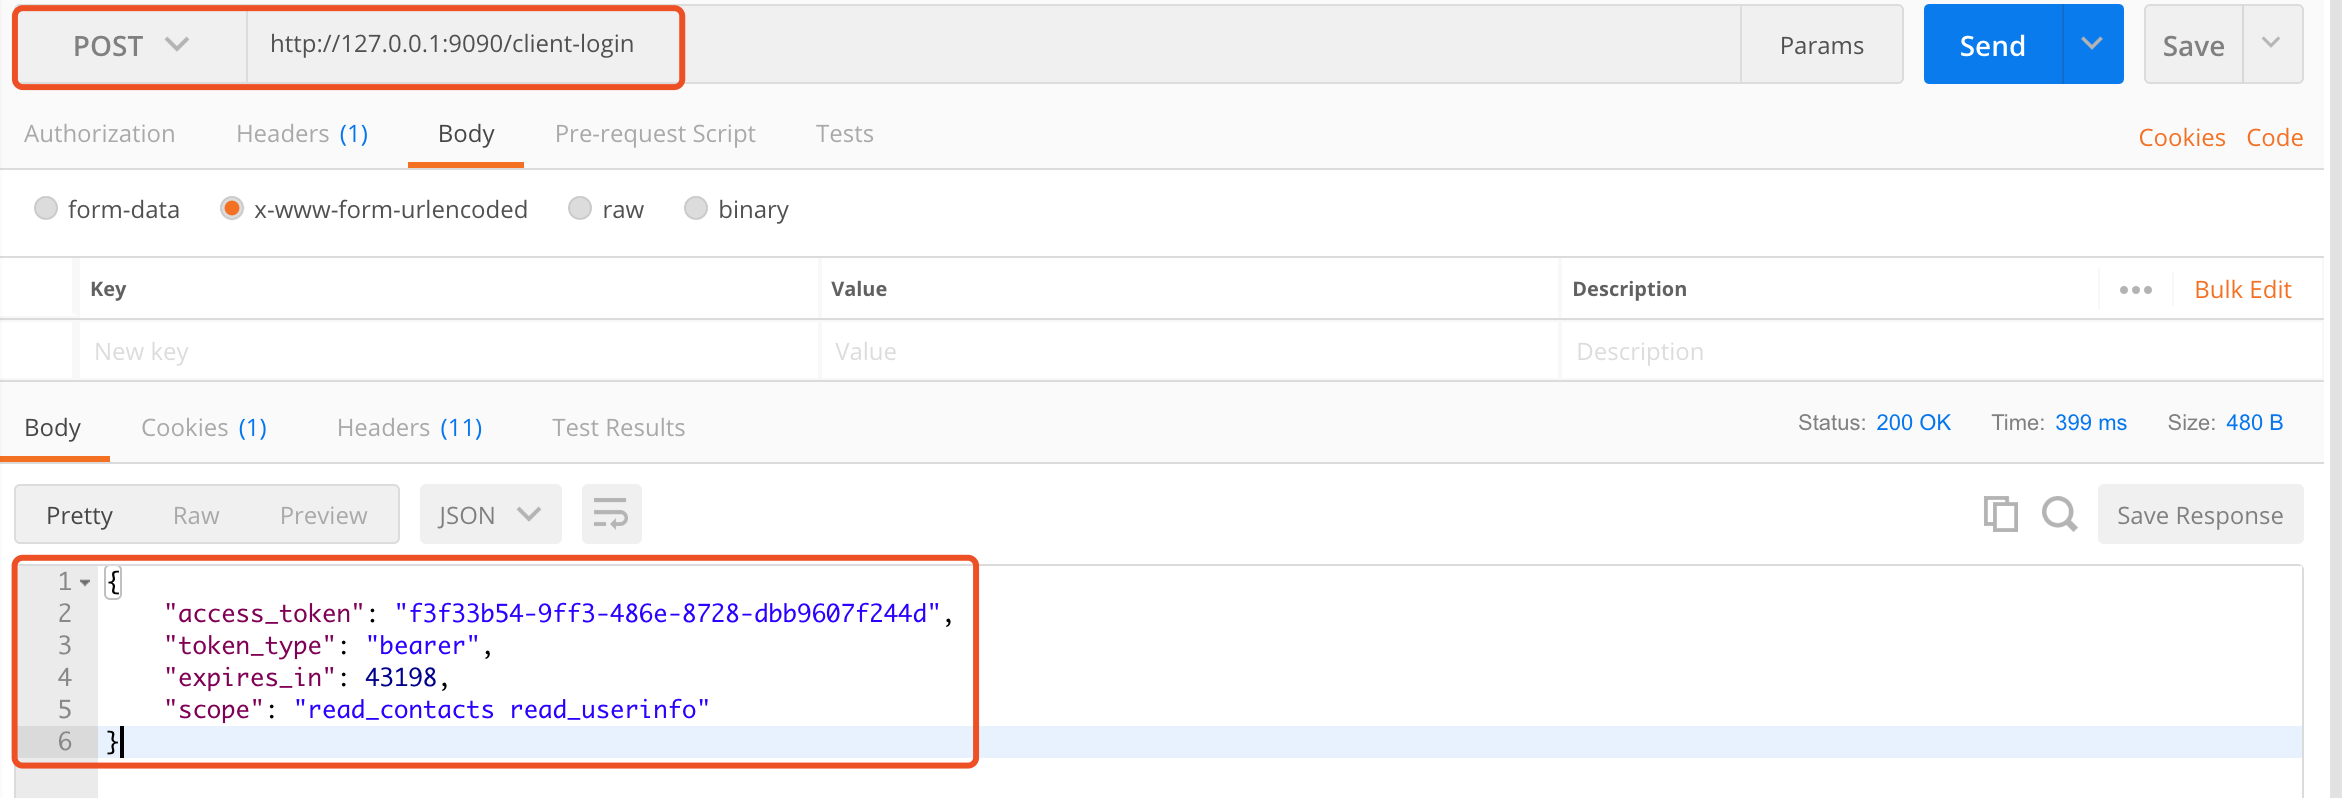
响应结果和授权服务器的 /oauth/token 接口是一致的,因为就是调用它,嘿嘿~

 浙公网安备 33010602011771号