RHCE(磁盘分区管理)
一:基本的磁盘分区
1:磁盘分区格式
1:MBR磁盘格式(msdos)
1)最大只能分4个主分区,3个主分区和一个扩展分区,或者是4个主分区
然后再扩展分区上面可以在来分多个逻辑分区
2)主分区和扩展分区上面的逻辑分区都可以存储数据,但是就是扩展分区的大小实际就是10K左右,没有意义,
3)0磁道512字节
MBR分区的引导空间位于0磁道0扇区,大小为512个字节,其中前446个字节存放的都是grub2(引导程序),后面的64个字节存放的就是磁盘分区信息,最后2个字节就是分区结束的标志
4)分区限制就是最大的分区为2TB,最多有4个分区
2:GTP磁盘格式(gtp)
1)可以分2T以上的,最大为128个分区,最大支持8Zib,给每个分区都要命名
2)头尾都有备份(分区表的信息),安全性高
二:磁盘分区的工具
分区中常见的参数
82 就是普通的Linux系统
1:parted工具
1:基础
1)支持交互式和非交互式的进行磁盘的分区,主要就是shell脚本中经常的使用这个非交互式的直接进行磁盘的分区
2)parted常见的命令
print 打印出磁盘的信息
mklael 指定分区的格式,如果是MBR的话,就是msdos,如果是GPT的话,就是g,这个就是对这个磁盘进行一个分区类型的设置
mkpart 分区的大小,如果是MBR的话,还要指定分的是主分区还是扩展分区,文件系统ext4(这里不是格式化为ext4,只是预测),start 1G end 5G;如果是GTP分区的话,那就是 mkpart 1 ext4 1 4
quit 退出
实时性的更改,就是退出了就执行成功了
2:操作
1)交互式的创建
交互式的创建就是需要与人类进行沟通才行,进行下一次的指令
[root@server ~]# lsblk
NAME          MAJ:MIN RM  SIZE RO TYPE MOUNTPOINTS
sda             8:0    0   30G  0 disk
sr0            11:0    1  7.9G  0 rom  /run/media/root/RHEL-9-0-0-BaseOS-x86_64
nvme0n1       259:0    0   40G  0 disk
├─nvme0n1p1   259:1    0  500M  0 part /boot
└─nvme0n1p2   259:2    0 39.5G  0 part
  ├─rhel-root 253:0    0 35.5G  0 lvm  /
  └─rhel-swap 253:1    0    4G  0 lvm  [SWAP]
[root@server ~]# parted /dev/sda    ###对硬盘进行分区
GNU Parted 3.4
Using /dev/sda
Welcome to GNU Parted! Type 'help' to view a list of commands.
(parted) help
  align-check TYPE N                       check partition N for TYPE(min|opt) alignment
  help [COMMAND]                           print general help, or help on COMMAND
  mklabel,mktable LABEL-TYPE               create a new disklabel (partition table)
  mkpart PART-TYPE [FS-TYPE] START END     make a partition
  name NUMBER NAME                         name partition NUMBER as NAME
  print [devices|free|list,all|NUMBER]     display the partition table, available devices, free space, all found partitions, or a particular
        partition
  quit                                     exit program
  rescue START END                         rescue a lost partition near START and END
  resizepart NUMBER END                    resize partition NUMBER
  rm NUMBER                                delete partition NUMBER
  select DEVICE                            choose the device to edit
  disk_set FLAG STATE                      change the FLAG on selected device
  disk_toggle [FLAG]                       toggle the state of FLAG on selected device
  set NUMBER FLAG STATE                    change the FLAG on partition NUMBER
  toggle [NUMBER [FLAG]]                   toggle the state of FLAG on partition NUMBER
  unit UNIT                                set the default unit to UNIT
  version                                  display the version number and copyright information of GNU Parted
(parted) mklabel    ### 进行分区设置的格式
New disk label type? msdos
Warning: The existing disk label on /dev/sda will be destroyed and all data on this disk will be lost. Do you want to continue?
Yes/No? yes
(parted) mkpart  ###设置分区的大小
Partition type?  primary/extended? primary    ###主分区还是扩展分区的设置
File system type?  [ext2]? ext4        ###预测文件系统,并不是格式化
Start? 1G          ###设置分区的起始位置的大小
End? 3G            ###设置分区的结束位置的大小
(parted) mkpart
Partition type?  primary/extended? primary
File system type?  [ext2]? ext4
Start? 3G
End? 6G
(parted) print
Model: VMware, VMware Virtual S (scsi)
Disk /dev/sda: 32.2GB
Sector size (logical/physical): 512B/512B
Partition Table: msdos
Disk Flags:

Number  Start   End     Size    Type     File system  Flags
 1      1000MB  3000MB  2000MB  primary  ext4         lba
 2      3000MB  6000MB  3000MB  primary  ext4         lba

(parted) quit       ####退出即生效
Information: You may need to update /etc/fstab.

[root@server ~]# lsblk
NAME          MAJ:MIN RM  SIZE RO TYPE MOUNTPOINTS
sda             8:0    0   30G  0 disk
├─sda1          8:1    0  1.9G  0 part
└─sda2          8:2    0  2.8G  0 part
sr0            11:0    1  7.9G  0 rom  /run/media/root/RHEL-9-0-0-BaseOS-x86_64
nvme0n1       259:0    0   40G  0 disk
├─nvme0n1p1   259:1    0  500M  0 part /boot
└─nvme0n1p2   259:2    0 39.5G  0 part
  ├─rhel-root 253:0    0 35.5G  0 lvm  /
  └─rhel-swap 253:1    0    4G  0 lvm  [SWAP]
[root@server ~]#
需要注意的就是,要再次划分区域的话,就要在上一次的结束位置开始划分,不然的话,会报错,
1)先进行分区格式的设置,msdos还是gpt格式
2)然后再来进行分区的大小设置,就是这个,主分区还是扩展分区,文件系统的类型,起始的位置和结束的位置
3)最后print,列出磁盘分区的信息
4)quit,退出(即生效)
2)非交互式的创建
就是不需要跟人类进行交互的执行方式,非常的方便,在shell脚本中进行磁盘的分区非常有用(简洁)
缺点:记得东西太多了,年纪大了,记不住那么多的参数
[root@server ~]# lsblk
NAME          MAJ:MIN RM  SIZE RO TYPE MOUNTPOINTS
sda             8:0    0   30G  0 disk
sr0            11:0    1  7.9G  0 rom  /run/media/root/RHEL-9-0-0-BaseOS-x86_64
nvme0n1       259:0    0   40G  0 disk
├─nvme0n1p1   259:1    0  500M  0 part /boot
└─nvme0n1p2   259:2    0 39.5G  0 part
  ├─rhel-root 253:0    0 35.5G  0 lvm  /
  └─rhel-swap 253:1    0    4G  0 lvm  [SWAP]
[root@server ~]# parted /dev/sda mklabel msdos
Warning: The existing disk label on /dev/sda will be destroyed and all data on this disk will be lost. Do you want to continue?
Yes/No? yes
Information: You may need to update /etc/fstab.

[root@server ~]# parted /dev/sda mkpart primary ext4 0G 5G
Information: You may need to update /etc/fstab.

[root@server ~]# lsblk
NAME          MAJ:MIN RM  SIZE RO TYPE MOUNTPOINTS
sda             8:0    0   30G  0 disk
└─sda1          8:1    0  4.7G  0 part
sr0            11:0    1  7.9G  0 rom  /run/media/root/RHEL-9-0-0-BaseOS-x86_64
nvme0n1       259:0    0   40G  0 disk
├─nvme0n1p1   259:1    0  500M  0 part /boot
└─nvme0n1p2   259:2    0 39.5G  0 part
  ├─rhel-root 253:0    0 35.5G  0 lvm  /
  └─rhel-swap 253:1    0    4G  0 lvm  [SWAP]
[root@server ~]#


上面的就是最简洁的写法
3:注意
1)切换分区的格式的时候会导致这个这个磁盘的分区的数据全部被损坏,也就是这个一整个磁盘的格式
2)
2:fdisk工具(默认的话是MBR分区)
1:基础
常见的选项
p 打印这个磁盘的分区的信息
n 设置分区
w 保存,并退出
t 改变磁盘的类型,是82还是81
l 列出磁盘的所有类型
g 设置gpt分区
o 设置mbr分区
d 删除分区
M 就是将gpt格式的转换成mbr格式的,但是无法逆转
2:操作
[root@server ~]# fdisk /dev/sda

Welcome to fdisk (util-linux 2.37.4).
Changes will remain in memory only, until you decide to write them.
Be careful before using the write command.


Command (m for help): n
Partition type
   p   primary (0 primary, 0 extended, 4 free)
   e   extended (container for logical partitions)
Select (default p): p
Partition number (1-4, default 1): 1
First sector (2048-62914559, default 2048):
Last sector, +/-sectors or +/-size{K,M,G,T,P} (2048-62914559, default 62914559): +3G

Created a new partition 1 of type 'Linux' and of size 3 GiB.

Command (m for help): n
Partition type
   p   primary (1 primary, 0 extended, 3 free)
   e   extended (container for logical partitions)
Select (default p):

Using default response p.
Partition number (2-4, default 2):
First sector (6293504-62914559, default 6293504):
Last sector, +/-sectors or +/-size{K,M,G,T,P} (6293504-62914559, default 62914559): +3G

Created a new partition 2 of type 'Linux' and of size 3 GiB.

Command (m for help): p
Disk /dev/sda: 30 GiB, 32212254720 bytes, 62914560 sectors
Disk model: VMware Virtual S
Units: sectors of 1 * 512 = 512 bytes
Sector size (logical/physical): 512 bytes / 512 bytes
I/O size (minimum/optimal): 512 bytes / 512 bytes
Disklabel type: dos
Disk identifier: 0xbb989813

Device     Boot   Start      End Sectors Size Id Type
/dev/sda1          2048  6293503 6291456   3G 83 Linux
/dev/sda2       6293504 12584959 6291456   3G 83 Linux

Command (m for help): w
The partition table has been altered.
Calling ioctl() to re-read partition table.
Syncing disks.

[root@server ~]# lsblk
NAME   MAJ:MIN RM  SIZE RO TYPE MOUNTPOINTS
sda      8:0    0   30G  0 disk
├─sda1   8:1    0    3G  0 part
└─sda2   8:2    0    3G  0 part
sr0     11:0    1  7.9G  0 rom  /run/media/root/RHEL-9-0-0-BaseOS-x86_64
nvme0n1
│      259:0    0   40G  0 disk
├─nvme0n1p1
│      259:1    0  500M  0 part /boot
└─nvme0n1p2
       259:2    0 39.5G  0 part
  ├─rhel-root
  │    253:0    0 35.5G  0 lvm  /
  └─rhel-swap
       253:1    0    4G  0 lvm  [SWAP]
[root@server ~]#
3)将gpt格式转换成mbr格式的
3:gdisk(只设置gpt分区)
与fdisk命令类似,学会了fdisk之后,就会这个命令了
三:格式化和挂载
1:格式化
快设备必须要使用格式化才能在上面写入东西进去,只有进行格式化的操作,如果一个设备有了一个文件系统的话,再次进行格式化的操作的话,会将之前的设备上的所有数据全部格式化
[root@server ~]# blkid | grep sda  ###查看快设备的uuid
/dev/sda1: PARTLABEL="Linux filesystem" PARTUUID="31a521b5-d4cf-4968-a649-43ccbc43fd0a"
[root@server ~]# mkfs -t ext4 /dev/sda1
mke2fs 1.46.5 (30-Dec-2021)
Creating filesystem with 786432 4k blocks and 196608 inodes
Filesystem UUID: 644a045c-6f1e-4960-a8b7-cb2b82e94527
Superblock backups stored on blocks:
	32768, 98304, 163840, 229376, 294912

Allocating group tables: done
Writing inode tables: done
Creating journal (16384 blocks): done
Writing superblocks and filesystem accounting information: done

[root@server ~]# blkid | grep sda
/dev/sda1: UUID="644a045c-6f1e-4960-a8b7-cb2b82e94527" BLOCK_SIZE="4096" TYPE="ext4" PARTLABEL="Linux filesystem" PARTUUID="31a521b5-d4cf-4968-a649-43ccbc43fd0a"
[root@server ~]#
操作:
mkfs -t 类型 设备
mkfs.类型 设备
关于这个设备的话,如果是逻辑卷的话就可以 /dev/mapper/逻辑卷
2:挂载
挂载就是将一个设备挂载到一个目录上面去(相当于一个入口),数据存放到这个设备上在,而不是这个目录里面(相当于u盘)
1:挂载的方式
1)通过设备进行挂载
[root@server ~]# mount /dev/sda1 /mnt/
[root@server ~]# df -hT
Filesystem            Type      Size  Used Avail Use% Mounted on
devtmpfs              devtmpfs  1.9G     0  1.9G   0% /dev
tmpfs                 tmpfs     1.9G     0  1.9G   0% /dev/shm
tmpfs                 tmpfs     778M  9.6M  769M   2% /run
/dev/mapper/rhel-root xfs        36G  4.1G   32G  12% /
/dev/nvme0n1p1        xfs       495M  220M  275M  45% /boot
tmpfs                 tmpfs     389M  100K  389M   1% /run/user/0
/dev/sr0              iso9660   8.0G  8.0G     0 100% /run/media/root/RHEL-9-0-0-BaseOS-x86_64
/dev/sda1             ext4      2.9G   24K  2.8G   1% /mnt
2)通过uuid进行挂载
[root@server ~]# mount -U "644a045c-6f1e-4960-a8b7-cb2b82e94527" /mnt/
[root@server ~]# df -hT
Filesystem            Type      Size  Used Avail Use% Mounted on
devtmpfs              devtmpfs  1.9G     0  1.9G   0% /dev
tmpfs                 tmpfs     1.9G     0  1.9G   0% /dev/shm
tmpfs                 tmpfs     778M  9.6M  769M   2% /run
/dev/mapper/rhel-root xfs        36G  4.1G   32G  12% /
/dev/nvme0n1p1        xfs       495M  220M  275M  45% /boot
tmpfs                 tmpfs     389M  100K  389M   1% /run/user/0
/dev/sr0              iso9660   8.0G  8.0G     0 100% /run/media/root/RHEL-9-0-0-BaseOS-x86_64
/dev/sda1             ext4      2.9G   24K  2.8G   1% /mnt
3)通过卷标进行挂载
设置卷标,不同的文件系统创建的卷标的格式不同
ext4系列:e2label 分区/设备 卷标名
删除卷标名:e2label 分区/设备 ‘ ’
xfs系列:xfs_admin -L 卷标名 分区/设备
删除卷标名 xfs_admin -L '--' 分区、设备
挂载的方式:mount -L 卷标 挂载点
查看卷标:blkid
[root@server ~]# e2label /dev/sda1 network
[root@server ~]# blki
blkid     blkiomon
[root@server ~]# blkid | grep sda
/dev/sda1: LABEL="network" UUID="644a045c-6f1e-4960-a8b7-cb2b82e94527" BLOCK_SIZE="4096" TYPE="ext4" PARTLABEL="Linux filesystem" PARTUUID="31a521b5-d4cf-4968-a649-43ccbc43fd0a"
[root@server ~]# mount -L network /mnt/
[root@server ~]# df -hT
Filesystem            Type      Size  Used Avail Use% Mounted on
devtmpfs              devtmpfs  1.9G     0  1.9G   0% /dev
tmpfs                 tmpfs     1.9G     0  1.9G   0% /dev/shm
tmpfs                 tmpfs     778M  9.6M  769M   2% /run
/dev/mapper/rhel-root xfs        36G  4.1G   32G  12% /
/dev/nvme0n1p1        xfs       495M  220M  275M  45% /boot
tmpfs                 tmpfs     389M  100K  389M   1% /run/user/0
/dev/sr0              iso9660   8.0G  8.0G     0 100% /run/media/root/RHEL-9-0-0-BaseOS-x86_64
/dev/sda1             ext4      2.9G   24K  2.8G   1% /mnt
[root@server ~]#

删除卷标
[root@server ~]# e2label /dev/sda1 ' '
[root@server ~]# blkid | grep sda
/dev/sda1: UUID="644a045c-6f1e-4960-a8b7-cb2b82e94527" BLOCK_SIZE="4096" TYPE="ext4" PARTLABEL="Linux filesystem" PARTUUID="31a521b5-d4cf-4968-a649-43ccbc43fd0a"
2:挂载文件系统的选项
-o 后面加上选项,防止恶意的修改文件系统,可以根据文件系统的不同的挂载的选项,
mount -r /dev/sda1 /mnt
-r 只读的挂载
-w 读写的挂载
-a 自动挂载/etc/fstab中没有挂载的条目
-t 指定文件系统类型(mount会自动的识别文件系统类型,有的文件系统类型无法识别需要使用-t设定,cifs类型)
-L 指定卷标
-U uuid
-o指定额外的选项(也就是defaults里面的)
async 异步模式
sync 同步模式
atime/noatime:是否更新atime,包含目录和文件
auto/noauto 是否支持自动挂载
exec/noexec 是否支持文件系统上的可执行文件,使用bash可以执行,相对路径和绝对路径不行
dev/nodev 是否支持在次文件系统上使用的设备
suid/nosuid 是否支持suid的权限
user/nouser 是否允许普通用户挂载此设备
defaults:默认挂载选项,是rw,suid,dev,exec,auto,nouser,async的组合
操作:
类似于破解root密码
[root@server /]# mount  -r /dev/sda1  /mnt/
[root@server /]# mkdir /mnt/11
mkdir: cannot create directory ‘/mnt/11’: Read-only file system
普通用户挂载的话,要写入到/etc/fstab文件里面去,然后使用mount 设备或者mount 挂载点,不能向root用户那样,mount 设备 挂载点
/dev/mapper/vg0-lv0  /mnt/dir   ext4 defaults,user  0 0
[q7@server mnt]$ mount /dev/mapper/vg0-lv0
[q7@server mnt]$ df -hT
Filesystem            Type      Size  Used Avail Use% Mounted on
devtmpfs              devtmpfs  1.9G     0  1.9G   0% /dev
tmpfs                 tmpfs     1.9G     0  1.9G   0% /dev/shm
tmpfs                 tmpfs     778M  9.5M  769M   2% /run
/dev/mapper/rhel-root xfs        36G  4.1G   32G  12% /
/dev/nvme0n1p1        xfs       495M  220M  275M  45% /boot
tmpfs                 tmpfs     389M   52K  389M   1% /run/user/42
tmpfs                 tmpfs     389M   36K  389M   1% /run/user/0
/dev/mapper/vg0-lv0   ext4      2.0G   61M  1.8G   4% /mnt/dir
[q7@server mnt]$ umount dir/
[q7@server mnt]$ mount /mnt/dir/
[q7@server mnt]$ df -hT
Filesystem            Type      Size  Used Avail Use% Mounted on
devtmpfs              devtmpfs  1.9G     0  1.9G   0% /dev
tmpfs                 tmpfs     1.9G     0  1.9G   0% /dev/shm
tmpfs                 tmpfs     778M  9.5M  769M   2% /run
/dev/mapper/rhel-root xfs        36G  4.1G   32G  12% /
/dev/nvme0n1p1        xfs       495M  220M  275M  45% /boot
tmpfs                 tmpfs     389M   52K  389M   1% /run/user/42
tmpfs                 tmpfs     389M   36K  389M   1% /run/user/0
/dev/mapper/vg0-lv0   ext4      2.0G   61M  1.8G   4% /mnt/dir
3:永久挂载
永久挂载的话,要写入到一个文件中去,/etc/fstab这个文件
/dev/mapper/rhel-root / xfs defaults 0 0
解释:
设备名称 挂载点 文件系统类型 挂载选项 是否备份 是否检查文件系统错误,0不检查,1只检查ext系列,不检查xfs文件系统,因为使用的是fsck检查
写入后,使用mount -a 进行挂载,就是挂载里面的/etc/fstab里面的设备
umount /挂载点
操作:
[root@server mnt]# df -hT
Filesystem            Type      Size  Used Avail Use% Mounted on
devtmpfs              devtmpfs  1.9G     0  1.9G   0% /dev
tmpfs                 tmpfs     1.9G     0  1.9G   0% /dev/shm
tmpfs                 tmpfs     778M  9.5M  769M   2% /run
/dev/mapper/rhel-root xfs        36G  4.1G   32G  12% /
/dev/nvme0n1p1        xfs       495M  220M  275M  45% /boot
tmpfs                 tmpfs     389M   52K  389M   1% /run/user/42
tmpfs                 tmpfs     389M   36K  389M   1% /run/user/0
/dev/mapper/vg0-lv0   ext4      2.0G   61M  1.8G   4% /mnt/dir
[root@server mnt]# umount /mnt/dir
[root@server mnt]# df -hT
Filesystem            Type      Size  Used Avail Use% Mounted on
devtmpfs              devtmpfs  1.9G     0  1.9G   0% /dev
tmpfs                 tmpfs     1.9G     0  1.9G   0% /dev/shm
tmpfs                 tmpfs     778M  9.5M  769M   2% /run
/dev/mapper/rhel-root xfs        36G  4.1G   32G  12% /
/dev/nvme0n1p1        xfs       495M  220M  275M  45% /boot
tmpfs                 tmpfs     389M   52K  389M   1% /run/user/42
tmpfs                 tmpfs     389M   36K  389M   1% /run/user/0
[root@server mnt]#
总结:
1)使用mount -a还可以检查哪里出现了错误,也就是问题
2)mount | grep /dev/sda这个选项,可以看到一些参数
四:swap分区
1:概念
就是在硬盘上面开辟的一块存储空间,专门存储内存的临时数据
主要作用就是:当内存不够用的话,可以运行更多的应用软件

操作:
1)查看swap分区
free -m 以mb的方式进行查看
free -th
swapon -s 查看系统上所有的swap分区
2)创建swap交换分区
1)fdisk 创建一个分区
2)格式话为:mkswap交换分区
3)挂载swap分区
4)swapon /dev/sda1
swap 分区优先级,数字越小,优先级越高,优先使用优先级高的swap分区,写完写其他的交换分区,如果一致的话,采用轮询的方式进行写入
3)设置优先级
swapon -p 优先级 分区
4)管理swap分区:
临时挂载:swapon -p 优先级 分区
永久挂载:写入到配置文件里面去, /dev/sda3 swap swap defaults.pri=3 0 0
列出swap分区;swapon -s
卸载:swapoff 分区 或者swapoff -a
五:逻辑卷
1:逻辑卷的概念
就是传统的磁盘分区有一定缺陷,设置好了一个分区的大小后,当这个数据填充满之后,无法向里面再次写入数据,只能再次购买一个硬盘,填充数据;
逻辑卷的出现弥补了这个缺陷,就是当一个磁盘写满后,只需要添加一个磁盘,将这个磁盘添加到卷组里面去,这样这个写满的磁盘就能扩容,就能再次的填充数据
1:底层的框架

最终写入的还是底层的物理设备
pp:对应的底层的物理分区
pv:对应的就是一整块硬盘
pe:逻辑卷最小存储单元,大小为4M
le:逻辑卷最小寻址单位,一般的话就是一个le对饮一个pe,如果对应多个话,就是备份
2:逻辑卷的工具的使用
1)pv的使用
| pvs | 查看物理卷的信息 |
| pvdisplay | 显示物理卷的详细信息 |
| pvcreate | 创建物理卷 |
| pvmove | 本地的迁移,就是将一个设备移动到另外的一个设备 |
| pvremoe | 删除物理卷 |
2)vg的使用
| vgs | 查看卷组的信息 |
| vgdisplay | 查看卷组的详细信息 |
| vgcreate | 创建卷组 |
| vgexport | 将卷组导出来 |
| vgimport | 将卷组导入进来 |
| vgremoe | 删除卷组 |
| vgextend | 将卷组的大小扩容 |
3)lv的使用
| lvs | 查看逻辑卷的信息 |
| lvdisplay | 显示逻辑卷的详细信息 |
| lvcreate | 创建逻辑卷 |
| lvextend | 扩容逻辑卷 |
| lvreduce | 缩容逻辑卷 |
| lvremove | 删除逻辑卷 |
| lvcovert | 使用快照恢复逻辑卷 |
3:创建一个逻辑卷
案例:创建一个逻辑卷为lv0的,大小为4G的
[root@server ~]# lsblk
NAME          MAJ:MIN RM  SIZE RO TYPE MOUNTPOINTS
sda             8:0    0   50G  0 disk
├─sda1          8:1    0   10G  0 part
└─sda2          8:2    0    5G  0 part
sr0            11:0    1  7.9G  0 rom  /run/media/root/RHEL-9-0-0-BaseOS-x86_64
nvme0n1       259:0    0   40G  0 disk
├─nvme0n1p1   259:1    0  500M  0 part /boot
└─nvme0n1p2   259:2    0 39.5G  0 part
  ├─rhel-root 253:0    0 35.5G  0 lvm  /
  └─rhel-swap 253:1    0    4G  0 lvm  [SWAP]
[root@server ~]# pvs
  PV             VG   Fmt  Attr PSize   PFree
  /dev/nvme0n1p2 rhel lvm2 a--  <39.51g    0
[root@server ~]# pvcreate /dev/sda1 /dev/sda2
  Physical volume "/dev/sda1" successfully created.
  Physical volume "/dev/sda2" successfully created.
[root@server ~]# pvs
  PV             VG   Fmt  Attr PSize   PFree
  /dev/nvme0n1p2 rhel lvm2 a--  <39.51g     0
  /dev/sda1           lvm2 ---   10.00g 10.00g
  /dev/sda2           lvm2 ---    5.00g  5.00g
[root@server ~]# vgcreate vg0 /dev/sda1 /dev/sda2
  Volume group "vg0" successfully created
[root@server ~]# vgs
  VG   #PV #LV #SN Attr   VSize   VFree
  rhel   1   2   0 wz--n- <39.51g     0
  vg0    2   0   0 wz--n-  14.99g 14.99g
[root@server ~]# lvcreate -n lv0 -L 4G vg0
  Logical volume "lv0" created.
[root@server ~]# lvs
  LV   VG   Attr       LSize   Pool Origin Data%  Meta%  Move Log Cpy%Sync Convert
  root rhel -wi-ao---- <35.51g
  swap rhel -wi-ao----   4.00g
  lv0  vg0  -wi-a-----   4.00g
[root@server ~]#
总体来说的话,就是先创建物理卷,再来创建卷组,最后创建逻辑卷
4:扩容逻辑卷
扩容的思路:
1)先查看vg的大小,如果够的话,就直接创建
2)如果不够的话,就添加物理卷到vg里面去,在来创建逻辑卷
扩容也分2个步骤:就是先对逻辑卷进行扩容,再来对文件系统进行扩容的操作即可
将上面的lv0逻辑卷扩容到10G
[root@server ~]# lvextend -L 10G /dev/vg0/lv0
  Size of logical volume vg0/lv0 changed from 4.00 GiB (1024 extents) to 10.00 GiB (2560 extents).
  Logical volume vg0/lv0 successfully resized.
[root@server ~]# lvs
  LV   VG   Attr       LSize   Pool Origin Data%  Meta%  Move Log Cpy%Sync Convert
  root rhel -wi-ao---- <35.51g
  swap rhel -wi-ao----   4.00g
  lv0  vg0  -wi-a-----  10.00g
如果是在挂载的状态下,扩容的话,需要刷新一下文件系统,因为还没有读取到扩容的信息
下面的挂载的情况的进行扩容的操作
[root@server ~]# lvextend  -L 10G /dev/vg0/lv0
  Size of logical volume vg0/lv0 changed from 4.00 GiB (1024 extents) to 10.00 GiB (2560 extents).
  Logical volume vg0/lv0 successfully resized.
[root@server ~]# lvs
  LV   VG   Attr       LSize   Pool Origin Data%  Meta%  Move Log Cpy%Sync Convert
  root rhel -wi-ao---- <35.51g
  swap rhel -wi-ao----   4.00g
  lv0  vg0  -wi-ao----  10.00g
[root@server ~]# df -hT
Filesystem            Type      Size  Used Avail Use% Mounted on
devtmpfs              devtmpfs  1.9G     0  1.9G   0% /dev
tmpfs                 tmpfs     1.9G     0  1.9G   0% /dev/shm
tmpfs                 tmpfs     778M  9.6M  769M   2% /run
/dev/mapper/rhel-root xfs        36G  4.1G   32G  12% /
/dev/nvme0n1p1        xfs       495M  220M  275M  45% /boot
tmpfs                 tmpfs     389M  104K  389M   1% /run/user/0
/dev/sr0              iso9660   8.0G  8.0G     0 100% /run/media/root/RHEL-9-0-0-BaseOS-x86_64
/dev/mapper/vg0-lv0   ext4      3.9G   24K  3.7G   1% /mnt
[root@server ~]# resize2fs /dev/vg0/lv0
resize2fs 1.46.5 (30-Dec-2021)
Filesystem at /dev/vg0/lv0 is mounted on /mnt; on-line resizing required
old_desc_blocks = 1, new_desc_blocks = 2
The filesystem on /dev/vg0/lv0 is now 2621440 (4k) blocks long.

[root@server ~]# df -hT
Filesystem            Type      Size  Used Avail Use% Mounted on
devtmpfs              devtmpfs  1.9G     0  1.9G   0% /dev
tmpfs                 tmpfs     1.9G     0  1.9G   0% /dev/shm
tmpfs                 tmpfs     778M  9.6M  769M   2% /run
/dev/mapper/rhel-root xfs        36G  4.1G   32G  12% /
/dev/nvme0n1p1        xfs       495M  220M  275M  45% /boot
tmpfs                 tmpfs     389M  104K  389M   1% /run/user/0
/dev/sr0              iso9660   8.0G  8.0G     0 100% /run/media/root/RHEL-9-0-0-BaseOS-x86_64
/dev/mapper/vg0-lv0   ext4      9.8G   18M  9.4G   1% /mnt
[root@server ~]#
不同的文件系统下,刷新的文件系统的方式都不一样,ext系列的话,resize2fs 设备
xfs系列的,xfs_grows 后面加上挂载点 xfs_ grows /mnt
5:缩容逻辑卷
缩容逻辑卷的话,前提是卸载文件系统才行执行缩容的操作
1)如果出现了没有卸载的话,就要使用检查,但是的话,这个会容易出现错误,解决的方法就是重新格式化,但是这样的话会导致数据全部丢失
2)卸载的话,就是之前的话,就是先缩容逻辑卷,再来格式化,最后在挂载,但是这样的话,数据就会全部丢失(方式不对)
3)所以的话缩容逻辑卷就是先缩容文件系统,然后在缩容逻辑卷,这样就避免了格式化的风险
步骤:
1)卸载文件系统
2)检查
3)缩容文件系统
4)缩容逻辑卷
xfs文件系统不能缩容。ext4文件系统可以扩容和缩容
#首先,就是卸载挂载点
umount /dev/vg-/vg0

#检查文件系统
[root@server /]# e2fsck -f /dev/vg0/lv0
e2fsck 1.46.5 (30-Dec-2021)
/dev/vg0/lv0: recovering journal
Pass 1: Checking inodes, blocks, and sizes
Pass 2: Checking directory structure
Pass 3: Checking directory connectivity
Pass 4: Checking reference counts
Pass 5: Checking group summary information
/dev/vg0/lv0: 11/196608 files (0.0% non-contiguous), 31036/786432 blocks

#然后缩容文件系统,也就是对逻辑卷进行缩容的操作
[root@server /]# resize2fs /dev/vg0/lv0 500M
resize2fs 1.46.5 (30-Dec-2021)
Resizing the filesystem on /dev/vg0/lv0 to 128000 (4k) blocks.
The filesystem on /dev/vg0/lv0 is now 128000 (4k) blocks long.

#最后对逻辑卷进行缩容
[root@server /]# lvreduce -L 500M /dev/vg0/lv0
  WARNING: Reducing active logical volume to 500.00 MiB.
  THIS MAY DESTROY YOUR DATA (filesystem etc.)
Do you really want to reduce vg0/lv0? [y/n]: y
  Size of logical volume vg0/lv0 changed from 3.00 GiB (768 extents) to 500.00 MiB (125 extents).
  Logical volume vg0/lv0 successfully resized.

#最后进行挂载
[root@server /]# mount /dev/vg0/lv0  /mnt/
[root@server /]# df -hT
Filesystem            Type      Size  Used Avail Use% Mounted on
devtmpfs              devtmpfs  1.9G     0  1.9G   0% /dev
tmpfs                 tmpfs     1.9G     0  1.9G   0% /dev/shm
tmpfs                 tmpfs     778M  9.6M  769M   2% /run
/dev/mapper/rhel-root xfs        36G  4.1G   32G  12% /
/dev/nvme0n1p1        xfs       495M  220M  275M  45% /boot
tmpfs                 tmpfs     389M  100K  389M   1% /run/user/0
/dev/sr0              iso9660   8.0G  8.0G     0 100% /media
/dev/mapper/vg0-lv0   ext4      428M  4.6M  389M   2% /mnt
6:删除逻辑卷
顺序:卸载逻辑卷,就是先删除逻辑卷,然后删除卷组,最后删除物理卷,至此就全部删除成功
[root@server /]# umount /mnt
[root@server /]# lvs
  LV   VG   Attr       LSize   Pool Origin Data%  Meta%  Move Log Cpy%Sync Convert
  root rhel -wi-ao---- <35.51g
  swap rhel -wi-ao----   4.00g
  lv0  vg0  -wi-a----- 500.00m
[root@server /]# lvremove /dev/vg0/lv0
Do you really want to remove active logical volume vg0/lv0? [y/n]: y
  Logical volume "lv0" successfully removed.
[root@server /]# lvs
  LV   VG   Attr       LSize   Pool Origin Data%  Meta%  Move Log Cpy%Sync Convert
  root rhel -wi-ao---- <35.51g
  swap rhel -wi-ao----   4.00g
root@server /]# vgs
  VG   #PV #LV #SN Attr   VSize   VFree
  rhel   1   2   0 wz--n- <39.51g     0
  vg0    2   0   0 wz--n-  14.99g 14.99g
[root@server /]# vgremove vg0
  Volume group "vg0" successfully removed
[root@server /]# vgs
  VG   #PV #LV #SN Attr   VSize   VFree
  rhel   1   2   0 wz--n- <39.51g    0
[root@server /]# pvs
  PV             VG   Fmt  Attr PSize   PFree
  /dev/nvme0n1p2 rhel lvm2 a--  <39.51g     0
  /dev/sda1           lvm2 ---   10.00g 10.00g
  /dev/sda2           lvm2 ---    5.00g  5.00g
[root@server /]# pvremove /dev/sda1
  Labels on physical volume "/dev/sda1" successfully wiped.
[root@server /]# pvremove /dev/sda2
  Labels on physical volume "/dev/sda2" successfully wiped.
[root@server /]# pvs
  PV             VG   Fmt  Attr PSize   PFree
  /dev/nvme0n1p2 rhel lvm2 a--  <39.51g    0
[root@server /]# vim /etc/fstab
7:修复文件系统
不同的文件系统使用不同的命令
ext4文件系统:使用e2fsck 设备
[root@server /]# e2fsck /dev/sda1
e2fsck 1.46.5 (30-Dec-2021)
/dev/sda1: clean, 11/655360 files, 66753/2621440 blocks
xfs的文件系统:使用xfs_reparis 设备
root@server /]# xfs_repair /dev/sda2
Phase 1 - find and verify superblock...
Phase 2 - using internal log
        - zero log...
        - scan filesystem freespace and inode maps...
        - found root inode chunk
Phase 3 - for each AG...
        - scan and clear agi unlinked lists...
        - process known inodes and perform inode discovery...
        - agno = 0
        - agno = 1
        - agno = 2
        - agno = 3
        - process newly discovered inodes...
Phase 4 - check for duplicate blocks...
        - setting up duplicate extent list...
        - check for inodes claiming duplicate blocks...
        - agno = 0
        - agno = 2
        - agno = 3
        - agno = 1
Phase 5 - rebuild AG headers and trees...
        - reset superblock...
Phase 6 - check inode connectivity...
        - resetting contents of realtime bitmap and summary inodes
        - traversing filesystem ...
        - traversal finished ...
        - moving disconnected inodes to lost+found ...
Phase 7 - verify and correct link counts...
done
[root@server /]#
8:恢复误删除逻辑卷的操作
就是根据日志来恢复的,恢复上一步的操作 配置文件
/etc/lvm/archive,这个就是vg的操作
比如,创建了一个逻辑卷,然后恢复到没有创建的时候
#根据grep
[root@server archive]# grep -r 'lvcreate -n lv0 -L 4G vg0' ./
./vg0_00000-760304738.vg:description = "Created *before* executing 'lvcreate -n lv0 -L 4G vg0'"
./vg0_00051-1660170045.vg:description = "Created *before* executing 'lvcreate -n lv0 -L 4G vg0'"
[root@server archive]# vgcfgrestore -f /etc/lvm/archive/vg0_00051-1660170045.vg vg0
  Volume group vg0 has active volume: lv0.
  WARNING: Found 1 active volume(s) in volume group "vg0".
  Restoring VG with active LVs, may cause mismatch with its metadata.
Do you really want to proceed with restore of volume group "vg0", while 1 volume(s) are active? [y/n]: y
  Restored volume group vg0.
[root@server archive]# lvs
  Devices file PVID Ljwq9pG8UM3AOijfU8OgiGt4voquNZKW last seen on /dev/sda1 not found.
  LV   VG   Attr       LSize   Pool Origin Data%  Meta%  Move Log Cpy%Sync Convert
  root rhel -wi-ao---- <35.51g
  swap rhel -wi-ao----   4.00g
9:逻辑卷的快照的操作(cow快照)
1:快照的分类:
cow快照:写前复制,将原有的数据存储在cow差分卷里面,然后新添加的数据,以空白的地方写入到cow差分卷里面(一样的大小),里面不会存储数据,删除的话,cow差分卷的大小也不会减小,覆盖的话就是以空白的地方覆盖有数据的地方即可,常见的例子就是lvm的快照;并且没有保存原卷的block,只是保存了元数据,所以的话,速度比较的快;并且原卷消失的话,快照也会消失
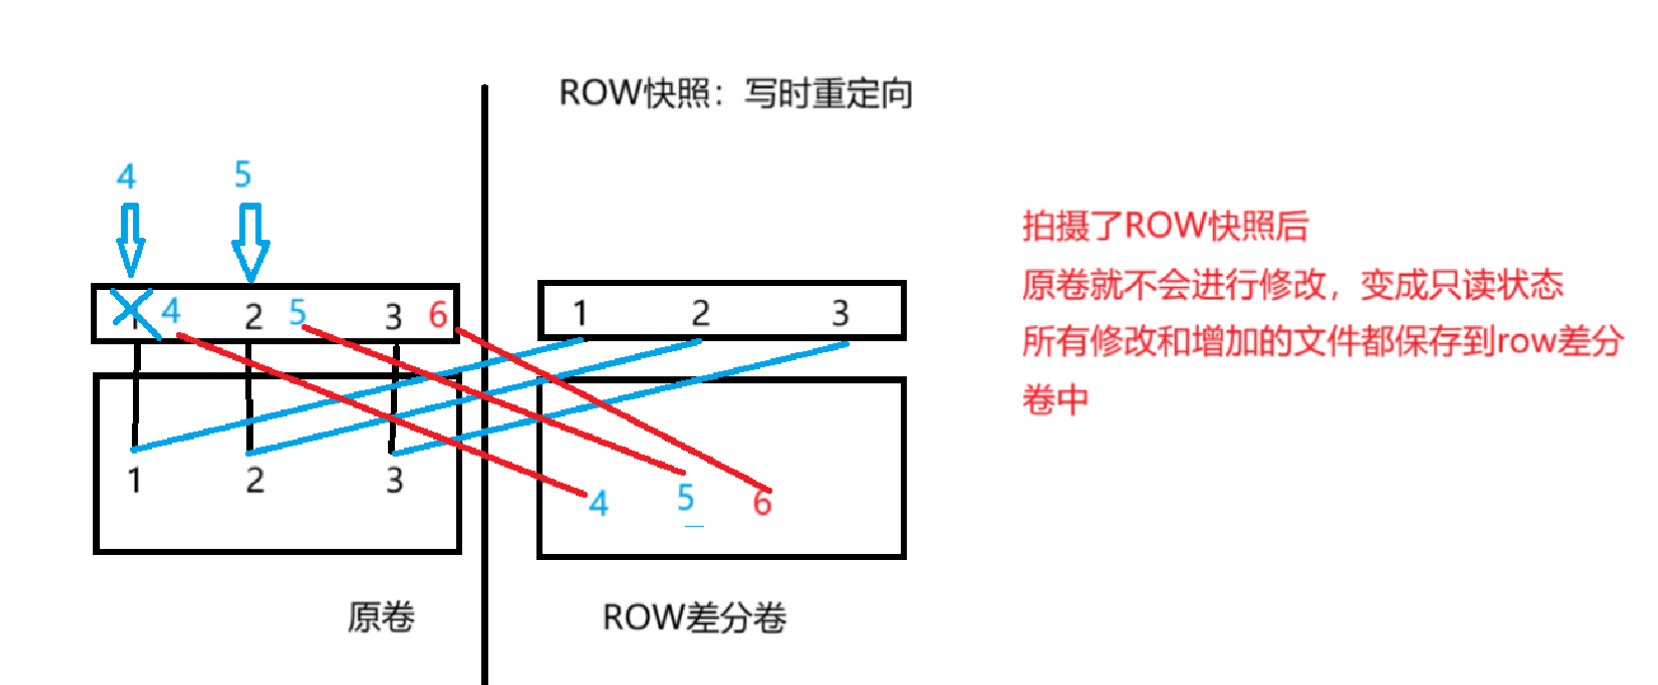
row快照:写时重定向,就是将新添加的数据写入到row快照里面,原卷变成了只读的状态,不会增加数据,最常见的就是虚拟机的快照的,就是row快照,vmen结尾的,回滚的时候,就是这个row快照就会消失,直接使用原卷
添加数据都是写入到row差分卷里面去,原卷不会改变
图片:
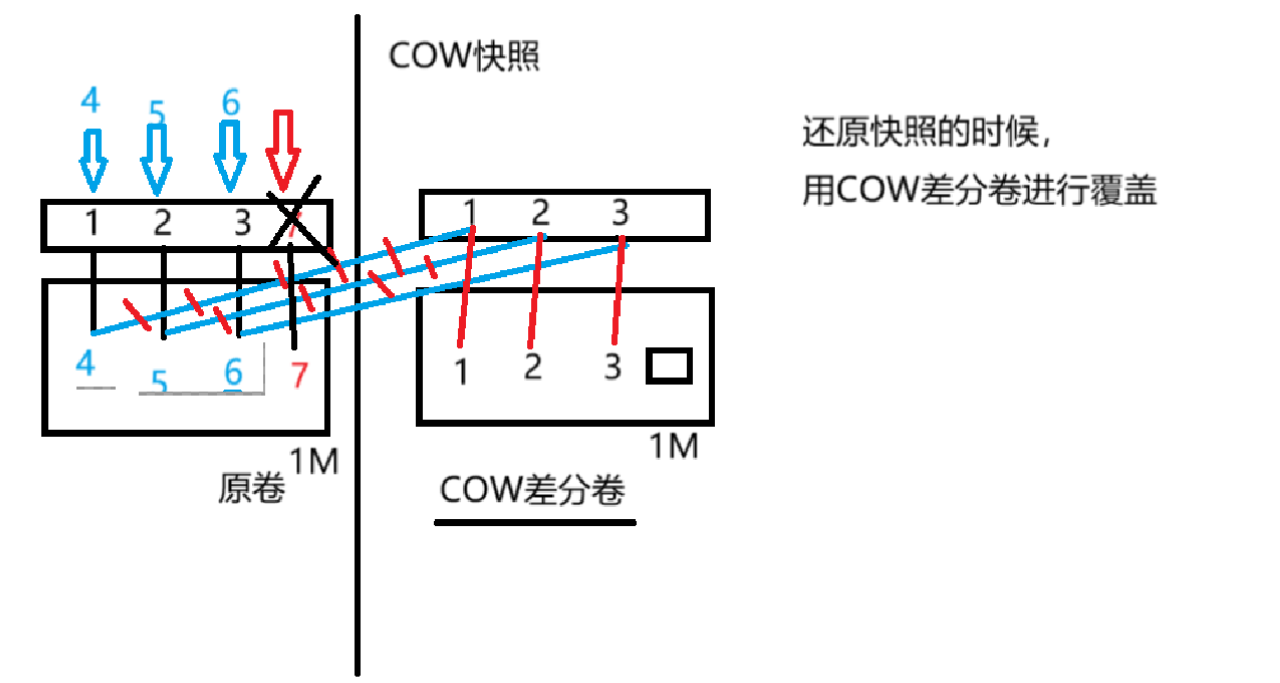
主要的作用就是:
1:少数的文件删除的话,可以挂载这个逻辑卷的快照,然后使用cp等命令可以恢复
2:整个逻辑卷删除了的话,可以使用逻辑卷这个快照复原之前的逻辑卷,然后逻辑卷的快照消失了(一次性的)
作用的操作:lvconvert --merge /dev/vg0/lvo-snap
#创建一个逻辑卷的快照
lvcreate -n lv0-snap -L 6G -s /dev/vg0/lv0

#删除原卷的一些数据
rm -rf file1

#挂载卷快照
mount /dev/vg0/lv0-snap /tmp/
[root@server tmp]# ls
file1  file2  lost+found

#然后cp,将数据复原
cp file /mnt/


#原有的逻辑卷里面的数据全部消失了,然后使用倦怠快照整合到那个原有的逻辑卷上面
先要卸载2个逻辑卷和他的快照挂载点
[root@server /]# lvconvert --merge /dev/vg0/lv0-snap
  Merging of volume vg0/lv0-snap started.
  vg0/lv0: Merged: 100.00%

#原有的快照的卷会被删除,原有的逻辑卷的数据会恢复
[root@server /]# lvconvert --merge /dev/vg0/lv0-snap
  Merging of volume vg0/lv0-snap started.
  vg0/lv0: Merged: 100.00%
[root@server /]# mount /dev/vg0/lv0  /mnt/
[root@server mnt]# ls
file1  file2  file3  lost+found
这个很有用,在数据丢失的时候,可以使用这个恢复,然后这个快照就会消失
2:cow快照的操作
就是对逻辑卷拍摄快照,最大的大小不能超过这个原卷的大小,并且一但cow的空间满了的话,就无法使用了,挂载都不行了
案例:在里面,就是里面有一个数据为100M的文件,cow差分卷,可以保存这个数据,保存的只是元数据,并没有保存底层的block,所以的话,可以保存,
lvcreate -n lv0-snap -L 50M -s /dev/vg0/lv0
lvdisplay
--- Logical volume ---
  LV Path                /dev/vg0/lv0-snap
  LV Name                lv0-snap
  VG Name                vg0
  LV UUID                gEi8HM-sO2z-gylJ-C0Eu-VjAj-LLsU-y7S9X2
  LV Write Access        read/write
  LV Creation host, time server, 2024-03-11 14:01:37 +0800
  LV snapshot status     active destination for lv0
  LV Status              available
  # open                 1
  LV Size                2.00 GiB
  Current LE             512
  COW-table size         52.00 MiB
  COW-table LE           13
  Allocated to snapshot  0.02%
  Snapshot chunk size    4.00 KiB
  Segments               1
  Allocation             inherit
  Read ahead sectors     auto
  - currently set to     256
  Block device           253:5
#写入一个200M的文件
[root@server mnt]# dd if=/dev/zero of=/mnt/200.txt bs=200M count=1
1+0 records in
1+0 records out
209715200 bytes (210 MB, 200 MiB) copied, 1.73034 s, 121 MB/s

#然后使用cow卷挂载,发现挂不上去,占用率达到了100%
[root@server mnt]# mount /dev/vg0/lv0-snap /tmp/
mount: /tmp: can't read superblock on /dev/mapper/vg0-lv0--snap.
[root@server mnt]# lvs
  LV       VG   Attr       LSize   Pool Origin Data%  Meta%  Move Log Cpy%Sync Convert
  root     rhel -wi-ao---- <35.51g
  swap     rhel -wi-ao----   4.00g
  lv0      vg0  owi-aos---   2.00g
  lv0-snap vg0  swi-I-s---  52.00m      lv0    100.00
就是拍摄了cow快照后,原有的数据的元数据被写入里面去了,但是如果有新添加的数据的话,就会以同样的大小写入到cow差分卷里面去,虽然是空白的数据,但是是一样的大小
3:cow快照自动扩容
有手动扩容和自动扩容,自动扩容非常的有用,达到了80%,然后的话,就自动的扩容
自动扩容的配置文件在/etc/lvm/lvm.conf这个文件里面,修改2个参数
一个是达到了多少就要扩容这个快照,/snapshot_autoextend_threshold = 80
另外一个就是扩容多少,snapshot_autoextend_percent = 30
案例:
#达到了80%以上的话,就自动的扩容30%
snapshot_autoextend_threshold = 80
snapshot_autoextend_percent = 30
#创建逻辑卷的快照
lvcreate -n lv0-snap -L 60M -s /dev/vg0/lv0
#创建一个49M的文件,测试是否自动扩容
dd if=/dev/zero of=/mnt/49M.txt bs=49M count=1

#当达到了80%后,自动扩容30%
[root@server mnt]# lvs
  LV       VG   Attr       LSize   Pool Origin Data%  Meta%  Move Log Cpy%Sync Convert
  root     rhel -wi-ao---- <35.51g
  swap     rhel -wi-ao----   4.00g
  lv0      vg0  owi-aos---   2.00g
  lv0-snap vg0  swi-aos---  80.00m      lv0    61.64
4:总结:
1)如果是ext4的和lv和lvm的快照做的逻辑卷可以直接的挂载
2)如果是xfs的做的快照,还要加上一个选项 mount -o nouuid
3)如果快照的空间满了之后的话,就使用不了这个快照了
4)cow快照,拍摄后,写入的数据都在原卷中的数据,但是cow快照也会存储一个空白的大小,原卷存储的数据的大小是一样的
10:修改逻辑卷的属性
修改卷的属性的目的就是为了防止其他人对这个卷的操作,可以禁用这个卷,
pv的操作
pvchange -an 设备 禁止使用这个卷,卷组里面不分配这个卷
-ay 设备 使用这个卷
当然这些卷必须要在卷组里面才行,
vg的操作
vgchange -an 设备 禁用这个卷组
-ay 设备 启用这个卷组
禁用卷组的话,下面的逻辑卷也被全部禁用了
lv的操作
lvchange -ay 设备 启用这个逻辑卷
-an 设备 禁用这个逻辑卷
11:卷组的迁移到其他的主机上面去
本地迁移:
通过使用pvmove可以将这几个物理卷的数据都迁移到一个物理卷里面去
[root@server ~]# lsblk
NAME          MAJ:MIN RM  SIZE RO TYPE MOUNTPOINTS
sda             8:0    0   50G  0 disk
├─sda1          8:1    0   10G  0 part
│ └─vg0-lv0   253:2    0    2G  0 lvm
└─sda2          8:2    0    5G  0 part
sr0            11:0    1  7.9G  0 rom
nvme0n1       259:0    0   40G  0 disk
├─nvme0n1p1   259:1    0  500M  0 part /boot
└─nvme0n1p2   259:2    0 39.5G  0 part
  ├─rhel-root 253:0    0 35.5G  0 lvm  /
  └─rhel-swap 253:1    0    4G  0 lvm  [SWAP]

[root@server /]# pvmove /dev/sda1 /dev/sda2
  /dev/sda1: Moved: 2.93%
  /dev/sda1: Moved: 100.00%
[root@server /]# lsblk
NAME          MAJ:MIN RM  SIZE RO TYPE MOUNTPOINTS
sda             8:0    0   50G  0 disk
├─sda1          8:1    0   10G  0 part
└─sda2          8:2    0    5G  0 part
  └─vg0-lv0   253:2    0    2G  0 lvm
sr0            11:0    1  7.9G  0 rom
nvme0n1       259:0    0   40G  0 disk
├─nvme0n1p1   259:1    0  500M  0 part /boot
└─nvme0n1p2   259:2    0 39.5G  0 part
  ├─rhel-root 253:0    0 35.5G  0 lvm  /
  └─rhel-swap 253:1    0    4G  0 lvm  [SWAP]

[root@server /]# mount /dev/vg0/lv0  /mnt/
[root@server /]# cd /mnt/
[root@server mnt]# ls
11M.txt  49M.txt  file1  file2  file3  lost+found
远程迁移:
就是将卷组进行导出,然后导入到远程主机上面
步骤:
1)卸载这个设备,禁用这个卷组
2)将这个卷组导出去
3)关闭这个虚拟机,打开远程主机使用这个卷组的数据
4)扫描pv,导入卷组
5)激活卷组,挂载
#卸载这个设备,导出去
[root@server ~]# umount /mnt
[root@server ~]# vgexport vg0
  Volume group "vg0" successfully exported
#然后进行关掉这个虚拟机,使用远程主机,添加一样类型的磁盘,使用现有的磁盘文件,即可

#扫描pv。导入卷组
[root@client ~]# pvscan
  PV /dev/sda1    is in exported VG vg0 [<10.00 GiB / <8.00 GiB free]
  PV /dev/sda2    is in exported VG vg0 [<5.00 GiB / <5.00 GiB free]
  Total: 2 [14.99 GiB] / in use: 2 [14.99 GiB] / in no VG: 0 [0   ]
[root@client ~]# vgimport vg0
  Volume group "vg0" successfully imported
[root@client ~]# lvs
  LV   VG  Attr       LSize Pool Origin Data%  Meta%  Move Log Cpy%Sync Convert
  lv0  vg0 -wi------- 2.00g
[root@client ~]# lvscan
  inactive          '/dev/vg0/lv0' [2.00 GiB] inherit
#开启卷组的使用
[root@client ~]# vgchange -ay vg0
  1 logical volume(s) in volume group "vg0" now active
[root@client ~]# lvscan
  ACTIVE            '/dev/vg0/lv0' [2.00 GiB] inherit
[root@client /]# mount /dev/vg0/lv0 /mnt/
[root@client mnt]# ls
11M.txt  49M.txt  file1  file2  file3  lost+found
六:高级存储(精简存储池)
图片:

1:概念
都是红帽的预览技术,就是还没有应用到生活产场景下,说白了就是不稳定
底层的设备都加入到一个存储池中,然后再起上面创建文件系统(默认是1T)
特点:上面的不需要在乎存储空间的大小,会实现自动的扩容(默认创建的文件系统为xfs,无法修改)
就是默认创建出来就是1T,但是实际上不是1T,就是有底层的物理设备加上去的
服务名:stratisd,要开启这个服务才行
然后安装stratis这个命令
2:创建stratis存储池
1:创建pool,将物理存储介质加入到pool中
2:创建filesystem,文件系统(默认是1T)
3:挂载使用:
设备:mount /dev/stratis/pool01/fs01 /mnt
uuid:通过查看这个blkid可以看到
或者使用 lsblk --output UUID /dev/stratis/pool01/fs01 也可以查看到文件系统的uuid
mount -U uuid 挂载点
4:扩容存储池
stratis pool add-data pool01 /dev/sda3
操作:
yum -y install stratis-cli-2.4.3-2.el9.noarch
stratis pool create pool01 /dev/sda1 /dev/sda2
stratis filesystem create pool01 fso1
mount /dev/stratis/pool01/fso1  /mnt/
[root@server /]# df -hT
Filesystem                                                                                      Type      Size  Used Avail Use% Mounted on
devtmpfs                                                                                        devtmpfs  1.9G     0  1.9G   0% /dev
tmpfs                                                                                           tmpfs     1.9G     0  1.9G   0% /dev/shm
tmpfs                                                                                           tmpfs     778M  9.6M  769M   2% /run
/dev/mapper/rhel-root                                                                           xfs        36G  4.2G   32G  12% /
/dev/nvme0n1p1                                                                                  xfs       495M  220M  275M  45% /boot
tmpfs                                                                                           tmpfs     389M   52K  389M   1% /run/user/42
tmpfs                                                                                           tmpfs     389M   36K  389M   1% /run/user/0
/dev/sr0                                                                                        iso9660   8.0G  8.0G     0 100% /media
tmpfs                                                                                           tmpfs     1.0M     0  1.0M   0% /run/stratisd/keyfiles
/dev/mapper/stratis-1-d41a4bc97fbe47ec8c857b7bdcb31b03-thin-fs-f661726c82b74cb7b21bc82363710ca7 xfs       1.0T  7.2G 1017G   1% /mnt
虽然实际上有这么多的空间(1T的空间),但是这不是真实的
3:查看stratis池
查看所有的filesystem:stratis filesystem list
查看所有的pool池:stratis pool list
查看存储池中的设备:stratis blockdev list
4:stratis精简池的的快照
stratis的快照可以独立的存在,因此可以删除这个原来的文件系统
1)创建快照和复原原文件系统
stratis filesystem snapshot pool01 fso1  snap01
stratis filesystem destroy pool01 fso1
stratis filesystem snapshot pool01 snap01 fs01
[root@server /]# stratis filesystem list
Pool Name   Name     Used      Created             Device                       UUID
pool01      snap01   546 MiB   Mar 11 2024 16:35   /dev/stratis/pool01/snap01   d8d15081-31b9-4d2c-b8b1-beee65435cc7
pool01      fs01     546 MiB   Mar 11 2024 16:36   /dev/stratis/pool01/fs01     9e76fed8-c233-444b-b530-4c5d5d6e6187
5:永久挂载的
就是如果不加任何的参数的话,会出现问题,所以的话,就是要延迟的挂载,等待stratisd服务启动后,才挂载
/dev/stratis/pool01/fs01 /mnt  xfs defaults,x-systemd.requires=stratisd.service 0 0
reboot
七:问题
1:创建了一个新的分区,但是没有显示出来
模拟:现将一个设备进行挂载,然后删除这个设备,然后进行分区,观察分区的信息
就是在挂载的时候,删除这个设备,然后再次创建分区的时候,就会出现不了
使用partprobe(刷新所有的设备)或者partx /dev/sda(单独的刷新这个)或者就是使用reboot重启即可,因为还没有读取到内核信息
2:当某一个设备进行挂载的时候,无法对这个设备进行删除,
模拟:在这个挂载点下,bash一下,使用fuser来解决
就是某个东西占用了这个进程,删除这个进程即可
使用fuser这个命令即可
使用这个fuser -v /挂载点
然后使用这个fuser -km 挂载点
3:模拟文件系统超级块的损坏
模拟:dd if=/dev/zero of=/dev/sda1 bs=1200 count=1
就是这个超级块保存的就是indoe和block里面的东西,indoe表依赖的就是这个超级块
修复的问题,就是使用文件系统的检查工具
不同文件系统类型修复的工具都不一样
ext4系列:使用fsck这个命令和e2fsck这个命令
fsck选项:-v显示详细的信息
-r交互式修复错误
-a自动修复
e2fsck选项:
-y 免交互式修复
-f 强制修复
xfs修复的文件系统
xfs_reparis 磁盘
如果修复不行的话,那就格式化这个磁盘即可
使用上述的操作即可恢复
4:xfs缩容,还原的操作
就是对于xfs文件系统的缩容的操作,先缩容的操作,然后再来挂载,发现挂不上去,只有重新扩大缩容之前的空间即可,恢复,就能解决
#卸载设备
[root@server /]# lvs
  LV   VG   Attr       LSize   Pool Origin Data%  Meta%  Move Log Cpy%Sync Convert
  root rhel -wi-ao---- <35.51g
  swap rhel -wi-ao----   4.00g
  lv0  vg0  -wi-a-----   2.00g
#缩容的操作
[root@server /]# lvreduce -L 1G /dev/vg0/lv0
  WARNING: Reducing active logical volume to 1.00 GiB.
  THIS MAY DESTROY YOUR DATA (filesystem etc.)
Do you really want to reduce vg0/lv0? [y/n]: y
  Size of logical volume vg0/lv0 changed from 2.00 GiB (512 extents) to 1.00 GiB (256 extents).
  Logical volume vg0/lv0 successfully resized.
#发现挂不上去了,并且xfs检查没有用
[root@server /]# mount /dev/vg0/lv0 /mnt/
mount: /mnt: wrong fs type, bad option, bad superblock on /dev/mapper/vg0-lv0, missing codepage or helper program, or other error.
[root@server /]# xfs_repair /dev/vg0/lv0
Phase 1 - find and verify superblock...
bad primary superblock - bad magic number !!!

attempting to find secondary superblock...

#扩容到原来的空间即可,就能挂载了
[root@server /]# lvextend -L 2G /dev/vg0/lv0
  Size of logical volume vg0/lv0 changed from 1.00 GiB (256 extents) to 2.00 GiB (512 extents).
  Logical volume vg0/lv0 successfully resized.
[root@server /]# mount /dev/vg0/lv0 /mnt/
[root@server mnt]# ls
file1

 浙公网安备 33010602011771号