Ansible自动化
目录
第一章 前提条件
1.1创建ssh密钥对
1.2分发公钥文件
1.3编写脚本
1.4端口被更改
第二章 安装测试
2.1 安装配置
2.2 常用模块说明
2.3 command模块
2.4 shell模块
2.5 script模块
2.6 file模块
2.7 yum模块
2.8 crond模块
第三章 编写ansible剧本
简介:
ansible是一个基于Python开发的自动化运维工具,并行安装执行脚本程序
服务端:不需要启动任何服务,默认不需要任何配置
客户端:不需要安装任何服务,因为通过服务端的ssh管理,需要修改成被管理
authorized_keys: 这个文件时秘钥文件
第一章、前提条件
基于ssh秘钥方式建立远程连接,直接从第三步操作即可
1、ssh密钥对创建(管理主机),需要两步免交互,
[root@Centos-7 ~]# >/root/.ssh/known_hosts #清空连接的文件
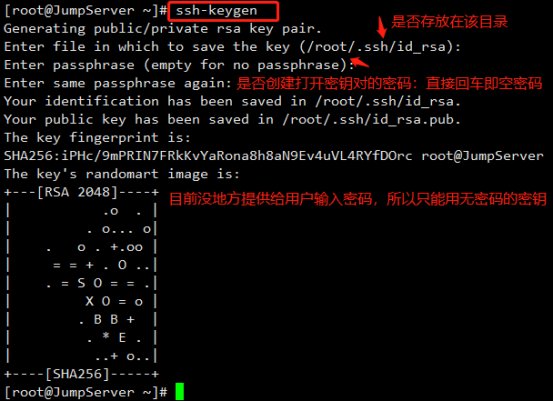
如上图,需要免交互两步操作
1、-f /root/.ssh/id_rsa 解决:不要问我,直接放这里即可
2、-N “” 或者-P”” 解决:密码为空
[root@ansible ~]# ssh-keygen -f /root/.ssh/id_rsa -N "" #免密创建密钥对
2、分发公钥文件(管理主机),需要免交互式分发
1、sshpass解决免密码登录
2、-o StrictHostKeyChecking=no #不要问我了,都可以,解决yes/no问题
[root@ansible ~]# yum -y install sshpass    #安装sshpass,实现免密码登录
[root@ansible ~]# sshpass -p123123 ssh-copy-id  -o StrictHostKeyChecking=no root@x.x.x.x  #不要加双引号
3、编写脚本
[root@ansible ~]# mkdir /script
[root@ansible ~]# vim /script/keygen-sshpass.sh   #编写自动创建秘钥和分发脚本
#!/bin/bash
#Author:quss
#Time:2020-6
rm -f /root/.ssh/id_dsa*
ssh-keygen -f /root/.ssh/id_rsa -N ""

for ip in 31 41 7
do
sshpass -p123123 ssh-copy-id  -o StrictHostKeyChecking=no root@x.x.x.$ip
Done
[root@ansible ~]# vim /script/check.sh              #编写批量检查脚本
#!/bin/bash
if [ $# -ne 1 ]
then
    echo "请输入一个参数"
    exit 1
fi
for ip in 2
do
    echo ===== info x.x.x.$ip======
    ssh x.x.x.$ip  $1
    echo ""
Done
[root@ansible ~]# bash /script/check.sh              #必须输入一个参数
请输入一个参数
[root@ansible ~]# bash /script/check.sh hostname     #检查
===== info x.x.x.x======
TEST02
4、端口号不是22的情况
[root@ansible ~]# sshpass -ppasswd ssh-copy-id -o StrictHostKeyChecking=no root@x.x.x.x -p1231 #最后增加一个端口号即可
二、安装测试
1、安装配置ansible
[root@ansible ~]# yum -y install ansible         #服务端 需要epel源
[root@ansible ~]# rpm -qa|grep ansible
ansible-2.9.9-1.el7.noarch
#如果客户端开启了selinux,安装这个就行, 服务端不需要安装
[root@ansible ~]#yum -y install  libselinux-python
[root@ansible ~]# cd /etc/ansible/
[root@ansible ansible]# vim ansible.cfg          #配置文件一般不做改动
[root@ansible ansible]# vim hosts
[quss]                                           #分组、销售的、运维的等等
x.x.x.x ansible_user=root ansible_password=123123
x.x.x.x ansible_user=root ansible_password=123123
#以上情况是没有分发秘钥时,基于口令进行批量管理
[ops]
x.x.x.x
[root@ansible ansible]# ansible ops -m command -a "hostname"             # 指定组名、模块、命令
#如果hosts文件只写用户名,不写密码,实现交互式输入也行。
[root@ansible ansible]# ansible x.x.x.x -m command -a "hostname" -k  #交互式输入密码
SSH password:
2、常用模块说明
-m 指定响应模块
-a 利用模块中某些参数功能
command模块
https://docs.ansible.com/ansible/latest/modules/modules_by_category.html #官方文档所有模块
[root@ansible ansible]# ansible-doc -l|wc -l                                #ansible所有的模块
3387
chdir:先切换到这个目录,再执行操作。
[root@ansible ansible]# ansible x.x.x.x-m command -a "chdir=/tmp/ pwd"
x.x.x.x | CHANGED | rc=0 >>
/tmp

create:类似判断,当存在时,后面的命令跳过就不运行
[root@ansible ansible]# ansible x.x.x.x -m command -a "creates=/etc/hosts hostname"
x.x.x.x | SUCCESS | rc=0 >>
skipped, since /etc/hosts exists
removes:存在就运行,和create正好相反
free_form:表示必须要有一个linux合法命令,如ls 等
shell模块:比command更全,是个万能模块,command不能写特殊符号< >| ; 等
[root@ansible ansible]# ansible x.x.x.x -m shell -a "ls;pwd" #运行多个命令
chdir
create
removes
free_form
script模块,shell也可以执行script但是不如script好用。执行本地脚本,操作到远程主机
Shell执行脚本时,先把脚本推送到远程主机,再赋予执行权限。
[root@ansible ansible]# ansible x.x.x.x -m shell -a "rpm -qa keepalived"
[WARNING]: Consider using the yum,           #粉色,建议用yum模块更好用
[root@ansible ansible]# vim /script/yum.sh   #创建脚本
!/bin/bash
yum -y install keepalived
[root@ansible ansible]# ansible x.x.x.x -m script -a "/scripts/yum.sh"  #用scripts
总结ansible颜色信息:
绿色:查看远程主机信息,不会对远程主机系统做任何修改
红色:执行操作出现异常错误
黄色:对远程主机系统进行修改操作
粉色:警告或者忠告信息
3、file 文件模块
Copy复制模块
[root@ansible ansible]# touch /tmp/file01.txt
[root@ansible ansible]# ansible x.x.x.x -m copy -a "src=/tmp/file01.txt dest=/tmp/"
[root@ansible ansible]# ansible x.x.x.x -m shell -a "ls -l /tmp/"      #检查
backup模块
[root@ansible ansible]# echo 123123 >/tmp/file01.txt    # 本地文件增加内容,再次推送
[root@ansible ansible]# ansible x.x.x.x -m copy -a "src=/tmp/file01.txt dest=/tmp/"
[root@ansible ansible]# ansible x.x.x.x -m shell -a "cat /tmp/file01.txt"  #发现被覆盖掉
x.x.x.x | CHANGED | rc=0 >>
123123
[root@ansible ansible]# ansible x.x.x.x -m copy -a "src=/tmp/file01.txt dest=/tmp/ backup=yes"    # yes为备份
[root@TEST02 ~]# cd /tmp                                #查看被管理主机
-rw-r--r--  1 root   root   7 Jun 20 12:45 file01.txt.21511.2020-06-20@12:48:29~
参数:owner---设置复制后的文件属主权限
参数:group---设置复制后的文件属组权限
参数:mode---设置复制后的文件权限(600 755)
参数:state---用于指定创建目录或文件:touch

[root@ansible ansible]# ansible x.x.x.x -m file -a "dest=/tmp/file01.txt owner=elk group=elk mode=600" #修改属主、属组、权限信息
[root@TEST02 tmp]# ll file01.txt                    #检查权限
-rw------- 1 elk elk 7 Jun 20 12:48 file01.txt
创建文件
[root@ansible ansible]# ansible x.x.x.x -m file -a "dest=/tmp/file01.txt state=touch"
创建目录
[root@ansible ansible]# ansible x.x.x.x -m file -a "dest=/tmp/file01 state=directory"
4、yum模块:并行安装
name:执行要安装软件的名称,以及软件的版本,如安装则提示
state:installed安装 absent(卸载)
list:指定软件名称,查看软件是否可以安装,以及是否已经安装过了
[root@ansible ansible]# ansible x.x.x.x -m yum -a "name=iftop state=installed"  #安装
[root@ansible ansible]# ansible x.x.x.x -m yum -a "list=iftop"     # 查看 = rpm -qa
"yumstate": "available"  #可安装
"yumstate": "installed"  #已安装
5、service---管理服务状态模块
name: 指定要管理的服务名称(管理的服务一定在chkconfig中可以看到)
state:stopped started restarted reloaded
enabled:yes表示服务开机自启动 no表示服务开机不要自动启动
[root@ansible ansible]# ansible x.x.x.x -m service -a "name=firewalld state=started enabled=no"  #服务名字、开启/关闭、是否开机自启。
[root@TEST02 tmp]# systemctl status firewalld    #在客户端检查
6、crond定时任务
[root@ansible ~]# ansible x.x.x.x -m cron -a "minute=0 hour=0 day=* month=* weekday=* job='/bin/sh/ /scripts/test.sh &>/dev/null'"       #完整的定时任务
[root@ansible ~]# ansible x.x.x.x -m cron -a "minute=0 hour=0 job='/bin/sh/ /scripts/test.sh &>/dev/null'"                               # 默认带*的可以省略
#以上如果客户端有定时任务,则会重复增加
[root@ansible ~]# ansible x.x.x.x -m cron -a "name=quss minute=0 hour=0 day=* month=* weekday=* job='/bin/sh/ /scripts/test.sh &>/dev/null'"   #增加一个name即可避免重复创建
[root@ansible ~]# ansible x.x.x.x -m cron -a "name=quss  state=absent"  #删除定时任务
[root@ansible ~]# ansible x.x.x.x -m cron -a "name=quss minute=0 hour=0 day=* month=* weekday=* job='/bin/sh/ /scripts/test.sh &>/dev/null' disabled=yes" #注释定时任务必须有job
三、编写ansible剧本。
[root@ansible ~]# mkdir -p /etc/ansible/ansible-playbook
[root@ansible ~]# vim /etc/ansible/ansible-playbook/test.yaml   # 编写剧本

[root@ansible ~]# ansible-play  -C                               #模拟执行执行剧本
[root@ansible ~]# ansible-play /etc/ansible/ansible-playbook/test.yaml  #执行剧本

 浙公网安备 33010602011771号